Last week when we showed you our DIY flower mobiles, we intentionally didn’t reveal the full wall. Why? Because it was looking a bit unbalanced. But first we’ll refresh your memory about how the entire wall looked before we started the mobile project at all. In the words of Ke$ha, it was pretty blah, blah, blah.
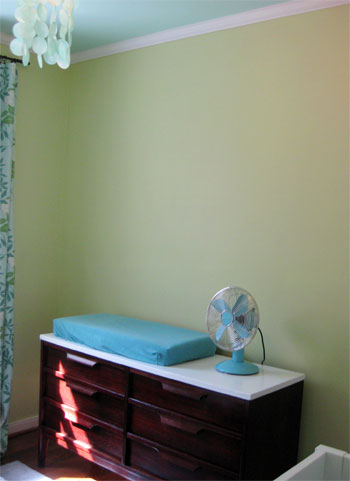
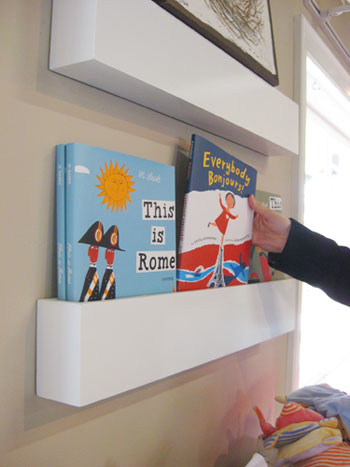
We realized early on that we wanted to DIY a mobile for above the changing pad, but that would leave about half of the wall above the dresser totally bare. So we decided to address the temporary imbalance with some big plans for the other half of that wall: shelves. We knew we’d need some sort of shelving in the nursery for miscellaneous storage and display (especially after realizing how much space a changing pad takes up on the top of our newly refinished dresser). Luckily, our inspiration-filled trip to Charlotte back in February sparked an idea thanks to a stop at a store called Nesting. We loved these deep pocket, floating bookshelves not only as a great way to display kiddie reading material but also a perfect way to avoid any object-rolls-off-of-shelf-onto-baby incidents (I hear that’s a big no-no in the parenting world).
But as much as we loved those shelves, we didn’t buy them. Instead, I figured this was a perfect opportunity for me to flex discover my carpentry muscles and actually build the shelves myself. Gulp.
I figured building my daughter’s first library would be a sweet, symbolic gesture of my grandfather’s woodworking skills combined with my mother’s love of books (she worked at a library for three decades)… assuming I could pull it off. Plus, since I’d be building them from scratch we’d be able to customize the measurements to exactly what we needed in the room.
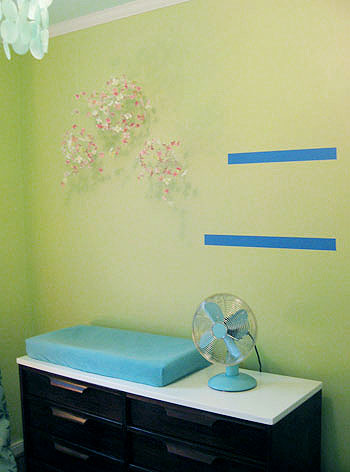
To figure out the desired size and placement for our shelves we simply broke out some handy blue painters tape. We tore off a few strips and began lining the wall in various configurations: three equal length shelves, two staggered shelves, various heights, various widths, etc. In the end, we landed on one shelf above one slightly longer shelf (both aligned on the right side and a bit uneven on the left):
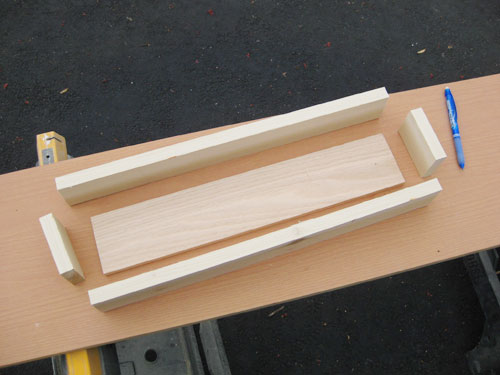
With our concept visualized via blue tape, we took measurements and figured out how much wood we’d need to create box-y pocket shelves inspired by the ones we’d seen in Charlotte. We knew we wanted our version of the shelves to be bit wider (to accommodate a few toys along with some books) and shallower (so less of the books would be hidden behind the shelf). So we headed to Home Depot, surveyed the wood selection, and came home with the right lengths of 0.75″ x 2.5″ poplar for the sides (it was light and inexpensive) and 0.5″ x 3.5″ maple for the bottom (it was a bit sturdier and less likely to bend and warp under the weight of the objects that we’d be storing on it). All-in-all, we spent less than $14 for the materials for both shelves.
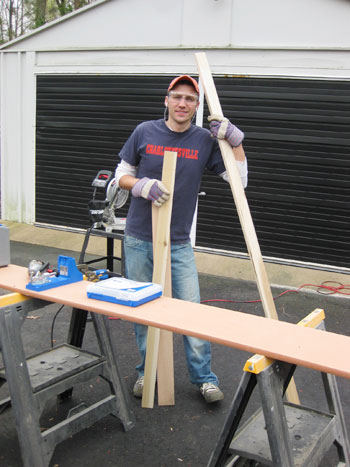
So here I am last Sunday ready to rock (literally, notice the iPod earphones) at my makeshift workbench:
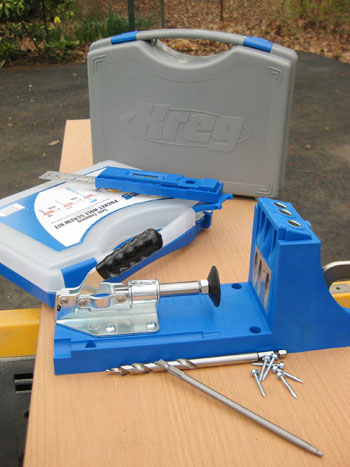
As for my weapons of mass construction? Lucky for me I had connected with a company called Kreg on Twitter a few weeks ago (and lucky for you, they’ll show up later today in this week’s giveaway!). They sell a whole slew of gadgets to make woodworking projects easier, so I jumped at the chance to take them for a spin. After all, my original vision for this project involved a lot of wood glue and L-brackets (feel free to laugh) so the guys over at Kreg (in my head they’re all named Craig, btw) sent us over a sampling of their make-you-feel-like-a-master-handyman products.
Admittedly, I stared blankly at them for a while wondering what kind of craftsman the Craigs mistook me for.
But before long I found myself actually using (and understanding how to use – thank you instructions!) several of the tools. Clamps? Yes, please! Multi-mark measuring device? Why not!
Before I could say “it’s tool time” I had the pieces for my first shelf measured, marked and cut (thanks to my brotha-from-another-motha: the miter saw I befriended during the bathroom trim project). Note: if you are sawless, don’t hesitate to ask your home improvement store to cut things down while you wait. Just be warned that they may charge you a few cents after the first cut, but this project is totally doable for those without a miter saw- really I was just showing off for my adorable pregnant wife. What can I say, I feel like a man when the sawdust flies…
Anyway, here’s how my first shelf was starting to come together after all of the cutting was done. Is it looking shelf-y yet?
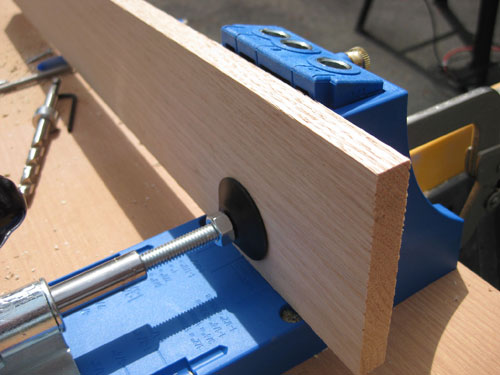
Now here’s the part where the Kreg tools were really going to do some heavy lifting. The centerpiece of the Kreg set was the Kreg Jig. It’s their entry-level tool (phew) for “anyone new to Pocket-Screw Joinery” (pardon my French). Basically, it helps you join pieces of wood together by guiding the placement of holes and screws for a solid, trusty-enough-to-hang-over-your-baby joint. And it all worked with my existing drill, so I didn’t need any fancy stuff beyond the Jig itself.
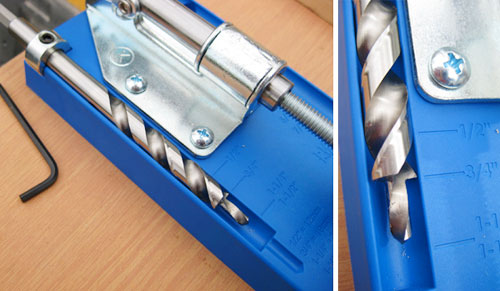
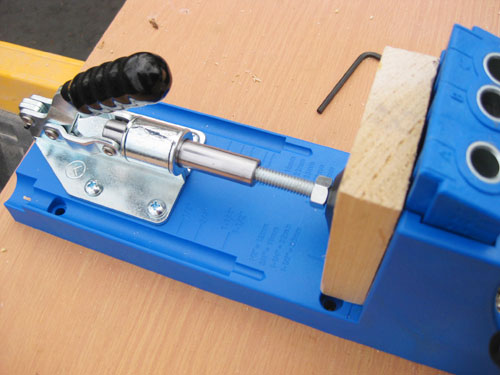
First I used their guide to set the depth of their specially-designed drill bit to match the 3/4″ inch thickness of my side pieces. It just took tightening the nut at the end of the bit (see upper left corner below) with an allen wrench to later keep me from drilling too deep. And you can see how it narrows at the end, which creates a guide hole for the screw.
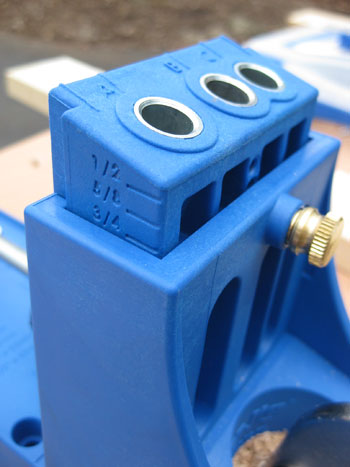
Next came setting the drill guide to the same 3/4″ measurement, so I wouldn’t drill straight through the wood and into the jig itself (I may or may not have done this on my first try – fortunately a tester piece of scrap wood was the only thing harmed in the process).
With my drill bit and drill guide set, I put my first piece of wood into the jig and clamped it tightly in place using the adjustable toggle clamp.
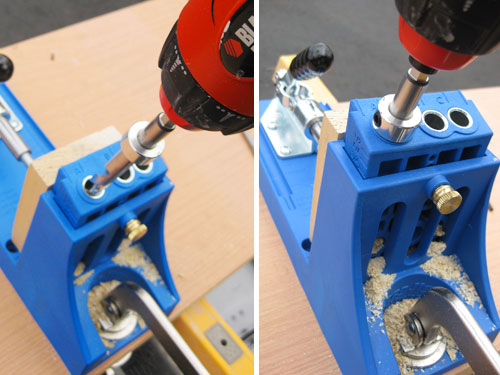
Then it was time to drill (cue that manly sawdust I mentioned earlier). Despite my initial nerves and confusion, it was really simple. I just drove the specialty-bit into the guide hole until the nut prevented me from going any further. Oh, and I totally appreciated how the jig sent all of the sawdust out of the back (and out of my manly eyes). Smart! Not that I didn’t have safety glasses on (which also contribute to that I-feel-like-a-pro effect). So I highly recommend those as well.
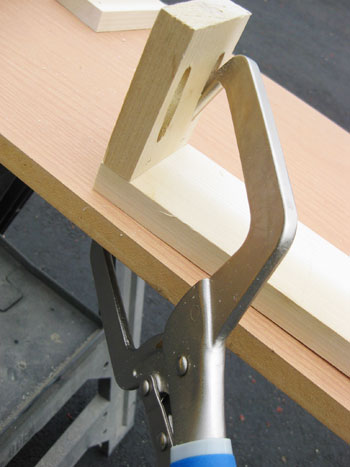
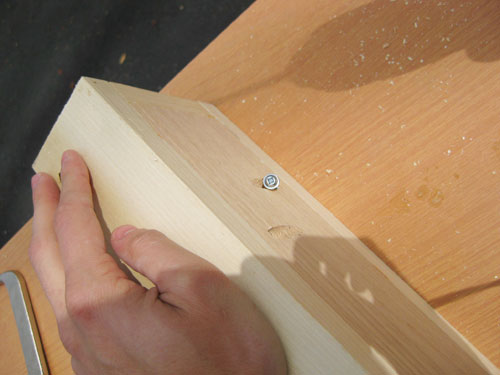
After drilling a second time, I was left with two perfectly sized pocket holes that were angled just right – ready for me to attach the short sided piece to the longer front piece. So with my holes drilled, I used the right-angle clamp Kreg included to hold my two pieces firmly in place. You can see how one side of the clamp fits nicely inside the pilot hole, while the other sits flat against the back of my workbench.
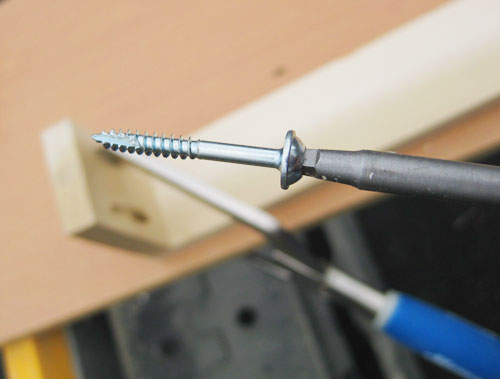
Then I was ready to screw everything into place. Kreg includes special self-tapping screws (and an accompanying screwdriver bit) that are designed for these types of joints, which definitely came in handy. I realized later I probably should’ve used their coarse thredded screws for my soft poplar, but I guess I’ve learned for next time. But hey, pretty sweet that the bit is magnetic, no?
Here’s where you miss a bit of the action because I couldn’t play Tim The Tool Man and take photos at the same time. But trust me that it was a pretty smooth, easy and quick process. And boy was it satisfying to immediately have a tight joint that didn’t involve gluing or clamping things for hours. Plus all of the screws were hidden from sight.
So before long I had my four sides screwed together and it was time to install the bottom of the shelf. I adjusted my bit and drill guide for the thinner 1/2″ maple base, clamped ‘er in place and drilled two holes in each direction, each about 8 inches apart.
With the pocket holes drilled, I shimmied the base into place at the bottom of my four-sided box and got back to screwing everything together. You can see a bit of what that looks like below – though I mainly shared this shot for the ominous, Psycho-esque screwdriver shadow looming over its victim.
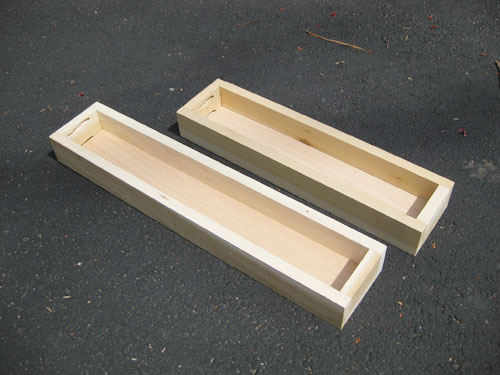
Through the miracle of the Internet, I’ll spare you the boring details of repeating the process for the second shelf. But believe me that it took just about 20 minutes to whip together a slightly-longer cousin for my first bookshelf baby.
Here’s the pair in all of their glory. Yes, I know they just look like two simple boxes, but please humor me when I explain how pleased and proud I was of myself. I was beginning to feel like a real carpenter-like person!
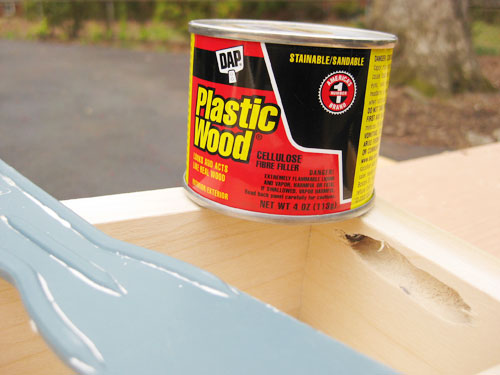
As far as “finishing” touches, it was pretty straightforward. While Kreg does offer wood and white plastic plugs that can cover all of those open pocket holes, we opted instead to go the wood filler route since we already had that on hand. We always have good luck with Dap’s “Plastic Wood,” so we applied a generous coat, let it dry for a couple of hours, and sanded it down for a smooth finish.
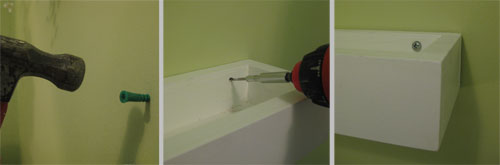
Once it was all lightly sanded down to a smooth finish, we – prepared to be shocked – painted our shelves white with two coats of FreshAire semi-gloss off-the-rack white paint (which we also use for all the trim in our house). And once everything dried they were ready to hang on the wall. While I had concocted many crazy schemes for hanging them securely, we opted for the most straight forward solution: screw straight through those suckers and right into the wall. It involved just a couple of pilot holes through the backside into the wall, hammering in some anchors and then screwing them tightly with some monster screws. This created two small shelves that could probably support up to 100 pounds of weight each- which is nothing close to the actual amount they’ll be bearing as small book and stuffed animal holders.
With everything secure, we brushed some white paint over the screwheads inside of each box (since the books and toys would obscure the screws even more) and Sherry began her favorite part: accessorizing.
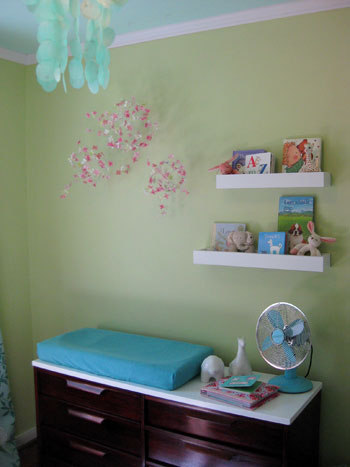
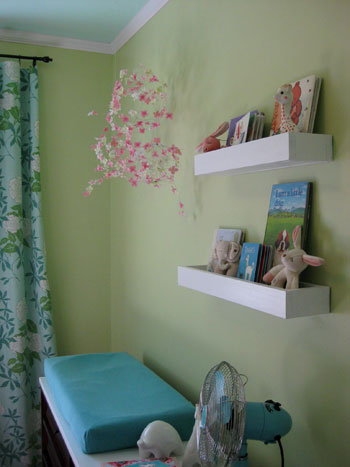
So… drumroll please… here they are!

We’re crazy pleased with how our under-fifteen-dollar-DIY shelves turned out, and we love that we earned ourselves some homemade bonus book storage and display space. We were even able to introduce some crisp modern lines to balance out the abstract flower mobiles nearby, so it really was a win-win-win solution.
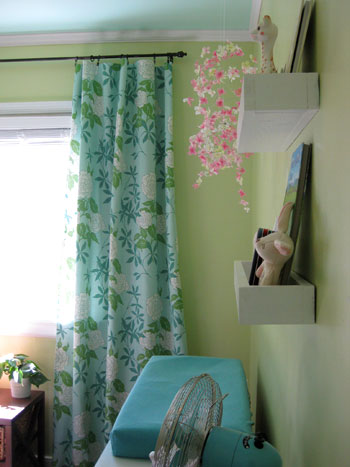
Plus it’ll be fun to have an easy way to mix up the look of that wall by swapping in the bean’s latest favorite book, rotating which toys or tchotkes are displayed, or even leaning a monogram letter up there once she officially has a name in May.
Thanks again to the Craigs- er, the guys at Kreg- for the confidence boost when it came to DIYing this project. And don’t forget to stop by later today to enter to win your own starter set of Kreg tools. ‘Til then, we’d love to hear about any construction or carpentry projects (big or small, beginning or expert) that you’ve tackled or are currently contemplating. Perhaps you’ll inspire us to build something a bit more complex next time around…
Psst- Wanna see our nursery progress from the very beginning? Here’s our painting post, our big shopping spree, our crib hunting rundown, our curtain-making tutorial, our fun little chair search, our mirror-painting extravaganza, our DIY faux sheepskin project, our big dresser makeover (and subsequent drawer lining project), our closet makeover, our homemade crib skirt undertaking, and our DIY mobile. Good times.

Danielle says
Found this great tutorial, Rain Gutter Book Shelves, as an alternative to building your own from scratch. http://bit.ly/dgEVcD. Yours do look fantastic though!
YoungHouseLove says
Oh yeah we love those Danielle. Thanks for sharing the link!
xo,
s
Jacci says
“Baby P can provide the visual weight” :) Awesome.
YoungHouseLove says
Maybe that should be her nickname, as in: “you look so cute today Visual Weight!”
xo,
s
kelly says
those are to die for cute!! can’t wait for this princess to make her debut, she is one lucky girl! be sure to add i’ll love you forever to your book collection!
YoungHouseLove says
We actually already have it! It’s just located in a basket near my reading/nursing chair. She already gets story time so we’re hoping that when Baby P is born she’ll recognize some of our favorite books right away!
xo,
s
Martha says
Your shelves look GREAT, John, great job! I have beginner carpentry skills thatnks to a class I took at a local technical school. I learned how to use many different power tools and have been tackling lots of molding projects around the house. Last Christmas my husband gave me a power brad nailer!! My next project is going to be board and batten molding in the dining room, going up about 5 feet, with a plate rail on top. Wish me luck!!
YoungHouseLove says
Not only am I wishing you luck but I’m jealous. Have fun!
-John
Ginger says
Ohh, I’ve been wanting that Kreg pockethole jig forever, it seems like, but something always comes up to take the funds! I want to build cabinet doors for a unit that we built in the bathroom between the studs, and for a set of bookcases turned pantry unit in the kitchen!
Those shelves are awesome, I may have to figure out where to place some around our house!
Jacci says
Just so long as John realizes that that would NOT be something he should say to *you* :)
Funny story – when I was super preggie with our first, I had a red bathrobe. One morning, as I came out of the bathroom, Sam blurted out (without thinking), “You look like Clifford!” :0 Woops. Pass this bit of wisdom on to John – think before you comment on such things to your very pregnant wife :) As if he doesn’t already realize comments like that are big no no’s!
Have a great sunny afternoon, Sherry :)
~Jacci
YoungHouseLove says
Haha, John learned from his brother in law, who said to his wife “look at that cute chubby belly!”
That lesson definitely ingrained itself into his brain and he has yet to slip up. Although there are still five weeks left…
xo,
s
Mary says
Love the shelves! Definitely will be stealing this idea for my baby boy’s nursery. I noticed in one of the other comments that you’re using cloth diapers. I plan on using them too, but the world of cloth diapering is SO confusing – way too many options. Will you guys be discussing what you bought and what your plans are?
YoungHouseLove says
We did a lot of research and asked a bunch of friends and family members before settling on BumGenius One-Size-Fits-All Organic Cloth Diapers. They’re All-In-Ones, so we don’t have to mess with inserts or anything- and they have snap closures which should last longer than the velcro varieties, so we can use them with multiple children. We really look forward to taking them for a spin! Not only will we be saving money, but we won’t be sending bins of diapers to the landfill each week. To us, it’s win-win!
xo,
s
Kim says
My husband loves this Kreg stuff. He was so excited when he bought it. He even convinced me to watch some of the instructional DVD with him. Good times! Glad it was handy for you too!!
David P. Swindler says
Outstanding! This gives me some ideas for my grandson’s room. Thanks!
Brittany says
Love the shelves, and a great tutorial too!
Jenny says
I noticed your Sophie the Giraffe – I hear they are the best teethers. Right now my 3 month old just looks at it, but I am looking forward to him carrying that cute little thing around! Great shelves!
Juliana says
Now, looking at this performance, I start to agree with my husband when he says that he needs the right tool to make this or that project for me.
Just starting…
Congratulations, the pieces are perfect.
Shannon says
Nice job with the handy man skills! I think this is a great idea for a nursery, and an easy way to keep the room decor changing!
We finished a big carpentry project not long ago – board and batten for our living room. http://tinyurl.com/yf7u8fb It was quite the undertaking, so you were smart to keep things manageable with the beanette on the way!
Lisa P says
I love these shelves! You two are amazing!
Amanda says
*Insert “Home Improvement/Tool Time”-style grunting here*
I do so love power tools/gadgets – a love I inherited from my Dad. Those are pretty sweet.
Nice work, Dad-to-Be Youngster! Love ’em!
Erin says
it’s even more wonderful that her daddy made them for her.
Rachel says
I am LOVING the shelves! Great job, guys!
Also, Sherry, I know you said you weren’t going to go “all baby” on this blog, but some of us (me, specifically) are dying for a few belly shots now that you’re so close to the Beanettes arrival! Can you humor us baby people and post a few? We bet you’re adorable and just want to see it for ourselves!
YoungHouseLove says
Hey Rachel,
We keep those pics delegated for Facebook and Twitter (where we get a bit more personal and aren’t all about home improvement) so feel free to follow us in those areas for more baby-related shots and chatter. Of course we do plan to share at least one more bump photo before the big day, so stay tuned…
xo,
s
Meghan says
Great job on the shelf! IKEA makes a similar shelf for the lazy among us: http://www.ikea.com/us/en/catalog/products/90149167
Here it is in our bathroom:
http://lilapuppy.blogspot.com/
Ami says
Love the shelves :). I am going to try to talk my husband into making some this weekend hehe.
I know you have mentioned using the BG organics one size diapers, I was curious are you guys planning on using them right from birth? I have heard great things about them too but am worried about that newborn stage with the cord (since they are a little bigger even on the smallest setting and don’t have a cord fold down). Just curious what you guys have planned/feedback you have gotten from family and friends who have cloth diapered during that stage (none of my family and friends have).
YoungHouseLove says
We just have to wait and see how big of a baby we have! The Petersik side of the fam has giant babies (as in 9+ lbs) so if we get one of those we’re sure they’ll work right from the get go. And even if Baby P is a bit smaller we have no qualms about using Seventh Generation disposables for just a few weeks until she can grow into her “permanent” diapers. We’re just trying to go with the flow and see how big our baby girl is come May…
xo,
s
Rachel says
p.s…..me again,
Also, Sherry, I just wanted to tell you how awesome it is that you’re so pro-breastfeeding on your site. I’m just entering my 16th month nursing our second daughter and I’m so proud that you’re mentioning breastfeeding in such a positive light.
Coincidentally, Check out CNN today for an awesome pro-breastfeeding article!
Tenille says
Those are fabulous! And i love the tape trick you used to place the shelves :0) I just recently made some DIY bookshelves for my little nursery (im due in May) and think they turned out all right!
http://tenillegates.blogspot.com/2010/03/crafty.html
Sure beats spending 20 bones a pop! Anywho, your nursery is looking fabulous..your little girl will love it!
Kari @ Foreclosure2Fabulous says
Hey! The shelves are very cute! My husband and I made our own floating shelves for our bedroom.
The tutorial is here:
http://foreclosure2fabulous.blogspot.com/2010/03/how-to-make-floating-shelves.html
JenWoodhouse.com says
Great job, John!
Lindsay says
Good job, John! Once you tackle one woodworking project, you’re going to be itching to start another! Sherry, watch out! Next thing you know he’s going to be asking for table and compound miter saws!!
Woodworking is fun!
Lindsay
Deb says
I love the look of the shelves! Makes me want some in my own house…
PS – Sophie the Giraffe is the best baby chew toy evah. I got one for my nephew and its his favorite.
Steven Jaynes says
I’m going to tackle refacing my entire kitchen, hoping to finished before summer’s end.
I can see that the Kreg Jig and other Kreg tools will help me to succeed my reducing the complication of joining and measuring!
I’m sure I’ll put one to good use since I’ll be replacing some of the awful drawers and other cabinet features we now have.
Good luck to everyone in your projects!
Paula M. says
These shelves look great!!! And to make them so cheaply. Imagine the big bucks these would cost if someone bought them from some big retailer. And with the baby books and stuffed animals in them, the whole effect is ADORABLE.
Love the wittily written, detailed tutorial on how this was done.
And it certainly did whet our appetites for the jig give-away as well.
Elyse says
Wow! They look awesome! I wish I had seen this before I put shelves in my nursery! I had the same type of idea, but not with bucket shelves.
Btw, I was wondering…How are you feeling at the end of your pregnancy?? Maybe you have already answered this, but I was wondering. I have 6 weeks left and I’m starting to get nervous I won’t get everything done that I want done.
YoungHouseLove says
Hey Elyse,
I’m still feeling great! Thanks for asking. I keep waiting for the third trimester to catch up with me (it still feels like I’m in my second- I have lots of energy and have been feeling good) so I better go knock on some wood…
xo,
s
Hannah says
The shelves look great! And they definately add balance to the wall with the mobiles, which are absolutely adorable. I also noticed too that it seems like the ceramic animal love has spread to the dresser in the nursery. :)
Lisa says
I’m so impressed that you built those shelves. I can change a lightbulb and do some other basic around-the-house stuff, including assembling Ikea furniture, but my husband didn’t get those genes. Ironic, as one of his uncles was a high-school shop teacher. It’s a good thing we live in an NYC apartment and have a very capable super. :) Someday I am hoping he can teach me the basics of installing a ceiling light fixture. For our son’s nursery we’ll buy a maple ledge from Room & Board to match the crib and dresser and it will be holding the Yankee Stadium seatback that family friends gave the hubby for his b-day this year…
In the meantime I see you have Sophie the giraffe… two of my friends with 4-5 mo. old kids have her, too; she’s apparently all the rage. We’re planning to get one when our little guy arrives at the end of June! I’ll be eager to hear about the Beanette’s favorite books, toys and other gear.
Oh, and if you are still looking for strollers, carriers, diaper bags, blankets, etc., Gilt.com is having a baby-gear sale starting 4/5 (Tues) at 12 noon. Brands include Maclaren, Baby Bjorn, Phil & Ted’s, UppaBaby and OiOi. More info: http://www.tinyurl.com/yk3rsss.
Kathy Lou says
I love the book shelves! I would like to make floating shelves similar to what you have in your dining room.
Lauren says
The shelves look great!! Nice work John!! Do you guys already have a baby name in mind or are you still debating?
YoungHouseLove says
We definitely have a few favorite names, but we’re not settling on anything until we meet the bean and see what she “looks like.” We didn’t want to pick a name and then have her come and totally not be someone who fits the moniker- and it’s fun not really knowing what we’ll call her until we get to lay eyes on her in a few short weeks!
xo,
s
Holly says
You guys are just full of great ideas… these are officially my new favorite bookshelves, and I’ve never seen them before!
Stephanie says
I love the “This is…” books! Great choice!
Sherrie says
Looks sharp. I have to say though, I was most excited to see your white ceramic pieces. I was thinking on your last nursery post about how great your signature white ceramic would look in there.
Tiffany says
Very cute-great job! I would love to build an extension to hubby’s desk so he’ll stop putting stuff on the banister.
Carol N. says
These are great! And so well made that when the bean grows up and has her own beanette, these will still be standing and ready to use!
Jenn says
I love the way the shelves look! They’re so sleek and pretty. I was thinking about how we were going to work with the books we have for the baby. I have made handmade books with many of my students this year and they gave me so many children’s books when I went out on maternity leave. I think your idea is great!
PTC Renovations says
I’ve been a contractor for almost 30 years and this neat tool looks like a no brainer, the final product looks very professional and I would consider using it for my next renovation project.
jaime says
Wow. Amazing shelves. You are the most enterprising and resourceful people I’ve ever seen. With a new bean and a very unhandy husband (!) building shelves would have been the last venture I would have considered. We used the Pottery Barn collector’s shelves instead – I think they’re a nice substitute and serve the same purpose in our son Fionn’s room. (You can see it here! http://www.ohdeedoh.com/ohdeedoh/nursery-tours/nursery-tour-baby-daleys-roomtobe-093282 ). And I recently wrote a feature about M. Sasek’s books – the best birthday present from my sweetheart. http://www.roomforyoungones.com/2010/02/m-sasek-picture-books.html Take care and feel good.
Dana @ House*Tweaking says
Your shelves (John) and those accessories (Sherry) really fill up the wall nicely. What a great combo!
jody says
Love the nursery. Great job!! I am in the midst of making a tree out of leftover wood to paint & hang on wall w hooks to hang my kids’ coats from….
kate says
I love your use of color! It’s fun to see different colors used besides the traditional pink for girls…it all works really well together.
Jamee says
I love these shelves! We are in the process of buying our first house and I am stoked about actually getting the chance to decorate our baby girl’s room in the new place! These would work perfect!
Christin says
Bravo! Great job! They look fantastic and such a great idea. Isn’t the Kreg Jig awesome?!? :)
Haben says
Hi I didn’t realize until after I posted for the giveaway for “I’m Gettin Jiggy” that I was supposed to actually write “I’m Gettin Jiggy” on the post, so I wrote another one thinking I could erase the first one but they both showed up!!!
I don’t want to get disqualified. Is there away to delete a post once it has been posted? Or maybe you could do it for me? Sorry for any inconvenience this might cause!
I love you blog it is so inspiring. Thanks for sharing your adventures with us!
Haben in AL
YoungHouseLove says
Hey Haben,
Not to worry. All duplicate entries are deleted after the contest ends on Wednesday evening.
xo,
s
Amanda Jerkins says
“I’m Gettin Jiggy” – I was just telling my husband I will be asking for some power tools and other building aids for Christmas this year. I have some old wood from the house my husband’s great grandfather built himself. I would like to make some frames and shelves with the wood. This handy tool will help me realize this project. Keeping my fingers crossed!
Heather Brandt says
I’M GETTIN’ JIGGY
I have a wood deck that is such a huge part of our summertime lives and it needs to be repaired, revamped and jazzed up! This would be a great tool.
Many Thanks
Shauntel says
Is that Sophie the Giraffe I see hiding in the shelf? You’ll be amazed at how much your beanette loves that squeaky thing. Our Annabelle is nine months old and still can’t get enough of her Sophie.
Thanks so much for sharing your adorable nursery with us. It makes me so excited for the day that our baby will have a room! (She shares the second bedroom with storage until we move in a few months.) I’m especially in love with the beautiful flower mobile, and I see some floating flowers in my Belle’s future…
Jenn C. says
Much as I love Mirozslav Sasek, I don’t think I could fathom having two identical copies of This Is Rome.
Great adaptation, John.