Updated 2019
We just swapped out two old fluorescent light fixtures in our kitchen and they each required slightly different techniques becausfe – surprise! – one of the didn’t have a fixture box in the ceiling behind it. Yep, just wires coming out of the drywall! So we’ll show you two ways to replace your fluorescent lighting with a more udpated pendant or flush mount fixture.
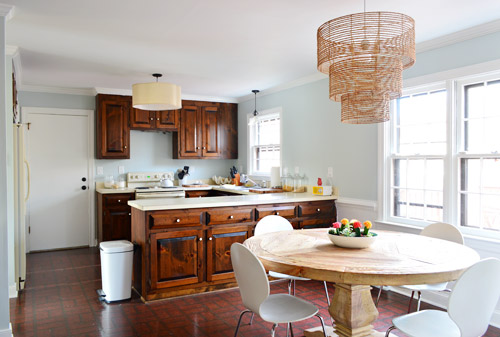
Removing A Large Fluorescent Light Fixture
First we replaced the big fluorescent light near our stove. It was incredibly simple to do so we’ve outlined a step-by-step process below:
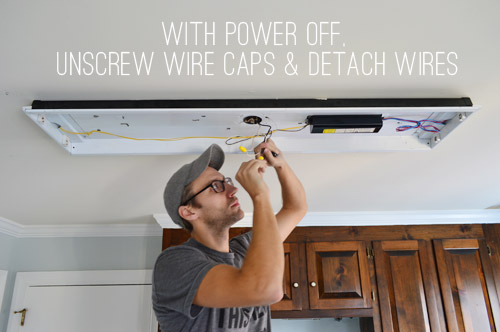
Step 1: Turn Off The Power
Whenever you’re working with a light fixture, it’s always good to turn off the power to this light at the circuit breaker in your electrical panel box, not just at the light switch. Doing this will make sure someone doesn’t flip the switch back on while you’re working. And doing it first makes sure you don’t forget about it later. If you want to be super, extra careful, you can also use a voltage dector to make sure there’s no current running to any wires before you make contact with them.
Step 2: Remove the Plastic Shade & Light Bulbs
Next, I took off the plastic shade cover, which was just snapped into place. Then I took out the long fluorescent bulbs and placed them aside, just to make sure the fluorescent tubes didn’t get broken in the process.
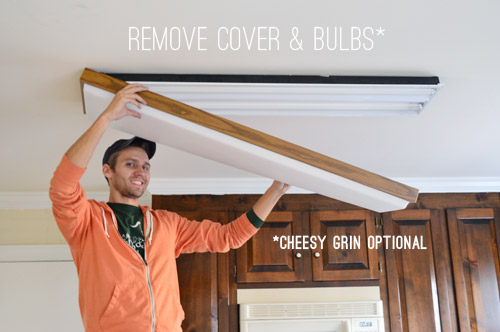
Step 3: Detach The Metal Panel
Then we snapped out the metal cover that concealed all of the wiring in the back of the fluorescent fixture. We were very relieved to see that the wiring came through the center of the fixture. In our last kitchen, the wires came through the ceiling at one end of the fluorescent light. Had that been the case here, it would’ve required more complex wiring to move the fixture box to the right spot.

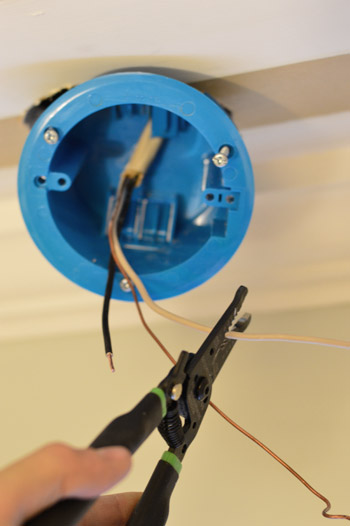
Step 4: Disconnect Wires In The Old Fixture
Then, with the power still turned off, I unscrewed the wire caps so that we could detach the fixture wiring from the ceiling wiring. You don’t need to mess with any of the wiring within the fixture itself (aka, those blue and red wires on the right side of the photo below). Also, you can see this step was actually done after we painted the walls.
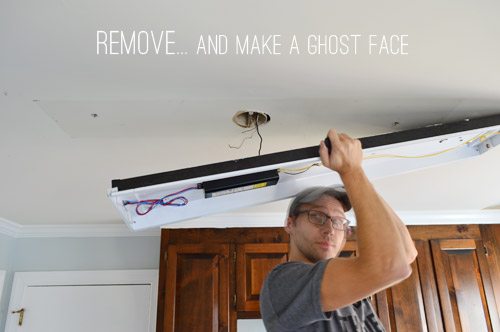
Step 5: Unscrew The Fixture Box & Remove It From Your Ceiling
Now the only thing holding up the fluorescent fixture were two big screws on either end. Once I unscrewed those with my cordless screwdriver…

…I could finally remove it entirely. Apparently I was so excited to have it gone, I blurred my face.
If you’re old fixture is in good enough condition still, we highly recommend donating it somewhere like a Habitat for Humanity Restore.
Step 6: Spackle Holes & Paint The Area
Since your new light fixture likely won’t cover the same spot, you’ll need to spackle any holes (like the ones from the screws), repair any other hidden damage, and also paint to blend the area with the rest of your ceiling. You’ll see us get to that later in this post, but this is an important step to make sure there’s no lingering evidence of your old fluorescent fixture!
Installing A Pendant Light Fixture In Its Place
With your fluorescent fixture gone, now you can turn your attention to installing your new pendant, semi-flush, or flushmount light. We planned to install a burlap quatrefoil shade from our local Decorating Outlet that we mentioned here, which is hung from the dual-bulb pendant below.
Note: If you’re not comfortable with this step, you can always hire an electrician (and also pat yourself on the back for saving the cost of removing the old fluorescent puppy). But if you made it this far, it’s pretty straightforward to finish the job yourself.
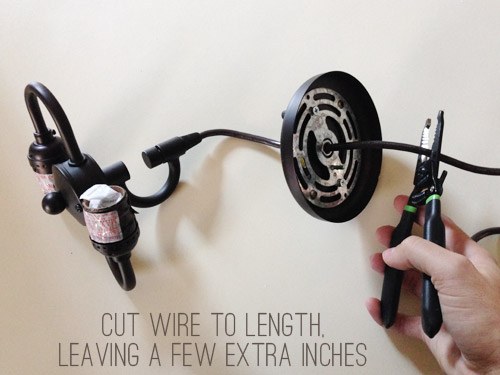
Step 1: Trim Any Excess Wire
We wanted it to sit nearly flush to the ceiling so we had to cut off a lot of excess wire before hanging it. This can be done to shorten any pendant fixture, or even to convert a plug-in light to a hard-wired one.
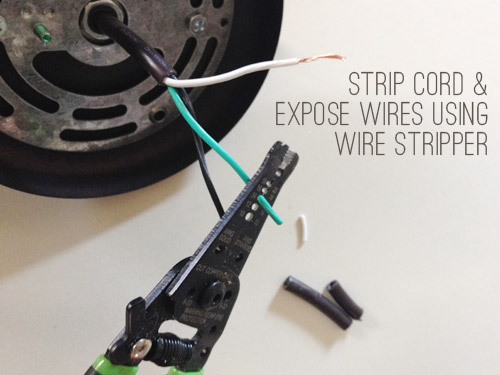
Step 2: Use Wire Strippers On The Cord To Expose Wires
Next, I used wire strippers to expose the tip of each individual wire, creating a place for them to connect to the wires in the ceiling. This wire stripper I bought a while back (similar to this one) has been a great purchase, in case you’re planning to hang any light fixtures soon.
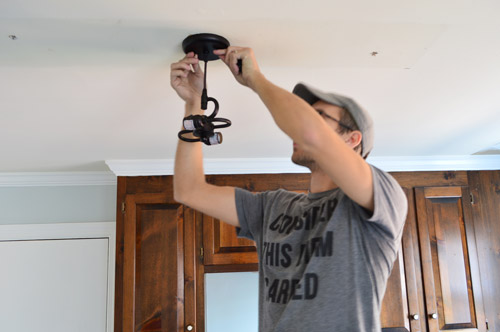
Step 3: Install Your New Fixture
With my cord shortened and my wires ready, I could complete the installation per usual. First I attached the mounting bracket to the ceiling fixture box and then connecting the matching wires together with wire caps. Once those were secured, I tightening on the ceiling cover with the two small screws that came with it.
Here’s our new pendant once the shade was installed – and after we’d painted and patched the ceiling too (notice how the holes and discoloration are gone from the photo above?).

With that project completed, we turned our attention to the smaller fluorescent light above our kitchen sink. It had been hidden behind the cabinetry on that side, but now that we removed it (in favor of some open shelving that we can’t wait to add) – well, it’s super visible. So we repeated some of the same steps above, although this one didn’t even have a plastic cover to remove first.
While it was a relief that the wires were centered over the window (again, this wasn’t the case in our last kitchen) it was kind of a bummer to take down the old light and discover that there was no fixture box in the ceiling. Just a big hole where the wires poked out.
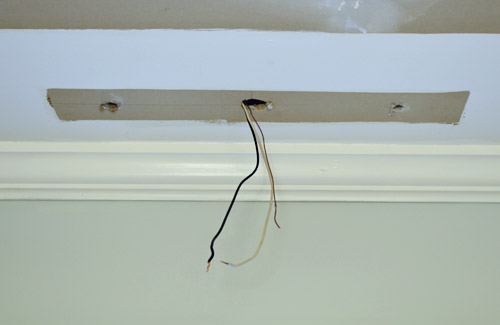
Installing An “Old Work” Ceiling Box
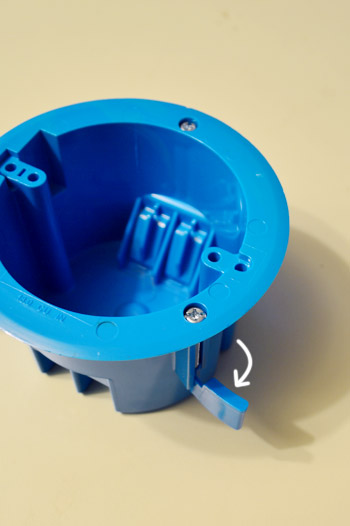
We’d need a fixture box to install the new glass funnel pendant that we’d planned for the space. I felt around near the wires to see if there was a beam that I could attach a fixture box to, but came up with nothing. So it meant installing one of these “old work” ceiling boxes. They’re designed to slide into existing walls or ceilings, where as “new work” boxes are attached to studs or joists before drywall is installed. Since we didn’t have a stud nearby, this old work box would just be held tightly to the drywall by three little wings on the side (see below). Once you’ve placed the box in your drywall, you tighten the screws on the face of the box which swing the wings out and pulls them forward – eventually hitting the back of the drywall and pinching the box in place.
My research revealed that these aren’t technically meant to support light fixtures (something that nails or screws into the frame of the house is recommended), but plenty of reviewers on the Home Depot site reported using them to hang lightweight fixtures like ours, so we felt comfortable giving it a try. Update: It held in place with no trouble for a couple of years, at which point we finally remodeled the entire kitchen and replaced with with a recessed light.
Step 1: Make Sure Your Power Is Off!
If you hadn’t already turned off the circuit breaker at your electrical panel box, make sure you do it before you continue.
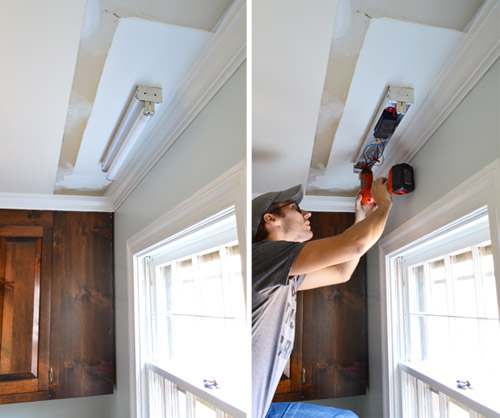
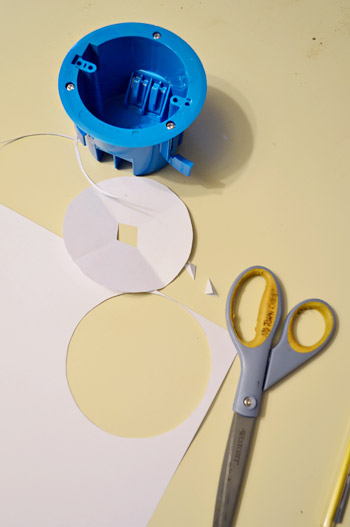
Step 2: Mark The Placement Of Your New Fixture Box
To install the box I first had to cut a hole for it in the ceiling. It had come with a template, but somewhere between checkout and home we lost the sheet. So Sherry made me one of my own – making sure it was a little bit smaller than the largest part of the box (since that’s a lip that needs to rest on the drywall).
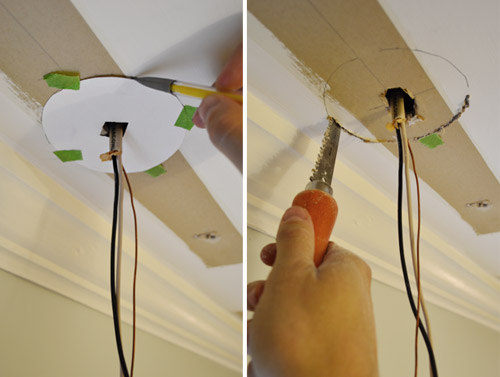
Step 3: Cut Your New Hole
Next I traced that template onto the ceiling, making sure that my wires were coming out through the center. The I cut the hole out using a drywall jab saw. I kinda felt like I was in the middle of an old school cartoon where one character cuts the floor out from underneath another.
Step 4: Feed The Wires Through The Box
With my hole cut, I could feed my wires through the back of the box and trim them to size (they had been surprisingly long!). Again, make sure the power is off before doing this.
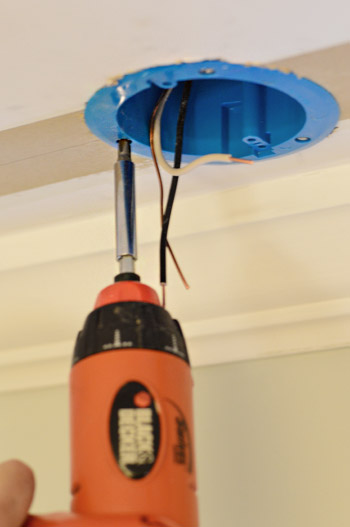
Step 5: Tighten The Screws To Secure The Box
Then I tightened the screws on the face of the box with a screwdriver to secure it in place with those wings.
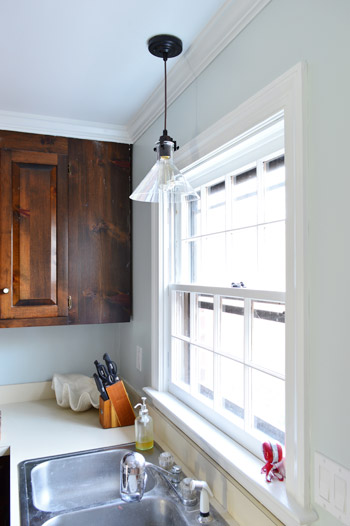
Step 6: Install Your Lightweight Fixture
From there, the actual fixture install itself was straightforward (connect the right wires, secure the canopy, turn on the power, and watch it glow). We like that it’s simple and doesn’t command too much attention visually (since the other two lights in the room do) and that the view out the window isn’t obscured by a big heavy shade.
UPDATE! We’ve finally transitioned our entire house to LED light bulbs (they save tons of energy & money, and they’re a lazy person’s best friend because you never have to change them). For anyone wondering, these are our favorite interior LED light bulbs. Their glow is warm & natural (not weird/blue like some of the others we’ve tried) and they use around 90% less energy.
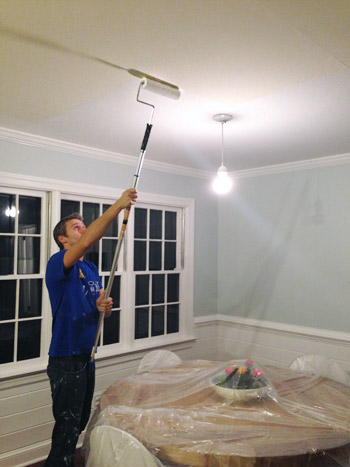
With the fluorescent fixtures finally gone, we could finally break out the primer and paint to make the ceiling look new again. We just primed the areas that were raw drywall, then we painted the whole thing in BM Simply White (same color as the trim) in a flat finish. As is our usual MO, Sherry did all the cutting in around the crown molding, and I was the resident roller man.
The difference of the painted ceiling is somewhat subtle in pictures, but in real life it makes the whole room look a lot fresher (the glossy white painted crown next to the old yellowed ceiling was no bueno in person, so we’re glad that’s gone for good). Oh and the two larger fixtures are sporting different colored cords at the moment, but we might spray the white one ORB like we did with this pendant in our previous kitchen if it bothers us after we paint the cabinets. We generally like an oil-rubbed-bronze cord for some visual contrast, but in this case we appreciate how the white one becomes kind of invisible over the dining area, so we’ll have to keep you posted if we alter anything as the room comes together more.
It’s nice to have three more items checked off the list, but it means we’re dangerously close to the task that we’re simultaneously psyched about and dreading: painting the cabinets. But man oh man, what a difference that will make (especially when they look like this up close).
Remove wallpaperMove fridge cabinet forwardRemove upper cabinets on window wall to prep for open shelvesReinstall crown molding(you can read about how we did those first four things here)Prime & paint the pantry and the door to the garagePrime & paint the trim, crown molding, & baseboardsPrime & paint the paneling(you can read about how we did those last three things here)Prime and paint the wallsRemove the existing microwave (craigslist it?) and get a countertop one we can eventually install in the pantry(here‘s the post on those last two bullets)
- Install a cheap range hood (we found one for $25 on craigslist that we can’t wait to hang) to lighten up that wall
Patch, prime, and paint the ceilingReplace the florescent light in the cooking area and the pendant over the sinkReplace and center the light over the dining table- Hang floating shelves on the window wall
- Paint the cabinets (you can see the colors we’re leaning towards here)
- Update the old cabinet hinges and knobs
- Get a rug for eat-in area? Possibly install peel and stick tiles everywhere?
- Curtains for windows?
Has anyone else checked off a few things on their to-do list? We know it was an interesting weather week for lots of you, so maybe you were able to accomplish your “drink hot cocoa” and “go sledding” to-dos? We’d be a bit jealous of that, considering that all that we got was ice and freezing rain.
Update – Wanna know where we got something in our house or what paint colors we used? Just click on this button:

*This post contains an affiliate link

Melanie says
It’s coming along! Inch by inch. :)
Nicole Doucet says
Woohoo!! I love checking things off the to do list!
keep it up! it’s looking awesome!
Mary | Lemon Grove Blog says
So. Much. Better! I love how this kitchen space is evolving! So crisp and fresh :D
Starr @ The Kiefer Cottage says
That room is really coming together!
We spent our weekend wearing 10 layers of clothing and dealing with a frozen hot water pipe. That and a minor furniture switcheroo, so nothing special here on the plains!
YoungHouseLove says
OH MAN! That doesn’t sound fun Starr. Congrats on getting ‘er done.
xo
s
lauren says
Same here, Starr! My husband’s shoulders are literally too broad to fit through the hole that is our crawl space, so it becomes my duty to fiddle around with frozen pipes and space heaters when it’s 20 below :/ Ahhh home ownership!
YoungHouseLove says
Oh man, I don’t envy you one bit!
xo
s
Laura @ Rather Square says
Love the new light fixtures, they make such a difference! And I’m impressed that you were able to wire them in yourself. I’m always afraid of doing that kind of thing on my own and electrocuting myself, so that’s why I let John (my husband, not yours!) handle the systems of the house.
We’ve been working on upgrading our thermostat recently, in fact. I know you guys have a Nest that you love… we looked into that but went with the Ecobee instead, and so far it’s been great!
http://www.rathersquare.com/2013/12/tale-of-three-thermostats/
YoungHouseLove says
We hear great things about those too! So glad you’re loving it!
xo
s
Maddy says
Congrats on your baby boy bun! Since you plan on a kitchen remodel later, have you thought about having some fun by trying appliance paint for your fridge, or practicing your carpentry skills by putting glass in some of your cabinet doors? If anyone can do it…
YoungHouseLove says
Wahoo! I love those ideas! Just have to get John on board (he’s the practical one who’s all about “not overdoing Phase 1” and “being able to craigslist the fridge later” which he thinks will be less easy if it’s painted). Will keep you posted for sure!
xo
s
Maddy says
Well, he had to go and get practical. Shame, cause one of these would have looked awesome for the short term.
http://media-cache-ak0.pinimg.com/736x/ac/2e/a1/ac2ea1b8f6256045da50325f82b7f7dd.jpg
http://media-cache-ak0.pinimg.com/736x/ec/27/fc/ec27fcd1dced520e8ad11023c226b3db.jpg
YoungHouseLove says
Haha, it’s true! Maybe I can beg…
xo
s
Connie says
Years ago I remember reading in Apartment Life about covering a refrigerator with fabric stuck on with liquid starch. At moving time—or Craigslist time—the fabric could be easily removed. I never tried it so I can’t vouch for easy removal, but that could be a way to get both of you happy.
YoungHouseLove says
Ooh that’s a fun idea I never thought of! I was wondering about chalkboard paper but fabric might hold better than paper!
xo
s
Eric @ AddSomeCharacter says
It’s crazy how much better your kitchen looks. Carpe diem indeed.
ashley @ sunnysideshlee.com says
looking good guys – any other long-term plans for the cabinets or kitchen design? granite counters?
YoungHouseLove says
Thanks Ashley! Yes, phase 2 will be all new appliances, cabinetry (this will end up in the garage to create a work-room for John) and new counters, although we’re not sure what kind. We’ll be reconfiguring the floor plan a little we think, so it’s nice to work with this as-is while we save our pennies for the bigger stuff once we’re sure what we want for the long term.
xo
s
Shannon says
Seriously?!! GORGEOUS! I absolutely LOVE the light over the table! Great job John & Sherry! :)
Shannon
Fabulously Vintage
Rachelle D. says
Thanks for this! We are under contract on a house and the first thing I need to fix is getting rid of the same giant flourescent ceiling light.
Gilly says
::wolf whistle:: Check out John’s guns!! I was scrolling through and had to stop and scroll back hahahahaha. High five, $herdog.
YoungHouseLove says
Yeehaw, that’s mah man.
xo
s
Dusa says
I was actually checking out the “nerdy DIY-er” with his specs and stubble.
And by “checking out”, I mean “appreciating the nerdy manliness of someone other than my hubby”.
^5s Sherry!
YoungHouseLove says
Haha! There’s just something about a man wearing spectacles and wielding a power tool…
xo
s
Theresa M. says
A nice, bright start to the week! Painting ceilings is so hard… Have your neck and shoulders recovered?
YoungHouseLove says
It wasn’t so bad this time! We usually hate painting ceilings but it only needed one coat since we used good paint and were only going from yellowed white to fresh white. Whew!
xo
s
Kristin says
We (actually my husband) did your vanity shelf project in our kitchen desk knee hole. It’s so great to have 2 shelves for much needed storage instead of a dust bunny gathering spot! I put the before & after on Facebook & have gotten many compliments, so I shared where I got my inspiration. Thanks! We too have a nasty large fluorescent fixture in the kitchen, and I’m happy to see that getting rid of it might not be as big a deal as I’d thought. I guess the only things stopping me now are 1. Finding a new fixture that we like that will give enough light and 2. The stupid popcorn on the ceiling. Ugh. I need to find someone to deal with that, because I’m pretty sure we don’t want to do it ourselves.
YoungHouseLove says
Oh man, good luck Kristin! And your vanity shelves sound awesome!
xo
s
Chelsey says
As absurd as it sounds, we actually had areas of ceiling re-popcorned. We were putting our house on the market and needed some touch-ups. It’s messy, but Home Depot sells a can that allows you to re-texture. We didn’t have great luck with that, but did have a contractor do it. I think it cost under $50 and blended seamlessly.
Kristin says
Chelsey…that doesn’t sound absurd at all! If I weren’t planning on staying in the house and if I weren’t wanting to get rid of all of that nasty near the stove where grease & cobwebs & dirt have collected in the popcorn over the past 20+ years, I might just follow your lead!
Becky B says
We’ve never dealt personally with a popcorn ceiling, but my suggestiong would be to just cover it with 1/4 inch drywall and spackle wall-ceiling joints. My cousin and husband did this rather than trying to remove the most-likely-asbestos-filled popcorn ceiling.
threadbndr says
Popcorn is not actually all that bad to take down. We used a steamer and a broad bladed putty knife. Messy, but not hard. Ours was over antique plaster, not wallboard, though.
carrie says
Unless your house was built pre-1978, the ceiling won’t have asbestos in it, which is about the only reason not to remove the popcorn ceiling yourself. We did our whole house (4 BR/2 BA) and its remarkably simple… just requires a water sprayer, a scraper, and a bandana to keep the stuff out of your hair. We covered the floor with plastic dropcloths so it was easy to clean up. Seriously, removing the ceiling is life changing! It’s the best thing we ever did.
Alli says
Looks great!
I really appreciate your info on removing the larger fluorescent light. We have one in our kitchen I would love to remove some day, but it gives me a bit of anxiety for a few reasons.
A) it’s a vaulted ceiling, so I’m not sure what light would work well on an angle and give off enough light as well since I’m so used to all the light from the current one and
2)our ceiling has a texture on it (which I really don’t mind!), but it’s not just texture, it’s sparkly texture… Everyone entering our house for the first time always says “your ceiling sparkles!”. So I’m not sure how we could patch in an area where the light was without having a glaring difference
So, for now, I’ll just live vicariously through you. Thanks!
Paige @ LPD says
Not to be a downer, but if you have a sparkly popcorn ceiling it’s most likely asbestos, be careful if you decide to disturb it!
YoungHouseLove says
Thanks for sharing that tip Paige!
xo
s
Christina B. says
I had a friend who was so excited to show me their new popcorn ceiling. They added glitter into the mix, and the ceiling sparkled. Maybe the owners before you were into glitter.
Sara says
Hi Alli – for your vaulted ceiling lighting – they do make cans now to compensate for the angle of a vault. You can even fill them with dimmable LED bulbs. You wouldn’t have to worry about changing them for years. I put them in my family room addition and I really like them. I also have 6 x 4″ cans in kitchen work area as well – also on a dimmer. I could not go back to less light in my work area. Best of luck with your update!
Emily says
You two have wonderful decorating taste. The light fixtures look incredible, and the paint job really does transform the room!
Suzanne says
It’s pretty amazing what a difference these phase 1 changes have made so far. And you have more in store for this phase. This is especially true because you haven’t blown a wad, although I realize you have put in significant time. When I think about is if I was a potential buyer looking at your kitchen before, I would have been overwhelmed and thought, complete overhaul, so out of date, etc. But if I was walking through now, I’d think, what a pretty room with tons of space and windows. Even with the cabinets and appliances as is, I would be so much more excited about the kitchen.
Katie {deranchification} says
Looking good! I love how the three new lights look together – and totally didn’t even notice the different color cords until you mentioned it!!
Jennifer says
I don’t know why I’m always amazed at how much difference the little things make, I should be used to that after years of reading your blog, but I still say “oooooooh!” at the end of so many of your posts. Like this one!
Also, I, for one, can’t WAIT for you to paint those cabinets, as we’re in the process of buying a new-to-us house that has cabinets I hate, and am planning on doing a similar Phase 1 as you, and I like the colors you picked out, so I want to see what they look like all painted out so I know if I should steal them or not! :)
Alex says
I cannot believe how much brighter it looks!! Great job guys :)
Tiffany says
I love this! it really is looking wonderful. Just out of curiosity are you going to be painting the floating shelves the same color as the upper cabinets or leave them white?
YoungHouseLove says
Good question! We’re not sure yet, but we lean towards leaving them white to begin (we can always paint something later, but unpainting it is harder ;)
xo
s
Amanda says
I feel like a ding dong, but what floating shelves??? Or you talking about the ones by the window they havent put up yet??
YoungHouseLove says
Oh yes, the ones we’re planning to hang but haven’t yet (I think we’ll paint the cabinets first without them installed since it’ll be easier that way).
xo
s
betty (the sweaty betty) says
ugh.. I’ve replaced 3 fluorescent fixtures and have one more (in the mater closet). they’ve been pretty straight forward for me, and i’m pretty sure anything you switch out with them looks 10x better. love the fixtures, guys!! the kitchen looks awesome (even if it is just a phase!)!!
Taya says
Love the new lights!
Kathryn says
Yea! Cacti still looking great! (yes, I realise they’re not the stars of this post, but dang it, I love that bowl o’ cacti)
YoungHouseLove says
Wahoo! Alive and kicking! Still haven’t watered them once!
xo
s
Megan @ Rappsody in Rooms says
They look so great! I love how they are all so different but definitely don’t compete either. I totally agree with how ceilings change everything. We have two textured kind of yellow ceilings in our house and I have no idea what to do with them. Paint them? Seems like a really hard project…oh to have all flat ceilings!
YoungHouseLove says
Yes! Paint those suckers with a roller made for textured surfaces! It’ll make such a difference!
xo
s
Carla says
I love these three lights. The rope chandelier looks beautiful over the table. I’m not sure why, but the other two look kind of awkward in the kitchen. I love the idea of changing out the white cord and plate to match those two. For the price you paid for the chandelier, I’m kind of surprised you didn’t have an option.
I’m getting ready to paint my ceilings, a daunting task for sure. Do you guys have a tutorial somewhere on your website? I’ll have to do a search. The last time I did a ceiling I could see roller marks. It didn’t look all that great.
YoungHouseLove says
Flat paint is the key to getting smoother ceilings without roller marks (anything glossier can bring out imperfections or marks as the paint goes on). We also like to apply thin and even coats without putting too much pressure on the roller (if you’re pushing on it too much you’ll get those outside roller lines and can even get splatters on the walls nearby). Good luck Carla!
xo
s
Carla says
Ahhh, I do push too much on the roller. Thanks!! :)
YoungHouseLove says
Good luck!
xo
s
Sandra T says
Just wondering…and sorry if someone else mentioned it, but my hubby swears by “ceiling paint” which is always bright white, of course! But what exactly is ceiling paint? Is it just a fancy name for flat paint, or does the paint itself have its own formula? Every brand seems to make their own version, as well. Also, this is a to each his own opinion I know, but even though I like the chandy over the table, my head thinks 2 things, 1)it looks like wedding cake and I WANT cake! and 2)maybe a “pop of color” would be good? I think because we only see it in pictures, the muted colors surrounding it make me think that and the proportions are hard to figure out, so ahem, I think you guys need a 3D camera! So, please “Get on that, SANTA!!” :D Love to you guys!
YoungHouseLove says
I think it’s thicker and less runny for fewer drips, although we have had luck just using quality paint (like BM) which is usually thicker by nature than the cheaper/thinner stuff. Natura and Aura for example have worked for us as ceiling paint even though they’re not entitled that. Hope it helps! And as for that table shot, I think it’s just the bare blue wall behind it and the lack of window treatments, so once we have art and fabric there should be that pop of color that’s missing!
xo
s
Lisa @ Double Door Ranch says
Your Phase One improvements look better than my final products! :)
We’re decking the halls of the Double Door Ranch lately. This is the first (and only)year we aren’t putting up our tree bc the house is so chaotic. So I’m making up for it by just sticking ornaments everywhere! Haha
YoungHouseLove says
Haha, I love it! Go ornament crazy. I’m having the same instinct. It’s a new movement called put a
birdornament on it.xo
s
Meredith says
I think you mean two long screws instead of too long screws? :) The changes look amazing! It’s so impressive that this is only a “phase I” update.
YoungHouseLove says
Haha, yes!
xo
s
Ms. Mitten says
Oh my goodness what a change!
The dark cabinets don’t look bad now that the room has been painted. Maybe you can save yourselves a step and just replace the hardware until the larger remodel happens?
YoungHouseLove says
Alas, they’re really dinged up in person (if you click the link to them in the sentence before our bulleted list you’ll see what I mean).
xo
s
Paige @ LPD says
I agree! It would be nice to see if a bit of sanding and some danish oil could make them nice enough until you decide to remodel completely. Plus, way less work and money than painting.
YoungHouseLove says
Oh yes, it’s certainly a personal preference thing (to paint or not to paint… that is the question…). There are “oh man, I can’t wait until you paint those cabinets!” comments in here too, so it’s funny to see both sides of the debate. We’re leaning towards paint for the time being just because it’s our preference since these are dark and more beat up than oil can solve (they’re actually gnawed on in many areas – which you can see here). We’ll keep you posted if we change our minds though!
xo
s
Amanda says
The phase 1 changes are seriously blowing my mind. I know it has cost time, and some money, but the changes (in every room) are amazing. You have given me hope as a hopefully-soon first-time home buyer! I’m absolultely loving the directon you’re taking this new house.
Jenb says
Love the light combo. Once again, I’m amazed at how easy you make it look sometimes…in an inspiring way! We have florescent kitchen lights that are recessed into the plaster ceiling. I can’t even begin to imagine how to tackle that! Someday:)
BTW–we love the Octonauts at our house, too. We were cracking up at Clara’s name suggestion. Congrats on the baby boy. They’re so much fun!
ETB says
Can.Not.Wait. till those cabinets get painted! It will definitely be a game changer in there.
YoungHouseLove says
Woot!
xo
s
Wendy @ New Moms Talk says
We have a Before We Get Pregnant Again List, and on it was to clear out the Octagon Garden-Crazy Downed Limb Area.
Yesterday my hub watched our daughter while I planned on sawing 2 piles for just a few minutes. Then that list provided motivation, and I hauled limbs about 4-6 inches in diameter and 5-20 feet out of the downed area (left by the previous owners).
There’s now a pile about 10 feet wide by 20 feet long filled with limbs of all sizes in front of the greenhouse that needs to be hauled for burning, but we’re waiting til it’s at least in the high 40s to burn.
I’m hoping if it warms up a bit this week to at least start the sawing to burnable size process. All the while my hub and our daughter will probably be watching cartoons like they did yesterday. :-)
YoungHouseLove says
Haha, I love the “before we get pregnant again list!”
xo
s
Janelle @ Two Cups of Happy says
I have a “Before Baby” list too! Helps calm my baby fever down just a bit.
Erika says
When you guys hang the range hood are you leaving the cabinets above it or removing them? I am in a similar situation, but I have a lovely MASSIVE fan/light/microwave holder that has to go. Just wondering what you were doing!
YoungHouseLove says
We just plan to hang a cheap one from craigslist with the cabinets in place and then down the line for phase 2 when we get all new appliances and counters we’ll re-craigslist the one we are using for Phase 1 (we’re hoping for the same price we got it for since it was just $25) and then get a new one. Not sure what that one will be, but we might remove the cabinets for that one (ex: a chimney style metal one that goes to the ceiling).
xo
s
Casey @ Waffling says
What is that on your faucet? I cant figure it out! Is it a giant faucet head?
YoungHouseLove says
It’s one of those water filters. We usually install them under the sink but we had some issues with doing that here (different type of pipes) so we just live with the weird faucet one for now.
xo
s
Laurea says
Looks really great you guys
This Little Blue Homestead says
I wasn’t so sure about the dining room light when I saw it in the box but as always you guys were right on it looks amazing! Congrats on getting some things done! We were busy painting this weekend and it’s so nice that a quick and easy afternoon of painting yields such dramatic results.
Isabel says
I was out of town last week and unable to get my regular fix of YHL so I’m glad to be back to my “regular schedule” but on the upside I was able to help my sister with her Xmas decor, which was lots of fun. Loving the lights :-) they look really nice together :-) I have a similar over the sink fluorescent which I can’t wait to get rid of and now that I see how good the one you chose looks, I may go with that or something similar. I have a random opinion question: if you had two different paint colors in a room (above and below chair rail like in your old, office) would you paint the ceiling the same as the top color or do you think it would look nicer to go with the bottom color (which is a shade darker) and/or a different color altogether? The colors are two light shades of beige/tan the room gets lots of natural light. Thx!
YoungHouseLove says
I think I’d go with either the same color on the walls and a different soft-yet-interesting color on the ceiling (with white molding and chair rails) OR a dark color under the rail, a lighter color on the upper wall, and plain old white on the ceiling – that way you’re letting two things have interest instead of all three fighting, ya know?
xo
s
Isabel says
Thanks for the input :) My husband is so not sold on the ceiling painting, I’m going to hold out until we install the crown molding (turns out my sister had a miter saw from a while back she was happy to gift us, yay!) and then see. Since I already painted the bottom a darker color, once the crown molding goes up I’m thinking a fresh coat of white might be all it needs. Are you guys still accepting cards to include in the children’s hospital room you’re redoing? Thanks!
YoungHouseLove says
Yes, we’d love cards if you have them! They’re still rolling in and it’s going to be such a treat for those kiddos!
xo
s
Debby says
Love it. You inspire me. We are in the prep work for an entire kitchen redo. I love to read your blog to keep myself on track since we are doing a lot of the demo and muscle work. Love those lights.
Kristen says
Love the new lights! I clicked the link to the 3-tier light and saw that it is now on sale for $235 and thought “oh nooo!” … It’s always the worst when you buy something and then it goes on sale for so much less soon after :( too bad Joss and Main won’t price match within a certain time period. That would rule.
YoungHouseLove says
BOO! I’ll just drown my sorrows in Christmas cookies… haha!
xo
s
Ellen says
You kids need to ask for some canvas drop-cloths for Christmas!!
They are the best things ever. Sounds weird right? Just try them. Those plastic cloths are awful – they are hard to move around and any wind blows them away. We use them all the time and they are easy to move around. My husband and I keep joking that all of our friends will get them as housewarming gifts from us.
Think of all the money you’ll save. Plus it’s really fun to see all the colors over the years from all the projects…if you are all into that sort of dorky-ness.
Go green!
YoungHouseLove says
I love that idea! We have one folded up in some moving box in the garage that we have yet to unpack, but we need to get more and make them easy to grab! We hate those plastic ones too!
xo
s
Melissa Webb says
The lights look great! Nice selection on all three. I have painted many cabinets in furniture, and honestly, it is not that bad. Once you figure out how to move your brush in the grooves on the doors, it is pretty simple. And, since you will use a primer first, you will have plenty of time to figure out how to tackle the doors and drawers. I love to paint drawers because they go so fast! I only paint furniture/cabinets with a Wooster Silvertip angled paint brush and I love my results. I love how this brush glides with the paint and how the brush strokes just fade away. I’m sure guys have brushes that you like to use, so as long as it is comfortable for you, I’m sure your cabinets will come out great!
YoungHouseLove says
Thanks for the tips Melissa!
xo
s
Sharon says
Looking good, really good.
By the way, did I miss a post on your new kitchen table. I’m loving it. Where did you score this one???
YoungHouseLove says
Thanks Sharon! Here’s that post for ya: https://www.younghouselove.com/im-still-laughing-about-blardware/
xo
s
Heather says
While I logically understand these were likely on different days, the *thought* of John taking his contacts out and change his outfit between turning the power off and taking everything down is hilarious. (Just look at the photos between the two haha).
I really love that three tier light by the way.
YoungHouseLove says
Haha! Yes, the first shots were before we painted the walls (about a week before we continued with the lighting updates). He does make some fast changes into painting clothes and contacts sometimes though. You should time him. Seriously, he’s like Clark Kent to Superman…
xo
s
Ethne @ Wom Mom Blog says
Wow, it is so bright in there now! I really love that chandelier over the kitchen table. I don’t love the floors…but they remind me of when I was little because my parents’ house had the exact same linoleum. So stylish.
Sherry, we need a bumpdate – I keep scanning the painting pictures to see if I can see a shot of the bun, but you are sneaky and haven’t loaded any!
YoungHouseLove says
Oh yeah, I owe you guys one of those. Maybe on Young House Life? I’m kinda shy about that stuff (I think I only shared a few photos of my belly with Clara, maybe right before she was born and after in her birth story post?) so we’ve taken some for our family album as I’ve grown, but I feel strange about posting them online. Better get over that, huh?
xo
s
Shandi Alegre says
I would love to know where your round table is from!? I’m sure it’s somewhere on here but not sure where to look! I’m looking for a table just like that!
YoungHouseLove says
Here’s that post for ya: https://www.younghouselove.com/im-still-laughing-about-blardware/
xo
s
beth says
I know you guys are pretty committed to white cabinets, and I do love a white kitchen. But, I have to say I kind of like the wood tone cabinets in a way with what you have there. I know yours are in bad shape, but it kind makes me think the right stained cabinets would look fab too. Again, totally get why you want to do white, but just had to chime in with that.
YoungHouseLove says
Aw thanks Beth! We’re actually not going with white this time (we’re planning for dark on the bottom and a mid-tone on the top), just because we think that’ll work better in the room for this phase! We love the idea of keeping the richness of the darker tone on the bottom but lightening things up for the top of he room.
xo
s
Lauren says
I am in love with your table! We are looking for a cozy round table that has an extension possibility to fit 6 when we have company… Does yours expand? If you don’t mind sharing, Where did you find it?
YoungHouseLove says
Thanks Lauren! It doesn’t expand, but it can easily seat 6 (maybe even 8!) – we just have four small chairs, but 8 of them could totally fit. Here’s the post about it: https://www.younghouselove.com/im-still-laughing-about-blardware/
xo
s
chrissie lynn says
Looks fantastic! I am in love with the new fixture over the table, awesome texture.
Any ideas on how this DIY-er could add a old work box to a plaster ceiling? We’re at a loss for what to do… have wires poking out just like you did, but no box and no drywall either!
YoungHouseLove says
Hmm, I would google around to see if others have used them with plaster. Might still work the same way, or it could be too flaky/crumbly to hold. Anyone have any experience with one for Chrissie Lynn?
xo
s
JG says
Don’t forget, there is lathe over the plaster as well, so that will probably hold it, if the fixture isn’t heavy. You might be able to use an old work box if the flaps go deep enough (it has to go over the plaster and the lathe- and that is thicker than drywall. You could also use a new work box that has front tabs where you screw in from the front, if you can manage to screw them into the lathe. If you get really stuck, they make ones you put in that have 2 arms that extend out to the studs on either side. Take a look in the electrical box aisle and see what might work for you. Also look in the ceiling fan area, because often they have useful boxes hidden there which work for unusual situations.
Also, when cutting the hole for the box, be very careful cutting, since you don’t want the plaster to vibrate and separate from the lathe.
Also, it would severely limit your options, but some fixtures have an integrated box. It would say in the specs.
Amy Butler says
I JUST (as in replaced the knobs this morning) painted the TERRIBLE thermafoil cabinets in our kitchen.
three words: TINTED. BONDING. PRIMER.
We used BM’s Kendall Charcoal on the lower cabinets and thanks to two coats of that bonding primer (after a good scrub) we only needed one coat of the actual paint!
I didn’t even need to sand before hand! (I did do a “as light as possible with a high grit sanding block” once-over after the second coat of primer.)
YoungHouseLove says
That’s awesome! I love it!
xo
s
Sarah says
Just wanted to say that we’ve had great luck with Behr’s paint and primer in one for cabinets. I painted our (horrible, sad condition, soon to be replaced) cabinets with an almost-free mistint, and they look great over a year later. Just a swipe of deglosser, then two quick coats and they were done!
YoungHouseLove says
Thanks for the tip Sarah!
xo
s