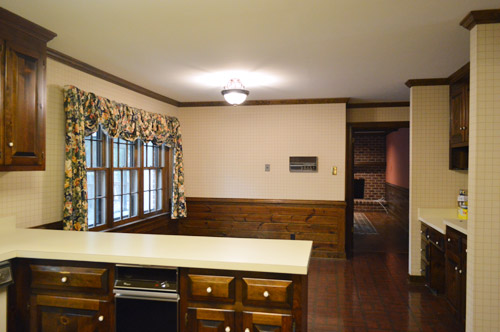
Remember when the kitchen looked like this back when we first laid eyes on our house?
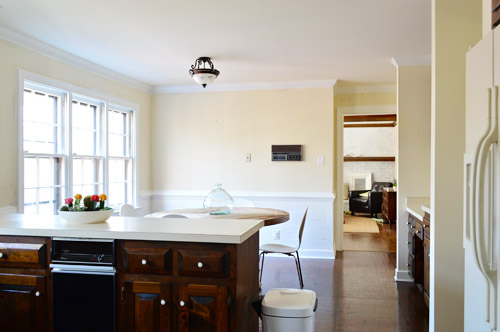
Whelp, now it looks like this…
It’s crazy how different certain angles look in person.
It’s like walking into the room and wondering who added five extra lights. It’s just so much brighter.
Yes, we dove headfirst into priming and painting the kitchen baseboards, crown molding, and window trim (52. freaking. panes.) and ended up just going all out and tackling the paneling and the doors to the pantry and the garage while we were at it. We have nothing against dark paneling, we just prefer the painted look for our house, especially after drooling over a few awesomely classic spaces that inspired us (like this one, this one, and this one).
I’m not going to lie – it was not an easy process. But it was SO WORTH IT. The room feels so much brighter and less heavy and we find ourselves actually looking out the windows now (when that trim was dark it stopped your eye, but now that it’s white, suddenly the outside world is the thing that’s emphasized, like a pretty little forest focal point).
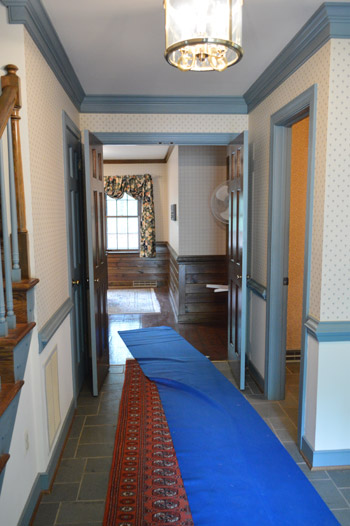
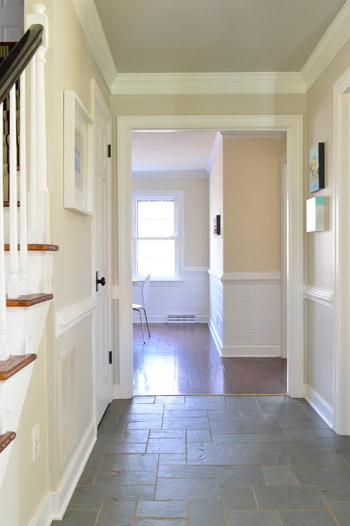
One of my favorite new views is from the front door. Here’s a shot we took during inspection (don’t mind the chaos, there were a few old furniture items being moved out by a crew at the same time).
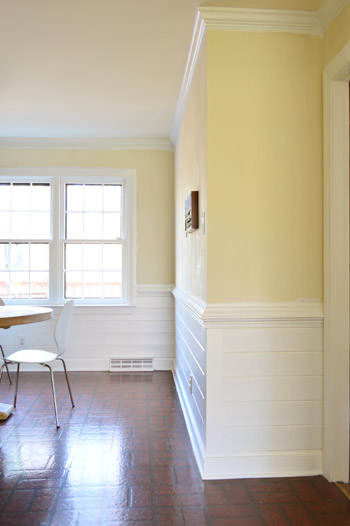
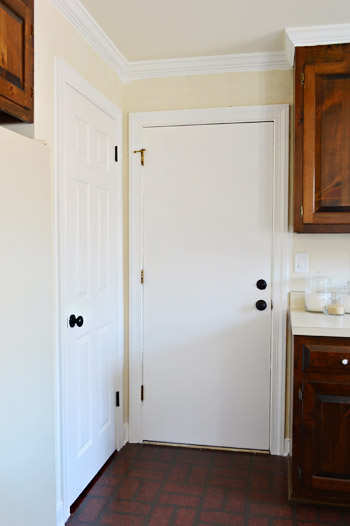
And here’s a shot we took yesterday afternoon. Ignore all the beige… we’re planning for some airy color on the kitchen walls to break things up (more details in this post). And the lower cabinets will end up nice and dark for contrast too. Eventually we also think we’ll end up with big dark (heated) tiles on the floor too, so that should help to balance/ground things. White paneling + softly colored walls + dark floors + a rustic wood table sounds like a nice mix.
All told, it took two coats of primer followed by two coats of paint applied by hand. We decided only to use the sprayer to paint things we could remove and take outside (like cabinet doors/drawers when we get to that stage) since we’ve used it once inside (to paint all of the baseboards/trim/doors upstairs while the carpeting was ripped up) and we noticed a pretty decent amount of overspray.
Based on that experience (and using it outside for things like painting the sunroom ceiling planks) we just think our type of sprayer is better for outdoor use unless we’re working in truly gutted indoor spaces. We’ve seen other folks tape off the entire room and spray every last inch of woodwork, but this room has four different doorways to other spaces that we’d need to fully block off (any paint seepage onto the wood floors in the dining room or living room scared us greatly) and we worried it wouldn’t save much time if it took us 10 hours to tape everything off anyway.
So John and I just chipped away at it over the past five days (Burger refused to lend a paw – that diva). Thankfully we found an awesome stainblocking primer that has no-VOCs but actually works so I could join in on the fun (some others gave us wood-bleed like you wouldn’t believe, but this one was awesome). It’s called Kilz Premium – just make sure you get the one with the label that says “no VOCs” and “stainblocking” since they have a bunch of different types. As for the paint, we’re still using Simply White (in semi-gloss) which has been our choice for all the trim and doors upstairs and in other rooms that we’ve tackled downstairs (like the foyer and the half bathroom). But we’ve got a round-up of other popular white paint colors you could choose from.
Gif time, baybay:

Two coats of the Kilz stuff followed by two coats of paint took us about 12 hours. The first coat is always the hardest (for some reason it just takes longer to get into all of those nooks and crannies and around all of those edges the first time, but your brush or roller seems to glide over them more easily as you go). So it was probably around 4 hours for the first coat and then 3 for the second coat and then 2.5 for the following two coats.
As for the application method, a regular old 2″ angled brush was what we both used to tag-team the trim as well as those window frames, and then we used a roller along with a brush on the paneling (a brush got into those crevices and then a roller could be passed over the fronts of each board to smooth them out). Here’s an example of what I did with a brush, and then John rolled the flat parts so it all blended in. Update: If your trim or paneling is super shiny and lacquered we always recommend sanding and using a liquid deglosser before the priming step. In our case it was chalky and dry wood without a thick layer of sealer, so we went right to primer and paint, which held nicely.

Now I’m like Jasmine rolling in there singing A whole neeeeeew world.*
*And then I see the intercom and turn into Ariel belting out You want thingamabobs? I’ve got twenty.
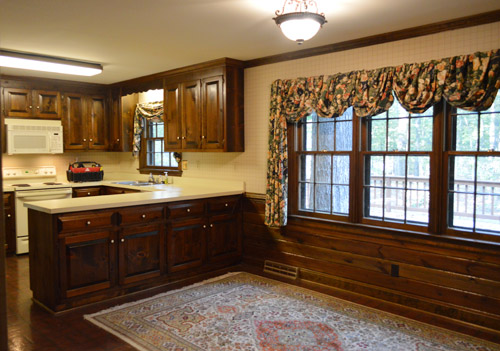
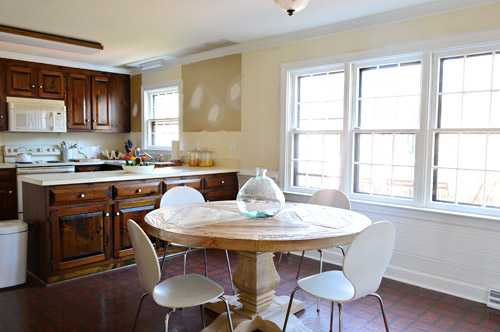
This corner. Huuuge difference.
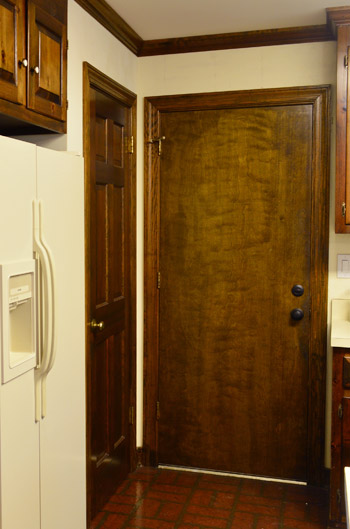
The door straight ahead leads out to the garage, and the one on the left is the pantry. Someday it would be awesome to have a paneled door that leads to the garage, but it’s wider than the other doors in our house (and needs to be fire-safe) so we might have to order one or miraculously find it at the ReStore or something. For now the white paint is a welcome upgrade.
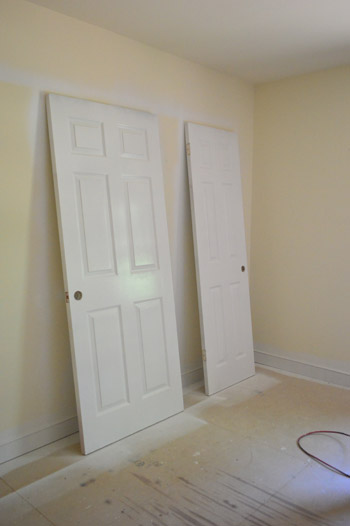
We didn’t have to paint the pantry door since we had one upstairs in our storage room that we sprayed white back when we sprayed the other doors up there but had never rehung (it was the between our bathroom and sink nook, but it blocked things off so we’re happier without it). As for the garage door, we could have removed it and sprayed it outside, but that would have meant an exterior door being off the hinges for a few days (drafty + not secure) so we just painted that one in place. Still need to replace those brass hinges though…
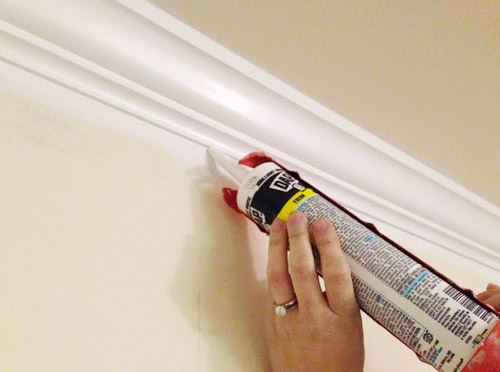
Oh and a quick tip for anyone tackling wood trim, paneling, or crown: it’s not unusual to see all sorts of dark cracks that need to be caulked after you get some primer and paint going on. Something about dark wood tones hides those cracks and shadows, but then when it’s painted they stand out. So our advice is to look for those after one or two coats of primer (you won’t be able to see them before you apply anything, since they only pop out at you as the wood gets lighter) and then fill ’em with paintable caulk (we like paintable Dap window & door caulk in white). As long as you get ‘er done before your final coat of paint, it should go over them for a nice seamless finish.
So now our to-do list in here looks a little something like this:
Remove wallpaperMove fridge cabinet forwardRemove upper cabinets on window wall to prep for open shelves
Reinstall crown molding(you can read about how we did those first four things here)
Prime & paint the pantry and the door to the garage
Prime & paint the trim, crown molding, & baseboardsPrime & paint the paneling- Patch and paint the ceiling
- Replace the florescent light in the cooking area and the pendant over the sink
- Replace and center the light over the dining table
- Paint the walls (you can read about the color we’re leaning towards here)
- Hang floating shelves on the window wall
- Possibly craigslist the existing microwave and get a countertop one (the we can put in the pantry?) and add a cheap range hood (we’ve seen some like this for $20 on craigslist) to lighten up that wall?
- Paint the cabinets (you can see the colors we’re leaning towards here)
- Update the old cabinet hinges and knobs
- Get a rug for eat-in area? Possibly install peel and stick tiles everywhere?
- Curtains for windows?
Psst – To read why we’ve chosen these steps for Phase 1 (for example, why we’re painting the cabinets, why we’re not going to attempt to paint the linoleum, and what’s on the agenda for Phase 2) there’s lots of background info in this post for ya.
There are still a lot of uncrossed items, but we’re so excited about how far this room has come already! What were you guys up to this weekend?

Heidi says
It’s looking a ton better!! Can’t wait to see where it goes from here! We hated our builder grade cabinets so we transformed them with some bead board and paint – for $200!
http://www.krusesworkshop.blogspot.com/2013/11/house-tour-dining-roomkitchen.html
YoungHouseLove says
That’s amazing Heidi!
xo
s
ashley says
As soon as I read the title I stated one of my cheer leading routines in my head. Did I just age myself? :)
Love the white updates. Its coming along!
Nichole says
SAME HERE!! lol
Nichole K says
Haha me too! Middle school dance team FTW!
Tasha says
It looks awesome! What a nice refreshing change. Why did you leave the spots where the cabinets were unpainted?
YoungHouseLove says
We didn’t paint the kitchen walls yet, so that’s just what the wall looked like after we removed those cabinets (we linked to that post in the bulleted list for ya). Can’t wait to get those gone!
xo
s
Kelly says
I thought the same thing until I re-read the post and realized you only painted the trim! That’s how big a difference it is!
I’m working on our powder room right now and turning the cream beadboard and maroon trim into white has been so room changing. Always amazed at what a little primer and paint can do.
YoungHouseLove says
Thanks so much Kelly! And good luck with your powder room!
xo
s
Laura @ Rather Square says
Looks great (as usual)! Question: Did you need to do any extra prep work on the wood areas, especially the paneling on the wall? I’m working on a blog post about how I painted a wood-paneled room and the prep I did, and I know in the past you’ve posted about other wood paneling you’ve painted over. Just curious if this time you needed to do any sanding etc beforehand.
YoungHouseLove says
If it’s super shiny and lacquered we always recommend sanding and using a liquid deglosser before the priming step. In our case it was chalky and dry wood without a thick layer of poly or anything, so we went right to primer and paint.
xo
s
Heather says
I just thought I would pass along some information we learned the hard way a few months ago. When my parents bought a 1970s condo the original paneling in the living room was killing me! So I convinced them to let me paint it as a housewarming present to them. We washed the walls, lightly sanded them, wiped the dust off and applied a layer of Kilz stain blocking primer. Before we made it around the room, we noticed a brown stain seeping through the paint. We think that we opened the stained pores when we sanded the walls. We ended up trying 2 other stain blocking primers and a coat of latex paint (test swatch) before we finally found our savior, A Sherwin-Williams, Alkyd (oil based primer) that cleans up with water. I’ve never been so happy to see a white wall! The best part is, my parents loved it so it was all worth it in the end!
YoungHouseLove says
Oh no! Thanks for sharing that tip Heather! I think you’re right about certain stains being “unlocked” and bleeding out. So frustrating! Our walls were sort of matte and chalky without much sealer, so it was really different than painting the paneling and trim in our last kitchen (that one bled like crazy!). Alkyd paint is a miracle!
xo
s
Sara V (NC) says
Ooh It looks so bright and airy now! My mother in law has a house VERY similar to yours and I’ve been trying to talk her into painting her trim white for years. Maybe if I show her this post it will inspire her.
Laurie says
Such an improvement! I feel like I could breathe in the new space, all that dark was suffocating. Can’t wait till you do the cabinets now :)
leah says
Okay, I thought that panneling was ug-ly! Beyond the point of beong able to be fixed by paint…. but wow!!! I love it painted white! So country-chic. Please keep it forever!
YoungHouseLove says
It’s so pretty right?! I’m in love with it now that it’s white! Even at breakfast today Clara said “um, mom? when are you painting the brown wood in the living room? let’s do that soon.” – haha!
xo
s
Sugar Cookie says
FYI, “A Whole New World” is sung by Aladdin and Jasmine, not the Little Mermaid ;)
YoungHouseLove says
Yes! All fixed! Sorry for the Disney princess mix-up (don’t tell Clara – she’d roll her eyes at me).
xo
s
Michelle Kersey says
Lol. You can claim preggo-brain on that one ;)
The room looks a billion times better. Such a breath of fresh air!!!!!
Oh, what about attaching trim to the garage door to give it a raised panel look?
YoungHouseLove says
Love that idea!
xo
s
Erin says
It’s OK Sherry–when I saw you wrote Jasmine, I actually thought “It’s not Jasmine–it’s Ariel who sang that!” But I was wrong. I think it’s easy to confuse because both movies had popular songs involving the word “world” and were around the same era. Anyway… just wanted you to know I thought the same thing :-)
YoungHouseLove says
Haha! Thanks Erin!
xo
s
Laura says
Holy Cupcakes! What a difference! Isn’t it amazing to look at it in photos as it was and wonder at the difference?!
Katie C says
Pump up THAT KITCHEN, pump it up, pump it up! Way to start off my Monday!! I was laughing whilst scrolling through this awesome musical update. Loving the direction!!!
YoungHouseLove says
Haha!
xo
s
Eric @ AddSomeCharacter says
Wow, the transformation of this room is looking great. Keep it up!
Beth says
Isn’t a whole new world Aladdin???
YoungHouseLove says
Yup! All fixed!
xo
s
Wendy @ New Moms Talk says
Wow! Beautiful! Way to go Phase 1!
We burned cut down limbs, branches, etc. for 6 straight hours on Saturday. 8′ flames roaring safely in the fire pit. The hub and I swapped off every 90 minutes to keep the fire person safe.
Sunday I sawed for another 90 minutes while the hub and daughter slept. Those piles should burn in about 60 minutes…maybe 120 based on Saturday’s burning.
We also decided where the fire pit area will end, so now we have about 100 or more pavers in great condition to dig up. If anyone on the Olympic Peninsula wants them, feel free to shout.
YoungHouseLove says
Sounds awesome!
xo
s
Rosemary says
It almost looks like a different house! The light is amazing! When we bought our house someone had painted our kitchen cabinets blue.. like regular old crayola crayon blue and it sucked up the light. We painted them white and it felt like a new room! I can totally appreciate the change.
Bethany says
I think you’re mixing up Jasmine and Ariel ;)
I’ve been meaning to ask this for awhile – when you caulk between crown/baseboards and the wall, how big is the hole in your caulk gun, and how big is the bead you’re putting out? We just re-trimmed our entire house, and there are some areas that could use filler – but every time I try, I end up with too much caulk and a wavy line. Do you have any tips? Or, do you just end up touching up the wall paint when you’re done with the caulk?
YoungHouseLove says
Ah yes, there was a princess mix-up! As for your caulk question, we probably cut an opening that’s half as big as a pencil eraser, then we squeeze a line of it out along the baseboard/trim/molding, and then we smooth it with a finger (dipped in water to make the caulk stick to us less). We haven’t painted the walls or ceilings yet for this reason (now we can paint over the caulk for a hopefully seamless look). Hope it helps!
xo
s
Bethany says
So how annoying is it when you make a mistake in the blog and everyone comments on it? ;)
Thanks for the caulk info. Maybe I’m just squirting too much – it always turns out as such a mess!
YoungHouseLove says
Oh yeah, it’s messy. I get it all over my pants and face and it’s in my hair at the end of things. It does help to have someone else on hand to hold the cup of water and to hand you rags or paper towels to do sort of a quick half-cleaning as you go, and then you can do the full cleaning at the end when you’ve worked your way around the room.
xo
s
Pam the Goatherd says
I’ve been hoping you’ll do a blogpost dedicated to caulking. When we replaced our bathtub we had to rebuild a wall and a half wall, both of which have trim around the edges with gaps between the wall and the trim. Every time I have tried to caulk anything I’ve always ended up with a goopy mess – swoopy lines, too much caulk, and caulk-covered fingers. I’m waiting to caulk in that bathroom until you show me how to do it properly!
YoungHouseLove says
Thanks Pam! We’ll have to try to get that on video or at least photograph the steps as we go next time!
xo
s
hollyloo says
i love how the glass jar turns into cacti during the animated gif!!
the room looks wonderful. can’t wait to see what else you do. also, the garage door looks like a great place to hang some clara art!!
YoungHouseLove says
Love that idea!
xo
s
caroline [the diy nurse] says
My eyes!!! Ah the power of paint :)
Michelle @ Ten June says
Oh but I really miss those curtains…! Looking fab in there, guys. Can’t wait to see what you have up your sleeves next!
Heidi says
Can you do a post someday on how you paint windows? I never know if you should paint the insides or if the paint is going to flake off when the window is raised and lowered. Lots more details and close-ups would be really helpful!!
YoungHouseLove says
Sure! I wish I had taken some details as we went! We never paint those slides (inside) since you’re right, the paint will just get shaved off – but they’re usually just all one color like silver so it’s not too bad once you paint the wood panes white. It really depends on your type of window how you paint those panes though. Ours are wood (even the millions are wood as well as the frames and sills) so they take primer and paint well (you want to sand and degloss if yours are shiny though). That will make the hold nice and strong assuming yours are wood. If they’re vinyl, I’m not sure they take paint as well. Anyone have tips for Heidi for vinyl windows and panes?
xo
s
Sylvia says
HOLY MOLEY! looks SOOOOOOOOOOOOOOOO mugh brighter & lighter! love it!
p.s. a whole new world was Jasmine I think. on the magic carpet ride? I only know because I was singing the same tune after finally getting a dishwasher a few weeks ago lol
YoungHouseLove says
Yes, all fixed! Sorry for the Disney princess mix up!
xo
s
Ashleigh P says
LOL! I spotted the same thing. Gotta watch out for us Disney nerds! :) Love, love, love how bright the kitchen looks now. If only I could talk the hubs into painting our paneling…
Renee says
I love it! Great transformation and so much lighter.
Kristin says
Looks amazing, guys!
Christi Davidson says
Hi. About that intercom system… As I was redoing rooms (painting mostly), I removed my individual room intercom speakers. And then, the big day came — removing the “queen bee” from the kitchen. It was fairly easy, and removing those things made a huge difference, taking my house out of that 1980s time warp.
YoungHouseLove says
Love hearing that!
xo
s
Tara says
It looks so much better, guys!
SherDog, I’ve got to razz you a little bit though– A Whole New World is from Aladdin. Ariel sings Part of Your World– that’s where she talks about thingamabobs, whozits and whatzits [galore].
:)
YoungHouseLove says
Haha, thanks Tara! All fixed! Don’t tell Clara I was such a doof about the Disney princesses…
xo
s
Ashley@AttemptsAtDomestication says
It looks so much lighter and brighter! Looking good!
Maria says
So much better already! Every time I see your kitchen I want to move one of the peninsula cabinets against the wall and make the other one an island as an interim improvement! But I guess that would only work if there is flooring under the peninsula, oh well!
I have hardwood in my kitchen and even though it isn’t necessarily recommended for kitchens I love it. Just throwing it out there since a good flooring company can stagger and match up the wood floors between your adjacent rooms and your kitchen. I know several people who’ve had it done and you cannot tell at all!
YoungHouseLove says
Yup, there’s no flooring under there, but for phase 2 when we eventually get new cabinets and move these out to the garage for John’s workshop we might reconfigure things (we’ll get a new floor then too)! John things an island would work too, so we might have to make one out of cardboard when we get to that stage so we can picture it!
xo
s
Melanie says
Yay!!!!!!!
MaNell Hembree says
I never noticed that the wainscoting had horizontal planks before (when it was darker). That feature just pops with the white paint!! Oh, I looooooooove it!!!
YoungHouseLove says
Wahoo!
xo
s
Erin J says
amazing what a little (or a lot) of paint can do!
Sarah R. says
Can’t wait to see how you decorate the new house for the holidays. So many more rooms and spaces to decorate!
YoungHouseLove says
I’m so excited! I want to make this a mini version of The Home Alone House with wreaths on every window! Haha!
xo
s
Nikki says
Holy cow! It’s so much brighter. I’m always amazed and what a difference just some paint can make!
I started tackling some wallpaper this weekend. It came off really smoothly…but then I discovered the even older wallpaper underneath it! Starting to feel your wallpaper pain.
YoungHouseLove says
Oh no! Godspeed Nikki!
xo
s
Blair {Blair Blogs) says
This looks absolutely beautiful. Clearly it was a ridiculous amount of work–but it paid off, it looks ridiculously good!
In other news, did you get a new ring? In the last photo it looks different! (It’s weird that I even know remotely what your ring looks like to ask…blame it on all the DIY photos with your hands included!)
xo,
Blair
YoungHouseLove says
Nope, same ol’ ring that I lurve. Maybe it’s the angle? There’s a shot of it (when it’s actually clean, haha) from our honeymoon dayz in Alaska back in this post :)
xo,
s
Andrea says
wow I just checked for an update like five minutes ago xD and BOOM new kitchen! Absolutely love this transformation! Great job, guys! Can’t wait to see where you end up with this baby (also makes me want to jump and get my own place so that I can start transforming my surroundings to MY liking, mine mine mine)
xo Andrea
Nicole says
Looks great! Nice and light and airy now. Makes me really want to get going on my kitchen also :)
Theresa M says
The power of paint! And you’re so brave to start this before the holidays! I, on the other hand, am chicken and will not be tackling the painting of kitchen cabinets in 2014. (debating whether or not to paint the interiors… Any advice on that front?) But yes, your kitchen looks like a whole new world.
YoungHouseLove says
We didn’t paint the interiors in our last kitchen but very cleanly taped them off so there was a crisp line. We liked that outcome! Hope it helps!
xo
s
ami says
LOVE IT! Question – I’m also pregnant, and we’re about to tackle some caulking in the nursery, but my husband isnt as handy… is the paintable caulk you used pregnant-lady friendly, so I can do all the caulking? Thanks in advance, love you guys!! I’m so excited to be due at the same time as you :)
YoungHouseLove says
We’re a little paranoid about that stuff, so because the caulk is low-VOC it’s not too bad, but it’s not VOC free, so John volunteered to tackle it (only took about 20 mins so I played upstairs with Clara, and then we aired out the room while it dried and ran some errands). That’s my hand holding it in the pic, but that was one of those retroactive “oops we didn’t take a caulking picture photos” so I just jumped on the stepstool and held it while John snapped that shot late last night.
xo
s
Leanne says
You must be ” Walking on Sunshine”. It is so much brighter! Great progress; look forward to seeing more.
Mrs. Money says
Wow. *stunned*
It looks amazing! I love white trim.
Gayla says
Holy Smokes Batman! This almost makes me want to go home and find some trim to paint… almost.
Lena says
I love how much brighter and happier the space looks now. But I love painted trim so I’m probably biased.
I did do the stained trim when I re-did it in my old house, but later I ended up painting it and replacing all the flat panel doors with molded ones so then painted all the trim white and wondered why I didn’t do that to start with. Would have been so much easier than the staining and saved me so much time and my paint color choices would have grown a lot too.
alisa d says
Why go through all the work of painting the cabinets if they are in rough shape & you will be replacing them down the road?
YoungHouseLove says
You can check out the link to that post at the bottom of those bullets, but we’re actually planning to reuse the cabinets in the garage to make a workroom for John, so a little paint will make the kitchen nicer and then help to update the garage while they provide a ton of storage for us. Might not be worth it to everyone though!
xo
s
Megan @ Rappsody in Rooms says
Wow!! What a change. Gosh white trim just wins every single time. It opens up a space so much! I’m loving that kitchen way more now!
Allen says
Chalkboard paint on the door to the garage! Last thing you see before you leave the house = perfect place for reminders and lists!
YoungHouseLove says
That’s a fun idea!
xo
s
April says
I must say, you guys are on fire lately. I vote for axing the nipple light next. The semi-flush mount makes it all the more cringe-worthy… like it’s going to droop down and touch you… ** shudders **
YoungHouseLove says
Haha, thanks April! I agree. Boob light’s gotta go!
xo
s
Jennifer J says
Wow, what a big, lovely difference! I really want to wash/paint our brick fireplace but am scared since there is a black film that has been left from usage. Won’t it ruin any paint job, when used?
YoungHouseLove says
Hmm, I would ask about that black film at a fireplace shop. Maybe it’s not venting correctly? John’s sister painted a wood burning fireplace white and years later it only needed a few touch ups from where the kids had scuffed it by slamming toys on it, but there wasn’t any soot or anything. We had a gas fireplace that we used all the time after we painted it and that held up well too! Good luck!
xo
s
Kelly says
We painted our fireplace and had the same issue. Prior to painting we had it cleaned and checked out and there weren’t any issues so I just assumed it was how porous the brick was.
We painted the exterior brick in the same color as our wall paint and it transformed the room. Just be sure to get a cheap brush to paint since you have to basically ruin it to get the paint in all the crevices. I also used a nubby roller cover made for painting brick.
It’s been more than a 18 months and it shows no signs of soot and we use it at least twice a week in the cooler/colder months.
I shared how I did it here. Hope it helps. http://www.thecentsiblelife.com/2011/03/how-to-paint-a-fireplace-diy-tuesday/
YoungHouseLove says
So helpful Kelly! Thanks for sharing that for Jennifer!
xo
s
Crystal says
Love it!
I am trying to talk my husband into letting me paint the kitchen and bathroom cabinets white and he doesn’t understand why I’d want to “cover up the wood”. So he says no! It is ugly, cheap wood cabinets! I think white would look soo nice! I also want to try that countertop transformation kit from Home Depot. I think it would make our spaces look brand new!
Emily says
Husbands are the worst. Always delaying progress.
Tall Tee says
John and Sherry have a really equitable process whereby they have to be in agreement before introducing something to their home–but in my house it’s the exact opposite, lol. My husband has no design savvy whatsoever, so our agreement is that the inside of the house is mine and the outside (lawn, landscaping, etc) is his. It’s freaking AWESOME to have that much freedom, lol.
Laura Jinkins says
We are moving at a much slower pace than you, but we are doing some of the same things in our house — two weeks ago, we ripped out a wooden cabinet/open shelving thing that separated our living and dining rooms (so much better with it OPENED UP like that) and we painted a paneled wall that was 1960s’ stain. Eventually we’ll replace the 1960s’ ceiling tiles with bead board (like you did your porch. I can’t wait to see how everything looks when we finally finish!
YoungHouseLove says
Sounds awesome Laura! So funny that we’re on the same track!
xo
s
Jeni T says
Looks great! Instead of replacing it, chalkboard paint on the garage door might be nice since it is flat panel. Maybe after you paint the cabinets a lighter shade and can reintroduce darker accents. :)
YoungHouseLove says
That’s a fun idea!
xo
s
Inga says
Hi guys. I am curious about any special things you did to paint the window trim. Did you just tape off the glass and use a razor to trim the tape right up to the wood? Thanks for the blog. I have been following for years but my husband and I just bought our first house. It is a ton of work but worth it!
YoungHouseLove says
We actually didn’t tape it off and just razored the slivers that we got on the window. We do our best not to be super sloppy on the glass (especially with primer since that’s a pain to scrape off) but when we cut in as cleanly as possible a little line of paint isn’t hard to razor off later.
xo
s
betty says
i’m assuming the windows are older. are you just going to paint them all white and keep them, or are you planning on upgrading to more efficient windows (not saying there is anything wrong with the current ones).. just curious.
YoungHouseLove says
We’re so grateful these windows got an a-ok from the inspector (this house isn’t nearly as old as our first two), so they’re here to stay. We love that they’re wood and have all those pretty panes (to replace them with anything other than vinyl would be super pricey and we just love the charm of wood ones).
xo
s
Jennie says
You are so fortunate that they are in good shape! We just replaced an entire house-worth of windows. All I can say is OUCH. At least the air doesn’t blow through the nice, new ones! It is our first winter in a long, long time with tight windows that don’t leak all of our heat :)
YoungHouseLove says
Oh man, that sounds rough!
xo
s