- The 12 Best White Paint Colors
- Benjamin Moore Edgecomb Gray
- Benjamin Moore Simply White
- Sherwin-Williams Pure White
- Sherwin-Williams Extra White
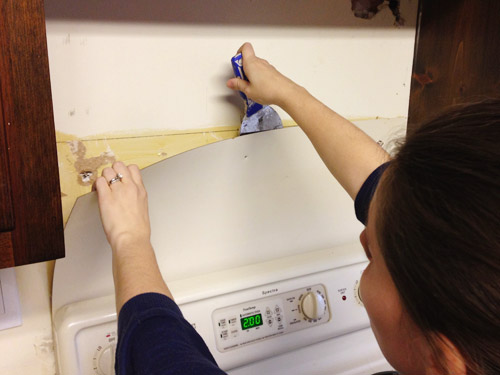
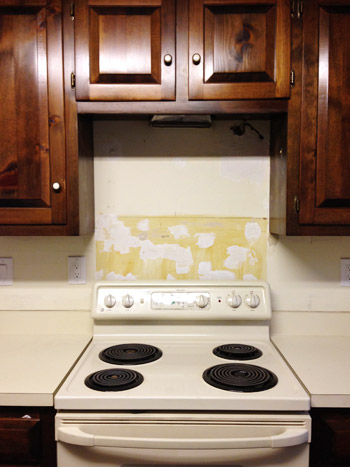
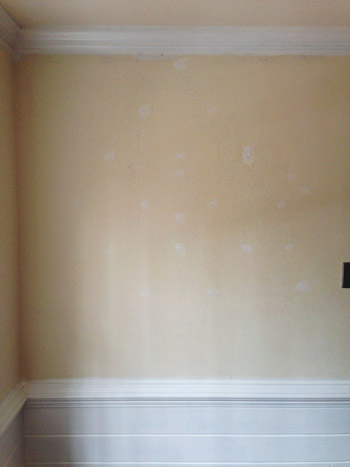
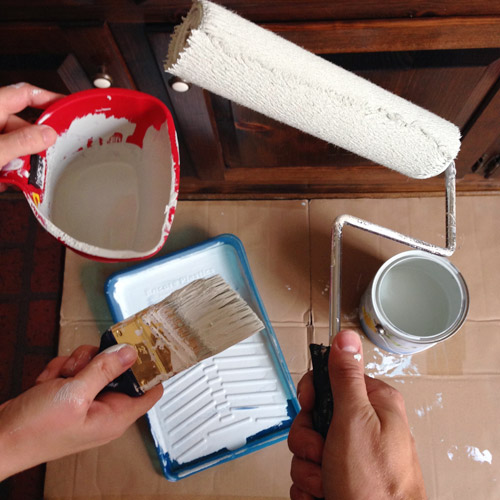
- The areas behind the cabinets that we took down had never been primed or painted, and it’s always good to prime drywall before painting it.
- Walls that haven’t been painted for several years may soak up more paint (as we experienced when painting Clara’s room) and we’d rather it soak up extra primer instead, since it’s cheaper than paint (one coat of primer + two coats of paint is almost always cheaper than three coats of paint because you usually need to buy more than one gallon of paint for more than two coats).
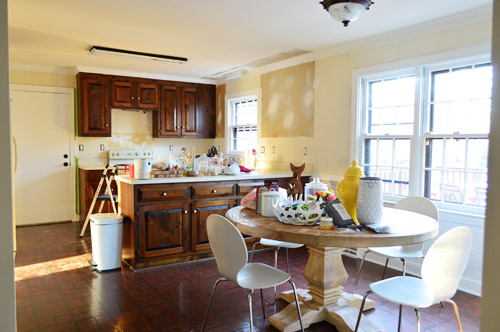
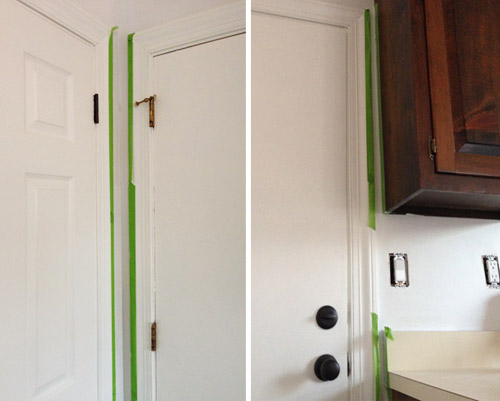
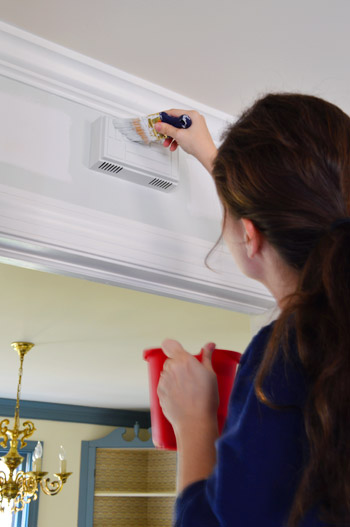
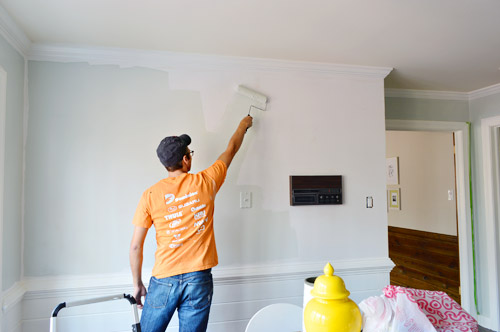
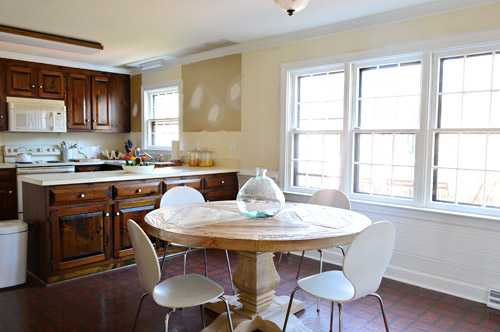
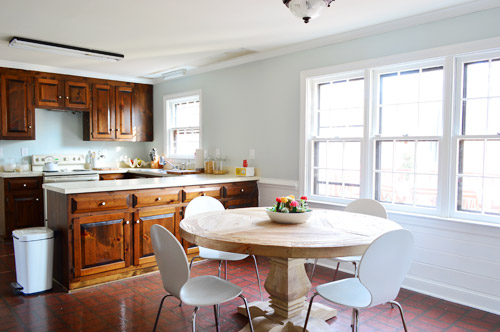
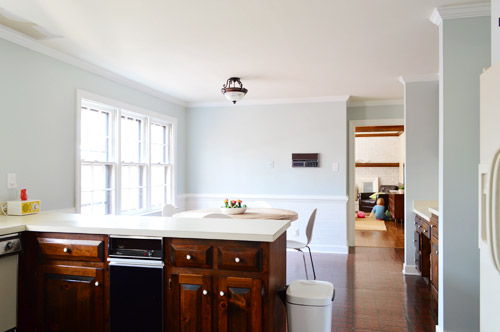
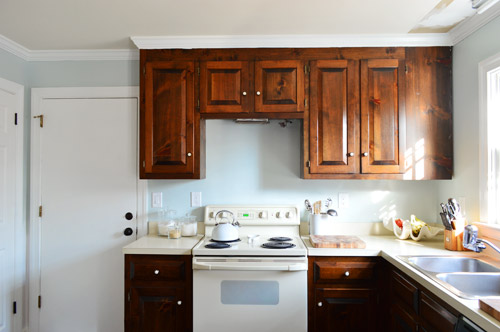
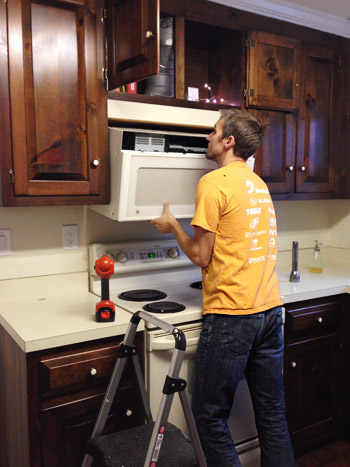
Remove wallpaperMove fridge cabinet forwardRemove upper cabinets on window wall to prep for open shelvesReinstall crown molding(you can read about how we did those first four things here)Prime & paint the pantry and the door to the garagePrime & paint the trim, crown molding, & baseboardsPrime & paint the paneling(you can read about how we did those last three things here)Prime and paint the wallsRemove the existing microwave (craigslist it?) and get a countertop one we can eventually install in the pantry- Install a cheap range hood (we’ve seen some like this for $20 on craigslist) to lighten up that wall
- Patch and paint the ceiling
- Replace the florescent light in the cooking area and the pendant over the sink
- Replace and center the light over the dining table
- Hang floating shelves on the window wall
- Paint the cabinets (you can see the colors we’re leaning towards here)
- Update the old cabinet hinges and knobs
- Get a rug for eat-in area? Possibly install peel and stick tiles everywhere?
- Curtains for windows?

Laura @ Rather Square says
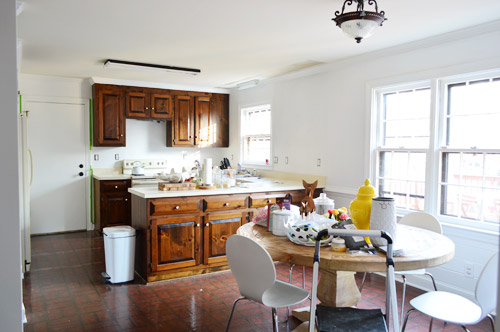
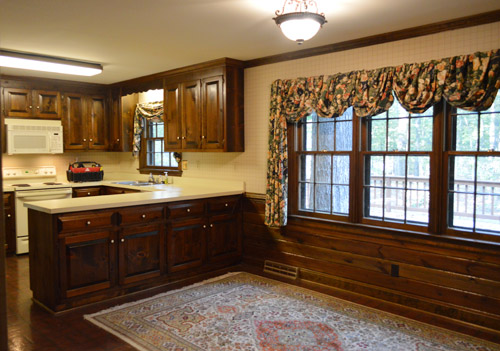
Great transformation – with the upper cabinets removed and that long wall painted all one color, it really looks bigger and brighter. I love the color too! Just enough of a contrast with the white paneling below.
Speaking of paneling, we were inspired by your current and past painting-wood-paneling projects, and we tackled an entire wood-paneled room in our own house recently. It really helped referring to all the info you posted about your own experiences, so thank you!
http://www.rathersquare.com/2013/12/painting-wood-paneling-knotty-or-nice/
YoungHouseLove says
Wahoo! Looking good Laura!
xo
s
Shannon says
Great progress! Random question – is your kitchen table sealed wood? If not, how do you take care of it?
YoungHouseLove says
I think it might have some matte wax on it so it looks and feels raw but doesn’t stain, at least so far it has been great! We heard from someone who spilled red wine on hers and dabbed it up and in the morning it was gone!
xo
s
julie says
Looks wonderful, very crisp and refreshing!
Amy says
Wow!What a great change.
Mrs. Money says
Ahh!! I love it!!
You guys are making me want to repaint a room!
Gem says
Wow, this looks great! I can really picture it now. I’m glad you’ve decided to go for coloured cabinets as opposed to white ones in this kitchen (for phase 1, anyway), it’s so much lighter than your other kitchen so I think it works. And that floor looks so much better with the new wall colour. I’m a fan!
Katie J. says
Amazballs!
jordan says
you two rock! I was in anticipation thinking a baby reveal was coming today. This week? (fingers crossed)
YoungHouseLove says
This week we find out! Hoping to share with you guys by Friday if we can tell the whole fam before then :)
xo
s
HeatherB says
I need a “like” button…
Meredith says
It’s incredible what a fresh coat of paint can do to a room. Looks great!
Allyn says
Very nice! But I’m surprised that you left the intercom and (what appears to be a) phone jack on the back wall. Does the intercom work/do you intend to keep it? And do you plan to use the phone jack in the future?
YoungHouseLove says
We have a plan to build a nice big pinboard over that whole area, so it’ll be framed out and covered by the end of Phase 1!
xo
s
Annaliza R says
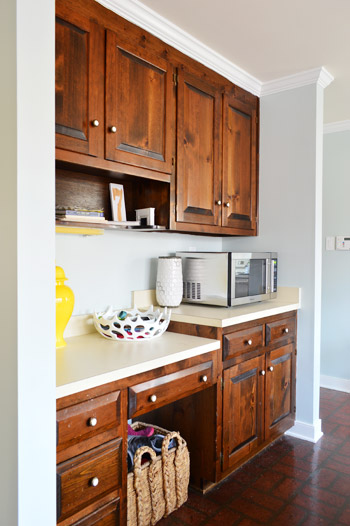
Where did you get white ceramic bowl and floor basket pictured with the new microwave? Love them!
YoungHouseLove says
HomeGoods! That’s our full-of-junk bowl! Gotta have one of those in the kitchen, haha!
xo
s
Mrs. Money says
Is today the big day for finding out what the baby is? :)
YoungHouseLove says
This week! Wahoo! Hope to reveal to you guys by Friday assuming we can get the word out to the family/close friends before then :)
xo
s
Cassandra says
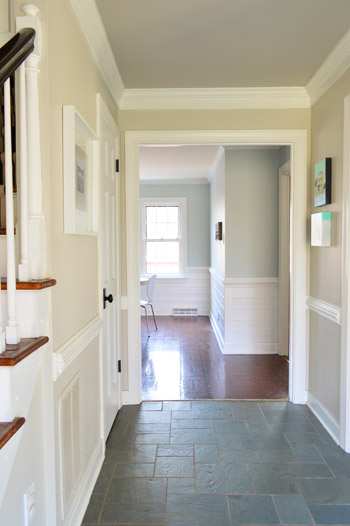
I love how the Nelson blue flirts with the slate tiles in the foyer!
YoungHouseLove says
Haha!
xo
s
Jodi says
it looks fantastic! and the new wall color makes me not hate the dark cabinets. they actually look pretty good. also? i adore that table.
YoungHouseLove says
Aw thanks Jodi!
xo
s
Jess says
I really love how nicely the new wall color goes w/ the tiles in your foyer :) I know ya’ll haven’t made a final decision about those tiles yet, but it must be nice that in the meantime, they look a lot more cohesive!
Jessaca says
Will the range hood be in phase 2? If so, I’d go for something pricier and read reviews to get something of quality. Cheap is cheap sometimes…I’m learning the hard way.
YoungHouseLove says
Oh yes, we’re planning no other major appliance purchases until Phase 2 when we can research and invest in long-term things. For now we’ve found a $25 range hood on craigslist that we can use for the time being and craigslist for $25 down the line when we replace it for Phase 2. More details when we pick it up and install it!
xo
s
Jess @ Little House. Big Heart. says
I’m loving that color! I’m planning on going navy in our kitchen soon, but your light, bright, and airy kitchen (sans cabinets and floor) has me rethinking it!
And speaking of the intercom… what’s happening with that?
YoungHouseLove says
I’ll add an update to the post for you guys about that! Sorry we forgot to mention it!
xo
s
Ana Silva says
I love that color! Great choice.
Lisa says
The view into the kitchen from the foyer shows how nicely the new kitchen wall color plays off the foyer tile. Great job!
Karen L. says
Love the new paint color. I still think I need to repaint our dark dining room a light color like yours! One question (and maybe I missed it already): why don’t you take down the old intercom fixture if you’re not going to use it? Maybe it’s too difficult to do or something. Since you usually say to “ignore it”, I was just wondering.
YoungHouseLove says
We’re not sure if we’re going to retofit that with another system (maybe that plays an ipod in each room or something) so for now we’re planning to cover that whole wall with a nice framed out pinboard or something – so it’ll be hidden but the wiring will still be there for a future conversion.
xo
s
Lisa @ Double Door Ranch says
What a breath of fresh air! Looks so much better!
Over the long weekend, I kept moving on my craft room. I have one coat of Edgecomb Gray on the walls so far and it is reading so. gray. Its amazing how even a big swatch can have such beige undertones but on every surface read straight-up gray. I’m gonna go with it and keep layering things in. Hopefully it works out!
YoungHouseLove says
Congrats Lisa! I bet it’ll look gorgeous in the end!
xo
s
Kara says
Hey – that Nelson Blue makes the slate flooring in your foyer looks better too, double winner!
YoungHouseLove says
Wahoo!
xo
s
Kara says
Ha! I’m just repeating what other are saying now.
Robin @ Happily Home After says
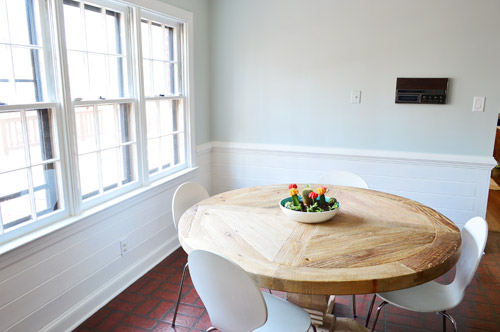
Super big ahhhhh. I definitely see a modern Scandinavian feel developing in your kitchen which is what I love and am working towards in mine as well. The bowl of succulents really pops now on the table, funny how small details can become big elements when the background color changes. I like a fresh aire blue in the kitchen, I’ve used BM Spring Mint which is also pale / “just there” … funny, I recall hearing on “Design Star” once that blue is an unappetizing color and therefore not one that works in a kitchen. Just proves that there’s no “rule” that works all the time!
HeatherB says
I was going to comment on the succulents and cacti, too! One of the first things I noticed. Good job, Sherry! They are alive and beautiful.
YoungHouseLove says
Wahoo!
xo
s
Bonnie @ The Pin Junkie says
You’re making great progress! Removing the wallpaper and painting has already made a huge difference! The updates give the kitchen so much more light. Really love it! Want to come do my kitchen?
YoungHouseLove says
Ding dong. It’s me!
xo
s
aNJFLer says
It looks great. The light blue paint makes the room look like it’s about 100 ft long! Taking out the cabinet to the right of the window was exactly the right choice too. WOWZA
Myra says
I LOVE your table…where is it from?!?
YoungHouseLove says
Thanks Myra! Here’s that post for ya! https://www.younghouselove.com/im-still-laughing-about-blardware/
xo
s
Katie says
I know you’d mentioned the slate in the foyer is in rough shape, but now with the blue in the kitchen, it really compliments it! Maybe you can replace it with something in a similar grey-blue?
YoungHouseLove says
Thanks Katie! I think we’ve been leaning towards big dark tiles (heated, wahoo!) so we’ll have to bring home some samples when it comes that that phase and see what we like! We want to run them into the kitchen too, so it’ll probably be in a year or two but I can’t wait!
xo
s
Megan @ Rappsody in Rooms says
Wow! It is a HUGE difference! Way to just bust out that painting over the holiday weekend! It looks great!
YoungHouseLove says
Thanks Megan!
xo
s
Lija says
Looks great! A huge improvement. But are you sure you want to paint the cabinets still? I actually like the grain of the wood now that the walls and trim have been painted. If it were me (and I know you’re not asking) I would replace the flooring and countertops before painting the cabinets, I think. But I’m sure they will be gorgeous whatever you do, as always!
YoungHouseLove says
Thanks Lija! If you check out this post, you’ll see why we’d like to replace them (at the bottom there are detail pics for ya, and they’re pretty gnawed on up close).
xo
s
Kara says
Question about cutting in – I have the short handled brush as well and have attempted to cut in without taping off. But I find that there are some bristles that stick out and just inadvertently paints the trim or whatever edge that it’s next to. What do you do about those, cut them off?
YoungHouseLove says
Oh yes, I’d just trim those off if you see them. Usually I try to keep them happy (yes, I try to keep my brushes happy) by washing them well and letting them dry flat on the counter so the bristles hopefully stay in alignment for the most part.
xo
s
Sapphira says
Sherry, maybe sometime you could do a post on how you guys wash your brushes and keep your painting tools in good shape? I never seem to get the job done right and end up having to buy new brushes all the time! I bet a lot of us could benefit from that (and could also be a great stockpile post for when the Bun comes along and you’re super busy). The kitchen looks great btw! That breakfast nook shot makes me want to have a cup of coffee and gaze out the window pretending I actually have a breakfast nook.
YoungHouseLove says
Thanks Sapphira! I just use water for anything latex (even this primer) and wait until the water runs clear. Probably takes 5 mins per brush (if you only take 1-2 mins it’s not really clean and get crunchy and firm when it dries). For oil-based I use mineral spirits, but that’s pretty rare these days, so usually it’s just water and time. Rinsing it over and over again. I should make a quick video for you if I remember!
xo
s
Sara w says
Wow! It looks gorgeous! That blue is so bright and airy. I think you’ve already said before, but where did you get your table? I love the chunky pedestal, and the top is so pretty!
YoungHouseLove says
Thanks Sara! Here’s that post for ya: https://www.younghouselove.com/im-still-laughing-about-blardware/
xo
s
Stacey says
So bright and cheerful!
Lisa says
Is the color a Benjamin Moore? Very pretty!
YoungHouseLove says
Yup, and the finish is satin.
xo
s
Pamela T says
Looks awesome! the window/trim/paneling paint job you guys did totally helped motivate me and my manfriend to “get on that already” with our front picture window. it has 20 panes, and is basically floor to ceiing. After 3.5 years I finally have the confidence in my painting skills to tackle such a daunting process. I am one coat of primer, and one coat of paint down. probably two more coats of paints- takes about two hours for one coat- and i kept thinking of your comment about how much ITS WORTH IT!
while i was tackling that project in the living room, the dude was installing shoe molding in the family room and kitchen. #makinggains #crossingthingsofflistsfeelssogood
sherry- you dont use the plastic liners in your little red handy painter pail?
YoungHouseLove says
I do use those when I have them around. So helpful! Otherwise I just let it dry out in the garage and then peel out the paint (so satisfying, it’s like peeling Elmer’s Glue off your hand as a child… or was I the only one to do that?).
xo
s
Kristen T. says
Ooooh, I love that color! Especially with the horizontal white paneling…looking very beachy chic to me. :) Just lovely.
Erin says
Wow, I could look at the before-and-after pictures all day long. And the pic from the front hallway just makes me sigh with how mellow and beautiful it is. I chose a very similar color for my kitchen and living room 2 years ago, Behr’s Limelight. It’s a blue shade but definitely has green in it like you mentioned. It’s such a great shade for subtle contrast with white and greige. Enjoy! It’s beautiful.
YoungHouseLove says
Sounds so pretty Erin!
xo
s
hannah says
love the blue! and it does make the wood cabinets look great. and because im feeling punchy this morning i just keep chanting, “hanging boob light!!” i forgot those existed :) looking forward to a new light over the table? :)
YoungHouseLove says
YESSSS! Those can’t be gone fast enough. The funny thing is we think the hanging boob was purchased for resale (the other lights everywhere in this house look very old, but that one looks new-ish so we think the old light over the eating area was perhaps sentimental and they left this dangling boob light in it’s place ;)
xo
s
Tania @ Run To Radiance says
I love it! So pretty and soothing! We painted approximately 800 square feet this weekend…still finding paint drops in the most random places! :O
YoungHouseLove says
Go Tania go!!
xo
s
Krissy says
Glad to see your cacti are still going strong! The color is really pretty!
We skipped house stuff and spent the weekend in the woods. Only one week left til season’s over.
YoungHouseLove says
Can you believe they’re all still alive and kicking? My secret? Haven’t watered them once. I just ignore them and they love it here apparently.
xo
s
Jami says
Guys, I really love the dark cabinets. Would you consider rethinking and leaving them? I think they look awesome with the light walls. 80s ranch retro…definitely the next big thing! ;) Seriously, I love them. An unexpected and bold choice…just think about it!
YoungHouseLove says
Aw thanks Jami! If you check out this post you’ll see why we can’t just leave them (in the detail photos at the end). Up close they’re in pretty bad shape. We love the idea of leaving them dark on the bottom though, so we won’t lose that contrast and depth of the dark tone.
xo
s
Theresa M. says
The kitchen is so bright, I gotta wear shades!! (an 80’s song reference in case you’re too young to have heard it.)
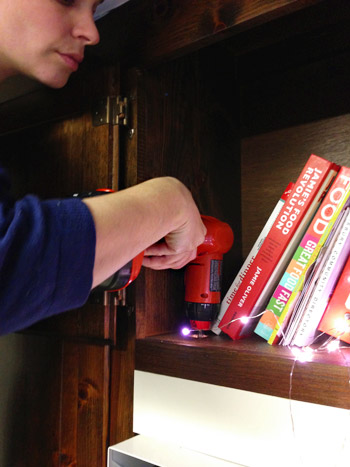
Two questions though… You just primed and painted the doorbell? No special DIY magic? And thirdly, why are there fairy lights with your cookbooks?
Sorry, totally lied. Three questions.
YoungHouseLove says
As a child of the 80s, I’m fully in on that eighties reference. High fives! As for the fairy lights, we mentioned those in the post (they’re battery powered, and they helped me see that screw that was recessed – without them I was going in blind). As for the doorbell, yup, just primer + paint. Hope it helps!
xo
s
Theresa M. says
I believe I could’ve been your babysitter in the 80’s! And yes, whenever you answer a question, it fer sure helps!
YoungHouseLove says
Haha! Did you have big hair and wear a scrunchie? That was the babysitter wardrobe back then. I loved it and totally wanted to be like them when I grew up.
xo
s
Theresa M. says
Like totally! (and there may have been a banana clip as well)
YoungHouseLove says
Sweeeeet!
xo
s
Jess says
It looks so much bigger in there! It’s amazing what paint can do to a room’s perceived ‘size’ without having to move any walls.
Question: is there a specific reason you painted the walls before the ceiling (it’s uncrossed on your to-do list)? I’d always learned to do ceilings first to avoid any accidental sprinkles/splatters on the walls and baseboard that can come with rolling overhead.
YoungHouseLove says
We just were done living with those walls with the unpainted square and those spackle marks. Technically it’s nice to do trim, ceilings, and them walls (so nothing from the ceiling drips on the walls) but we’re pretty neat painters and have done ceilings afterwards a bunch of times, so it was just about getting some color up and losing those crazy blotches of spackle and unprimed drywall that plagued us.
xo
s
Jessica says
I’m a pretty neat painter, too, and I can never seem to stop the roller from inadvertently spraying onto the walls when I am painting a ceiling. How do you prevent that?
YoungHouseLove says
That sounds like it could be a pressure thing. If you’re pushing too firmly on the roller it can spray (or if you have too much paint, but it doesn’t sound like that’s your issue) so I’d try just not pressing as firmly or going as fast, to hopefully cut down on that.
xo
s
Kate says
Amazing! Such a difference! I am always so impressed with how much progress you two make. It would take me a year to get that before and after photo.
YoungHouseLove says
Aw thanks Kate!
xo
s
Lindsay says
LOVE! Can’t wait until you work on the cabinets. That will really transform the entire room even more! Good work guys!
Yvonne @ Dress This Nest says
I can’t believe how amazing it looks already and you haven’t even painted the cabinets!!! It looks SO much bigger and more airy. What a relief for you! I can’t believe you are doing this in between Thanksgiving and Christmas. You guys are crazy but are such an inspiration. I want to paint my kitchen now.
YoungHouseLove says
Aw thanks Yvonne!
xo
s
Lisa E says
I can’t believe how much you get done so quickly, either, and always big projects around the holidays! We are hosting a Christmas party this weekend and want my kitchen re-painted, up for the challenge? Oh and minor detail, I’m up in MI, lol!
YoungHouseLove says
Oh man, if only I could make it there and back before dinner! I vote that you bribe some friends or family members with pizza and see if you can knock it out!
xo
s
Lisa E says
LOL – would love that, but I’m afraid my friends would run the other way. Getting older…. no fun. It was a nice thought, anyway. Looks great, btw. :)
YoungHouseLove says
Aw, good luck Lisa!
xo
s
Sarah says
Hey guys!
Oh my goodness, the kitchen looks GREAT! I love the color.
So I have been super busy, but I still wanted to mail a letter for your bulletin board in the hospital. Are you still accepting them?
I hope that you had a wonderful and relaxing Thanksgiving, it sure looked like you did on your Instagram, and I can’t wait to find out the gender of the little bun soon! I know that I’ve said this, but I have a feeling that it’s going to be a boy. :)
All my best,
Sarah
YoungHouseLove says
Aw thanks Sarah! Yes, we’re still accepting letters for the hopital! So feel free to send away! We can’t wait to find out what’s cooking either :)
xo
s
Brittany says
Is it just me or are the wood cabinets looking nice and rich against all that light? Kinda dig ’em… Might be worth just leaving them/replacing hardware for phase 1!
YoungHouseLove says
If only they weren’t all gnawed on. There are some pics in this old post for ya: https://www.younghouselove.com/well-that-can-of-worms-is-officially-open/
xo
s
Kathryn says
Aw. I miss the warmth of the original wood panelling. But kudos to you both for knocking this stuff out so efficiently!
Isabel says
Great progress guys! Feels so good to get such major things accomplished :) I can’t wait to see the cabinets done. We want to do some major changes to the kitchen too and want to start with the walls and cabinets but just can’t figure out colors. I change my mind every day *sigh*. We were at a wedding in DC this weekend and as we were driving down, I started to see the Richmond signs and told my husband: that’s where my Internet friends are from (he’s terrible with names so saying John and Sherry or YHL usually results in blank stares). He got all excited and said: oh, we should go visit them! To which I replied: aside from the fact that Richmond is like 2 hours further south, how would you react if two complete strangers showed up at our door gawking like idiots? He was like, good point, guess you’ll just have to continue reading the blog. :-)
YoungHouseLove says
So funny! I love that he was down for a visit!
xo
s
Samantha says
Wow! I love how the paint has really brightened the room. I can’t wait to see it with the painted cabinets.
keisha says
*sigh* I don’t know how y’all do it. I’ve been slapping paint samples on my kitchen walls for months. I am so scared of colors. Just when I think I’ve found a color, I notice it looks different in different light, and it’s back to the drawing board. Your kitchen looks fantastic so far – looking forward to seeing more progress.
YoungHouseLove says
Aw thanks Keisha! I’m a big fan of test pots of paint if you can’t decide! That might help you narrow things down and dive in!
xo
s