With our fireplace refacing plan all worked out, and our supplies waiting at the ready, it was time to dive into step 1: TILE! So we’re here with every last detail, from prepping and tiling to grouting.
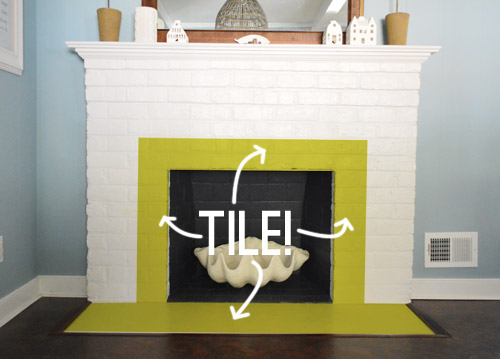
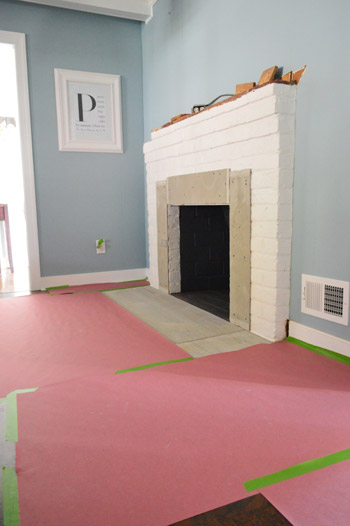
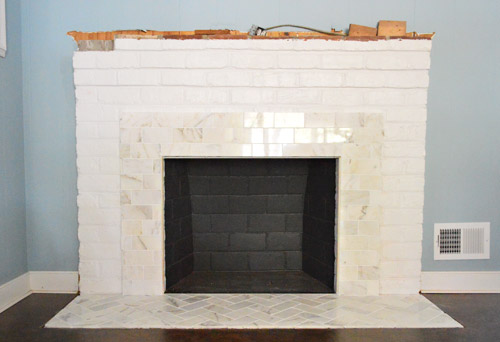
In case my sketch below is still indecipherable to everyone but me, I highlighted the areas of the photo below that are going to get the tile treatment. The tile border is only about 7 inches wide because the rest of the brick is going to get framed out with wood and MDF (which will layer on top of the tile, hence doing tile first).
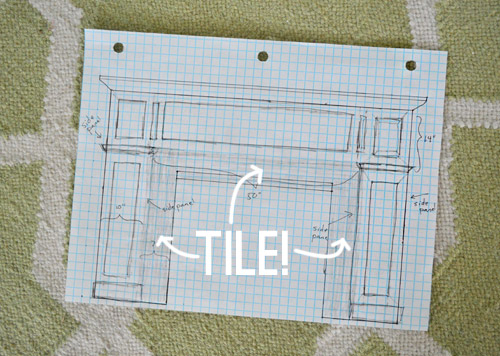
Oh but it’s smart to check the code in your area to make sure your wood surround isn’t too close to your firebox (ours calls for at least 6″ of tile and then the wood surround can start). And no, the tile is not going to be grellow. Ha!
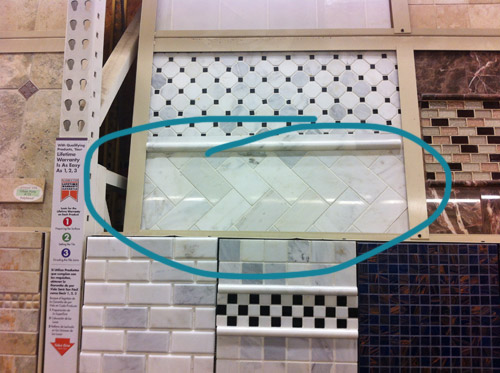
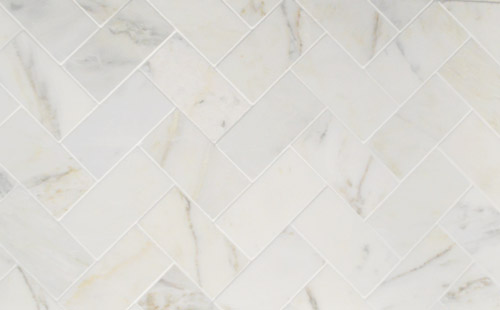
If you recall, the tile we picked out was this marble subway found at Home Depot for a little over $5 per square foot.
But before we could start slapping tile everywhere (that’s a technical description, btw) we had to create a smooth surface on which to attach them. So we bought some 1/4″ cement board and we used the old bend score and snap method to cut it into strips. Then, thanks to some heavy duty masonry screws and a cheap masonry bit for our drill, we attached them to the fireplace. It was quite a dusty process, and it helped to have four hands around for it (Sherry would hold while I drilled and vice versa).
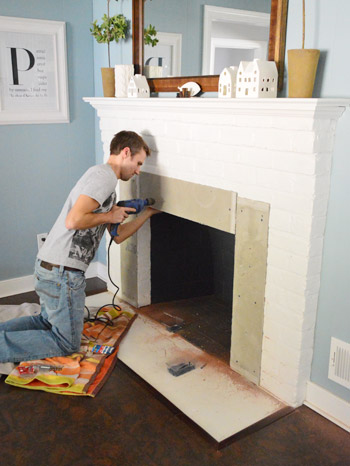
Oh yeah, and it was around this point that we realized we probably should clear off everything sitting on the fireplace mantel so that all of our drilling didn’t send anything down on our heads. Plus I’m not going to lie, if I directly (or even indirectly) sent one of those ceramic houses on the mantel crashing to the floor, the lady wife would not be pleased (I have sort of a bad track record when it comes to things like that).
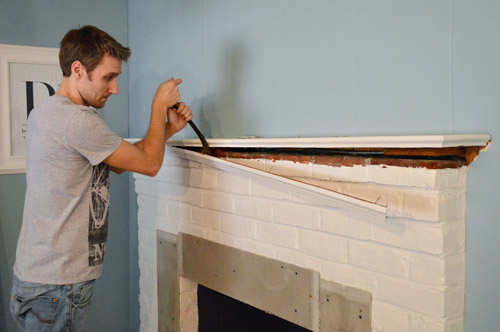
So after we cleared things off the mantel and ripped off the old wood top while we were at it (demo-ing things fully before tiling is always smart) it was back to tile prep. For the bottom hearth portion, I actually just squeezed out a whole bunch of heavy duty construction adhesive, laid down my pieces of cement board and then stacked some heavy storage ottomans (of which we have plenty around here) to hold them securely in place overnight (I later added a few screws at the corners just to reinforce them).
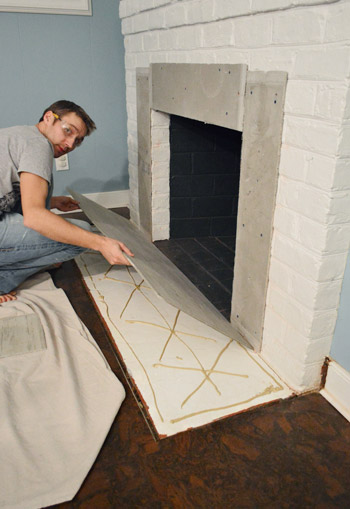
The nice thing about adhering the cement board right over the old hearth instead of demoing it out first was that because we added the cork floor right over our previous linoleum one (due to not wanting to disturb an asbestos liner underneath) we still had room to add cement board and tile without it bumping up and being oddly raised (in fact it brought it back to being aligned).
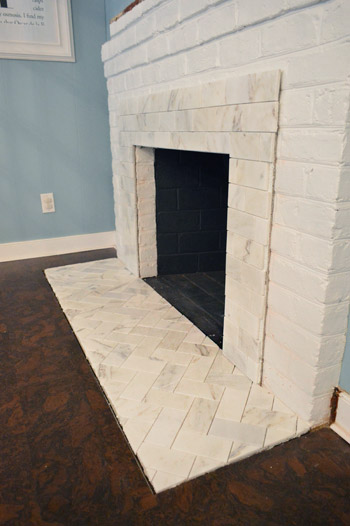
So here’s the fireplace all set and ready for actual tile.
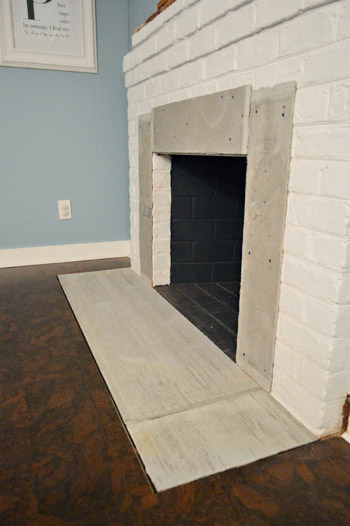
Well, not totally all set and ready. We wanted to protect our cork floors before getting into the thinset-and-grout-y mess of a tiling project, so we quickly taped down some protective rosin paper leftover from our last kitchen tile project.
We also took the time to lay out our tile beforehand. At Bryn’s suggestion, we bought a few extra boxes than we needed, just to account for overage and so we could pick out any weirdly chipped or discolored ones. Thankfully there weren’t many broken or otherwise wonky tiles, so I’d say that we used 90% of the tile we bought, and only returned 10% as overage tile (which is a pretty normal percentage – and Home Depot is happy to take it back).
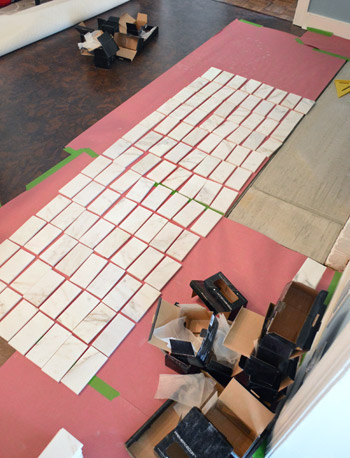
It was a smidge tedious to lay it all out, but it was great because we could begin to see how they’d come together and even do things like space out the veining (so there was a nice mix of both instead of all of the dark veining ending up on one side of the hearth and all the lighter tiles on the other side). And in the interest of using as many tiles as we could without being super picky, we also made a pile of “why-is-this-one-weird-or-chipped-on-one-side?” tiles to use for the smaller cut pieces that we’d need (we could slice off the weird/bad parts for many of the edge tiles anyway).
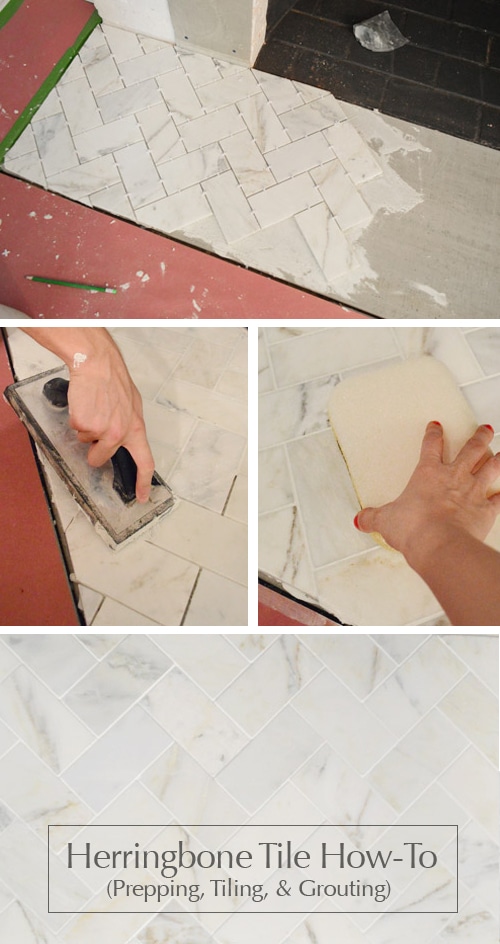
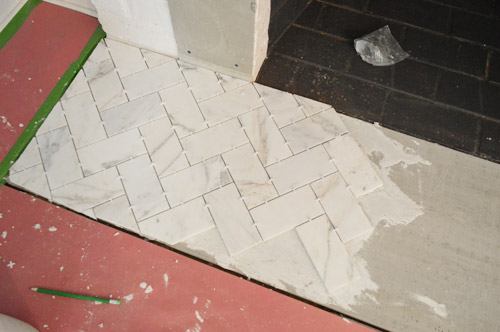
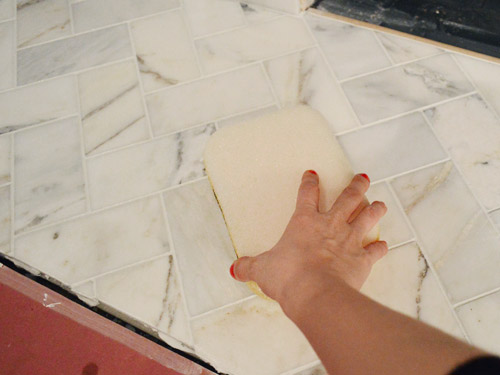
And as you can see from the angled cut that I’m marking below – we decided to go for a herringbone pattern on the hearth mixed with a traditional brick-layers pattern on the fireplace surround (we held them up a few ways and liked that configuration best). Update: we’re getting requests for more info on why we chose that combo, so here ya go… with so little surface area (just 7″ showing around the firebox) it wouldn’t really establish the pattern enough (we thought it would look like random and busy half-zigs and half-zags without enough of the tile showing to look like chevron). So we held it up both ways and liked the simpler pattern for the smaller area, just because we didn’t think it would look as chaotic.
And thank goodness we own this triangle square…
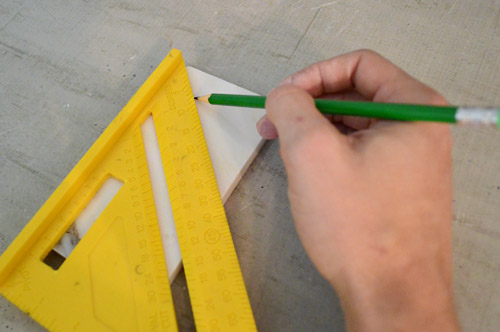
It was a lifesaver since basically every single cut for the hearth was on a 45-degree angle. And after cutting tons of crown molding on all sorts of angles, I gotta say that this was much simpler. Anyone can do this. Yes, even you scared-of-tiling folks out there. It’s really not that bad. I promise.
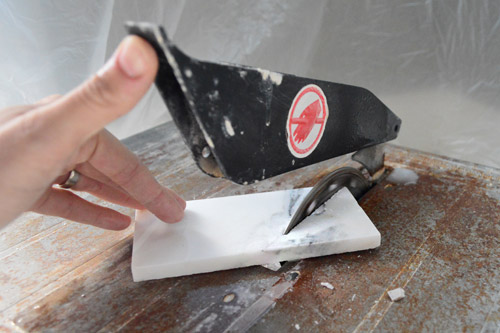
We made all of our cuts with our wet saw (one of my favorite tools) and it was fairly easy. The only challenge was that the marble was a bit brittle so sometimes the corners broke off as I got to the end of a cut. But I didn’t lose too many tiles in the process, so it was actually a lot easier to work with than penny tile (we had a much higher learning curve when it came to cutting that).
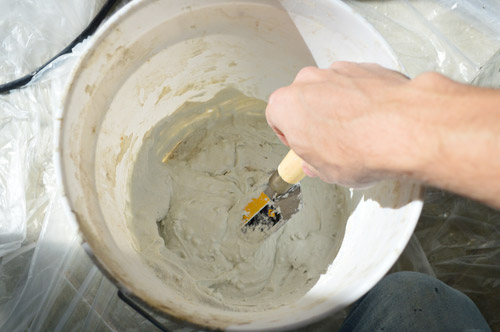
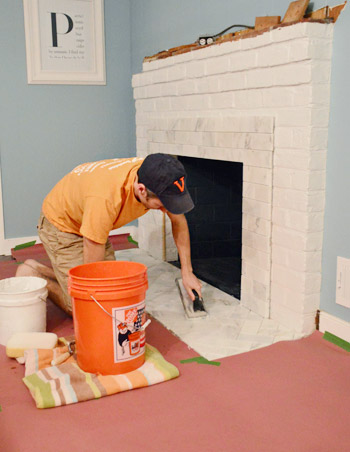
Once we had a few of our initial pieces cut, we mixed up some thinset (still leftover from penny tiling – woot!) and started slapping down some tile. Again, that’s a technical term.
I realize I’m glossing over some of the details of the actual tiling process. But we’ve covered it so extensively in the posts below (including video) that I thought sharing those links made the most sense. So for this project just trust us that it went along pretty much the same way unless otherwise noted in this post.
- Here’s how to hang cement board
- Here’s how to install penny tile (including video)
- Here’s how to grout penny tile (including video)
- Here’s how to de-haze & sealing tile
- Here’s how to install a subway tile shower & marble floor (including an extremely detailed supply list)
Once we had the pattern started it was a pretty mindless process, it just took a long time because there were so many cuts involved in such a small space. But it was pretty straightforward (it was one of those just-keep-going tasks that didn’t involve much problem solving once we got the hang of it). I’d guess that it took us a good four hours to get the bottom portion done (although it was broken up by lunch plans with an old coworker, so it still ate up a good portion of day 1).
The next day during Clara’s nap we attacked the top portion, which went significantly faster because the straight cuts were easier to do.
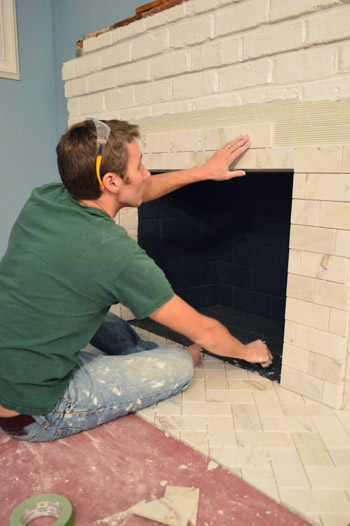
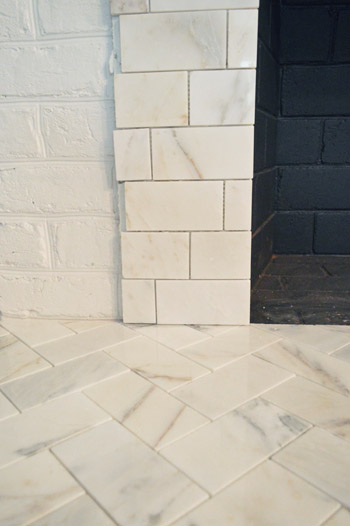
And since the outer edge was going to get covered by the MDF frame of our wood surround eventually, we didn’t have to be sticklers for a clean edge. In fact, Sherry and I figured out a way to stagger the tiles so that we were able to reuse both sides of a cut, which made life much easier. See how the bottom row has a cut tile on the left? The other half of that tile is in the row above it (on the right). So they sort of staggered themselves up the wall, and we weren’t creating tons of tile fragments that we couldn’t use.
So by the end of day 2, we had all of our tile done. Yeehaw. (Oh, and that white strip of brick inside the fireplace is eventually going to get painted the same dark charcoal color as the rest of the firebox, so just ignore it for now – and of course we have trim pieces for the floor around the hearth so it’ll be seamless and smooth in the end).
The next evening we got our grout on using some non-sanded grout from Home Depot in their Snow White color (it’s not super white, sort of a very soft gray).
I don’t know about you guys, but for some reason the transformation from un-grouted tile to grouted tile is super satisfying to me. Seriously. I could grout all day… well, if I had a bionic wrist.
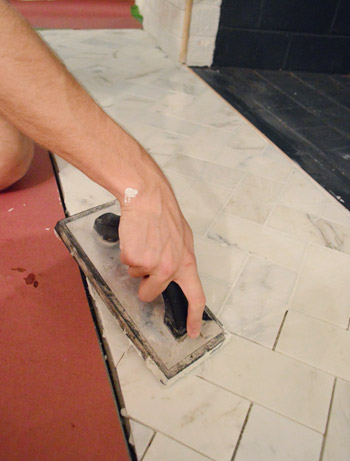
As I shoved grout into joints, Sherry stepped in periodically with a slightly damp sponge to smooth everything and wipe off the excess. I’m still jealous of how clean she stayed.
Grouting took all of 45 minutes, maybe. And it left us with this beaut. Admittedly it still looks crazy without a built out mantel around it, but that’s next on the agenda.
So we’re excited to start building the surround, reconstructing the mantle, adding trim and molding, priming and painting, and eating a celebratory cookie (or twenty) when we’re finally done.
Oh and we sealed all of the tile/grout after the grout-drying waiting period on the bottle (we had some leftover from the backsplash). Took ten minutes tops. Ending up with a completely re-tiled hearth and fireplace surround (in white marble, no less) feels like such an upgrade for only around seven hours of work (total), and the budget wasn’t nearly as scary as “marble tile” sounds. Ha!
- Cement board (2 sheets): $16
- Masonry screws: already owned
- Liquid Nails Heavy Duty: $2
- Subway tile: $5.50/sq ft, totaling $70
- Thinset: Already owned
- Tiling tools (saw, trowel, float, etc): already owned
- Grout: $11
- Tile sealer: already owned
- TOTAL: $99 (*thanks to some holiday gift cards from the family, we actually only spent $49 – but without gift cards or already owned supplies this might be an $150 upgrade)
I think we’re riding a herringbone high right now. Seriously. I’m so glad we decided to do that pattern. For some reason it makes me feel super fancy. Maybe we need to rename our house Downton Ranchy.
And maybe we should record a sequel to this SNL skit called “Marble Subway Tile.”
Does anyone else have some good experiences with subway tile, a herringbone pattern, or tiling a fireplace in general to share? Have you purchased a marble column recently? Are you like “What is this, The White House??”
*This post contains affiliate links

Debbie says
Wow! Watching that video had me instantly transported to any neighborhood in the suburbs in the NY Metro area. Sherry must watch these when she gets home sick. Now if only they would parody the Venetian Hour…
Christine says
I love it! The marble is perfect, it seems to fit in so well with your house and the herringbone pattern is great.
Tipling says
I Love This! The marble looks so classy and the herringbone pattern is beautiful. It looks great against the dark wood floor. Are you going to try to route the mantle yourselves or buy one pre-made? We have been contemplating a similar project.
YoungHouseLove says
Making it from scratch, baby!
xo
s
Lisa says
Absolutely gorgeous. Can’t wait to see the next step!
Katie D. says
Does the sealer effect the breathability of the stone? I know sealing ceramic tiles is very beneficial, but I’ve heard mixed reports about sealing stone surfaces.
YoungHouseLove says
You definitely have to buy a sealer that explicitly says it works on marble (some can stain or hurt breathability while others can work nicely). Hope it helps!
xo
s
K (Barking Babymama) says
The marble tile is beautiful! I love it! I’m trying to figure out what I can use it on :) So I guess you are not concerned about any of your hard work getting damaged in the demo when you open the fireplace up to the living room? I would’ve thought you would have to wait until that was done to redo the fireplace – I’m excited to see how this turns out!!
YoungHouseLove says
Thankfully we can go in from the other side and it won’t effect the tile or mantel at all :)
xo
s
Kristen @ LoveK Blog says
The tile looks beautiful! I love that you did a herringbone pattern, it really adds a little extra sass!
Lauren {L'amour chez nous} says
Wow, it’s going to look fabulous!
Louisa T. says
We recently redid our fireplace. It was similar to yours but our brick went all the way to the ceiling. Yuck! We tiled the surround with stacked stone and laid large granite tiles on the hearth. The mantle and wood surround was built out almost identical to your plans. Above the mantle we wanted an HD flat screen tv so the brick above was covered with MDF and plywood in a pattern to compliment the mantle. My absolute favorite renovation to date. The marble looks amazing!
YoungHouseLove says
Woah, that sounds awesome Louisa!
xo,
s
Jennifer Laura says
I love it but I’m wishing the entire top was tile- then you would have had enough space to make the herringbone look amazing there too. All tile and topped with a wood mantle…could be awesome.
YoungHouseLove says
Always another way to go! Wish we had the budget to tile the entire room. Hahah!
xo
s
Erika says
Love it! So fancy…you need to drink some Moet and Chamdom while looking at your fancy marble.
http://www.hulu.com/#!watch/465352#i1,p0,d1
YoungHouseLove says
Haha, we just watched that one again this morning. “Monica and Chandler Champagne!” “Did someone say celebrate?” “Not yet!”
xo
s
Wendy says
LOVE that tile! It is gorgeous! It may just steal the spotlight from the penny tile ;) haha!
Your fireplace makeover must have been floating around my subconscious the past few days because I dreamed about it last night! I snuck in your house because I just couldn’t wait for you to blog about it. Boy was I disappointed. It looked like a tiny, round toy fireplace. What you did for real, MUCH better! Can’t wait to see the rest. Maybe I’ll dream about it more in anticipation. haha!
YoungHouseLove says
Aw thanks Wendy!
xo
s
Halla says
Well, I love it. I have to admit I was a bit hesitant (not that it is any of my business), because I thought it would be too traditional with the rest of the kitchen, but it’s really beautiful. You continue to inspire me (once I’m out of my dorm room) :)
YoungHouseLove says
Aw thanks Halla! I can’t wait to finish the mantel and share those pics!
xo
s
Kristin F says
I’ve been totally crushing on marble subway tile for about a year now, plan on using as the back splash when this dang kitchen redo finally gets going. I have a fireplace in the adjoining room that has an old black tile base and surround and seeing your tile makes me think I should use it there to tie it in as well. My only concern at this point is as I’ve coveted, everyone’s been using it, so will it be passe by the time I get there?
Oh, and thanks for the heads up on HD having the tile; I’ve been pricing it on Overstock and Amazon, and I think HD may have them beat.
YoungHouseLove says
I think marble tile = classic. You can find it in design magazines in the 20s, 50s, 90s, and I bet it’ll be there in 100 and 200 years too! So I wouldn’t worry about being passe :)
xo
s
Lindsey says
It turned out beautiful! When I first read what you would be doing to it, I thought it sounded crazy… but now that I see it, I LOVE it! One question though, in the photo of the finished tile, I noticed that the herringbone pattern is nicely centered with the back of the fireplace, which is centered with the entire fireplace… did you guys measure to make sure the middle of the herringbone pattern would line up so nicely? Or did everything just happily fall into place? There’s a surface I’d like to attempt tiling in our home and the thought of the tile looking off-center bothers me! Thanks! :)
YoungHouseLove says
We did our best to measure so it would be centered and laid it all out to try to picture it (not the whole thing but a good chunk).
xo,
s
Jane says
John&Sherry,
This is completely OT, but I just wanted to come on here and say I am so thankful I found your blog through a random google search a year ago. I have learnt so many things from your blog, not only home related but so much about parenting,children,cloth diapers , breastfeeding and life in general. There is just so much information on here. I also love reading all the comments on good posts like breastfeeding,potty training etc cos people share so much good information. So , let me just say THANK YOU. You guys do such an awesome job. Keep at it!
YoungHouseLove says
Aw thanks so much Jane. You’re so sweet.
xo,
s
Monique says
The funny thing is, you said you weren’t going with ‘grellow’ tiles, but with that clean blue paint the herringbone tile looks, well, green-yellow on my screen. Does it read that way to you in real life? Does that affect the rug you had in front of the fireplace (seemed like a green-beige)? Just curious.
YoungHouseLove says
In person is describe the tiles as white with some gray and some ivory undertones. Definitely not any green in them though. As for the rug, we think it’ll still work but will wait for it to come together fully and then judge it :)
xo,
s
Ashley says
I love this! We actually have the same thing in our house. We layed down laminate flooring and now it’s higher than the brick (dirty brick) hearth and I’ve been dying to lay some sort of tile or stone down the brighten the area and make it look clean. Your project is great inspiration!
I love the herringbone!
Erin says
One day in the near(ish) future, when all four of your hands are busy, Clara will be able to be your little photographer!
YoungHouseLove says
Haha that will rule!
xo,
s
Laura & the Shell says
Wow, it looks great. I’d like to see a close up of the seam between the face tile and the inside. I know you said you guys are going to paint that inside bit to match the rest of the inside, but I’m curious about the seam. Is there a end border tile type thing? Can you see the thin set? Or did you seal it up with grout? Sorry for the 100 questions!
YoungHouseLove says
We trimmed it out with a tiny sliver of wood to make it seamless. Will post close ups soon!
xo,
s
QP says
Love you guys! Your posts are always hilarious. But I really enjoy it when John writes due to his typos and his constant reference to Sherry as his lady wife. It makes me wonder what goes on at Downton Ranchy. Does John need to make a distinction between his lady wife and his man wife? LOL! :D
YoungHouseLove says
Haha he might!
xo
s
Lija says
Love the tile! This is a great application for marble subway tile. We have it for our kitchen backsplash and love it.
We also have it for our shower surround. Don’t love it. It hasn’t looked shiny and clean since the first week, despite numerous “marble-safe” cleaners and polishers. But even worse, a few of the tiles cracked (probably due to a not perfectly-level base) and water got in and then the caulk cracked and… you can guess the outcome. We had to tear out a whole huge chunk down to the backer board and replaced it only 3 years after installation. It’s ok now, but doesn’t look great. I wish we had stuck to ceramic tiles for the shower. Hope our experience saves others some headaches.
YoungHouseLove says
Oh no! Maybe it’s best for smaller projects? Great tip about making sure it’s level :)
xo,
s
Sarah says
Looks awesome, as usual! We did the same herringbone pattern on our hearth in the fall, but ours was squared with the corners instead of on an angle like yours. It was all my idea, and my poor husband was stuck doing all the dirty work… I say this because we special-ordered 13″ square tiles THEN realized the hearth was too small for it to look normal in any configuration. He had to cut every tile into I think it was 8 pieces, then do all the normal cutting. It turned out beautifully, but it was definitely a boatload of work!
YoungHouseLove says
Sounds beautiful!
xo,
s
Suki says
How do you always have something to up the wow factor in your home? Geez! Talk about inspiring. Every blog post pretty much blows my mind.
YoungHouseLove says
Aw thanks Suki! You’re so sweet.
xo,
s
Sophie says
John, did you just make a Legally Blond joke? Or was that you lady-wife’s input? Either way, you just earned 200 cool points.
YoungHouseLove says
I take credit for teaching him that!
xo,
s
Guylaine Côté says
Hi!!!
You are lucky to have a great handy man like that!!!Haaaaaaaaaaaa!!! They can not have it all! I love it, it’s very beautiful!!!
Misty says
Actually… I love the herringbone pattern! We are re-doing or cabinets in our kitchen this spring, adding new countertops then after will be adding a backsplash. I have already been showing my boyfriend pic’s of the herringbone subway pattern because I think it does add a little something fancy! Well done as usual guys!
YoungHouseLove says
Sounds great Misty! Good luck with everything!
xo,
s
DJ says
It’s a wise man that can learn from his mistakes:
“Plus I’m not going to lie, if I directly (or even indirectly) sent one of those ceramic houses on the mantel crashing to the floor, the lady wife would not be pleased”
YoungHouseLove says
Hahaha, oh yeah, he knows what’s up.
xo,
s
Shelley @ Green Eggs and Hamlet says
My husband and I want to redo our guest bathroom which would involve re-tiling the floor and tub surround and the more I read about your tiling adventures, the more confident I feel that we can do it ourselves. Thank you, thank you!
The herringbone pattern is spectacular – great choice, totally worth the number of cuts!
sarah says
You guys did a great job! I love the pattern! I can’t wait to see the finished product!
Sarah
http://www.etsy.com/shop/owleyevintage
Coran says
Gorgeous! Love the tile dresses up the fireplace. The kitchen wall color change is a nice fresh look as well!
GreenInOC says
They have that capiz-ish look from a bit of distance – purrrrty!
kristi@SimplePrettyThings says
Love the herringbone pattern! We’re going to use that pattern in our half bath reno! I have to agree with you about not putting it up on the sides in that pattern. This looks so good. Reminds me of mother-of-pearl goodness. Looking forward to seeing more progress!
Kelly says
AHHH. I LOVE it. I’m trying to convince my husband that pretty white subway tile is beautiful…and that it needs to be somewhere in our home. Ha. We live in a 160 year old house and have a hard time mixing more updated styles without ruining the classic beauty of the architecture in our home. I think subway tile would be a good option ;)
Louisa T. says
Thank you for the sweet comment. One question though, on the tile surround, did you not have to support the center tile (above the fireplace opening) in any way while the thinset dried? This was a little bit of an issue for us because of the weight of the stacked stone facade. It wanted to slip on us so a raised platform was created out of 1×4’s to support it over night.
YoungHouseLove says
We did one row with tape holding them up and let it set a bit and then built over them. It seemed to work since they were not very heavy.
xo,
s
Kara says
I LOVE the way this looks. John, you’re a pro! I’m thinking this pattern would look awesome in my kitchen for the new backsplash. Thanks for the inspiration. ;-)
Ash says
Wow, that is so B-E-A-U-tiful! Color me impressed!
Also, my last name is Bates – can I come be [Mrs.] Bates at Downton Ranchy? I don’t have the mysterious background, but I’d totally be up for being a valet!
YoungHouseLove says
Hahaha yes, I will send a chauffeur for you henceforth!
xo,
s
Meredith Jones says
Swooooon…. I’m lovin this! It looks GREAT with the new blue paint job too. Great pick! The hubs and I just did our first tile job ever, the kitchen backsplash. Now I just wanna tile EVERYTHING!! :)
Chris says
Are you planning to do the mantle and surround in white, or stained wood? I think either would look great, but the wood would really draw out the subtleties in the marble.
Love the herringbone pattern!
YoungHouseLove says
I think painted white to balance the cabinets on the other side but we’re not 100% sure!
xo,
s
Debby says
How did you make the transition from the edge of the tile and backer board to the inside bricks of the firebox. In your pictures it looks like some kind of yellowish line. Will it be filled with the grout or caulk?
Love the marble tile, nice choice.
YoungHouseLove says
We have added some thin wood trim to cap it cleanly. Will share pics as we go for sure!
xo
s
Lorilyn says
Ah I LOVE the herringbone pattern – this might be my favorite project to date!
Heidi says
(SQUEALS!) It looks so great!! Can’t wait to see it complete but the tile looks uh-MAZING!
Lil says
That is gorgeous. Already! Can’t wait to see the rest. We also have a fireplace that needs love. Fortunately, it isn’t brick (actually circa 1960 paneling that I spackled between the grooves *really* to smooth it out so it looks like drywall. I’ve actually had one of your inspiration photos in the back of my head for ages too, so i can’t wait to see how it turns out.
Jenn says
Man, marble tiles just speak to my soul. Your surround makes me wish I had something to tile as well. It’s so gratifying to see a post that has many steps accomplished – no cliffhangers :)
PS if Sherry is the “lady wife”, does that make John the “man wife”? Hmmm.
YoungHouseLove says
He’s my man-hubby ;)
xo
s
Rebecca says
I’m in the midst of studying for the NCIDQ (interior design qualification exam) and just yesterday I was studying about fireplaces. I’m not sure how far you’re planning on the wood surround protruding, but the same code that requires the wood to be 6″ from the opening, also states “any combustible trim between 6-12″ of the opening may only project 1/8″ from the fireplace face for every 1″ of space between the trim and opening.”
YoungHouseLove says
Thanks for the tips Rebecca! We’re definitely keeping code in mind :)
xo
s
Blair r says
I know you guys (and many other people) have said that setting tile is easy breezy once you get a rhythm going. However, I am terrified. I just have in my head that it’s really difficult to make sure that all the tiles are even (i.e. that some aren’t sticking off the wall higher or lower than the others). Any tips for how to make sure you end up with a smooth finished project?
YoungHouseLove says
Definitely go slowly and occasionally you can even use a board to make sure they’re all the same level (lay it across the tile you have laid to make sure none of them pop up oddly). Also we use spacers between tiles (they sell them at Home Depot) to be sure they’re all evenly placed (they look like little x’s) and it’s such a big help! You can do it Blair!
xo
s
janice says
Great job! I”m another ‘not quite used to the blue’ but I have to tell you I just LOVE watching you progress through the house, through each project. I so wish I had the time to do more in my house.
re: cutting the tile and breaking cracking as you near the end. If you ever do it again and find it’s a problem, here’s a fix. Cut partway, back the saw out, turn the tile around and cut from the other side to meet in the middle. It’s how we do gemstones. :) Keeps the cuts nice and neat.
YoungHouseLove says
Great tip Janice! Love it!
xo
s
Luisa says
Love the herringbone! Just wondering if the design of the wood elements might be too colonial and therefore adding another period to your house??
YoungHouseLove says
Nah, I think it’ll be really clean and modern just like our cabinets when it’s done. We think it’ll actually tie the kitchen together a lot more :)
xo
s
Alexandra says
Hahaha ‘downton ranchy’ made me giggle-snort on my quiet train to work.. This looks amazing! I couldn’t picture what you had described in your first post. But I had faith, and I was not disappointed. This looks amazing! I LOVE the herringbone pattern on the hearth with the straight tiling around the fireplace. It makes for a subtle and beautiful feature. Well done! Can’t wait to see the whole project finished :)
YoungHouseLove says
Thanks Alexandra! We’re working on the mantel while Clara naps and are so excited about it!
xo
s
Jillian {Her Split Ends} says
So gorgeous!! Can’t wait to see it all built-out. nice pick with the marble tile too!!
YoungHouseLove says
Thanks Jillian!
xo
s