With our fireplace refacing plan all worked out, and our supplies waiting at the ready, it was time to dive into step 1: TILE! So we’re here with every last detail, from prepping and tiling to grouting.
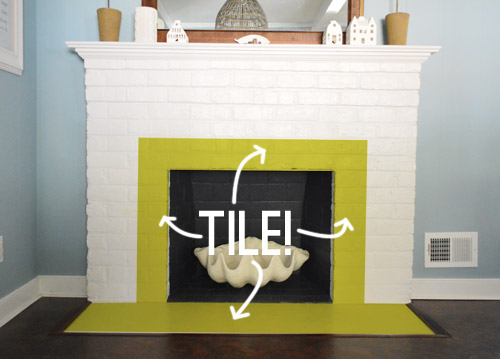
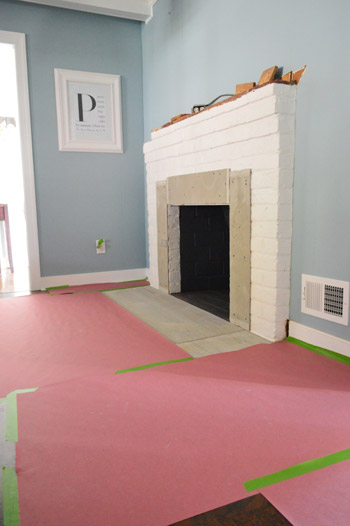
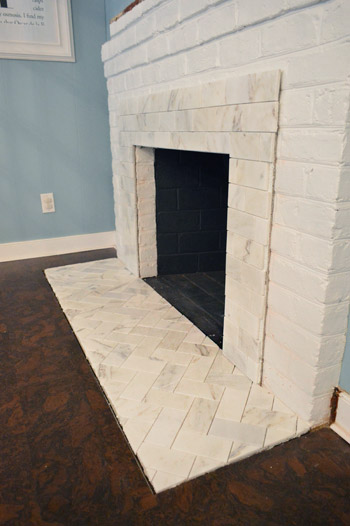
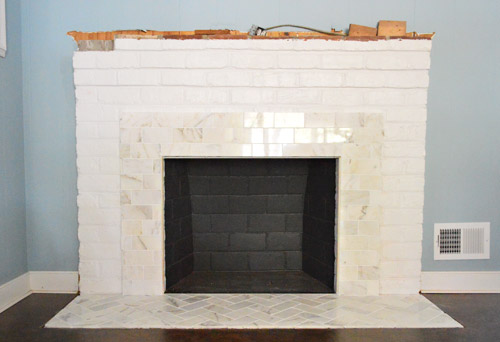
In case my sketch below is still indecipherable to everyone but me, I highlighted the areas of the photo below that are going to get the tile treatment. The tile border is only about 7 inches wide because the rest of the brick is going to get framed out with wood and MDF (which will layer on top of the tile, hence doing tile first).
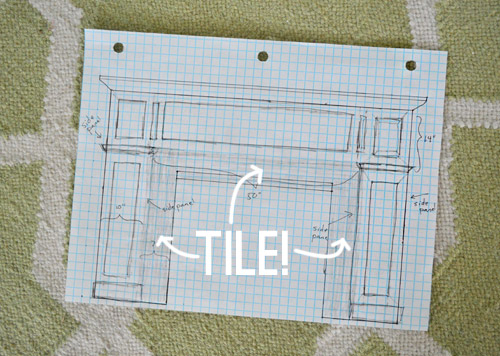
Oh but it’s smart to check the code in your area to make sure your wood surround isn’t too close to your firebox (ours calls for at least 6″ of tile and then the wood surround can start). And no, the tile is not going to be grellow. Ha!
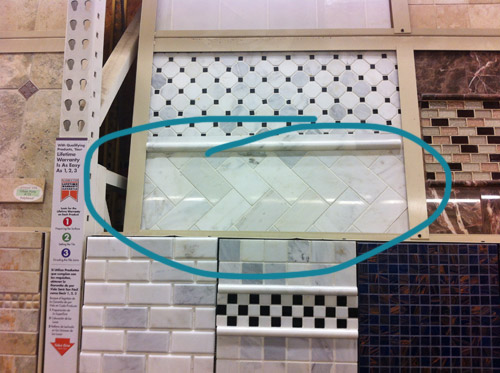
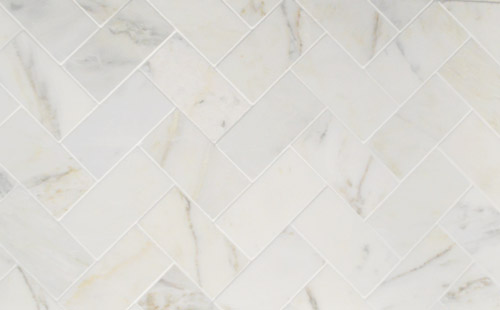
If you recall, the tile we picked out was this marble subway found at Home Depot for a little over $5 per square foot.
But before we could start slapping tile everywhere (that’s a technical description, btw) we had to create a smooth surface on which to attach them. So we bought some 1/4″ cement board and we used the old bend score and snap method to cut it into strips. Then, thanks to some heavy duty masonry screws and a cheap masonry bit for our drill, we attached them to the fireplace. It was quite a dusty process, and it helped to have four hands around for it (Sherry would hold while I drilled and vice versa).
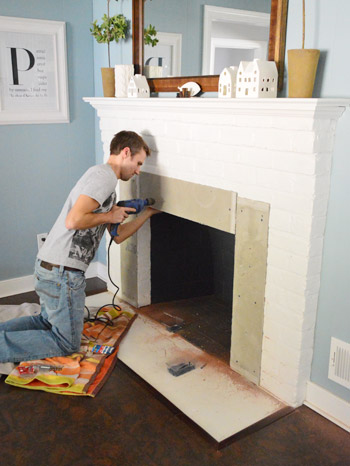
Oh yeah, and it was around this point that we realized we probably should clear off everything sitting on the fireplace mantel so that all of our drilling didn’t send anything down on our heads. Plus I’m not going to lie, if I directly (or even indirectly) sent one of those ceramic houses on the mantel crashing to the floor, the lady wife would not be pleased (I have sort of a bad track record when it comes to things like that).
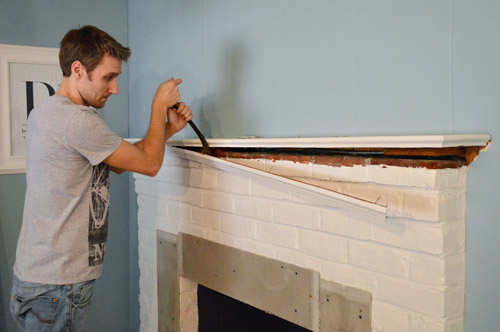
So after we cleared things off the mantel and ripped off the old wood top while we were at it (demo-ing things fully before tiling is always smart) it was back to tile prep. For the bottom hearth portion, I actually just squeezed out a whole bunch of heavy duty construction adhesive, laid down my pieces of cement board and then stacked some heavy storage ottomans (of which we have plenty around here) to hold them securely in place overnight (I later added a few screws at the corners just to reinforce them).
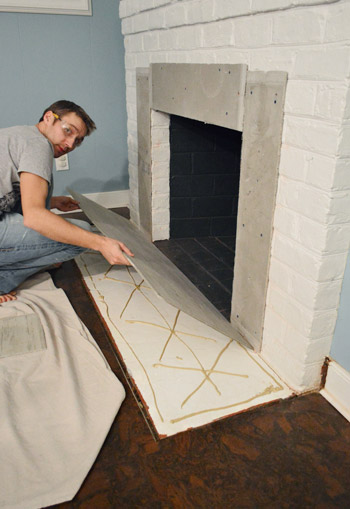
The nice thing about adhering the cement board right over the old hearth instead of demoing it out first was that because we added the cork floor right over our previous linoleum one (due to not wanting to disturb an asbestos liner underneath) we still had room to add cement board and tile without it bumping up and being oddly raised (in fact it brought it back to being aligned).
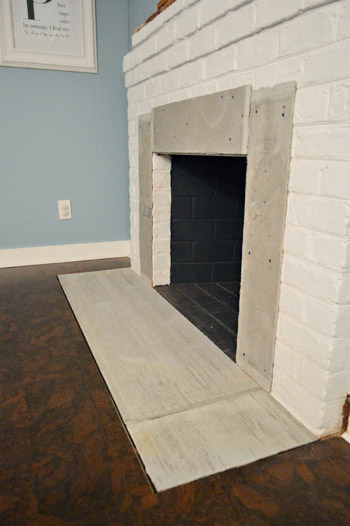
So here’s the fireplace all set and ready for actual tile.
Well, not totally all set and ready. We wanted to protect our cork floors before getting into the thinset-and-grout-y mess of a tiling project, so we quickly taped down some protective rosin paper leftover from our last kitchen tile project.
We also took the time to lay out our tile beforehand. At Bryn’s suggestion, we bought a few extra boxes than we needed, just to account for overage and so we could pick out any weirdly chipped or discolored ones. Thankfully there weren’t many broken or otherwise wonky tiles, so I’d say that we used 90% of the tile we bought, and only returned 10% as overage tile (which is a pretty normal percentage – and Home Depot is happy to take it back).
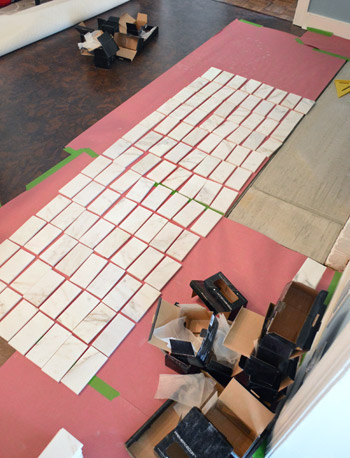
It was a smidge tedious to lay it all out, but it was great because we could begin to see how they’d come together and even do things like space out the veining (so there was a nice mix of both instead of all of the dark veining ending up on one side of the hearth and all the lighter tiles on the other side). And in the interest of using as many tiles as we could without being super picky, we also made a pile of “why-is-this-one-weird-or-chipped-on-one-side?” tiles to use for the smaller cut pieces that we’d need (we could slice off the weird/bad parts for many of the edge tiles anyway).
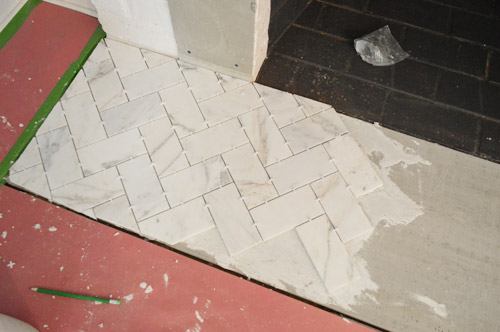
And as you can see from the angled cut that I’m marking below – we decided to go for a herringbone pattern on the hearth mixed with a traditional brick-layers pattern on the fireplace surround (we held them up a few ways and liked that configuration best). Update: we’re getting requests for more info on why we chose that combo, so here ya go… with so little surface area (just 7″ showing around the firebox) it wouldn’t really establish the pattern enough (we thought it would look like random and busy half-zigs and half-zags without enough of the tile showing to look like chevron). So we held it up both ways and liked the simpler pattern for the smaller area, just because we didn’t think it would look as chaotic.
And thank goodness we own this triangle square…
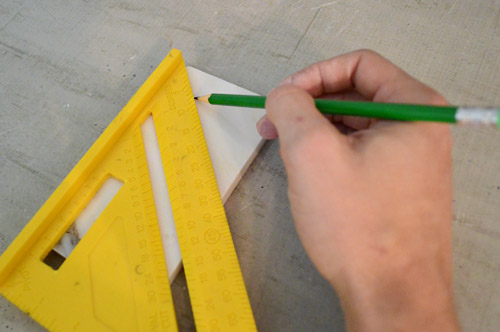
It was a lifesaver since basically every single cut for the hearth was on a 45-degree angle. And after cutting tons of crown molding on all sorts of angles, I gotta say that this was much simpler. Anyone can do this. Yes, even you scared-of-tiling folks out there. It’s really not that bad. I promise.
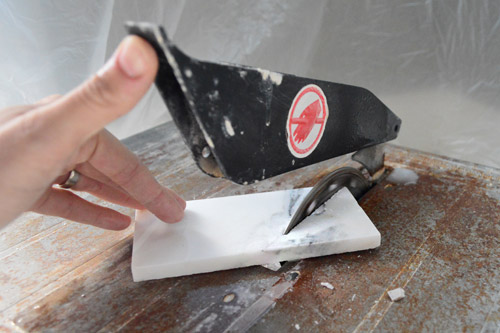
We made all of our cuts with our wet saw (one of my favorite tools) and it was fairly easy. The only challenge was that the marble was a bit brittle so sometimes the corners broke off as I got to the end of a cut. But I didn’t lose too many tiles in the process, so it was actually a lot easier to work with than penny tile (we had a much higher learning curve when it came to cutting that).
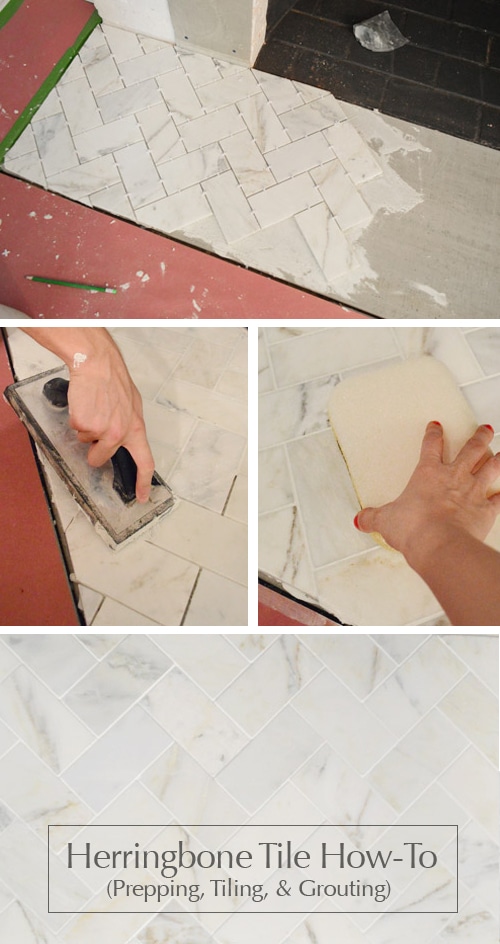
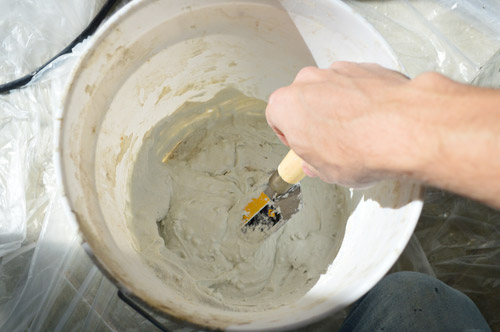
Once we had a few of our initial pieces cut, we mixed up some thinset (still leftover from penny tiling – woot!) and started slapping down some tile. Again, that’s a technical term.
I realize I’m glossing over some of the details of the actual tiling process. But we’ve covered it so extensively in the posts below (including video) that I thought sharing those links made the most sense. So for this project just trust us that it went along pretty much the same way unless otherwise noted in this post.
- Here’s how to hang cement board
- Here’s how to install penny tile (including video)
- Here’s how to grout penny tile (including video)
- Here’s how to de-haze & sealing tile
- Here’s how to install a subway tile shower & marble floor (including an extremely detailed supply list)
Once we had the pattern started it was a pretty mindless process, it just took a long time because there were so many cuts involved in such a small space. But it was pretty straightforward (it was one of those just-keep-going tasks that didn’t involve much problem solving once we got the hang of it). I’d guess that it took us a good four hours to get the bottom portion done (although it was broken up by lunch plans with an old coworker, so it still ate up a good portion of day 1).
The next day during Clara’s nap we attacked the top portion, which went significantly faster because the straight cuts were easier to do.
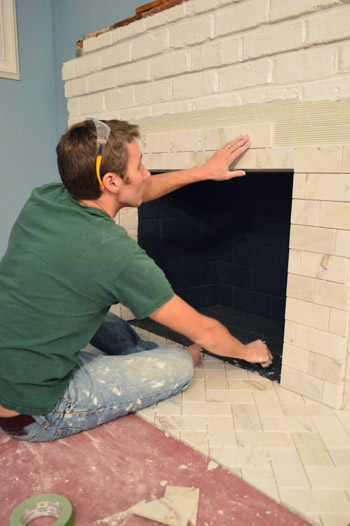
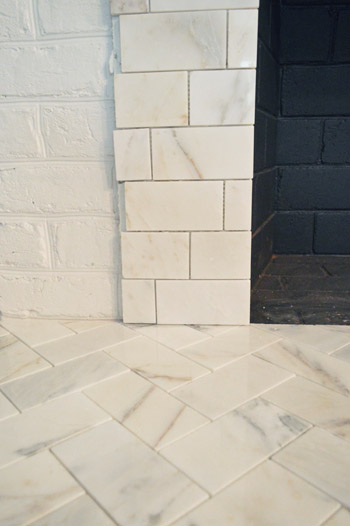
And since the outer edge was going to get covered by the MDF frame of our wood surround eventually, we didn’t have to be sticklers for a clean edge. In fact, Sherry and I figured out a way to stagger the tiles so that we were able to reuse both sides of a cut, which made life much easier. See how the bottom row has a cut tile on the left? The other half of that tile is in the row above it (on the right). So they sort of staggered themselves up the wall, and we weren’t creating tons of tile fragments that we couldn’t use.
So by the end of day 2, we had all of our tile done. Yeehaw. (Oh, and that white strip of brick inside the fireplace is eventually going to get painted the same dark charcoal color as the rest of the firebox, so just ignore it for now – and of course we have trim pieces for the floor around the hearth so it’ll be seamless and smooth in the end).
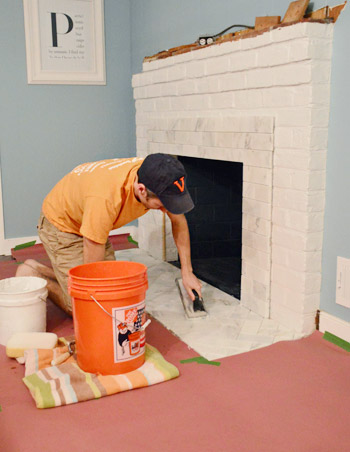
The next evening we got our grout on using some non-sanded grout from Home Depot in their Snow White color (it’s not super white, sort of a very soft gray).
I don’t know about you guys, but for some reason the transformation from un-grouted tile to grouted tile is super satisfying to me. Seriously. I could grout all day… well, if I had a bionic wrist.
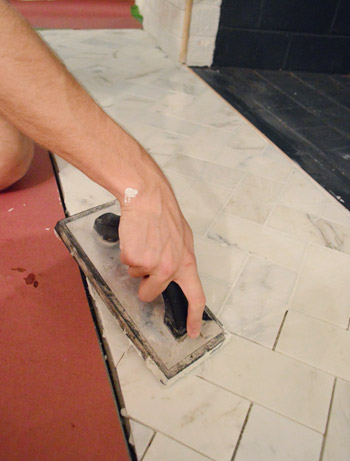
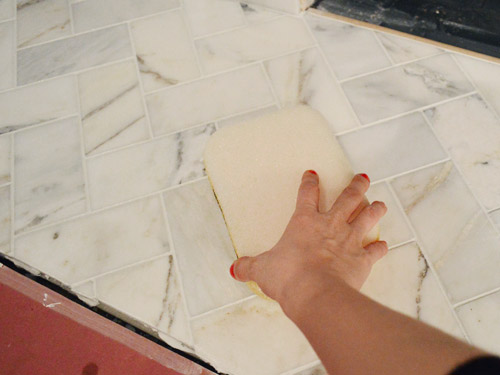
As I shoved grout into joints, Sherry stepped in periodically with a slightly damp sponge to smooth everything and wipe off the excess. I’m still jealous of how clean she stayed.
Grouting took all of 45 minutes, maybe. And it left us with this beaut. Admittedly it still looks crazy without a built out mantel around it, but that’s next on the agenda.
So we’re excited to start building the surround, reconstructing the mantle, adding trim and molding, priming and painting, and eating a celebratory cookie (or twenty) when we’re finally done.
Oh and we sealed all of the tile/grout after the grout-drying waiting period on the bottle (we had some leftover from the backsplash). Took ten minutes tops. Ending up with a completely re-tiled hearth and fireplace surround (in white marble, no less) feels like such an upgrade for only around seven hours of work (total), and the budget wasn’t nearly as scary as “marble tile” sounds. Ha!
- Cement board (2 sheets): $16
- Masonry screws: already owned
- Liquid Nails Heavy Duty: $2
- Subway tile: $5.50/sq ft, totaling $70
- Thinset: Already owned
- Tiling tools (saw, trowel, float, etc): already owned
- Grout: $11
- Tile sealer: already owned
- TOTAL: $99 (*thanks to some holiday gift cards from the family, we actually only spent $49 – but without gift cards or already owned supplies this might be an $150 upgrade)
I think we’re riding a herringbone high right now. Seriously. I’m so glad we decided to do that pattern. For some reason it makes me feel super fancy. Maybe we need to rename our house Downton Ranchy.
And maybe we should record a sequel to this SNL skit called “Marble Subway Tile.”
Does anyone else have some good experiences with subway tile, a herringbone pattern, or tiling a fireplace in general to share? Have you purchased a marble column recently? Are you like “What is this, The White House??”
*This post contains affiliate links

Toni says
It looks great, but I must admit I am still not use to the blue. It’s like, where’s their kitchen?
Marilyn says
You can’t be for real..open your mind just a little to explore color. In nature every single color is found and nobody says “why is that color HERE?” lol! Why have we isolated only certain colors for certain rooms? Any color can be chic in any room, it just depends on the shade selected and how it is applied with the big picture in mind. You might love it once the room is done! :)
Sheryn says
WOW, I honestly didn’t even know this was “a thing”, but I can’t get over how updated and chic it looks! Well done!!!
Anele @ Success Along the Weigh says
That herringbone is sah-weeet! *SWOOOOOON!* I can’t wait to see how the surround turns out. You guys have waaaay more patience than I could muster.
*bowing to your awesomeness*
Anne @ Planting Sequoias says
It looks amazing! The tile reminds me of your capiz collection of frames…which makes me think it would be awesome if you could tile out that sink nook in your master bathroom in a similar way. Just saying. ;)
YoungHouseLove says
Ahhh, that would be awesome if we didn’t have compete-y granite for the sink top. Hmm, maybe if we got a slab of butcher block or a different stone remnant for the top someday though…
xo
s
Julia says
OOOOOhhh! That would be so pretty. I’m kind of in love with how Katie B.’s new marble hex tile backsplash looks against her dark granite.
aly marcotte says
We’re actually laying out herringbone hardwood floors in our kitchen THIS WEEKEND and I am so nervous and excited!! We are going to blog through the process, and are going to submit our kitchen for reader redesign once the floors are in!! (We’ve finished all of the other parts – homemade wood counters, installing hex tile backsplash, homemade floating wood plexiglass shelves, etc.) So funny you mention herringbone now – it’s the last piece of our puzzle!!
YoungHouseLove says
So exciting Aly! Good luck with everything!
xo
s
Angel says
LOVE IT. It looks great with the blue too, like clouds and sky. I dont think it would have been as beautiful with the grellow. Good choice.
Robin @ our semi organic life says
Looks amazing! So cool how with a few simple tools and your imagination you guys can create great stuff! So custom and fab!
katie says
I am loving those tiles. And the herringbone. Looks amazing. Can’t wait to see it once you add all the trim and molding!
Meredith says
“But I didn’t LOOSE too many tiles…” I think you mean “LOSE”. :)
It looks bee-yoo-tiful. I also love, “what is this, the White House?” Hey, why not?
YoungHouseLove says
Haha, yes, lose, not loose!
xo
s
Jess @ Little House. Big Heart. says
Wow. After seeing how gorgeous that herringbone pattern came out I’m seriously reconsidering going with 2″ marble hexagon tile (ala Katie Bower) for our bathroom floor!
It’s a little hard to tell from the photos; what is the predominant color in the tiles? It looks like some gold-y and grey tones on a creamy white background… is that right?
YoungHouseLove says
I’d call them cool in tone, so probably more like white with some grey veining and sometimes a tint of ivory. Maybe check them out in person and bring some home to see how they read in your lighting situation though?
xo
s
Amy says
Was the marble tile pre-sealed when you bought it? Usually stone tile gets two coats of sealer (unless it’s pre-sealed), one before grout, so the excess grout will release from it, and one after grout. A little, but potentially important point that could make for a disappointing result. Looks like it worked out for you, though.
YoungHouseLove says
I’m not sure, it definitely felt sealed but the grout went on well, and then we sealed it again (using sealer meant for marble and stone) which seemed to work too!
xo
s
Gabriella @ OLinA says
Oh wow – very nice. It gives it a very different look. I have always been intimidated by tiles….so afraid that I am going to screw up and won’t be able to fix it. Then we did our bathroom, and I screwed some of them up but fixing it wasn’t as bad as I thought.
Great job. Can’t wait to see the finished picture.
Kristen | Popcorn on the Stove says
That marble tile looks so fancy! I love it!
Lianne says
Looks gorgeous, and haha Downton Ranchy gets a vote from me
YoungHouseLove says
We need a footman stat!
xo
s
Kerry says
Gorgeous, you guys! Can’t wait to see the final product.
I think we’re SNL twins — I’m constantly referencing little-known sketches that no one else likes — and a few weeks later, they should up on YHL. Thanks for dorking out with me!
YoungHouseLove says
Haha, of course Kerry!
xo
s
Rose says
And John needs a Valet. Love that show.. the end of season 3 is too much.. I don’t want it to be true!
YoungHouseLove says
Haha, yes! But don’t pronounce it val-ay! It’s val-it! And yes, so sad about the end of season 3 (although losing a certain girl a few episodes earlier was sadder for me because she was my favorite).
xo
s
Nico says
She was my favorite too (tear). And then there’s Edith…
YoungHouseLove says
Oh Edith!
xo
s
kathy says
poor Edith! Why is everyone in the family so mean to her? She’s such a modern woman for the times.
YoungHouseLove says
Haha, it’s true!
xo
s
Rose says
Spelled it wrong..whoops! I definitely wanted to ask someone to “VALIT” my car.. guess that wouldn’t work. And yes I feel like she shouldn’t have gone so soon. Now him? Oh what will become of Downton??
YoungHouseLove says
My thoughts are that a certain widow will have some interesting dating experiences. Sex In The City anyone? Haha!
xo
s
Jennie says
I am in love with this little thread here! Sherry, she was my favorite too. (Although I DO love Cousin Violet!)
And yes, I think a certain widow is up for some interesting experiences … and dare I say, I think her future husband is already on the premises? Just a guess … It’s hard to predict Downton!
YoungHouseLove says
Oooh! Who could it be?!
xo
s
Katy @ The Non-Consumer Advocate says
That look fantastic, great job!!!
That is all.
Katy
Karen F says
looks AMAZING so far! you make it look so easy!
Katy @ The Non-Consumer Advocate says
That looks fantastic, great job!!!
That is all.
Katy
bridget b. says
I love the way that it looks already, especially the herringbone part. Which got me thinking, I’ve been wanting a coffee table with a marble top, but everything I’ve found has been super expensive and very heavy. I decided to find a way to make my own.
Since I want this table to double as my kids’ play table, it needs to be durable and light-weight. What do you think about making a table top with this same type of tile in the herringbone pattern?
YoungHouseLove says
Hmm, I don’t know if marble would be the best since it’s known for staining (even when it’s sealed I wouldn’t want a red marker on it I don’t think). Anyone have tips for Bridget?
xo
s
Ashleigh says
Marble would be really heavy, but if you aren’t stuck on white Lowe’s sells the black marble subway tiles for $5.98 a square foot. (That wouldn’t have the staining problem). They will also price match Home Depot’s price and then take another 10% off! They have the white too
Krystal says
I second the recommendation for not going with marble on a kid’s tabletop. Marble is an extremely soft stone and it absorbs stains (and those stains will be permanent) very quickly if not regularly sealed and maintained.
Lauren says
I got a great marble coffee table that I LOVE from CB2 at only $350 – it is not, however, light weight or durable (no children in my home, but I make all adults use coasters)
Megan @ Rappsody in Rooms says
Oh herringbone, how I love thee! I just got a grey and white herringbone rug that I like to dance around on these days. The fire place looks amazing! Can’t wait to see the whole project come together!
Austin says
Love the herringbone pattern! The white marble is just stunning, and definitely not as cold/formal as I’d expect. Can’t wait to see the finished product!
[By the way, Sherry, you’ve turned me into a ceramic animal addict. Currently finding funky animals at thrift stores and turning them into gleaming beauties! Driving my roommate crazy, but I love it!]
YoungHouseLove says
Haha, I love it Austin! Keep the ceramic animal dream alive!
xo
s
Jessica says
I once rented a house where the owner really liked the look of marble, but apparently not the price. She covered every imaginable surface with marble-printed contact paper! I must say, I like it much better when it’s actual stone. Good call on the herringbone pattern. It’s much more work, but the results are totally worth it. Can’t wait to see the rest!
YoungHouseLove says
Wow that’s really cool!
xo
s
Danielle says
Looks beautiful! I love the marble and the herringbone pattern is so pretty!
Our fireplace has a black marble-y tile around the firebox and a boring matte black tile on the hearth that’s not our style at all. I’d love to update it some day, but I think we’d have to demo it all first since the hearth is flush with our wood floors. In the meantime, I’m definitely bookmarking your tiling how-to! Thanks for sharing!
YoungHouseLove says
Of course! Good luck Danielle!
xo
s
Tricia says
looks awesome, love the timelessness of marble, but bringing some spunk with the subway tile. What are you going to do about the transition from the tile to your cork floor?
YoungHouseLove says
We have trim pieces that match the cork that used to be there (we installed them when we redid the floor) so we’ll just add those back in. Can’t wait for that part!
xo
s
Cassidy says
Oh my goodness! This is GORGEOUS! I can’t wait to see it all finished!
Jenny says
looks wonderful. I love you both for your fearlessness. It’s hard for me to tell,but just how much is the hearth raised up over the cork floor? I know you said it is aligned, but wouldn’t the board and tile raise it up a half inch or so, or am I missing something? Thanks!
YoungHouseLove says
The hearth was always sunk a bit, so the backer board raised it a little and the tile raised it more, and not it’s pretty much level. Once we put the trim on it’ll all look seamless. Can’t wait to share the pics!
xo
s
Ashleigh says
I love the herringbone tile! I just did that pattern with paint in our bedroom and it really does look fancy.
Angie says
I love the hearth but some reason I thought you were doing the herringbone pattern on the fireplace as well. It’s still great, but in my opinion, looks a little “blah” compared to the floor.
YoungHouseLove says
It was just 7″ aorund, so it wasn’t enough space to really establish” the pattern. So it would have just been little random slices of zigs and zags, which we thought would look busy and weird. It’s hard to explain in words, but when we looked at it in person it was an easy choice :)
xo
s
Gray says
The house I lived in growing up had that horrible shattered brick-tile-esque floor area around the fireplace (it was also a very old house) as well and we always hated it. Too bad my parents didn’t think of something like this because it looks great & I can’t wait to see the finished product! I have a soft spot for beautiful/unique fireplaces!
Brilliant choice of tile by the way, especially with the herringbone pattern!
Fran Siefert says
EXCELLENT = Agree with Downton Ranchy!!!!
Steph @ SeeStephRun.com says
What a gorgeous upgrade. For some reason tile intimidates me. We are planning to tile a bathroom this summer and I am already worried about it! You guys make it look easy though!!
YoungHouseLove says
You can do it Steph!
xo
s
Caitlyn says
I’ll admit that I was a little hesitant because I loved your fireplace the way it was, but the herringbone looks AMAZING! I am a huge herringbone fan, and for some reason it looks awesome with the blue kitchen. Cannot wait to see what the new mantle looks like!
YoungHouseLove says
Aw thanks Caitlyn :)
xo
s
Crystal @ 29 Rue House says
This looks amazing guys! Can’t wait to see it all finished!
RebeccaNYC says
Meh. I liked it before. I guess it’s one of those “you had to have been there” things. Love the blue!
YoungHouseLove says
Bear with me Rebecca! John and I knew sharing this project in real-time meant that lots of people wouldn’t see the beauty in this until it’s totally completed (it’s a hot in-the-middle mess right now). But hopefully once this turkey is cooked you’ll see what we see :)
xo
s
Julie says
Love the tile and the herringbone…curious if you thought about herrinboning it up the sides instead of the horizontal version and your reasoning (obviously waaaay easier the way you did it, for one) for choosing horizontal…
YoungHouseLove says
We tried it both ways, but with so little surface area (just 7″ showing around the top) it wouldn’t really establish the pattern enough (we thought it would look like random and busy half-zigs and half-zags without enough of the tile showing to look like chevron. So we held it up both ways and liked the simpler pattern for the smaller area, just because we didn’t think it would look as chaotic :)
xo
s
Joanna says
So much glam already! I wasn’t sure when you mentioned it, but now I am convinced. It’s really beautiful!
YoungHouseLove says
Aw thanks Joanna!
xo
s
Liz says
I kind of wish it was the same penny tile as the big wall in the kitchen! Any reason you didn’t go that route? Too matchy-matchy?
The brick vs subway tile visual fight is messing with my perception of how great I know it’ll all look in the end, but I’m excited to see the finished product!
YoungHouseLove says
Yeah, we just thought it would be fun and timeless to go with another stone that “goes” but doesn’t match exactly :)
xo
s
Mel says
This might be a silly question but why didn’t you use the herringbone pattern on the top also?
YoungHouseLove says
We tried it both ways, but with so little surface area (just 7″ showing around the top) it wouldn’t really establish the pattern enough (we thought it would look like random and busy half-zigs and half-zags without enough of the tile showing to look like chevron. So we held it up both ways and liked the simpler pattern for the smaller area, just because we didn’t think it would look as chaotic :)
xo
s
Melanie says
That herringbone pattern on the floor looks great! I can’t wait to see the build out for the surround.
I’m going to do a dusty light teal in my kitchen. Still trying to find the perfect shade. So glad to see you went with a blue, too.
Lori says
LOVE the tile! And even love it more that you did it in a herringbone pattern. The shimmer is gorgeous and goes so nicely with all your capiz that you have around the house. Of course you make things look so much easier than I’m sure they really are :-)
YoungHouseLove says
Haha, it wasn’t that bad I promise! It’s always easier with four hands, so if you have a partner in crime it’s not terrible :)
xo
s
Tracy says
That tile is really beautiful, I love the herringbone pattern. We had an old brick fireplace in our house that we painted (following your instructions) and then for my birthday last year, my husband built the surround while I was out of town. I love it, you won’t regret building one. Here’s some pics:
http://www.flickr.com/photos/34894435@N06/8574058303/
http://www.flickr.com/photos/34894435@N06/8574058469/
It still needs another coat of paint (after a year! oops!)but it’s still a huge improvement.
YoungHouseLove says
Oh my gosh it looks awesome! I love it!!
xo
s
Ashlea says
Totally obsessed with it! And I have the same broken terra cotta tile mosaic in front of my fireplace. What a difference the marble makes! Plans are a brewing… ;)
YoungHouseLove says
Good luck Ashlea! You can totally do it!
xo
s
Liz says
I love herringbone and I love carrara marble anything!
Kati Mallory says
Just wanted to drop in and tell you how much I enjoy your blog! I LOVE that you come to us in the middle of projects, but that you usually have quite a bit of progress to show before getting too far into it. Some home blogs just don’t have enough interesting stuff per blog post, but yours is always nice and long with great pictures and good content. Anyway, just wanted to say KUDOS and that I love the tiles (especially that HERRINGBONE — wowza!). Can’t wait to see it’s progress!!
YoungHouseLove says
Aw thanks Kati!
xo
s
Rebecca W says
Do you plan on using the same marble subway tile when you end up doing the other side? Would it possible not be available anymore? Wondering if you thought about buying enough for that side too for future plans.
YoungHouseLove says
Great question! We’re not sure what we’ll do on the other side (it might be pretty to find an old reclaimed wood mantel and just use that with the brick around it and in the firebox like an old cottage look for the living room side). We’re fairly confident that it’s easy to find marble tile, but even if we can’t we’re sure we can find something else that we love for that room :)
xo
s
Maja says
Ha! Bend… and snap! Love it. :D
YoungHouseLove says
Good ol’ John loves a bend & snap reference. Hahah!
xo
s
Scully says
I came across this mantle project on Pinterest this morning and thought of you guys. It isn’t what you’re going for, but I still wanted to share the pretty. Those tiny mosaic tile? I’m swooning.
http://www.theprojectgirl.com/2013/02/14/project-house-mantle-reveal/
YoungHouseLove says
GAH!! It’s amazing! Love it so much. Thanks for sharing Scully!
xo
s
kara @ launching our life together says
So pretty!
Kelly N says
In the future, if you didn’t do it on this project, it might be quicker if you know how many tiles you need cut at a certain angle and cut them all in one trip (or at least more than one tile at a time).
Rather than lay, measure, mark, leave to cut, return, repeat, you have everything you need already!
YoungHouseLove says
SO SMART! We were afraid of miscalculating so we just worked as we went, but you’re right about that speeding things up if we did the math a few times to be sure before cutting :)
xo
s
karen says
looking good!!