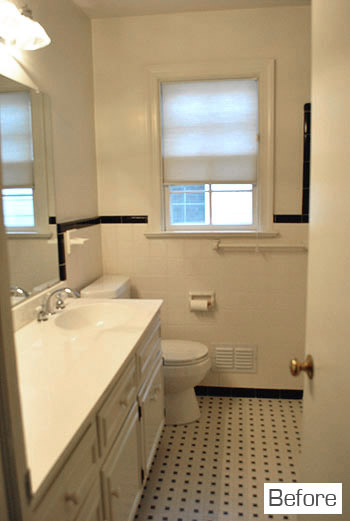
Remember when John mused about who would win the bathroom race (he wanted to frame out the mirror and I was on the DIY window shade train) here? Well, chugga chugga, baby. Momma won.
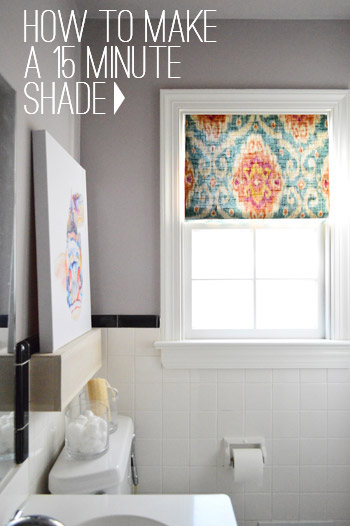
We got the fabric at an outlet called Mary Jo’s a while back (here’s an affiliate link to it on amazon for folks in other areas). We threw Clara a wormy birthday party with her two favorite colors – pink & orange – so when it came to picking out the fabric for the hall bathroom, where we log some serious potty and bath time with her, I couldn’t resist adding some fun with the bold patterned fabric that featured a few of Clara’s favorite colors. Especially since so much of the room is such a safe/neutral tone (lots of white tile and trim + gray walls with a soft plum undertone), so it’s fun to bring some pops of color with the turquoise knobs that we added to the vanity, some colorful art, and our new window shade.
As for the process, it was a semi-similar system to the shade I recently made for the kitchen – except even simpler. Yup, this baby was an $8, fifteen minute curtain (the kitchen one took about an hour). There was still no sewing machine involved, but this time there was also no pinning and less fabric (I only needed half a yard) – so it took a lot less time. You ready for the breakdown? I thought it would be fun to do a minute by minute rundown, so here we go.
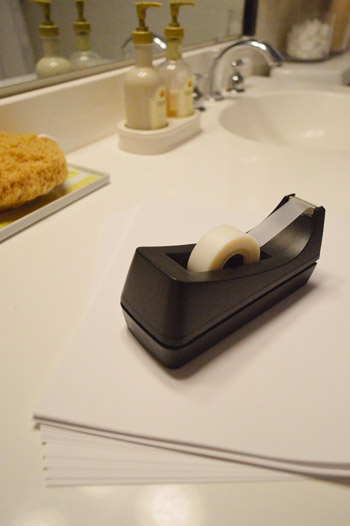
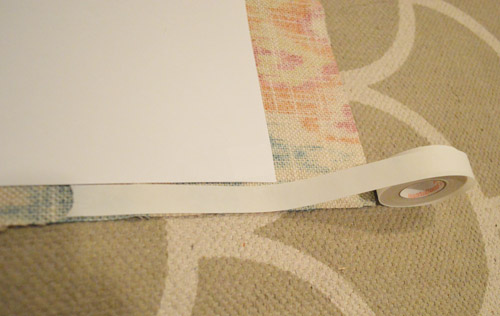
Minutes 1 – 3: Make A Paper Template
I broke out six pieces of cardstock and the tape to make a quick paper template for the exact width and length of the window.
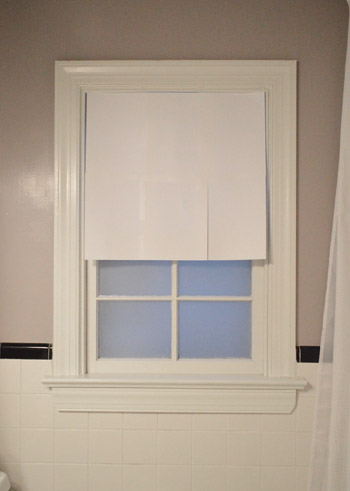
Then I taped it up in place. Sometimes it just helps to visualize things before committing to a certain size/shape.
Minutes 4-5: Cut Your Fabric
Next I carefully placed my paper template on my fabric (so the pattern was centered) and cut it out with an inch border on each side and the bottom with a wider border along the top (3″) since that extra fabric would be used to mount it at the top.
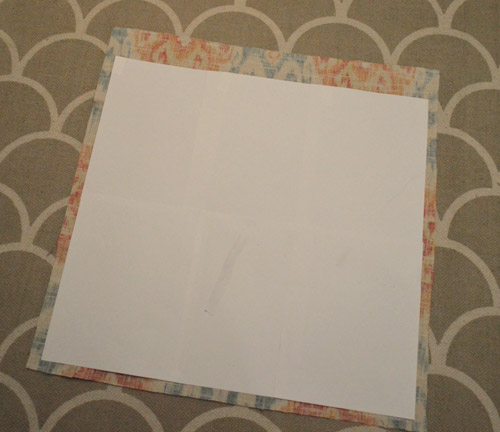
The reason I cut the fabric to just be an inch wider on those three sides was because that’s the width of my hem tape, so once it was hemmed I knew I’d end up with a shade that was exactly the width of the paper template, which perfectly fit our window.
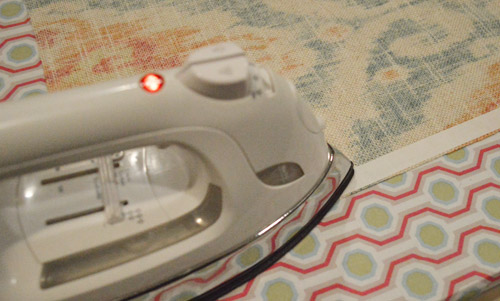
Minutes 6-8: Hem Your Fabric With An Iron
Then I just hemmed all of the sides with no-sew iron on tape (I like heavy duty Heat N Bond). Oh and there’s a little video tutorial on how to use no-sew tape here for anyone interested.
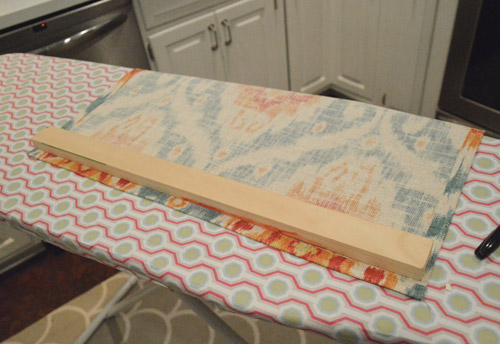
Minutes 9-11: Attach Wood Piece
After all four sides were hemmed and the fabric was now the same width as my paper template and two inches taller on the top for mounting reasons, we got a piece of 1″ x 2″ scrap wood from the basement and cut it to be a tiny bit narrower than the width of the fabric.
Meanwhile, Clara ran off with the measuring tape and was found “helping us measure the tub.” Thanks, girl!

Minutes 12-15: Screw Shade To Window Frame
You can see from this photo that we secured the fabric to the piece of wood. I used a staple gun to attach it so it would be firmly held in place once the wood piece was screwed directly into the top of the window (just like you’d hang an inside mount shade). And see that rolled bottom edge in John’s left hand in the picture below?
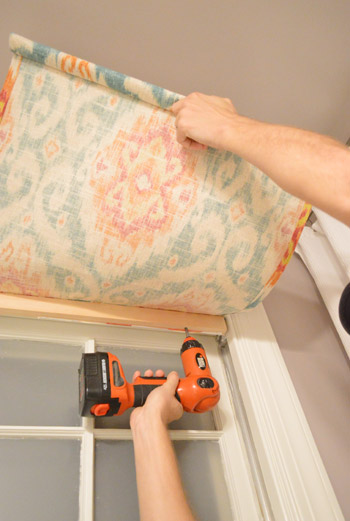
I also grabbed a scrap dowel that we had in the basement and cut it to the same slightly-narrower-than-the-width-of-the-shade size and rolled it into the fabric at the bottom of the shade to create a nice finished bottom edge with a bit of weight to it so it would hang nicely. I secured that rolled edge with a few stitches in a few places (no sewing machine came out, so it was just a minute of “tacking” the fabric in a few spots to hold that tight curl around the dowel). That’s optional though, because the shade in the kitchen doesn’t have a dowel at the bottom and it still looks clean and straight. Maybe I was just in a dowel mood?
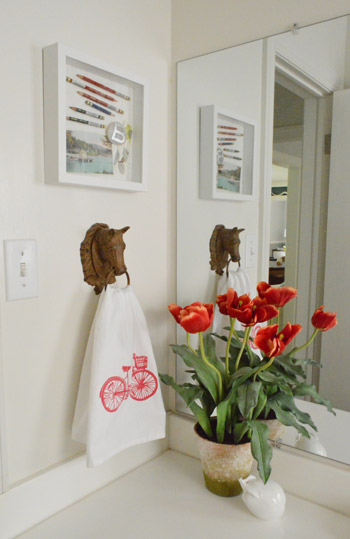
Then, like a finely cooked steak, that baby was done. And since the entire window is also frosted (see how we did that last week), there’s privacy but light still streams in – so it doesn’t feel dark. I love how the colors in the fish canvas not only tie into the gray-plum walls but are also echoed in the window fabric. I mean if you can’t have fun with fish art and some bold window fabric in the bathroom, where we can you have fun with it? #fishcanvas4eva

Update: We’ve had a few “but how do you wash your DIY window shade?” questions, so here’s that answer for ya: just like any other store-bought roman shade or blind, it’s not washable, but we didn’t have any issues with the white Ikea shades that we had for over four years in our first house (which couldn’t be washed). If you really wanted to be able to wash yours, maybe you could connect it at the top to the wood mounting piece with washable velcro instead of stapling it?
It still looks a little undone in here since we have to frame out the mirror and I’m planning to bring in a few more pops of color to tie in the curtain, but it’s getting there. The sweet thing is that the other side of the bathroom has some nice bright colors that balance things out pretty well already.
And the room as a whole is definitely looking a lot more “us” than when we started…
So if you have a basic looking bathroom, a half-yard of colorful fabric, and a few bright accessories you can hopefully spice things up without a total gut job. A cheerful little patterned curtain isn’t even a giant commitment since it’s so easy to switch out down the line. Oh and did you notice how I colored my brassy doorknob black in the photo below thanks to a little one-second photoshop work? Hah! Someday I’ll actually spray him for real.
Here’s the updated bathroom list:
rehang the shower curtain at ceiling height
trim out the unbalanced window(more on that here)switch out the light fixture(more on that here)add some meaningful art(more on that here)build in a shelf over the toilet for some leaning art(more on that here)paint the walls a fresher color to help the original tile pop(more on that here)upgrade the vanity hardware(more on that here)
frost the window(more on that here)make a bold fabric shade for the window- frame out the mirror over the vanity for a less builder-basic look
- ORB that brassy gold doorknob
- paint the whitewashed shelf in a solid white tone (since the room is coming together more & we’re feeling that now – we’ll keep you posted!)
- add finishing touches/accessories and dish out a budget breakdown for you guys
Psst- Wanna know where we got something in our house or what paint color we used? Just click on this button:


Wendy says
Speaking of ORBing… the fireplace in my living room has a built in knob to open/close the flue. It’s brass and rusted so I want to ORB it, but I think it’s built into the fireplace. I was thinking I could give it a quick spray right before I leave for work in the morning, and then the house would be empty for 10 hours and I could repeat over several days to get good coverage and minimal fumes. It’s so small – do you think that would be ok? It’s winter in New England, so I can’t leave the windows open, and if I wait to spring… well I may have a dog in the house by then so the house wouldn’t be empty. What do you think?
I spray painted grapevine wreaths this weekend (in my garage) and they are drying now so I can hang them in some windows (book project!). Thanks for the inspiration!
YoungHouseLove says
Hmm, I think that could work! I would run a fan all day long too – just a little oscillating plug-in one if you have one. Oh and be sure to tape and cardboard off everything around it so you don’t accidentally spray the wall,etc! Good luck!
xo
s
Wendy says
Whew! I have a ceiling fan in that room and will definitely run it. I sometimes err on the side of “eh, it’ll be fine” so it makes me feel good to know you approve :) Thanks!
Erin says
Looking good. I’m madly in love with your new knobs on the cabinets. Such a great color and shape.
YoungHouseLove says
Aw thanks Erin!
xo
s
Sarah Tucker says
I know what I am doing today when I get home! Can’t beat a 15 minute project!!
PS: Love the nickname for Clara – I mean Da Bean :)
-Sarah Tucker
YoungHouseLove says
Wahoo! Go Sarah go!
xo
s
Steph says
I love it! Super cute and what a great idea to get style when you don’t need the function.
My weekend was spent cooking because I had all my friends over on Saturday night for “Friendsgiving.” We cooked a turkey (my first!) and a whole bunch of sides. Plus homemade desserts, including ice cream! :) We might have gone overboard and I might have spent my entire day yesterday slowly cleaning my house.
YoungHouseLove says
Haha, that sounds like so much fun!
xo
s
Anna says
I am loving all those colors! I am saving all this inspiration for when we buy our own fixer-upper of a house (on the hunt for that nowadays).
This weekend, I discovered that we have a Habitat for Humanity Restore in Boston, and dragged my hubby for an hour-long drive to check it out. We didn’t buy anything but it was worth the trip! And I also did some web design updates on my little blog (having way too much fun with that!)
YoungHouseLove says
I just got sucked into your blog and scrolled down to read how DIY saved your wedding! LOVE it! And your dress = gorgeous!
xo
s
Laura Miller says
Just curious why this shade didn’t get hung above the window frame? I need to do something like this in my bathroom and I was always picturing it higher per your usual MO. :) Thanks!
YoungHouseLove says
I thought it would be fun to do something inside mounted in here, so I made that paper template to make sure I liked it and then just went for it! Since there’s lots of height with the long shower curtain and light over the sink, it seems to work :)
xo
s
Sarah | offbeat & inspired says
Love this! I’ve had a towel hanging up in my bathroom window for months, waiting to be replaced with a curtain. This is perfect!
Kat says
Man! It’s lookin’ good in there. Clean and bright with a splash of color. Isn’t light pouring in from a window the BEST? We knocked some things off our to-do list but it still seems like it’s never ending! I know you can relate;) http://www.mapleleavessycamoretrees.com/2012/11/this-is-reno-that-never-ends.html
YoungHouseLove says
Haha, we totally can! It’s looking great in the laundry room! Love the flooring you chose!
xo
s
Meghan says
I seriously just put up a shower curtain in this fabric yesterday to finish off my bathroom re-do. A little bit of deja-vu!! Love it!
YoungHouseLove says
No way! I bet it looks awesome on a shower curtain!
xo
s
Anna says
Awww, thanks Sherry! The whole wedding DIY thing… you know that you guys totally had a hand in inspiring me to do that, right? Like that hydrangea bouquet, that was totally your idea (which I did credit when I wrote about it), so thank you for that!
YoungHouseLove says
Aw that’s so sweet Anna! I just loved soaking up your blog!
xo
s
lauren | rebuild (health & home) says
One. Now that the nickname is all official and out there on the internet, you’ve gotta get that girl to Chicago to stage a Bean/Bean photoshoot at Millennium Park. Maybe you can get real meta and have Clara holding a lima bean in the picture.
Two. You evil genius, you! The shade looks great. I love projects that come about from scrapping around-the-house odds and ends together. Last week I cut a lampshade in half and used an Anthro bag and contact paper to finagle a solution for our ugly bedroom ceiling fan. I’d venture to say your versions of these types of projects are a bit more polished and professional :)
Lauren
YoungHouseLove says
Haha, that actually sounds awesome!
xo
s
Kirsten says
Clara is getting so big! I love that you do not shy away from tweaking when things aren’t quite the way you imagined. I feel less guilty going back and re-doing something that isn’t quite right because if you two do it!
YoungHouseLove says
Oh yeah, you gotta tweak! Haha.
xo
s
Janelle says
Sherry, thank you for telling me/all of your readers about hem tape! I never even knew it existed until you mentioned it way back when and now I’m dreaming of pillow covers & pretty curtains. It seems like a great alternative to having a big bulky sewing machine in my tiny apartment. Haha.
YoungHouseLove says
Oh yes, it’s the best invention since sliced bread! And oil-rubbed bronze spray paint! Haha.
xo
s
Audrey says
I love your window shades (this one and the kitchen)! Kudos for keeping it simple but not settling for un-styled simplicity!
Jennifer says
That fabric is cute, but the everydayimmeasurin is AWESOME!!
YoungHouseLove says
Hahah!
xo
s
Lynn @ Our Useful Hands says
That came out so nice and quick too! Your bathroom is just chuggin right along. This weekend we went on our annual camping trip. It was so nice and relaxing. The kids ran around. We ate tons of food. The only thing I would have changed was the 29 degree morning we had to wake up to and the raccoon that stole my bag of snack size snickers and cracked one of my eggs open like he was going to make us breakfast.
My best, Lynn
YoungHouseLove says
Hahahahahahahaha, I’m sorry to laugh but you paint a hilarious picture.
xo
s
skeeter says
What did I do this weekend? Got my YHL book int he mail…woot! Loving it! And also loving the DIY shade. I might have to try something similar in my kitchen..hmmm
YoungHouseLove says
Wahooo! So glad you got your book!
xo
s
seansmom says
GREAT window treatment! Your bathroom is looking so cheery!!!
What did we do?…Got hubby to work some more on our library. We’ve got all the base cabinets in and this weekend, we put down the tops the bookshelves will rest on, built out the window seat area, and set the built in desk area in place. He cut, sawed, glued and screwed, and I held stuff, did the staining and of course the clean up. Will send you some pictures when we’re all finished, so you can see the wonderful room my husband created for all my books!
YoungHouseLove says
Sounds awesome! We’d love to see the pics!
xo
s
Cara says
It looks great! Really brings the room together. We had a big 1 year old birthday party for my daughter this weekend. I have quite a few projects I am working on but unfortunately I am the handy/project person in our home so no racing :(
I’m trying to talk my hubby into a beadboard backsplash right now which I want to paint a very dark brownish/black. i was all set on tile and then got scared it was so permanent and now want to do this. Just need to convince him!
YoungHouseLove says
Ooh that sounds pretty!
xo
s
Leslie says
Hah :) My daughter has the same shirt and wants to wear it every day ;-) Glad I bought one for now and one a size larger for next year!
Lindsay says
Another possible nickname for Da Bean? Lil’ Bean. or Lil’ B. Both have “thug” written all over them.
Melissa G says
can’t wait to see how you frame out the mirror. SOOOO need to re-do ours!
Camille says
Sorry to be micromanaging your decor, but I can’t help but think the red coral piece on your entrance table would look fab in there. I don’t know why, but coral = bathroom to me. I like the red accents in the bike towel and the print. And I said it once so I’ll say it again, LOVE that you’re keeping the old tile!
YoungHouseLove says
Oh that would be pretty!!
xo
s
Jennifer says
I can’t wait to hear how you frame out the mirror – both of my bathrooms have mirrors like that and I know it can look better. I hope it’s easy too as I have no saws or miters or things like that. But I do have a tape measure! :)
Marcie says
It looks great! I really is all coming together. I have to admit, I doubted you when you first showed the fish painting and the color you decided to “paint” the shelf. I may or may not have audibly winced when I read that post. Now I get it. I’m sorry for doubting :(
Vicki says
I love the fabric and the super easy curtain! I’m REALLY itching to see the mirror framing post though since we have 3 bathrooms with plain mirrors like yours and I am dying to fix them!
LARY @ Inspiration Nook says
Love this. So simple yet changes the room immediately.
YoungHouseLove says
Thanks Lary! You’re so sweet.
xo
s
JenniferH says
I got a laugh out of your paper template, I make these for every project too my husband thinks it is so stupid! But my little templates get things done right the first try and unlike my husbands method of banging uneeded holes in the walls :)
YoungHouseLove says
Amen! Anything to save me from a bigger mistake later…
xo
s
Jess Nicolosi (DeCesare) says
“every day I’m measurin’ ” Love it.
Kimberly Visram says
Love what you’ve done with the bathroom so far. It was a happy happy joy joy day in our house on Saturday. I finally did some painting and check out the colour – Summer Plum by Benjamin Moore. Totally out of my comfort zone but I’m loving it. The teal walls in your guest bedroom were definitely an inspiration.
YoungHouseLove says
I LOVE THAT COLOR!!
xo
s
how2home says
Love the color and pattern on the fabric! Such a nice punch of color to the bathroom. Amazing! It was so nice to meet you guys in Toronto couple weeks ago! Keep doing what you guys are doing :)
YoungHouseLove says
Aw thanks! It was great to meet you too!!
xo
s
Caitlin says
ahh. I love anything ikat, I will have to try this!
really looking forward to your post about how to frame the bathroom mirror. As an almost one year old homeowner, I am still learning how to DIY (mostly through inspiration from your blog, so thanks!). but real quick, I was going to frame my mirror a few weekends ago and went to Home Depot for supplies and I got really discouraged when a few guys there told me I’d be better off going to a picture frame supply store! They said those plastic clips would be tricky. I left sad and discouraged! hopefully your post will re-inspire me!
Diane says
Tweaking things is illegal in 4 states. Tsk, tsk.
YoungHouseLove says
Haha!
xo,
s
cicile says
As I am taking care of family with allergies (dust etc.), I cannot imagine not being able to wash the curtains :'(
YoungHouseLove says
Aw man, maybe a version that buttons/velcros on and off (or zips on and off) of the part that gets mounted to the top could work?
xo
s
Cris says
but… what if you want to wash it? i don’t see the point….
YoungHouseLove says
You can’t usually wash any sort of roman shades or blinds, so it’s just like that but less money ;)
We had white Ikea shades for over four years in our first house (which couldn’t be washed) and didn’t have any issues with ’em, but if you really wanted to wash yours, maybe you could connect it to the wood mounting piece with velcro instead of stapling it?
xo
s
Cassondra says
Love how such simple things made an amazing transformation! It looks like an all new room and it didn’t cost a ton. Hoping we can make some things happen in our house! Just started renovating two of the rooms and so far so good! Looking like a brand new house already :).
Maria @ Inspiration Affirmation says
I love how this turned out — it look so pretty! That bathroom is really comin’ along; I am loving it! I also really like the other side of the bathroom with the fun towel and the shadow box! Very cool!
Annie says
omg…love the paint color with the fabric! you really brought that room to life. very inspiring. I was just pricing roman shades for my living room and they’re sickly expensive. this is inspiring me to look into making them myself..maybe?
YoungHouseLove says
You can do it Annie!
xo
s
Gabbi says
That fabric is pretty amazing. I love the pop of color it gives to the bathroom!
Cindy says
Such a quick and easy project! So, I imagine your book tour is over? Does that mean no makeup date for NY :(? I’ve been holding off on getting the book cause I wanted to get it at the signing (and of course get the chance to meet you guys!!) but I’m itching for it now!!
xo Cindy
YoungHouseLove says
Oh no we still have more than half of it to go! We’re just home for a Thanksgiving break with the family! The NY date still has to be rescheduled so we can’t wait to hear back about it! It’s definitely on!
xo
s
Allyson M says
I seriously thought about you guys so many times this weekend that I actually dreamed about you last night! Crazy, right? We’ve been living in this house since March (it was bought as a “flipped” foreclosure) and just realized that the previous owner didn’t seal the shower properly! So all these months water has been slowly dripping down under the flooring and caused a mold issue! UGH! Now we have a completely gutted bathroom and haven’t really decided what we want to do with it yet- although I know it’s going to take some time to figure out exactly how we’re going to put it back together! It’s kind of a breath of fresh air having such a clean slate to work with! No more ugly sink and mirror! Hoorah! :)
Cindy says
WooHoo!! Best. News. Ever!
Hannah says
That fabric is my most favorite!
Kate says
Love the shade and the paint! But I think the whitewash wood box does not go with the classic tile. Maybe it’s the angle of your photos?
Natalie says
I really love the fabric you went with, and thanks so much for the tutorial! We’re in the process of buying a house and I’d like to do something similar for the large kitchen window ~ this was just what I was looking for! Thanks again! :)
Heather W. says
Love your bathroom update but just had a quick question. I have a 1/2 bath that needs updated. It has no window and I can not seem to decide whether to go lighter or go dramatic and dark???? I have very similiar colors as your house in mine and I am debating between a light neutral or a dramatic dark such as hale navy? I am loving the color in your bathroom too. Your thoughts would be mucho appreciated…. =)
Carolyn L says
Sherry, I apologize if someone already asked this, but where is your towel hook (hoop? loop? ring? lol) from? I LOVE it and we’re wrapping up our brand new powder room..
YoungHouseLove says
Aw thanks! That’s a secondhand store find, although we think it was from a stable and not meant to be a towel holder- the ring was just too perfect though! Maybe try ebay for “iron horse” or “wall mount iron horse” and see what comes up?
xo
s
Deborah Nowland says
It looks good, and definitely easy. I would recommend you add a curtain liner fabric. If you get a lot of sunshine through the window the fabric will quickly fade unless you add a curtain liner.
YoungHouseLove says
Thanks Deborah! We actually have a lot of patterned curtains in this house and thanks to living in a wooded area they haven’t faded (even after two years with brightly patterned curtains in the big front window!).
xo
s
Jo says
So how do you take off the shade to be washed?
YoungHouseLove says
Just like any other store-bought roman shade or blind, it’s not washable, but we didn’t have any issues with the white Ikea shades that we had for over four years in our first house (which couldn’t be washed). If you really wanted to be able to wash your homemade shade, maybe you could connect it at the top to the wood mounting piece with velcro instead of stapling it on? Hope it helps!
xo
s
Leah says
Wow… that Clara is such a cutie!