It has been nearly a month since we talked about stenciling the floor in our sink nook (we’re all over the place lately – Clara’s room, outdoor tiling, installing our stair runner, landscaping adventures, starting in on the kitchen, etc) but that doesn’t mean we were done in there. We had a few more bullets to check off:
- sealing those stenciled floors
- loading in the closet after the floors dried (hopefully with more function/storage instead of the stuff we thoughtlessly shoved in there when we moved)
- updating the vanity with more function as well as a fresh finish (up close it was in pretty rough shape, and we thought we could gain more function from that empty cubby on the right side if we added some inexpensive shelves)
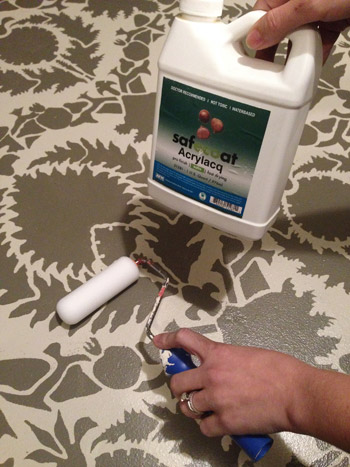
So to knock that first bullet off the list, Sherry used a small foam roller to apply two thin and even coats of SafeCoat Acrylaq to the floor (that’s our favorite non-toxic eco poly). She rolled those on about 24 hours apart, and wore a respirator just because it wasn’t fully odorless. It went on pretty fast, and she started in the furthest corner of the closet and just rolled her way out of the room. Then we blocked it off while it dried so we didn’t end up with puppy paw prints in it.
It has been a nice protective final step that has made us less worried about any chips or drips (heck, I was even able to scrape off a dried staining splatter later without damaging the stencil).
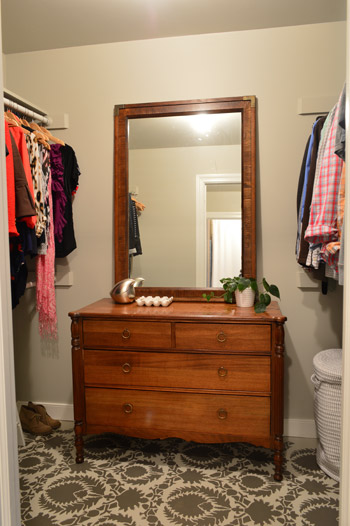
Once the floor sealer was fully cured (we waited around 72 hours) we could load in the closet, and this time we tried to be more thoughtful about what went where, and what would be the most functional. Bringing in a dresser and a mirror as well as a laundry room basket to use as a hamper really helped to make it a lot more storage-friendly than a bunch of random bins and piles. Although this dresser will probably end up in the nursery and our new West Elm dresser will most likely make its way in here after we add that wall of built-ins around our bed down the line.
Here’s a shot of Sherry’s side:
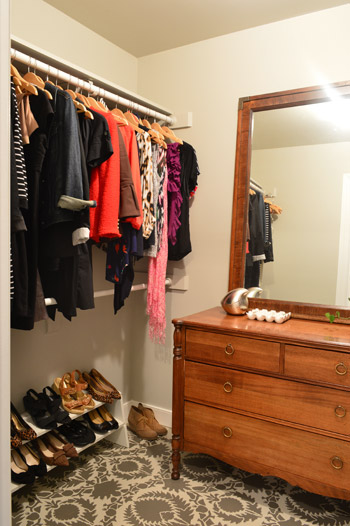
And my side (note the difference in shoe quantities):
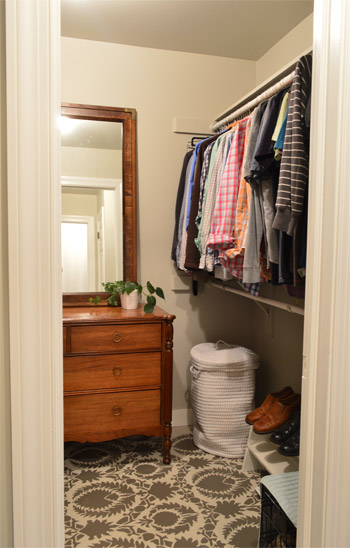
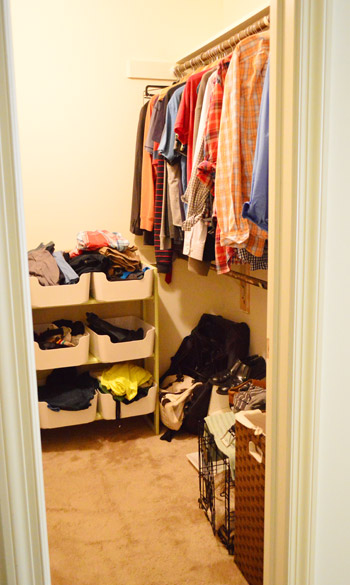
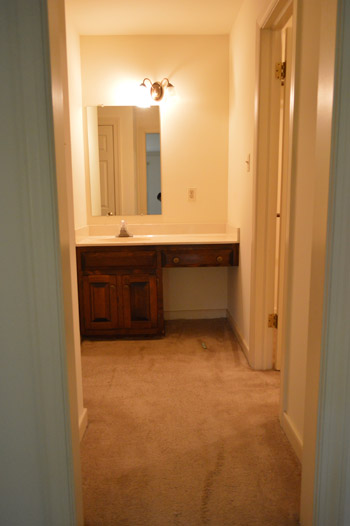
Just as a refresher, here’s what the closet looked like when we moved in and threw everything down. It’s amazing what some fresh paint on the walls, trim, floor, and ceiling along with some much needed organization and some old furniture (the dresser’s a hand-me-down and the mirror was a $5 yard sale find) can do.
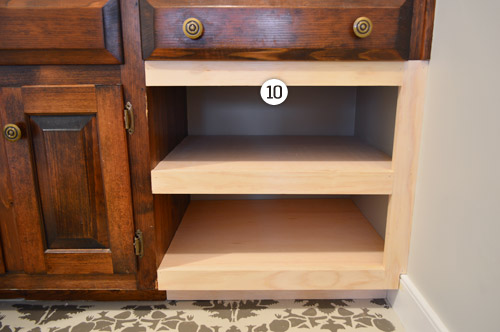
So with those first two bullets checked off, it was shelf o’ clock. They were actually a pretty easy build. We just had to keep two things in mind as we planned them out on paper:
- how to build supports for two shelves (function!)
- where to create places to attach the front-facing boards to make it look pretty (form!)
So here’s what we came up with (we like to map things out on paper together, and then we usually divide and conquer, so in this case Sherry did the polying and most of the closet organization, and I was happy to do the shelf building and staining, especially since the stain isn’t without VOCs). Then Sherry swooped back in and tackled the hinges and reattached the doors while I switched out the drawer and door hardware.
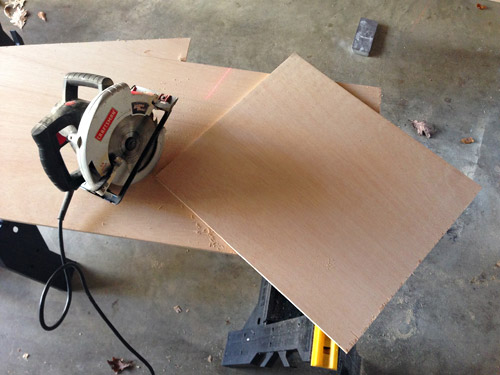
As for the building step, I started from the floor and worked my way up.
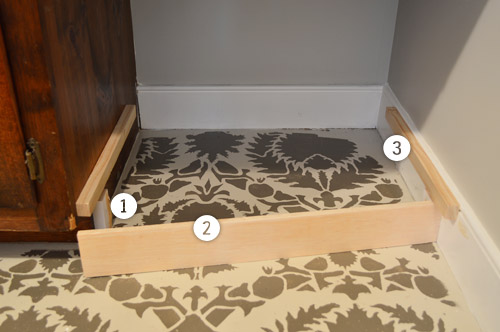
Step 1: I nailed a small piece of scrap wood into the side of the vanity (and another just like it into the baseboard on the opposite side) with one side resting on the floor and the other set back 3/4″ from the front of the vanity’s toe kick.
Step 2: This created a spot for me to attach a strip of plywood that would effectively extended the toe kick all the way across.
Step 3: Right above this, I nailed in matching strips of 1 x 2″ board (that I ripped in half on my table saw) that the bottom shelf could rest on. You’ll see in Step #10 why I didn’t line it up with the bottom of the vanity.
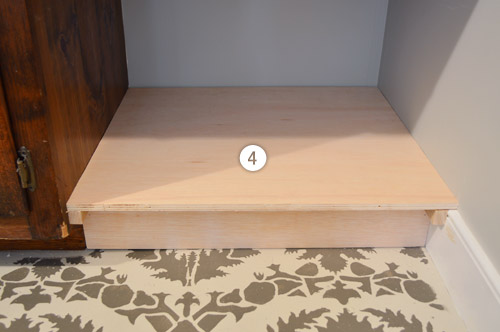
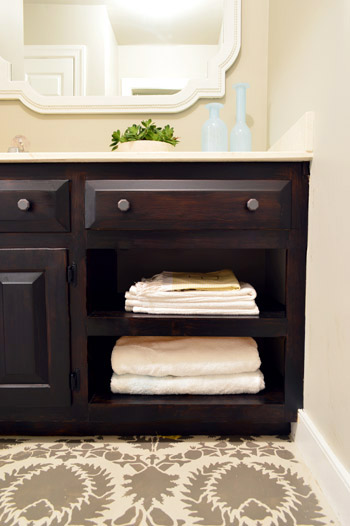
Step 4: I placed my first shelf, which I cut out of a piece of plywood I had leftover from the sunroom ceiling. It was such a tight fit I didn’t bother nailing it into place.
Step 5: After carefully measuring for the middle of the space, I nail-gunned another set of small strips on all 3 sides. I hadn’t done a back strip on the last shelf because it (coincidentally) rested perfectly on the top of the baseboard. Note: in this photo you can see how the vanity is a little dinged up in a few places, hence our desire to refinish it, which would also help us match the new wood with the old wood.
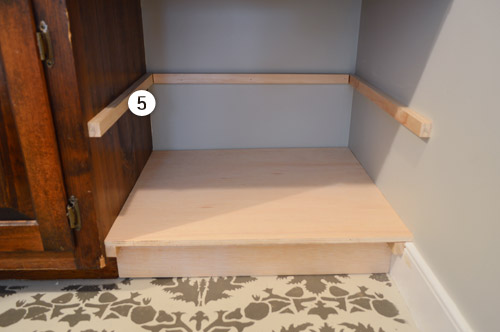
Step 6: I added my second shelf, cut from the same piece of plywood scrap.
Step 7: We wanted to add a face board at the top of the opening too, since we were trying to mimic the spacing and the look of the existing vanity. So by putting a face board here, it’d continue the strip of wood between the drawer face and cabinet doors that’s already on the left side. So, just like I did for the toe kick, I nailed small pieces of scrap wood here, set slightly back from the front of the cabinet.
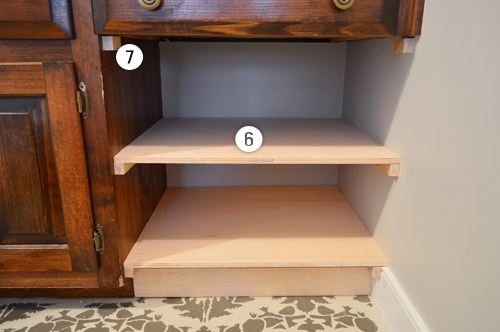
Step 8: Time to start adding face boards. I started with a vertical one against the wall, which was a 1 x 3″ board (which really measured 1 x 2.5″) that I ripped on the table saw to be 1 x 2″ to match the width of the existing face boards. I glued and nailed it into place against the supports and shelves.
Step 9: Since that vertical face board got nailed into the small piece of scrap that I had placed at the top, I no longer had a place for the horizontal face board to attach. So I screwed another piece of scrap into the back of the vertical board to create one again.
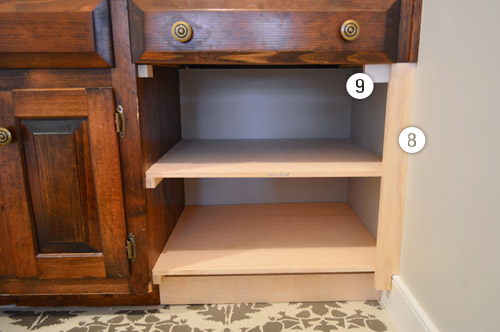
Step 10: Now to put in all of the horizontal face boards, which were from the same 1 x 3″ board that I ripped to be 2″ wide. I was able to glue and nail these into the supports and the front edge of the shelves too. I wanted the bottom edge to match up with the existing vanity, which is why in Step 3 I had to account for the 2″ face board when placing my shelf support strips.
Here’s a pulled back shot of the whole thing once it was constructed. Putting it together was pretty fast (maybe an hour?). It was triple-checking all of my measurements and cutting my pieces that took the longest. I was certain I was going to mess something up along the way – like forgetting to account for the thickness of the plywood shelf when placing my support strips – so I tried to do the whole measure twice (and think twice) before cutting once thing.
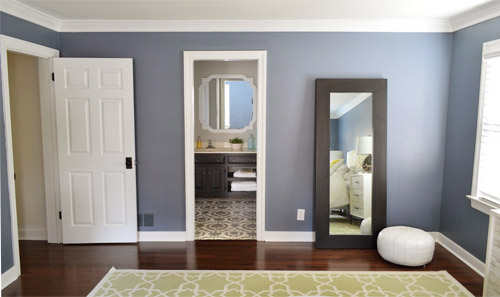
Obviously the next challenge was getting the new shelves and the old vanity to be the same color. We wanted to maintain some semblance of wood grain texture, but also had some darker toned wood items in our bedroom (like a big leaning wall mirror near the doorway to this sink nook) that inspired us to go a little richer/darker with our new stain choice. We also learned from painting the vanity in our half bathroom that a deeper, less-orange shade can tone down the yellow in the sink top. So after having such a good experience with PolyShades on our stair railing (and having half a can leftover) we decided to go that route with the vanity.
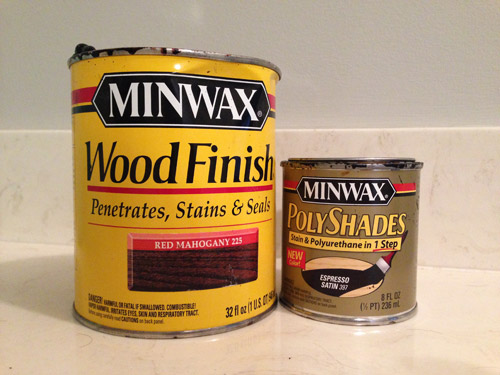
The other can pictured above is some stain that we had leftover from Clara’s dresser makeover, which we first brushed onto the new shelves (to get them closer to the existing color on the left side of the vanity before PolyShading the whole thing to be uniform). I stupidly forgot to take a picture of that step, so unfortunately we’ll just have to skip ahead, but the color wasn’t a perfect match at all – just sort of within a tone or two instead of one side being bleach blonde. Apparently it was enough of a similarity that one coat of Espresso PolyShades (applied with a brush) did the trick in fully bridging the gap. Oh and before I brushed on the PolyShades, Sherry lightly sanded the existing vanity side so it was stain-ready just like the fresh wood was.
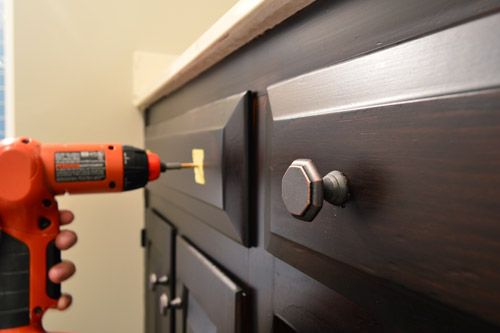
Before Sherry reattached the doors and put the drawer back in (all of which I had removed to make staining easier) we updated the knobs with some cheap ones (under $2 each!) that we found at Target. We thought that the octagon shape was a nice step-up from completely basic but the color would blend in nicely with our dark stain, so the knobs won’t compete with the patterned floor. In addition to using four of them to replace the existing knobs, I also drilled holes to add two more in the dummy drawer face that sits under the sink for a more balanced look.
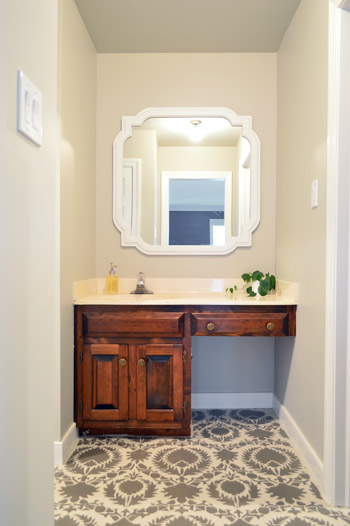
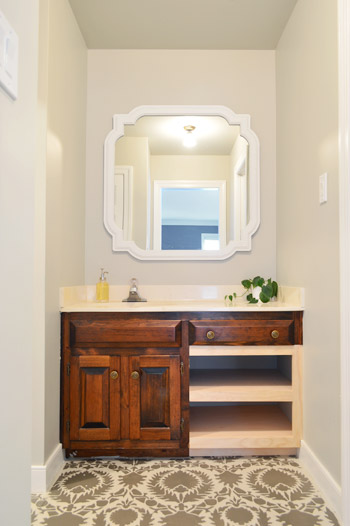
And with that folks, we have a completed vanity. Wait, but let’s reminisce about what we started with:
And where we ended up:
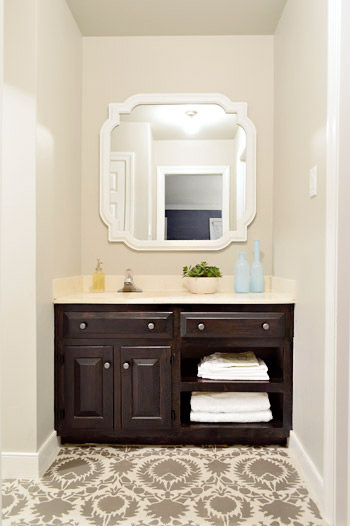
I realize the dark stain color makes it a bit hard to see some of the detail in photos (in person it’s more wood-grain-ish without looking quite as goth-dark), but I’m happy to report that the new shelves look like they’ve always been there. We only did one coat of the PolyShades because we didn’t want it getting any darker, so there’s a little variation in the wood tone throughout the vanity. A second coat might’ve evened that out, but we both decided we like how the variation maintains the wood grain (although if you’re going for consistent overall coverage, we’d probably recommend two coats).
The best part is that the project was super cheap for us. Thanks to having the plywood and both types of stain on hand, our only costs were a 1 x 2″ board and a 1 x 3″ board ($12 total), along with the knobs ($12) and two pairs of new ORB hinges for the cabinet doors ($6). So this entire vanity update came to a grand total of $30. Note: if you don’t have plywood and stain on hand, you might want to add $30 to the budget.
Between this, our half bathroom, and our stair makeover, we’re starting to notice that we’re really gravitating towards high-contrast, almost monochromatic color schemes in the smaller nooks and crannies of this house. I don’t think it’s an indication that we’re ditching color (our adjoining bedroom has blue walls, a green rug, bright yellow pillows, and a patterned headboard – and we can’t forget Clara’s recent wall & door makeover) but I do think we’re appreciating the impact of some dark accents in the mix.
And just for fun, here’s a before shot from that angle from before we moved in:

So I’d say we’re getting pretty darn close to calling Phase 1 of the sink nook complete. Which is probably a good thing since we’re halfway through stripping wallpaper in the dining room and ready to start rolling on some kitchen updates before the chaos of the holidays (along with the showhouse kicking into high gear). What did you guys do this weekend? Any building? Sealing? Staining? New hardware? Closet organization? As boring as the closet organization part sounds, it’s pretty nice to finally have a real spot for all of our stuff after feeling like we were living out of bins and sorting through random piles since June.

Lena says
I love the light by the door, but not by the garage – I think what is getting me about the garage one isn’t so much the size, but rather that the light is going up vs. down. I think it should hang down from the plate like the original light vs. going up and above the plate for the garage side. Think this would tie it more into the garage portion and wouldn’t draw the attention up to the large brick wall so much.
Maybe a barn style light would look good there and light up more of the drive way portion too vs. the wall.
Lena says
Oops looks like my comment went on the wrong post.
YoungHouseLove says
No worries!
xo
s
Kathleen says
Wow…what an amazing, low-cost transformation! You guys have such great vision. The vanity looks seamless. I have the same type of vanity in my master bath and could use extra storage space, so I may have to try this. Thanks for the inspiration, I never would’ve thought of it on my own!
Megan says
Okay, I know that you are calling this phase one – but I love this sooo much, I would leave it forever. I am sure you have a plan, but if that was my bathroom, I would add a sweet sliding barn door (to block out light) and call it phase done!
Can’t wait to see what you are doing downstairs!!
YoungHouseLove says
Aw, thanks Megan!
xo
s
Emily @ DavenportDIY says
Gorgeous!! I love the final shot, where you can see your bedroom and the bathroom nook- the stenciled floors are amazing, and I love how much more balanced the vanity feels with the shelves. Nice work you two- it’s shaping up quite nicely in there :)
Ely says
Amazing transformation! I love what a few boards and some stain can do! Looks great with the floor too. I also like the idea of rolling the towels! :)
Donna says
You guys are SO inspiring! I mean, it looks like a completely different house! I wish I had half of your talent.
Kimberly says
Waaaaaaaait! The lovely splurge of a dresser is going into the CLOSET?!?!
YoungHouseLove says
This is going to be a Beverly Hills Housewives closet (read: faaaabulous, except with clothes from Old Navy in it, haha) so it’ll be the crowning jewel with built ins and a chandelier and a big mirror…. at least that’s the plan for now. Who knows, it could end up on the wall across from the bed too and we could just do built-ins in the closet!
xo
s
Tiffany says
That sounds amazing Sherry! Did you see Sawdust Girl’s closet reno? I could live in there!http://sawdustgirl.com/2011/12/20/executive-master-closet/
YoungHouseLove says
YES! IT’S SO AMAZING!
xo
s
keisha says
Oh my gah, you guys somehow inspire and depress me at the same time (as in, why can’t I do that??). Your vanity area redo is AMAZING!
YoungHouseLove says
You can totally do it Keisha! 5 years ago we didn’t know how to build or even caulk anything! We painted all of our trim in the wrong finish. It’s a learning curve for everyone, but you can get there, I promise!
xo
s
Erin says
What a great look! well done!
Susan C says
Looks great!
This weekend, after living with an in-progress (for 5 yrs or so) basement drywall job, we finally taped, sanded and primed! Looks soo much better, just to have all those seames sealed and a solid wall to look at. Can’t wait to actually paint those walls and put up some baseboard. Looks like a real room now.
Angela says
Wow, how impressive! This is one of my favorite before and afters. Your ability to visualize an outcome–and then MAKE IT HAPPEN!–just keeps me coming back, Monday after Monday! :)
Carli says
That vanity looks great!! Love the built in shelves and the new, darker stain!
Manda Wolf says
Looks great! I want to stain my kitchen cabinets, but I’m afraid my hubby will freak out on me! But back to you guys, I love what you have down with that room. It is a great way to live with it until you are ready to do it right.
Melissa @ReThreads Charlottesville says
Great job! I really though the “where we ended up” pic with the vanity was your photoshopped version you’ve shown before. I guess what I mean is that it looks unreal/perfect! :)
Melissa @ HOUSEography says
Wow! That is an awesome before and after. Great work, guys! Any plans to update the faucet? Seems like that’s the last thing that could use an update.
YoungHouseLove says
If we find a secondhand one or super cheap one we’ll grab it I think, but we’re not ready to spend $70 for an oil-rubbed bronze one we love or anything, just because for Phase 2 if we have a double sink it might call for a different size/spread (you know how some faucets have one hole and others are wider and have three?)
xo
s
threadbndr says
Our local HD had some discontinued bathroom faucets on sale for 50% off. Might be worth a look. That single knob plastic ‘crystal’ is crying to be replaced……..
YoungHouseLove says
Thanks so much for the tip!
xo
s
Sarah C says
Looks fab! I have seen mixed reviews on that Polyshades stuff but I am becoming more convinced that when it doesn’t work, user error was to blame. Might have to finally stain MY handrail.
(On an unrelated note, I seem to remember that Nov was the time you guys would be finding out the sex of the new baby. Can’t wait for THAT reveal!) :D
YoungHouseLove says
Aw, thanks Sarah C! It was supposed to be around Thanksgiving but they put us off until early December because the office is closed for the holiday. Womp-womp. But we’re still so excited! More on that here :)
xo
s
Addie says
Oh my goodness, that looks AMAZING! I can’t believe how good it looks compared to what it was before. Well done!
Isabel says
Wow, guys, it really came out great! That closet is huge to fit that dresser! And I don’t know if the color of the bedroom is true to life in the pic, but it is gorgeous. I may have to steal it ;-) I felt really accomplished this weekend: we finished removing the wallpaper, YAHOO!!!! When it came to the last layer, it was all steam power, although the paper being so old and brittle, we had to scrape as we steamed, so it took a lot of good ol’ muscle power too, but it is gone, gone, GONE! I also took advantage of the warmer weather and ORBed the old chandelier. It’s a really nice, classic chandelier but the brassy finish was in pretty bad shape but now it looks gorgeous. Now we can prime, paint, get new curtains and a rug and call that baby done. After the Holidays we plant to tackle our kitchen too, lots more wallpaper there! I guess there’s still hope for some Madonna arms for me ;-)
YoungHouseLove says
That’s so awesome Isabel! Get on with your bad self!
xo
s
mariela says
UM…that paint color in your bedroom is EVERYTHING!.
YoungHouseLove says
Thanks Mariela! It gets really moody and dark at night. We are loving it!
xo
s
Tania says
It looks so awesome! I am tempted to go home and rip up all our bathroom carpet and build shelves riiiiight now!
Lauren says
Awesome! I love that espresso finish. I was looking for a good color to refinish my bathroom vanity, and possibly my kitchen cabinets down the line, and I think I found my winner!! Can’t wait to see what you guys do next!
Leah says
One word: YES.
Holly says
A+++++!!!!! The vanity turned out great! You guys inspire me!
Alex says
So great! I love the subtle way the knobs play off the shape of the mirror, too.
Did you paint the wall behind your new shelves? Or is it just dark from lack of light?
Looks AMAZING, youngsters. Well done!
YoungHouseLove says
Thanks Alex! That’s just darker looking from the light, but it’s the same color as the walls in that nook (Revere Pewter).
xo
s
Alex says
(P.S. That is an AMAZING hm time, John! Seriously, you should feel very proud. Speed demon!! How’d the race feel?)
YoungHouseLove says
Thanks Alex! I felt good! Just some tightness afterwards but that’s to be expected. I had done a few long runs beforehand to be sure I was up for that length, so it was nice to go into it with some confidence (I’ve only done one other HM, but usually run 10Ks). I’m planning to write a post about it on Young House Life soon, so I’ll add some photos and info over there soon!
-John
Alex says
Ah, I see. Thanks!
Yes, please do! I’d love to read it. Congrats again!
Janet says
I think it’s amazing that you can look at that plain, outdated space, and imagine something this beautiful! I noticed you completely removed sink-area lighting and just have that overhead (which you can see in the mirror reflection). Has that lighting been sufficient?
YoungHouseLove says
Yes, the overhead light has been good for us, but eventually we’d love to move the fixture we capped behind the mirror up above it.
xo
s
Samantha says
Looks amazing! I still can’t get over how much I love the floor.
Holly says
Do you think the staining technique would work on el-cheapo builder’s grade white bathroom vanity cabinets? I’m almost wondering if I’d have to peel off the white coating/layering then stain/paint them. You guys seriously did an amazing job!!!
YoungHouseLove says
Hmmm, I think PolyShades is made for a wood base and not a white bathroom cabinet. If it’s laminate I’m not sure peeling them would help (it might not be stainable wood underneath). Anyone have tips for Holly?
xo
s
Callie says
If it’s laminate it won’t work the same I don’t think. But check whether it has a wood layer or if the front is wood perhaps – I redid our vanity and although the bottom inside was plywood painted white, I was able to carrrefully sand off the white paint (with an electric sander, by hand would have been terrible!) and still have enough wood left to stain (I just used MinWax). I had a couple spots inside with white flecks and I couldn’t sand any more without flaking the plywood, so after I was done I just used a tiny artist’s paintbrush and some black paint to hide those spots. Hehe :D Since it was only inside the cabinet, it totally worked.
Holly says
Cool thanks everyone :-)
Martha says
LOVE IT. I might shed some tears when you do the full demo! Though, to be fair, these photos don’t show off the AWESOME blue tile in the shower/toilet area :-)
YoungHouseLove says
Haha, it’s true! Don’t forget that there’s not only blue tile on the floor, but on the shower walls and there’s dark blue and brown wallpaper going on. Hotness.
xo
s
Gwen says
Wow! What an improvement. Great job, guys!
You are getting so much done in that new house! Way to go.
YoungHouseLove says
Thanks Gwen!
xo
s
Stephanie @ Sandpaper and Glue says
may I ask where you got the white hampers in the closet? I’ve been on the lookout for something we could have in plain sight in the office (which is where I make my husband keep his clothes so I can have a closet to myself…lol), but that can also be easily trekked to the basement to do laundry. thanks!
YoungHouseLove says
That was from HomeGoods maybe 6 months ago? They have the best baskets and bins there!
xo
s
M says
Yesterday I decided to paint my bedroom door. I have two containers of white paint.. I didn’t realize I grabbed the matte until I was almost done. I wondered why it was going on rough ,figured I didn’t stir it enough. Somebody is repainting today.
YoungHouseLove says
Oh no! Good luck M!
xo
s
Krissy says
It looks GORGEOUS. I love that you’re including darker toned wood in this house. Everything seems a lot moodier – in a good way!
I am working on a pinterest project while I heal from wisdom tooth extraction. Woohoo!
YoungHouseLove says
Oh no! Feel better Krissy!
xo
s
Lindsey says
It looks SO great, you guys! What a transformation! My weekend was spent finishing my third and final paint job in our living room dining room combo. It took me three tries, but I finally found my color: French Linen Grey, by Pittsburgh Paints.
YoungHouseLove says
Ooh, that sounds gorgeous Lindsey!
xo
s
stephanie says
How is it Sherry hasn’t taken a pry-bar to the side splashes yet? Sherry, you must have completed your Side Splash Remover’s Anonymous therapy. : )
Looks beautiful!!!
YoungHouseLove says
I know, right?! This sink sabotaged me because it actually has a backsplash that’s connected to the sink top (it’s shaped like an L but all fused together instead of having a top part I can pop off). I could get the sides off, but I thought since the back had to stay put since it was fused, it was just fine to leave it all for this phase.
xo
s
Celia Rodriguez says
You guys did an awesome job, I am impressed. Question though, how is the texture of the floors? Isn’t subfloor rough? Doesn’t not cause splinters?
YoungHouseLove says
Ours is super smooth, but we hear that’s uncommon. It’s called particle board, and some is splintery like plywood (which I believe needs to be sanded smooth before you paint it) and some of it’s made sort of like MDF (ours was almost velvet-y or felty it was so smooth and chalky).
xo
s
Ray Ray says
I really love that you decided to go with a dark stain on the cabinet. It all turned out so well!
Fernanda says
It’s really impressive how, with dark hardwood floors and a dark paint and white trims, your room looks twice the size than with everything at the same color! Love it!
alison says
STOP IT. You guys never cease to amaze me!
Bethany Cox says
holy crap yall. that looks amazing.
Callie says
Ahhh gorgeous!! I LOVE it. I’m so glad you didn’t paint that vanity! I’d been thinking that its chunky lines and rich wood grain would look so great stained. It reminds me of one of my favorite projects in our last house, also restaining our bathroom vanity with a similar dark rich wood tone. It makes such a huge difference for such a great low price tag! (this is ours, and hey I just remembered I used your dresser makeover in Clara’s nursery as inspiration!: http://house-capades.blogspot.ch/2012/04/visual-music-bathroom-vanity-makeover.html)
And also great idea on the shelves! I love how you maintained the chunky look of the vanity.
YoungHouseLove says
Wow, Callie! That looks so good! Thanks for sharing the link!
xo
s
Gabbi @ Retro Ranch Reno says
Wowww, what a difference! It’s really coming together. I love the darker stain you guys went with. Gorg!!
Sayward says
What?! Total transformation!!!! I’m dying!!!
Haley says
One question – I know you guys are a shoes off inside household, how does that work if you store all of your shoes in your closet? We’re trying to move to a shoe free indoors, and so far we’ve just been storing all of our shoes in bins by the door.
YoungHouseLove says
We have a shoe basket downstairs for all of our everyday shoes (hence why you only see two pairs of shoes of John’s in the closet). So unless we’re doing something formal (speech, family gathering, meeting, signing, etc) we don’t get shoes from the closet, they just come from the shoe basket downstairs. So the closet is just for storing less-in-rotation shoes.
xo
s
Haley says
That makes so much sense! And would seriously reduce the amount of shoes in bins by our door (and thus the time it takes to find the pair you’re looking for when leaving). One of those things that’s so obvious I just couldn’t think of it, thanks!
YoungHouseLove says
Of course! Good luck Haley!
xo
s
Dayna says
Ok, that explains a lot. I was wondering how someone with a self-proclaimed “shoe problem” only had 9 pairs. I was thinking, I don’t even care about my shoes, but I have more than she does!!
YoungHouseLove says
Haha, oh yeah, some are hiding out in the shoe bin downstairs!
xo
s
Susan says
The vanity looks like it’s always been that way! It looks wonderful! I also love the addition of the darker accents you are doing in this house. I’ve always been a fan of darker frames and other accents to “ground” a design.
Emily says
Serious this is awesome! Talk about bang for your buck!!
Sara says
It looks lovely! But forgive me for being dense. I am confused… Did you STAIN or PAINT the cabinet? Or stain THEN paint? Or stain just the new shelving and paint all of it?
YoungHouseLove says
It’s all stained. PolyShades is a rich dark stain, and the larger can of Minwax stuff is what John used on the half of the vanity that was blonde, just to even the tones a little bit more (it wasn’t perfect, but then when the darker stain went on everything it looked nice and seamless).
xo
s
Kim says
Wow. Just wow.
Jess says
Cute post title. Very silly. Also, you guys are makeover rockstars. You make everything look beautiful and you work so darn fast together. You’re unstoppable. Keep up the great work and love seeing the results of your projects!
YoungHouseLove says
Aw, thanks Jess!
xo
s
Michelle | Birds of Berwick says
These small updates can feel so rewarding! And it looks great! Now what to do about a blue bathtub… :-)
YoungHouseLove says
Haha!
xo
s
Ruth says
WOW!! I love it!! What a difference.