It has been nearly a month since we talked about stenciling the floor in our sink nook (we’re all over the place lately – Clara’s room, outdoor tiling, installing our stair runner, landscaping adventures, starting in on the kitchen, etc) but that doesn’t mean we were done in there. We had a few more bullets to check off:
- sealing those stenciled floors
- loading in the closet after the floors dried (hopefully with more function/storage instead of the stuff we thoughtlessly shoved in there when we moved)
- updating the vanity with more function as well as a fresh finish (up close it was in pretty rough shape, and we thought we could gain more function from that empty cubby on the right side if we added some inexpensive shelves)
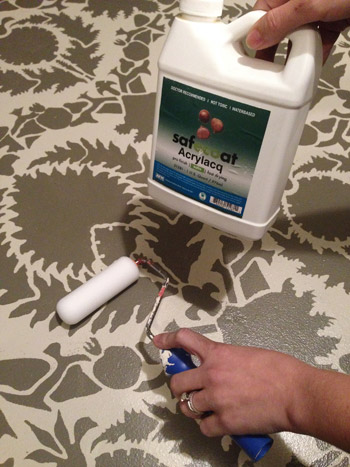
So to knock that first bullet off the list, Sherry used a small foam roller to apply two thin and even coats of SafeCoat Acrylaq to the floor (that’s our favorite non-toxic eco poly). She rolled those on about 24 hours apart, and wore a respirator just because it wasn’t fully odorless. It went on pretty fast, and she started in the furthest corner of the closet and just rolled her way out of the room. Then we blocked it off while it dried so we didn’t end up with puppy paw prints in it.
It has been a nice protective final step that has made us less worried about any chips or drips (heck, I was even able to scrape off a dried staining splatter later without damaging the stencil).
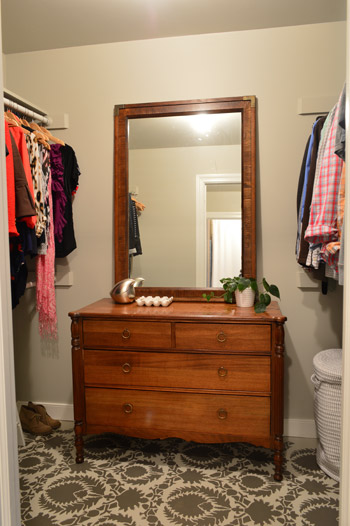
Once the floor sealer was fully cured (we waited around 72 hours) we could load in the closet, and this time we tried to be more thoughtful about what went where, and what would be the most functional. Bringing in a dresser and a mirror as well as a laundry room basket to use as a hamper really helped to make it a lot more storage-friendly than a bunch of random bins and piles. Although this dresser will probably end up in the nursery and our new West Elm dresser will most likely make its way in here after we add that wall of built-ins around our bed down the line.
Here’s a shot of Sherry’s side:
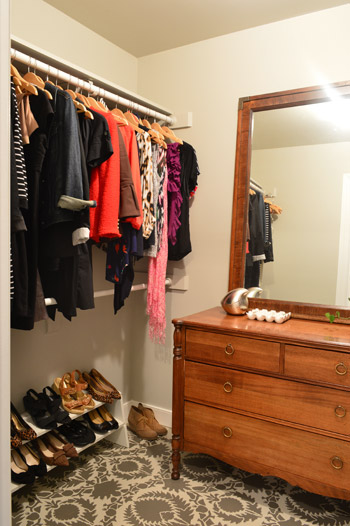
And my side (note the difference in shoe quantities):
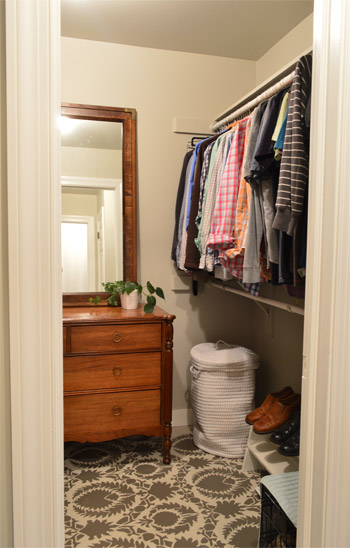
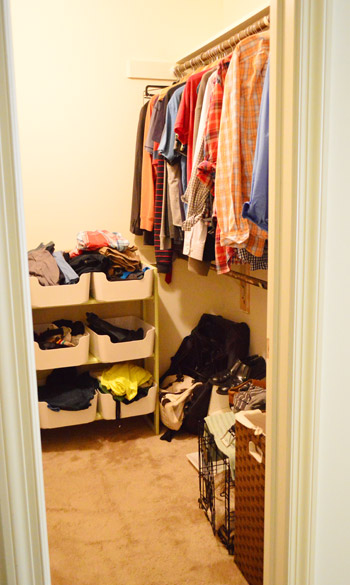
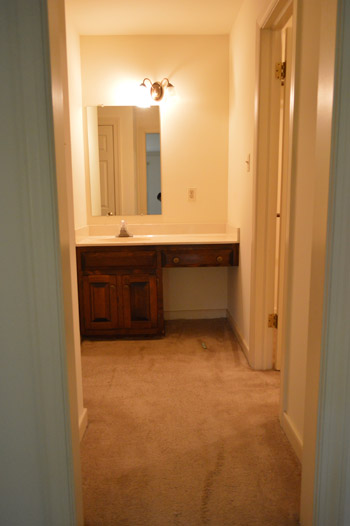
Just as a refresher, here’s what the closet looked like when we moved in and threw everything down. It’s amazing what some fresh paint on the walls, trim, floor, and ceiling along with some much needed organization and some old furniture (the dresser’s a hand-me-down and the mirror was a $5 yard sale find) can do.
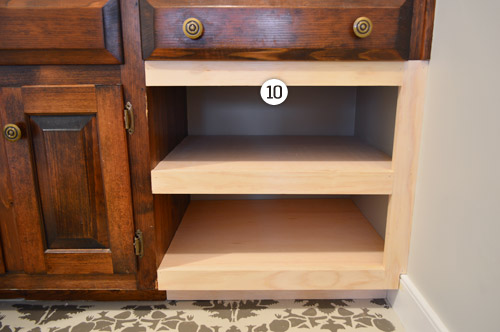
So with those first two bullets checked off, it was shelf o’ clock. They were actually a pretty easy build. We just had to keep two things in mind as we planned them out on paper:
- how to build supports for two shelves (function!)
- where to create places to attach the front-facing boards to make it look pretty (form!)
So here’s what we came up with (we like to map things out on paper together, and then we usually divide and conquer, so in this case Sherry did the polying and most of the closet organization, and I was happy to do the shelf building and staining, especially since the stain isn’t without VOCs). Then Sherry swooped back in and tackled the hinges and reattached the doors while I switched out the drawer and door hardware.
As for the building step, I started from the floor and worked my way up.
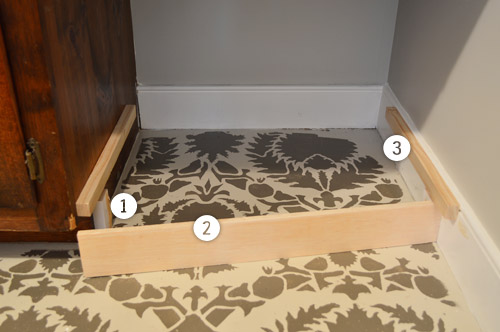
Step 1: I nailed a small piece of scrap wood into the side of the vanity (and another just like it into the baseboard on the opposite side) with one side resting on the floor and the other set back 3/4″ from the front of the vanity’s toe kick.
Step 2: This created a spot for me to attach a strip of plywood that would effectively extended the toe kick all the way across.
Step 3: Right above this, I nailed in matching strips of 1 x 2″ board (that I ripped in half on my table saw) that the bottom shelf could rest on. You’ll see in Step #10 why I didn’t line it up with the bottom of the vanity.
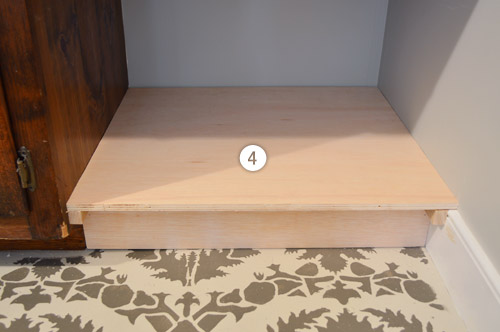
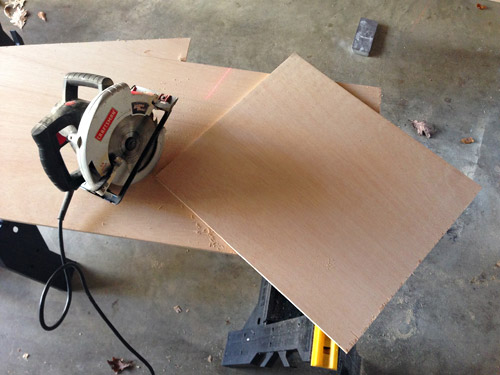
Step 4: I placed my first shelf, which I cut out of a piece of plywood I had leftover from the sunroom ceiling. It was such a tight fit I didn’t bother nailing it into place.
Step 5: After carefully measuring for the middle of the space, I nail-gunned another set of small strips on all 3 sides. I hadn’t done a back strip on the last shelf because it (coincidentally) rested perfectly on the top of the baseboard. Note: in this photo you can see how the vanity is a little dinged up in a few places, hence our desire to refinish it, which would also help us match the new wood with the old wood.
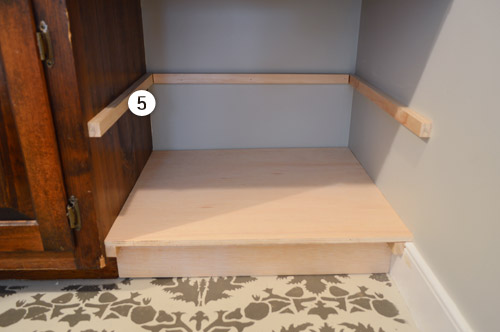
Step 6: I added my second shelf, cut from the same piece of plywood scrap.
Step 7: We wanted to add a face board at the top of the opening too, since we were trying to mimic the spacing and the look of the existing vanity. So by putting a face board here, it’d continue the strip of wood between the drawer face and cabinet doors that’s already on the left side. So, just like I did for the toe kick, I nailed small pieces of scrap wood here, set slightly back from the front of the cabinet.
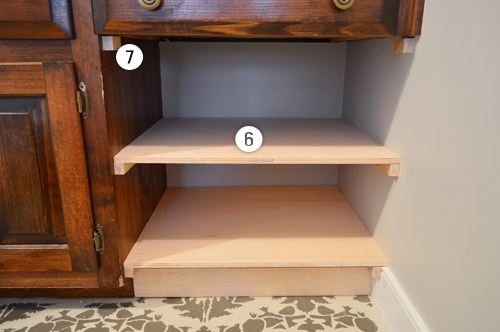
Step 8: Time to start adding face boards. I started with a vertical one against the wall, which was a 1 x 3″ board (which really measured 1 x 2.5″) that I ripped on the table saw to be 1 x 2″ to match the width of the existing face boards. I glued and nailed it into place against the supports and shelves.
Step 9: Since that vertical face board got nailed into the small piece of scrap that I had placed at the top, I no longer had a place for the horizontal face board to attach. So I screwed another piece of scrap into the back of the vertical board to create one again.
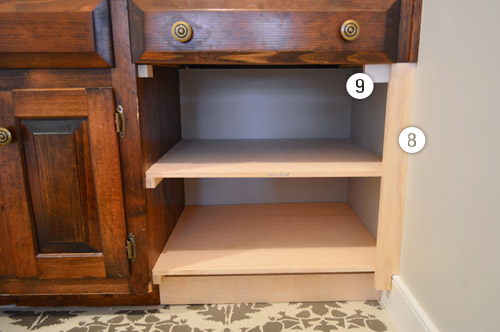
Step 10: Now to put in all of the horizontal face boards, which were from the same 1 x 3″ board that I ripped to be 2″ wide. I was able to glue and nail these into the supports and the front edge of the shelves too. I wanted the bottom edge to match up with the existing vanity, which is why in Step 3 I had to account for the 2″ face board when placing my shelf support strips.
Here’s a pulled back shot of the whole thing once it was constructed. Putting it together was pretty fast (maybe an hour?). It was triple-checking all of my measurements and cutting my pieces that took the longest. I was certain I was going to mess something up along the way – like forgetting to account for the thickness of the plywood shelf when placing my support strips – so I tried to do the whole measure twice (and think twice) before cutting once thing.
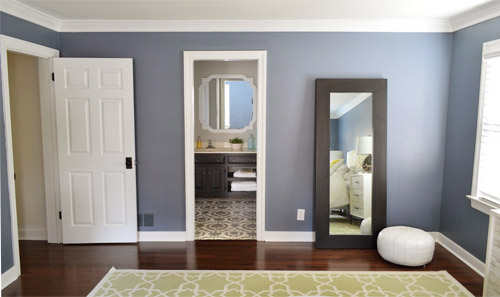
Obviously the next challenge was getting the new shelves and the old vanity to be the same color. We wanted to maintain some semblance of wood grain texture, but also had some darker toned wood items in our bedroom (like a big leaning wall mirror near the doorway to this sink nook) that inspired us to go a little richer/darker with our new stain choice. We also learned from painting the vanity in our half bathroom that a deeper, less-orange shade can tone down the yellow in the sink top. So after having such a good experience with PolyShades on our stair railing (and having half a can leftover) we decided to go that route with the vanity.
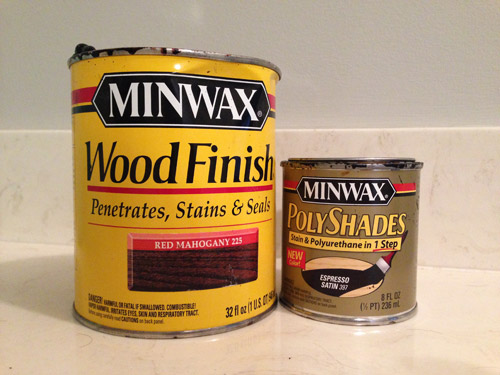
The other can pictured above is some stain that we had leftover from Clara’s dresser makeover, which we first brushed onto the new shelves (to get them closer to the existing color on the left side of the vanity before PolyShading the whole thing to be uniform). I stupidly forgot to take a picture of that step, so unfortunately we’ll just have to skip ahead, but the color wasn’t a perfect match at all – just sort of within a tone or two instead of one side being bleach blonde. Apparently it was enough of a similarity that one coat of Espresso PolyShades (applied with a brush) did the trick in fully bridging the gap. Oh and before I brushed on the PolyShades, Sherry lightly sanded the existing vanity side so it was stain-ready just like the fresh wood was.
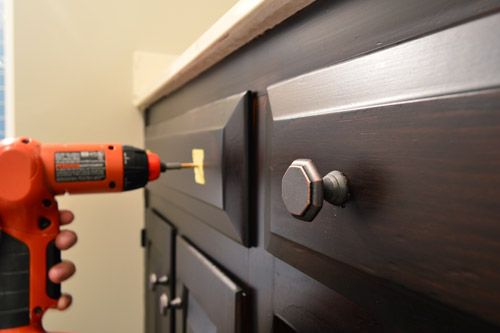
Before Sherry reattached the doors and put the drawer back in (all of which I had removed to make staining easier) we updated the knobs with some cheap ones (under $2 each!) that we found at Target. We thought that the octagon shape was a nice step-up from completely basic but the color would blend in nicely with our dark stain, so the knobs won’t compete with the patterned floor. In addition to using four of them to replace the existing knobs, I also drilled holes to add two more in the dummy drawer face that sits under the sink for a more balanced look.
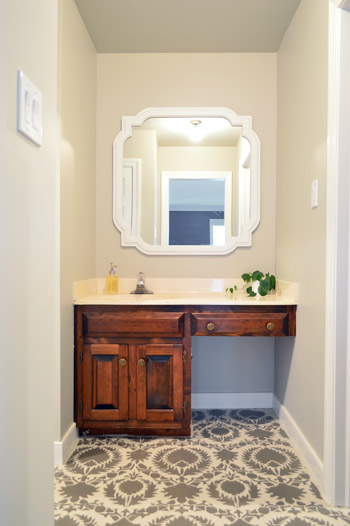
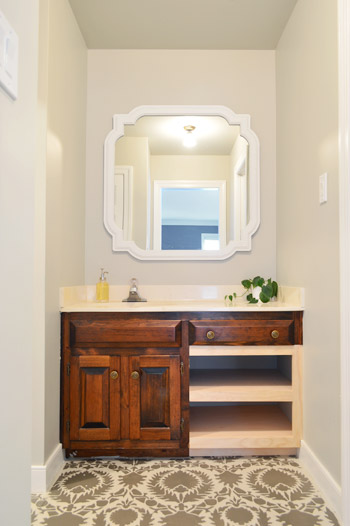
And with that folks, we have a completed vanity. Wait, but let’s reminisce about what we started with:
And where we ended up:
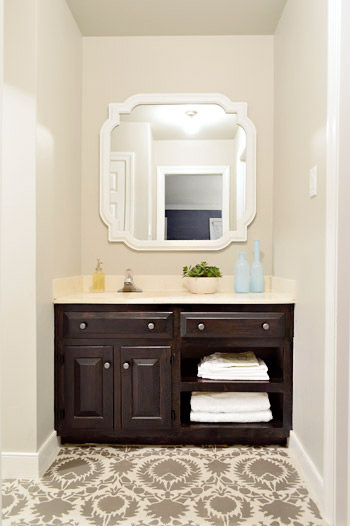
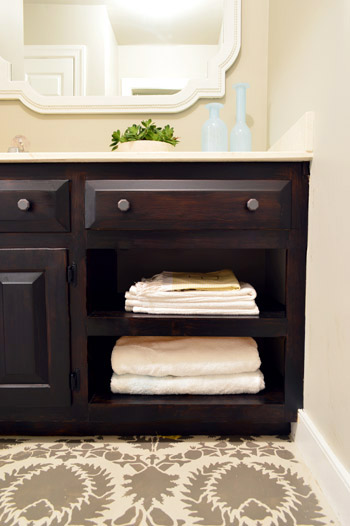
I realize the dark stain color makes it a bit hard to see some of the detail in photos (in person it’s more wood-grain-ish without looking quite as goth-dark), but I’m happy to report that the new shelves look like they’ve always been there. We only did one coat of the PolyShades because we didn’t want it getting any darker, so there’s a little variation in the wood tone throughout the vanity. A second coat might’ve evened that out, but we both decided we like how the variation maintains the wood grain (although if you’re going for consistent overall coverage, we’d probably recommend two coats).
The best part is that the project was super cheap for us. Thanks to having the plywood and both types of stain on hand, our only costs were a 1 x 2″ board and a 1 x 3″ board ($12 total), along with the knobs ($12) and two pairs of new ORB hinges for the cabinet doors ($6). So this entire vanity update came to a grand total of $30. Note: if you don’t have plywood and stain on hand, you might want to add $30 to the budget.
Between this, our half bathroom, and our stair makeover, we’re starting to notice that we’re really gravitating towards high-contrast, almost monochromatic color schemes in the smaller nooks and crannies of this house. I don’t think it’s an indication that we’re ditching color (our adjoining bedroom has blue walls, a green rug, bright yellow pillows, and a patterned headboard – and we can’t forget Clara’s recent wall & door makeover) but I do think we’re appreciating the impact of some dark accents in the mix.
And just for fun, here’s a before shot from that angle from before we moved in:

So I’d say we’re getting pretty darn close to calling Phase 1 of the sink nook complete. Which is probably a good thing since we’re halfway through stripping wallpaper in the dining room and ready to start rolling on some kitchen updates before the chaos of the holidays (along with the showhouse kicking into high gear). What did you guys do this weekend? Any building? Sealing? Staining? New hardware? Closet organization? As boring as the closet organization part sounds, it’s pretty nice to finally have a real spot for all of our stuff after feeling like we were living out of bins and sorting through random piles since June.

Amber says
It is truly amazing what stain and creativity will do!! The entire bathroom looks incredible and for such a low cost!
Again, great job. Y’all really can make anything look high end!
Happy Monday!
~Amber
jenson says
A plant in the closet. Thats a new one!
YoungHouseLove says
Ha! That’s my experiment. I ignore these plants like crazy, yet they grow beastly-long (I have to cut them back) so we’ll have to see how it goes with him…
xo
s
Iz says
I was wondering about the plant(s) in there too – do they do ok without any natural light?
YoungHouseLove says
This one used to live in the sink nook (which is also an area without any windows) for about 2 months and it seemed to be just fine. I think it’s a robot.
xo
s
Sara Richins says
Looks like a pathos plant which is a shade plant. If you cut them, you can actually grow the cuttings. I’d stick it in a glass of water near (but not directly in) light until it grows a few roots. Then you have a new house plant. I plant my clipping back in the same pot to get a bushier look, and sharing the space seems to slow down the growth rate so I’m not cutting it very often.
YoungHouseLove says
Thanks Sara! I did that a while back and blogged about it! SO easy! These plants are impossible to kill.
xo
s
Elise says
I was just researching indoor plants and read that pothosbarw poisonous.to.children and pets if chewed on. I was bummed cuz I’ve heard so many recommendations for them.being easy to maintain.
YoungHouseLove says
Thankfully Burger’s not a plant eater and Clara’s past that putting things in her mouth stage (thankfully when she was in that stage our plants were out of reach, since that was also her playing-with-the-dirt stage) but it’s a great thing to be wary of if you have an animal or child who chews on plants! Maybe put one up on top of an armoire or high cabinet out of reach?
xo
s
Laura @ Rather Square says
I’m loving how custom the shelves under the vanity look, it really appears seamless and integrated. Did you do any sanding on the existing parts before staining/poly-ing?
YoungHouseLove says
I did a little sanding on the dings and scrapes, just to sort of flatten them out before the PolyShades went on. We debated using wood filler as well, but nothing was too deep, so between the sanding and the dark finish it seemed to hide a lot of sins!
xo
s
Ashley says
Wow it looks awesome!!
One quick, random question- where did you get the cookies for Clara’s 3rd bday party? I can’t find the post & I also live in Richmond and am planning my sons bday party!
Thanks!!
YoungHouseLove says
We bought them from Snickety Snacks! http://www.snicketysnacks.com/
xo
s
AmyNH says
Thank God! That vanity was begging for intervention. I commend you for living with it so long. Wow. What an improvement.
janice says
Wow. Really. I think that is all I can say. Wow! (and LOOKS GREAT!)
Barb says
Good job! Looks GREAT.
Jess @ Little House. Big Heart. says
I know that feeling of knowing you’re going to mess up a measurement (of course, we usually do)! The update looks fantastic,though! Way to go!
We finished painting our deck railing this weekend… finally!
YoungHouseLove says
Wahoo! Congrats Jess!
xo
s
Heidi says
John – you did an amazing job on that vanity, it looks incredible! My husband built a vanity for our basement, but it took him a year to get around to adding the doors and drawers to it.
http://www.krusesworkshop.blogspot.com/2013/11/defcon-1.html
YoungHouseLove says
That looks great! I really like the hardware you guys went with. And that wood finish is awesome too.
-John
Katie {deranchification} says
The updated vanity looks awesome!! I mean, I knew y’all would knock it out of the park, but it looks even better than I anticipated. Thanks for the step by step on adding the shelf – it’s been on my list for a while to do the same thing in our hall bath, and you’ve made it seem a lot less overwhelming now!
YoungHouseLove says
Happy to help, Katie. Good luck!
-John
Lisa says
Wow guys, this looks amazing! It blows my mind all that you have already accomplished in this house.
YoungHouseLove says
Thanks Lisa! It does feel like we’re speeding along (kinda scares me, haha) but I think “before the baby comes” keeps echoing in my head, so we might kick things into high gear now knowing that it’ll be a whole different ballgame when we have a newborn around!
xo
s
Lisa says
Looks Beautiful!
Cathy says
What color of blue did you use in your bedroom? I have been looking for a blue for my dinning room!
YoungHouseLove says
That’s Black Pepper by BM. It gets so cozy and dark at night so it’s really soothing for a bedroom!
xo
s
Wendy @ New Moms Talk says
We went house hunting this weekend for my brother-in-law (he’s in a different state) and met up with the Realtor who sold us our house.
We shared our progress 2 months in and he was thrilled. He gave us his takes on what we might do down the line. It was incredibly helpful, though we had to remind ourselves, “it’s from his perspective which is (likely) to make money and sell houses.”
We’re still not 100% on the direction that we’re going with our place, but hearing the Realtor’s take was very beneficial.
Of course we cut down more trees and clammed, too. After all, it wouldn’t be a weekend without that (except when it’s not a permissible clamming time)!
YoungHouseLove says
That sounds like so much fun Wendy!
xo
s
Maggie S says
That looks incredible!!! what a big difference for just a little $$$. You have made me a believer of doing Phase 1 projects!
What color is on the walls in the vanity?
YoungHouseLove says
That’s Revere Pewter by BM. It reads really differently depending on your light (sometimes it’s really tan, sometimes it’s really platinum). Such a great color!
xo
s
Angela L says
Wow, what a spectacular transformation!
Maggie S says
….I meant to say vanity area WALLS!!
Sadie says
Oh yeah, and John ran a half marathon. No bigs. ;) My husband and I painted the powder room we added to our 101-year-old house. Eventually we’ll add wainscoting and wallpaper, but for $15 and a few hours of work it feels 100% more like “us.” We’re embracing the different phases of renos like you guys, while we save up for big things like tearing down walls and installing new flooring.
YoungHouseLove says
Haha, oh yeah, and there was that whole half marathon thing. John = a machine. And I love that you’re showing a 101 year old house some love. You can’t beat a $15 makeover! That’s so awesome Sadie.
xo
s
Becca says
Yay! I was secretly hoping u wouldn’t paint the vanity and keep the wood look! It looks awesome :-)
Renee says
Too bad this is only Phase I, because it is awesome enough to call it done!
Brittany says
I love the mirror above the new vanity, where did you find it?
YoungHouseLove says
That was a HomeGoods find (I painted it white since it was sort of a rustic gold when we got it).
xo
s
Katie R says
That is awesome! Way to show that room some love. My favorite is the update to the vanity and the floor of course. The vanity looks SO much better!
Sarah says
That is such an AMAZING transformation for so cheap! Some would have ripped it out to buy something new there but for very little you made it look awesome and brand new. You rock!
Teresa says
Wow!
Theresa M says
Such a transformation! You can definitely live with that for a few more years. Did the gel stain take as long to dry this time?
YoungHouseLove says
We noticed two things: the first Minwax stain that John used just on the blonde wood side of the vanity is WAAAYYYY stinkier (we slept in the guest room a few nights because it was so fumey). Meanwhile the PolyShades was almost odorless about 5 hours after it was applied, although it did seem to take about 10 hours to fully cure (I didn’t reattach the doors/drawers for 48 hours just to be sure).
xo
s
Megan @ Rappsody in Rooms says
I am so impressed with this whole bathroom and closet makeover. I love it so much! I will actually be sad (sort of) when you do a full reno (although I’m sure that will be down the road and we will be ready). It is so beautiful just the way it is. Probably not as functional as your future plans are but meow I love it!
YoungHouseLove says
Haha! I love a good Monday morning meow. Thanks Megan!
xo
s
Jessica D. says
Wow! That is probably the best Phase I upgrade ever! I have been with you guys for all three houses, so I may be forgetting a better one, ;) but seriously that looks great! It is definitely something you guys can live with for awhile until you decide to redo the whole master bath. Great work and inspiration!
(One more ! for good measure)
YoungHouseLove says
Thanks Jessica!
xo
s
Amy B. says
WOW! Looks like it has always been there! I love it when that happens. Great job!
Marlena says
It looks great! Hooray for Phase 1 projects. This weekend I kept painting our dining room. Taking longer than usual because we have chair rail, so there’s extra cutting in, and I was working around our weekend activities. Hope to complete tonight!
YoungHouseLove says
Good luck Marlena!
xo
s
Elyse B says
So it sounds like you guys stained on top of stain? Did you have to prep the existing vanity, with the old stain, at all?
YoungHouseLove says
John just used the larger container on the side that was new wood, I sanded the old side just to smooth out any dings, and then John applied the PolyShades all over, which seemed to do the trick and bridge that gap.
xo
s
Elyse B says
I think I found the answer to my own question on the Minwax PolyShades website for anyone wondering: http://www.minwax.com/expert-wood-tips/change-stain-color-with-polyshades/
YoungHouseLove says
Thanks for sharing that link Elyse! So helpful!
xo
s
Alicia M says
Polyshades is great stuff! We painted our kitchen cabinets off-white (previously painted brick red) and I antiqued them using Polyshades. Regular stain is penetrating and doesn’t work on previously painted or finished surfaces. Polyshades is meant to be applied on top and is perfect for projects like this.
ps: LOVE the transformation!! I just shared this post with my mom who is looking to upgrade their bathroom vanity :)
Candace says
This might be my favorite DIY project yet!! The before and after differences are AMAZING!!! Good Job!!
YoungHouseLove says
Thanks so much Candace!
-John
Jenifer says
Very nice, and looks totally seamless. :)
Samantha Cobos says
It looks so pretty. Did I miss what happened to the vanity light? It looks like you are not doing a light above the mirror any more – Is this right?
YoungHouseLove says
We have a ceiling fixture in that little sink nook too, so the one over the vanity was nice, but it was so low the mirror didn’t fit, so we capped it off with plans to move it up down the line if we find something we love.
xo
s
Lisa says
Love, love, love your site! Just a thought, since the towels are exposed…..how about rolling them to make it a statement?
YoungHouseLove says
Love that idea!
xo
s
Katy says
You probably already covered this in a post a while back, but do you have an electrical outlet in your vanity area? I noticed your new mirror covers the old outlet…
YoungHouseLove says
We capped that outlet off and are planning to move that for phase 2, but for now we have an outlet in the sink area of our main bathroom (this is an extra sink located off of the bathroom) so that’s in there for use if we need it. I’m not really a blow-drying girl, and we can charge our toothbrushes in the main bathroom so we seem to be covered for now.
xo
s
Mary | Lemon Grove Blog says
Hot tamales!! I’m in love! Your vanity turned out great you guys – can’t wait to see this space continue to evolve!
Candace says
This might be my favorite DIY project yet! The before and after differences are AMAZING! Good Job!!!
Melly says
It looks terrific! I totally agree with adding knobs to false drawers when the ones nearby have them. Good call!
I just cannot get over how fantastic your stenciled floor looks. It’s hard to believe it’s the same space looking at the before and after shots. You two have such great style.
Tirsa says
This are looking really good in there. I am loving your bedroom color more and more. I just recently found a somewhat darker color than the current one for our bedroom, but DH won’t even consider it. I guess I need to give him a little more time. ;)
This weekend we had friends over one day and the other I plugged away at a the wall where I’m placing black and white frames filled with our pics and mementos. It’s finally staring to take shape. (Gosh I’ve been “working” on it for months now.) DH and DS had big grins on their faces last night. Hope to be completely done before the end of the week.
YoungHouseLove says
That’s so sweet Tirsa!
xo
s
Lindsey says
Amazing!! It looks seriously beautiful. You guys are crazy talented.
Lauren says
This is such a small change, but it made such an impact. Great job!
Carla says
This look awesome! It’s so pretty I almost can’t believe it’s not photoshopped. I love the contrast with your bedroom, too!
cc says
Ahaha! No matter where you live, you’ll always have nearly the same view of a master bathroom sink and mirror! (I love it!) ;)
YoungHouseLove says
Isn’t that funny?! Even when the houses are built in difference decades!
xo
s
Deb says
Gorgeous! What color did you paint your bedroom, I love it!
YoungHouseLove says
Thanks Deb! That’s Black Pepper by BM. It’s so dark and moody at night. We love it.
xo
s
Laurie says
I am super impressed! My sister in law just moved into a house that has that same kind of space on one side of the vanity, so I am totally stealing this idea, and your handy dandy step by step instructions :)
Catherine says
Love the new shelves! I’m am such a fan of phased make-overs. They truly enable you to enjoy your space for very little money, while you save up for a bigger renovation. Sometimes I’ve found that I love phase 1 so much I don’t ever move to phase 2! Thanks for the continued inspiration, I always look forward to reading your posts. :)
Cora says
I’m totally understanding your Phase I, II, III type projects. I see why you would want to do something that won’t necessarily be forever but looks so much better than just leaving it as is. Great job guys!
YoungHouseLove says
Thanks Cora! Sometimes it’s easier to just ignore something for a while (like we did to this nook for months) but then when you put in a little time/money, it’s so much less groan-inducing for the year or two until the main event!
xo
s
Stephanie says
looks great. you guys just add awesomesauce to everything. :)
GreenInOC says
That addition is seamless John, seamless I tell ya’!
Love the shelves, the knobs make such a difference and the color is great.
Still totally jealous of those floors!!
Karyl says
That looks fantastic! I am now eyeballing that PolyShades for a stair rail update. And I nominate the title of this post for one of your best word plays ever!
YoungHouseLove says
Ha! Thanks Karyl!
-John