So our built-in wall-to-wall desk already made some good progress this week with the painting and making-taller of our cabinets. But something was missing.
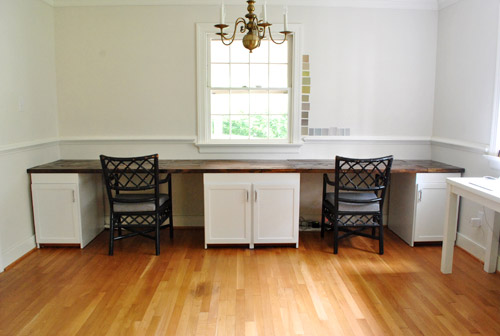
Yes, remember the view from before?
Yes, we were devoid a counter (aka, the desk top). John and I were actually quite indecisive about what to do when it came to that part. And whatever we did, we needed about thirteen feet of it (a length that we learned most kitchen counter suppliers wouldn’t even deliver since 12 feet was usually the max before you ended up with a seam). At first we considered ordering a legit kitchen counter top (maybe butcher block, maybe silestone, maybe this from Ikea – although they would all have a seam). I think after having saved so much with our $6 cabinets we thought that maybe the top could be our splurge.
But, then again, we’re not very good splurgers. Also, I was leaning towards something white (to keep things light, and to tie into the top of the nearby built-ins in the dining room) but John was Mr. Hesitant about white overload (and worried that the white tone of the counter could clash with the white of the cabinet). I know, it’s shocking to hear a guy worry about clashing white tones (especially when he usually can’t tell one white paint chip from another) but he can own it. In short, we were stuck.
But after seeing this DIY-ed desk that Aubrey and Lindsay built, John won we both realized that wood was the way to go.
We’ve always loved the combo of white and deep wood (we did something similar but flipped when it came to refinishing Clara’s dresser), so why not? And rather than “matching” a white counter to the tops of the built-ins in the dining room, we thought referencing the rich wood tabletop in there could really look great.
So with the “rich wood finish” decision made, we tracked down our materials. We wanted something thicker than the 3/4″ console table top (just to stay proportionate with the four chunky cabinets below and the thirteen foot length), so we picked up some 2 x 10″ untreated framing lumber. It was as thick as one of those jumbo cutting boards and I walked around the store talking lovingly to it, which was completely embarrassing but I could. not. help. it.
While there we had the guy at Home Depot cut a bunch of eight foot pieces in half so we could fit them in the car (it would also make maneuvering them at home much easier). And this is the most exciting thing. Total cost: $27.30. Yup, it came to less than a dollar a square foot (which is a heckova lot cheaper than most other countertop options, even butcher block or laminate from Ikea).
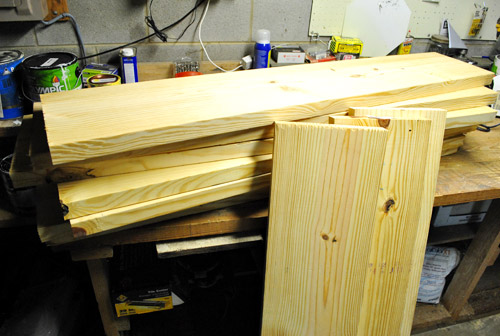
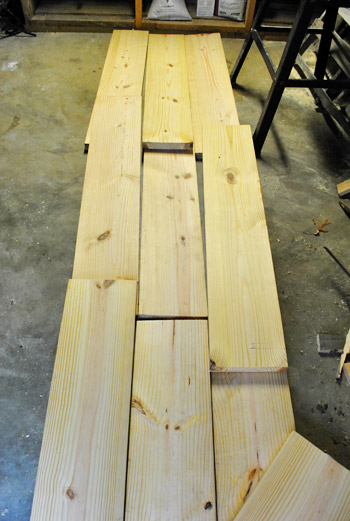
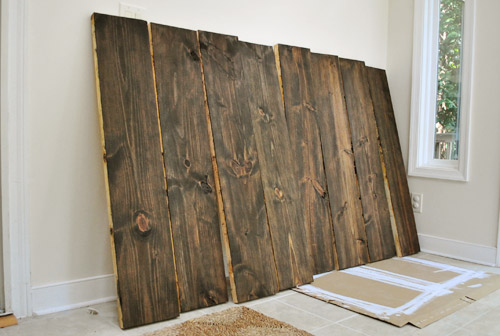
So with everything home, we did a rough layout on the floor of our basement workshop to figure out which pieces had the nicest edges (for the front lip) and which ones should be hidden in the back. We didn’t have 13 feet of floor space to work with, hence the overlapped look.
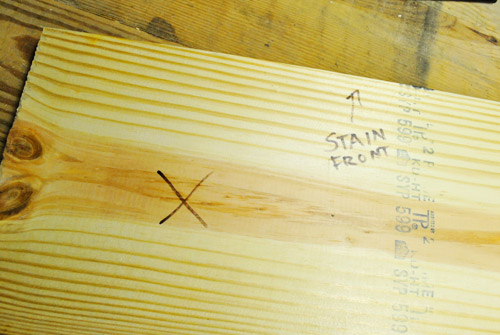
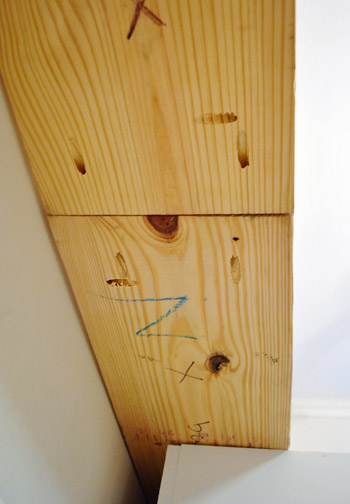
Since I was going to do the staining, John helped me label the back of each piece with clear directions so I didn’t end up staining the wrong side. The X meant “don’t stain this side” and STAIN FRONT meant, well, “stain the front edge” since it would show on the outer boards if it was a front board.
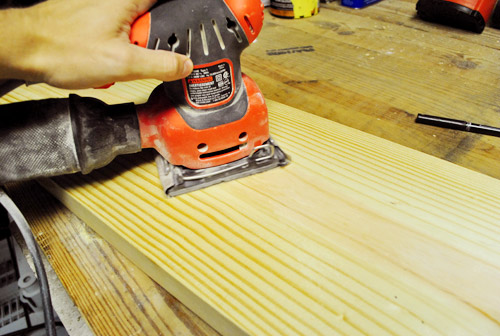
John’s duty (besides cutting a few end pieces to size) was sanding (since I still had memories of my vibrating hand from sanding the cabinets in the priming step of the process). John used the same cheerful little mouse sander to go over each piece thoroughly with some coarse 60 grit sandpaper first (to smooth out any big imperfections) and then went over things again with some finer 150 grit paper afterwards – just to give it an even smoother finish.
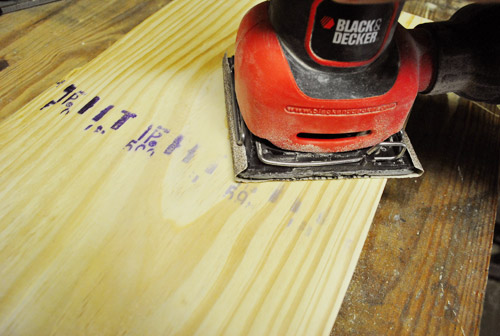
One potential challenge with lumber like this is the prints and stamps that come on them. We ended up using only the sides without marks, but if that weren’t the case we could’ve just used some extra sanding elbow grease to buff out the ink. But thankfully the other sides were just fine.
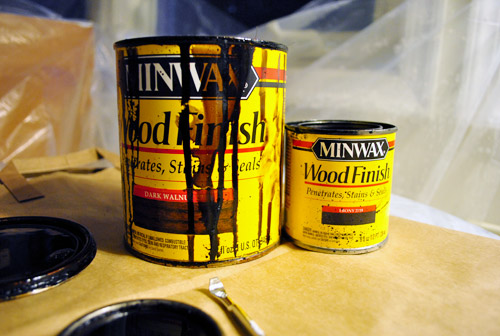
With everything sanded, we brought the boards into the sealed-off sunroom so I could stain them. We decided to use stain we already had on hand (leftover from the console project, actually I think it was from another project before that one) and ultimately decided to use the dark walnut and not mix in any of the ebony this time. Although we had done a combo of the two for the console, we weren’t really going for that same weathered / distressed look. Instead, we were trying emulate the deep, rich finish of our dining table.
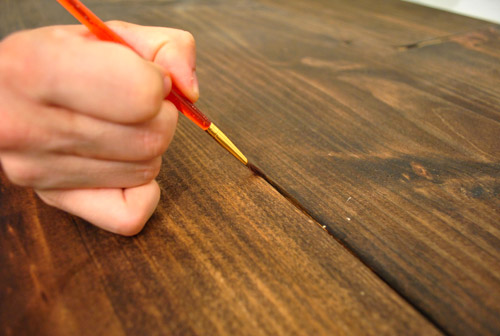
So as usual, I brushed on a coat of the stain with a paintbrush (and a mysterious gloved hand)…
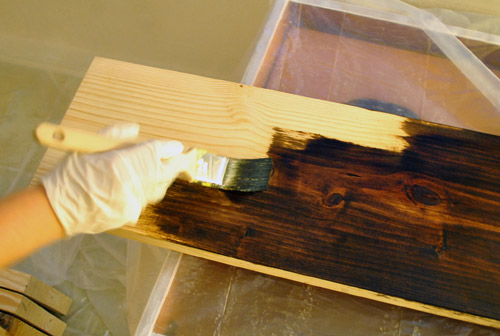
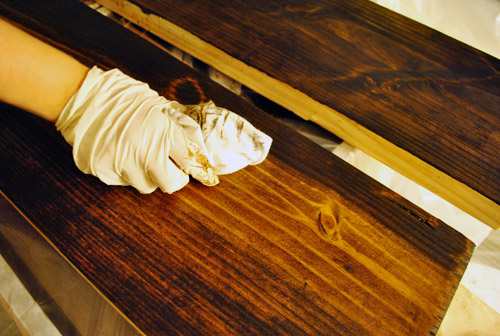
…and then wiped it off with a rag after letting it soak in a for about a minute.
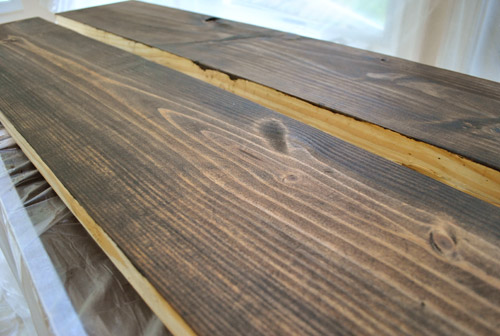
Once they dried overnight, we were left with these beauts (I did the staining at night and shot these after photos in the morning, hence the different look/undertones – you’ll see the actual finished look later in the post though).
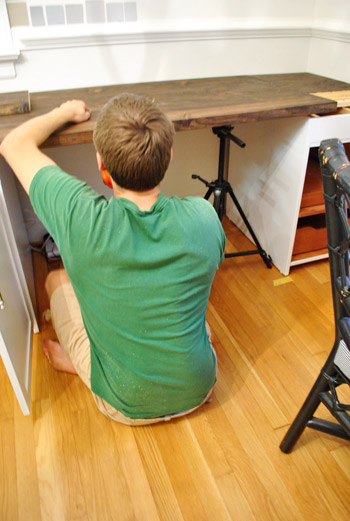
John’s original plan for building the counter was to recreate his process for the console top, just on a larger scale. That meant using his beloved Kreg jig to screw the boards into one another side-by-side so they became larger sections that he could then piece together on top of the base cabinets. But after going to town with his jig on a few boards, he realized these heftier boards weren’t gonna jive with that plan – especially when he had a seam straddling two cabinets. You can’t tell from this picture, but this set up was a bit wobbly. And a wobbly desktop (or something uneven that made our laptops wobbly) wasn’t the goal.
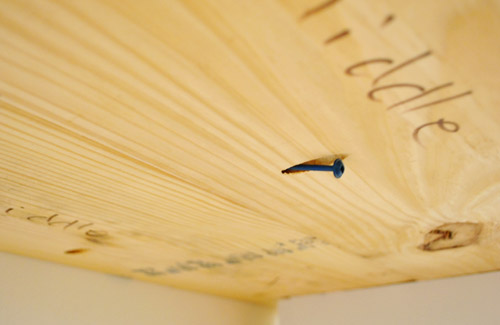
So he adjusted his approach to focus on screwing the boards to the cabinets first, and then to each other wherever necessary (for added support). It wasn’t a bad alternative, it just meant a lot more cramming his body into the base cabinets to drill screws up into the bottom of the counter planks while I leaned on things to keep them in place from above.
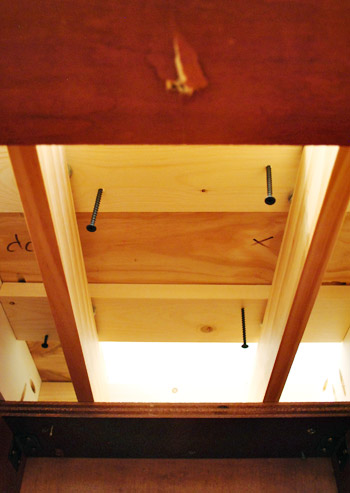
True to form, wherever he could, John used his pre-drilled pocket holes to secure the pieces to one another for added strength (did I mention the man loves his jig?).
Perhaps our favorite discovery of the day was realizing that our camera tripod could double as a great jack-substitute to keep the boards level while John screwed them together (this was a lot more precise than me standing there and trying to hold them at a consistent height). They make a good counter-building team, John and his trusty tripod.
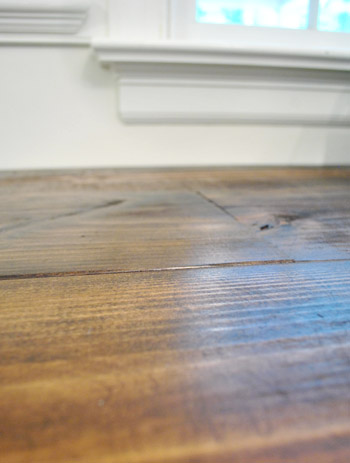
The brevity at which I’m recounting this process makes it seem like it was fast and easy. It wasn’t. You know we like to keep it real, so the counter install (not counting a few hours of sanding/staining) took us the better part of an evening – maybe around four hours? And it was relatively exhausting, especially to poor John who was doing the bulk of the lifting and contorting himself into the base cabinets to drill. The most frustrating part was realizing that our boards, like most, weren’t all perfectly straight. So we had to do our best to counteract/deal with the whole slightly warped thing (once we screwed them down/together in a few places they seemed to level out, but it took some finessing to make sure the tops stayed level as we went).
But eventually it got done. Though it did teach us a lesson in staining: be sure to stain about a centimeter over each edge, even if you don’t think it’ll be visible, since some of the tiny cracks between where the boards met revealed slivers of unstained wood. Luckily it was nothing a little stain touch-up with a small brush couldn’t fix (I dabbed it in there and then wiped the seam with a rag to blend it).
With the touch-ups dry, I later added three thin coats of our favorite non-toxic low-VOC poly alternative (Safecoat Acrlacq). This is the can that we originally bought for our bathroom vanity project over a year and a half ago and it’s still going strong (we use it for almost everything).
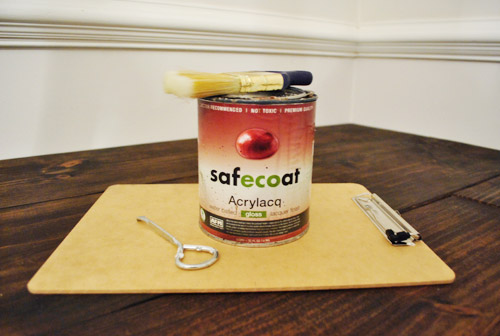
The Safecoat seal will not only protect the finish and add lots of long-tern durability, but it also gives the wood a richer glossy look – just like our nearby dining table.
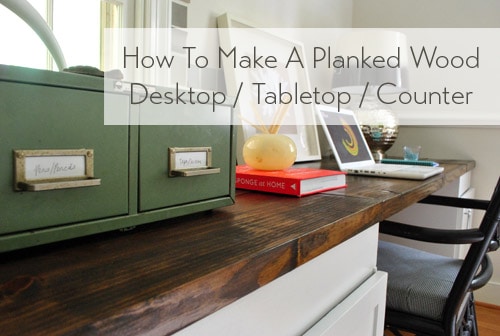
Once we’d given the whole thing 24 hours to dry, it was time to take her for a spin. This is what our new desktop looked like empty…
…and here she is with some “styling” (come on, do you know me at all? I love to put a bunch of stuff on newly completed projects – just to help us get a sense of what it might look like when it’s in use). Of course everything was just shoved there in four minutes so it’s safe to say that nothing is permanent and I obviously want some larger art to actually hang on the wall (which we still have to paint, hence the swatches) and a bunch of other things will likely change/evolve as we actually get into using our new desk.
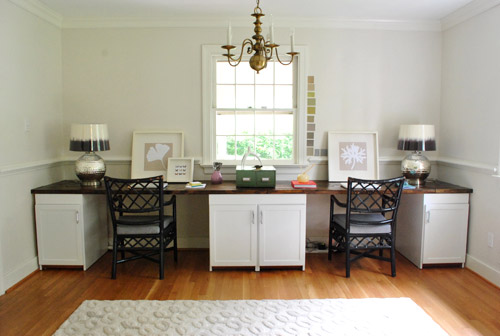
And yes, I borrowed the lamps from the console table in the living room and added some fun shades that I spotted at Target (they still have the wrapping on them, which is why they’re so shiny). But eventually we’ll have to grab two more lamp bases for in here (where we might keep the two-toned shades – we’ll see).
We’re so happy with how the office looks from the dining room. The wood top ties right into the wood table and doesn’t look weird with the white topped built-ins in the foreground. Whew.
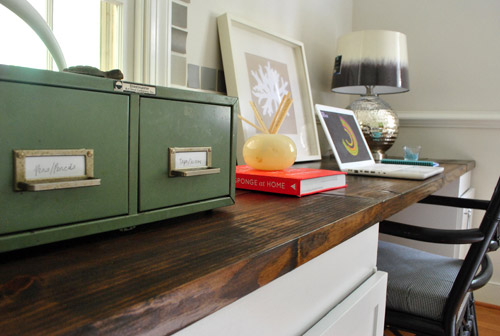
And the chunky wood top is such a rich counterpart to the white cabinets, we really couldn’t be happier. Oh and see that vintage green library box (found for $4 at a thrift store a while back)? That’s our new drawer system for pens, pencils, tape, and scissors – so the file cabinets are full of larger things (like the shredder, some storage boxes, etc). So far it’s all really functional- so I owe you a photo of the insides of those cabinets once we’re more settled in.
Oh and as for writing things down atop a wood plank counter, there are a few seams, but they’re four feet apart and the boards are nice and thick. We also generally use notebooks and notepads anyway, so getting bumps and lines when we write isn’t an issue. In fact in the square foot of counter space to the right of each of our laptops there’s not a single seam cutting through – so any pad or piece of paper could be written on easily without any seam-conflicts. Which is a nice accident because we just laid the boards in a staggered zig-zag pattern and they happened to fall without any seams to the right of our computers. Holla.
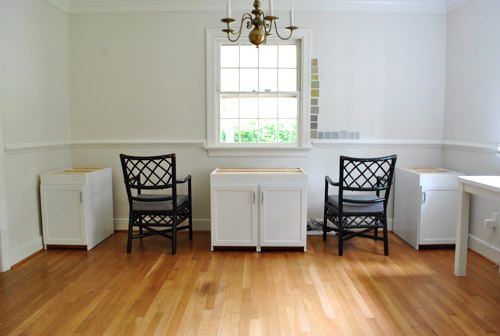
Overall, the current setup (although the “styling” is ever so un-permanent)…
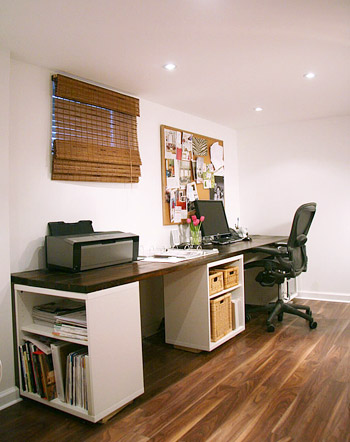
… is definitely an update from the old office setup (you can read more about the floor-planning process here). Only now do we realize how cramped that desk really was:

Of course we’re not 100% done with things. We still want to put some sort of molding around the bottom and sides of the cabs to give them a more built-in look. Plus we’re still not sure if we’re gonna stick with the shiny silver hardware finish that came with the cabinets (of course I’ve thought about ORB, but don’t know if that’ll look too matchy with the black glass pulls on the file cabinet nearby- I’ll keep you posted though). Even with those little things still on the to-do list, our budget’s looking pretty darn good for the ol’ wall to wall built-in desk project:
- Cabinets (from Habitat For Humanity ReStore): $6.30
- Kilz Clean Start No-VOC Primer$0 (leftover from painting the kitchen paneling, but it would be around $20 to buy for those wondering)
- Electric sander & sandpaper: $0 (already owned, but would be around $25 to buy)
- Benjamin Moore Advance paint (in Decorators White, satin): $40 (thanks to 10% off haggling/begging)
- Pre-primed & unprimed wood to build up cabinets (from Home Depot): $51
- Framing lumber for counter (from Home Depot): $27.30
- Stain & poly for top: $0 (already owned, but would be about $8 and $20 respectively if you didn’t have any)
- TOTAL: $124.60
We’re psyched, especially since a white laminate counter from Ikea that would span the 13′ length would be around $125 on its own (not counting any cabinetry, paint, etc). But of course just like any upgrade, our new desk is making the rest of the room look terrible. Haha. We need wall paint. And window treatments. And to actually update the chipped navy chairs that we grabbed for $35 a while back. And art. And a chair for the corner. And a lighting upgrade. And about a million other things. But thinking about everything at once gives me hives. One step at a time is the mantra these days.
Has anyone else out there gone with a wood topped something (be it a desk, dresser, kitchen counter, etc)? Do you do things backwards (like build a desk before you paint the walls)? Do you find it hard to resist stroking and talking lovingly to lumber at the home improvement center? I gotta get a handle on that.
Psst- To follow our desk makeove from the beginning, here’s the post about office floor planning, the post about finding our $6 cabinets, the one about other places we looked, the post about sanding and priming the cabinets, and the post about painting and building up the cabinets before adding the countertop.

Annalea says
Love it. It’s great!
My first thought was: Now Sherry’s GOT to paint those chairs! lol Something bright, cheery & glossy. Apple green (too matchy?), front-door yellow (fun to echo that color?), Sue Blue (but bright enough to pop in front of those white cabs) . . . but I guess you’ve got to wait ’til the wall color is up, eh?
I can’t wait to see! :o)
YoungHouseLove says
Yeah, a few other things to wait for (wall color and upholstery for window and chairs I think). Itching to pull the trigger though!
xo,
s
Sarah K says
So inspired! Can’t wait to see what color the walls go.
Elisa @ What the Vita says
Brilliant how that counter cost only 27 dollars.. love how it looks!!
Please spray your chairs a nice, bright, fun color!
Emily M. says
It looks awesome. As you said, it really ties together the two spaces so well. Really well done. Amazing!
Nicole says
This looks great! You guys rock at scoring sweet projects on a budget. I’m also doing a dining table with dark walnut on top and white on the bottom. I’m using Minwax water-based poly and it says to sand in between coats. I’ve never seen you do this in your projects – do you know if it’s necessary or what difference it makes?
YoungHouseLove says
We skip the sanding between coats because we apply it thinly and evenly (so there aren’t lumps and bumps to sand) but it can’t hurt! I say do it if you want to be sure it’s smooth!
xo,
s
Janelle says
I was wondering about writing on the wood countertop, but not how the writing would turn out. I was thinking about leaving indentations in the wood itself. Glad you usually have a buffer anyway. I love the white/dark contrast, and the wall-to-wall finished look makes the room look bigger, ironically, than the previous tiny desk.
YoungHouseLove says
Yeah someone else mentioned that we should use a buffer like a pad or notebook just to be safe so that’s the plan!
xo,
s
Angela says
I love it! We actually did the same sort of wood counter top on a new sideboard in our dining room! I love how it turned out.
http://almostfabulouscottage.blogspot.com/2011/06/final-dining-room-post-i-promise.html
YoungHouseLove says
Ooh, so pretty!
xo,
s
Jessica says
Love, love, love the built in desk! I think now your brass fixture needs to be spray painted some fun color…leaf green maybe? What does Sue the napkin recommend?:)
YoungHouseLove says
Haha, she has a few recommendations for sure. Just waiting to see what we choose for window fabric and wall paint and chair upholstery fabric, etc.
xo,
s
Beth @NashvillePug says
I just completed a very similar project! White base with dark, stained wood top. Love the look of the two together! Check it out if you have a minute…
http://nashvillepug.blogspot.com/2011/09/pb-desk-knockoff.html
Beth
YoungHouseLove says
Really cuuuute!
xo,
s
Brittany says
You may have answered it in an earlier comment or post but I’m curious as to where you got those two grey/white prints you have on the desk in your final pictures. I am going for grey/white in my bedroom and I love those prints!
Thanks!
Brittany
YoungHouseLove says
Those were from our old print shop (which we closed around when Clara was born) but I made them in Photoshop if that helps. I just scanned in the texture of burlap and created the leaf shapes on top of the burlap and filled them with white.
xo,
s
Mandy says
Actually, I have done somewhat the same with a desk. I recently asked my awesome bro to build me a simple, clean wood desk. I wanted it all white, but once I saw the nice wood, I decided instead to paint the legs white and just poly’d the top, which kept the wood look and darkened it slightly. I ABSOLUTELY LOVE IT! I also have built this desk before I’ve painted the room which will be a home office/spare bedroom/music room! :)
Kathryn says
Wow…one of my favorite projects to date! Love this…and you did it at such a budget. And, yet again, I feel like (even as a DIY total dufous) that we could do something similar :) Thanks for excessive pictures. This is why I <3 you.
Aron says
Perfection.
Maggie Rose says
Shut up. It looks fantastic! Excited to see what the paint color will end up (and the chairs). Will you be stashing the old desk away for the playroom/Clara’s room when she’s older?
YoungHouseLove says
We’re still not sure where it’ll live – right now it’s in the dining room with the sleeper sofa. Crazytown! Haha.
xo,
s
Karen says
I really love how the desk came out. I was wondering how are you going to handle cables, like the laptop power cables and the plug for the lamps? Are you going to do some kind of grommets?
Thanks for all the detailed posts – I love reading your blog!
Karen
YoungHouseLove says
We’re going to drill a small hole in the back of the desktop behind each computer for power cords and lamp cords and stuff. We’ll share those pics soon!
xo,
s
Ashley A. says
Is your office missing from the House Tour page?
YoungHouseLove says
Argh, yes. I have to dig up some before pics and add that right away!
xo,
s
Sarah D says
I didn’t bother reading all the comments so I apologize if someone already said this, but have you considered painting the office a shade of light yellow? It would really help to tie it into the dining room a bit more especially with yellow accents you have on the bookshelves in the dining room and the yellow in the curtains. Ohh and also the yellow front door. Not that I am suggesting the same shade. Ohh and funny story…I saw a Wildflower of Alaska poster in a hideous gold frame and a thrift store off of Patterson and Lauderdale. They wanted like 25 dollars for it. Just in case you wanted another one for your bedroom.
YoungHouseLove says
Yes, that’s definitely one possibility. The only thing is that it’s connected to the grellow kitchen and right off of the grellow laundry room, so it might be too much yellow in that area. Not sure yet! As for the wildflower poster- thanks so much for the tip!
xo,
s
Ami says
That looks so great. Our house has a hallway with a nook that has a built in desk almost identical to yours. We wanted upper cabinets in the corners to match so we got a quote from the same company that did the lower desk cabinets, over 2K!!! Needless to say, we have no upper cabinets. I love, love, love that dark counter with the white and that is my exact plan with a light wood desk my husband got me at Pier 1 years before he was my husband. Can’t wait to see what paint color you choose.
p.s. You two are saints when it comes to answering already answered questions or answering questions about things you PUT IN THE POST. That is such a peeve to me that peeps just won’t read it all! Kudos!
Megan Willis says
AHHH! Ya’ll this looks amazing. I especially love the view from the dining room. It looks perfect!!! Can’t wait to see more! <3
Shay says
As always, awesome wonderful job!
Joanna says
Do you guys like the sander you have? We have plans to re-do our kitchen cabinets and are in the market for hand sander. Wondering if you would recommend it?
YoungHouseLove says
Oh yeah we love it. Just a simple square (well, I guess rectangular) one by Black & Decker with a little bag to suck the dust up.
xo,
s
Heather W. says
The Design Sponge at Home book. Where did you buy yours and do you remember how much? Just curious. I meant to look at Target tonight and forgot. Shucks! I was too overwhelmed by my white frames I bought on clearance for $8-$9. You might want to check it out. They are big ones too with mats. Love them!
YoungHouseLove says
We got it on Amazon! It was on sale for $19! So good for such a giant gorgeous hardcover.
xo,
s
Heather W. says
Thanks, I saw it on Amazon and wanted to make sure that was the best price. I figured it was. Great job on the desk and what a find on the end tables SCORE!!! love it when that kind of thing happens :)
julianna says
It looks great! I haven’t read all the comments, so I don’t know if anyone has already suggested this, but what about using wooden knobs stained to match the desktop? I think Lee Valley has some big, chunky unfinished knobs at a low price (they used to, anyway).
I’m also hoping you do some kind of makeover on that light fixture, because we have the exact same one and I want to shamelessly copy whatever you do with it!
YoungHouseLove says
Oh yeah- that’s another possibility too!
xo,
s
Stefani @ Try To Enjoy says
I’m so excited about your new desk! It just looks great! It all really came together perfectly.
One thing is how amazing it is to me how your old desk looked so small compared to this new one, but how it used to look SO BIG back in your old house’s office! I remember when you put that desk into your old office it was just so perfect. Funny how things change with perspective!
Speaking of your old office – do you have any thoughts about whether you might try to recreate your little wall-art shelves with postcards and whatnot in this new office? That was such a cool idea, it would be fun to see it back up and running again.
YoungHouseLove says
Isn’t that funny?! One thing about our first house is that it was tiiiny! And we loved it fiercely. But whenever someone came over they always said “wow- it looks so much bigger online!” – haha.
xo,
s
Karen w says
Great job. Can’t wait to see the chairs refinished. Keep up the good work!
Jessi says
Love, love, love!
Belinda says
Awesome job as usual! My poor husband has lots of work ahead of him!
I haven’t read through all of the comments but I am interested to know about your laptop cords – do they just hang down the front when they are plugged in?
YoungHouseLove says
We’re drilling a hole behind each computer to feed power cords and lamp cords. We’ll post details and pics soon!
xo,
s
DONNA says
You two cease to amaze me! Talk about BANG FOR YOUR BUCK!!! Awesome job! I do think the floor trim near the outer units should have been cut so the cabinets could have been installed flush against the walls for a more built in look. What d’ya think?
YoungHouseLove says
Nah, we thought about that but didn’t want to mess with that since once we trim out the cabinets on the front and side with baseboard trim you’d need to be on the floor under the desk to see the small crack where they sit forward a smidge from the wall (luckily the counter makes them appear flush to the wall from any not-under-the-desk vantage point, haha).
xo,
s
DEBRA SHATTO says
Good job! You know, if you were having a party that would make a great buffet! Close to Kitchen, but allowing your table setting in the dining room to shine. The chairs would look cute with a small table inbetwixt on the rug, kinda away from the buffet, but providing another conversation area. And your old desk will make a cute desk for Clara some day. Anxious to see the upcoming wall color.I’m hoping the chairs get a little turquiose splash, that would shake up a dreary winter or cloudy day! Debra
Erin says
Look it is your desk and chairs in Elle decor 2010 designed by Nate berkus! http://blog.urbangrace.com/2010/greetings-from-the-random-corners-of-my-brain/
YoungHouseLove says
Haha, how funny is that. Love me some Nate!
xo,
s
Kath says
LOVE the wood!
Also, we have the same vintage library drawers at the bakery!! I might steal them for my house :)
Paint colors noted!
Justin says
The thing is amazing!! I love the idea of a built in like that! Just curious, is there any room to drop electric cord (for the lamps, laptops, whatever) down the back or drilled holes to drop through to keep them out of view?
YoungHouseLove says
Yeah, we’re planning to drill a small hole behind each computer for lamp and computer cords since the desktop is flush with the wall. We’ll share some pics of that process when we get ‘er done!
xo,
s
Andi says
THIS IS BEAUTIFUl!!! SO INSPIRED!!!
Leslie Ann says
ORB THE CHAIRS!!!! I would LOOOOVE to see a chocolate-y tone on those chairs. Sherry, I think the ORB disease is contagious….
Sarah says
So, how are you handling cords?
YoungHouseLove says
We’re planning to drill a hole behind each computer. We hope to share those details soon!
xo,
s
Sarah says
I just missed that comment/reply!
YoungHouseLove says
No worries!
xo,
s
Brianne Pitts says
I LOVE the two toned desk. The white and the dark wood is such a classic combo. Nice work!
Casey says
Love the way this looks from the dining room. I’ve had the Pottery Barn Bedford corner desk with white bases and a mahogany top for about five years and completely love it. We went to the store intending to get all white, but I changed my mind on the spot and had to convince my husband to go with it. I’m so glad we did–not only is the contrast way more interesting, it’s also worn better than I imagine the white would have on such a heavily used piece. Worn wood desktop=character; worn white paint desktop=dingy and unkempt.
Emily says
When our installer came today to put in our dark brown counter tops (on our white cabinets), he told me that when he picked them up at Lowe’s the woman said, “Why would they ever choose counter tops this color!?” It was definitely reassuring to log on and see this post shortly thereafter! :) Your desk looks great!
You can see my “ugly” counter tops here: http://findingformerglory.blogspot.com/2011/09/kitchen-day-45-everything-and-kitchen.html
YoungHouseLove says
Those look nice! What a weird thing for the installer to pass along. Haha.
xo,
s
Par says
Looks Fab!!!
Maybe you can use the lamps that are there in your Bedroom side tables with the new lampshades as well! But the crisp white and wood looks lovely!!! Maybe some coloured chairs? Green / deep blue perhaps?
Alyssa says
This turned out so! good. What did you do with the couch though?
YoungHouseLove says
The couch is in the dining room looking crazy. Gotta figure that out! Haha.
xo,
s
marie says
This is random unsolicited advice, but have you thought about swapping the yellow rug in your guest bedroom for the gray one in your office? It seems like the yellow would tie in really well with the colors on the curtains in the living room, and even the rocker you just reupholstered, and the pattern on the rug would compliment the shape of your chairs. The gray rug would make the guest room calmer I think.
YoungHouseLove says
Sadly neither rug will work since they’re 5 x 8 and in order for the chairs to fit it actually has to be shoved back against the file cabinet on the other side of the room (it can’t be centered under the light, so it looks super crazy in real life). We’ll need something long and skinny that can still be centered if we want a rug at all in there (which we do for Clara play). But something with color would be fun!
xo,
s
mp says
Ahhhh, takes me back to December, when I started my MBR reno. I bought 20 1 x 12s as flooring, primed, painted and poly’d them myself, then moved back in before the room was completed. (One dislocated shoulder — me — and a torn knee tendon — my friend John — later, it still isn’t.)
But still … good times.
alissa says
it looks so good!
have you thought about switching the doors of the two middle cabinets or would they not open? it seems so much more practical.
YoungHouseLove says
Yeah, we just figure since our chairs have arms and the cabinets have pull out systems that even if the doors opened towards us we might prefer to get up to access them, so we like how they look better this way, which is why we kept them opening that direction. We’ll just put things we use more often in the side ones (which open towards us) and in the drawers on the counter (where we stash pens/pencils/scissors/tape/cords for computers, etc) – and get up to use the middle ones once in a while.
xo,
s
MJ says
I can’t believe you spent less then $125 on the whole set up…it is beautiful! Yay for saving money but still making something swoon-worthy. :)
ToTheMoonandBack says
You guys are amazing! I love this!
Barb says
have you thought of making a mini version of the desk with the two cabinets you have left over for clara and future kids to do homework on?
YoungHouseLove says
I do actually plan to use the cabinets for a Clara project! But not a desk- more details soon (hopefully)!
xo,
s
Kelly.R says
I love how sanders always look like they are smiling! (Just look at the first picture [of the sander] and tell me you don’t see a happy sander. I dare you.)
YoungHouseLove says
Oh yeah, he’s a happy guy!
xo,
s
Wom-mom Ethne says
Fabulous. Can you move it at all when you paint and such?
YoungHouseLove says
Yup, it slides forward a few weeks. We’ll share painting pics when we get there!
xo,
s
Julie B. says
I love it so much that I want the two extra cabinets you have to do my own!!