Originally Published: April 21, 2011. Updated 2019.
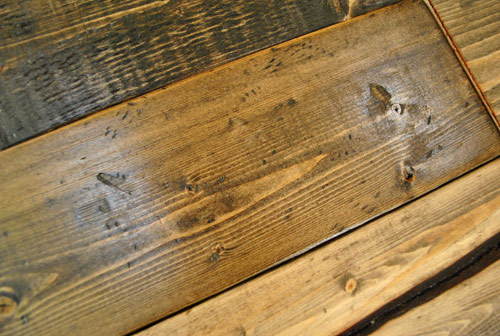
We wanted a weathered, rustic wood look to the top of the DIY console storage table we built, but we couldn’t just make old, reclaimed barn wood or aged shipping pallets appear out of thin air. Instead, we had to find ways to turn new store-bought whitewood from Home Depot into something that looked like it had a story to tell. So here are the easy steps we took to turn that pristine wood into the old-looking, distressed tabletop we imagined. We’ve even got a video of our process in action!

Making this new wood look old wasn’t just easy to do, it was actually kind of fun. The final look was achieved with a one-two punch of:
- A variety of distressing techniques
- Applying wood stain strategic
And spoiler, there’s almost some literal punching involved. Although it just involved some objects we had around the house, not our actual fists. Phew! So let’s get started:
Step 1: Purchase New Wood With Imperfections
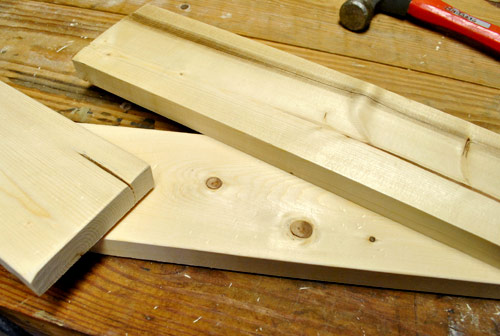
Our project called for 1×4″ boards and we purchased the cheap whitewood from Home Depot. Not only is it affordable, but it’s hardly pristine to start with. So I tried to pick out boards that already had flaws or interesting texture details like knots, chips, dark stripes, etc.
Step 2: Make Your Cuts
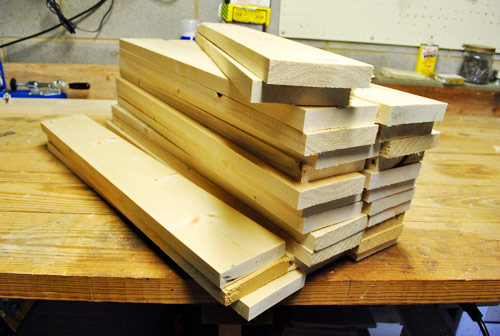
Before distressing our wood, we cut each 8ft board into 2ft lengths, since we wanted sort of a “patchwork” look to the top of our console. It’s best to cut your wood to length ahead of time, if possible, so that you can distress all sides of it at one time. Otherwise you may expose your new wood (literally) when you make your cuts, and have to repeat some of these steps.
Step 3: Sand The Edges
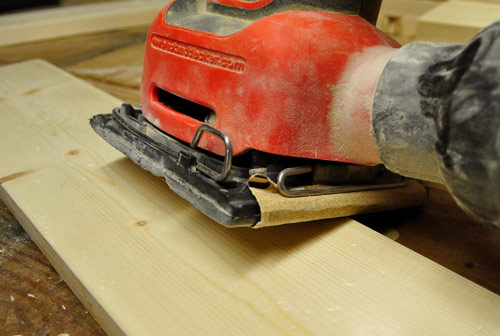
The sharp corners and crisp edges of the store-bought wood was a dead giveaway that it was new. So before I got to beat up any of the boards, my first step was sanding the four edges on the top of each board using my palm sander. This wore down the crisp edge into a rounder and smoother one, so they looked older right off the bat.
Knowing that I had some extras, I tried a bunch of things on a spare plank before really landing on a process (well, “process” is too strong of a word in this case, since it was pretty much a random exercise in let’s-see-what-happens).
Step 4: Start Beating Up Your Boards
I tried a handful-ish of techniques to create that aged wood texture and then used them sporadically throughout my pile. That way I’d end up with a mix of weathered looks, almost as if the boards had been scavenged from a few different sources after lots of character-creating trials and tribulations. So I’m going to show you all the different things we tried, but keep in mind that you don’t have to do EACH technique on EVERY board.
Oh and if you’re someone who likes all the details, I managed to capture a lot of my weathering “process” on video (so watch this if you want the “bonus stuff” that’s not all outlined below):
Note: You can also watch this video on YouTube.
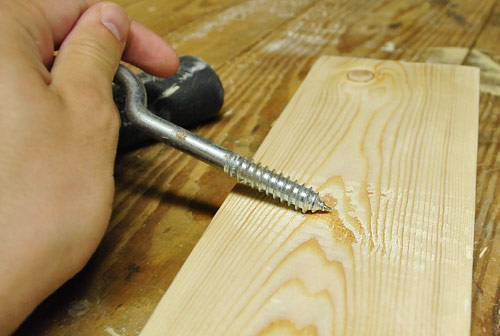
Trick #1: Smack It With A Bag of Screws
The first thing we tried was smacking each board with a Ziploc bag full of coarse screws. I actually did this to each piece and ,besides sanding, it’s the only thing I did on all of them. It gave each board some very subtle dings or divots (see below) and it was also kinda cathartic, if I’m being totally honest. Oh and I’ve heard that some people do this with metal chains, which sounds equally fun.
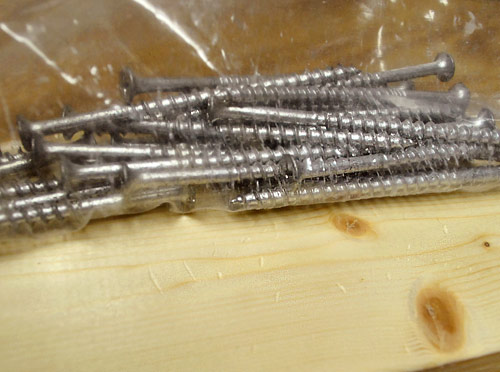
Because I know it’s a bit tough to see the dings above, you can see them a bit more clearly on the final stained board below. Since stain catches and collects in all of these dents and dings, it tends to accentuate them – which is a good thing, in this case. This is the damage inflickted by the bag of screws.
Trick #2: Hit ‘Em With A Hammer
On some boards, I also hit them with my hammer. Whitewood or pine is relatively soft, so it’s easy to leave some dents with just a few light bangs. I liked to concentrate my hits in one spot because it looked more organic than having a few evenly spaced out hammerhead impressions. I was all about the cluster.

Once stained, they looked a little something like this:
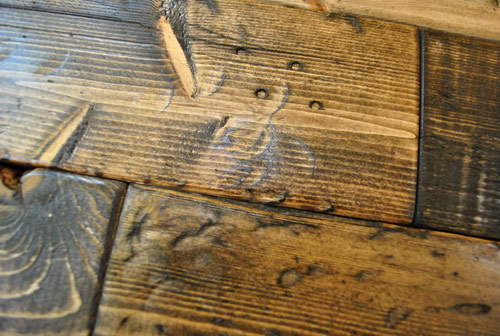
Trick #3: Break Out Your Nail Punch
In the shot above you can also see some of the “fake nail holes” that I made using an improvised nail punch (check out the video for more clarification on that method, which I couldn’t photograph since it took two hands). It almost looks like a spot that an actual nail was hit through the board, without actually having to embed nails in your wood.
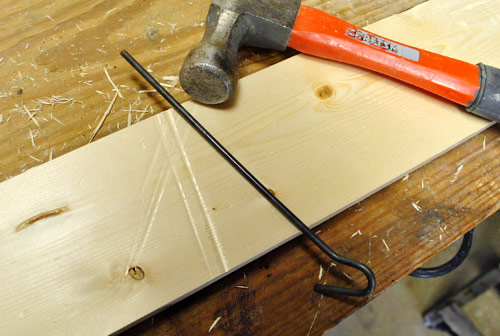
Trick #4: Make Long Impressions
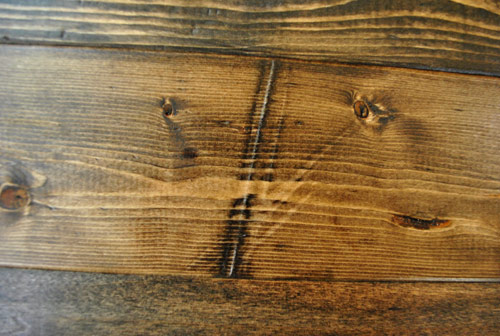
I also used the same tool to make some line impressions across the boards. I just laid it down and hammered on top of it to create a nice long ridge. You could do the same with any long, thin object that can withstand the impact of your hammer (a long nail laid on its side would work great). I though it created the effect that some hard edge had bumped into it over the years.
I especially loved this effect once it was stained because it was so distinct. Why hello character, nice to meet you.
Trick #5: Scrape & Scratch It Up
Using a big screw that I found in the basement, I dragged the thread across the board which roughed up the wood grain. After sanding it down again it really started to look like the wood was slightly rotted, just like some of the spots on the pallets that we couldn’t use (more on that here).
On a couple of boards I did this all the way up and down the length of the board, giving them a really cool and distinct look. Definitely far from the store-bought feel that they started with:
If you watched the video, you can also catch a couple of techniques that I forgot to photograph: namely dragging a paint can opener to make long smooth scrapes down the length of the board (another effect that I really liked after stain was applied) and making those nail punch holes that I mentioned earlier.
Step 5: Give It One Last, Light Sand
I’ll be the first to admit that I probably overdid it when it came to trying so many different tricks – not to the detriment of the final result, just my own time. But since this kind of thing is my idea of fun, I’d do it all over again in a heartbeat. And after I had taken out all of my aggression worked my new-to-old magic and had given everything one last light sanding (to ensure a smooth and not splintery finish), it was time for Sherry to take over for the staining portion of The Console Table Show.
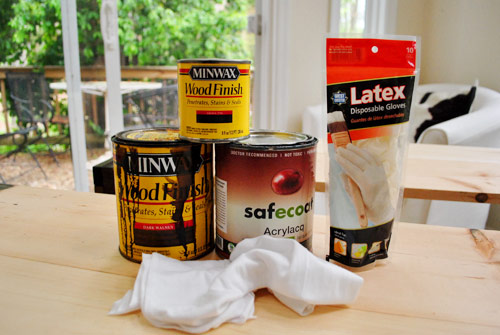
Step 6: Gather Your Staining Materials
Get yourself set-up to stain your boards and gather your materials. Here’s what we used:
- Rubber gloves (because wood stain is messy)
- A cheap $1 paintbrush or two like these (because stain is messy and tends to ruin good brushes)
- Spare rags to wipe up excess stain (because stain is… well, you know).
- Your stain, we tag-teamed the boards with two different stain colors – Ebony by Minwax, and Dark Walnut by Minwax (which we already had from staining the bottom of the console).
- Your sealer. Our favorite water-based non-toxic poly alternative, Safecoat Acrylacq, but you can also use polyurethane from your local hardware store.Just be sure to use something with a low sheen (matte is best) because anything glossy will make your wood look new again.
We made a video of this process too, in case you’d prefer to save yourself all of this pesky reading (and want all the deets instead of just the highlights). Plus Sherry’s gloves make a fart sound, which is always a crowd pleaser.
But if you can’t watch the video (or you prefer words to moving images), here’s a quick rundown.
Step 7: Test Your Stain Colors
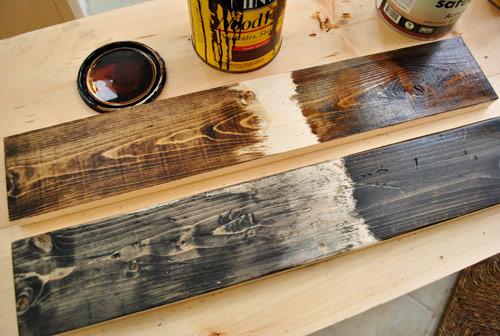
Keeping in mind that we wanted a fair amount of variation from board to board, Sherry did a few tests first to see what each of the stains looked like with a light coat of stain (wiped off quickly) and a heavy coat (which was allowed to penetrate for a bit longer). Here are the test boards with the light coats on the left and the heavy coats still soaking in on the right:
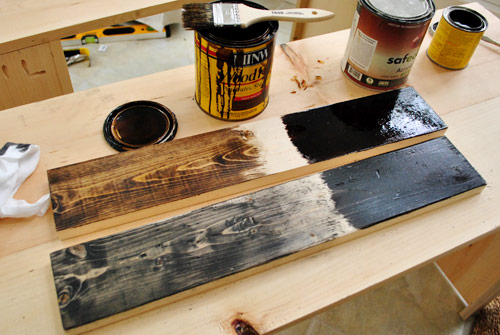
We actually ended up liking both stain colors. We thought the Dark Walnut would help it relate to the bottom of the console (as well as some of the other dark woods in the room) while the Ebony would be a closer match the the gray pallet boards that originally inspired us. In reality, on a lot of the boards Sherry actually ended up using a layer of each color to achieve a tone somewhere in the middle so nothing looked too jarring.
Step 8: Get Creative With Your Wood Stain
The only thing we didn’t like was that we wanted to get some boards even lighter than the stain seen on the above left (which was applied thinly and then wiped away immediately). So Sherry pulled some weird technique out of her you-know-what and it ended up working perfectly. Basically, she pre-washed the board with a light coat of plain water, let it soak in for a couple of seconds, and then went over the still-damp board with a light coat of stain (that way it soaked up less color thanks to the water that it absorbed first). For those who’d like more info, you can see this entire technique in action on the staining video.
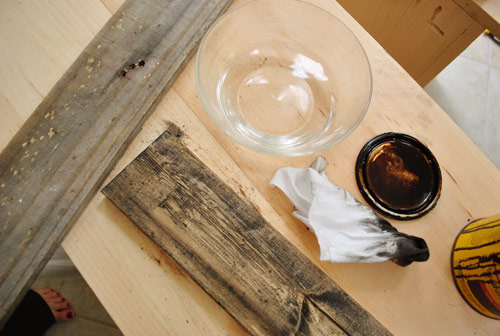
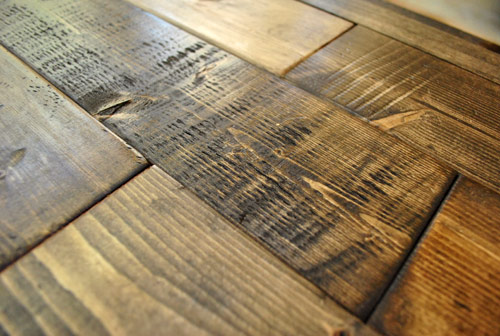
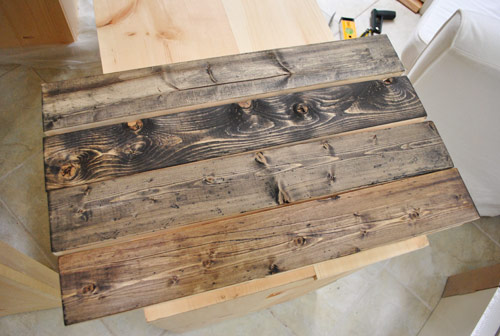
It was by far the closest that we got to replicating the look of the pallets (you can see a random pallet board on the left in the picture above for reference). But we’re glad that it wasn’t a perfect match, because we realized that the pallets were too blue-gray for our living room (since it’s already dominated by a huge gray sectional with gray walls and gray beams we wanted to add some warmth and balance). So we were thrilled with the colors and the variations that we landed on, thanks to staining some and allowing the stain to penetrate a while, wiping it down right away on other boards, and using the water technique above to get some lighter variations. In the end, those brandspankinnew boards were all looking nice and rustic.
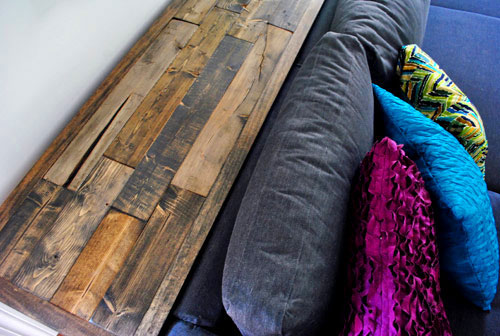
Step 9: Seal & Enjoy Your Finished Product
You can see how our finished project turned out in this post (which includes yet another video!). It also includes details about how we assembled the 2ft sections into a long tabletop.
*This post contains affiliate links*
Update – Wanna know where we got something in our house or what paint colors we used? Just click on this button:


F.D. says
Incredibly impressive. This turned out amazing!
Cait @ Hernando House says
I’m going to need to try this soon. Not sure what I’ll do this on yet (maybe a mirror like Katie Bower?) but something.
Also? Your talking about hitting it with a bag of screws reminded me of how my coworker always says “dumber than a bag of wet hammers”, so I started cracking up. Then you mentioned hitting it with hammers, and I cracked up some more. So thank you for unintentionally brightening my day :)
Robin @ Our Semi Organic Life says
Sounds like fun! Looks great of course. Can’t wait to see it all decorted and lit!
Megan says
Thanks for the step-by-step. The finished product is amazing!
Allison says
I find it hilarious that John is wearing a “Whethermen” shirt… cause he’s weathering the wood… I’m easily amused.
Amanda says
I liked that touch that he added in there as well. It made me chuckle. :)
Stephanie Phillips says
I was having a crummy day, so thank you for the pick-me-up. Everything turned out beautifully!
Katie says
I’m so very impressed. It was 100% worth the effort and time, because this is a beautiful piece you’ll be proud of for YEARS to come! Really lovely. Now, can you come make one for my house, please? ;)
Bree C. says
I said it in the last post, but I’ll say it again…this couldn’t have come at a better time! I’ll be faux-weathering two interior barn doors we built this weekend and can’t wait to try your method!
Paige says
fun techniques! I’ll have to remember the water tip whilst staining…I definitely dig that look. turned out great, guys!
Tanya from Dans le Townhouse says
Truth be told, I used to think making wood look old was cheesy, but you did such an awesome job that I may just change my mind. I had a similar scavaging flop – spent a day taking down old barn beams for a project but they were so gross that the project just imploded. This seems like a much better plan of action! I’m a convert!!
Kristen @ Popcorn on the Stove says
The way you “aged” the wood was really cool! Do you think you guys will bring the wood beams in the ceiling back to the natural color so it ties in more with these stains or keep it that grey for now?
YoungHouseLove says
The wood beams weren’t really warm or aged looking (they were more of a dark reddish color – they even clashed with the floors, which the console doesn’t seem to do) so they wouldn’t have worked that well with the console anyways. We actually really like them gray to balance out the huge gray sectional. And once we hang curtains it’ll soften things up for more of a balanced look (admittedly the room feels pretty hard now, but that should change).
-John
Kristen @ Popcorn on the Stove says
Can’t wait to see the room with the curtains!
Marije says
I now have this mental image of you two as Natalie (Portman) and Bert, haha…
YoungHouseLove says
Haha, we’re such an elegant couple.
xo,
s
Brenna says
What a wonderful tutorial! Thanks for all the photos, the video and great descriptions; it’s really very helpful.
Jessica says
John, has anyone ever said you sound like Bert? (from Bert and Ernie) :-) Just a little bit.
YoungHouseLove says
I can honestly say I’ve never gotten that before. Off to YouTube a video of him to see if I catch the resemblance…
-John
Lauren says
Agreed! It’s not necessarily the voice, but the cadence and phrasing of your words that match the way Bert speaks.
YoungHouseLove says
I love this. I’m gonna start calling John Bert.
xo,
s
Ted says
But, Sherry, that would make you…Ernie. Bert and Ernie Petersik….hmmmm…
YoungHouseLove says
Haha, I’m down with being Ernie. He was an affable guy. Haha.
xo,
s
YoungHouseLove says
I just realized the really eerie thing about this is that my dad has this random running joke about my long lost brother – who he happens to call Ernie.
Maybe he’s been making fun of my Bert voice this whole time???
-John
Ted says
Gosh…you mean Sherry is your long-lost brother? Whodathunkit? (just kidding)
YoungHouseLove says
Haha, that would be weird.
xo,
s
Sara says
Really, really helpful video. It’s starred in my Google Reader for a future project someday! As always, thanks for sharing your great ideas!
Julie says
Awesome! I want to build a console table for behind our Karl and I love what you guys have done. My console table just has to wait until after I build the dining room table and desk for the office. Building furniture is definitely horribly addictive, my husband is getting sick of me saying “pssshht! Why would we BUY that when I can MAKE it!” at which point he reminds me that I work 60 hours a week and maybe we should just buy the furniture so I don’t go insane. We’ll see what happens but thanks for the inspiration!
Ashley @ DesignBuildLove.co says
LOVE what you guys did! The distressing is a blast- I’ve done the chain one. :) One good method to age new wood to make it look old is by spraying it down with a vinegar solution. I will be doing this soon for our recently repaired fallen fence-http://designbuildlove.co/?p=253. (blog to come soon)
Ginny says
I am so impressed! All of my weathering/aging projects I’ve attempted haven’t turned out so great, I’ll have to bookmark this for the next time I get my courage up. LOVE how yours turned out and I think it looks great in the room!
Alison says
Pssst- west elm has some really cute ceramic owls right now (good for Sherry or Carrie!)!
http://www.westelm.com/products/ceramic-owls-a931/?pkey=e|owl|7|best|0|1|24||5&cm_src=PRODUCTSEARCH||NoFacet-_-NoFacet-_-Common%20Rule%20Top%20Wide%20Kitchen-_-
YoungHouseLove says
Cute! For some reason the link didn’t work but I just searched owl on WE to find them. Love ’em.
xo,
s
Ana Silva says
You guys are so cool. Thanks for all the details and videos. I am going to try something similar one day.
Rocky B says
I have not tried distressing, but currently my husband has a few patina concoctions brewing in the garage to patina our newish cedar fencing. The idea is that you rub the boards with white vinegar using steel wool to give the cedar a greyish silver. It looked a little too green for my taste so we are going to try out another patina.
Love your distressed top!
Stephanie says
Very cool! We are in the process of building a dining table from reclaimed wood….that stuff is a chore:( I think your way is the way smarter way to go!
Wom-mom Ethne says
I’ve never seen all of these techniques – nifty. ~Ethne
heather says
One of my favorite distressing techniques is to do a layer, sand it down lightly, then do another layer, then do a light sand down again in strategic spots. Give’s it a weathered look. I’m lovin’ what you did too.
I never noticed John’s southern twang in other videos before. In the beginning of his video right when he says “well, when my pallets didn’t work out I had to turn to other means” it sounds super southern to this New England girl. The rest didn’t sound like it though haha. I love it!
YoungHouseLove says
Hmmm, didn’t notice that either – though I’m still having trouble hearing it myself (isn’t that always the case with your own voice?). We just played that part over here and Sherry said if anything I sounded like I was doing a bad impression of Bill Compton’s Louisiana accent from True Blood when I said “turn to other means.” Which was followed by her own impression: “Sookie, John had to turn to other means.”
-John
Crystal says
We’re big fans of the “Oh gosh, something happened here” look, as well. Too funny, John!
Nicole says
I found this website:
http://curbly.com/modhomeecteacher/posts/9287-how-to-create-a-rustic-farmhouse-dining-table-from-an-inexpensive-new-table
and tried it on my dining table. I just finished it earlier this week and posted on my blog. I love how it turned out!
YoungHouseLove says
Oh man the link doesn’t work. I’d love to see it!
xo,
s
Nicole says
The images on the curbly site came from here:
http://inthelittleredhouse.blogspot.com/2010/02/how-to-build-table.html
I should have just linked to this one in the first place. Sorry about that!
YoungHouseLove says
Wow, love it!!!
xo,
s
Lauren says
Hey John,
Just wanted to compliment you on your video. It’s annoying when a video on a blog is filled with ummmm ehhhh, hehehe, and other stuff like that. You did a great job of being very clear and concise with your words, the tutorial flowed nicely, and there weren’t any bad nervous jokes. Oh and props for not ending the video with ummmm so that’s it! *shrugs shoulders. This is the first vid I’ve seen from your blog so I hope I haven’t unintentionally dissed any previous ones!
Thanks for all your hard work and inspiration guys!
YoungHouseLove says
You’re too kind, Lauren!
-John
Lonely Wife Project says
This is going to come in so handy for our next dining room table!
Karen says
Keep the videos coming – great job guys! These two were very informative, and the one in the previous post with Clara and Burger was so cute. Thanks for everything you do, and your work is amazing!
Dana says
You did such an amazing job on this project! Kudos!
Tia says
I showed my husband yesterday’s post about your awesome console and he says ” YOU NEED TO SAVE THIS POST, THIS IS AWESOME AND I CAN TOTALLY DO THIS” yea he loved it!
Jen @ The Decor Scene says
Thanks for sharing this process. Good ideas if I ever do a project like this. Awesome job guys, awesome job!!!
Em says
I’m suprised you didn’t put you initials on it. J+S in a heart somewhere. The console looks awesome BTW.
YoungHouseLove says
That would have been fun – maybe we’ll carve them into the back of the pull out center thing.
xo,
s
jenn says
that’s a very cool idea!
Shauna says
I just did this exact thing to a headboard I re-finished! :)
Amanda Wells says
Very cool!
Allison says
Yes, I agree with the others that the videos were both very helpful in showing off these techniques. The second one will come in handy as I’m getting ready to stain a doorway we had to repair (my first staining experiment)!
And also I’m very impressed that both of you know how to deliver a clear, concise, and to-the-point video—or at the least edit it down to that. Makes it so enjoyable to watch without all that filler/rambling/repeating that some how-to videos include!
Linda says
You need a metal paint scaler… that’s what the pros use to make those “nail holes”… or make it look like a woodpecker’s been at it. Great job!
Allison says
I love your website! You guys have such amazing projects. I have done my fair share of distressing wood and in addition to the great techniques you used, if you are feeling adventurous you could try using a blow torch. With the type of wood you used it would make the raised grain and any imperfections black. You can also stain on top for another different effect. Thanks for all the inspiring ideas!
YoungHouseLove says
Blow torch = music to John’s ears. What is it with guys and fire? Haha.
xo,
s
Val says
I love how detailed and thorough you guys are on your how-to posts. I know it must feel somewhat awkward and painful when you’re writing it, but it is really helpful to those of us with a slightly less fearless attitude towards projects like these. Thanks for resisting the temptation to just say “and then we beat these boards up with random stuff from the garage and after that we stained them.”
Stephanie says
I found your blog just a few weeks ago, and although our relationship is still new I have a very serious question to ask the both of you: Will you adopt me, and teach me your crafty ways? But seriously I love all of your projects and I REALLY love how detailed you guys are in your step by step instructions! Thanks for sharing all that you do!
YoungHouseLove says
Haha, sure. As long as you’ll change diapers!
xo,
s
Emily says
In college, I toured an upscale cabinetry factory as part of a Business Operations class. There was a whole section of the factory devoted to distressing the wood, using many similar techniques to those you described above!! :)
YoungHouseLove says
I think John would LOVE to see that!
xo,
s
KathyG says
It is very cool, and a ton of fun. I think you can just call and ask for a tour, tell them you are considering new custom cabinets and would like to see their facility.
Lizzie says
Carve: John, Sherry, Clara and Burger 2011… that’s not too much, is it? :)
YoungHouseLove says
Haha- not if we hide it on the underside. Maybe there’s room for a quick sketch of Burger too
xo,
s
Ted says
Oh yeah…I just remembered, on one of the HGTV shows, they were trying to distress a piece of wood that they wanted to use to make a mantel on a fireplace. They took it out to a rough piece of old asphalt road (the house was on a cul-de-sac) and then just kicked it around. The rough asphalt and rolling and kicking did at a lot of the same effect as John’s bag-o-nails. And they said it was pretty cathartic as well. Since these were home-owners that were not having luck in selling their house (maybe Real Estate Intervention???), the cathartic part was pretty important, too.
georgia says
I really wanna Bash up some wood for the heck of it… ha!
Do you think in the wood might swell in different weather?
I just have childhood memories of not being able to shut the front door as the wood got bigger…. i know i probably sound like a moron, but could that affect your super cool hidey hole? or is that just un-treated wood that does that, or is it just our freakishly crap weather we have here in the UK? lol
YoungHouseLove says
Oh good question! Here there’s a rule of acclimation, which basically means that you should bring your wood into the house and leave it alone for 3-5 days so it can acclimate to indoor temps. That way it’ll hopefully not swell or shrink too much if you build something out of it. But sometimes doors swell and we just sand them lightly to fix them, so that might come in handy if it happens.
xo,
s
georgia says
A tip for you with sanding doors…
Dont sand them with a net curtain still attached… my step dad did this, and yep you guessed it, the sander was partial to the odd Net curtain… was a slightly giggly occasion where my step dad was getting mad at the sander trying to rip the net curtain out… hehehee
YoungHouseLove says
Haha, good tip. That sounds hilarious.
xo,
s
skye says
aside from looking great this looks like a lot of fun to do also! :) i always love your videos too. they are great tutorials.
Emily D. says
My husband said I have to stop reading your blog. He said my head is too full of ideas and until I actually finish a project, like the desk made out of a recycled door, I can’t even think about distressing wood and building tables. What a party-pooper!
I am in LOVE with how the wood came out and I’m considering marrying it after I ditch my bossy hubby!
YoungHouseLove says
Haha, comment of the day goes to Emily for making me laugh out loud at the last line.
xo,
s
Amanda Wells says
You guys will love this playroom – you need to house crash this family!
http://www.amandadovewells.com/?p=217
YoungHouseLove says
So fun!! Wow.
xo,
s
MARTHA says
the final product looks quite good! did you guys consider using reclaimed wood? these days you can find some very cool stuff for $4.00sf. it would save all the work and you would have a more authentic final product. but then we would not have the fun of watching john “stressing” in the basement…
YoungHouseLove says
Oh yes! We drove all over town in search of anything in the right width and in enough bulk to cover the whole top- it was nowhere to be found. And first we tried to use pallets in our back yard but they just splintered and fell apart and took John forever to mess with so we had to abandon that idea. Thankfully we found what we needed in the end- but reclaimed wood would have been amazing if we could have hunted some down!
xo,
s
Frog says
Honestly, I like how your wood came out better than the wood from the pallets.
Thanks for the great distressing tips. I’m working on something similar, but I’m hoping to get it sort of a white-washed look to fit the beachy theme of my living room.
vanessa says
a chain works well. i have used this a few times in “aging” boards.
Nicole says
Great job you two!! Love, Love, Love Clara and Burger they make my day!! :)
Jessica says
I think it is so totally cool and awesome that you guys made this huge console with distressed wood and all! I hope one day I can take on a project like this! Reading your stories gets me really excited to go home and re paint my walls or put up drapes…or build something! By my poor little studio apartment can only house so much creativity, on to the neighbor’s house??
Rosalyn says
How COOL!!! Today we are using your ideas and fun crazy things we just learned and doing our beams for our box ceiling in our new custom built home!! It’s going to be a fun family affair and a memorable time we will all remember for sure! You guys are AWESOME!