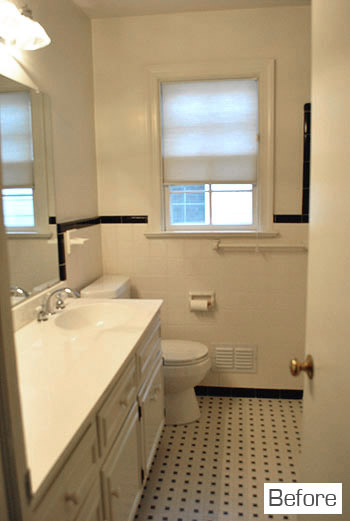
Remember when John mused about who would win the bathroom race (he wanted to frame out the mirror and I was on the DIY window shade train) here? Well, chugga chugga, baby. Momma won.
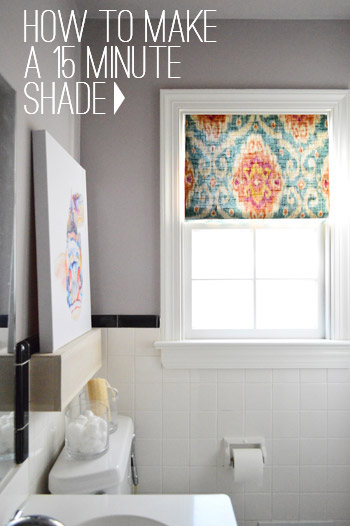
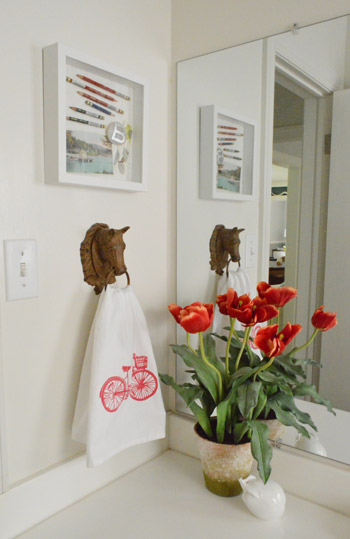
We got the fabric at an outlet called Mary Jo’s a while back (here’s an affiliate link to it on amazon for folks in other areas). We threw Clara a wormy birthday party with her two favorite colors – pink & orange – so when it came to picking out the fabric for the hall bathroom, where we log some serious potty and bath time with her, I couldn’t resist adding some fun with the bold patterned fabric that featured a few of Clara’s favorite colors. Especially since so much of the room is such a safe/neutral tone (lots of white tile and trim + gray walls with a soft plum undertone), so it’s fun to bring some pops of color with the turquoise knobs that we added to the vanity, some colorful art, and our new window shade.
As for the process, it was a semi-similar system to the shade I recently made for the kitchen – except even simpler. Yup, this baby was an $8, fifteen minute curtain (the kitchen one took about an hour). There was still no sewing machine involved, but this time there was also no pinning and less fabric (I only needed half a yard) – so it took a lot less time. You ready for the breakdown? I thought it would be fun to do a minute by minute rundown, so here we go.
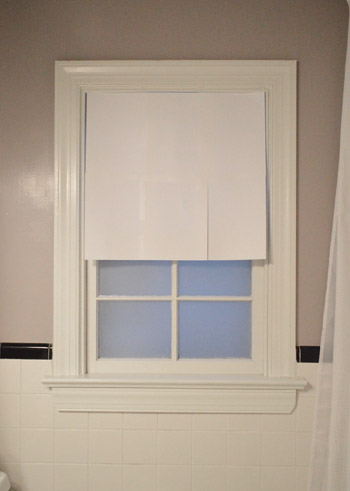
Minutes 1 – 3: Make A Paper Template
I broke out six pieces of cardstock and the tape to make a quick paper template for the exact width and length of the window.
Then I taped it up in place. Sometimes it just helps to visualize things before committing to a certain size/shape.
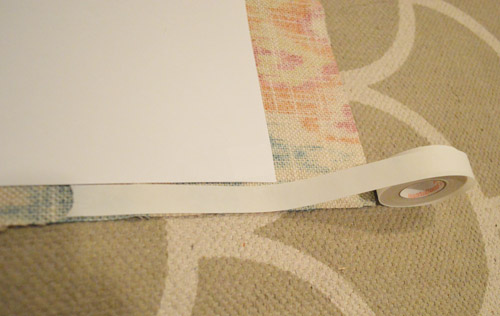
Minutes 4-5: Cut Your Fabric
Next I carefully placed my paper template on my fabric (so the pattern was centered) and cut it out with an inch border on each side and the bottom with a wider border along the top (3″) since that extra fabric would be used to mount it at the top.
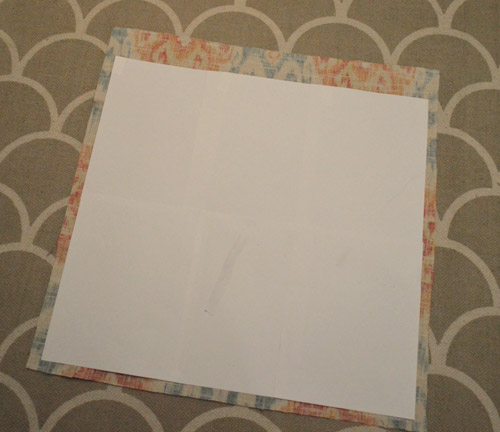
The reason I cut the fabric to just be an inch wider on those three sides was because that’s the width of my hem tape, so once it was hemmed I knew I’d end up with a shade that was exactly the width of the paper template, which perfectly fit our window.
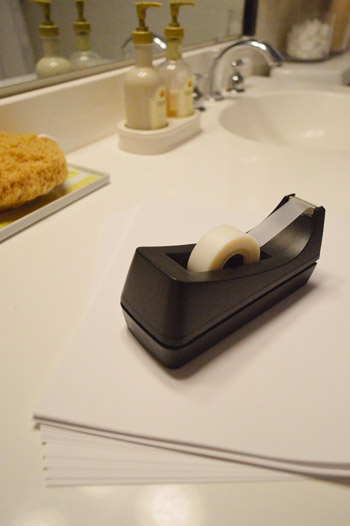
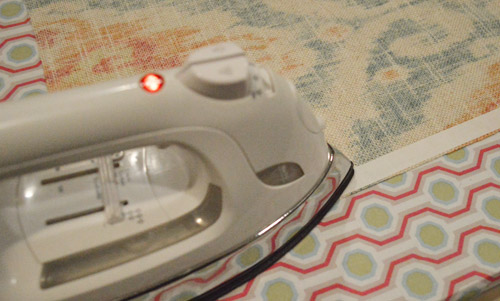
Minutes 6-8: Hem Your Fabric With An Iron
Then I just hemmed all of the sides with no-sew iron on tape (I like heavy duty Heat N Bond). Oh and there’s a little video tutorial on how to use no-sew tape here for anyone interested.
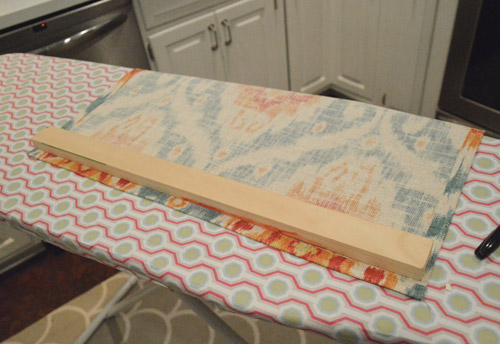
Minutes 9-11: Attach Wood Piece
After all four sides were hemmed and the fabric was now the same width as my paper template and two inches taller on the top for mounting reasons, we got a piece of 1″ x 2″ scrap wood from the basement and cut it to be a tiny bit narrower than the width of the fabric.
Meanwhile, Clara ran off with the measuring tape and was found “helping us measure the tub.” Thanks, girl!

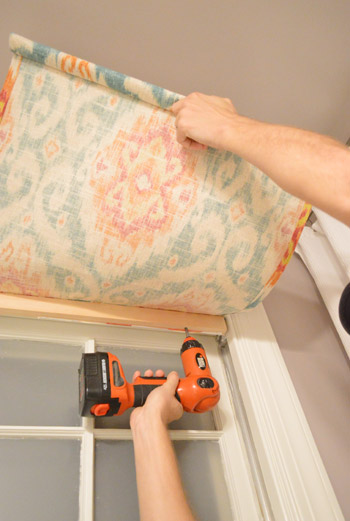
Minutes 12-15: Screw Shade To Window Frame
You can see from this photo that we secured the fabric to the piece of wood. I used a staple gun to attach it so it would be firmly held in place once the wood piece was screwed directly into the top of the window (just like you’d hang an inside mount shade). And see that rolled bottom edge in John’s left hand in the picture below?
I also grabbed a scrap dowel that we had in the basement and cut it to the same slightly-narrower-than-the-width-of-the-shade size and rolled it into the fabric at the bottom of the shade to create a nice finished bottom edge with a bit of weight to it so it would hang nicely. I secured that rolled edge with a few stitches in a few places (no sewing machine came out, so it was just a minute of “tacking” the fabric in a few spots to hold that tight curl around the dowel). That’s optional though, because the shade in the kitchen doesn’t have a dowel at the bottom and it still looks clean and straight. Maybe I was just in a dowel mood?
Then, like a finely cooked steak, that baby was done. And since the entire window is also frosted (see how we did that last week), there’s privacy but light still streams in – so it doesn’t feel dark. I love how the colors in the fish canvas not only tie into the gray-plum walls but are also echoed in the window fabric. I mean if you can’t have fun with fish art and some bold window fabric in the bathroom, where we can you have fun with it? #fishcanvas4eva

Update: We’ve had a few “but how do you wash your DIY window shade?” questions, so here’s that answer for ya: just like any other store-bought roman shade or blind, it’s not washable, but we didn’t have any issues with the white Ikea shades that we had for over four years in our first house (which couldn’t be washed). If you really wanted to be able to wash yours, maybe you could connect it at the top to the wood mounting piece with washable velcro instead of stapling it?
It still looks a little undone in here since we have to frame out the mirror and I’m planning to bring in a few more pops of color to tie in the curtain, but it’s getting there. The sweet thing is that the other side of the bathroom has some nice bright colors that balance things out pretty well already.
And the room as a whole is definitely looking a lot more “us” than when we started…
So if you have a basic looking bathroom, a half-yard of colorful fabric, and a few bright accessories you can hopefully spice things up without a total gut job. A cheerful little patterned curtain isn’t even a giant commitment since it’s so easy to switch out down the line. Oh and did you notice how I colored my brassy doorknob black in the photo below thanks to a little one-second photoshop work? Hah! Someday I’ll actually spray him for real.
Here’s the updated bathroom list:
rehang the shower curtain at ceiling height
trim out the unbalanced window(more on that here)switch out the light fixture(more on that here)add some meaningful art(more on that here)build in a shelf over the toilet for some leaning art(more on that here)paint the walls a fresher color to help the original tile pop(more on that here)upgrade the vanity hardware(more on that here)
frost the window(more on that here)make a bold fabric shade for the window- frame out the mirror over the vanity for a less builder-basic look
- ORB that brassy gold doorknob
- paint the whitewashed shelf in a solid white tone (since the room is coming together more & we’re feeling that now – we’ll keep you posted!)
- add finishing touches/accessories and dish out a budget breakdown for you guys
Psst- Wanna know where we got something in our house or what paint color we used? Just click on this button:


Ann L. says
$herdog — I wouldn’t want you to lose your rep as the most gangsta DIYer in the RVA, so you may want to change “Ditty” to “Diddy.” :)
– A Money
YoungHouseLove says
Hahahahahahahah, worst gaffe ever. How will he ever forgive me?
xo
s
Tracie@MiddleClassMod says
Awesome! I still love that fabric.
I made a window shade inspired by the painted shade in your book over the weekend: http://middleclassmodern.blogspot.com/2012/11/the-day-has-finally-arrived-first.html. It was inexpensive and easy, and it looks great.
YoungHouseLove says
That’s awesome!
xo
s
annabelvita says
Love this! The room is really starting to come together. I made a similar fake shade for our living room with one of those tension closet rods – if anyone is looking for a no-sew no-screw solution!
Kristen | Popcorn on the Stove says
I gotta say – I love the curtain’s colors with the wall color. Also, I hear ya on finishing a project first :)
YoungHouseLove says
Thanks Kristen!
xo
s
Katie Kerr says
I am wondering how you have found the light fixture. I love the look of it and how dark it is and am considering it for our bathroom. The only problem is that we do not have any natural light in our bathroom. Do you think that the light would be bring enough in a room without natural light?
YoungHouseLove says
We like it! The room gets some nice light through the window (which still comes through even with it frosted) so it’s enough – even at night (it has two bulbs). I’m not sure if it would feel dark without a window though… maybe if you kept the walls and shower curtain light it would be great?
xo
s
Jess @ Little House. Big Heart. says
That’s so easy and such a great idea! Someday I will get around to making a shade for the kitchen window. Someday.
PS. I love how you guys are working with the existing vintage tile! Do you ever have plans to gut it, tough?
YoungHouseLove says
Nah, it’s in great shape so we’re happy to keep it as is!
xo
s
Rebecca @This Nest is Best says
What a great idea! We have a window in our stairwell that I would like to frost and a little pop of color above it would be fantastic!
Our weekend was celebrating our third turkey dinner and putting up some xmas decor :)
Also, last day to enter to win the NYT bestseller YHL book! http://thisnestisbest.com/2012/11/18/young-house-love-book-giveaway/
YoungHouseLove says
Woot! You’re so sweet Rebecca!
xo
s
Megan @ Rappsody in Rooms says
Looks awesome! I think I am channeling your homemade shades because I was busy making Roman shades this weekend. And I also won on projects. My new light fixture went up. But then the next day I helped out the hubs getting leaves up. I guess we both “won”.
YoungHouseLove says
Haha, that’s the best outcome!
xo
s
Emily says
From the title, I got excited that this was a post about her big girl room!
Ann says
I wish I would have caught you guys and Novogratz in Cinci. I am in NE Ohio. Anyway, when you ORB your door handle will you remove it, or try to do it in place. I have many I would like to tackle however, I do not seem to get door handles back on correctly. Thanks for the advice.
YoungHouseLove says
We’ll remove it- I’ll post all the details for ya when we get there!
xo
s
Julia @ Chris Loves Julia says
You had me sold at the very first picture. It’s amazing how the muted plum walls have become almost a neutral. Plum as a neutral! Amazing!
YoungHouseLove says
Aw thanks Julia! It’s the best color ever! Pics don’t do it justice. Run out and get a nice big swatch of it! Haha. And now I sound like a swatch salesman….
xo
s
Karen F says
very cute! I might even actually be able to handle this project, and both of my bathrooms could use a little something-something. maybe after the holidays :)
Emma (Broke Ass Home) says
I love the colors and how they’re coming together! Great Job!
I feel like we got a lot done this weekend- we did our project, inspired from your book & set up the link party (Be Fangirls with us and link up here: http://bit.ly/UWbqPp
We also hosted our first Thanksgiving, went to a friend’s thanksgiving, shopped on Black Friday AND put up Christmas decorations. Who says long weekends are for resting, anyway?
YoungHouseLove says
Love your link party! So much fun! And your weekend sounds busy but like so much fun!
xo
s
Brenda says
Is there still some sort of way to cover the bottom half of the window? I know privacy is an issue thanks to the deck. The fabric and the fish painting complement each other in such a fun way!
YoungHouseLove says
Oh yes, last week we frosted the whole window, so there’s full privacy in there now :)
xo
s
Brenda says
Oh wow, totally forgot about that! It’s so bright in the pictures it’s hard to believe there’s anything on the glass. Yay for privacy + natural light!
Anne @ Planting Sequoias says
I love how your bathroom is coming together! It give me hope that you CAN have a cute bathroom without a complete reno. :)
Christina says
This weekend I helped demo a house in Brick, NJ that was affected by Sandy with: We Are Team Jersey (search on facebook). It was my first demo EVER and who knew I’d be so good at it? ;) Seriously though- if anyone is in the NJ area and would like to help out- they are helping clean out / rebuild houses everyday for the next year and are amazing people. Check them out :)
YoungHouseLove says
That’s awesome! You’re amazing for helping such a great cause! Thanks for spreading the word!
xo
s
Koliti says
Love the splashes of color and how your window shade is reflected in the mirror for even more color.
Went to an arts & crafts fair in the park this weekend – found a happy piece of art.
YoungHouseLove says
Sounds so sweet!
xo
s
Tasha says
I am in turkey EUPHORIA! I’m making turkey stock with the carcass tonight and having turkey soup (with bacon!) for lunch. Mmmm maybe I should have an early lunch…
YoungHouseLove says
Hahah! I love it.
xo
s
Janette@The2Seasons says
Does the window have a UV coating on it? I’m wondering how you will prevent the fabric from bleaching out from sun exposure since it isn’t lined.
YoungHouseLove says
The window is frosted (we did that last week) so we think it’s all good! Will report back if it majorly fades though! We generally like bright curtains but haven’t had issues with fading since we live in such a wooded neighborhood.
xo
s
Dalenna says
That’s super easy! If you decided to change the fabric down the road, how difficult of a switch would that be?
YoungHouseLove says
Unscrew two screws to remove the shade from the window, use a screwdriver to pop out a few staples to free the old fabric, and spend 15 more minutes cutting/hemming a new piece of fabric to staple up in its place :)
xo
s
Britt F. says
Love it! Thanks for sharing.
And, yes, sometimes you just gotta compete a little! I beat my husband to the punch and built a wall mounted coat rack yesterday while he ran to his office for a bit. Sawed that bad boy and all! #proudwifemoment #stillhaveallmyfingers
YoungHouseLove says
Haha, go Britt go!
xo
s
Rebecca says
You guys used to do time spent breakdowns on projects. I miss them!
YoungHouseLove says
I did that on this one actually- did you see the minute by minute titles for each step? Hope it helps!
xo
s
Rebecca says
Sorry, I meant when you totally finished the project up, the total minutes spent on the whole bathroom project
YoungHouseLove says
Oh yeah, we love those! When we do a budget breakdown at the end I hope I can do a time breakdown too! In here it’ll be quicker than most room makeovers I think, so that should be fun to look at!
xo
s
L says
This weekend I’m packing and preparing for a move while going through all of my belongings and cutting it down to 1/3 of what I currently have! I actually looked at your past posts of your old tiny new york apartments to get inspiration. The shade looks awesome – my new apartment has lots of naked windows and I’m sure I’ll be referencing this post to make a quick (and adorable) shade for the bathroom window that looks into the shower :/ !
YoungHouseLove says
That’s amazing! 1/3 is an awesome awesome goal! Good luck L!
xo
s
Analise says
Can we talk about how delightful Da Bean is? (And the fact that your “#everydayI’mmeasurin” hashtag made me laugh out loud at work. I love you guys.) Clearly, that girl needs her own tool belt, stat!
YoungHouseLove says
Haha, it’s true! Maybe it needs to say Da Bean on it. And be bedazzled with nuts and bolts…
xo
s
Leyna says
Seriously–that girl needs tools! Montessori supply stores sell really cool, miniature but REAL tools, and Clara seems mature enough to handle those, along with her own supply of scrap wood, screws, etc. It’s been a year since my son got his workbench & real tools for Christmas and it’s still going strong! I love it when you can say that about a gift.
YoungHouseLove says
That sounds like so much fun!
xo
s
Melissa @ HOUSEography says
Looks so cute! I totally agree on the white shelf. The natural look is just not working now that you have other stuff going on in there. Looking forward to seeing you on Wednesday!
Ade@fortheloveofpainting says
So cute, I am going to do this for my small bathroom!
Christine says
Love how the colors of the shade and the paint don’t exactly, ‘match,’ but do, ‘go’ together. And speaking of framing out big bath mirrors… last night, my husband just finished refinishing (that sounds weird!) a big rocking chair we found in trash, and it turned out great. My father in a law said, “Any other projects you want help with?” And I said… “Yes! The big bathroom mirror needs a frame!” This was sorta sneaky of me, because my husband has been on the fence about a mirror frame. But his dad said yes, so that won my husband over. I can’t wait, as it will make the bathroom look so much more finished! I’m excited to see how John does his.
YoungHouseLove says
That’s awesome! Score.
xo
s
Jen@The Decor Scene says
Love how the bathroom is coming together. And I absolutely love that fabric. Gorgeous!!!
We started to put our Christmas decorations up this weekend. Hopefully they will be done by this weekend coming up. :)
YoungHouseLove says
Sounds fun!
xo
s
Gina aka Slappy says
I ordered your book and it has inspired me to redo our kitchen and laundry room. My husband is soooooooooo “thrilled” and by “thrilled” I actually mean rolling his eyes and sighing a lot. It’s hilarious!
YoungHouseLove says
Hahaha, good luck Gina!
xo
s
Juliette says
Love how it turned out!
Also noticed that you added a knob to the fake drawer under the sink, definitely makes it look more complete.
Can’t wait to see you guys on Sunday!!
YoungHouseLove says
Oh yes, we mentioned in the last post that they had sold out of knobs so I ran back a week later and they had another one in stock to fill that in!
xo
s
Amy says
Love it, and love all the changes in the bathroom. You mention ORB’ing (that’s totally a verb, right?) the doorknobs… have you done that anywhere else yet? I’m just wondering how it holds up? I’m thinking you did an exterior door handle…
YoungHouseLove says
Oh yes we did it with our exterior handles on the front door and the sliding doors to our sunroom/patio and even out in the elements it’s holding up great! We ever did an update post with pics of them!
xo
s
Cora says
Love love the fabric!!! I can’t wait to make a shade like that for my kitchen!
On a side note, please don’t think me a stalker when I come to the book even this weekend from CT…I already saw you guys in Wilton but I want to craft with J-Boom and $herdog! Now the question is…who will get my book since I already have one!
Sincerely,
NOT-A-STALKER-I-SWEAR Cora
YoungHouseLove says
Wahoooo! That’s going to be so much fun. Can’t wait Cora!
xo
s
Careen says
Seems like Da Bean just suddenly became a big girl. She’s grown so much, so fast.
YoungHouseLove says
I know it! Sniffle.
xo
s
Katy @ The Non-Consumer Advocate says
Really cute! I’ve been wanting to do a simple, not fussy window treatment for my kitchen, and this project is totally within my skill set. ;-)
Katy
Crystal @ 29 Rue House says
I still can’t believe I didn’t buy that fabric when I saw it for $7 bucks a yard on clearance!
I finished my diy wall growth chart for the kiddos after being inspired by Cape 27’s from your house tour. Need to finish repainting the dining room before we hang it though. :)
http://29ruehouse.blogspot.com/2012/11/stain-and-sharpie.html
YoungHouseLove says
Wow- $7 a yard is crazy good!! And that growth chart is adorable. So sweet!
xo
s
Lisa P. says
So happy to hear that you are repainting the shelf to a solid white…it was standing out as unfinished looking to me. The rest of the room looks fantastic!!
YoungHouseLove says
Oh yeah, we just gotta let things shake out sometimes! Haha.
xo
s
Nora Rose says
Love it! I wish our bathroom (especially the counter) was larger for more fun accessories but I love the way you guys did it too!!
Kenz @ Interiors By Kenz says
Lerve that fabric! I bought the exact same fabric months ago! I have yet to make anything with it yet though. I was thinking pillows for my front room, but it hasn’t felt quite “right” yet.
This weekend I dedicated my DIY-ing to one of your book projects! Painted that headboard right smack onto my wall. And it looks so KILLER!
http://interiorsbykenz.com/link-party-how-to-paint-a-headboard-on-the-wall/
YoungHouseLove says
I’m obsessed with it Kenz! You did such an awesome job. Thanks for sharing it with us!
xo
s
Vanessa says
Sherry..your bathroom is looking great! I have a silly question…Where did you get that soap/cream dish? I saw it in the post you did on the kitchen window treatment and now I see it again in your bathroom. I just think it’s such a nice soap/cream combo dish thingy! (that is totally how you call it right?) I’ve seen some wire basket ones at Home Goods but I think your’s is nicer!
YoungHouseLove says
That was from Anthro a long time ago! It’s made by Cucina if that helps.
xo
s
Beth says
Nice! Your bathroom looks great!
This weekend I convinced my husband to help me with a “Dude, Get On That Already” challenge. We have a lot of books… maybe 500? 600? And when we moved, they got to live in the corner of the room for about four months. Finally, I couldn’t stand it any longer. We bought single-track standards and brackets at a hardware store, pre-finished 96″ long shelves, and hung them. With only the most minor of set-backs (our 100 year old house is completely non-level), we hung the shelves and put up the books in an afternoon! Yay!
YoungHouseLove says
That’s amazing!!!
xo
s
Christina @ Homemade Ocean says
Ohhhh dangit….when I read the title I thought we were getting a peak at a big girl room!
That bathroom looks awesome, I love that you did a work with what ya got instead of ripping out the tile! Way to go :)
YoungHouseLove says
Haha, I’m more excited about starting that big girl room than you are! Haha. Can’t wait!
xo
s
heather says
Nice! We had TWO Thanksgivings on different days, mixed in with renovating the house (oh, big surprise – we don’t do anything else). Most of the framing is done, the upstairs bathroom plumbing is almost complete (just the rough plumbing, no fixtures yet) and holes were started for the electrical as well as laying out where we wanted plugs in the bedrooms, etc. We still don’t totally agree on the lighting for the upstairs bedroom but we’re working on it!
http://www.likeacupoftea.com/weve-been-framed-but-its-all-plumby-no-worries/
YoungHouseLove says
You guys are amazing! You get so much done!
xo
s
heather says
It’s all Andy. He is totally 100% internally motivated and a machine. I swear his blood line was somehow once infused with ox blood. His grandfather once built a gigantic pond on his property just so he could bass fish in front of his house. It’s absolutely gorgeous and he did all the work. His Dad has also renovated now going on his third house, not including our camp.
They just don’t stop…it’s truly mind boggling and awe inspiring and they don’t get why anyone wouldn’t be that way haha.
YoungHouseLove says
Haha, that’s amazing!
xo,
s
Gabriella @ Our Life In Action says
Holy Smokes!!! Two posts in the morning – sweet Jesus!!!!!!:-DDD
I love the shade. What colour are the tiles. We have the same look to our bathroom (sortof….tiles are around the tub area) and they are a light cream with black around the top). I love this look and was just curious (hoping really) that it would work in my bathroom as well. :-)
YoungHouseLove says
They’re actually bright white, especially with a moody color on the walls. But cream is a neutral too, so it probably could work!
xo
s
Andrea says
Love how it’s all coming together!
I also owe you guys a big “thank you”! We are FINALLY getting to painting since we’ve moved (a month of staring at builder beige was driving me CRAZY!), and we knew we wanted gray. We had tons of swatches and nothing was quite right — too blue, too dark, too taupe, etc). Finally, I was decided to go to Lowe’s and get a sample of “Moonshine” since I loved it in your house. I am convinced it is the most perfect gray ever! We love it! Hopefully that’s not too creepy :-) “Imitation is the sincerest form of flattery” right?
YoungHouseLove says
Aw you’re so sweet! So glad you love it!
xo
s
Jillian {Her Split Ends} says
La-oving the bathroom! Where did you get Clara’s fabulous shirt? I’m gonna need to get a bunch of those!!!
XO
~ Jillian
http://www.hersplitends.com
YoungHouseLove says
That was from Old Navy! Hope it helps.
xo
s
Anele @ Success Along the Weigh says
I love it when you guys bust out some easy projects that I can do. Not that I don’t appreciate deck posts and stuff but I’m thinking even this over a window pane on the bathroom wall would make awesome art in a bathroom with no real window! :)
YoungHouseLove says
Aw that’s a sweet idea!
xo
s
Sarah @ RixenItUp says
With all the stapling and screwing of the fabric, what do you do when you want to wash it?
YoungHouseLove says
We’ve never washed roman shades from the store, so I don’t think we’ll be washing this homemade one either (spot cleaning if it gets a stain or something maybe?).
xo
s
Lindsey @ arkadian belle woods says
I am in love with the fabric! Those colors are amazing!
YoungHouseLove says
Aw thanks Lindsey!
xo
s
Janice says
oh my word. Love the shirt! love the project! love, love, love. This weekend I spent mostly getting ready for two upcoming shows. Last two of the year. Then RELAXATION!!! Well, sort of, there is still that whole Christmas thing going on…and my basement fixer upper project, and ummm, ok, you guys know how it is – the list goes on and on and on. Well, except yours above is almost all crossed off. . . but you have other lists! I know you do! ;-) :end ramble:
YoungHouseLove says
Haha!
xo
s
Krystle @ Color Transformed Family says
I like that the bathrooms still maintains some class even though it is mainly a children’s bathroom. The pops of color keep it playful and fun but don’t look like anything Clara will grow out of in a year or two. Do you guys have a plan for any rugs in there?
YoungHouseLove says
I’d love to get a great bath mat or even a small “real” rug (I’ve heard those can work in a bathroom too) so we’ll have to see what we find!
xo
s