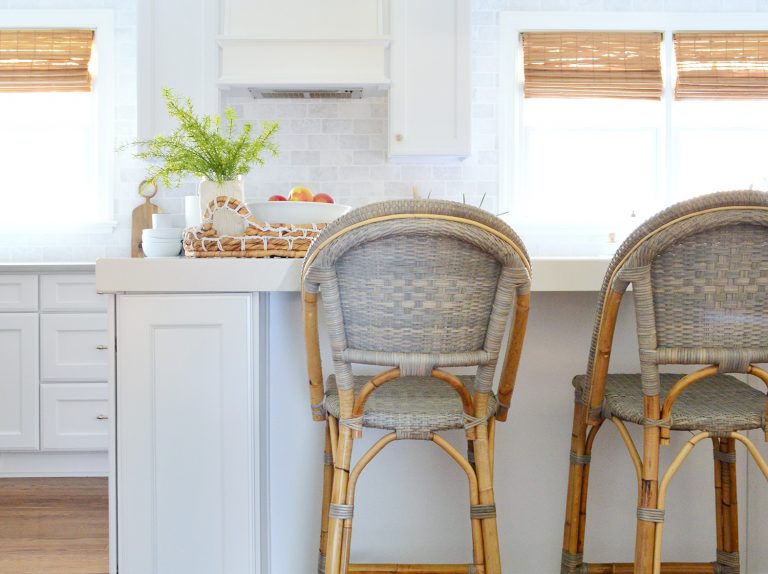
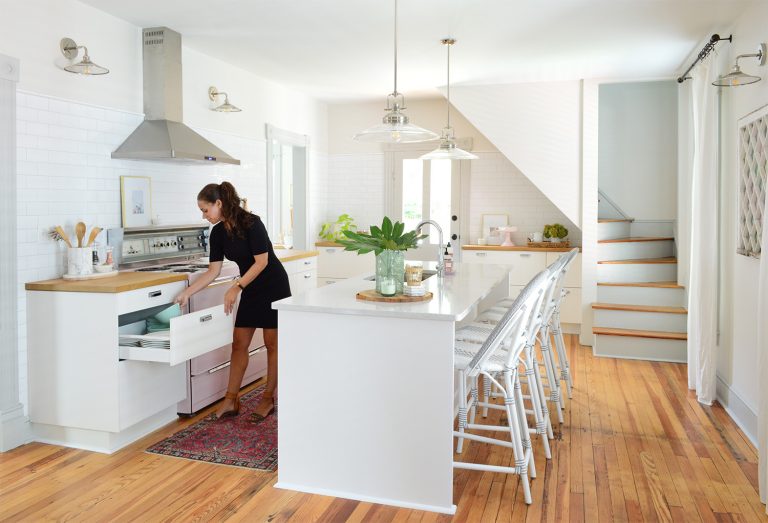
Author Archive
Mixing Up The Mantel
Having a fireplace in the kitchen is definitely something that we think is charming (it’s the heart of the home, and even though it’s not functional, just tucking a basket of Clara’s toys or books in there and having a spot to display stuff above the mantel is our idea of a good time). Well, maybe I should say it’s my idea of a good time, since I’m pretty sure John could commit to whatever we have up there at any given time for the next ten years. I, on the other hand, like to turn surfaces like the mantel into a rotating display or sorts. Not every day or even every few weeks, but it’s safe to say that around once a month I get a wild hair and decide to switch some things out. And our mantel has undergone quite the transformation since we moved in. Here are just a few “takes” on it, over the last fifteen months here:
About a week after we moved in (in mid December of 2010) we wanted to cozy up the room full of brick and paneling, so I slapped some holiday stuff up there and called it a day:


A while later (after priming and painting the brick and the mantel), I kept it simple with two fauxpiaries (faux topiaries) from Crate & Barrel and a round hanging mirror along with a mirror in the firebox, and a tray full of candles. This definitely wasn’t Clara friendly, I was just having mommy fun when she went off to bed:

After priming and painting the paneled walls (which look extra green here since we didn’t have good kitchen lighting installed yet), I added some Halloween stuff, complete with some homemade bleeding candles:


Then it was decorated for our second Christmas here, with a mirror that later moved into the living room, some stockings, a basket full of presents, and a few feather trees (eeks, the colors are all sorts of terrible in this pic, again since we didn’t have our new kitchen lighting installed yet):

Well, now it looks like this (don’t mind that one remaining broken light that we’ve been meaning to replace for months now):

Oh yes, and we still haven’t trimmed out the area where the cork meets the tile surround yet (but you know we’ll share pics when we do)!
Here’s a little side action:

You might notice one of my favorite birthday presents ever, this little painting of Burger from my insanely thoughtful friend Lesli (who is one of the most talented painters I know). Yup, I cried when I opened it. It just captures him perfectly (she used this picture to base it on). I love that it’s small and chunky (the canvas is extra thick and just 9 inches wide/tall). And for everyone sweetly wondering how he’s doing since this incident, he’s back to his usual happy self, thank goodness. We are so grateful.

Of course these blooms won’t stay up there nearly as long as my beloved Burger portrait probably will (darn you tulips, why must you die?) but for now I’m loving them in this bright green vase. It was one of those free vases that came with a birthday bouquet that a friend sent me last year (it was sitting in my little decorating cabinet waiting to get some action).

Oh and I got those tulips last Wednesday since we were hosting some Easter guests and I wanted to brighten up the house. They’re still looking happy thanks to reclipping their stems and refreshing the water every few days (and dropping an old penny in the water to help keep them from getting too floppy).Yay tulips! But I think I might only get one more week out of them. Sniffle. But I guess that opens me up to a whole new mantel makeover. Haha. And so it continues…
Do you have a mantel or another surface (the top of a console, dresser, your coffee table or dining table?) that you tweak every once in a while? Can you believe we lived with that dark paneling and weird lighting that made everything look neon as long as we did? I can’t either.
Hot Diggety Dog
Yup, we’ve been digging. And my arms are sore. But they don’t look like Madonnas yet so it couldn’t have been that bad. We still have a ton of things to do outside, so this is one of those it’ll-take-years-things, and not a ta-da-here’s-the-after-by-the-end-of-the-post things, but it’s nice to focus on one small area at a time to keep from getting overwhelmed (last year we limbed up the magnolia, transplanted/removed a lot of the bushes, and painted the front door). And for this installment of Petersiks Vs. Wild, we tackled the sad little garden bed to the right of the front porch:

If you look closely, you’ll see what looks like a rectangular brick patio on the right half of the garden bed, which prevents us from planting anything there. But for reasons of balance, function, and curb appeal it had to go.

So $herdog got her shovel on:

The brick wasn’t mortared together or anything, so it was easy enough to dig one out and free up the next brick, one by one. It wasn’t exactly quick work or light work (I must have carried 100 bricks to make a neat pile next to the carport) but it was nice to start clearing things out. As for what we’ll do with those bricks, we’ll either use them somewhere else down the line or craigslist them. We’ll keep you posted.
Meanwhile John started digging up the liriope on the side of the garden bed right next to the porch as Clara played with all of her friends nearby. No she doesn’t have invisible friends, the girl actually loves worms. She loves talking to them, waving at them, and crouching down to watch them wiggle. It’s weird yet hilarious and adorable. Whenever John or I found them while digging we’d just gently put them in front of Clara so she could watch them inch by (at this point we were both wearing gloves mind you, $herdog doesn’t palm worms).

The liriope was a beast. Check out this sod-like run of tangled roots he dug up in a strip:

Then we found what we thought was the mother of all worms but actually was a tiny garden snake. So snake alert- don’t scroll down and look at John’s comical expression if you have nightmares about those guys. Although, if you’re gonna see a snake, this one’s pretty small. John was flashing a smile and I said “look scared” so he gave me one of these:

After about four hours we had our little 13 x 7′ zone stripped down and ready for some actual plant-life (it always looks less wide in photos for some reason- probably because I can’t exactly take aerial shots being 5’2″ and all).

It took us a while of hunting around at a bunch of nurseries and places like Home Depot to find two more things to add to this part-shade garden with the otto luyken laurels we planted here. We usually go for a group of the same thing (or at least try to repeat a few things), but we fell in love with the idea of a feathery little maple and a sweet white-flower-covered shrub (which we also planted around our first house’s perimeter) so we just went for it.

We looked at some red maples but thought they’d blend into the red brick too much (and some would get too big). But this feathery green one (a virdis laceleaf) had us at hello. It’s a small dwarf version that’s great for a 7 foot deep bed in front of a house (it will only get 6′ tall, and is often recommended for a house’s perimeter since it has a small root base and can easily be trimmed if it crowds the house). We planted it almost 4′ from the house, so although it looks more cramped in the pics, there’s lots of room for him to fill in.
The small flower-covered bush in the middle is a Dwarf Pieris Japonica Variagated, which only gets to be 2 feet tall and 2 feet wide (so it’ll just get around 6″ wider on all sides). It’s covered in white flowers in the spring and is a pretty leafy shrub for the rest of the time. It also works in part shade like the maple so it just felt like they were meant to be. And they both have a one year warranty so we have high hopes for their survival.

So yeah, there are lots of rules of gardening (like “group a bunch of the same type of plants, repeated three or five times since odd numbers are great”) but in the end our two rules were: 1) pick plants you love – no placeholders allowed and 2) make sure they’re right for the spot and that you plant them with the recommended amount of room around them and sun on them – so you don’t end up crying over dead plants or having to dig them up to place them more thoughtfully
We remembered doing some yard work in the back yard at our first house and in the first few years we just bought whatever was cheapest or seemed like a quick fix instead of really thinking things through and holding out for stuff we loved. And it either ended up dying because it was wrong for the place we put it or we ended up wishing we had put the money/time towards something we actually liked a bit more. So we learned our lesson and course corrected just in time to redo the front yard there, which we really loved. But back to our planting project. We dug in our new tree and our bush following the directions on the tag (read them! they help you know how to space them, how big to make the hole, how to break up the roots, what to add to the soil, how often to water, etc).

And speaking of spacing, we originally planned to pop two annuals in front while we wait for things to fill in (everything will grow a foot or two over time, but thanks to proper spacing it shouldn’t get crazy/crowded). But while we were at the nursery we saw these inexpensive perennials called Garden Variagated Dead Nettle. They only get 6-8″ wide and tall, so they won’t overwhelm our little garden- and they should be easy to dig up down the line if things fill in and we’d rather move them somewhere else. The great thing about these little purple flowering guys is that they bloom in the spring and summer year after year (instead of just for one year and die like annuals). And they work well in part shade. Holla!

Once they were planted and everything was mulched to keep the weeds away (and keep them nice and moist between waterings), we were really happy with our small side garden.

And now for some plant-tastic detail shots. No allergy meds required:


Shucks, they’re sweet. All told, it probably took us about seven total hours of work (done sometimes with Clara and her worm friends nearby and sometimes while she napped) to go from raw and bare…

… to this not-grown-in-yet-but-much-better result. But we hope these guys will fill in a bit more and live here for the next few decades, just doing their thing. So a little work up front will hopefully pay off. We’ll keep ya posted!

It’s funny how much smaller this planting bed looks in the pics. Doesn’t it look 4 feet deep in these shots or something? Meanwhile, all the plants in the back are almost four feet from the house and the whole bed is 13 feet wide by 7 feet deep. Oh and here’s a tip we learned in our last house from a master gardener: it’s always good to place things a bit further out from the roof overhang so roots don’t mess with your foundation, so runoff doesn’t flood your new plants, and so they get a bit of sun instead of always being in the shade of the awning.
Now the plan is to attack the garden on the other side of the porch while Clara’s out there whispering “wooooorms? where the worms go?” We’re also starting to plan our big deck project (we called in Miss Utility to make sure there’s nothing dangerous in the ground and then need to get a permit). So that’s on the docket along with finishing our master bathroom and hopefully tackling more Dude Get On That Already things. Ah, spring. It never fails to get us excited to hop from project to project, Easter-bunny style. Speaking of which, what did you guys do this weekend? We got to see a bunch of our family (including Clara’s youngest cousin Ben who is just six months old) and had a grand old time. Lots to be thankful for. We owe you a Young House Life post about it soon. Hope you guys had the perfect mixture of family, food, and DIY fun.
Look Who’s Hanging Out In Our Bathroom
This guy:

You saw the wall we were dealing with before we removed the not-very-functional shelf and towel bar here:

And you saw it again after we spackled and sanded those holes from the fixtures and painted:

Well now, thanks to two nails (it’s a pretty light canvas), we hung up the DIY art that I made a while back (I originally whipped it up for the bedroom, but it’s nice to tie this color in here and it was aqua overload in the bedroom). Thankfully I used latex wall paint to make the painting (the same thing you’d use on the walls of a bathroom) so it should hold up well in here. It was a complete lucky break that it fits on this wall. And thanks to the ceiling-height shower curtain on the other side of the room, something over-sized on this side of the space actually adds balance, and feels less heavy or invasive than the shelf/towel bar that stuck out from the wall.

Admittedly, the pattern of the art isn’t perfect with the tree border tile that runs around the room since that’s pretty busy (see that up close here) but because we have a plan to redo that with soft frosted white or gray glass subway tile someday it should look nice and clean after Phase 2. It’s not that the tree tiles are terrible, they’re just not “us” if that makes sense. So we figure the room will feel more like our bathroom and not someone else’s when we put up accent tile that floats our boat.
And now for an art detail shot. Ooh. Ahh.

One of the coolest things about my homemade painting is how purty it looks with our blue light. The room just went from feeling beige and builder-basic to feeling like ours. Ya know?

And now for a light detail shot. Ooh. Ahh.

One issue in here that we haven’t explained is that the door is too tight to the floor, so it actually doesn’t open all the way since it gets stuck on this floor grate. So we have added “remove the door from its hinges and shave a sliver off the bottom so it opens correctly” to our to-do list. And then we can have a bath mat outside the tub since it won’t get scraped by the door. Hurrah!

Speaking of the door, the trim around the window, the trim around the door, and the door itself were originally a beige-y off-white color. So things like the bright white towels, shower curtain, and light switch made that feel a little… dirty. We’re crisp white trim folks anyway, so I got my paint on.

I used leftover semi-gloss paint that we’ve used for other rooms (it’s off-the-shelf white by Olympic Premium). And two coats later…

… it was white! Like the towels and the shower curtain and the light switch. Oh happy day.

Here’s the window all glossy and refreshed.

Pretty much still looks like this from the doorway since you can’t see the art behind the door. But once you go inside, bah-dow, art in yo face.

So that’s the latest with our cheap little bathroom update. We love that this step was f-r-e-e thanks to art we already had (sitting around in the playroom waiting to be hung – who’s surprised?) and leftover trim paint. And here’s what the ol’ to-do list looks like now:
paint the walls so they have some contrastreplace the boob lightpaint the cream trim whitehang some bathroom-friendly art- craigslist the toilet and replace it with a classic white one
- do something to add privacy to the window
- remove the door so we can shave the bottom to allow for a rug/bathmat (and add a door stopper so it doesn’t squash the art)
- replace the border tile around the room (maybe in phase 2?)
- move the blue pendant light to hang centered in front of the window
- replace the floor tile down the road (just to break things up since there’s so much of it)
So there you have it. Any trim painting or art hanging going on in your neck of the woods? Have you painted any giant canvases to add color to a small room? Or made some quick bathroom upgrades on the cheap?
Psst- To follow this bathroom sprucing project from the start, check out this planning post, this painting post, and this light-swapping post.
Patio Problems
It looked sweet when we finished it last year, especially if you ignored the fact that we had lots of landscaping stuff to attend to behind it.

But these days it’s looking more like this:

That’s a whole lotta ugly going on.

The patio itself still looks great (and is weed free thanks to this step, while our un-polymeric-sanded cobblestone driveway is covered with them), but the “garden” area behind the patio has never looked worse.

We even learned from the Katherine (the certified landscape designer who recently came over) that some of the trees were diseased and dying (which we actually heard from the previous owners as well but didn’t want to believe) along with a big rhododendron bush that was completely dead. Bummers.

So she told us what to prune back, what to keep, and what dead or diseased things we should remove to give the living things a better shot at survival – and make the whole area look a lot less… well, ugly.

So first we removed the two diseased trees that were on their last leg (sniffle) and the completely dead rhododendron. Then we raked up all the leaves so we could actually see the ground again.

It was definitely a huge immediate upgrade. In person the open-ness is really nice. Things were sort of encroaching on the patio a lot when it was all overgrown back there, so now when you walk onto the patio you feel less crowded and worried you’ll get a stick in the eye.

But we still had some liriope to remove and a whole lot of bare spots that needed some planting (I’ve been meaning to paint our rain barrel to blend him in a bit more, but who knows how long it’ll take me to get on that…).

The next step was digging out all the random clumps of liriope to make way for some more intentional looking plantings.

So here’s the area behind the tree that we cleared to make way for some free bushes.

How does one get free bushes? Well, by transplanting them of course. Yup, it was another suggestion from Katherine The Landscape Gal. She pointed out these were much too big and on top of each other over here…

… so we dug them up…

… and planted the three nandina bushes in a group with the one that was already there next to our giant hydrangeas in the corner. Since one happy little nandina bush was already on this side of the garden, we knew they’d do well over here. And a clump of the same type of plant always looks nicer than just one of ten different things hanging out all willy nilly together. Ideally we would have transplanted four of them to end up with a grouping of five since odd numbers seem to work well in gardening, but we were working with what we have. Thankfully they look nice in their little pack and will continue to fill in a bit more.

Then we grabbed three new hydrangea bushes from a local nursery (after some price checking, a place called Great Big Greenhouse had the best deal and also offered a year warranty on them). They’re the exact same variety as the ones we already have in the corner – which are doing gangbusters, so we hope these guys will grow nice and big and bloom just as well.
Of course only time will tell, but we’ll keep you posted. Here’s everything all dug in before we mulched the whole bed (which looks awesome by the way- just forgot to snap photos so we’ll have to share those in our next landscaping update).

Between all the rain we’re getting (and the rain barrel that’s nice and full from previous storms which comes in handy for stretches of dryness), we’re making sure these guys don’t give up on us. Oh and in Clara news, she especially loves talking about worms since digging our new plants in prompted us to discover a few (she even said she had a dream about worms the next night).

Sure we still have the corner by the rain barrel to attend to, but we have plans for that. So we’ll get there, someday! It’s definitely a nice discernible difference from the mess we were working with a week ago. There’s something really rewarding about landscaping work, although it’s bound to get you dirty and sweaty, just due to the fact that it’s such an obvious before and after. Something pretty and green can be found where there were only leaves and weeds the day before.

And the whole area is looking especially cheerful with the trees in bloom too.

Here are things from the other side (yup, Clara really did make it her job to be in every pic). This shows a few places we still have to work on (the bed near the house could use some smaller-scale greenery and of course we have the whole corner with the rain barrel to tackle)…

… but it’s definitely a lot easier on the eyes than this debacle.

It’s so crazy to me that the shot above was only taken about a week before the after pic on top of it (see all the buds on the trees that were about to bloom?).
Now they’re doing their thing. So pretty.

Here’s another before…

… and after.

And another. I can’t help it.

Ahh, much better.

I really wish I had snapped mulch pictures because it’s even better looking. Oh well, at least the mulch is holding it down and keeping weeds out and moisture in. Yay mulch. Update: Couldn’t resist sharing a Mulched & Fabulous pic, so I ran out and got this for ya:

It’s definitely a far cry from the view before:

This next picture is my favorite of the entire lot because I said “Clara, you’re in mommy’s picture!” and she squatted and closed her eyes and said “Where’s Clara” as if she were invisible.

Which must run in the family, because it’s exactly what her daddy did here.

What can I say? The girl has good hiding genes.
What are you guys planting? Do you have any favorites? I never thought I’d be buying hydrangeas since they always seemed to be out of my skill level (how can something that pretty not be super high maintenance?) but after 15 months of not killing the existing hydrangeas (which get bigger and more gorgeous each spring) we decided to go for it. And nandina is always a really easy one for us (we had that at our last house and it always did well), so here’s hoping I didn’t just jinx myself. Anyway, I’d love to hear what action is going on outside in the garden or on the porch or wherever else you get your plant on.


