Updated 2019
With Thanksgiving around the corner, we thought it would be nice to adapt Sherry’s daily gratitude journal habit for a fun holiday craft for the whole family. Rather than keep the things we’re thankful for stuck in our heads or on the page of a journal, what if we put the practice on display during the month of November? Who knows, maybe it will even inspire more gratitude!
Craft Supplies To Create Your Own “Thanks Jar”
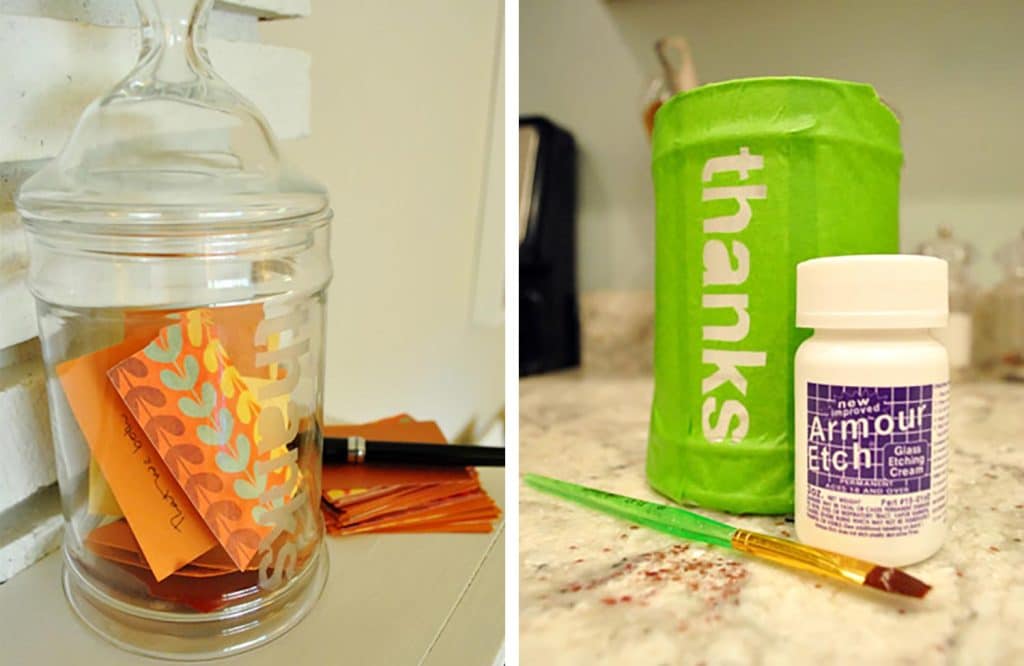
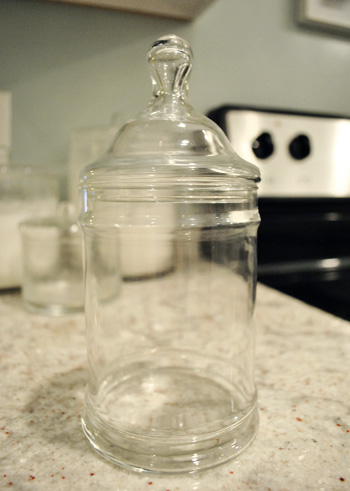
We got this idea after scoring this awesome 99-cent apothecary jar from the thrift store (it was originally $1.99 but we scored it during a 50% off glassware sale). But you can use any glass vessel you choose, even a regular drinking glass or flower vase!
- Small glass jar
- Glass etching cream
- Small paintbrush
- Craft knife
- Printer and printer paper
- Painter’s tape
- Colorful cardstock cut small enough to fit in the jar
Obviously you can also create a Thanksgiving “Thanks Jar” without etching your glass vessel, but we’ve been itching to try a glass etching craft ever since seeing this one on How About Orange.
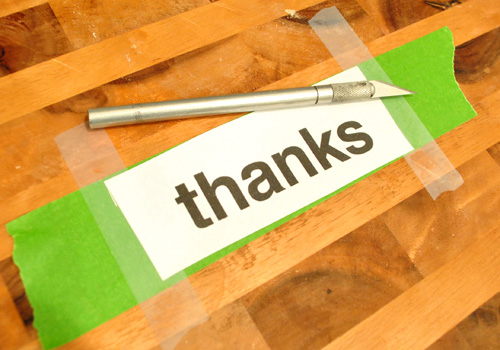
Step 1: Design & Print Your Stencil
We ever-so-creatively (kidding) decided that we wanted to etch the word “thanks” on the base of our jar. So we used our computer to print it out on paper in a simple, blocky font (Helvetica) that was sized perfectly to our jar. You can create this in any word processing software (even a draft email!) just be sure to keep the design simple and stencil friendly.
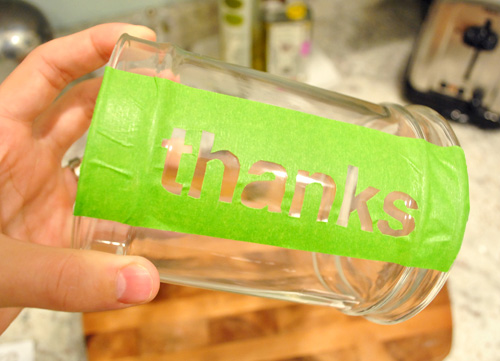
Step 2: Tape Your Stencil Over Painter’s Tape
Since we really need to stick our stencil tight to the glass, we first had to transfer the design from paper to painter’s tape. So we taped a thick section of green painter’s tape to a cutting board and then scot taped our “thanks” print out over it. I promise this will make more sense in a moment.
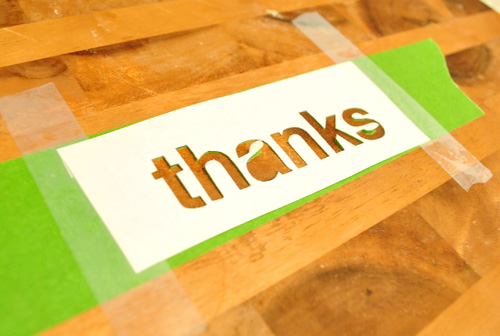
Step 3: Cut Out Your Stencil
With everything taped down, we used an Exacto knife to cut out our letters one by one. Be sure to go deep enough to cut through the painter’s tape too. We decided not to be picky about preserving the hole in the “a.” But we did crack up when Sherry said “I don’t think we need to save the a-hole.” I know, we’re like fifth graders over here.
Step 4: Apply Your Tape Stencil To Your Glass
With the “stencil” cut, we then disposed of the paper print-out guide and slowly peeled the painter’s tape from the cutting board, being careful not to rip the tape or let it stick to itself. Once it was safely off the cutting board, we stuck it right onto the glass jar. Ta-dah! Tape stencil mission complete.
The hump in the “h” got a little wonky, but other than that we were pleasantly surprised by how well our makeshift stencil was holding up. And with a couple more strips of tape on the sides (just to be safe) we were ready to apply the etching cream without having to worry about getting it in the wrong places.
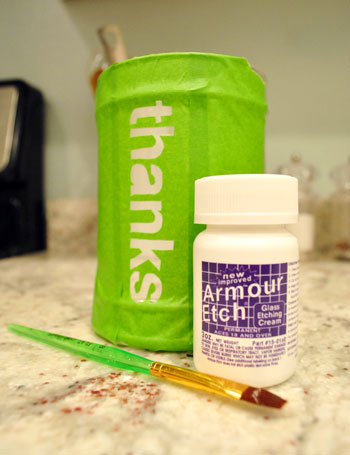
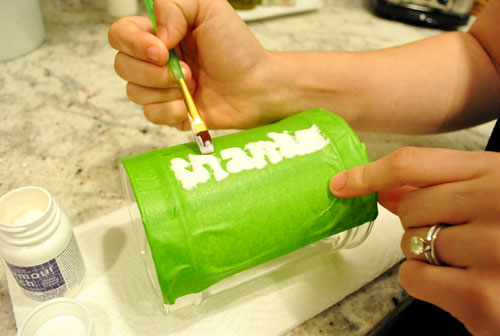
Step 5: Brush On Your Glass Etch Cream
We picked up this Armour Etch cream for $6.50 at Michael’s (thanks to a 50% off coupon) and broke out this tiny paintbrush to apply it over each of the cut-out letters. The painter’s tape does the job of not letting it seep behind the letters.
Step 6: Wait!
The instructions made it unclear how long we should keep the cream on (since that depend son your “stencil” material). But since our tape wasn’t as durable as a vinyl stencil might be, we kept a close eye on the backside of the tape through the glass. We noticed after about 90 seconds that the edges of the tape weren’t looking as crisp as they had been (the etching cream was probably slowly degrading the tape). But the longer you leave it on, the deeper your etch will be.
Step 6: Rinse Off Cream & Remove Stencil
After letting the cream work its magic for about 1.5 minutes, we washed it off in the sink and removed our tape stencil. We had a tiny smidge of bleeding between the “k” and “s” but otherwise it worked out beautifully!
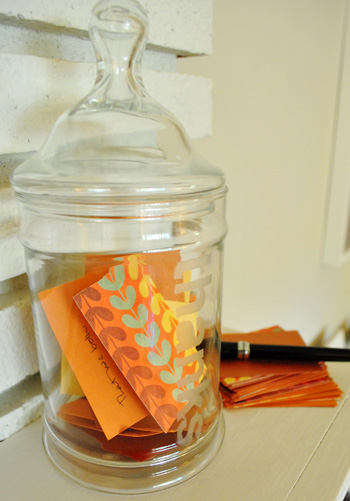
Step 7: Starting Filling Your Jar With Gratitude!
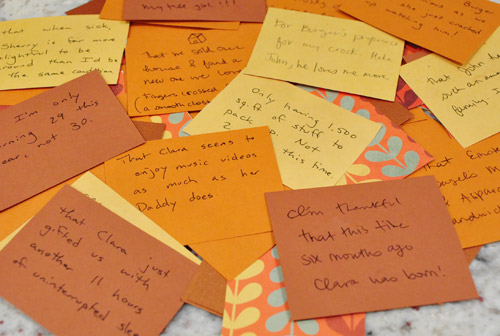
Sherry cut out several small notecard from Fall-colored scrapbooking paper from Michael’s. Our goal is to write one per day all month long so by November 30th we’ll have accumulated sixty notes of gratitude. Oh, and we have a no peeking policy so we won’t know what each other has written until the end of the month! That should be a fun little family reveal.
“Thanks Jar” Update
Want to see what we ended up writing? Here’s are the results of our inaugural “Thanks Jar” Thanksgiving tradition.
BONUS: Save Your “Thanks Jar” Notes
We’re also thinking at the end of the month we’ll punch holes in the cards so we can store the collection on a ribbon or a binder ring. That way when we break out our “thanks jar” next year we can relive all of the things that we were grateful for in 2010 and create another collection of things we’re thankful for that year.
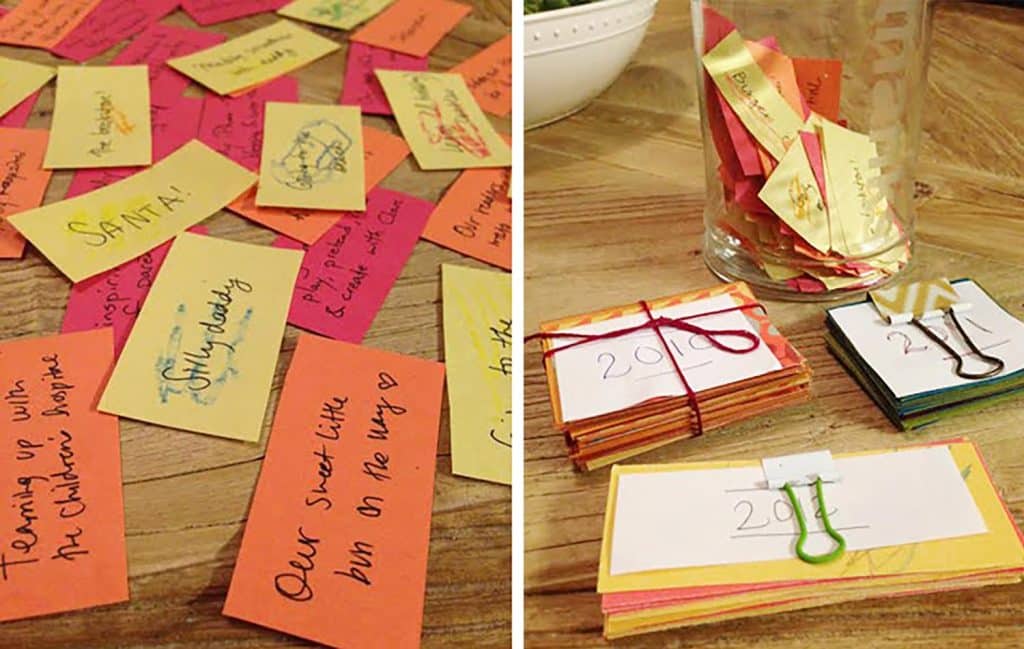
Who knows, it could become a great little family tradition with Clara and future kiddo(s) adding their thanks to the pile when they’re older. And we love that we’ll have a yearly account of everything that we’re grateful for. Kind of like a diary, but less high maintenance since we only have to scribble one small thing down each day for a month.
Update: Our Continued Thanksgiving Tradition
We did end up keeping this tradition for several years and even blogged about it several other times, along with other Thanksgiving crafts and traditions we undertook. Check them out here:
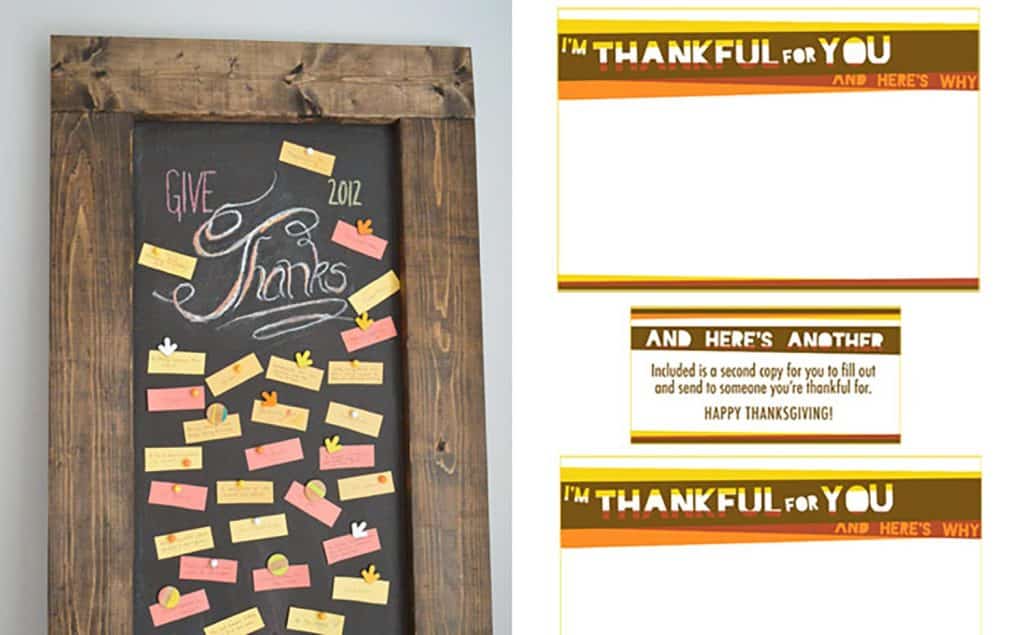
- A free Thanksgiving printable to mail messages of gratitude to friends & family
- Creating A Thanksgiving gratitude chalkboard display
- Our daughter’s first year writing Thanks Jar messages
Do you guys have any fun Thanksgiving traditions? Any glass etching stories of success or horror? An acute attraction to printed scrapbooking paper like my wife? She can’t be the only one who geeks out in the paper aisle.
Update: You can check out all of our favorite holiday decor finds here – many of which are under $15!

Katie says
Great idea. I would love to use this somehow with my DIY wedding favors. Do you know if it is washable?
YoungHouseLove says
Hey Katie,
Yup, it’s even dishwasher safe (it actually burns/etches the glass, so it can’t be washed away). Hope it helps!
xo,
s
Erika says
Great idea! I love it! I attempted my own version for a dog treat jar. Thanks for the inspiration!
http://blondemomentsintheburbs.blogspot.com/2010/12/personalized-dog-treat-jar.html
YoungHouseLove says
Love it! So cute! What a lucky dog.
xo,
s
Emily says
I love this project too, in fact, I did something similar at a kids camp a few summers ago. Just a note though- glass etching cream is really harsh stuff and I would recommend wearing gloves when you’re working with it. That summer I ripped the glove I was wearing while working on the glass and was unknowingly exposed to the cream. My finger started to hurt and after a call to poison control I ended up in an ER and then an ICU- just from a little spot on my finger! So be extra careful with this one!
YoungHouseLove says
Yikes! Thanks for the warning.
xo,
s
Jenny from the Block says
When I was making my Christmas candy jar last night, I found that using black electrical tape as the stencil worked a little better than painter’s tape. The tape still removes very easily when done but I was able to leave the armour etch on for longer than a minute. The design came out bolder than when I just used painter’s tape on my practice round and I didn’t have any smudging/feathering issues. Just thought you might want to know for the next time around!
~Jenny
YoungHouseLove says
Such a great tip! Thanks for sharing!
xo,
s
Melissa says
I took some inspiration from this DIY project in making my grandma’s Christmas present this year. She’s had a rough year and has been so down in the dumps( Gramps is in the hospital for a long term illness) and asked me to write her a letter that reassures her that I love her so that she can read it when she feels down. I thought it might get borning to read the same letter every day, so I got a book of scrapbooking paper(on the free from the sista in law!)and a gianormus jar (3 dollas at Goodwill, yo) and have had the entire family write a total of 365 cards of quotes, I love yous, memories, words of encouragement, etc so that everyday she can draw a new one and feel loved. Thanks so much! I just love your blog to pieces! Keep on keepin on!
xoxo,
Melissa
YoungHouseLove says
That’s amazing! What a fantastic and meaningful DIY gift!
xo,
s
GMM says
Awesome Job. Thanx!! Cannot wait to try this!
Jenny says
I wonder if duct tape would hold up longer. It doesn’t seem to matter though, they etching is nice and clear. Well done, you!
YoungHouseLove says
Oh yeah – that could be worth a try!
xo,
s
Lindsay says
just a suggestion…I also use this armor etch, but I make my stencils out of clear contact paper. It is thicker than the tape, which allows you to leave the cream on longer and makes it look more like true etching :)
YoungHouseLove says
Great tip!
xo,
s
Tarey Azbell says
Love it!!! This can be used in so many different ways! A cheap way to make your own personal canisters in the kitchen or bathroom. Love it! =) Oh and did I mention that I love it! =)
Jill says
I have been etching wine glasses and glass jewelry boxes with Armour Etch Cream as well…..I put clear contact paper directly onto the glass I am ethching, then trace/print my stencil on plain paper and tape it down to the contact paper protected surface. Then I cut through the paper as well as the contact paper with the Xacto knife. I leave the etching cream on for 5+ min with no deteriation of the contact paper. Have never tried to reuse the contact paper, cause I normally do a 3 letter monogram that is never repeated.
mad says
I just did this following your blog, I had a lot of bleeding cause it’s sloppy, but a tip has come of it! Clear nail polish on the unwanted smudges etc, makes them disappear. I have no idea if that comes off in the dishwasher- but at least for display it’s a good fix.
YoungHouseLove says
That’s amazing! So smart!
xo,
s
Emily says
If you want to do this again, perhaps you should use a heavier tape like Gorilla tape or duck tape. It’s a bit thicker and more durable than painters’ tape. Should work out for you. (=
YoungHouseLove says
Thanks for the tip Emily!
xo,
s
Julie says
It might be easier to use a different tape than Frog Tape which is designed to get kind of gooey on the edges. Maybe if you used contact paper or regular blue painter’s tape it wouldn’t get fuzzy on the edges as quickly.
YoungHouseLove says
Great tip Julie!
xo,
s
Lauren says
Thanks for the idea! I am going to have the girls I teach make this before Thanksgiving and share with their family as a Christmas gift.
Paula says
Oh this is nice! I just found this on pinterest and wanted to know how it would look in the end. Never would I have thought that your description would make me want to do this myself but now I really do. Thank you!
Jessica says
Here’s a protip: if you wat to keep the hole in the letter A, put the tape on the glass before you cut out the letters. That way, the hole will stick to the jar when you peel away the letter. The exacto knife won’t cut or scratch the glass at all. I do a lot of glass etching on flat panes. I tape the glass over, trace on my stencil with carbon paper, then cut away the stencil on the tape right on the glass. It’s much easier to do designs that way. Just a tip from a fellow glass etcher :)
YoungHouseLove says
Smart!
xo
s
Jessica Latosa Cardenas says
Hello from the Philippines.
I love your blog.
I love your dog.
I love you baby.
I love you two.
I’m sounding like a real fan here. HAHA thanks! and continue to be an inspiration.
YOU spell awesomeness! :)
YoungHouseLove says
Aw thanks Jessica, you’re so sweet.
xo
s
Miranda says
I can’t wait to try this for my kitchen canisters! I hope you don’t mind, I featured this post on my Link Party.
You can see where I linked to your post here:
http://www.mirandabee.com/2014/01/fun-friday-link-party.html
YoungHouseLove says
Thanks for the link!
xo
s
jim says
thats exactly what i have been looking for