Looking for some new graphic art? Enter to win a $50 gift certificate towards Grace Hester Designs’ Etsy shop through Wednesday, Feb 17th.
[ Read More ]
Home Decorating & DIY Tutorials
Looking for some new graphic art? Enter to win a $50 gift certificate towards Grace Hester Designs’ Etsy shop through Wednesday, Feb 17th.
The exact weekend after we wrapped up our big bathroom makeover, we hightailed it out of town. It wasn’t that we were over staring at our new bathroom (we actually found ourselves going into the room just to ogle our newly spruced surroundings) but it was more like we needed a self-imposed “vacation” after such hard work. Especially my main tile man John. He really deserved a nice little weekend getaway. So we drove five hours up to the family beach house in scenic Rehoboth, Delaware (we know it’s weird to go to the beach in the dead of winter, but we love how quiet and sleepy the off-season is… and we always seize the
Q: Do you guys have any tips for photographing your rooms? I’m actually listing my house for sale and thinking of snapping some photos (for memories and also to help with the flier) but I want them to look great. Any and all tricks, tips and suggestions are appreciated! – Leslie A: We totally feel your pain. When we started our blog and were suddenly tasked with sharing photos we had no idea how to make rooms look their best (hence all the fugly pictures way back in our archives). But we did learn our fair share of simple tricks (mostly through trial and error) along the way- and we’re happy to share the goods.
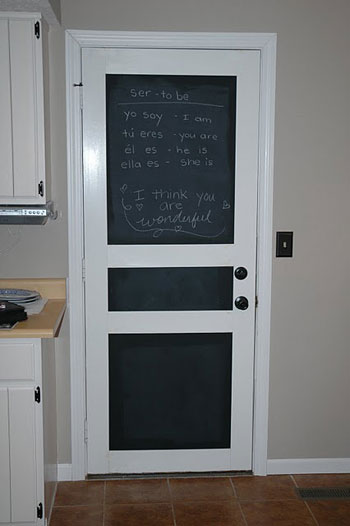
When one of our favorite super busy DIY moms (she gives me hope!) sent over some photos of her kitchen’s recent door makeover we couldn’t wait to share the goods. Here’s her letter: Hi, guys! Sam and I just finished up our kitchen door project and I was wondering if you thought it might make a fun Reader Redesign. We only spent $35 on it, so I thought it was right up the YHL alley. Everyone can check out the step by step process here and here on my blog. Basically we just applied black chalkboard paint to our flat metal kitchen door and trimmed it out with some lightweight boards (which we had to screw into the
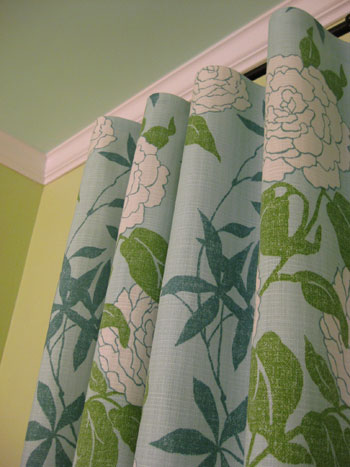
We’re back with our homemade nursery curtain panel how-to. Remember when we revealed our punchy patterned find during last week’s shopping post? Well here’s how we took it from one big bolt of rolled up fabric by P Kaufmann… … to three gorgeous floor-length curtains (two for the window and one for the doorless closet). And probably best of all: there’s no sewing machine required. In fact, here’s my short and sweet list of supplies: tape measure, scissors, iron on hem tape, and an iron of course. Plus we even added a few kid-safe features so stay tuned for those details… But before we get into all the dirty curtain-makin’ details, we should mention that
Delta’s giving away a fancy schmancy kitchen faucet that turns off with the simple touch anywhere on the fixture. Your elbows have never been more powerful. Enter through 2/10/10.
Ever wondered how to upgrade or replace your kitchen faucet? Here’s a look at how we installed a new Delta faucet with an extra special “hands free” feature.
When Jennifer sent us her almost unrecognizable kitchen before and after pictures we had to share the goods. Here’s her letter: I‘m so excited about my kitchen transformation that I had to send it your way since so much of it was inspired by YHL! Two of my favorite features in my new space (under cabinet spice shelf and sliding barn door) were inspired by this transformation that you guys featured on your blog a few months back. You can see my entire transformation with before/after pics here and the day by day process here. I’m so glad we were able to take the room from a neon green mess (yes, I painted it that
Ok, here it is. The much anticipated crib post. First we have to talk about how giddy we are to have a mini-me mattress going on. Let me explain. Remember back when John and I talked about saving our pennies for an organic mattress (after sleeping on a sketchy old hand me down for far to long) back in June of last year? Yeah, we actually had a “mattress fund” going until we could take that baby home. And pretty much ever since the day that we sprung for our own Organic Serenity Natural Dunlop Latex Mattress By Savvy Rest we dreamed of someday getting a mini version for our offspring in the form of
It’s (already!) the beginning of February so it’s about time we actually got our act together and replaced our still-pitifully-displaying-December calendar in the kitchen. And this year John actually wanted to DIY one. Isn’t he industrious? His big calendar concept: to pick out a bunch of our favorite “inside joke” quotes and slap them on top of a long skinny white numbered page so we’d get a little private chuckle every time we checked out the date or penciled in an appointment. Cute huh? He actually said it was going to be a secret V-day present for me but since February 14th is a few weeks off (and we both felt like bigtime slackers every
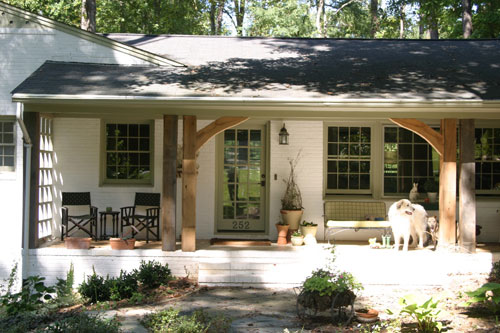
When Krystol sent over her unbelievable before & after exterior photos we just had to share the gorgeousness. Here’s her letter: I love your blog and I thought you might like our recent porch renovation. We’re trying to take our rancher to a french country cottage. First we the removed the porch railings and moved the posts a bit further apart. One of the posts was right in front of the door (not too welcoming!). Then we sheathed the existing posts in rough cut oak and added a second set of posts for a little extra oomph at the front door. We also added arches (carved from a single curved tree trunk section- go hubby!)
You all remember where we left off when it comes to the big nursery makeover, right? We painted the walls a nice pear color and added a splash of light aqua to the ceiling: Well… then it was time to go shopping. And not just any kind of shopping. Seriously determined we-have-a-goal-and-we’ll-make-fifty-stops-if-we-have-to shopping. And that goal was a lofty one. We set out on a Saturday morning with the hope of hunting down five distinct items for the recently painted nursery by that very evening: Some sort of light fixture, either a big fun patterned pendant lamp or some sort of playful and sweet chandelier A plush 5 x 8′ 100% wool rug (without any