We’re back with our homemade nursery curtain panel how-to.
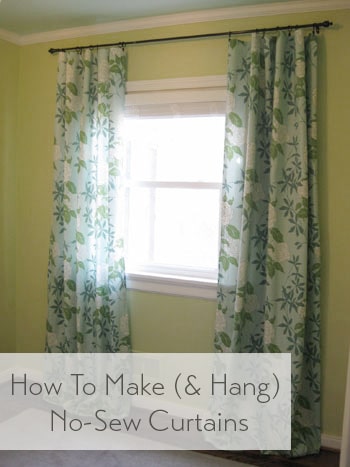
Remember when we revealed our punchy patterned find during last week’s shopping post? Well here’s how we took it from one big bolt of rolled up fabric by P Kaufmann…

… to three gorgeous floor-length curtains (two for the window and one for the doorless closet). And probably best of all: there’s no sewing machine required. In fact, here’s my short and sweet list of supplies: tape measure, scissors, iron on hem tape, and an iron of course. Plus we even added a few kid-safe features so stay tuned for those details…
But before we get into all the dirty curtain-makin’ details, we should mention that we hope our baby sleeps well. So in the interest of aiding our little one in that area, we decided that we also needed to grab some sort of 100% light-blocking blinds or shades. So we trolled the aisles of Home Depot and found some chic white faux-wood blinds. We loved them because they felt almost like substantial wood shutters when they were lowered (a lot more solid than those thin plastic or metal venetian blinds) and they definitely would block any and all light when in use (and could easily be pulled up and out of the way to let light stream in during the day).
But here’s the bummer. Of course they didn’t come in the exact measurements of our quirky old house’s window (39 1/4″ wide in case you’re wondering). Sadness. But we soon learned that Home Depot could actually cut them down to custom fit our window perfectly- and the cutting service is F-R-E-E. That turned our frown upside down. So we give the guy in the orange apron our window’s odd width and he had our custom-cut clean-lined faux wood blinds waiting for us about five minutes later. The blinds weren’t super cheap at $37, but they look convincingly like much pricier white wood blinds and we know the darkness that they’ll provide will be priceless when we’re dying for one more minute of sleep.
Of course we also liked that they didn’t have those dangerous loopy pull cords (they were labeled as having “kid safe cords” that are actually separated instead of connected so they’re less of a strangulation hazard- no loop to get caught in). And of course we plan to keep them wound around one of those cord wrangling pieces of metal at the top right corner of the window far out of baby’s reach anyway, but we love the added loop-free design.
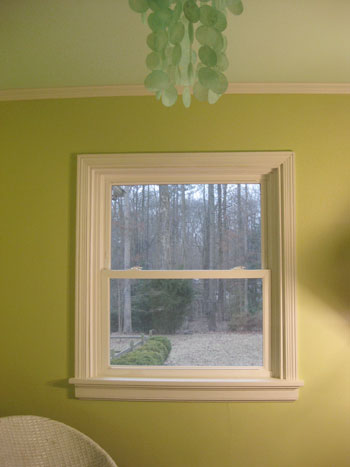
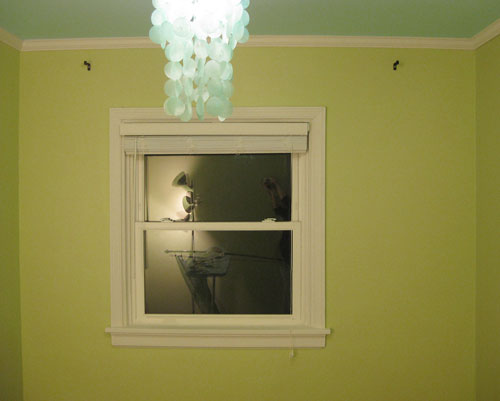
And since we love a before picture, here’s the window prior to our little curtain and blind fest:
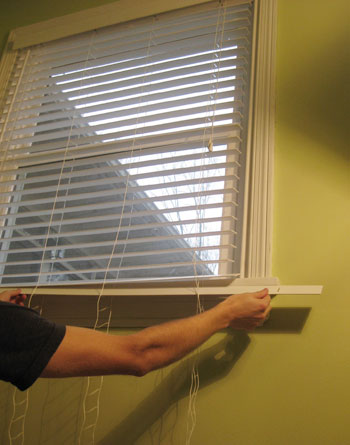
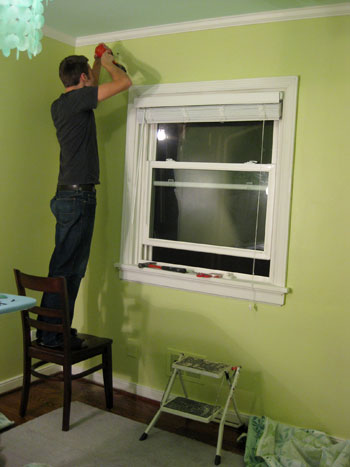
John had the blinds up in about twenty minutes, but they definitely left a lot to be desired in the length department. They were actually a bit heavy to raise and lower, all due to the fact that they were at least two feet too long for our window, so there were a bunch of slats that just clumped together at the bottom of the blinds when they were in the “lowered” position. Luckily in the installation instructions they actually detailed how to shorten them to customize their length to fit any window. Nice.
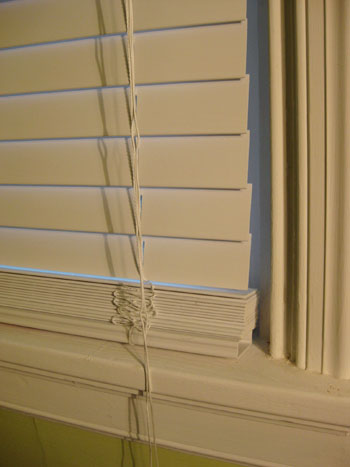
So John just followed the included directions and popped out these little plastic pieces on the bottom and could easily remove as many slats as he’d like and trim the excess string. Then he just popped the bottom pieces back on and we had an even more customized nursery blind that was a lot less cumbersome to raise and lower without all those extra slats at the bottom. Then, like a finely tuned relay team, John tagged me and said “your turn” and I began working on the curtains.
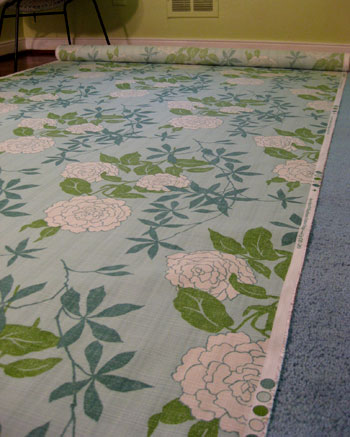
First I measured the approximate height that I wanted the curtains to be (just shy of 8′ for an almost floor to ceiling look) and added an inch and a half on the top and bottom to accommodate the hem. It was actually a nice clean measurement in the end because I determined that cutting two eight foot long sections of fabric would do the trick perfectly (since I wanted them a bit shy of 8′ but with the added hem measurement it brought them right back up to 8′ exactly). Hurrah for no quarter of an inch calculations!
The other super convenient thing about measuring out my fabric was that we already happened to have our new 5 x 8′ rug on the floor… so to cut my 8′ long fabric sections, I simply rolled the bolt from one end of the rug to the other and cut a straight line using the edge of the rug as my guide. It doesn’t get much easier than that. And for the width I just left each panel as wise as the bolt allowed (so I didn’t need to trim those edges at all).
Then it was time for my trusty Heat N’ Bond iron on hem tape (I always grab the “ultra hold” variety). You may have seen us using it in this crib skirt tutorial from a while back and we’ve also used it to hem all the white Ikea curtains that we have hanging in the rest of the house. In short: I’m a hem tape black belt (the irony is that John does all the clothes-ironing in the house). Anyway it’s great stuff for leaving a polished and clean-looking edge (a lot more reliable then me with a sewing machine!) and it’s even washable and super cheap (we grab ours for a few bucks a roll at Michael’s). So I whipped out the ironing board, fired up the iron, laid out my big eight foot long fabric panel and had my scissors and hem tape on hand.
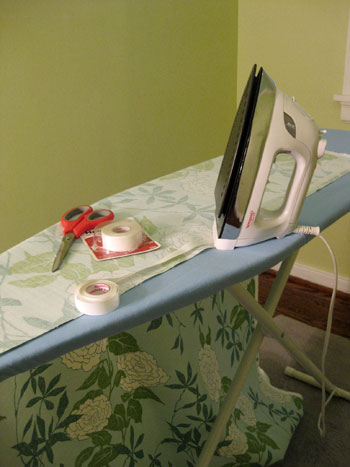
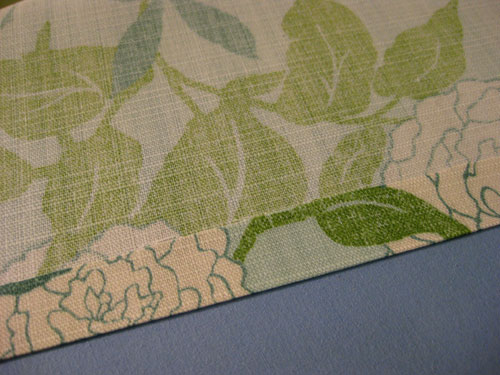
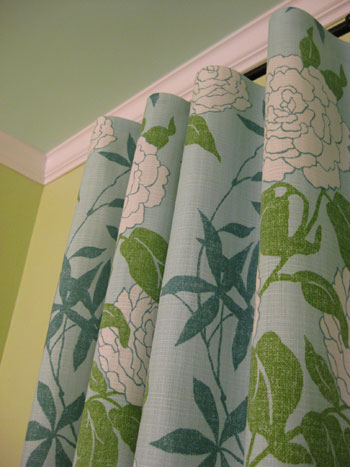
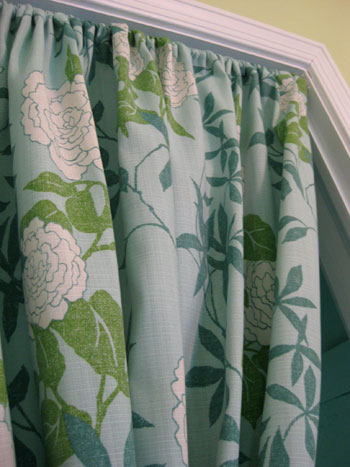
All it took was an easy-iron hem on each of the four sides of my fabric (for step by step hem tape instructions, just check out this post). Then I had a nice finished panel (without any rod loops or tabs) that I could clip up using my cheap-o oil-rubbed bronze curtain rings and rod from Target. Just look at how seamless and perfect that edge is! Much more even and less bunchy than anything I could sew…
Then I tagged John to get to work hanging the curtain rod with heavy duty anchors (so it’ll never come toppling down, even if over 100lbs of force is used) while I created a third curtain panel for the closet (this one only needed to be seven feet long). I also made a little rod pocket at the top of this panel (I just positioned hem tape about 4 inches below the edge of the fabric and ironed the fabric to that line of hem tape created a nice loop of fabric). Meanwhile John was already executing my let’s-cheat-our-off-centered-window-so-it-looks-more-balanced plan.
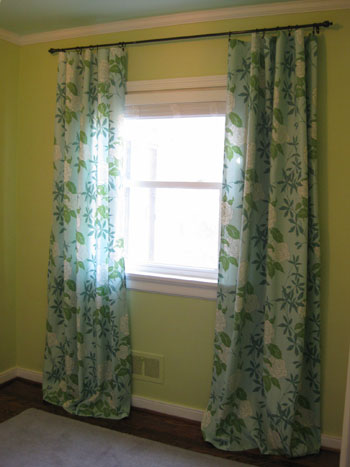
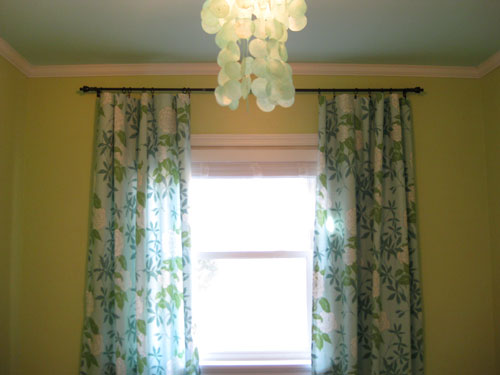
This angle gives you a better idea of what we were dealing with. See how the window is shifted a bit too much to the left? Well it’s nothing a curtain rod and some billowy floor length curtains can’t totally solve. I asked John to hang the left curtain rod support hook only about four inches wider than the trim on the left side of the window but requested that he hang the right curtain rod support hook about fifteen inches wider than the trim on the right side of the window.
This way, once we hung each of the curtain panels, we could cheat them both over to the right (blocking a bit of the window on the left side, but adding a ton of balance and polish to the room):
And we also mentioned in our shopping post that we snagged our simple oil-rubbed bronze curtain rod along with two packs of curtain rings on clearance at Target for less than $12 total. We love the height and the elegance that the shot of dark color brings to the wall, and love that it echoes everything from the mocha finish on the floor to a few of the darker wood accents that we’ll be bringing in to keep things from getting too sugary sweet and matchy-matchy.
Plus the clip-on curtain rings are actually something of a safety feature. Remember how we mentioned that someone could hang on those curtains without the rod coming down thanks to the use of some heavy duty anchors? Well we also realized that using clip-on curtain rings would allow for just the fabric panels to pull down if anyone got too rowdy and tried to swing from them (while the rings and the rod would most definitely stay put). We even tested them out by tugging on them a bit, and although it took pretty much all of my pregnant adult weight, sure enough the fabric was released from the rings and fluttered lightly to the floor while the rod and the rings stayed nice and securely in place on the wall.
And as someone who has never used curtain ring clips before I just have to sing their praises. Not only are they nice little secret safety features, they also create such perfect little “waves” in the panels which result in such an amazingly high end look (and best of all, there’s no rod-pocket required, so you can hang any panel of fabric without worrying about extra sewing or loop-making).
Update: This P Kaufmann fabric seems to be discontinued now, but here’s an affiliate link to another fun oversized floral print on amazon for anyone looking for something similar.
Oh and we can’t forget our tiny little blue closet (thanks to John’s cute idea to bring the aqua color from the ceiling into the mini enclave for fun). Doesn’t the curtain panel add some nice pattern and sweetness to a closet that was formerly pretty bleak looking?
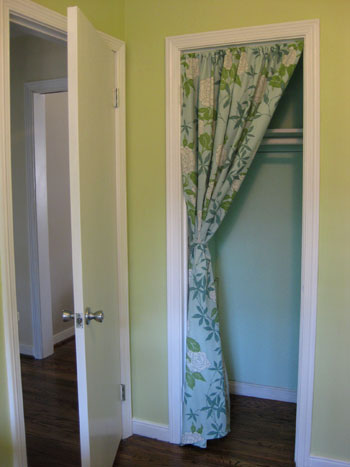
Maybe we should refresh your memory with a before pic:
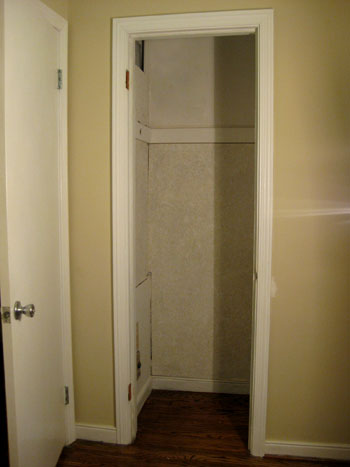
It’s looking better already, right? And of course we still have to add bins, baskets, and more hanging rods (along with some sort of storage piece on the floor of the closet).
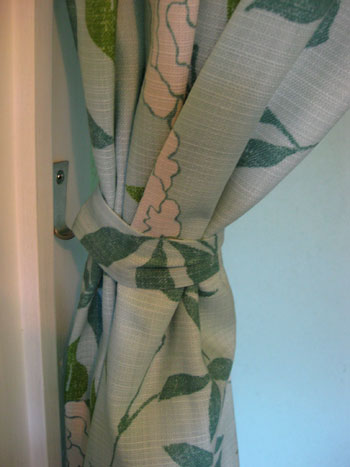
As for how we swagged our curtain panel so it’s mostly out of the way, we just hung it on a $3 tension rod (one that screws into both sides of the molding for more reinforcement than those that rely only on tension). Then we added a regular old Ikea coat hook that we already had on the left side of the closet’s interior trim. Next I made a little strip of fabric (using my trusty hem tape to finish the edges) and used that to create a loop around the curtain panel. Note: it’s safety pinned in the back so it can easily be removed and readjusted.
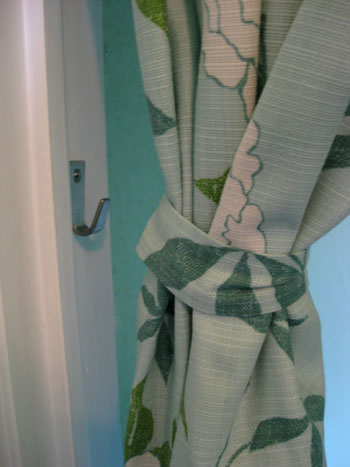
Then it was as simple as slipping my loop of fabric onto the hook on the side of the closet to hold the curtain off to the side.
So that’s the story of how we made our off-centered window look more balanced, blocked out all the light for less sleepless nights (fingers crossed) and added a fun pop of pattern to both sides of the nursery in the form of breezy floor-length curtains (which make the ceilings feel about a foot higher). Plus we only spent about $35 a panel (with almost an entire yard of fabric leftover!). Oh and it always makes us smile at our fabric luck when we recall that it’s actually indoor/outdoor fabric, so it’s a lot more stain and fade resistant than the average bear (although still completely washable). Which is a good thing when it comes to sticky fingers and goey faces…
But what about you guys? Have you made your own curtains before? Do you have a closet with a panel of fabric on a tension rod in lieu of a door? Spill the sewing (or hem tape) beans.
Psst – Wanna see our nursery progress from the very beginning? Here’s our painting post, our big shopping spree, and our crib hunting rundown.
Update – Want to know where we got something in our house or what paint color we used? Just click on this button:


Catherine says
Fabulous work on the curtains! The hem tape is such an easy way to make even-bottomed panels. I make almost all of my drapes because I tend to like bold fabrics that just don’t come ready-made in stores, or are completely out of the budget if they do! You can’t beat the clearance sections of Joann’s or Hancock’s for posh home dec fabrics that end up costing you <$10/panel most times.
Some tips for you and other seamstresses: I've found that IKEA curtains almost always should be hemmed with the included tape rather than sewn; their bottoms are never cut evenly so if you try sewing that following the existing edge you'll end up with a hot mess! I learned this the hard (read: annoying) way. :) Also, I tend to give a pretty generous bottom hem because it seems that even if you pre-wash your fabric, the panels will shrink up a little over time. A generous hem can be let out in the future should this happen.
Can't wait to see the finished nursery – it will be beautiful, no doubt.
Cindy @ The Flipping Couple says
I’m totally drooling over the curtains! I love the color scheme you guys have going and the floor to ceiling curtains are absolutely gorgeous! Can’t wait to see the next step.
Gloria says
You two are amazing. The room is coming together beautifully. What a great room for your little “Beanette.”
Maya says
I love how the room is coming together! The fabric looks great, and I totally agree with your choice now… I like how it is delicate and feminine (even though you aren’t using overtly feminine colors) and it makes the room seem like it is a place you’ll all love to be… this baby is getting a lot of love already!
Theresa says
Beautiful!
Carmen says
The room is coming along so beautifully! The fabric is gorgeous and definately something that can grow with your little girl.
Shunta says
I’m SO inspired!! I didn’t even know those curtain clips existed!! I mentioned earlier that we are purchasing our first home and I really wanted to make our curtains but I was concerned about making loop holes and now I see that there’s a “loop hole” (pun intended!) around that problem!! This is by far the best blog EVER!! So excited I found you all!! :-)
P.S. I’ve been to so many fabric stores this past week and I did a fun dance when I found you all’s curtain fabric in the store. I said–this is the beanette’s curtain fabric!!
Jessica @ How Sweet says
I love those curtains! So cute! :)
Erin says
Beautiful! They curtains look great! Love the fabric choice. We have the same blinds throughout our home and love them!
The good thing too about using the ring clips is that if need be you can clip on some blackout drape liners. The blackout drapes work wonders at getting a little one to sleep and stay asleep when it is sunny outside or when the early morning sun comes in.
Clare says
I’ve never made my own curtains before, as I assume sewing skills were required. What a great solution! As you’ve used these all over your home, have you experienced any fallen hems over time? If so, have you been able to reapply the hem tape? Thanks!
YoungHouseLove says
No fallen hems- even after years of use and washing! This stuff is just as “permanently bonding” as thread as long as you apply it with a hot iron and get a great bond right from the start (which is super easy- this stuff is the best) and of course follow the washing instructions (no high heat in the dryer). Hope it helps!
xo,
s
Jessica says
I LOVE this room already!! I wish I’d seen this type of color scheme before I decorated my baby girl’s room. I figured I pretty much had to go with pink touches in order to keep it feminine but you proved me wrong. Time to switch out some pink for blue in her currently pink and green room!
You’re so inspirational, and you guys always crack me up with the “tag, you’re it”, witty kind of humor.
Katie H says
I love curtain rod rings. They are one of my all time favorite things!! It makes it a lot easier to take your curtains down and wash them when you need to since they are just clipped up there. Another idea for making easy curtains is to check out flat sheets in pretty patterns when they are on sale and hem if needed.
I took the door off one of our closets in our last apartment and hung a curtain over it. but i just used a curtain rod over the door frame and did regular curtain tie back holders on each side to hold it back when needed. The main reason I did that was because our kitty’s litter was in there but I didnt want the door open to look into it all the time. Kitties need privacy too! ha ha.
Heather @ Brown Brick House says
I love the curtains. Currently working on new curtains for my little mans room (moving from the nursery to his own big boy room) I just haven’t found the “perfect” fabric yet! Still looking.
Love what you did with the closet too. Currently, our kids bedroom and playroom closets are just open, no doors or curtains (the tension rod lost in a tug of war with my toddler boy, haha)
Keep up the great work!
YoungHouseLove says
Hey Heather-
Our tension rod is actually one that is screwed into each side of the door frame so it’s stronger than most of those tension-only ones. Maybe that will help?! It was still just $3!
xo,
s
Liz says
We have the exact same blinds in our bedroom. I LOOOVE them for sleeping in on weekends. They block out so much more light than flimsy thin blinds do. We also have them in a dark mocha color in our bathroom. They look like dark brown shutters. The price and the free “custom cut” make it almost too good to be true.
I can’t wait to see the rest of the room! I know y’all will make it look awesome.
Christin says
You guys are just so inspirational! I never would have thought to use those colors or even that fabric – and it’s stunning!! Your posts never cease to amaze and inspire me!
I made my own curtains when I was in college and living at home over the summers with my folks. My Mom made me a duvet cover and we used various patterned sheets to make the patches for the patch work of it. Then I used one of the same patterens to make my curtains. I sewed them but it was a pretty forgiving project seeing as I’m still a beginner at sewing. But they were great and I loved them. And I absolutely LOVE the magic hem stuff. It’s fantastic! Thanks for the reminder about that stuff. It makes some projects I have in mind less daunting to tackle. :) Keep up the great work and thanks for all you do!
Nela says
Hey there! Love your ideas…. I have a question in regards to the closet door. How did you repair the indents done to the frame caused by the hinges of the old door? I have one closet in my spare room I would love to do this, but the spot where the hinges where are horrible. Thank you for the inspiration and motivation!!
YoungHouseLove says
Hey Nela,
Some simple putty should do the trick. Just grab a putty knife and fill in those indents so they’re not longer visible once it all dries and you paint everything white to match the trim. If you ask someone at a home improvement store for tips they can show you what to get and how to use it. Hope it helps!
xo,
s
Sarah says
The room looks great so far. I love the curtains! I cannot wait to see the final reveal!
For our daughter, I embellished a white eyelet valance I bought for about $5.00. I ran pink and green ribbon through the eyelet holes and ironed on dainty little flower patches horizontally across the area above the eyelets. That’s about it for our no-sew curtains.
Oh, and we use tension rods/curtains for closets all the time. Love the look!
Sonya says
I have the same blinds and had no idea you could shorten them to “customize” the length – thanks for showing that tip!!
Love your new curtains! Your post is so encouraging to me because I’ve wanted to make tie-up curtains for my bathroom windows and thought I’d have to take a sewing class – yours look so great with the tape that now I’m going to give that a try! I say bravo to you for doing what you want with the style/length now while knowing you can always make modifications later on! I feel that sometimes people seem to think that the baby will arrive ready to crawl around and rip them down right away – haha :)
Joe says
We replaced my teen daughter’s ugly bifold closet doors with a curtain, and it’s a total nuisance. But hers is a lot wider than yours, so maybe you’ll have better luck. One day soon I’m going to take down her curtains and install a pair of sliding closet doors.
denise says
props to iron-on hemming! love that stuff. and i adore that light!
i have a very thin closet in my room with no door that i found a wooden roman shade for at good old walmart. it’s a bit of a pain to raise and lower it every day, but it looks really tailored and fits great.
X
denise
Kristen says
Love them! How did you measure for the curtains and know how much fabric to buy?
YoungHouseLove says
Hey Kristen,
We knew that our ceilings were 8 feet tall and that we wanted two almost floor to ceiling panels for the window so that was 16 feet of fabric that we needed off the bat. Then we measured the closet and learned that it was just shy of 7 feet tall so that took us to 23 feet of fabric total (which breaks down into 8 yards of fabric necessary and should have left us with about a foot of fabric to spare). The bonus was that the guy who cut it for us gave us a bit of extra yardage on the front and back end (just to be sure) so we ended up with nearly a yard of extra fabric leftover- which is always nice to have on hand… just in case. Hope it helps!
xo,
s
Janell Beals says
Looking very very lovely! The colors in the room are just so pretty & sweet…Janell
Rosie says
Great looking nursery you two! Baby P will be proud!
Are the bottom of the curtains hemmed too? How much are they actually “falling” on the floor? I want to try my hand at making curtains (maybe that drape on the floor), but have no idea just how long they should be to overlow on the floor.
Are straight floor-length curtains not really the look nowadays? It’s all new to me and I’m learning as I go.
Thanks for your help!
YoungHouseLove says
Yup, all four sides of each panel of fabric are hemmed, and I left about 2.5 extra inches on the bottom for that pooled look when they gather on the floor just a bit. These days everything from curtains that just graze the floor (or even stop about a quarter of an inch above the floor) to panels that pool on the ground even more than our nursery ones are definitely “in” so it’s all about personal preference. If you want a clean and crisp (ie: more modern) look, go for panels that just graze the floor or stop short about 1/4 of an inch before touching it. If you’re after more of a vintage-y or traditional look then a bit of extra “pooling” on the floor always looks romantic and sweet. Hope it helps!
xo,
s
Sam says
That fabric is great- it really brings the room together. I’m also in the process of putting together my daughter’s nursery and love checking in with your blog to steal ideas from you! Can’t wait to see the finished room!
Amanda in Boston says
Glad you found those blinds! We have the same one in all the windows in our condo! We had HD cut them down too, which was so great. We looked into the honeycomb blinds and it would have cost 1,000. They do look very nice, and are great at blocking out light. Gotta love HD!
Irene R says
Love the curtains and they were so easy to make. I’m thinking of copying your idea for the curtain and a closet door in our guest room. I’m gonna bookmark this post.
Amanda says
I’m super impressed with how you made the window look centered. You can’t even tell!
Sherry maybe you’ve already answered this question- but do you own a sewing machine? Do you have a crafty seamstress side, or is it all just find-genius-ways-to-do-super-cute-projects?
YoungHouseLove says
Hey Amanda,
Nope, no sewing machine for me. The funny thing is that I registered for one when we got married and my sweet grandma got it for me way in advance (it arrived about 3 months before the wedding). Every time I saw it sitting in the closet taking up space and collecting dust I felt guilty for not using my grandma’s gift. So after about a month or two of realizing that I never used it (and always reached for alternatives like hem-tape) I just faced the fact that it wasn’t for me and I could use the closet space more than the guilt-inducing sewing machine and ended up exchanging it for something else on my registry. Of course I called my grandma to fess up and she was just glad I got something I could use (and even teased me for trying to sew when she knew I was more of a “metropolitan girl” anyway). Isn’t my grandma hilarious? Anyway, it all worked out in the end.
xo,
s
Valerie says
Great tips! I’ve used those exact blinds in our house and love them. They are a little more expensive than a traditional blind when your working on a budget, but well worth it and I think they always look great.
I also have the same problem with a window in our master and I’ve been thinking about doing exactly what you did here, but I was having a hard time picturing what it would look like. Mainly because I didn’t know if the light filtering in would throw the eye off so that it was noticeable. However, in your picture you don’t even notice that you moved the panel over an additional few inches. Fantastic!
BTW – I love your site. I’ve only been following a few weeks, but have learned so much! I think my favorite so far is the basement. I feel the exact same way about mine as you did about yours. I can’t wait to start applying some of your ideas to ours!
Thanks for sharing. Can’t wait to see the final after photo!
Natalie says
Love the fabric! We also used the Home Depot faux wood blinds in our house. We have a 1940’s house, so like yours, the windows were all different sizes. They customized our blinds and then my husband labored on shortening all of them once we got them installed. They really are great, and so easy to clean too!
Can’t wait to see more updates of the baby’s room!
Amy says
Oh, one of the many projects on our apartment renovation…
The closets in the unit don’t have doors (or jams for that matter) so I suggested to Garry a few weeks ago that we could get tension rods and put a curtain up instead of worrying about a door. With all the complex projects he’s working on, he was thrilled that I finally came up with something simple!
Virginia @ Where You Hang Your Hat says
This is such a welcome post! Thank you! Going in my “starred” folder.
Kate says
Just wanted to thank you for all your fun posts… I love reading your excitement waiting for the baby! And how fun is decorating a nursery?
Ps… those curtains? How cute & fresh!
JenWoodhouse.com says
Looks great, guys! Question… and you might know better than me, but I vaguely remember reading somewhere that faux wood blinds release non-eco friendly, (maybe toxic?) gases when the sun warms them. Sorry for my bad memory… now I’m going to have to google. Ha!
YoungHouseLove says
Hey Jen,
Good point! We actually read that they can offgas for a few months after you buy them when the sun shines on them as well. Luckily since we purchased them about four months in advance of baby P’s arrival we think they’ll be a-ok by the time she’s here (and have been airing out the house and cracking windows regularly just to keep the air nice and clean for me too). We even have two plants just sitting on the floor of the nursery since they’re proven to reduce toxins in the air. I’m a crazy person when it comes to that stuff so I’m sure everyone who visits wonders why those plants are sitting on the floor but it’s all in the name of pure air! Haha.
xo,
s
Tana says
I love the fabric you chose! The other fabric reminded me too much of bed sheets.
I am so glad you went with safe cords for your blinds; I cringe when I see long looped curtain cords in houses with young children. When I was about 3 or 4, I nearly hung myself on a curtain cord. I was standing up on the sofa looking out of the window, and absentmindedly playing with the cord. I started winding it around my neck like a necklace, then forgot that it was there and jumped down off the sofa. My mom tells me I would have died if she hadn’t been right there in the same room.
By the way, we’re neighbors! (sort of). I grew up in your neighborhood, in fact my parents still live there, right around the corner from you guys. I go down your street every Sunday to get to my parents house for dinner.
YoungHouseLove says
Wow that’s crazy Tana! So glad you’re ok. And it’s so funny that you’re in our neighborhood every Sunday to meet up with your parents. It’s such a small world!
xo,
s
Joanne says
What timing! I scored 2 window scarves for $12 TOTAL, and I’ve just been dreading getting out the machine. I’ll just get myself some hem tape – and use it on the new jeans too!
Rachael Ensom says
LOVE it! It looks geat!
D says
The curtains look great! Love the chandelier and paint color with the pattern of the panels!
Will you baby proof the closet since there isn’t a door. A baby on the loose will go straight for it!
YoungHouseLove says
Hey D,
Yup- we’re definitely planning to babyproof everything- just not until our beanette is a bit more mobile. We still have a few months until she’s here and then half a year after that before she’s on the go, but stay tuned for all the child-proofing details coming later this year!
xo,
s
CarMaj says
Love the curtains and really love the chandy – everything looks so wonderfully girly too!! Great job (as always!!)
Lisa says
For the faux wood blinds from Home Depot – are they 1″ slats or 2″? We’ve been trying to figure out window treatments for our baby girl’s nursery as well (due May 3) but I know that 2″ blinds won’t fit in our windows. These might be a great option!
YoungHouseLove says
They’re 2″ slats, but I have to say that ours don’t perfectly line up with our interior window trim since they’re set a smidge more forward and it still looks polished and lovely once you add curtains on either side to flank them (which protrude even more from the wall thanks to the way a rod is hung so it’s all good). Hope it helps!
xo,
s
Ashley M. [at] (never home)maker says
I love faux wood blinds! We had them — in white — all throughout the 1st floor of our house . . . until our cats ruined them. You’re so lucky you chose to have a dog and not cats. First the x-mas tree, then the blinds, what’s next?
Anyway — what a sweet fabric choice. Good for a baby’s room, but will also be somewhat ageless (I’d love that in my bedroom!). Smart choice so you don’t have to scrap it all when she gets a bit older. But you two are always changing things up — so you’ll likely want to get creative :)
Anyway, can’t wait to read your babyproofing tips. I just found out that three more friends of mine are preggers. Definitely something in the water . . .
Suzanne says
I love the Heat n Bond tape. I’ve used it to make roman shades and hem curtains, as well as pant hems. It’s truly a life saver for those of us like me that don’t sew. I love the colors of your nursery. Can’t wait to see the final result!
JenWoodhouse.com says
Whew… my google search was successful. As long as your blinds aren’t made of PVC, you should be okay. Good thing you bought them awhile back!
YoungHouseLove says
Thanks so much Jen! We feel better already. But I’m leaving those two plants on the floor- just in case! Haha.
xo,
s
JenWoodhouse.com says
Another question… off-topic, though. What’s your stance on cloth diapering vs. disposables?
YoungHouseLove says
We’re cloth diapering all the way! Here’s a post where we mentioned our cloth diaper of choice (we’ve heard nothing but great things about the new organic snap versions): https://www.younghouselove.com/youre-a-curious-bunch/
xo,
s
Amy Jaynes says
Don’t you love those blinds? We bought our fixer-upper in 2008 as first time home buyers.. and one thing we didn’t notice until we moved in: there were no window coverings in any of the rooms! So we made the trip to Home Depot and bought them for our whole house– it made such a difference!
Kathi says
It’s so neat watching your little one’s future nursery come together. I really love the colour combo, although when I first read the colour choices, I wasn’t too sure. And the new curtains really pop, but somehow in a mellow way, if that’s at all possible. Can’t wait to see what’s next!
I was wondering how you made the calculations on the placement of the curtain fixtures to “even up” your window. We have the same sort of thing going in our bedroom, and I’ve been looking for a way to make it look more centered. If you could explain how you made them, it would be much appreciated, as it’s the one thing in my room that drives me totally batty!
YoungHouseLove says
Hey Kathi,
It’s beyond easy! Just take your curtain rod and put it on the floor in front of your window and extend it so it’s about 10″ longer on each side than the window frame. Then (while it’s still on the floor) shift it over so it’s no longer centered under the window, but is now centered on that wall. You’ll see that one side will call for more of an overhang while the other side calls for less. It’s just an approximation so there’s no need to whip out a ruler or a calculator or anything, but by looking at the floor you’ll be able to see where it would look centered on that wall and then you can hang it in that placement on the wall above the window. Hope it helps!
xo,
s
Susan says
Wow, you make everything look so easy! I bought the same blinds from Home Depot when I moved into a new apartment in September. I found hanging the blinds and removing the extra slats easy enough, but then what do you do with the hanging strings? Where do you cut? Do you just make four quick snips to detach the vertical ropes? Or do cut off each horizontal ladder? For a DIY novice like me the instructions that came with the blinds were vague and confusing. It became such a headache that I stopped after adjusting the length of one set. Now it’s February and unfortunately I have one set of blinds that are the right length and one set with about 50 too many slats. Any advice on that final step of trimming the cords would be incredibly appreciated! Thanks!!
YoungHouseLove says
Hey Susan,
John did the actual blind installation but I watched him so I hope this makes sense: he slid out each extra slat as you can see in the pic from the post above, and then he made four quick snips to detach the vertical ropes (of course taking care to leave enough of the rope to attach the base again and finish everything off). Hope it helps!
xo,
s
Kristin says
Great curtains!
And I love the repeated color inside the closet. These clip-on curtain rings are another great item – never heard of them before, it sounds great to use just a large sheet of fabric without having to add any loops or whatever.
When I was a kid, my parents made a great DIY closet for me out of the IKEA GORM storage system (here in germany built-in closets are a rarity, so we always have to buy a closet anyway). They added some hanging rods and used Ikea bamboo blinds (quite similar to the ones you’re using in the laundry nook) instead of doors or curtains. I loved the tons of storage inside!
Erin @ Domestic Adventure says
Your curtains came out great! I did the same clip routine with some curtains I made this summer, although I did torture myself by sewing the hems… (http://www.domesticadventure.com/2009/09/curtain-call/). I love the look of the clips, plus it makes the process super easy!
Can’t wait to see the rest of the nursery as it comes together!
Mollie says
Love the curtains! Looks great and super easy.
Jessie (Vegan-minded) says
Wow, the curtains look fabulous! I love the idea of using the hem tape to make your own curtains. I don’t have a sewing machine so this would be great for me!