We’re back with our homemade nursery curtain panel how-to.
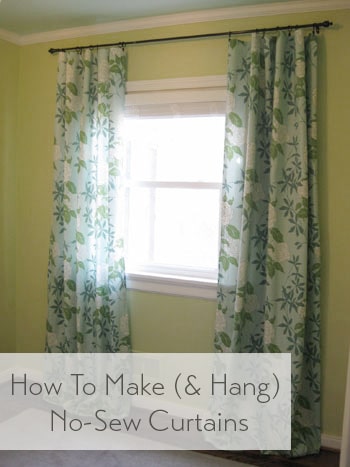
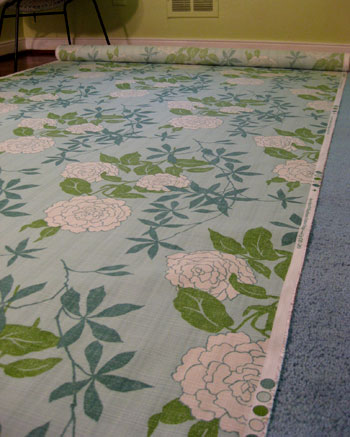
Remember when we revealed our punchy patterned find during last week’s shopping post? Well here’s how we took it from one big bolt of rolled up fabric by P Kaufmann…

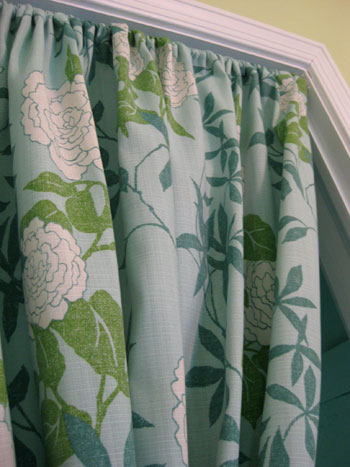
… to three gorgeous floor-length curtains (two for the window and one for the doorless closet). And probably best of all: there’s no sewing machine required. In fact, here’s my short and sweet list of supplies: tape measure, scissors, iron on hem tape, and an iron of course. Plus we even added a few kid-safe features so stay tuned for those details…
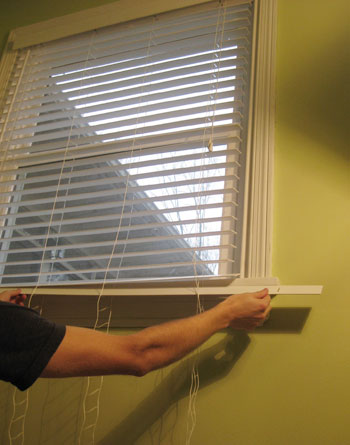
But before we get into all the dirty curtain-makin’ details, we should mention that we hope our baby sleeps well. So in the interest of aiding our little one in that area, we decided that we also needed to grab some sort of 100% light-blocking blinds or shades. So we trolled the aisles of Home Depot and found some chic white faux-wood blinds. We loved them because they felt almost like substantial wood shutters when they were lowered (a lot more solid than those thin plastic or metal venetian blinds) and they definitely would block any and all light when in use (and could easily be pulled up and out of the way to let light stream in during the day).
But here’s the bummer. Of course they didn’t come in the exact measurements of our quirky old house’s window (39 1/4″ wide in case you’re wondering). Sadness. But we soon learned that Home Depot could actually cut them down to custom fit our window perfectly- and the cutting service is F-R-E-E. That turned our frown upside down. So we give the guy in the orange apron our window’s odd width and he had our custom-cut clean-lined faux wood blinds waiting for us about five minutes later. The blinds weren’t super cheap at $37, but they look convincingly like much pricier white wood blinds and we know the darkness that they’ll provide will be priceless when we’re dying for one more minute of sleep.
Of course we also liked that they didn’t have those dangerous loopy pull cords (they were labeled as having “kid safe cords” that are actually separated instead of connected so they’re less of a strangulation hazard- no loop to get caught in). And of course we plan to keep them wound around one of those cord wrangling pieces of metal at the top right corner of the window far out of baby’s reach anyway, but we love the added loop-free design.
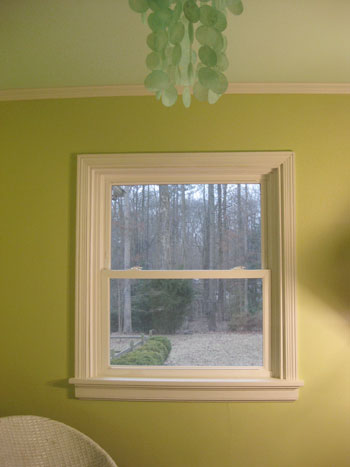
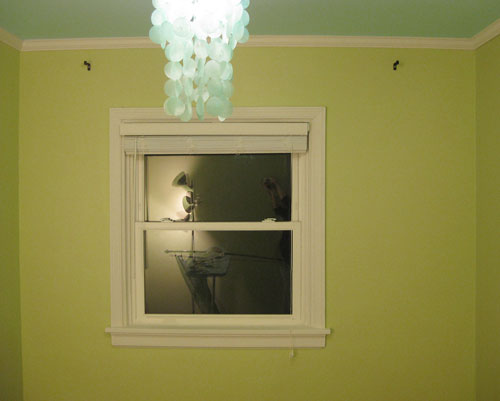
And since we love a before picture, here’s the window prior to our little curtain and blind fest:
John had the blinds up in about twenty minutes, but they definitely left a lot to be desired in the length department. They were actually a bit heavy to raise and lower, all due to the fact that they were at least two feet too long for our window, so there were a bunch of slats that just clumped together at the bottom of the blinds when they were in the “lowered” position. Luckily in the installation instructions they actually detailed how to shorten them to customize their length to fit any window. Nice.
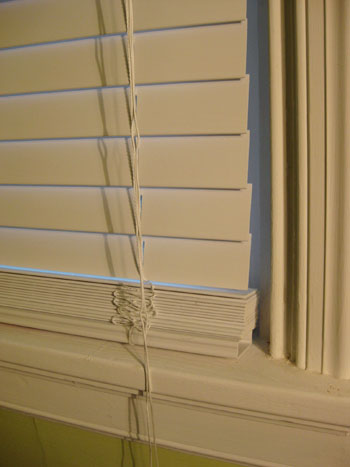
So John just followed the included directions and popped out these little plastic pieces on the bottom and could easily remove as many slats as he’d like and trim the excess string. Then he just popped the bottom pieces back on and we had an even more customized nursery blind that was a lot less cumbersome to raise and lower without all those extra slats at the bottom. Then, like a finely tuned relay team, John tagged me and said “your turn” and I began working on the curtains.
First I measured the approximate height that I wanted the curtains to be (just shy of 8′ for an almost floor to ceiling look) and added an inch and a half on the top and bottom to accommodate the hem. It was actually a nice clean measurement in the end because I determined that cutting two eight foot long sections of fabric would do the trick perfectly (since I wanted them a bit shy of 8′ but with the added hem measurement it brought them right back up to 8′ exactly). Hurrah for no quarter of an inch calculations!
The other super convenient thing about measuring out my fabric was that we already happened to have our new 5 x 8′ rug on the floor… so to cut my 8′ long fabric sections, I simply rolled the bolt from one end of the rug to the other and cut a straight line using the edge of the rug as my guide. It doesn’t get much easier than that. And for the width I just left each panel as wise as the bolt allowed (so I didn’t need to trim those edges at all).
Then it was time for my trusty Heat N’ Bond iron on hem tape (I always grab the “ultra hold” variety). You may have seen us using it in this crib skirt tutorial from a while back and we’ve also used it to hem all the white Ikea curtains that we have hanging in the rest of the house. In short: I’m a hem tape black belt (the irony is that John does all the clothes-ironing in the house). Anyway it’s great stuff for leaving a polished and clean-looking edge (a lot more reliable then me with a sewing machine!) and it’s even washable and super cheap (we grab ours for a few bucks a roll at Michael’s). So I whipped out the ironing board, fired up the iron, laid out my big eight foot long fabric panel and had my scissors and hem tape on hand.
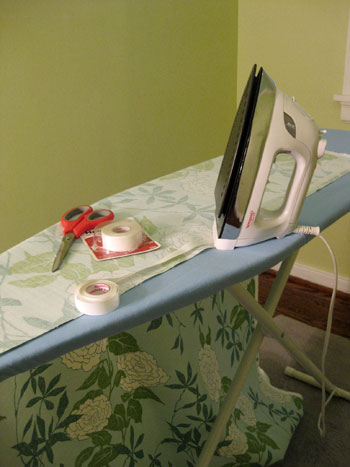
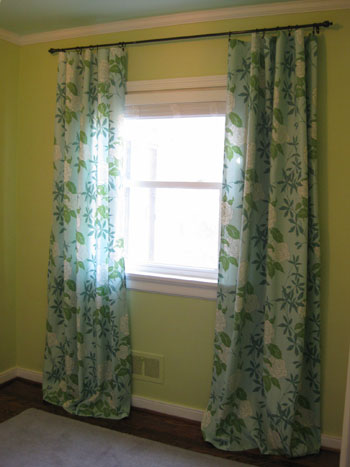
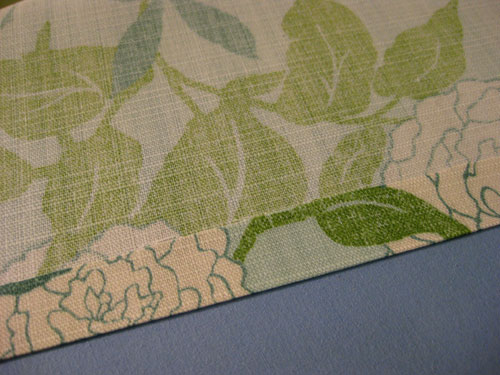
All it took was an easy-iron hem on each of the four sides of my fabric (for step by step hem tape instructions, just check out this post). Then I had a nice finished panel (without any rod loops or tabs) that I could clip up using my cheap-o oil-rubbed bronze curtain rings and rod from Target. Just look at how seamless and perfect that edge is! Much more even and less bunchy than anything I could sew…
Then I tagged John to get to work hanging the curtain rod with heavy duty anchors (so it’ll never come toppling down, even if over 100lbs of force is used) while I created a third curtain panel for the closet (this one only needed to be seven feet long). I also made a little rod pocket at the top of this panel (I just positioned hem tape about 4 inches below the edge of the fabric and ironed the fabric to that line of hem tape created a nice loop of fabric). Meanwhile John was already executing my let’s-cheat-our-off-centered-window-so-it-looks-more-balanced plan.
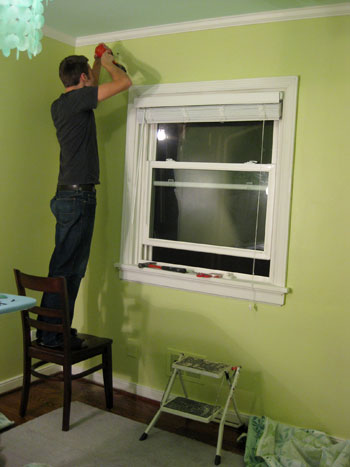
This angle gives you a better idea of what we were dealing with. See how the window is shifted a bit too much to the left? Well it’s nothing a curtain rod and some billowy floor length curtains can’t totally solve. I asked John to hang the left curtain rod support hook only about four inches wider than the trim on the left side of the window but requested that he hang the right curtain rod support hook about fifteen inches wider than the trim on the right side of the window.
This way, once we hung each of the curtain panels, we could cheat them both over to the right (blocking a bit of the window on the left side, but adding a ton of balance and polish to the room):
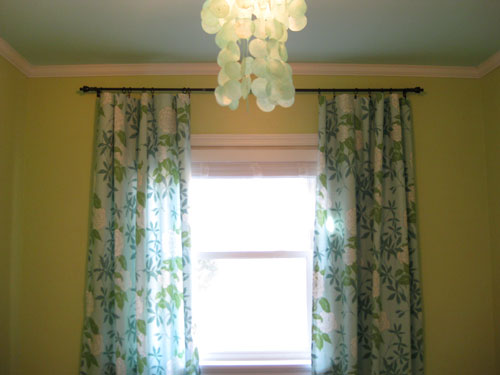
And we also mentioned in our shopping post that we snagged our simple oil-rubbed bronze curtain rod along with two packs of curtain rings on clearance at Target for less than $12 total. We love the height and the elegance that the shot of dark color brings to the wall, and love that it echoes everything from the mocha finish on the floor to a few of the darker wood accents that we’ll be bringing in to keep things from getting too sugary sweet and matchy-matchy.
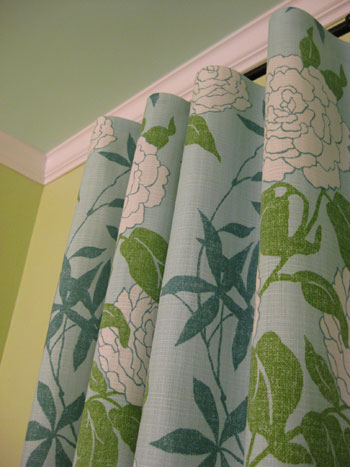
Plus the clip-on curtain rings are actually something of a safety feature. Remember how we mentioned that someone could hang on those curtains without the rod coming down thanks to the use of some heavy duty anchors? Well we also realized that using clip-on curtain rings would allow for just the fabric panels to pull down if anyone got too rowdy and tried to swing from them (while the rings and the rod would most definitely stay put). We even tested them out by tugging on them a bit, and although it took pretty much all of my pregnant adult weight, sure enough the fabric was released from the rings and fluttered lightly to the floor while the rod and the rings stayed nice and securely in place on the wall.
And as someone who has never used curtain ring clips before I just have to sing their praises. Not only are they nice little secret safety features, they also create such perfect little “waves” in the panels which result in such an amazingly high end look (and best of all, there’s no rod-pocket required, so you can hang any panel of fabric without worrying about extra sewing or loop-making).
Update: This P Kaufmann fabric seems to be discontinued now, but here’s an affiliate link to another fun oversized floral print on amazon for anyone looking for something similar.
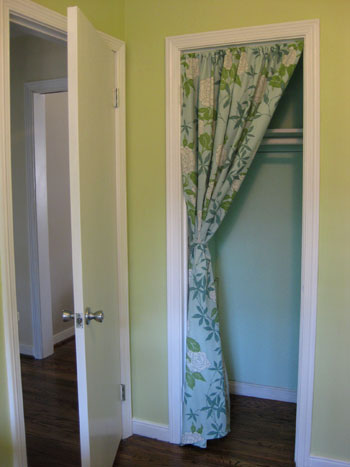
Oh and we can’t forget our tiny little blue closet (thanks to John’s cute idea to bring the aqua color from the ceiling into the mini enclave for fun). Doesn’t the curtain panel add some nice pattern and sweetness to a closet that was formerly pretty bleak looking?
Maybe we should refresh your memory with a before pic:
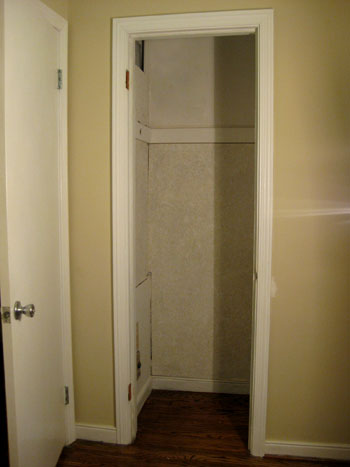
It’s looking better already, right? And of course we still have to add bins, baskets, and more hanging rods (along with some sort of storage piece on the floor of the closet).
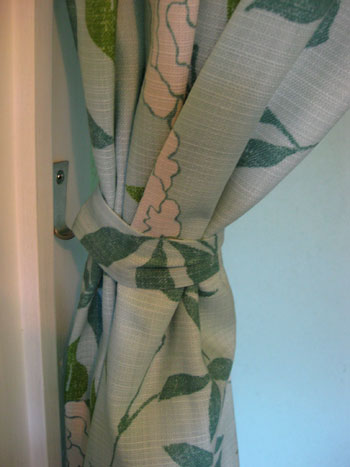
As for how we swagged our curtain panel so it’s mostly out of the way, we just hung it on a $3 tension rod (one that screws into both sides of the molding for more reinforcement than those that rely only on tension). Then we added a regular old Ikea coat hook that we already had on the left side of the closet’s interior trim. Next I made a little strip of fabric (using my trusty hem tape to finish the edges) and used that to create a loop around the curtain panel. Note: it’s safety pinned in the back so it can easily be removed and readjusted.
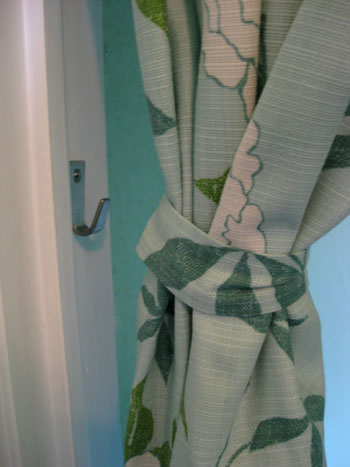
Then it was as simple as slipping my loop of fabric onto the hook on the side of the closet to hold the curtain off to the side.
So that’s the story of how we made our off-centered window look more balanced, blocked out all the light for less sleepless nights (fingers crossed) and added a fun pop of pattern to both sides of the nursery in the form of breezy floor-length curtains (which make the ceilings feel about a foot higher). Plus we only spent about $35 a panel (with almost an entire yard of fabric leftover!). Oh and it always makes us smile at our fabric luck when we recall that it’s actually indoor/outdoor fabric, so it’s a lot more stain and fade resistant than the average bear (although still completely washable). Which is a good thing when it comes to sticky fingers and goey faces…
But what about you guys? Have you made your own curtains before? Do you have a closet with a panel of fabric on a tension rod in lieu of a door? Spill the sewing (or hem tape) beans.
Psst – Wanna see our nursery progress from the very beginning? Here’s our painting post, our big shopping spree, and our crib hunting rundown.
Update – Want to know where we got something in our house or what paint color we used? Just click on this button:


Jessica says
wow – these are so so pretty and the whole colour scheme is so inspiring! I didn’t realize that hem-tape was washable – this is exactly what I needed to know to finish off the curtains in my bedroom which I’ve been afraid to hem with the sewing machine. http://marcelnme.blogspot.com/2009/12/i-considered-calling-this-blog-omg-i.html
Thanks!
heatherly says
I love the curtains!
I have been wanting to replace the two sliding/overlapping closet doors in the bedroom 2 of my daughters share, because the way those doors work, it is so difficult to access the middle of the closet. The tension rod is a great idea, although I may use a regular rod so I can pull the curtains all the way off the opening for full access.
I also have been wanting to make my own curtains for my living room, because I haven’t found any cool fabrics on ready-made curtains. However, I was not confident with my seldom-used sewing skills. Now, I am definitely going to give it a try.
Thanks for the no-sew tips! :)
Meredith says
I love it!!! You guys did an amazing job!!!!!
bridget says
I have silently (except for entering the faucet contest) followed your blog and lusted after many of your projects. With today’s post, I decided I would break my silence and put my busy body nose in your business. I would imagine that with such a popular blog you might be inundated with so much parenting advice and tips. Frankly, when I had my first little one almost 15 years ago everyone had an opinion and advice much of which was very helpful but some of it just upsetting. So here is my tip: take what works for your family and leave the rest. There can be a worry found in any situation, and as my mom always told me “It is by the grace of God that children grow.” With that said, I will give you the best advice I ever received: Enjoy your child/ren, they grow up so fast and it is so much fun!
Sorry this was so long. Thanks again for your awesome blog.
YoungHouseLove says
Aw thanks Bridget! We’re definitely planning to raise our babies just like we take on home improvements: by doing as much research as we can beforehand and learning as we go!
xo,
s
Ashley M. says
The room is looking fantastic!
I am so in love with the fabric! Do you know what the name of the fabric is by P Kaufmann?
Can’t wait to see more updates!
YoungHouseLove says
Hey Ashley M,
Since we got it at a discount fabric outlet they didn’t have the fabric name or style number on hand- just that it was by P Kaufmann. We wish we could be of more help!
xo,
s
Lisa says
So we found out today that, as I suspected, our bean is a boy! Any chance you’ll have some boy-nursery makeovers in the works? Maybe I’ll just have to get up reeeally early next week to snag a moodboard!
YoungHouseLove says
Hey Lisa,
Congrats on your baby boy on the way! We actually did a complete nursery makeover for a little man a while back, which you can check out right here: https://www.younghouselove.com/2009/09/onemodern-nursery-the-big-reveal/
Don’t forget to click all the links in the reveal post to be taken to step by step tutorials for everything from our lamp shade project to a fun art idea and even a no-sew crib-skirt project. We also think a lot of our current nursery ideas are universal to either sex. For example if you picked a more masculine fabric you could still have green walls and a blue ceiling and end up with a totally cute boy’s nursery. We’re not even bringing much pink into the mix so we hope a lot of our ideas can be easily adaptable for either gender!
xo,
s
Fatima says
You guys are doing such a great job! I love the window. I need to do my windows too, makes me want to run to home depot. The blinds look awesome. And I love your curtains too. I am sure the baby will adore her new room :)
Dana @ HouseTweaking says
Lovin’ the fun curtains! Glad to know I’m not the only one who cuts their fabric on the floor… I use the lines in my vinyl-floored kitchen to make straight lines! (That’s about the only thing I like about the ugly floor.) And let me tell you that ‘darkening’ the nursery will do wonders for a sleeping baby. I actually handmade my son’s shade in his room and lined it with blackout material for total darkness… and hours of sleep. Here’s to sweet dreams for the beanette – and Mama and Dada, of course.
abby says
Looks really nice! I am also a huge fan of curtain rings. I have noticed that with heavier curtains the fabric folds nicely, but when you are using a lighter fabric you really need almost 10 rings per panel. I used store bought Rod pocket panels and cut a little slit for each clip on the to back side of the rod pocket. This hid the clips and made them look just like the fancy curtains form pottery barn. Just a little trick I wanted to share with you and your readers. Love the blog and the nursery. I know your LO will love it too!
Amanda says
Dear Sherry and john,
You mentioned being a little worried about the loopy cords for the blinds. You can cut the cord down a little bit, if that would help lessen your anxiety. Put the blinds to the all the way down position, and this is as short as your cord would be. Then pull the plastic knobby bit up, untie the knot at the end, cut the cord to a length you like better and retie the knot, and slid the knobby bit back down.
Amanda
YoungHouseLove says
Hey Amanda,
We actually mentioned that our blinds came with kid-safe loop-free cords (so they don’t have anywhere for a child to get snagged since there aren’t any loops!). Thanks for the cutting idea though- we definitely like that any cord can be shortened to keep it even more out of reach!
xo,
s
Melissa says
With all of that fabric left over, you should make some cute throw pillows for a rocking chair!
Lesley H says
Absolutely lovely. I’m always a fan of ‘no-sew’ projects and these curtains turned out beautifully. VERY clever how you magically centered your window too. This Petersik chick is so lucky to get caring AND smart parents! Stay healthy Sherry – you look great!
Lauren says
I love curtain rings! I saw an article about using these in your kitchen window along with tea towels, in the DIY magazine you guys are featured in a few months ago. It took me a while to find the perfect tea towels, but now they’re up and look great! So easy!
Sarah says
Do you plan on showing pictures of the closet with your new storage boxes/ organization system? Sorry if I missed this in your post but I would love to see the closet finished! I am in the middle of creating our nursery and I am trying to find a solution for the closet storage system.
Thanks!
YoungHouseLove says
Of course. We’re total oversharers! You’ll see every nook and cranny of our nursery (even our future closet organization) but we’re just pacing ourselves since the beanette won’t be here until May. We feel fortunate that we have the luxury of doing things one step at a time, which also means we can share lots of detailed tutorials and projects as we go. Stay tuned…
xo,
s
Holly says
We bought those same blinds for both of our upstairs bathrooms (thankfully, the rest of the house came with lovely, neutral window treatments that were only a year old when we bought it) and they seem to work nicely. I think for our baby’s room we’re going to be getting plain white roller shades — even though I don’t love the way they look, I recall from growing up that they’re really excellent for blocking out the light (the nursery is the room in the house that gets the most sunlight of all — go figure!). And then I just bought these drapes (in the coffee stripe, 63” length since we’re planning to use the area underneath the windows to build a little front-facing book display out of the Ikea Ribba picture ledges) to be hung over that, and I’m going to craft some pretty printed pink/brown/white tie-backs to use on them to add a bit more color.
Happy continued decorating for your wee one! It’s so fun, isn’t it??
Sarah says
Love the photo of John hanging the curtain rod standing on a chair with the step stool next to him!
We made curtains for our nursery as well and because they did not block the light enough (even though they are black with white polka dots) I had to call in the experts and have a friend sew a white backer on them. I hung them on tension rods since we have an old house the windows are actually curved in the turret – talk about decorating around some funky stuff!
Took the extra fabric and made a square topper for the table next to the rocking chair – so sweet!
YoungHouseLove says
Hey Sarah,
Haha, that is pretty funny about John standing on our dining room chair with a step stool right next to him. In full disclosure that was actually my stool since I was jumping up there to help hold the rod from the other side of the window at certain points where John couldn’t do it alone. It does look pretty hilarious though.
xo,
s
patti says
wow, what a lucky little lady to have such awesomely talented parents. her nursery is really coming together nicely! can’t wait to see the big reveal!
well done guys!
Emma says
Oh my, you guys read my mind.
I have been lusting after some very expensive floor-length curtains from Ballard Design for a few weeks now. While at a local craft store this weekend I saw some similar fabric and lamented that I can’t just sew them myself. Little did I know all I need is my iron! AMAZING! Thanks. :)
julia says
Just curious – would the iron on tape work with a more sheer fabric or would it show?
YoungHouseLove says
Hey Julia,
Good question! I don’t believe it would show when used with a more sheer fabric since it’s clear and we’ve used it on our Vivan panels from Ikea (which are very delicate and thin white panels). But with any sheer-ish fabric that you hem (with hem tape or thread) you will see a thicker band of fabric around the outside of the panel since it’s doubled up in those areas that are hemmed. It looks nice and polished and finished though- not anything out of the ordinary. Hope it helps!
xo,
s
Barbara says
Wait, whoa…wait…I’m not even all the way through the post yet and I have questions…what brand blinds did you buy, because NO Home Depot by me will cut “cheap” blinds…I am ONE INCH from buying blinds, but they say they can only cut the ‘spensive ones….AND can you post how to shorten the blinds, as I have this problem all over the house, and no instructions to go by!
Now, back to reading the post…
__
Barbara
http://ifididnthaveasenseofhumor.blogspot.com
YoungHouseLove says
Hey Barbara,
We tried to link to our blinds but couldn’t find them on the HD website. They’re definitely not those cheap metal or plastic venetian blinds, they’re nice substantial 2″ slats that are faux wood. You should see them as soon as you enter the blind section. And they most definitely will cut them for you- we watched them do it for us and ours were $37. As for how to shorten them, just follow the manufacturing instructions that come with them. The reason we didn’t detail that step was because every blind can be made differently and we don’t want to tell people to snip the wrong thing since it’s not a universal process. Hope it helps!
xo,
s
Amanda says
You did such a great job! You also make it look easy and I just might attempt to tackle some curtains myself one of these days.
heather s. says
I love hem tape. I’ve used it for a ton of projects around my house (curtains included). Great job.
carrie a. says
Hey guys. Love your site, love your ideas and amazing sense of style and resourcefulness. I just wanted to pass this along. I thought roman blinds were recalled in all households with children. It was all over the news a few months back. I think you can order kits from the government to fix them. Basically they were a strangulation hazard. I know this only b/c I have two small children and literally dozens of roman shades in my house. Something you might want to doublecheck before Baby arrives! Good luck and keep on posting.
YoungHouseLove says
Hey Carrie A,
Yes they were recalled and we’re totally on the case! We actually fixed all of our existing bamboo blinds by converting the loop cords to non-loop cords (which are basically what those kits are for that you can get from the government). And as we mentioned the blinds for the nursery came out after the recall, so they have non-loop kid-safe cords to begin with. Hope it helps!
xo,
s
Jenny says
I wanted a certain shade of green for some curtains in our dining room, and couldn’t find any that were cheaper than about $75 a panel (no joke.) Then I went to Target and realized that they had tablecloths for less than $10 that were the exact shade I wanted…and the exact right size for the panels I needed! Bought some of those ring clippy things, hung them up, they look perfect! When we wanted curtains for our upstairs bathroom’s tiny window, I bought some white napkins with cute stitching around the edges, a cafe rod, and some more ring clippy things. Perfection!
Emily says
Love, love, love your ideas! I don’t think I’ll be doing a nursery again anytime soon, but I love these ideas for other rooms! Awesome – I think I’m inspired :-) And, I hate sewing and love the idea of doing something else!
Margie K says
My daughters room is full of curtains. She has light mint green paint on the wall with pink bubble gum curtains layered on top of light-blocker shades. Her closet has white gauze curtains on a shower tension rod. We haven’t been able to afford closet doors yet for any of our rooms so we’ve been going with the cheap curtain theme since fabric is so inexpensive at the Garment District in Los Angeles.
Stacy says
Love it! The nursery is looking so good! As a boy mom, I’m not a big fan of girl nurseries that look like a bottle of Pepto Bismol exploded in them…yours is going to be so pretty and feminine without being sickly sweet.
And this curtain project has me so excited! I can’t even sew on a button, but I would love to make my own curtains. A (probably stupid) question – how did you figure out where to attach the clips so the “waves” would be even? Did you measure or just eyeball it?
YoungHouseLove says
Hey Stacy,
It’s actually a good question because as a first time curtain-clipper I wondered this myself. What I ended up doing was counting out the ring clips that I had to determine that I could use seven per panel (since there were 14 in the pack). Then I just eyed things to space them all out evenly (probably about every 5 or 6 inches or so I added a clip). The waves looked great without any further adjusting! Hope it helps.
xo,
s
Carmen says
Sherry,
I was just curious how well the iron on tape withholds if put through a wash machine?
Love the nursury so far!
Carmen
YoungHouseLove says
Hey Carmen,
It holds up just as well as thread would- it’s really a permanent bond as long as you adhere it strongly from the get-go and follow the washing instructions (no high heat in the dryer for example). Hope it helps!
xo,
s
Christine Schwalm says
I love those drapery clips! I inherited some great panels when we changed out a room setting in my design center but they were tab top–not my fave. I was able to pin the “tabs” down and use clips to hang them for a simple black rod.
I was not aware of how wonderful this iron on tape is. I need to invest in some.
Nads says
I love your curtains, but even more, I LOVE that you used iron tape! I too was not blessed with the amazing talent of using a sewing machine, but have been able to get by pretty well with iron tape. I used to feel bad about it, but if it’s ok for Sherry, it’s so OK for me!!! My latest project included turning an amazingly beautiful shower curtain from Target into a mock roman shade using iron tape and safety pins!
August Rhodes says
I love the curtains they turned out amazing. I’ve used the heat n’bond before, but I find it tends to pull apart and doesn’t always go through the wash well. Am I doing something wrong? My fun curtain adventure begain with finding black out curtains for our master bedroom. Well I should have washed them first, but didn’t think of it so after I had them hung up for a while I washed them and of course they shrunk. So I found a super cute long table cloth from Target (which was the right length I needed) and just cut panels to fit on the bottom of the curtains. Heat n’bonded the heck out of them, but now i’m afraid to wash them because the bond might not hold. Wouldn’t be so bad if there wasn’t dog hair always on them.
YoungHouseLove says
Hey August,
It could be one of two things:
1. You didn’t have a strong bond to begin with, which could be attributed to a not-hot-enough-iron (you really want them to be secure and strong from the get-go)
2. You didn’t take the washing care instructions for the hem-tape into account (for example, they definitely say they can’t be dried on high-heat which could compromise the hold)
Hope it helps! Oh and it sounds like your tablecloth panel fix was just perfect!
xo,
s
Carole says
Even though I like to sew, I might try the no-sew option for my next full-length curtain project, yours look great. I made curtains with Marimekko fabric a few weeks ago, and it was hard to keep the seams from having a few wobbles when the fabric was that long. Nice job!
I used quilt binding on the edges of my curtains to maximize the fabric width. If only you could do *that* with hem tape! :)
http://buckcanuck.blogspot.com/2010/02/refusing-to-give-inch.html
Amanda says
I just love your curtain choice, fabric and hanging choice! I have been searching for a pattern in pre-made curtains for some time because I was so overwhelmed with the thought of making my own and now I am definitely on that bandwagon! Can’t wait to search out some fabric around my neck of the woods. Thanks for the insight!
Keeley says
Who knew that Home Depot could “customize” blinds? I love it! I also appreciate that you two always keep it real about the costs of your projects. It seems that you are on a budget just like the rest of us! Oh, and I love your use of iron-on hem tape. I love that stuff!
Susan Kelly says
I desperately need you to tell me where you found a curtain rod that can be attached with screws but does not curve out. I have searched the world OVER for one…. although now I’m wondering if all the rods marked “tension” might have included screw mounts without me knowing it…
YoungHouseLove says
Home Depot! It’s white and thin and metal and was in the “tension rod” area (in fact it even said “tension rod” on the label) but when you looked inside the clear packaging it had little brackets that screwed into either side of the closet trim. Hope it helps!
xo,
s
jbhat says
Fabulous tutorial. I too want to try this at home. Our little one’s curtains are quite lame and don’t do anything for her otherwise very sweet room. Hooray–now I have a shopping mission this weekend.
Joy says
I love love love the room. Such happy colors. She is a very lucky baby to have such a pretty room and such sweet parents.
Jennifer says
Hi, I’ve never done any sort of “fabric project”. Fabric stores intimidate me. I would, however, like to attempt some curtains in our bedroom following your lead on this project :) I know that you have 2 panels at 8′ long a piece, but how wide do you recommend each panel be? is it specific to the window width? Thanks!
YoungHouseLove says
Hey Jennifer,
Just for my convenience I didn’t trim the fabric at all width-wise and it worked out great. Each panel is about 55″ wide since that’s how it came right off the bolt from the store. That width should work perfectly for any sized window. Hope it helps!
xo,
s
Aimee says
AWESOME! I recognize that first picture…isn’t that next door to Williams and Sherril? LOVE that place. They designed my master bedroom duvet/pillows/window treatment. I also bought some fabric from the discount place to recover an old telephone chair/table combo. Congrats! The nursery is looking awesome!!
YoungHouseLove says
Yup, it’s called The Interior Outlet (we actually gave them a shout out in our previous shopping post). Hope it helps!
xo,
s
Ann says
Lowe’s has the same blinds with the same service options. I replaced some expensive wood blinds with ones from Lowe’s and you can’t tell the difference except close up. And if they don’t last as long I can replace them many times, still for less money.
YoungHouseLove says
Thanks for the tip Ann! We’re equal opportunity home improvement store lovers so we’re glad to hear Lowe’s offers the same service and products!
xo,
s
Sara says
I LOVE you guys!!! This post just gave me the courage to tackle my too-long blinds. I installed them two years ago, however they did not come with directions on shortening them.
All these two years I’ve considered trying to shorten them, but was afraid they would never work properly again.
After reading your post I dove in and just cut the cords! It worked! They are still operable!
I’ve only been on your site for a few weeks, and I love it. Thanks so much for all your hard work documenting your home improvement ideas. It is truly motivating and inspirational. I could blab on for a few more paragraphs, but I won’t.
Thank You! Thank You!
Jennifer says
I love this post. Very informative, and the room looks great. Just wondering a couple of things:
– Did you wash the curtain panels prior to hemming?
– How wide are the curtain panels? I’ve read about using 150% to 300% of the width of the window.
YoungHouseLove says
Hey Jennifer,
We didn’t cut our panels width wise so they were about 55″ right off the bolt and that’s how they stayed. We think it’s a pretty standard look that would work on a number of windows (both large and small) so we actually don’t think the whole 150-300% calculation is necessary- although if you wanted to use it for peace of mind then totally go for it!
We also didn’t wash our panels prior to hemming them although we always recommend that with Ikea panels (it loosens them up and makes them more breezy, plus they shrink up a ton in the wash) since this fabric came pre-shrunk. Also because we chose to hem them to be so long that they pool on the floor, we realized that even if they shrink up a bit in the future they’ll still look good (but we’re thinking they probably won’t since they’re already pre-shrunk). Hope it helps!
xo,
s
Cait says
Oh I love this! I have been pondering using the curtain clips and trying something a little beyond just plain ol’ curtains in our living room. You have inspired me to go for it! Your little one has an adorable room! Can’t wait to see all the other details!
Samantha says
Those curtains look great! You have me wondering if I could handle this task myself. I just bought the fabric to match
pillow shams from Etsy – http://www.etsy.com/view_listing.php?ref=vt_related_1&listing_id=39421276.
My only question about the clip-on rings, and it is probably a super obvious one, is does the clip sit right at the top of the fabric? Meaning, do you see or notice the clip, or does it look integrated with the ring and fabric?
Thanks for your help and inspiration! You actually helped me pick the colors for our bedroom makeover :)
Samantha
YoungHouseLove says
Hey Samantha,
You can vaguely see the ring clips in the second photo on our post above (although it’s definitely not a close up) so you’ll see that there are rings of oil-rubbed bronze with a matching oil-rubber bronze clip. These are exposed and you do see them, but they look extremely polished and integrated with the ring and the rod. Just head out to Target where we grabbed ours to see them up close. Hope it helps!
xo,
s
Patti says
I love the off-center window magically becoming centered with your curtain trick … Genius! Also, just another tip to make a hem bond without sewing, for my curtains I used a glue made specifically for gluing leather that bonds like the dickens when it dries. Luvs the room so far!
Sherrie says
Beautiful. Just beautiful. I like how you didn’t feel compelled to sew the curtains either. My husband has used the hem tape before.
I sewed some panels for my office–the material is pretty thick, so hem tape wouldn’t work. It was a little challenge for me. I attempted to sew in a liner, but after reading “Feathering the Nest,” my project has stopped b/c the fabric (already on hand) I planned to use is synthetic and, as Tracy says in the book, could release toxins when heated. Good thing I only started one liner.
I like how your blog banner colors are reflected in the nursery, also. It truly is lovely. I’m excited to see how you’ll pull in that cream color you showed us previously as well. Great combinations.
Dee says
I have thoroughly enjoyed discovering your sight. I grew up in Richmond and now live outside Nashville, so your road trip video to Dallas really made me smile…Your curtains turned out beautifully! I do the same thing in my kitchen. I have a tension rod and a homemade panel hanging over my kitchen sink that I change whenever I “feel like it”…it’s a great way to change the look inexpensively. Gotta love the hem-bond tape. I also ike to cover my kitchen chairs with matching fabric using a staple gun. Voila – new kitchen! Keep up the great work!
Stephanie B! says
TOUCH ME!!!
My biggest turnoff with a guy is when they are SMUG and cocky!!! For instance, when they think they are God’s gift to earth and have been blessed with the most athletic gene, making him into the best athlete alive, even so to put up a good match to MJ… lol, i think i am raving about a recent pick up basketball game with my husbands friend. Whew, now that that is off my chest, bring on the faucet!!
Jen says
The curtains look perfect! Just to note, I’ve had great success with http://www.selectblinds.com – you can order custom sized blinds for a great price (cheaper than Lowe’s and HomeDepot) and I think we got free shipping. We’ve ordered 2″ wood blinds from them twice, and each time they arrived within 3 days! We ordered blinds for a total of 9 windows and each fit perfectly! When you order you can assign a name to each one (bedroom left, kitchen, etc.) which makes it easy for installation.
Love this room, can’t wait to see it all decked out!
Jacki says
I’m wondering where you got your curtain rods from? I’m planning to buy later in the day so thought I will ask you. Thanks!
YoungHouseLove says
On sale at Target along with the rod clips. Hope it helps!
xo,
s