But first, who framed Roger Rabbit? I dunno. I can’t remember how that movie ended. But as for who framed out our hall bathroom mirror? We did.

Putting a dressed up frame around a plain builder mirror is one of the easiest ways to upgrade a bathroom, especially if you’re working with the tile and not doing a total gut job (which we thankfully are in this room since the classic b&w tile is in great shape). It’s actually kind of crazy that we haven’t really tackled this yet (well, we sorta did it here I guess, but this mirror has been naked for the last two years since we moved in).
There are companies out there, like Mirror Mate, who can make it super easy for you – but like the true DIY addicts that we are, we opted to try our hand at making this guy from scratch. It seemed like a pretty straight-forward task, despite the challenge of not having much space around our mirror to actually attach anything. But we’ll get to that later…
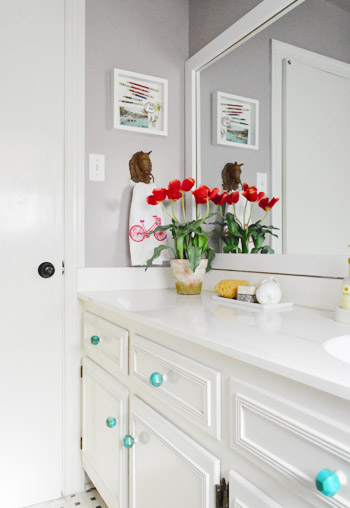
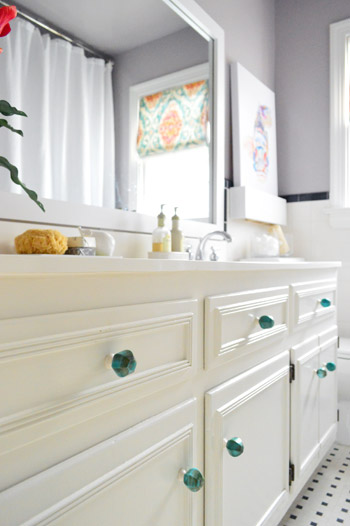
We opted for a super simple frame. After considering some more ornate moldings or window trim, we decided a flat chunky piece of wood would be best (and it’d match the chunky shelf nearby without competing too much with other more interesting items like our patterned window shade or the new vanity knobs). So first we picked up some 1 x 3″ pieces of pine in the lengths that we needed (I believe our total cost was $14). I was too distracted by the cutie in the cart to save my receipt.

I used my miter saw to cut my corners on an angle, but if you are miter-saw-less you can also do a simpler frame that’s kind of like this chalkboard frame that we built instead.
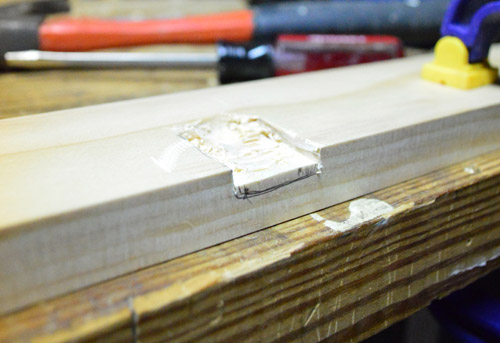
Another challenge of this project was to make the frame rest over the plastic clips that hold the mirror to the wall. No challenge that a little routing couldn’t handle, right? So first I marked where I need to notch out the wood so that the clips would rest inside and the wood could lay flush against the mirror. I decided to be generous with my notches so I’d have some wiggle room when placing the mirror, which is why they’re about twice as tall and twice as wide as the clips themselves.
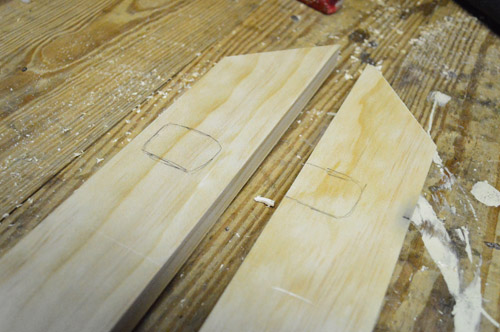
If you rolled your eyes at the word “router” and said “well great, I don’t own no stinkin’ router” – you’re in luck. My router broke so I didn’t have one at my disposal either. So here’s the really simple (but not quite as pretty) way to get those notches:
- I used a Dremel to make small grooves on all sides of my marked notch, just so I’d get a relatively clean edge. This step is TOTALLY OPTIONAL. I only did it because I’m particular. So if you don’t have a router OR a Dremel you’re still ok.
- Use a small drill bit to make some not-too-deep pilot holes, fairly close together (see, if all you have is a drill you’re cool).
- Follow up by going into each pilot hole with a much bigger bit so the holes begin to run into one another.
- Use a flathead screwdriver and hammer to gently chip or pry away any chunks the drill didn’t get.
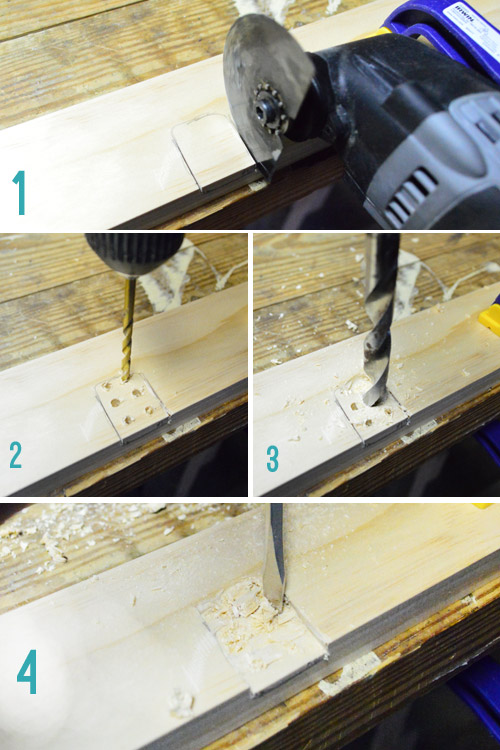
Again, not the prettiest result. But for a simple shallow notch like this (which won’t be seen by anyone but the plastic clip itself) it does the job. Oh, and this one goes along the bottom of the frame which is why my notch won’t be seen even though it goes all the way to the edge of the wood.
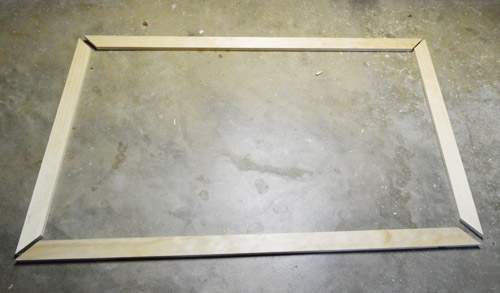
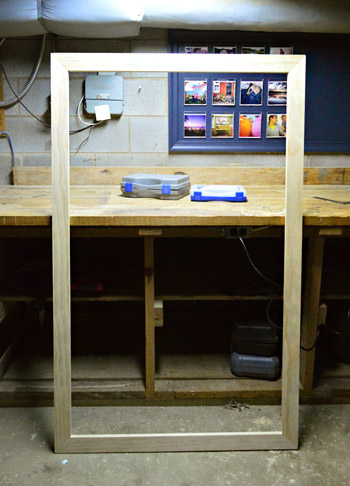
Once all of my notches (four in total) were made, I used my Kreg Jig to make pocket holes and then join my corners together.

And ta-dah, my constructed frame:
Before painting it, we brought it inside to make sure it fit and looked square and everything. This picture below gives you a better sense of how my unpretty notches will fit up against the clips (while still not being visible to anyone once the frame is in place).
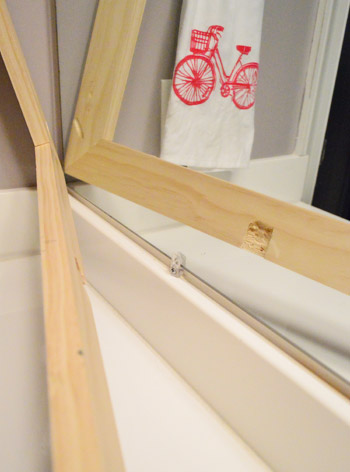
It fits!
Fast forward about a day and I primed and painted the frame white (Decorator’s White by Benjamin Moore in semi-gloss, using a small foam roller for a smooth result). While we were at it, we also painted the previously-grey-washed shelf in the background so everything would match (which Sherry mentioned in this post).
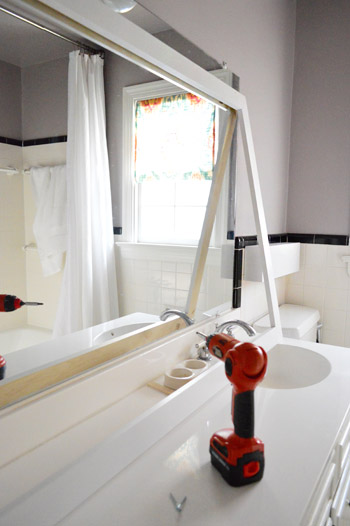
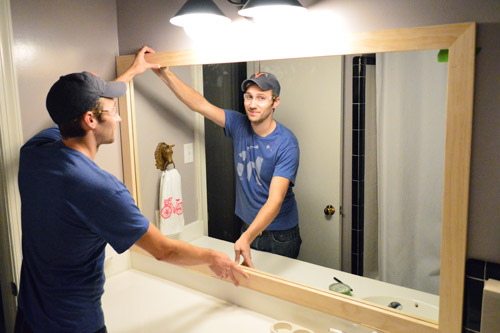
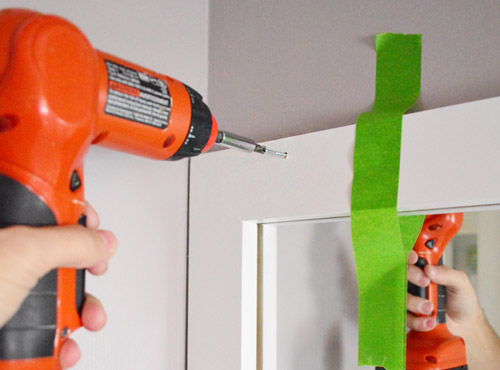
I’ve seen other folks do this project where they simply use some heavy duty caulk or construction adhesive to straight up stick their frame to the mirror itself. But since my last attempt at gluing something to a mirror made me wary of that trick, I wanted to rely on a few strong & secure screws instead. So when we measured and cut our frame we made sure it overlapped the top edge of the mirror (the only edge without a wall, the counter, or some tile in its way). That meant I could drive a couple of screws through the frame and into the wall without being anywhere near the mirror to make sure the frame wouldn’t come crashing down on us. The whole contraption was pretty light, so it didn’t have to be too heavy duty.
And then just to make sure the bottom of the frame didn’t flap out or anything, we put a couple of dots of silicone caulk between the frame and the mirror just to hold it in place (we taped the frame down along the bottom until the caulk dried so it would hold it firmly for the long haul).
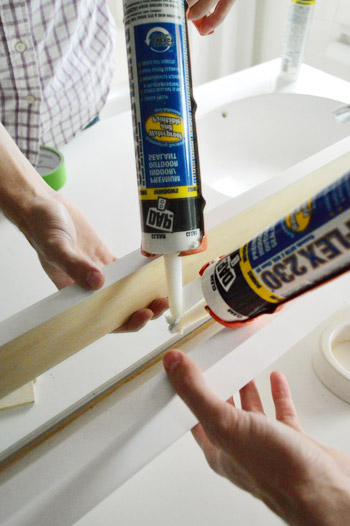
That was a few days ago and we’ve since removed the tape and even given Clara a few baths in there and it’s still holding strong. Whew.
When all was said and done caulked and dried, we just filled those two screw holes with wood putty and painted them so they weren’t obvious. Then it looked a little something like this.
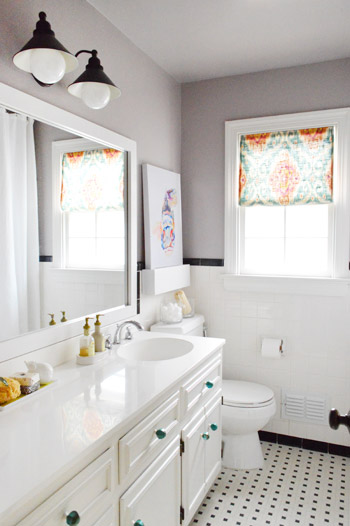
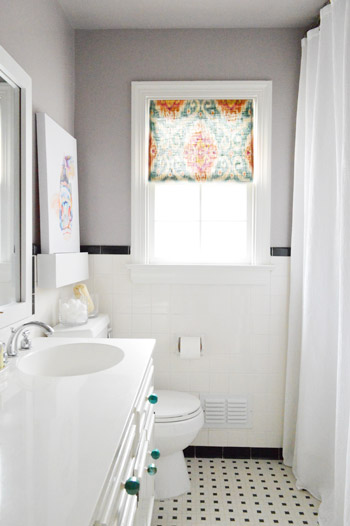
Isn’t it such a cleaner and more finished look than this before-the-frame shot?
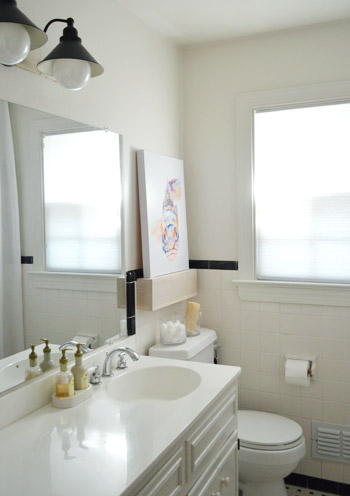
Even for a not-very-fancy frame, we’re pretty darn pleased with how it polished off that big unpolished beast in the room. And weirdly enough, in person it makes the room feel taller since it somehow draws your eye up more than the frameless mirror used to. Which is a nice balanced look since we have an extra tall shower curtain on the other side of the room.
So blammo. New mirror frame for a total of $14 and about three hours of time if you count all the building, chipping out notches, priming, and painting.
And since that officially wraps up the last project on this portion of our bathroom upgrade, shall we do a quick budget breakdown? I think we shall.
The total mini-update came in well under our mental budget of $200 (which is mainly just a random low number that we throw out when we don’t feel like calculating a specific budget and we’re not doing anything major like replacing tile).
- New light fixture: $61 (from Joss & Main)
- Shelf: $6
- Paint (a quart of Elephant Gray by Benjamin Moore): $24
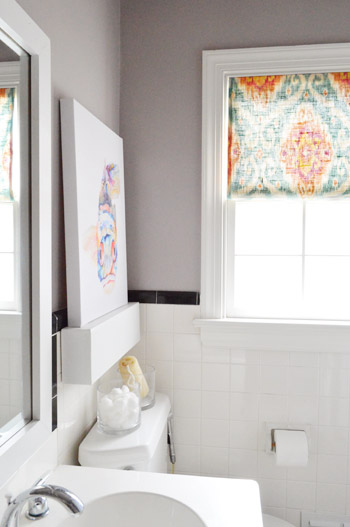
- Fish art: $30 (from Joss & Main)
- Knobs: $17 (from Hobby Lobby)
- Window shade: $16 for yard of the fabric we used from Mary Jo’s (although we only used $8 worth, so Sherry has leftovers)
- Window frosting: $0 (leftover from other project)
- Mirror frame: $14
- Shadowbox: Already made
- Accessories: Already owned
- TOTAL: $168
*(if you didn’t already have a shadowbox, window frosting, and some accessories, you might spend an additional $30-40 for a total of 200-ish beans)
If we had to pick the stars of the room, though, it’d totally be the window fabric paired with the fish art. Both just wake things up and made us feel good about going pretty neutral on everything else.
So there you have it. We can officially close the books on this bathroom for now. Although there’s still another untouched bathroom on the to-do list (I’m talking ’bout you, guest bathroom).
And now, much like The Talking Dead takes a fond look back at each zombie who is killed (please tell me you guys watch that), we shall take a fond look back at the bathroom that greeted us when we moved in back in 2010 (sorry about the bad lighting, Sherry grabbed the picture right as we pulled up in the moving truck before we carried in about five million boxes).
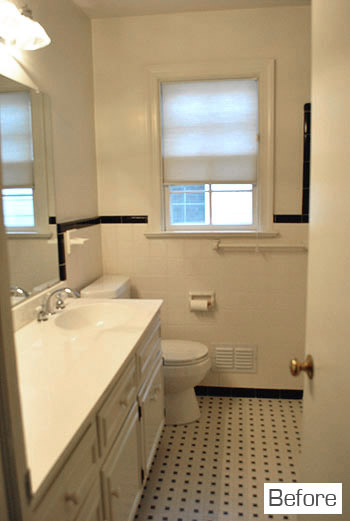
I have to say, I think this room’s $168 upgrade is one of my favorite inexpensive room redos that we’ve done here. Doesn’t the after shot almost feel like it could be a completely new bathroom even though we worked with the original 1960’s tile?
What under-$200 upgrades are you guys doing around the house? Is anyone else making mirror frames or floating shelves or other semi-straightforward projects for the loo? Sidenote: I think Sherry’s favorite line in our entire book was “who doesn’t enjoy a gussied loo?.” So there you have it, a window into my quirky wife’s soul and a post about framing our bathroom mirror.
Update – Wanna know where we got something in our house or what paint colors we used? Just click on this button:


Katie G says
I liked the gray-washed shelf, but I love it painted white. Fits in so much better!
Shanna says
Great inexpensive upgrade!
I am dying to do something with our master bath..all the fixtures and even the shower framing are an awful brass color that doesn’t even match the rest of the house. Do you guys know if there are any shortcuts I can use to update without replacing everything? I’m praying there’s some kind of miracle spray paint that I just haven’t found yet!
YoungHouseLove says
I’ve heard of bloggers like the DIY Showoff spraying them with ORB paint to redo them! With fixtures you just want to tape off where the water goes through so you don’t have it running over spray paint (it can taint the water) but it seems to work for handles and the outside of the spout, etc. Maybe check pinterest for the tutorial?
xo
s
Jen E. says
It CAN be done, but for me, once I saw the amount of prep work involved (ie, shower frame) I decided not to bother. Here is my favorite example, and check out the link at the end for the full before and after:
http://www.addicted2decorating.com/d-i-y-project-how-to-paint-a-bathroom-faucet-shower-enclosure.html
YoungHouseLove says
Wow- that’s a ton of work but it looks awesome!
xo
s
Kate H. says
The most important thing I have gleaned from this post is that you watch the Walking Dead. Yes, yes, so does a good percentage of our generation, but still. I always fall asleep in the middle of Talking Dead.
Oh, right, but back on subject. Love the bathroom. I love bright color and lots of pattern, and you guys are appealing to my style.
YoungHouseLove says
Haha thanks Kate!
xo
s
Amber says
Oh you guys have done it again! This little DIY looks fabulous and gives me great hope that our hallway bathroom can transform (almost) as wonderfully as yours. Thanks for the great how-to. Putting this on my to-do list.
Also, a huge thanks for explaining how to do some of the parts without very specific tools. We’re still adding to our tool box, so I appreciate you pointing out that routers/dremels/miter saws are not must-haves.
YoungHouseLove says
Happy to help Amber! Good luck with everything.
-John
Alison says
Christopher Lloyd as a puddle of goo. That’s how it ended. Truly, a very clever movie. It’s been too long since I re-watched it.
YoungHouseLove says
Hahah!
xo
s
Autumn says
Ok, I am officially inspired! We built our house last summer (2011), and couldn’t find mirrors we liked for the bathrooms, so we put up plain mirrors with the intention of doing this! But… Haven’t changed a thing. Boo! Now that I can see how much better it will look I’m thinking “dude, get on that already!” :-)
Julia @ This Idiot's Guide says
I’ve been waiting for this post ever since you mentioned you had plans to frame out that mirror! We have a similar giant beast of a mirror in our master bathroom that I’ve wanted to frame out (but I of course had no idea how to go about doing that), so I’m glad to finally have some tips on how to make that happen! Thanks for sharing – it looks great!
jackie says
I’ve been waiting fo this post! Looks awesome. What is the countertop material in the bathroom? Marble?
YoungHouseLove says
We actually thin it’s white corian, which is funny since that’s what we installed in the kitchen!
xo
s
Candice says
Love your DIY mirror frame! When we upgraded our bathroom mirrors (3) we went with the beveled mirror frames (not cheap or DIY). We took the plastic clips off because the mirrors were glued to the wall and weren’t going anywhere!
Isabelle says
Hello! I’m probably not your average reader… (24, single, live in an apartment) but I follow you guys every day! I haven’t yet attempted much DIY other than being inspired by some of the small art/craft/decorating projects you do, since I am renting in an apartment.
BUT, this post is kicking me into action! My parents have an unframed mirror in one of their bathrooms and I think my dad has the right tools… Doing a little DIY upgrade for the ‘rents for Christmas? I think YES! Wish me luck! I’ll try to send a picture upgrade :-)
Thanks for always making my morning commute bearable… You guys are the best!
YoungHouseLove says
That’s so sweet! Sending lots of luck your way!
xo
s
Amy says
Thank you so much for this tutorial! I was waiting for this post before I tackled my own mirror. I guess I will be getting a Kreg Jig (once I fully figure out what it does). By the way, have you seen this tutorial on using washers to get around the mirror clips? http://www.somewhatsimple.com/how-to-frame-your-bathroom-mirror-over-plastic-clips/
YoungHouseLove says
So smart!
xo
s
Monica says
Looks great!
After my father-in-law passed away last summer, my husband and I were cleaning out his workshop and deciding which tools to store away for our future home. I saw a Kreg Jig on the pegboard and told him we needed to keep that. My husband asked what it was and I said, “I’m not really sure, but John and Sherry on YHL use it all the time so it must be useful!”
Oh, and that picture of Clara is just adorable :)
YoungHouseLove says
Aw that’s so sweet Monica! I’m sorry for your loss.
xo
s
Casey says
It looks SO GOOD! Also, I’m in LOVE with that Elephant Gray. IN.LOVE. If I ever have a girl, she’s getting an elephant gray room. For sure.
We framed out our bathroom mirror a few years ago and I couldn’t believe what a difference in made. Such a big payoff for such a simple project.
YoungHouseLove says
Amen, it’s the best color! I am sad I didn’t discover it for Clara’s nursery. Oh well, we can always repaint! Hahah!
xo
s
Jessalyn says
mirror frame looks great! way to go!
i actually had a question about receipt saving, since John casually mentioned he didn’t save the receipt for the wood, and your budget for this room was a “mental estimate:” i’ve heard that you should save all your receipts whenever you do a big project to the house so that when you sell the house, you can get tax breaks for the cost of the money you put into the house? is that true? how does it work, and are there certain projects that you all do this for and others that you don’t? i suppose it’s nice writing about it on the blog because you definitely document the work that was done and the money that went into it. just curious! thanks!
YoungHouseLove says
It might vary by state/locality but here in Richmond we can’t write off any home updates unless they meet certain energy savings quotas (so even though we blog for a living about DIY, our house isn’t our “business” it’s our primary residence, so we don’t write off anything because then when/if we sell we won’t owe the government a big chunk of money like we would if we billed it as our “office” instead of our primary residence).
xo
s
heather says
Any large improvements you do to the house, that become a permanent part of the house (i.e. addition), can (typically) be figured into the house cost when you sell it. It helps bring down your gain so you don’t pay as much tax. I.E. Basis of the house is $250,000 sells for $650,000 realizing a gain of $400,000. Proof you put $100,000 into the house permanently leaves a gain of $300,000 to be taxed on. Keep in mind there is a threshhold (currently) on which your profits won’t be taxes, but I don’t remember what it is. In other words, you don’t keep receipts to write off upgrades in the current year, you keep receipts to help prove basis + capital improvements when you sell the house to help reduce the taxes paid (if any) on your gain (if above a certain threshhold). Rules and regulations are always changing so you always want to consult a professional – but that’s the basic theory behind saving those receipts.
Ow. Tax brain just came back after a few years away from doing them. It turns out some of that stuff just sticks in your head.
It hurts. Must go design something now.
heather says
(P.S. This article might help explain it more, and what constitutes a repair versus a capital improvement.)
http://www.houselogic.com/home-advice/tax-deductions/tax-breaks-capital-improvements-your-home/
YoungHouseLove says
Thanks Heather! So interesting!
xo
s
Elizabeth says
Love it! Do you think it would stay up with command strips? I rent so I don’t want to make any unnecessary holes if I don’t have to.
YoungHouseLove says
Hmm, it’s not super heavy but not as light as a small picture frame or anything, just because it’s so big. Maybe check the weight limit on command strips and see if they can do it?
xo
s
Meredith says
I wouldn’t! 5 lbs. is usually the heaviest. I tried to use them on a heavy-ish picture frame and it came shattering down—that would be disastrous on a mirror! (Think of all that bad luck…) :)
YoungHouseLove says
Eeks! That would be scary!
xo
s
annabelvita says
You could use something really light like balsa wood?
Samantha Horseman says
LOVE the result of this! The cabinetry knobs make it so unique and I really want to attempt the window treatment :) in a hopefully similar fabric! Great job and p.s. it was fabulous meeting you guys @ mongrel on Sunday (should have a post on my blog soon about it)
YoungHouseLove says
Aw we had the best time Samantha! Thanks so much for coming out!
xo
s
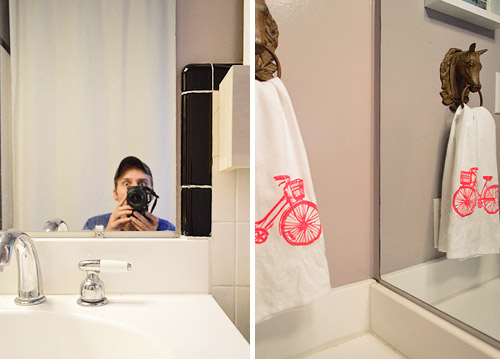
Steph says
I LOVE the left side of this bathroom. The black and white tile, the crisp white countertop, the horsehead towel hanger with the red tulips and the framed mirror – it totally belongs in a glossy design mag.
I am not in love with the right side of the bathroom, however, but I know it’s your house and if you like it, that’s all that matters. I just feel like the turquoise knobs, the goldfish print and the roman shade really compete and take away from the clean, crisp overall aesthetic going on in there.
Overall – the updates are great, though. Good job, guys!
Olivia says
Wow, what a big difference a frame makes. I can’t believe it – looks wonderful!
Brenda says
Some of my favorites are when you do simpler room makeovers like this one. I love the balance of white and color, and the frame is totally the icing on the cake.
Katy says
The frame looks AMAZING! I feel like I need to do some more home improvement things but I feel swept up into the holiday spirit already. How is it only December 4th but whenever I walk into a store I feel likes it Christmas Eve? I must admit some of the feeling may be my own fault. I’m making these headbands so glitter and Christmas is constantly surrounding my shopping! http://www.etsy.com/shop/TheSheaShoppe?ref=si_shop Anyways, I think I need to go do some manly things soon, maybe I will go sledgehammer something! That seems uber manly!
~Katy
YoungHouseLove says
Hahah!
xo
s
Meghan P says
The bathroom looks so great!!
My husband recently framed our bathroom mirror and did biscuit joints for screw-free corners!
YoungHouseLove says
Really smart!
-John
LDD says
You guys!!! I knew there had to be a way to work around the plastic clips, and I really appreciate you figuring a way to do it with ordinary tools, ’cause I don’t own no stinkin’ router (that was funny). Plus I don’t want to spend the $$ on a premade frame. Thank you!!
Laura D says
The bathroom makeover looks great. I love how relatively small changes totally transformed the room. I also liked John’s slightly psychotic photo looking over the top of the camera in the mirror. Almost like “The Shining” but in a good way. :)
YoungHouseLove says
Hahah, mah man can make some awesome faces.
xo
s
Amber says
Such a great upgrade! I’ve got a mirror that seriously needs this treatment too.
Lil says
Awesome. I’m totally doing this to my bathroom. I’m also going to use your “Clara’s Christmas Kitchen” post as a guide for making my peanut’s Christmas kitchen. Thank you for the inspiration and “how to”.
YoungHouseLove says
Aw, good luck Lil!
xo
s
Ashley@AttemptsAtDomestication says
I love the mirror framed! I really want to do the same thing in our bathrooms! And now I have a bit of a tutorial for the hubby to follow ;)
Anika says
The difference between the before and after pictures is really impressive, especially when you consider that it was all cosmetic changes. I love this type of blog post with simple, straightforward, and easy upgrades. And I can’t believe what a huge difference framing the mirror made – I’m a total convert now!
Thanks for sharing such a range of projects with us all!
YoungHouseLove says
Aw, of course Anika! We love all projects – big and small :)
xo
s
Adam says
You’re a genius dude. I’ve been wondering how to frame our mirror in it’s rather tight confines. This may just be the ticket…
Crystal says
great job yet again, Dynamic Duo!
Dana says
Looks great!! What a difference!
Nicole @ Liberty Belles says
looks awesome! for such a low total spend (most of which was a light fixture + paint too!) the difference is impressive. that is totally an HGTV type improvement – super inexpensive with fantastic bang for your buck!
Janice says
Nice room redo, on a budget! And so glad you painted the shelf. It’s been driving me crazy. Am a little worried about the pretty fabric fading quite quickly, with no liner.
YoungHouseLove says
Don’t worry Janice! We’ve had patterned curtains in the giant picture window in our dining room for 1.5 years and it’s not fading at all! We have a very shady tree-riddled neighborhood!
xo
s
Morah says
It looks so good. And your timing is perfect, I’ve been itching to do the same to my bathroom mirror and now I’m totally empowered to do so! Nicely done, as always.
Val says
Ahhh! My heroes!! I’ve been anxiously awaiting this post because the giant mirror in my bathroom has the same issue – no clearance on the bottom and sides. And I would like to add that you got around the problem in exactly the way that I would have, but now that you have put it in action, I can finally convince the hubs that it will work. Thanks for the validation, guys. BAM! (Yes, I got so excited that I just “bam”ed…how embarrassing…)
YoungHouseLove says
Hahaha, I love it. Never stop “bam”ing.
xo
s
Lucy says
I was trying to figure out how to build a frame around our medicine cabinet mirror, and I’m thinking I’ll actually use the mirror clips to hang the frame on the mirror. I’ve seen a lot of discussion of using adhesive, but, given that this will be swinging back and forth regularly, I think a clip might hold better. Your before and after shots definitely make me even antsier to get this done (which, you know, means it will still be at least another 6 months…). We want to redo the bathroom at some point (it’s very similar to your first house’s pre-renovation), but know that will still be some time away.
Megan @ Two Live Colorfully says
I love how the bathroom tuned out!!! I think my favorite part is the paint color. I feel like it can be hard to get purple right but this looks so fantastic! It not over bearing but it’s bright enough to be noticed!! Really great job!
Todd Kelly says
Thanks, S&J, this is exactly what I needed! I was planning on doing this to our bathroom mirror, but didn’t know where to start. And now I have a new tool to buy as well (the jig). I love new tools. I’m excited for my vacation day this Friday :)
Heather says
We’re doing this at some point this week! Bathroom gutting has been…an experience to say the least. I should have the progress posted on my blog later tonight if you feel like checking it out :-)
YoungHouseLove says
Aw, good luck Heather! And we’d love to check it out tonight!
xo
s
Kim @ Yellow Brick Home says
Hey, guys! Just a quick question.
We tried to do the same thing with our builder bathroom mirror, and we couldn’t get the wood frame to stick to the mirror using glue (just like your full length mirror experience). In any case, of course! Screws at the top! Sheesh, so simple and effective.
Anyway, my question is this: I noticed you didn’t paint the back of the frame. We didn’t either, and for the day our DIY frame stayed in place in our bathroom (until we nixed the whole idea), it drove us NUTS that you could see the reflection of the back of the frame just the tiniest bit – and it was just plain, raw wood.
Do you notice this, too?
YoungHouseLove says
Thankfully since the pine is really light wood it actually looks painted in the reflection (it’s sort of a shaded crack so it’s hard to make it out very well). Maybe it has to do with how tight you can get it (the closer it butts up against the mirror, the thinner that crack will be). Hope it helps!
xo
s
Christina @ Homemade Ocean says
Holy smokes….what a difference a couple pieces of wood can make!
Putting this on my to-do list asap!!!
Kate says
Ooooh, thank you so much for posting about how you chipped out the spaces for the clips! I’ve been thinking about how I could frame our mirrors – all three bathrooms have the mirrors held up with a long vertical metal channel at the bottom, which almost touches the top of the backsplash. I’m thinking maybe I could chip out the bottom along the entire length of the board to accomidate for it. I also love the screws at the top instead of gluing it to the mirror, I kept being concerned about the idea of wanting to remove it later and then being stuck with it (though it might still be hard since you’d have to putty over the screws).
Emily-Jane @ Not A House, But A Home says
Wow, that looks great! I can’t believe how inexpensive the makeover was! I need to send this post to my mom so she can do this to the bathrooms in her house. All of the mirrors in her house are frameless… I bet she’d love to know how easy it is to make them look a million times better lol
Sherri says
We’re looking at doing this project in the next couple of weeks. I’ve read that you need to paint the back of the frame as well as the front because the reflection in the mirror will show an unpainted back. Did ya’ll (yes, I’m from TX) paint the back? If not, can you see the unpainted back in the reflection of the mirror?
Thanks for this timely post!
YoungHouseLove says
We actually didn’t but its a great tip! Ours is installed so close so there’s not much of a reflection of the back (since we routed out those clips so there’s just sort of a shaded crack that looks painted since it’s light pine, which is a really blonde wood tone).
xo
s
emilymarion says
AHHHH! Finally! I have been patiently waiting for this post (and your tv/entertainment console solution!) I have two massive frame-less mirrors that have been driving me crazy. I wanted to see what you guys came up with, because I knew it’d look fabulous and be affordable. I wasn’t sure what to do with plastic holders either. Although, I did gaze lovingly at bordered tile mirrors via Pinterest whilst I waited.
YoungHouseLove says
Haha, glad to finally get it up here for ya!
xo
s
Diana Maria says
So pretty y’all!
Robin says
This is one of my favorite updates you’ve done. I’m in love. I am really digging the floor tile in there and considering using something similar in my upcoming bathroom remodel. It’s hard to see, what color is the grout in there, and how is it holding up after being installed for so long? (50 years, right?!?) My instinct would be to go light gray, but gosh, darker seems like a more maintainence friendly choice.
YoungHouseLove says
It’s so super bright white! We actually think it was reglazed before we bought the house since it’s so clean looking!
xo
s
Jenny says
So great! I have a question though. We keep wanting to do this, but for some reason I am afraid to do something that cannot be undone later. We are confident about patching dry wall, so I like the screws, but all the tutorials for this I have seen use caulk or some sort of glue on the mirror. Is that reversible later? Or will it leave a permanent mess? Just curious! Thanks!
YoungHouseLove says
Oh yes, if you secure it at the top with screws and just unscrew them you can hinge the mirror out into the room and use an exactly knife to cut the silicone caulk (which just peels right off the mirror).
xo
s
Desiree C. says
What a difference! Though, it makes me ever so slightly jealous. But not in a bad, negative way. In our bathroom, we have a built-in medicine cabinet (similar to this shape: http://www.houzz.com/photos/903133/Scallop-Top-Small-Recessed-Medicine-Cabinet-contemporary-medicine-cabinets-) with a mirror that is rectangular and slides into supporters in front of the cabinet. I plan on having the mirror cut at the top to match the curves of the cabinet, but would also like to frame it some how. I would imagine the curves of the mirror would make framing it (if possible) rather expensive, so I’m thinking of etching the edges to create a “mock” frame. Would that look incredibly ridiculous? The house is a 50s ranch (!!) and we’d love to not venture too far away from it’s originallity, but at the same time, we want to update and modernize.
YoungHouseLove says
I don’t think it sounds ridiculous! I would give it a try!
xo
s
Misty says
What a difference a few changes made! It’s beautiful guys!! Well done!
We have two builders mirror to frame out this holiday season! I cannot wait!!!
Jerri says
Love everything you two have done in this bathroom! And, loving that you’re Walking Dead / Talking Dead fans, too! I loved you more when you revealed you are Dexter fans. What about American Horror Story?!
YoungHouseLove says
Heck yeah!! Um, and how good was the Adam Levine cameo? So good.
xo
s