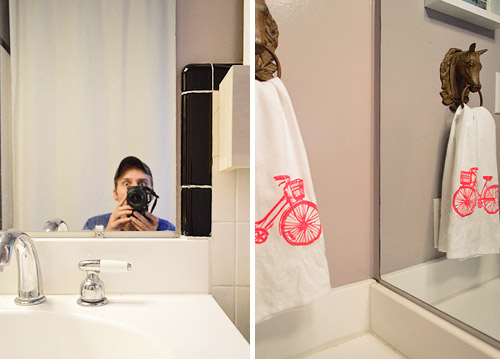
But first, who framed Roger Rabbit? I dunno. I can’t remember how that movie ended. But as for who framed out our hall bathroom mirror? We did.

Putting a dressed up frame around a plain builder mirror is one of the easiest ways to upgrade a bathroom, especially if you’re working with the tile and not doing a total gut job (which we thankfully are in this room since the classic b&w tile is in great shape). It’s actually kind of crazy that we haven’t really tackled this yet (well, we sorta did it here I guess, but this mirror has been naked for the last two years since we moved in).
There are companies out there, like Mirror Mate, who can make it super easy for you – but like the true DIY addicts that we are, we opted to try our hand at making this guy from scratch. It seemed like a pretty straight-forward task, despite the challenge of not having much space around our mirror to actually attach anything. But we’ll get to that later…
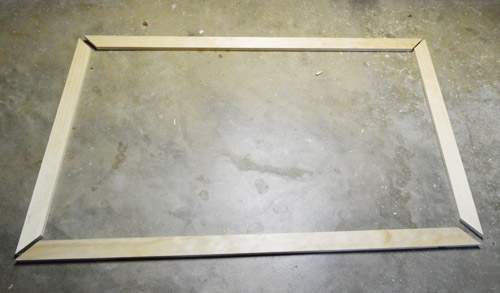
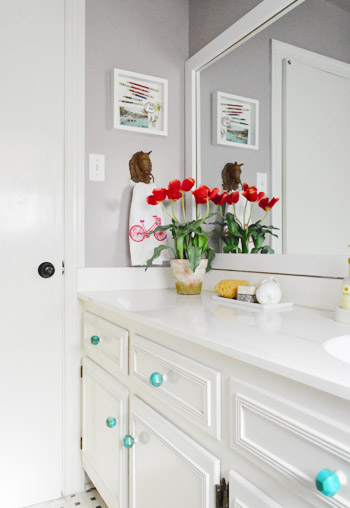
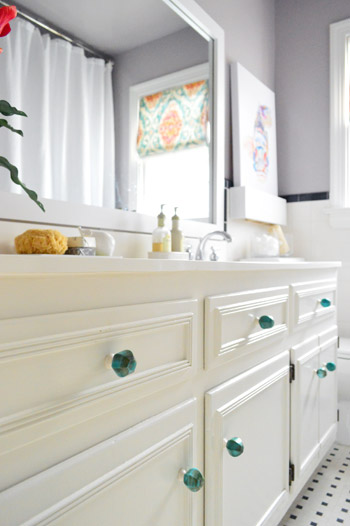
We opted for a super simple frame. After considering some more ornate moldings or window trim, we decided a flat chunky piece of wood would be best (and it’d match the chunky shelf nearby without competing too much with other more interesting items like our patterned window shade or the new vanity knobs). So first we picked up some 1 x 3″ pieces of pine in the lengths that we needed (I believe our total cost was $14). I was too distracted by the cutie in the cart to save my receipt.

I used my miter saw to cut my corners on an angle, but if you are miter-saw-less you can also do a simpler frame that’s kind of like this chalkboard frame that we built instead.
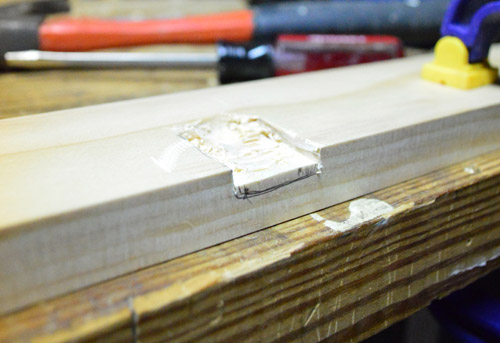
Another challenge of this project was to make the frame rest over the plastic clips that hold the mirror to the wall. No challenge that a little routing couldn’t handle, right? So first I marked where I need to notch out the wood so that the clips would rest inside and the wood could lay flush against the mirror. I decided to be generous with my notches so I’d have some wiggle room when placing the mirror, which is why they’re about twice as tall and twice as wide as the clips themselves.
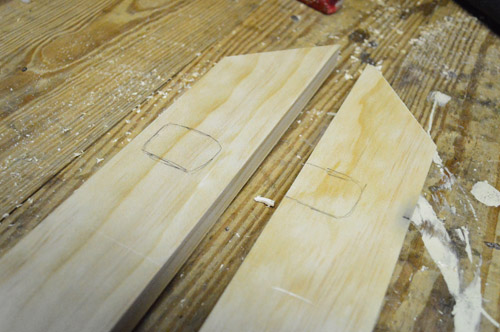
If you rolled your eyes at the word “router” and said “well great, I don’t own no stinkin’ router” – you’re in luck. My router broke so I didn’t have one at my disposal either. So here’s the really simple (but not quite as pretty) way to get those notches:
- I used a Dremel to make small grooves on all sides of my marked notch, just so I’d get a relatively clean edge. This step is TOTALLY OPTIONAL. I only did it because I’m particular. So if you don’t have a router OR a Dremel you’re still ok.
- Use a small drill bit to make some not-too-deep pilot holes, fairly close together (see, if all you have is a drill you’re cool).
- Follow up by going into each pilot hole with a much bigger bit so the holes begin to run into one another.
- Use a flathead screwdriver and hammer to gently chip or pry away any chunks the drill didn’t get.
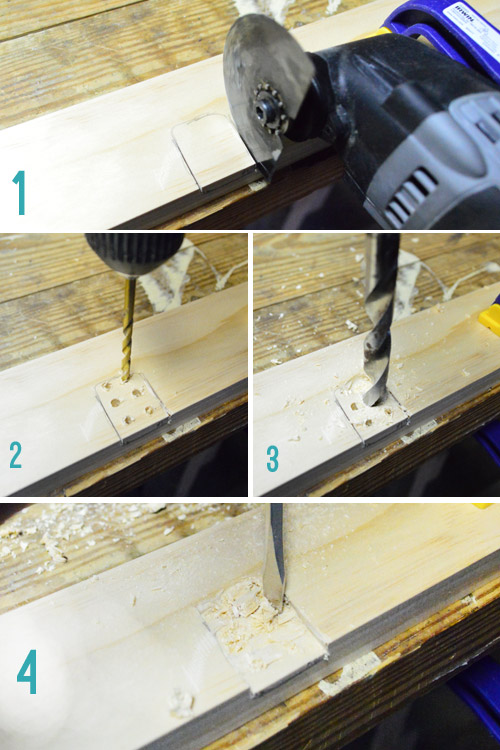
Again, not the prettiest result. But for a simple shallow notch like this (which won’t be seen by anyone but the plastic clip itself) it does the job. Oh, and this one goes along the bottom of the frame which is why my notch won’t be seen even though it goes all the way to the edge of the wood.
Once all of my notches (four in total) were made, I used my Kreg Jig to make pocket holes and then join my corners together.

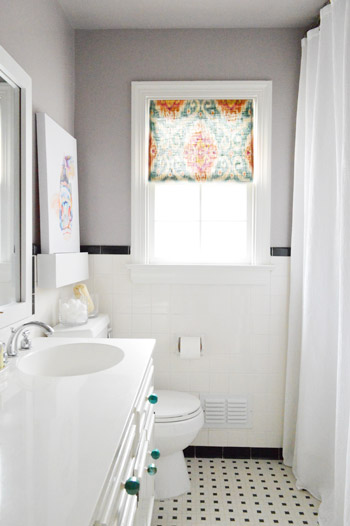
And ta-dah, my constructed frame:
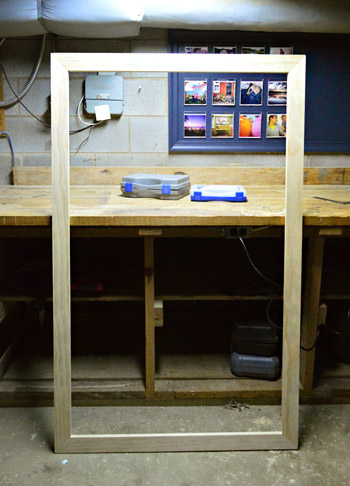
Before painting it, we brought it inside to make sure it fit and looked square and everything. This picture below gives you a better sense of how my unpretty notches will fit up against the clips (while still not being visible to anyone once the frame is in place).
It fits!
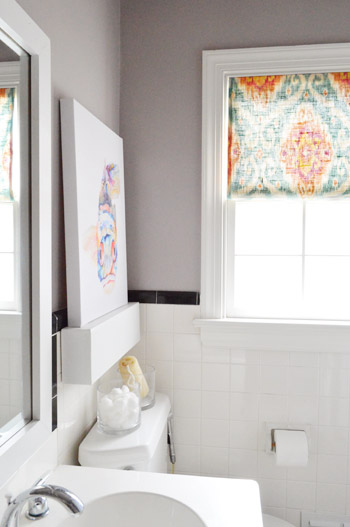
Fast forward about a day and I primed and painted the frame white (Decorator’s White by Benjamin Moore in semi-gloss, using a small foam roller for a smooth result). While we were at it, we also painted the previously-grey-washed shelf in the background so everything would match (which Sherry mentioned in this post).
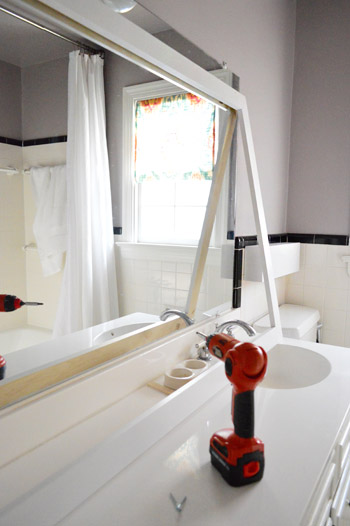
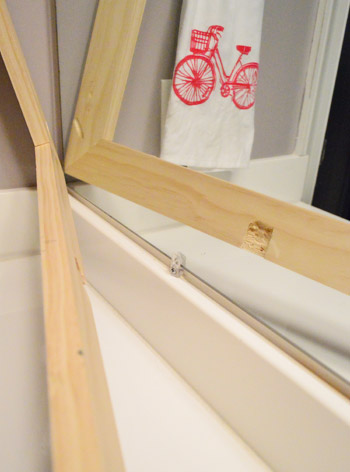
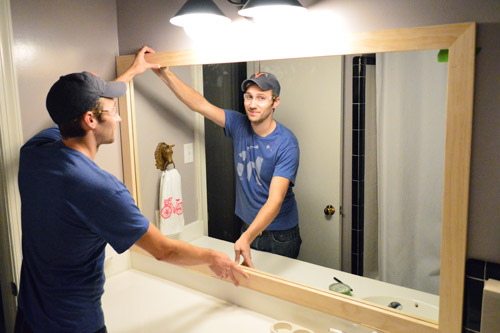
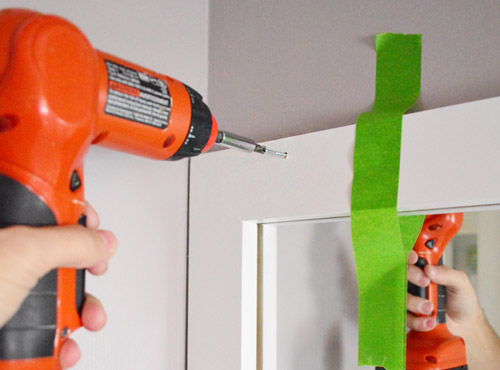
I’ve seen other folks do this project where they simply use some heavy duty caulk or construction adhesive to straight up stick their frame to the mirror itself. But since my last attempt at gluing something to a mirror made me wary of that trick, I wanted to rely on a few strong & secure screws instead. So when we measured and cut our frame we made sure it overlapped the top edge of the mirror (the only edge without a wall, the counter, or some tile in its way). That meant I could drive a couple of screws through the frame and into the wall without being anywhere near the mirror to make sure the frame wouldn’t come crashing down on us. The whole contraption was pretty light, so it didn’t have to be too heavy duty.
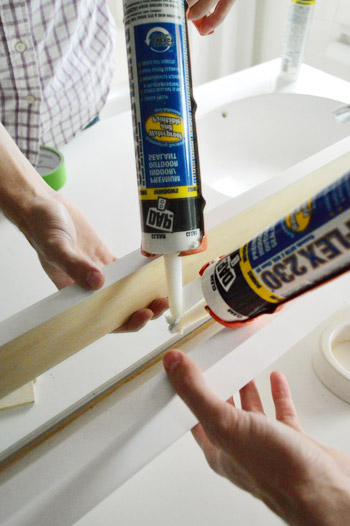
And then just to make sure the bottom of the frame didn’t flap out or anything, we put a couple of dots of silicone caulk between the frame and the mirror just to hold it in place (we taped the frame down along the bottom until the caulk dried so it would hold it firmly for the long haul).
That was a few days ago and we’ve since removed the tape and even given Clara a few baths in there and it’s still holding strong. Whew.
When all was said and done caulked and dried, we just filled those two screw holes with wood putty and painted them so they weren’t obvious. Then it looked a little something like this.
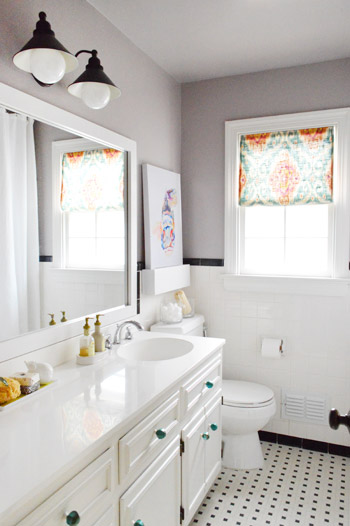
Isn’t it such a cleaner and more finished look than this before-the-frame shot?
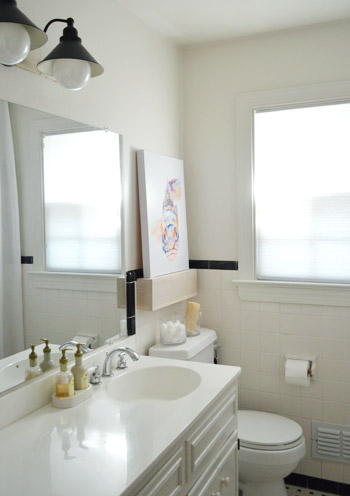
Even for a not-very-fancy frame, we’re pretty darn pleased with how it polished off that big unpolished beast in the room. And weirdly enough, in person it makes the room feel taller since it somehow draws your eye up more than the frameless mirror used to. Which is a nice balanced look since we have an extra tall shower curtain on the other side of the room.
So blammo. New mirror frame for a total of $14 and about three hours of time if you count all the building, chipping out notches, priming, and painting.
And since that officially wraps up the last project on this portion of our bathroom upgrade, shall we do a quick budget breakdown? I think we shall.
The total mini-update came in well under our mental budget of $200 (which is mainly just a random low number that we throw out when we don’t feel like calculating a specific budget and we’re not doing anything major like replacing tile).
- New light fixture: $61 (from Joss & Main)
- Shelf: $6
- Paint (a quart of Elephant Gray by Benjamin Moore): $24
- Fish art: $30 (from Joss & Main)
- Knobs: $17 (from Hobby Lobby)
- Window shade: $16 for yard of the fabric we used from Mary Jo’s (although we only used $8 worth, so Sherry has leftovers)
- Window frosting: $0 (leftover from other project)
- Mirror frame: $14
- Shadowbox: Already made
- Accessories: Already owned
- TOTAL: $168
*(if you didn’t already have a shadowbox, window frosting, and some accessories, you might spend an additional $30-40 for a total of 200-ish beans)
If we had to pick the stars of the room, though, it’d totally be the window fabric paired with the fish art. Both just wake things up and made us feel good about going pretty neutral on everything else.
So there you have it. We can officially close the books on this bathroom for now. Although there’s still another untouched bathroom on the to-do list (I’m talking ’bout you, guest bathroom).
And now, much like The Talking Dead takes a fond look back at each zombie who is killed (please tell me you guys watch that), we shall take a fond look back at the bathroom that greeted us when we moved in back in 2010 (sorry about the bad lighting, Sherry grabbed the picture right as we pulled up in the moving truck before we carried in about five million boxes).
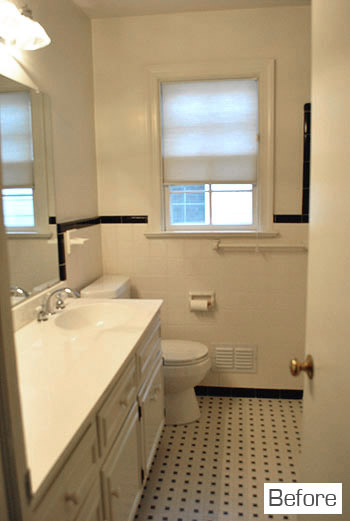
I have to say, I think this room’s $168 upgrade is one of my favorite inexpensive room redos that we’ve done here. Doesn’t the after shot almost feel like it could be a completely new bathroom even though we worked with the original 1960’s tile?
What under-$200 upgrades are you guys doing around the house? Is anyone else making mirror frames or floating shelves or other semi-straightforward projects for the loo? Sidenote: I think Sherry’s favorite line in our entire book was “who doesn’t enjoy a gussied loo?.” So there you have it, a window into my quirky wife’s soul and a post about framing our bathroom mirror.
Update – Wanna know where we got something in our house or what paint colors we used? Just click on this button:


Anele @ Success Along the Weigh says
Look how just framing that out makes it look 100x better! More finished! Now I’m off to Joss and Main, our bathroom light fixture is getting on my nerves and you’ve given me a kick in the rump!
Lyndsay says
Great write up John…very easy to follow. I really appreciated the other options you gave in case you don’t own the fancy schmancy tools. When I leave a reply, what does “Website” mean and do I have to enter anything there? Also…obsessed with “The Walking Dead!” After every episode I am always thinking what we would do or go if the zombies start coming!
YoungHouseLove says
Oh no worries! Website just asks if you have a site or blog you want to link your name to (ex: when we leave comments on other sites we put our URL in there so if anyone clicks our name it’ll take them to our site).
xo
s
Ashley says
Just saw this as I sipped my morning latte- So awesome! Congrats.
http://www.slate.com/articles/arts/books/2012/11/best_books_2012_slate_staff_picks_their_favorites.html
YoungHouseLove says
Ahhhhh! It’s so awesome we can’t even believe it. It’s such a nice write up!
xo
s
Jenny says
So cool! You had mentioned that the Amazon delays were supposed to be cleared up soon — is that still the case? I noticed they’re still saying post-holiday delivery. Boo! (I already have mine, just saying for the poor souls who only learned about the book from Slate…)
YoungHouseLove says
We keep hearing that within 24 hours they’ll be back to saying “immediate shipping” and will arrive well before the holidays, so we’re crossing our fingers that change happens asap! We’ll keep you guys posted with a new update at the top of a post when it’s up and running again! Picture me crossing all of my fingers and toes while holding my breath until then…
xo
s
Jess @ Little House. Big Heart. says
Muuuuch better! Amazing how such an easy (and relatively inexpensive fix) can do so much for a room.
And this post just reminded me of something else to put on my Christmas list… a Kreg jig!
Carrie Beth says
Hey Y’all,
First of all, I love your blog. I read it all of the time and have been reading since Clara was a baby. Second, I found this site and thought of you since you all (or is it just Sherry?) love porcelain animals. Hope you find something you like!
http://imm-living.com/index.php?p=product&cat_id=8
Merry Christmas,
Carrie Beth
YoungHouseLove says
I’m in love!
(drool, drool)
xo,
s
Amy S. says
The Judge framed Roger. Painting the back of the frame is also a good idea because the unpainted wood is visible in the reflection. I saw that tip on another blog and so glad I did it when I framed our mirror.
YoungHouseLove says
Such a great tip!
xo
s
heather s. says
Exactly what I was going to say – always paint the back if it will be reflected in the mirror.
You can also just use wood chisels to cut out the small sections of wood for the mirror clips if you don’t own a drill (and personally I think it is easier).
Looks nice!
nancyo says
I love the write-up and, I love that you kept it real.
I’ve read other DIY blogs where the person wrote a sponsored post for mirror mate. I appreciate that you kept it simple and straight forward… and inexpensive!
BTW – it seems like you make small changes over a period of time to a room. Do you make inspiration board before you begin or just wing it as you go?
YoungHouseLove says
We sort of try to make a plan before we start and then stick to it in the middle when nothing makes sense – so generally tweaks and experiments happen in the beginning or the end but not in the middle since it’s hard to judge anything when half of the room still has to come together. Does that make sense? So going into this the general plan was bright patterned shade and art and accessories with pretty neutral walls/frames/shelves so the fun things stood out and it all went with the b&w tile.
xo
s
ilikebeerandbabies.com says
totally doing this.
Janna says
Do you guys use bath mats? I hate leaving ours on the floor because then it gets stepped on and all dirty throughout the day. But you have to have one with wet footsies out of a shower! Where’s yours?
YoungHouseLove says
Yes! We hate leaving it out for the same reason, so we have one we take out and use for Clara-baths and then let it dry and tuck it into the linen closet (or hang it over the tub to dry with the curtain closed).
xo
s
Lindsey @ A Pear to Remember says
Seriously brilliant, guys! I am so impressed and wondering if the man from who we rent would let us do this to our bathroom? Congrats and wellllllll done :)
YoungHouseLove says
Oh heck yeah- he’d probably kiss you if you did! I’d just ask!
xo
s
carolyn says
Love this! Isn’t it amazing how simple changes can really update a room?
Amanda Nowak says
It looks so finished! :) Pretty pretty.
robin @ our semi organic life says
Love all the work. I knew the mirror would be the shining star!
Emma (Broke Ass Home) says
This is amazing! Framing our downstairs mirror is on our to-do list too. I’m thinking the mister needs a Kreg jig for Christmas…
Krystle Clark says
Thanks for sharing this post!! I’ve been thinking about doing the same thing in 2 of our bathrooms — now, I have a tutorial :-) Always so timely Petersiks!!
Miranda says
Looks great!! Are you still planning on painting the cabinets?
YoungHouseLove says
Nope, I think we’re totally sold with it as-is for now (with the room being so small and having white tile around the rest of the room we think a painted vanity might be too heavy on one side).
xo
s
Lindsey says
SEEEEEEE?! That’s why y’all are the pros. Because now it all makes sense. (Although I’mma be a brat for a second and say I called it on the whitewashed shelf that it would end up painted. Love ya.)
Here’s a question re: painting ceilings. We have the dreaded popcorn ceilings in our upstairs (downstairs basement we finished ourselves and obviously left the ceilings smooth). We have a hall bathroom that needs some lovin’ and I have been considering a repaint including the ceiling. But does the popcorn nature of the ceiling make it weird if you paint it the same color as the walls?
YoungHouseLove says
Haha, you called it on the shelf! The middle makes no sense to us, so we wait til the end to tweak ;)
As for the ceilings, we don’t have popcorn ceilings so I’m not sure but I would guess that painting them the same color as the walls would help them somewhat blend in more than being all stark white. Anyone with popcorn ceilings know?
xo
s
Melissa Shipman says
We had popcorn ceilings (ick) and they weren’t in the best shape, so we just removed them. It was a LOT of work and mess, but since we did the entire upper floor of our house, I imagine one room would be totally doable!
Check out our post on that here!
http://lovinghere.com/no-more-popcorn/
emilymarion says
I painted our popcorn ceiling and it’s a HUGE PAIN. It seems to soak up paint, because you have to go over the same area several times in different directions to completely cover it. I can’t tell you how many times I thought we were finished, but stepped back to look at it and see speckled areas that we didn’t paint in the opposite directions. Good luck!
Callie says
When we moved in we had ugly popcorn ceilings in Every. Room. When we scraped all the popcorn off it seriously updated our whole house by 20 years!! It is kind of a mess to do, but soo worth it. Here’s how we did it:
1. Send a small portion to a lab to test for asbestos (we didn’t, but later I read that we probably should have.)
2. Get a big spray bottle for water and a ceiling scraper (we got ours from Lowes). The ceiling scraper has a bag-holder that catches a ton of the debris. Totally worth it.
3. Move everything out of the room and put down plastic
4. Spray a section of ceiling *liberally* with water, wait a minute, spray again. Then use scraper to remove popcorn.
Since we didn’t test for asbethos, we were careful to use lots of water to eliminate any dust! But the water also makes the popcorn way easier to get off. Depending on what popcorn solution they used to put it up, it could be really easy or really hard to get it off. If you’re worried about how hard it’s going to be, test in a small section first.
Leigh Anne says
We have a bathroom with the same tile. But, our white is a little less than white. It has a little beige tint to it. Is yours a true white? We also have a teensy tiny windowless bathroom downstairs, and the 70’s called, apparently they want their brown floor to ceiling tile back. Bathroom remodels intimidate me. Any thoughts on painting tile??
YoungHouseLove says
It’s definitely not cream, but not super stark white either- maybe warm white (but not cream or eggshell) is a good description? As for painting tile I think if you google it there are some awesome tutorials and you can also get professional reglazing for a few hundred bucks and that is a pro job that can last a decade plus!
xo
s
Kylie says
It looks fantastic! I actually just bought some crown to do this very upgrade to our master bath, and when I took a peek at the top between the mirror and light fixture I discovered there is a GIANT HOLE in the wall behind the mirror. As in, the entire 3×5 mirror is hiding studs and pipes. Yay for straightfoward projects that aren’t!
YoungHouseLove says
No way!!
xo
s
Jamie says
I definitely feel you on the giant hole lurking behind the mirror. When we did our final walk-through, the previous owners had taken the mirror (that they were supposed to leave), and we discovered that there was a hole that was duct taped and painted over from a previous light fixture. Classy.
YoungHouseLove says
No way! That’s terrible!
xo
s
J+H @ Beyond The Stoop says
looks so nice! i LOOOOOVE the knobs too!!
erin says
and i totally want to frame out my bathroom mirror now!
Krissy says
Wow, love it! I missed the post on the window shade, so it was a double dose of fantastic! A whole new room for under $200, awesome.
MJ says
I’ve been waiting for this post! The mirror frame is fab!! My mom, bless her heart, picked up a miter saw for me at a garage sale because she knows I want to make a frame for my big ‘ol plain mirror. I’ll use your tips to go for it soon, probably after Christmas. Since I’ve never used a saw, say a prayer for my fingers.
YoungHouseLove says
You can do it MJ! Slow and steady, baby!
xo
s
Sabrina says
Love the change. I did something similar with a couple of builder mirrows but learned something from the folks at Home Depot: those little clips are often just used to hold the mirror in place while the glue attaching it to the wall dries. So my husband and I took them off, very carefully, and discovered the mirror was quite solidly glued to the wall. Since those clips were the reason I waited 12 years to put the darn frames on, I was rather annoyed I had never checked them out before…but all’s well that ends well as they say.
YoungHouseLove says
Haha, that’s a lucky discovery!
xo
s
Jill says
That framing really makes the whole room look pulled together. Well done! And for less than $200?!? You guys are awesome! When I read your posts I feel like I can make something cute happen in my own house! Haha
Crystal @ 29 Rue House says
The frame really does take it up a notch. The room looks great and I love that you made your tile work. If only I could figure out how to do that with my green (where your’s is white) and black tile bathroom.
LisaOK says
@Crystal, we have a green and black tile bathroom as well. When we moved in they had a squatty wood stained vanity and super short toilet. We used this picture from houzz.com for our inspiration. It still isn’t the look I would go with if we were starting from scratch, but I do like that we’re “honoring” the original design and gives our house character.
It’s the first picture in the gallery (from Tim Barber Architecture)
http://www.houzz.com/photos/bathroom/mint-green
YoungHouseLove says
So pretty!!
xo
s
Gabby says
@Lisa,
Ooh, that picture is gorgeous! Very Art Deco and I love Art Deco. If your bathroom turned out like that then I’m very jealous!
@Crystal,
What do you think? I think it would look awesome!
Crystal @ 29 Rue House says
Thanks LisaOK! I love that picture. My green is a bit darker but I love the idea of a soft minty green wall color with lots of bright white and natural wood. The tile design in the floor looks really cool too! I’m totally inspired now!
p.s. I can’t believe I put an apostrophe in “yours” up above. Oops.
Crystal @ 29 Rue House says
Gabby – I’m totally on board! Let’s do this!
Allyn says
That bathroom looks so bright and happy now! It’s probably a good thing I’m not at your house or those knobs might wind up in my pocket.
YoungHouseLove says
Haha, no knob pilfering!
xo
s
Steph says
Looks soooo good. I love that pic where you can see the knobs, the art and the reflection of the shade in the mirror. Really ties it all together nicely.
Also, I’m obsessed with that paint color.
I really need to stop slacking and find a good bathroom light for my half bath. I have a mirror I can put up, and floating shelves. I need to “get on that.”
Stacey T says
I absolutely love the bathroom redo! The frame around the mirror and the fresh paint on the walls just give it a fresh vibe. Awesome job!
Candice says
Eeeek! I’ve been waiting very patiently for you to show me this!!! I can’t wait to do ours now!
Kellie says
How would you do a frame for oval mirrors? We have one large rectangle mirror flanked by two oval mirrors in our master, and I would love to gussy up that loo!
YoungHouseLove says
Hmm, honestly I might consider taking down the builder one and hanging a new one in a square or rectangle from HomeGoods or something (they sell them for cheap- even big ones can be scored for under $40 sometimes!). I don’t know how you’d get molding to curve enough to look good around an oval. Hope it helps!
xo
s
Maya says
If you want to make the oval mirrors work, one option is to cut out oval frames from cardboard and then upholster them (batting, fabric, staples/tape)… I have a mirror like that in my daughter’s nursery, and it looks really cute!
YoungHouseLove says
That’s such a sweet idea!
xo
s
Maureen says
Wow. It’s pretty crazy how much of a difference that frame makes. Can’t wait to see what you do with the half bath. Mine is screaming for a makeover. I have the ol’ 1940’s sears metal medicine cabinet complete with a fluorescent light that takes about 5 minutes to turn on.
Maureen says
*1970s not 1940s. lol
carla says
This is a project that’s been on my “to do” list for over 3 years now. 3 hours, huh? I think that translates to 3 days in my world.
YoungHouseLove says
Haha, I know what you mean!
xo
s
Jaclyn says
Hey guys, I know you have mentioned it before, but I can’t find the post. Where is the lovely soap and lotion with the tray set from?
YoungHouseLove says
Those are from Anthropologie a few years ago (we just refill them with inexpensive stuff so we can keep the packaging).
xo
s
Melissa says
It looks awesome guys! Oh and I sooooo need to build a frame for my bathroom mirror as well. (It’s one of my Dude get on that already lists as well)
Katie says
I must admit, I wasn’t convinced that the mirror framing was going to make that much of a difference (it’s not usually something I notice in bathrooms), but it definitely looks more finished and put together than before. Well done!
YoungHouseLove says
I’m with you! But in person the difference is even crazier! It feels like a completely new mirror/wall – that whole side of the room changed. So I’m now a huge believer!
xo
s
Fran Siefert says
You make everything look so easy – the end results are always PERFECT and beautiful. John (and Sherry) your mother’s OLD friend Francie gives her stamp of approval! Bring her to Ft. Lauderdale with you in February!
F
YoungHouseLove says
So great to hear from you Francie! We’re really excited for Ft Lauderdale -especially since it’ll be freezing here in Richmond then…
-John
Jeanna says
Did I miss the post where you changed the hardware on the door, or am I looking at a photoshop rendering still?
YoungHouseLove says
Oh yes, we photoshopped that last week since the brass bugged me like crazy and I called it out there, but stay tuned in the next few days for a hardware makeover post!
xo
s
Joanna Larson says
I have always loved you guys…but now after reading that you watch The Talking Dead (and I am assuming therefore you also watch The Walking Dead), my love for you has just grown even more! : )
YoungHouseLove says
Haha, of course! Wouldn’t miss those two TV masterpieces! Have you heard The Talking Dead will be an hour when it returns in Feb. So excited!
xo
s
Julie says
We are planning on framing our bathroom mirror this weekend, and we were going to caulk/screw the frame to the mirror in a very similar fashion. Now that your frame is glued over the clips, how would you get it off the wall if you wanted to replace it?
YoungHouseLove says
Our frame is only caulked along the bottom with silicone caulk, so we would unscrew the two screws on the top of the frame that hold it in place and just lean it out so we could cut the caulk with a razor (caulk can be razored clean off a mirror, so it’s removable!)
xo
s
Julia @ Chris Loves Julia says
I think it turned out sooooo good. And I was not ready for it to be over. I loved watching this little bathroom evolve. Swan-like really. And now I am looking for a space to paint that muted plum.
Have you thought about painting the edges of the fish canvas? You did so many cool frame edging ideas in your book and I feel like the fish canvas would be a perfect candidate to implement some of those ideas. Just a thought. Maybe I really don’t want this room to be finished. Hahaha.
YoungHouseLove says
Ooh that would be fun!
xo
s
Sarah says
Love the mirror. Looks great in the bathroom! I am going to do that to the builder mirror in my basement bathroom!
and Love WALKING DEAD/ Talking Dead!So funny when they did the dead characters this week…not shane!HAHA!
highlight of talking dead this week though was by far this quote… “Combine merle, the governor and hershel and you get a pirate! BAHAHAHA
YoungHouseLove says
Oh yeah we were cracking up over Not Shane! I loved Shane and was so sad when he was gone so just seeing him for a second broke my heart all over again. Haha. And the pirate tweet was the most amazing comment ever.
xo
s
GG says
Looks like you finally ORB’d the doorknob too! Great job!
YoungHouseLove says
Oh yes, we have a hardware update coming in a day or two! There’s a big doorknob project going on!
xo
s
Tracie@MiddleClassMod says
I was here to post that. We have a whole bunch of sixty year old knobs that need a date with a can of ORB, but I can’t take the doorknob off the doors and I’m scared to spraypaint in situ.
YoungHouseLove says
Oh yeah, we’ll spill those details as soon as we can.
xo
s
Megan @ Rappsody in Rooms says
What a fun little makeover. When you have been going through it slowly, it didn’t seem like all that much but when you look at the before and after you see the big impact. Awesome job. The curtain really is the winner in the bathroom though.
Amanda Miller says
Wow, crazy how 14 dollars can make the room like insanely amazing.
Do you have a rug that you put out when guests come and stay and will be using the shower? Or is it just not in the shot?
YoungHouseLove says
We have a white bath mat that we use when we give Clara a bath but otherwise it’s rolled up in the linen closet (we’ve learned that it just gets trampled and looks ratty the rest of the time, so we like storing it so the cute tile can show).
xo
s
Melissa R says
Love the color of the walls and the touch of color on the knobs. I think I may have to do this in my guest bathroom. Unfortunately the wall paper has refused to release itself so I’m going to have to replace all the drywall before I get to do any fun stuff. But thankfully the BF used to do that for a living =) Oh and spoiler alert, Judge Doom was the killer (the crazy toon in human costume), love that movie!
YoungHouseLove says
Oh yeah! Judge Doom! Forgot all about him!
xo
s
Paige says
It looks great! Nice job.
Marisue says
Nice and easy bathroom update. Thanks for the tips! In somewhat related news…Hollywood is planning a sequel to Roger Rabbit. Woot, Woot! ;)
YoungHouseLove says
No way!!
xo,
s
cristy says
LOL… I have a funny story to tell about building a frame around a builder grade mirror…
My dad built a great one for us this summer. Because of the space we were filling, the frame was going to be overlapping the mirror by about 3 inches and would run all the way down to our tile backsplash. Like you guys, he wanted to be sure it was secure so he opted for putting it up with screws.. unfortunately he eyeballed where to put a screw in and mis-judged the placement of the bottom of the mirror by about 1/8 of an inch (honestly that’s how close it was)… we soon heard a loud crack and then a splintering sound as a spiderweb shot across the bottom of the glass… he had screwed right into the mirror and cracked it. He was beyond frustrated with himself! FORTUNATELY he has a friend who is a glass cutter, so the frame and mirror came down, his friend came over and cut the mirror down to be the exact size of the inside of the frame (that’s the only configuration that would work w/o buying a new mirror) so now the frame really is a frame!
YoungHouseLove says
That’s pretty amazing! I feel terrible for your dad but I’m so glad you guys figured out a way to save it!
xo
s
Jessica says
Looks Great! Are you guys going to add a rug or is there already one there that I can’t see in the photos?
YoungHouseLove says
We’ve found that a bath mat just gets trampled so we bring it out for Clara baths and then let it dry over the edge of the tub and store it in the linen closet for the rest of the time.
xo
s
Janelle says
Man, I learn so many tips from you guys. I can’t get over how much a difference the frame makes. The room looks so much more polished & even, fancy. I am filing this one away for when we buy our first home. Thank you!