Today we’re going to show you how we built the bookshelves in our son’s room. It’s an easy project that we’ve since used to create custom shelving everywhere from our living room to our beach house pantry. But these bedroom shelves were our very first attempt at them and we absolutely loved how they turned out.
This tutorial specifically focuses on building the actual shelves, aka the top portion of these built-ins. You can separately read about how we first built-in the cabinet bases (it’s an Ikea hack!) and later finished them off with crown molding. But since not every bookshelf needs those features, we’re talking just about the shelving today.

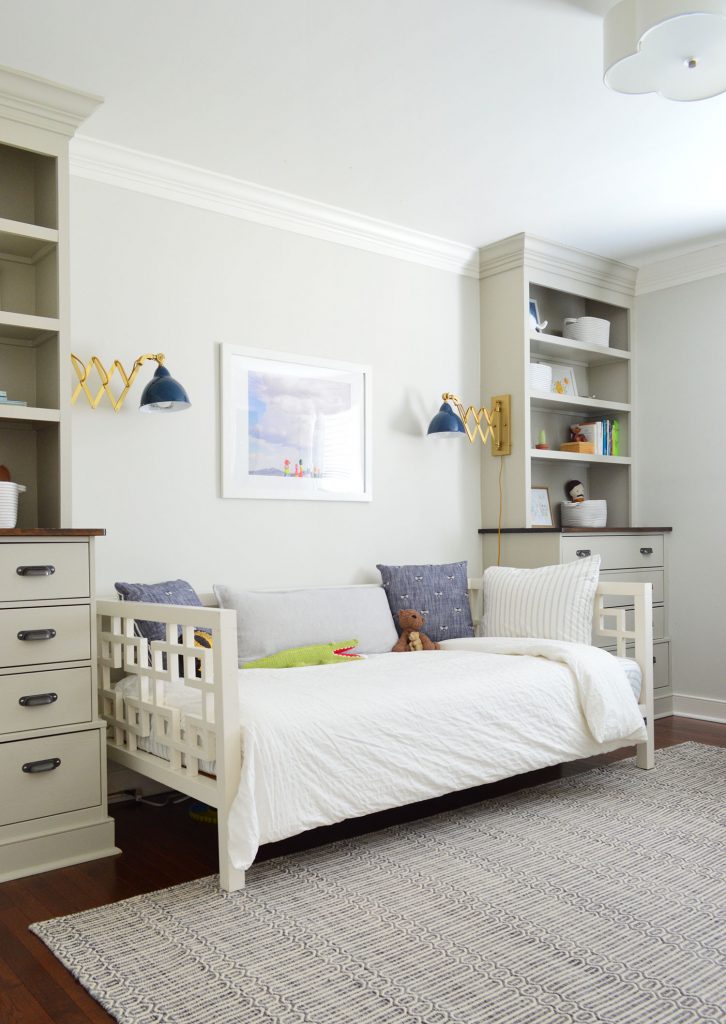
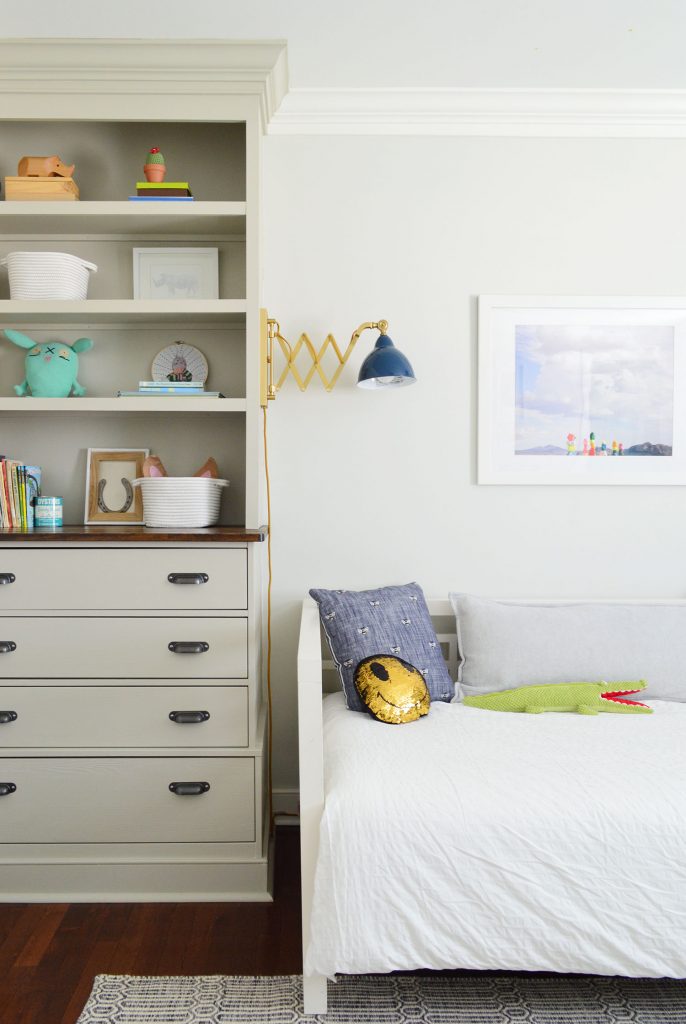
You also can take a tour of the finished room both in it’s initial version as our son’s nursery and then later when we updated it with a big boy bed.
Tools & Materials To Build A Bookshelf
Here are the supplies and tools you’ll need to build your bookshelf. If you don’t have a table saw or circular saw, try renting one from your local home improvement store. Some stores will also cut your wood for you, but this is a project where you’ll really like having one around.
- 1/2″ MDF or plywood for the shelves
- 1×3″ pine (ripped in half) for support pieces
- 1×2″ pine for face pieces
- 1×4″ or 1×6″ pine for top brace
- Measuring tape
- Stud finder
- 24″ level
- Clamps
- Nail gun with finish nails
- Miter saw
- Table saw
- Circular saw
- Power drill/driver
- Wood glue
- Paintable caulk
- Primer & paint
- Painting supplies
The exact amount of wood you’ll need depends on the specs of your bookshelf build. That’s why the first step is so important!
Step 1: Plan Your Build
Start by measuring your space and sketching out your bookshelf on paper. This will help you figure out how material you may need. You can still adjust as you build (like you might change your shelf spacing as you go) but always take time upfront to make a plan. For us, this made sure we bought enough – but not too much! – plywood for our shelving. You can see below how figuring out exactly how to maximize a 4×8′ sheet of plywood was almost like a puzzle.
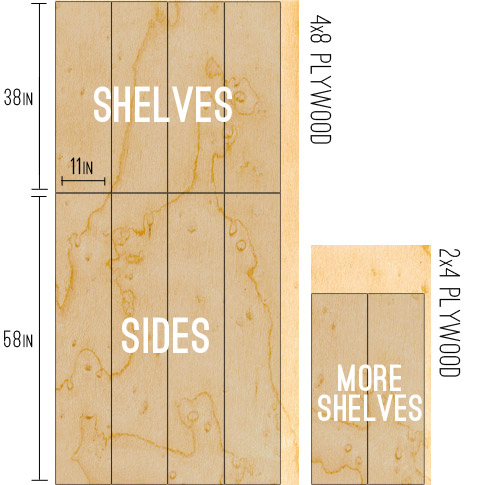
NOTE: We used plywood for this build to better match the subtle wood grain in the base cabinets. However, for a smooth, painted finish we recommend using MDF instead.
Step 2: Cut Your Shelf Pieces
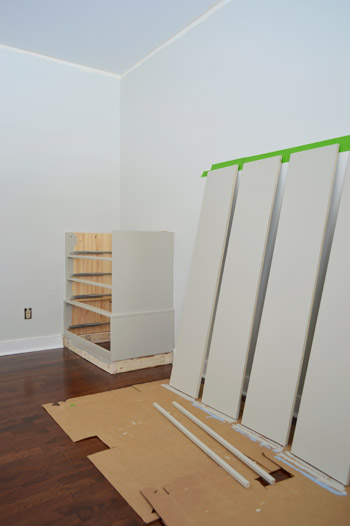
The first building step is to cut your plywood or MDF into the big shelves and side pieces. You can do this with a table saw or circular saw, like you see below. That photo is actually from our pantry shelf project because we got our plywood cut in-store for these bedroom bookshelves. The Home Depot guy ripped my plywood into 11″ strips after seeing my sketch, which was a huge help. He was able to lock his big saw into place to ensure I got equal and even cuts on all of my shelves.

If you are cutting at home, I recommend careful measuring and taking your time. You can also see above that I had clamped two pieces of MDF together so that I could make two cuts at once to ensure the shelves matched.
Step 3: Prime & Paint Your Shelves
We find it easier to paint all of our big pieces BEFORE installing them. It’s typically easier to paint flat surfaces with a roller when you don’t have to worry about edging against walls or cutting in to corners. You will still need to do some touch-ups after building, but this saved us a lot of time.
Just be sure to prime the pieces first, especially if you’re starting with raw plywood or MDF. The color we used was Benjamin Moore Senora Gray.
Step 4: Build Your Bookshelf Frame
One our paint was fully dry, we began construction by securing one of the tall side pieces directly into the wall. We used a stud finder to locate studs and attached the piece with countersinking screws that we could putty over later.
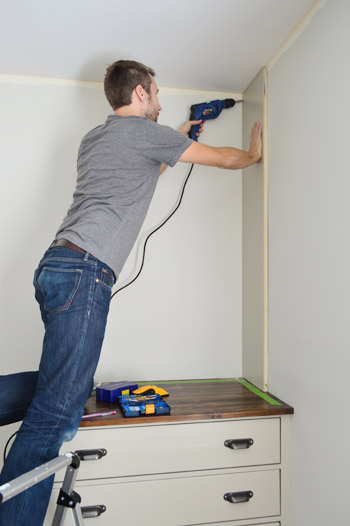
Attaching the next side piece was a bit more involved since I wasn’t screwing directly into a wall. I knew it would become sturdy once I added my shelving, so the challenge was to keep it in place in the meantime.
To do that, I attached a 1×3″ brace piece along the top of the back wall into a couple of studs. This piece wouldn’t be visible in the final bookshelf, but it gave me a place to screw the vertical side piece into. An alternative plan would’ve been to purchase a large piece of MDF or plywood to act as a solid back behind the bookshelf. We opted to just use the wall itself instead, mostly to cut down on cost.
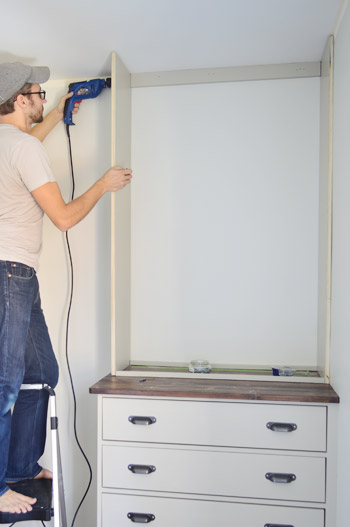
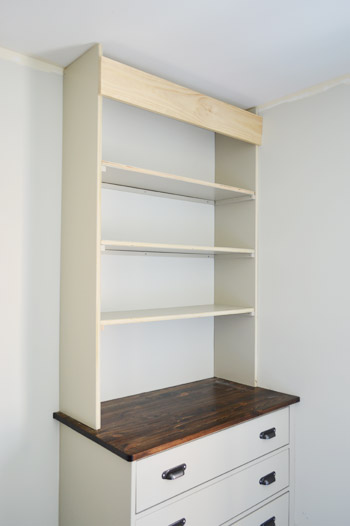
I also add a 1×6″ brace piece across the front of the bookshelves to help keep things square. I hadn’t planned on this piece originally, which is why it’s not painted.
You can also see some pieces at the bottom helping to keep things square down by the base of the bookcase. These were cut to the same length as the eventual shelves just laid there temporarily.
Step 5: Add Your Shelves
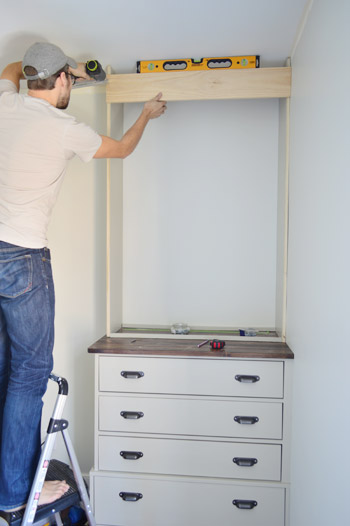
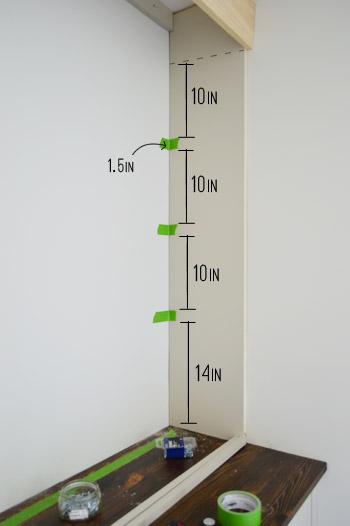
With the sides in place, we turned our attention to the shelves. First we needed to finalize our shelf spacing, so we broke out a ruler and some painter’s tape to help visualize spacing options. Ultimately we ended up with evenly spaced 10″ shelves with a little bit of extra room at the bottom. Just be sure to account for the 1.5″ width of the shelves themselves, as represented by our painter’s tape.
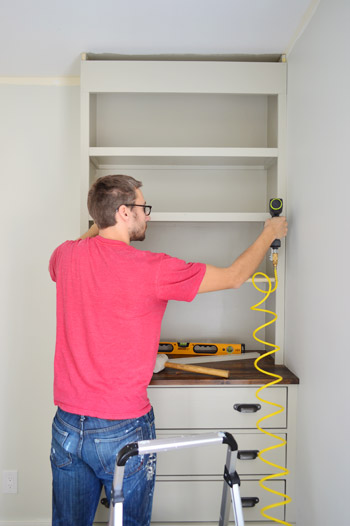
Next it was time to attach the shelf supports. These are thin strips of wood under each shelf on 3 sides. I cut these pieces by ripping a 1 x 3″ along my table saw into .75″ wide pieces. This will make more sense in a moment, but any thicker than that and the supports would be visible below the face pieces added later to the front of each shelf.
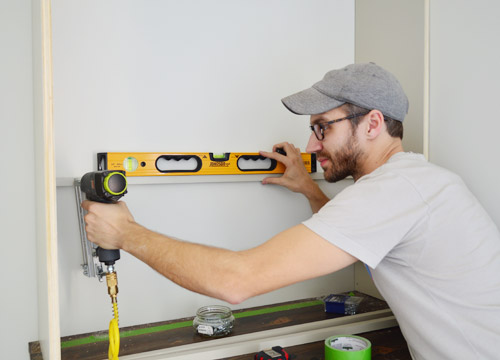
I first nailed the braces into the wall and the sides being sure to keep things level as I went. This was just a speedy way to get everything in the right place. Then I went back and screwed each piece more securely into a stud (along the back) and into the wood (along the sides). This enables the shelves to bear more weight over time.
Once all of the support pieces were screwed in, it was easy to pop the plywood shelf pieces into place. After all, we’d already cut, primed, and painted them!
I also nailed each shelf down into the brace piece so they won’t pop out or jiggle or anything.
Step 6: Finish With Face Pieces
The next step is my favorite because it makes the bookshelf look way more finished. We cut and nailed in 1×2″ pine pieces (already primed and painted) to cover all the exposed edges along the front of the shelves. This not only hides the raw edges, but also makes your shelves look thicker than they actually are! This is also why you want those support pieces cut thinner in the previous step.
You can also see before this step I had done some painting – both the back wall and the brace piece at the top. I also had done some caulking, but you can do this as a final step as well.
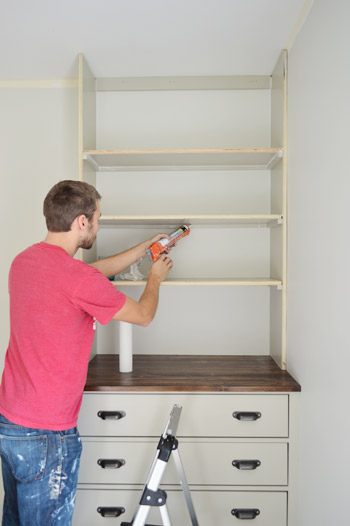
Step 7: Caulk & Touch-Up Paint
Once everything is constructed, you’ll want to caulk your seams, fill any nail holes, and do any necessary touch-up paint. The caulking will take some time, since you’ll want to caulk any place two surfaces meet: shelf meets wall, wall meets support piece, support piece meets shelf, etc. We did a little bit of this as we went, especially to fill gaps where our wall wasn’t very flat.
Once your caulk is dry, you’ll need to do touch-up paint over it. This may feel tedious because you already painted, but I promise you this is much faster to do quick touch-ups than be painting from scratch at this point.
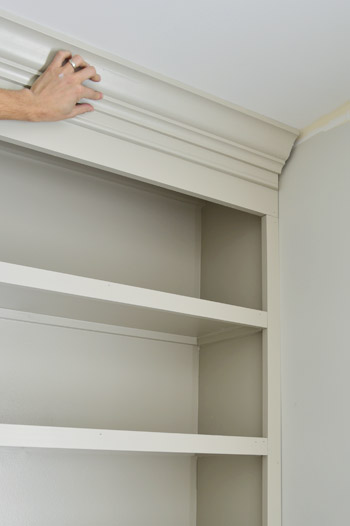
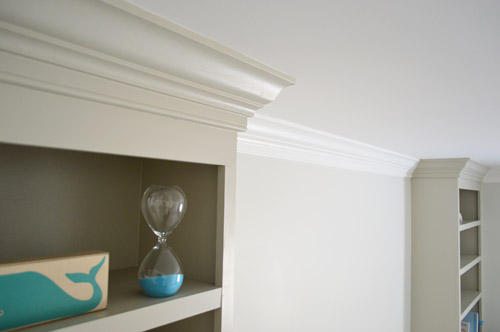
Step 8: Add Crown Molding (Optional)
For our bookshelves, we decided to finish off the top with crown molding that integrated with the crown we’d put installing around the whole room. We would be using a “beefy crown” method we’d tried first in our daughter’s room. It’s involved putting a piece of baseboard around the top of the room first, to make the crown look thicker.
You can read more about the process of installing crown molding in this room.
We love how these bookshelves turned out, especially how easy and affordable they were to create – they were about $60 each. And that includes all of the material for the bottoms too! They’ve also been great for both functional storage and cute display items.
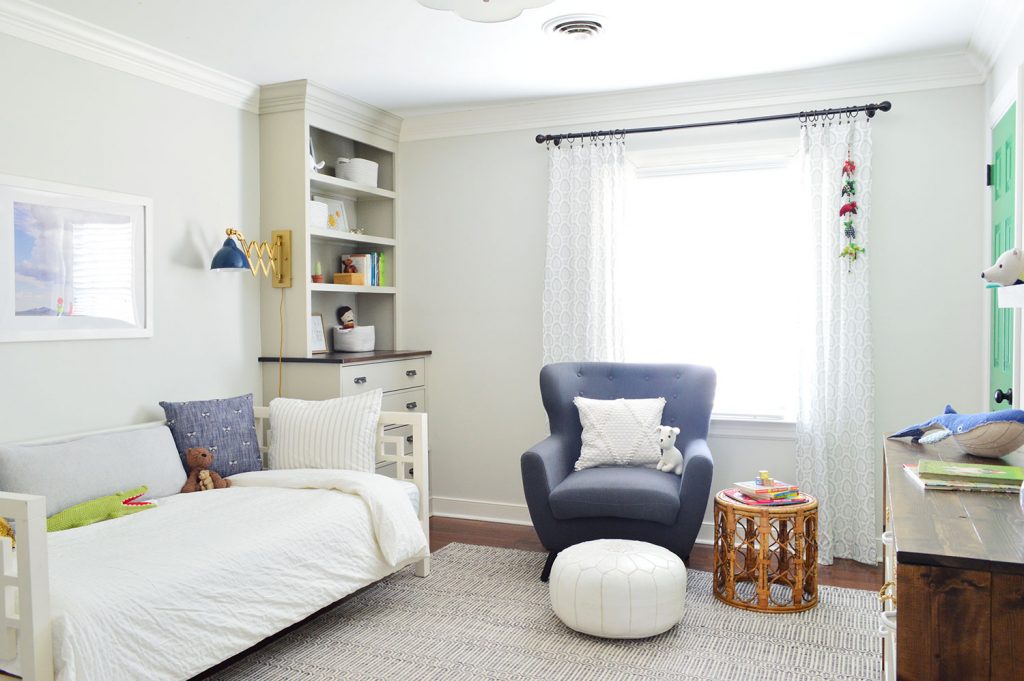
Again, you can read more about how we finished this room in its first iteration as his nursery, and then a few years later as a big boy room.
More DIY Shelving Projects
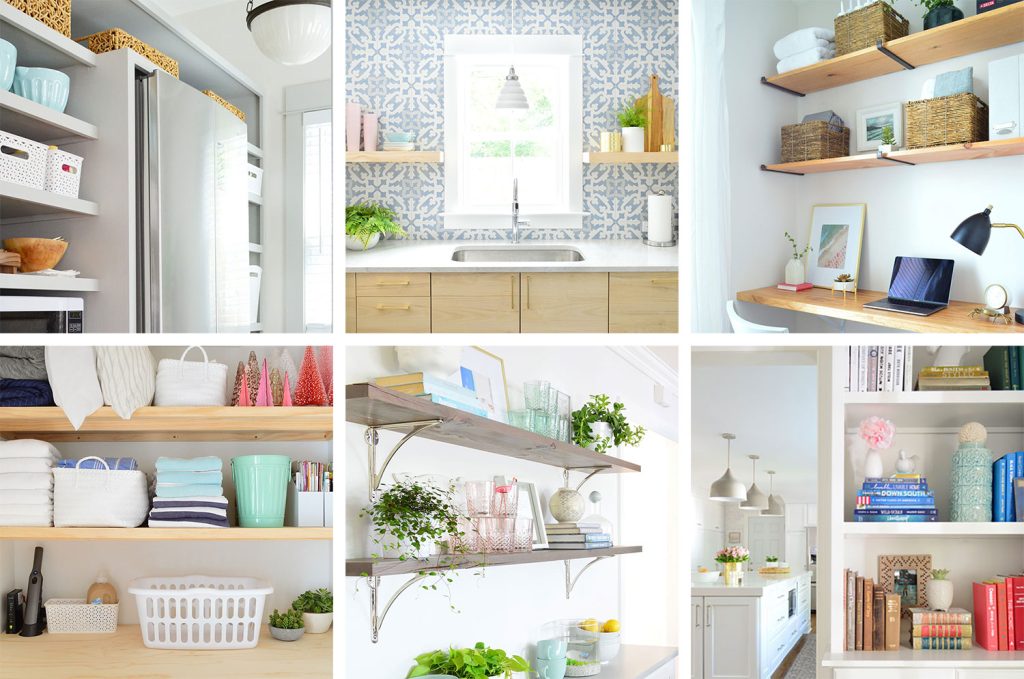
If you’d like more DIY shelving ideas, we wrote a roundup of 15+ shelf projects you can build yourself. You can even see how we used a similar technique shown here to create kitchen pantry shelving!
P.S. And when it comes to the items in our house, we hear “where’d you get that?!” a lot – so here’s a page full of our home’s paint colors & stuff we’ve bought/loved.
*This post contains affiliate links*

Pat S says
Those look fabulous!!
Amanda says
Definitely spot on painting the molding at the bottom! It might look more like furniture than built ins that way, but I think it looks a lot better!
YoungHouseLove says
Thanks Amanda!
xo
s
Annie says
I must say I think they look great, at first I thought the colour wasn’t stand-out enough but I really like this for a nursery room. Fab job!
Will you be doing a contrasting colour in the back of the built-in shelves (forgive me if I missed this in the text part of the post)?
Also, not to be weird and lech-y but John looks very attractive with the beard!
YoungHouseLove says
Haha, he does, doesn’t he? I love his winter look. As for the backs, we’re totally open to a bold color (or even a fun wallpaper or fabric wrapped around foam core so it’s removable) but I want to fill up the shelves first to make sure it won’t look too busy.
xo
s
Julia @ Hooked on Houses says
I’m so impressed that you built these yourself. They’re beautiful! Can’t wait to see how the rest of the room turns out now. :)
Angela N says
Wow!!! These look fantastic. It makes me even more excited to see the finished room.
courtney clark says
Ok…I’m confused!?! Earlier in post you said that the crown was going to be painted to match the built ins and then at the end Sherry commented on the white crib making more sense with the white crown…so are you just painting the crown piece around the built in the same and the rest of the room will white??? Remember the only stupid questions are the ones not asked!! Lol ;)
YoungHouseLove says
Sorry to be confusing! The rest of the room will have white crown around it, just like the rest of the room has white baseboards and trim, so only the stuff on the built-ins is that color :)
xo
s
Karly says
Four things:
1. I love those.
2. You were right about the trim colour. I wasn’t a believer, I am now.
3. Too much storage is not a thing.
4. If you’re baby manages to Evil Knievel style swing onto those bookcases, you need to start training him for Cirque de Solei asap.
YoungHouseLove says
Hahahaha! Thanks Karly!
xo
s
Michelle says
Oh man, you guys, they are amazing!! Nice work!! I’m so excited you want to paint the crib drawer, we actually have the same crib (expecting our first in May) and we definitely want to paint the drawer. It just doesn’t go with the rest of the room. But we’re still tossing around ideas as to how to best go about it. Can’t wait to see what you come up with!
Thank you for making every morning of my week that much sweeter! Don’t tell my boss I spend the first half hour of every day checking your blog ;)
YoungHouseLove says
Thanks so much Michelle, you’re so sweet.
xo
s
Megan @ Teaching Every Day says
They look beau-ti-ful! Oh, sorry. It’s a boy’s room. They look very tough. :)
Kate says
really enjoying watching this all come together-you are such a great pair,with such complimentary skills-I can’t wait to see the end results!! Have a great day…
YoungHouseLove says
Thanks so much Kate!
xo
s
sarolabelle says
So I am guessing these aren’t the changing tables? Will you have another piece of furniture for that or are these changing tables?
YoungHouseLove says
The changing pad actually fits on top of these, but we think it might be a tight squeeze when the bun gets bigger than just that squishy baby stage, so we’re thinking about other options for one of those other three still-bare walls. Maybe a cubby-filled console for toy storage and baskets with space on top for our changing pad? Will keep you posted!
xo
s
Penni McNamara says
You guys should buy a truck as your second car! talk about useful!
YoungHouseLove says
We have definitely thought about it! Right now it doesn’t make sense financially (we’d spend far more buying and insuring a truck than we do on $19 rentals, which we might use 6 times a year for a grand total of $120) but we’d love to eventually sell our current car for something slightly larger with a hitch. That way we can get a trailer and have lots of haul power :)
xo
s
Janet says
Sorry for the second post – but just had to add. As for the storage? My teenage daughter would go to town with those drawers and shelves for body products alone and my young boys would definitely make a lego showcase on those shelves! Somehow lego can overtake a house in no time flat, haha!
YoungHouseLove says
Haha!
xo
s
Melanie says
I love a good built in, and I appreciate you sharing your idea of beefing up the crown with upside down base molding. I might have to use that idea on my next project. The bookcases look great, and like everyone else, I can’t wait to see the entire room decorated. I am sure it will look amazing! Wishing you guys a healthy and safe delivery when the baby comes!
YoungHouseLove says
Thanks so much Melanie!
xo
s
Tiffany says
Love, love, love! Are you two still planning to do the built ins in your room? Is that a before baby comes item? Are you planning on having those mimic these for continuity or are they going to be totally different? I love the idea of the green door and green drawer. What a lucky little guy.
YoungHouseLove says
This has us rethinking them since we don’t want to just clone these in there, but I love the idea of a little window seat in our room with plenty of added storage, so we’ll have to see what we come up with! Will keep you posted. They definitely won’t be before baby though (we’re down to 10 weeks and counting! ahhh!).
xo
s
Vanessa says
These look truly AWESOME! Random question – where will you be changing the Barnacle when upstairs? I know Clara’s dresser was your go to spot – wondering if you are going to put another storage piece in here. Just curious.
Keep up the great work this is fantastic!
YoungHouseLove says
Thanks Vanessa! We’re thinking about other options for one of those three still-bare walls in there. Maybe a cubby-filled console for toy storage and baskets with space on top for our changing pad? Will keep you posted!
xo
s
Tovah says
That last sentence of the blog was awesome. And who wouldn’t be excited to fill up all of those shelves?:) They look great!
Diane says
These are beautiful and totally look like they were already part of the house. I’m just dreaming of all the stuff that could be hidden in so many drawers. For us, it would be the tons of great hand-me-downs we received, which are stuffed in plastic bins in closets.
Jaimie says
These are absolutely incredible! I have been reading your blog religiously for years and have repeatedly said to myself “I want to do that in our house!”… but this time I’m BEGGING my husband to head to Ikea this weekend so we can pick up those dressers :) I love how they came out – the color, the stain the base of the bookshelves, and even the drawer pulls! Were those the standard ones that came with the dresser or did you pick those out elsewhere?
YoungHouseLove says
Thanks Jaimie! We got SO LUCKY and those pulls came with the Fjell dressers! We really love how they look – even the finish and weight of them is awesome.
xo
s
Lori says
Really, really nice. I love how you guys find a way to take things just that one step further that makes everything look so polished and complete. Your website and book are a big inspiration for me as we finally get the gears grinding on our long-postponed remodel. xo
YoungHouseLove says
Thanks so much Lori!
xo
s
Melanie says
Oh Sherry, I so feel your pain! My baby boy will be here April 8th and I am nesting like a BEAST! Our nursery still has a ways to go before I can decorate and it’s killing me! My husband thinks it’s funny/strange that I’m so concerned when we still have time, but I keep trying to explain to him that when you’re pregnant and nesting decorating is an emergency! Haha.
Also, I totally forgot about Bear City. So funny!
Wendy says
I’d definitely leave the crib drawer! It ties into the stained part of the built ins and the floors (and will probably make it easier to Craigs List that crib once you’re done having babies!)
YoungHouseLove says
Thanks Wendy! It looks a little too red for us (like it clashes with the floor the the built-in tops, so we’ll have to see where we end up. I can also sand it down and use the same stain from the top of the built-ins so it all ties together. Will keep you posted!
xo
s
Karla says
I wonder if you could use polyshades on that drawer to try and match the tops? If it doesn’t work, I’m sure you could paint it? Just a thought! :)
YoungHouseLove says
Such a good idea! Didn’t even think of that!
xo
s
Jessica says
Hahaha the Golum impression of “criiiiib skiiiiirt” kills me. Fabulous job! The Barnacle is going to love it!
Leann says
One of my favorite things you guys have ever done! I seriously wanted you guys to keep the base white….but now I totally see your vision of it being seamless! I guess thats why you’re the blogger and I am the reader! :-) XO
YoungHouseLove says
Aw, thanks so much Leann!
xo
s
Julianne says
Wow, these look really great! Definitely cabinets that can accommodate at any age. Really love them…excellent work!! Looking forward to seeing Sherry unleash her design prowess in here!!! Hope you and the bump are doing well and feeling fine :O)
YoungHouseLove says
Thanks Julianne!
xo
s
Kate says
Those look amazing!! I know you are so excited to see the nursery coming together for the little Barnacle :)
Rachel says
They look awesome!! The one thing I was curious about is the colors. I know you showed how they are on the same sample card just slid down a few, but in these pictures they look like the tones are very different. I was just wondering if this is just my monitor or how do they look in person? Do they contrast more in person too? Either way they look so great! Can’t wait to see the rest of the room!
YoungHouseLove says
I think subtleties like this are a challenge to capture due to a combination of factors (our photography skills, the natural lighting at the time we take the pics, how monitors show photos, your computer screen’s brightness, etc). In person they definitely look like they’re in the same family, but the walls are more muted (just slightly darker than the white trim and baseboard) and the built-ins look about a shade or two darker than those (they’re really four swatches darker on the swatch card, but in person it looks more subtle than that).
xo
s
April says
Great job John! You are quite the carpenter!
Christy says
What a great look! BTW, glad to read that shoes are worn for other tasks — my husband once dropped a drill on his friend’s foot and the sharp bit went right through the top of the shoe. Oops and ouch!
YoungHouseLove says
Ouch!
xo
s
Danielle says
So awesome!!
Tashia D says
These are AMAZING!!! I can’t believe anyone would think they would be storage overkill! I’ve found that with two kiddos you can NEVER have too much storage! I would love to have these in our home. Nice work!
Robin says
These look amazing! Since imitation is a form of flattery, yall can be very flattered when copy this idea in our boys’ room.
YoungHouseLove says
Wahoo! Send pics!
xo
s
Vanessa says
Love these bookcases! I cannot wait to see how it turns out once the beast is unleashed :).
Rachel says
Top o’ the built-in TO YOU! {Oh, I hope you get that reference! Because I’m giggling!}.
YoungHouseLove says
I’ll have you know that I giggled out loud when I read that. Well played, Rachel.
xo
s
Mandi says
Okay, YOU WERE RIGHT! I was totally on team “leave the trim white,” but you’ve sold me. I’m still interested to see what it looks like with the rest of the crown in place. :)
Julia says
I am in LOVE with these!! They look fantastic!!
YoungHouseLove says
Thanks Julia!
-John
Felicia says
Sherry reminds me of a brunette Amy Poeler from Parks and Rec– enthusiastic about everything!!! I love it!! Can we be best friends?? Okie!
YoungHouseLove says
Haha! I think that is an eerily good description. In high school I got “Kimmy Gibler from Full House” a lot. It was both mortifying, yet painfully accurate.
xo
s
Jess says
… don’t mind me, just creepin’ comments….
I almost spat out my milk all over my lappy when I read Kimmy Gibler! OH MAN. So good. I hope your feet don’t stink like hers! I remember the episode where DJ got pulled over because Kimmy was airing her socks! Or the time Jesse hypnotized her… AHH Thanks for the flashback!
xo!
YoungHouseLove says
Haha! I thankfully have no foot odor issues!
xo
s
Beatriz says
This room is going to be amazing. The built ins look great. I love the green accents. Can’t wait till it’s all done! Great job!
carol says
Nicely done! I envy the ability to plan out your project to minimize waste, time and dollars. They look very professional and I can imagine they will look great years from now when they’re filled with teenager paraphernalia. One concern, and this is the Mom in me: Barefoot and tools, yikes! (Safety first).
YoungHouseLove says
Thanks Carol! We definitely have shoes on when we’re sawing and cutting lumber out in the garage, they just get covered in sawdust so we slip them off at the door (hence the barefoot look upstairs when we’re doing lighter duty things like nailing or screwing).
xo
s
Meagan Briggs says
This has definitely been one of my favorite projects you guys have done. Good work! They look amazing. and that color!
YoungHouseLove says
Thanks so much Meagan.
-John
fulori says
HOLY BUILT-INS, BATMAN!
it’s so funny – i check your inspiration pins, read your plans, and am STILL blown away by how awesome everything looks. LOVE
can’t wait for the “filled-in the built-ins” post!
YoungHouseLove says
Thanks so much Fulori!
xo
s
Audrey says
I have those container store bins in my daughter’s nursery and they’ve been great! Can’t wait to see the final room!
Shannon Fox says
Seriously, seriously awesome. Loooove everything about those built ins. Can’t wait to see the whole look completed! Quit being a spoil sport, John! ;)
YoungHouseLove says
SERIOUSLY! Doesn’t he know I’m heavily pregnant and HEAVILY NESTING!
xo
s
Sandy says
It looks so good! I’m glad that you painted the floor and crown trim to match the built-ins. You both have such a good eye for design. Can’t wait to see the room come together more and get colorified. (that’s a word, right?) So glad you’re going to use green! Hurry, Sherry, and get that door painted! :)
YoungHouseLove says
Haha, thanks Sandy!
xo
s
Danielle says
The bookcases look amazing, can’t wait to see the white crown molding so the crib ties in! And I’m antsy for Sherry’s decorating to blow the lid off the place, as it always does :) Most importantly, I love the Bear City reference. I swear nobody ever remembers Bear City when I bring it up. You guys just get me (Consummate V’s, anyone??) This is why I voted for you guys for my favorite bloggers on Better Homes & Gardens!
YoungHouseLove says
Bahah! I haven’t thought about Consummate V’s in at least a month. What’s wrong with me. Also, whenever the alarm is beeping I scream “ten second MacGruber!” (John is now immune to my joke, but I can’t help myself).
xo
s
Kate F. says
Hey Guys, just wondering if you used your paint sprayer to paint the top shelves or if you went the roller route. Thanks!
YoungHouseLove says
We just rolled them since it was freezing outside (so we tried to paint as much in the house as we could). In the spring/summer/fall we probably would have sprayed them though!
xo
s
Isabelle says
I think the wood stain shelf on top of the drawers is my FAVORITE!!! I love how it looks with the hardware and the color you chose.
Really inspiring, you two :-) Can’t wait to see what comes next!
YoungHouseLove says
Thanks so much Isabelle!
xo
s
Merris says
We are looking to replace all the old metal blinds in our house and I love the look of bamboo blinds (like the image you have) but I am wondering what they will like like from outside in the front of our house. Have y’all thought about this at all or is this a dumb question? Do you worry about having the same blinds in every room so they look they same from the front?
YoungHouseLove says
We have the same blinds throughout our entire second floor (white Home Depot faux wood blinds that we got right after we moved in for privacy and light-blocking) so we figure if we leave those up in each room but then layer in things like wood blinds and curtains in the nursery, it hopefully won’t look that crazy from outside (like you’ll only see the back of the white blinds if they’re half-raised and the bamboo shades will be mounted in front of those). Might look terrible though! Will have to report back!
xo
s
Raesha de Ruiter Zylker says
For the love of Jesus on Midlothian, I love you guys. These are BEYOND beautiful and utterly fantastic. I cannot wait to see them all gussied up. Thanks for sharing your life and talents with us all. <3
YoungHouseLove says
Hahahahahahaahahahahahahahaha! Comment of the day. No, the month. That opening line had me laughing so hard I couldn’t even read it to John.
xo
s
Jennifer R. says
Not sure if you guys already picked out some bamboo blinds but I thought I would let you know that JC Penney has some great cordless shades. We actually bought some and loved them but they were a bit too dark for our kitchen… they would be perfect with your color scheme though and the price is really good for the quality. Cordless is much safer for babies, too… and just cool.
http://www.jcpenney.com/for-the-home/sale/view-all/burnout-bamboo-cordless-roman-shade/prod.jump?ppId=pp5002200349&catId=cat100260228&deptId=dept20022800026&topDim=Material&topDimvalue=bamboo&dimCombo=Material%7C&dimComboVal=bamboo%7C¤tDim=Material¤tDimVal=bamboo&colorizedImg=DP1025201218001853M.tif&urlState=/window/shop-/blinds-shades/bamboo/_/N-1noxacZ1z13z1f/cat.jump
YoungHouseLove says
Love the cordless feature! Thanks for the link Jennifer!
xo
s