This DIY tutorial for adding built-in bookshelves is a lot simpler than it looks. That means getting this classic look of floor-to-ceiling shelving around a doorway is something anyone can do. We planned these bookcases as part of our big kitchen remodel, and they may be my secret favorite part of the whole renovation.
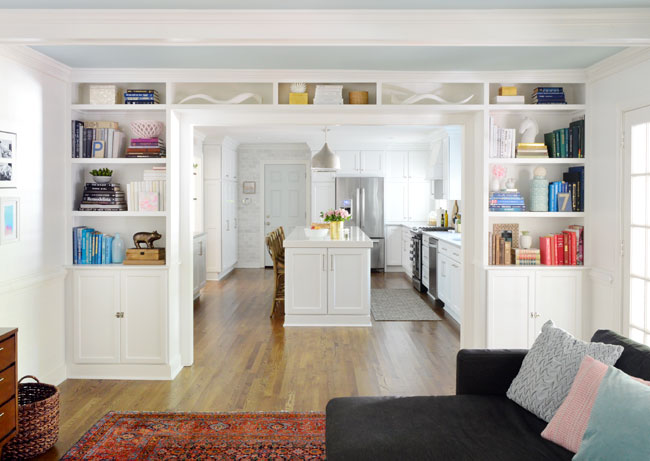
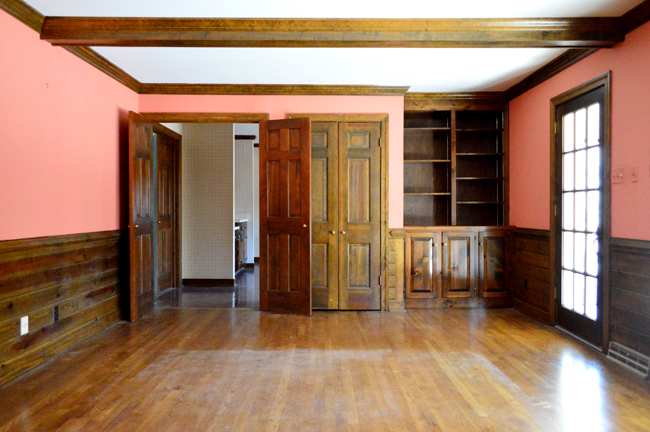
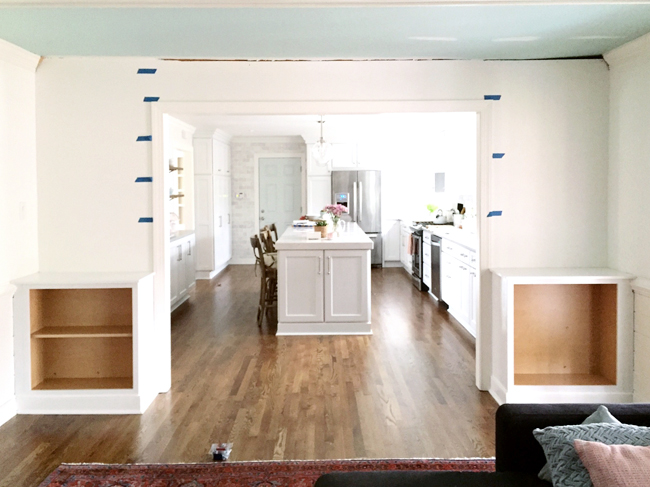
This wall did have a bookcase on it originally, as you can see in this before photo. But we demo’d and reframed it to be more open to the kitchen.
In addition to the DIY building tutorial, we’ll also share all of the measurements so you can make sure to create the best shelf height and depth for books and decor.
Tools & Materials for Built-In Bookshelves
Constructing built-in bookcases like this will likely be a multi-day project that requires some patience and attention to detail. However, the actual process is not complicated and requires pretty basic DIY skills. You will also need these tools and materials handy:
- Stock cabinets for bases
- 1/2″ MDF for the shelves
- 1×2″ and 1×4″ pine for facing
- 2×4″s and scrap wood for miscellaneous blocking
- Baseboard and crown molding
- Measuring tape
- Stud finder
- Long level
- Clamps
- Nail gun with finish nails
- Miter saw
- Table saw or circular saw
- Power drill/driver
- Wood glue
- Paintable caulk
- Primer & paint
- Painting supplies
Step 1: Plan Your Bookshelf Design
Planning is always the most important step to a DIY building project like this. Begin by taking careful measurements of your space. You can write them down or, better yet, make a rough sketch. For us, this was the blank wall we started with.

You may have a clear idea of what you want to build already, or you may need to take some time browsing blogs or Pinterest to gather inspiration. Take note of shelf spacing, trim details, paint colors, and even what sort of items are on the shelves that inspire you most. For us, we were loosely trying to recreate those built-in bookcases from our second house.
With that image in mind, we were able to sketch out our vision (with measurements!) so that we could also start planning how much material we would need to buy. More on that in a bit!
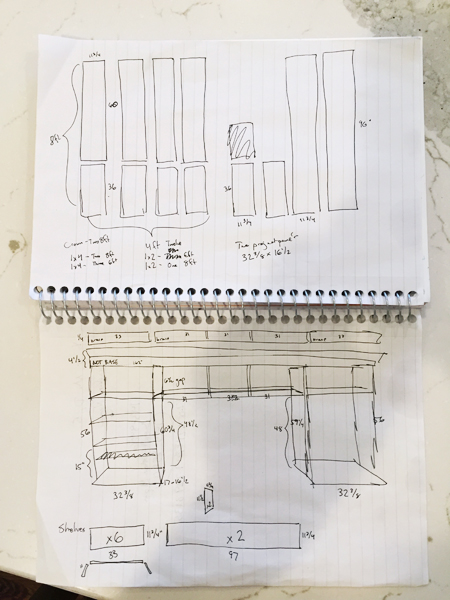
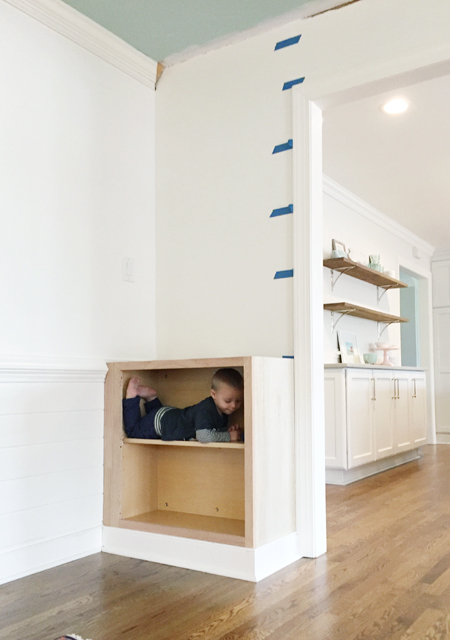
Some people also like to mock things up in Photoshop or 3D software like CAD. But as you can see, good ol’ pen and paper works too. Even when we were in the midst of the build we double-checked our shelf spacing measurements with blue painter’s tape. You can see us considering two spacing options below (we chose the one on the right).
Long story short: don’t shortchange the planning process because it will save you time, headaches, and trips to the home improvement store.
Step 2: Build-In Your Bases
For the bases, we knew we wanted some closed cabinet storage to hide stuff like old photo albums and yearbooks. Lucky for us, these 30″ x 30″ stock upper cabinets from Home Depot fit almost perfectly and were an easy, affordable way to kick off this build.
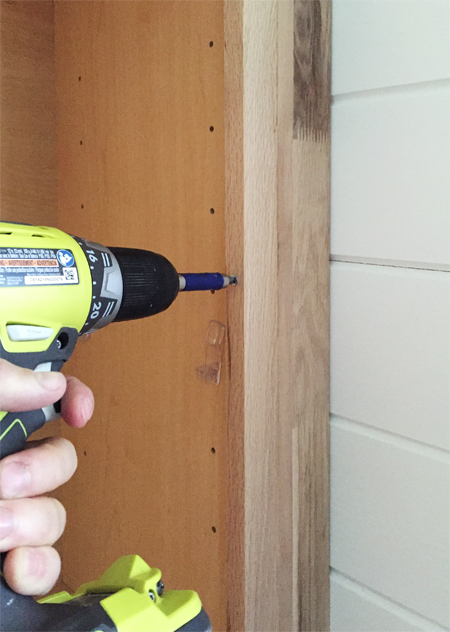
The drawback to upper cabinets like these is that they’re only 12″ deep. A typical bookcase is 10-12″ deep, but we wanted our shelves to be 13″ to accommodate larger books and decorative objects. So we added two layers of 2×4″ blocking against the wall behind each cabinet. We simply screwed the blocking into studs using long 2.5″ wood screws.
You’ll also note in the photo below that there is also some blocking under the cabinet. This will allow you to add matching baseboard around the bottoms without obstructing the doors. Typically a single 2×4″ will do. We, however, were trying to carefully match the height of the room’s existing wainscotting. So we had to get a big creative and prop it up with some random scrap plywood to get the right height.
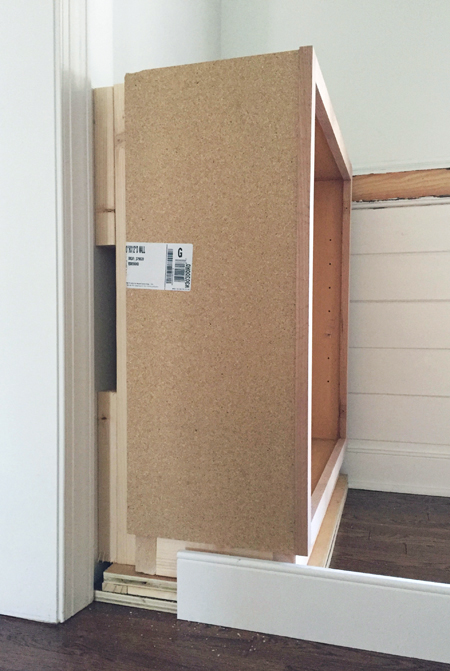
I know that looks kinda crazy above, but don’t worry. We used these unfinished end panels to cover it all up. I also nailed in a 1 x 2″ along the bottom edge to give the baseboard something to rest against along the front. And don’t mind the matchbox cars in there. Toddlers, amiright?
You may also need to add some filler pieces between your cabinet and the wall to close any gaps. We used some stock filler pieces, but any wood would do,
To complete the cabinet bases, we then cut and installed baseboard to wrap around the bottom of each cabinet. Use a miter saw to cut each piece and attach it with a nail gun. Adorable toddler not required.
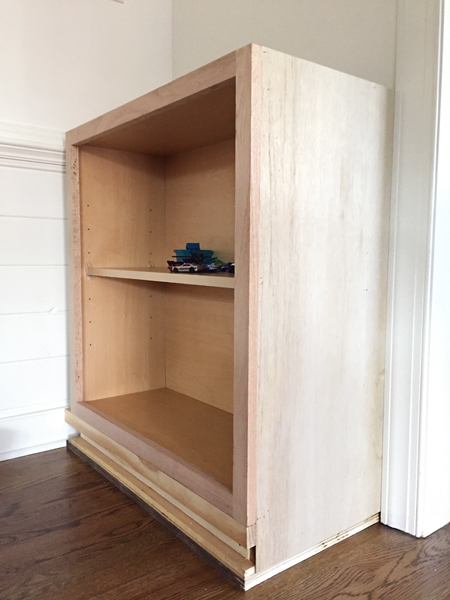
Here’s what it looked like with both bases installed. Don’t worry, they came with doors and shelves. We just removed them to make installation easier.
It also made our next step easier as well…
Step 3: Prime, & Paint
Before you start constructing your built-in bookshelves, we find it’s easier to prime and paint your shelving pieces first. You know, when everything is flat on the ground. Your cuts don’t have to be precise yet, but we did rip all of our MDF to size before we started. I’ll explain that more in a bit.
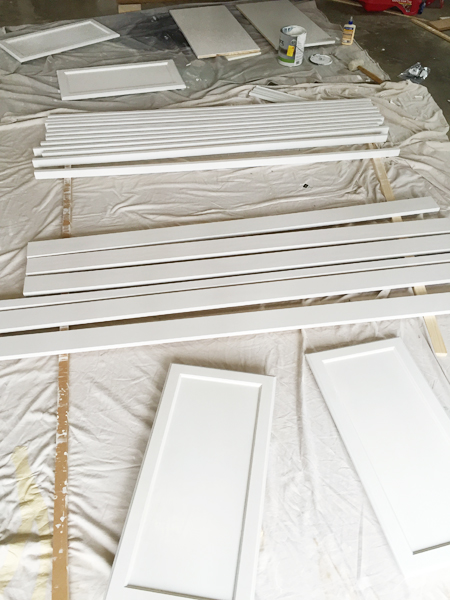
You will still need to do touch-ups after, but this way you can roll most of it flat without worrying about drips, pooling, or getting a brush into lots of nooks. You can see we painted the cabinet doors, shelves, and facing pieces all at once. The color is Simply White by Benjamin Moore (in a semi-gloss finish) which is what’s already on the other trim in the room.
Step 4: Construct Your Side Shelves
For the open bookshelves themselves, we followed the same process we used for our son’s built-ins. You can see more detail in that post, but I’ll give you an overview here. We constructed them out of 1/2″ MDF panels because they’re easy to cut and give you a smoother finish than plywood.

As you can see, the bookshelf construction goes as follows:
- Screw one MDF vertical panel directly into the side wall
- Add a 1×4″ brace piece to the back wall across the top
- Screw a matching MDF vertical panel on the other side into the brace piece
- Add another brace piece across the front of the shelves
- Rip 1×1″ strips of pine on a table saw to shelf support
- Wherever you want a shelf, nail support strips on 3 sides
- Add MDF shelves
- Nail and glue 1×2″ face pieces on all exposed edges
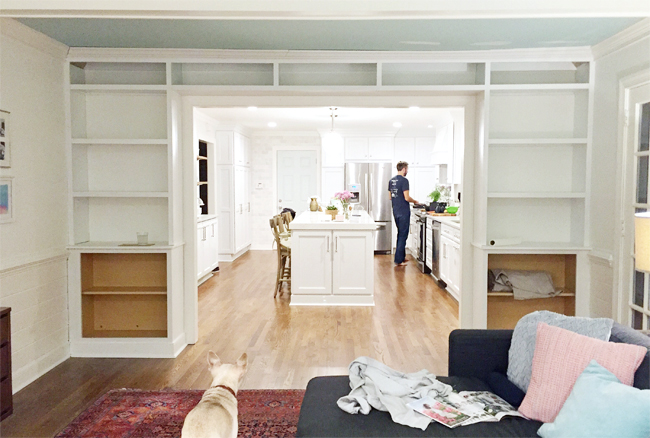
I know that’s a quick overview, so please check out this tutorial for more detail. But you can see after doing that on both side (well, minus the face pieces) we achieved this around our doorway.

This part was all old hat for me. The new challenge was the next step: spanning a shelf across the cased opening!
Step 5: Add The Shelf Across The Doorway
To build the middle shelf over the doorway, I took advantage of any surface I could secure the MDF into and added a few extra to be safe. For instance, I started by adding sections of 1×4″ “header” boards across the back (STEP 1). That gave me an edge to nail the vertical divider into (STEP 2). Once those dividers were in, I could screw the bottom in from below (STEP 3). You can see it mocked up below.
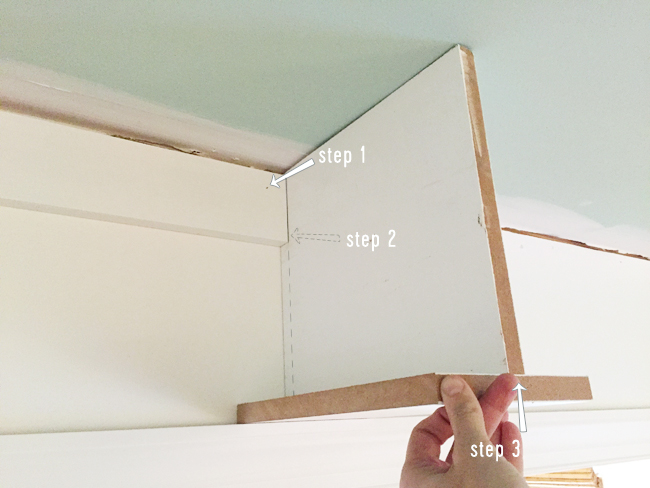
As I started building it for real, I also ended up adding a scrap piece to the ceiling. This helped keep everything square and also gave me a surface to attach the facing & crown molding. You can see I also took advantage of the door casing as extra support for the bottom shelf. All of the arrows are places I screwed things together.
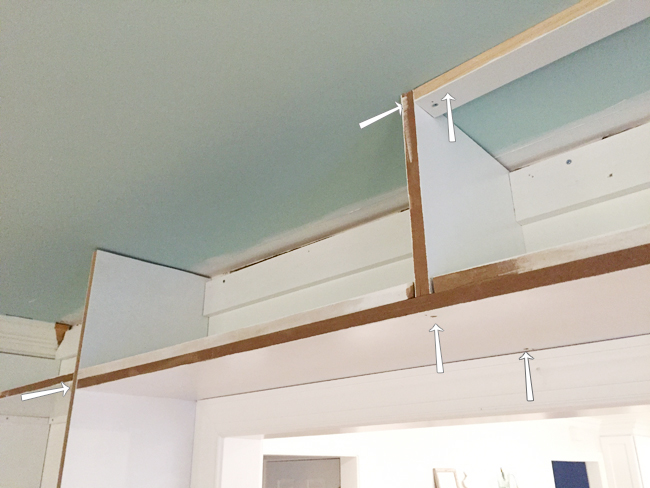
You can also see in the photo above that the shelves over the doorway are doubled up. This is so that, once the 1×2″ face piece is added, these shelves are flush on both the top and the bottom. All of the other shelves have a small lip on the bottom, but we didn’t want that visible on this portion that will be walked under.
Step 6: Nail In Your Face Pieces
The last step is to add 1×2″ pine pieces (already primed and painted!) to cover all of the unfinished front edges. This will make your raw edges look tidier AND make your shelves look twice as thick as they really are.
Again, you can read more about this process in this tutorial.
Step 7: Caulk & Touch-Up Paint
Lastly, you’ll want to use some paintable caulk and wood filler to fill all of your seams and nail holes. Basically, anywhere two pieces of wood meet, you’ll want to add a beam of caulk. This will give your built-in bookshelves the nice, finished look they deserve.
Once your caulk is full dry, you’ll want to paint over it. This should be pretty quick with a brush. And this is a good time to touch-up any scuffs you created during construction. I know this feels repetitive to Step 3, but trust me it’s much easier doing a quick pass with paint now than having to do multiple coats of paint & primer.
Step 8: Let Cure & Decorate!
Even after it has dried, paint has a curing period when it hardens and becomes more durable. This can take multiple days, so be patient when it comes to loading up your new built-in bookshelves. We know you’re excited because we were too! We waited a full 10 days just to be safe. That way our decor was less likely to scrape, scuff, or leave impressions in the uncured paint.
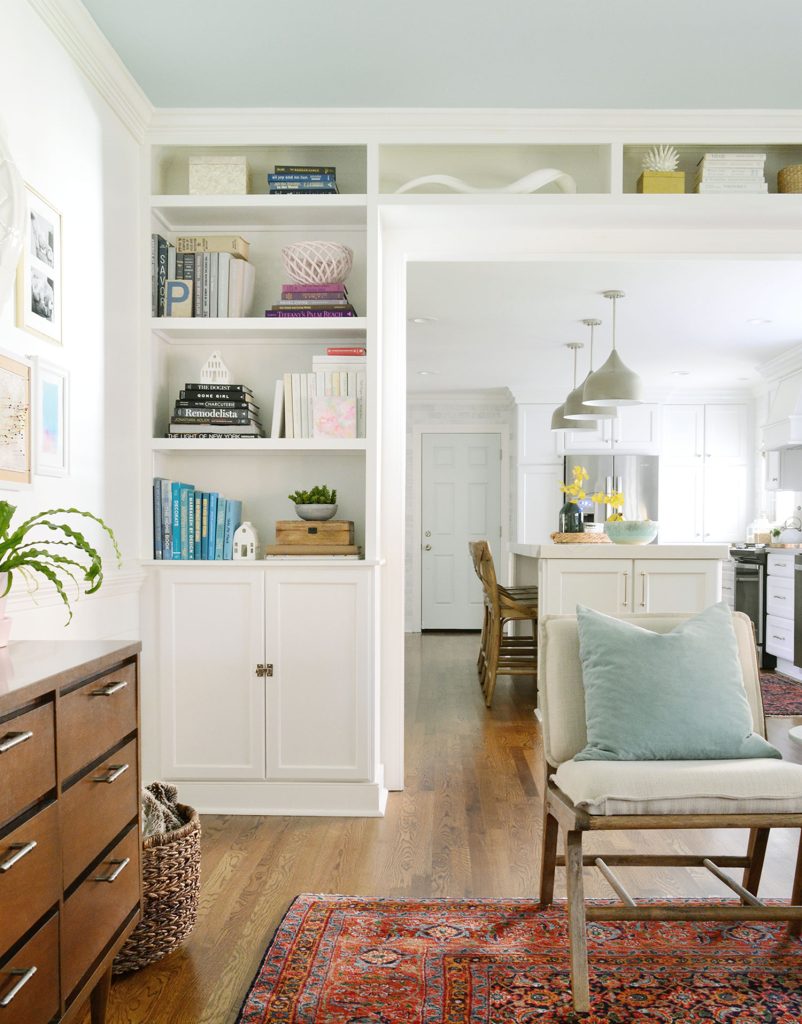
You can read our tips for decorating bookshelves but we generally like to include a mix of books (stacked in various orientations) and decorative objects. Our final shelf measurements were 15″ high and 13″ deep, which mean they could fit a lot of stuff without looking too cramped. We also kept our books in a loose, color-coded arrangement. It wasn’t a true rainbow or gradient, but we find keeping similar color spines together makes shelves look like chaotic.
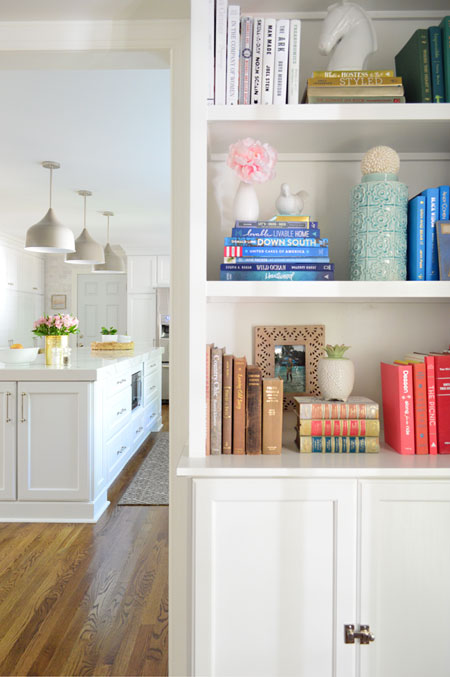
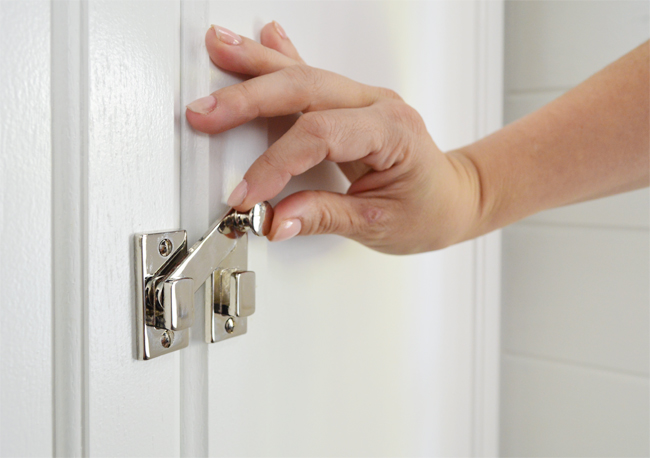
Oh, and don’t forget to add knobs or pulls to your cabinets. We found these fun latches online and thought they’d be a nice way to mix it up from the pulls we have in the adjacent kitchen.
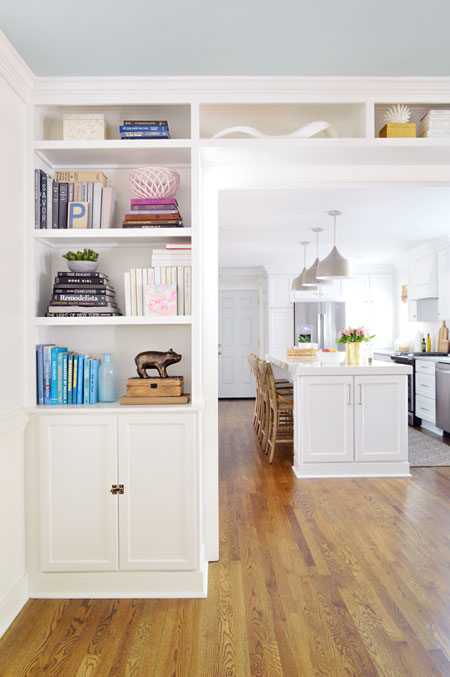
We’re absolutely thrilled with how these built-in bookshelves turned out. They look like they were always meant to be here, which is always the goal of any built-in DIY project.
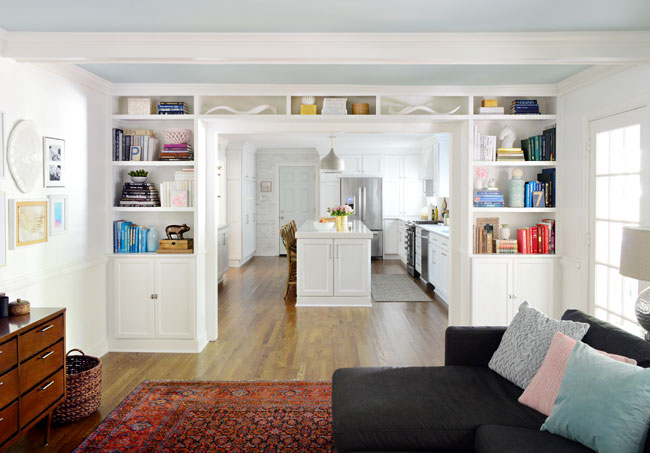
They add architecture to the room and make the living room feel cozy and lived in. Plus, we’ve got more storage too!
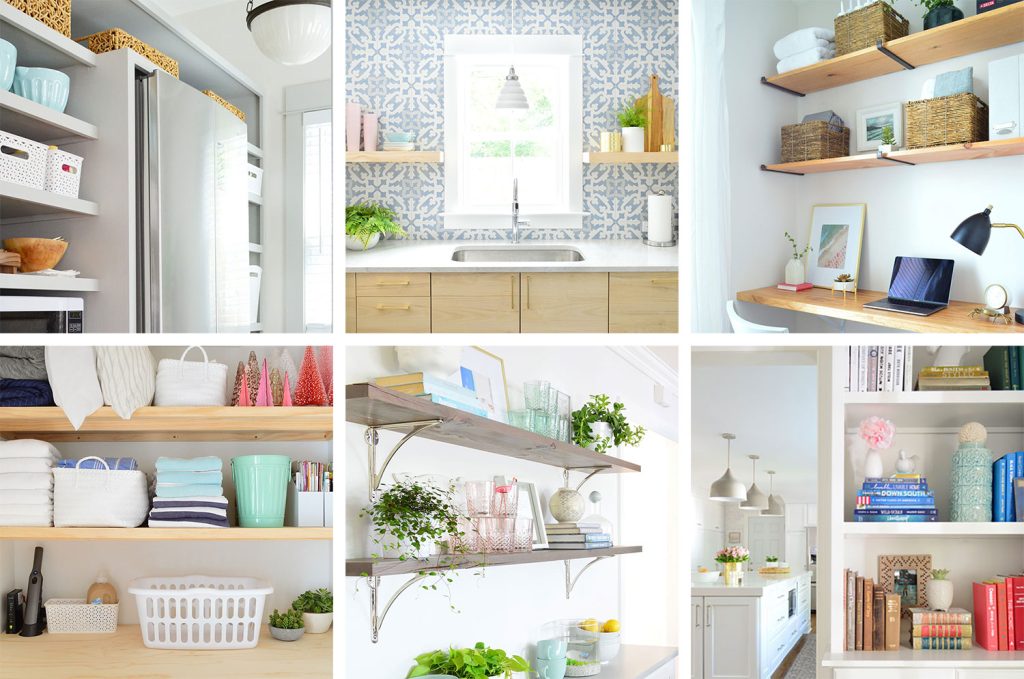
Decorating Your Built-In Bookshelf
Now for the fun part – or maybe tough part for some: filling your built-ins! We’ve got a whole post with tips and tricks for styling a bookshelf. You can also watch how we decorating our friends’ built-in bookshelves in this time lapse video below.
Note: You can also watch this video on YouTube.
More DIY Shelving Projects
If you’d like more DIY shelving ideas, we wrote a roundup of 15+ shelf projects you can build yourself. You can even see how we used a similar technique shown here to create kitchen pantry shelving!
P.S. And when it comes to the items in our house, we hear “where’d you get that?!” a lot – so here’s a page full of our home’s paint colors & stuff we’ve bought/loved.
*This post contains affiliate links*
