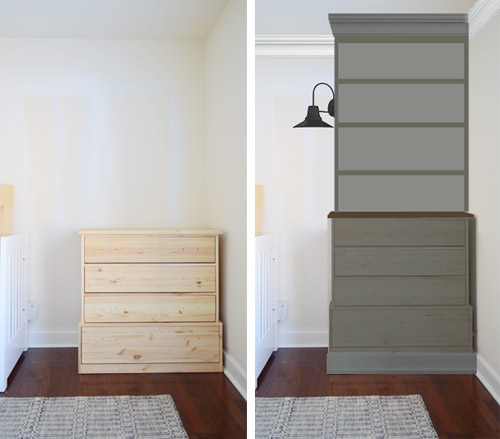
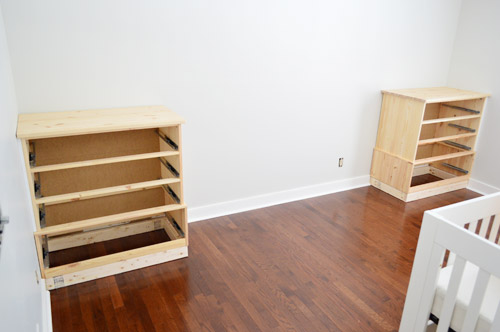
It’s been a busy but productive week in the nursery built-in department, so I’m going to cover a lot in this post. Hang on to your hats, crank up your favorite Swedish electropop, and be prepared for some nitty-gritty detail on how we began the transformation from free-standing Ikea dresser to built-in dresser/bookshelf combo (that’s not a finished result on the right, by the way, it’s just photoshop).
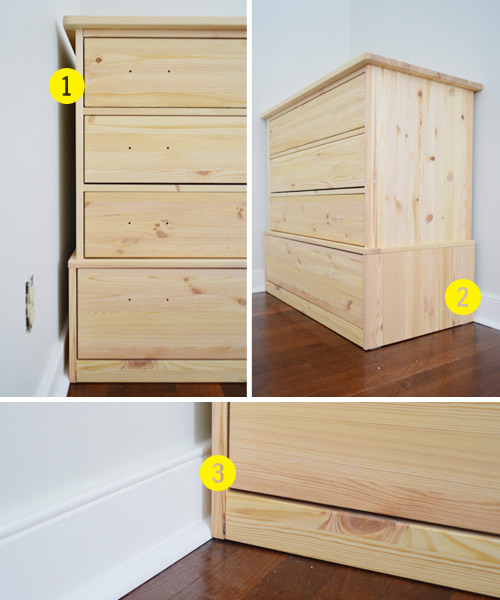
As you might recall, we bought two FJELL dressers because they were the size we needed and they were made of solid wood. But they did need a little additional help when it came to giving them a built-in look:
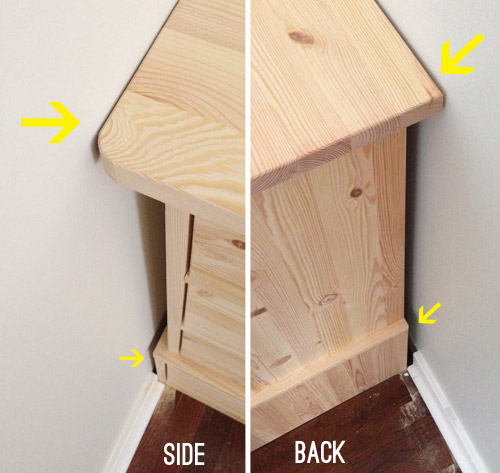
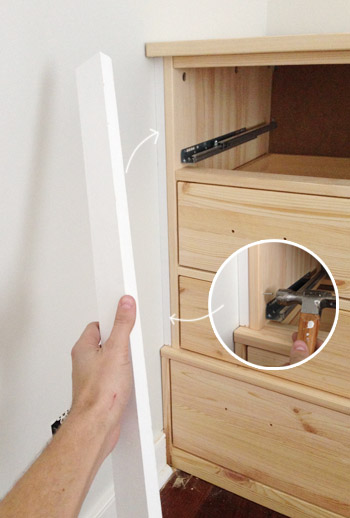
- The indented side profile meant it couldn’t sit flush to the wall, leaving a pretty glaring gap that needed filling
- The nursery’s baseboards on both the side and the back also prevented it from hugging the walls tightly
- The bottom drawer wasn’t built up enough from the floor to accommodate wrap-around baseboards, which we wanted to add to complete the built-in look
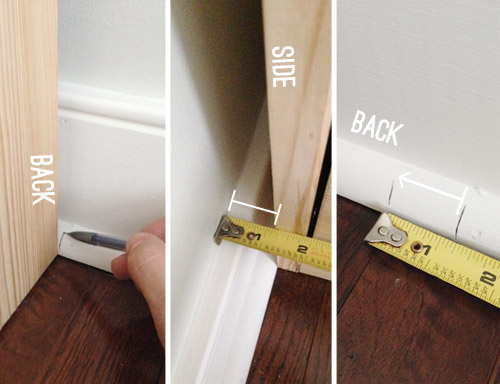
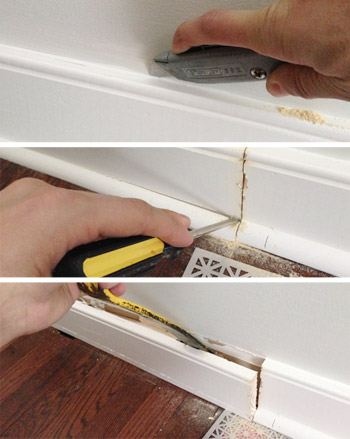
None of these issues were insurmountable, but it did take a some extra work to get them taken care of before we could move on to the fun stuff. Let’s start with problem #2: the existing baseboard, since it’s an issue that anyone would run into with any piece of furniture they’re trying to build-in. The solution? Cut it out. I just had to mark where to make my cuts. I marked where it sat originally, but kept in mind that when I removed the side baseboard, the whole piece would shift to the left against the wall. Same goes for marking the side cut (when I remove the back baseboard, it would sit further back).
To cut it out I used my Dremel Multimax. The metal radiator cover (leftover from this project) is just there to help protect the floor. You don’t technically need a metal grate, but I figured this way it would make a pretty distinct noise when my blade got too close, which was a nice warning to keep me from damaging the floor underneath it.
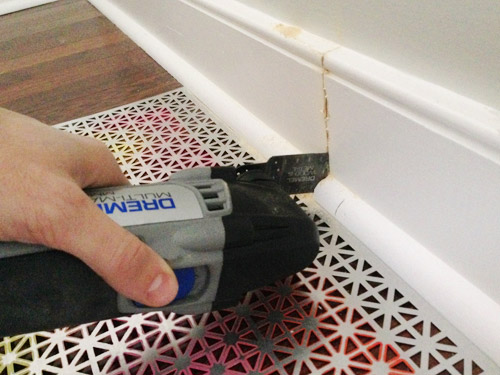
Once I had cut all the way through, I scored the seam between the wall and the baseboard with a utility knife (to make sure no wall paint peeled off with the baseboard). Then I just pried off the quarter-round and the baseboard.
With both the back and side baseboard removed, I excitedly pushed the piece back into the corner… only to realize that the top piece was now the problem. It was bigger than the bottom of the dresser, so the overhang was preventing me from getting the piece completely flush. Bummer.
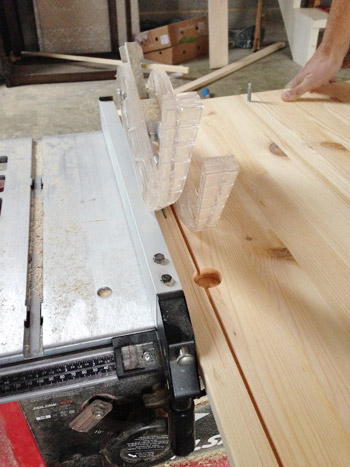
So Sherry and I had a little “meeting of the minds” and decided to trim the top a smidge to remedy the situation. Luckily, being an IKEA product, it was easy enough to remove the top (after I marked how much would need to come off). I was sure to write my cut measurements on the side that needed a trim so that once I got downstairs to my saw I didn’t accidentally slice the wrong end.

I set the guide on my table saw to the correct measurement and just sliced the two sides accordingly. This is a moment we were particularly thankful that we went with a nice sturdy dresser made of solid wood (and not particle board, which can be tougher to cut cleanly).
With the top cut and reattached, the dresser now sat nice and flush against the wall on the back… but I was still dealing with a gap-on-the-side (problem #1, if you remember).
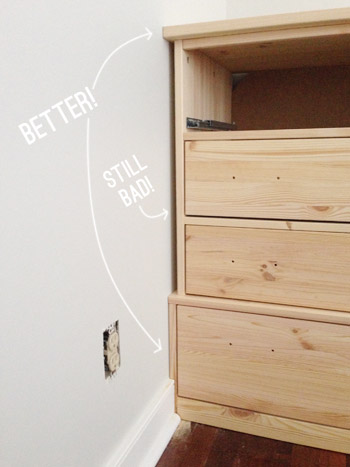
This was an easy solution because the gap just happened to be 3/4″, which meant I just had to slip a 1 x 2″ piece of scrap wood in there (after I cut it to the right length with my miter saw). It was actually a tight enough fit that it might’ve stayed on its own, but I put a couple of nails through the dresser into it, just to be safe.
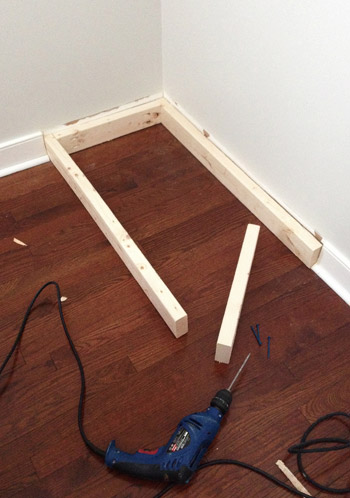
The last and final issue (#3) was building up the entire piece so that the bottom drawer wouldn’t be blocked by the new baseboard that we wanted to wrap around the base of each dresser. We decided a simple base/platform for the dresser to sit on would be nice and simple, and would buy us the extra height that we needed. Since it wouldn’t be visible, we just chose some 2 x 4″ framing lumber (since we needed it raised about 3.5″ off the ground). I cut the pieces and then attached them to each other in place, using my Kreg jig and some nice heavy duty screws.
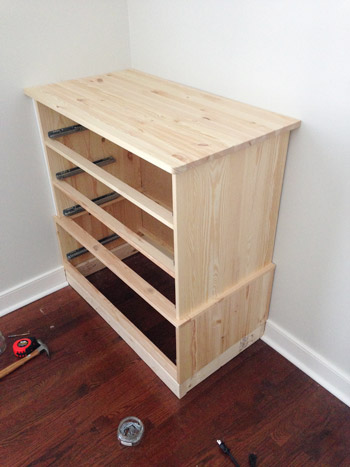
Here you can see how the dresser (sans drawers at the moment, for easier moving) sits right on top of this base. I didn’t actually attach the dresser to the base, which leads me to my next point…
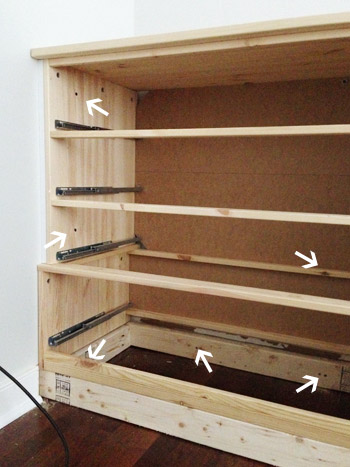
Securing everything in place was really important. We didn’t want this thing to move an inch – especially movement of the tip-over variety (dressers can be especially wobbly if someone pulls all the drawers out at once). So using my stud-finder I found as many places as I could to drill through nice solid wood (i.e. not the thinner backing piece) into studs – along both the side and the back. Not only did that help make things super flush against the wall, but both the base and the dresser became rock solid in their placement. Phew.
I know all of that didn’t seem terribly complicated (or exciting), but there was enough careful measuring, cutting, and screwing together, that it took me a good day-ish to complete… especially since I had to do it twice over.
I was deep into building mode at this point, but logic told me that I should pause construction and Sherry and I should do some of our painting and staining before going further. Taking time for these steps while everything was still apart would mean less edging and taping, so it would hopefully save us time in the long (and result in a really clean look).
First up was staining the top, since we decided we wanted to take advantage of its wood grain texture and make it contrast a bit from the rest of it. We had two stains on hand that we’ve always liked, so it was just a matter of choosing which one worked for this application.

We were having a hard time judging based on the cans, so we decided to just look at real projects that were already sporting those colors. Clara’s dresser was Red Mahogany and my bike frames were Dark Walnut.
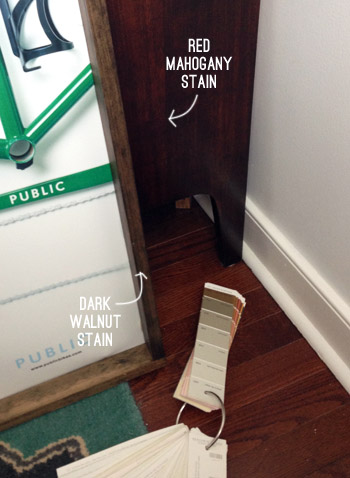
It’s hard to tell from that picture above, but in person the Dark Walnut color was closer to the floors (Red Mahogany was darker) and was also the exact tone that we’d used on the bike frames that would go in the room, so that made the decision pretty easy.
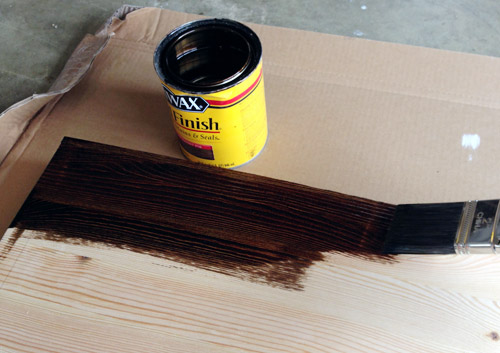
I removed the tops, took them out to the garage, and got to staining. They each took two coats of stain followed by two coats of Acrylacq sealer, which Sherry brushed on (it’s non-toxic and awesome for sealing in any off-gasing from non-eco products like the stain). Including drying time, this step stretched over about four days, but each coat went on pretty quickly, so a lot of that was just drying time.
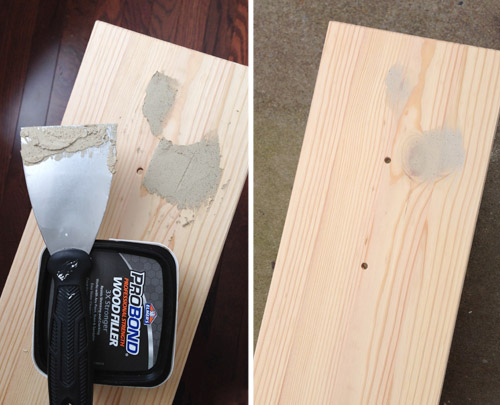
But we didn’t sit idly by, we had two whole dressers to paint. Except one thing we worried about – which some of you explicitly warned us about – was the potential bleed-through. Strong knots like these have a tendency to make stains seep right through a paint job over time, even through layers of primer and paint in some cases.
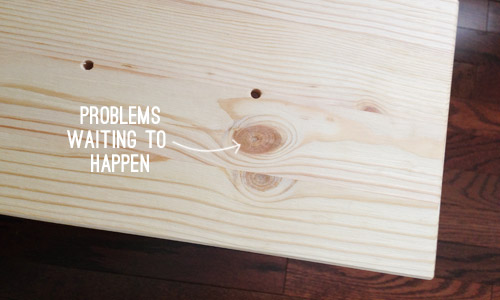
So thanks to some of your warnings and a little bit of research on Sherry’s part, we decided to take a couple of knot-busting tricks for a spin. The first was to cover them in wood putty, since it’s supposed to seal the knots and keep them from bleeding. I’ll admit I wasn’t crazy about this technique, mostly because it was time consuming (this piece has LOTS of knots) and when it came to sanding down the dried wood putty (which I did with a palm sander) it was a thin line to walk between getting it smooth again and sanding all the putty off completely. In the end I think we got a nice thin glaze of putty over most of the knots though, which did feel like added protection.
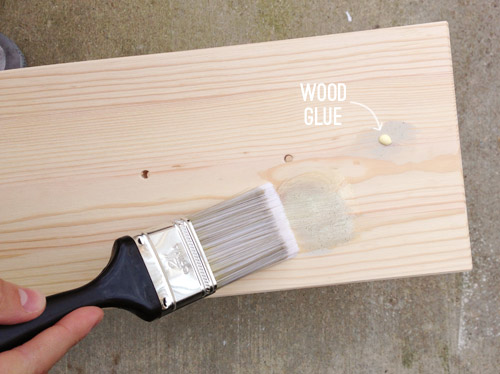
Sherry also had another trick up her sleeve (thanks Internet!), which was painting a thin layer of wood glue over each of those puttied knot areas. This technique was considerably faster (glue is surprisingly easy to paint with) and it didn’t result in any sanding dust getting everywhere.
We could’ve avoided the putty and glue by using a shellac-based primer, but since we try to keep things as fume-free as possible (especially in a nursery where a newborn will soon reside), we prefer to use Kilz Premium as our primer (it’s VOC-free). We used that on our kitchen cabinets a month ago, which were darker and had their fair share of knots, and nothing has come through their crisp white finish, so it does seem to do the trick in most cases – and the wood putty and glue that we used on the dresser feels like nice added insurance.
Not to skip ahead or anything, but it has been a few days since priming and painting, and so far not even a hint of bleed has occurred (sometimes things bleed right through the primer before you even get to the painting step, so it has been really comforting). Only time will tell if these techniques really work for the long run, but you know we’ll keep you posted either way.
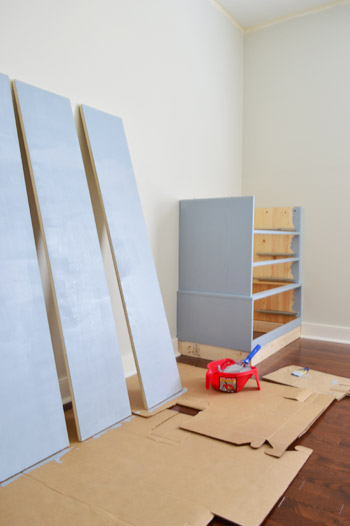
Speaking of the priming step, we already had some Kilz Premium leftover from when we painted our bedroom dark blue, which is why it’s tinted.

We probably didn’t need tinted primer, but we appreciated the chance to use up this can. Sherry detached and rolled all of the drawer fronts downstairs in the kitchen (it was too cold in the garage) and upstairs I rolled the bases in place, along with a few pieces that I had already cut for the top part of the build.
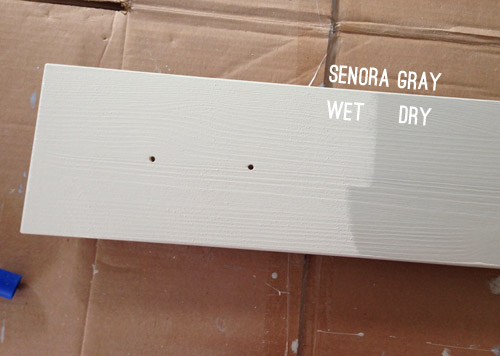
With the primer dry, we could move on to our first coat of paint (we went with Senora Gray in Advance paint, which is made for furniture and cabinetry, and has some nice self-leveling and low-VOC perks). It’s the same paint we used on our office cabinets in our last house, along with our last two kitchens. Those office cabinets were beat on by Clara with wooden trains when she was younger, so we love how durable it was.
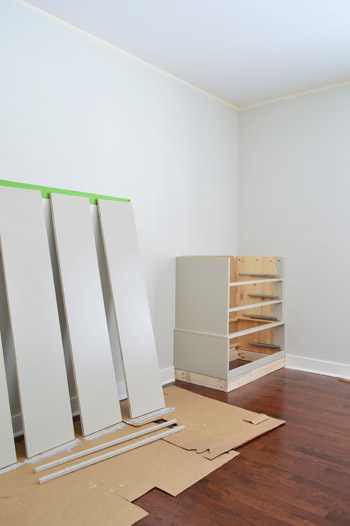
The color nearly gave us heart palpitations when it first went on. It was so light and so, I dunno, beige. We actually triple checked the swatch and can to make sure they had mixed it right. Fortunately it dried considerably darker and much closer to what we were envisioning. Phew.
Although I’ll admit we did second-guess the color a bit. It’s not nearly as dark as our photoshopped rendering, but that was on purpose. After doing that mock up, Sherry found this inspiration picture (it’s originally from Ballard Designs) and that’s how we picked Senora Gray for the built-ins and Going To The Chapel for the walls (more on that process in this post).
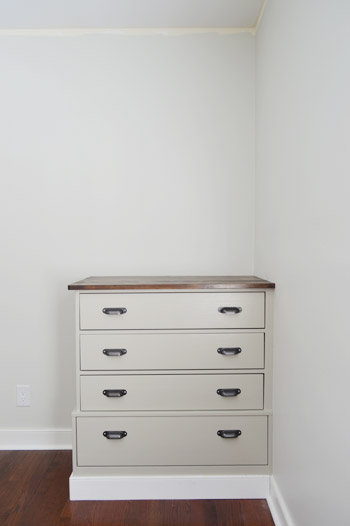
Still, I think Senora Gray turned out a bit lighter than we expected – namely in that it doesn’t contrast with the walls as much as we thought it would (even though it’s four squares below the wall color on the swatch card). We considering picking a new color before applying our second coat, but we decided it was a blessing in disguise, because it makes the stained wood top and the hardware pop really nicely thanks to more contrast, and as much as Sherry and I might chose moodier built-ins for ourselves, we keep trying to remind ourselves that this is a room for a little boy (and it only has one window) – so keeping things lighter isn’t a bad thing.
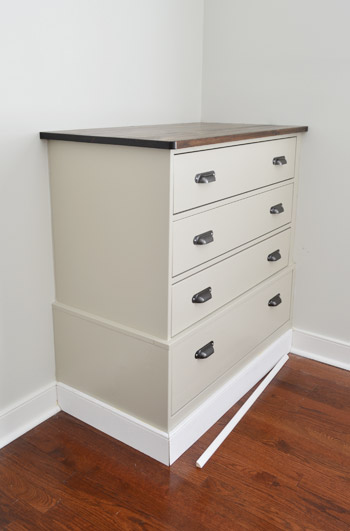
We finished both coats and put everything back together – including the stained top, the hardware (which came with the FJELL originally), and even started attaching some of the molding on the floor. That baseboard and shoe molding will be painted Senora Gray too – we just have some caulking to do first.
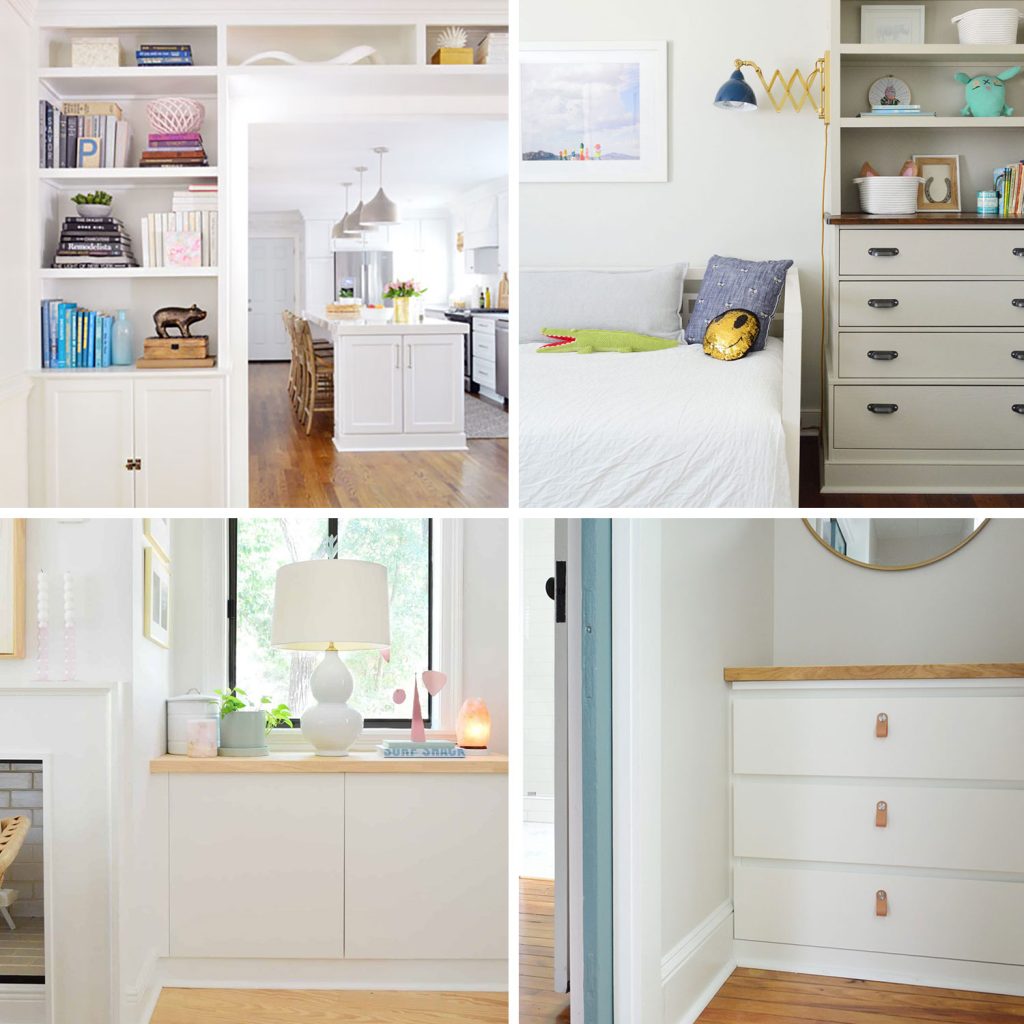
Update #1: People are wondering how we decided to paint the baseboard (and the crown we’ll be adding) to match the built-ins instead of keeping them white. We think it could look good either way, but we just prefer the look of an entire piece from floor to ceiling being the same tone (as opposed to accenting something like baseboard or crown by choosing to make it a contrasting color – especially since we already have the stained wood top as an accent). Here’s an example of a painted built-in with the baseboard and the crown in the same color, which we really like.
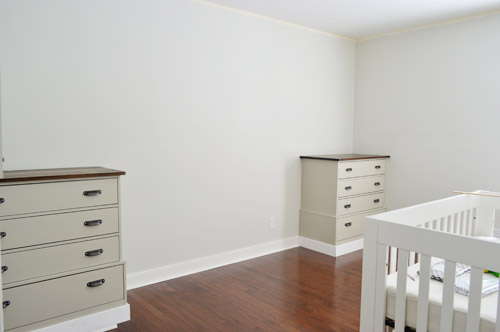
We’re super psyched with how they’re turning out. I know they’re a bit anticlimactic without having their bookcase tops on yet, but after all the time it took to get this far we relished in them at least looking partially complete.
Update #2: A few others have asked if we’ve thought about filling that indentation on the inside edge of each dresser for more balance. In person we actually really love that added detail (we feel like it gives them some special architecture, and once the crib is between them it’ll be a nice little accent). Of course we could always change our minds and add something to fill that down the road, so we’ll keep you posted!
Assuming things stay on course the next couple of days, we should have these completely finished – built to the ceiling and primed/painted – by Wednesday or Thursday. Which is a huge relief because when I first started planning these guys I felt like I’d be lucky to have them done before baby boy arrives. Guess I kinda overestimated the task!
We’re definitely looking forward to crossing off the biggest project on our to-do list with ten weeks left for the fun stuff (Sherry can’t wait to tackle things like bedding, mobile-making, art, curtains, a bold green closet door, adding sconces and a light fixture, and doing something exciting to the wall between the built-ins where the crib will go).
More Built-In Storage Projects
We’ve done similar cabinet built-in projects in several spaces, so if you’d get more ideas and inspiration, be sure to check out some of the posts below:

Katy @ The Non-Consumer Advocate says
Wow, you are going to have A LOT of storage for this baby boy. Of course, they’re only babies for a short period.
Sniff . . .
Great job!
YoungHouseLove says
I know, right?! I keep thinking “I want this in my room!” – but we figure we’ll blink our eyes and be saying “how does he have so much stuff and where can we shove it next?!” in a few short years! Haha!
xo
s
Anele @ Success Along the Weighn says
Excellent job! They look great. I think you may have just chosen our living room color! Senora Gray!!
Julia [Chris Loves Julia] says
We tackled an Ikea dresser for our nursery this weekend, too! (http://www.chrislovesjulia.com/2014/02/ikea-tarva-dresser-makeover.html)
Nursery + Ikea twins. :) The hardware on your dresser is so killer. I can’t wait to see this project completed, guys!
YoungHouseLove says
That looks amazing Julia! You guys did a fantastic job! Love those details you added and the sweet color.
xo
s
Sarah says
Julia- your dresser makeover is amazing! I think that’s one of the best IKEA hacks I’ve seen, what an awesome idea and it looks to custom and luxurious. Thanks for sharing!
Katy says
Looks amazing!!! It really looks like it was an expensive build.
YoungHouseLove says
Thanks Katy!
-John
Jarrett says
These look fantastic! Nice paint choices, and trimming them up a bit to make them appear built in was a great choice. I’m sure the top piece will be a great addition too. Nice work.
Jess @ Little House. Big Heart. says
These are looking really great! I would have been too chicken to cut into the existing baseboards though…
Can’t wait to start seeing some pops of color!
haverwench says
Wow, am I actually the first to comment?
I just wanted to say: save those baseboard molding pieces that you cut out! You never know when you might need to replace a piece elsewhere in the house somewhere down the line.
YoungHouseLove says
Thanks for the tip! We’re storing them in the garage just in case!
xo
s
jessica says
what’s the difference between these minwax products and the polyshades you used on railing/kitchen cabinets? How do you know when to go with what? Thanks!!
YoungHouseLove says
For raw wood we’d always go with Minwax I think, and for wood that’s already stained and sealed that we want to make a different color (especially deeper) without a ton of sanding and stripping, the PolyShades is great.
xo
s
Lisa | Winter Heights says
Looking good! And I like that as the boy grows a big boy bed could still fit into that little nook between the shelves.
Oh and your accent doors are totally making me think that maybe I can live out my bold paint color obsession in a more subtle way. Needless to say, I’m looking forward to that green door. :))
YoungHouseLove says
Ahhh, me too! Practical John keeps making me wait until we add things like curtains and art to pick the right shade but I’m ready to go rightthissecond! Haha!
xo
s
Chris says
One word… AMAZING. Want to come by and build some more over here??? Looking forward to seeing what’s to come.
YoungHouseLove says
I’ll send John right over! Haha!
xo
s
Joanna says
Good gravy, these look amazing! I love the contrasting stained top. Just perfect, you guys.
Janelle @ Two Cups of Happy says
I was a bit unsure about filling in the sides to make them flush. You’ve fully convinced me! I like how the thicker piece next to the drawers seems to visually ground the dressers to the wall. I think the lighter paint colour will let the pops of green be the star in the room too. Looking good so far! I house hunted this weekend :)
YoungHouseLove says
Wahooo! House hunting is always fun! Hope you find that diamond in the rough!
xo
s
Julianne says
Wow! They look fantastic, guys! Nice work. Most definitely a great colour choice, rather than anything darker. Can’t wait to see the rest go in!
YoungHouseLove says
Thanks Julianne! It really threw us off for a second, but now we’re completely smitten!
xo
s
Bree says
Seeing hacked ikea stuff is my fave!! I love the stained tops and hardware especially. It will be fun to see the finished product.
Do you guys have your furniture secured to the wall for the kid’s safety?
YoungHouseLove says
Yes, we have blogged about how we use wall anchoring systems for everything from dressers and cabinets to TVs and leaning wall mirrors. It’s so important! Spread the word!
xo
s
minneapplegirl14 says
Wow! I am so impressed with how the look of the dresser changed! Went from eh to having some serious swagger!
Tracy says
I totally used kitchen cabinets to build a window seat with cabinets and bookshelves in my son’s nursery. (Well, actually, my father did the building but still…my idea!)
http://lindybasenji.typepad.com/not_living_vicariously/2013/09/a-very-hungry-caterpillar-room.html
YoungHouseLove says
So awesome! What a lucky little guy!
xo
s
Eric @ AddSomeCharacter says
Well now I’m impressed. Those look great!
Sue Riggs says
I really love this project, very nice photography as well. Your step by step is very clear, makes me think I could even try this, LOL!
Kn says
Wow! That is a lot lighter! You didn’t paint a sample ahead of time? Is there a way to fix it- or are you going to tough it out?
YoungHouseLove says
We actually chatted about that in the post for ya (we decided to go with it, and think it could be a happy accident in the end since it makes the hardware and the stain pop – and the room only has one window so we might have regretted going too dark). Here’s that excerpt:
“We considering picking a new color before applying our second coat, but we decided it was a blessing in disguise, because it makes the stained wood top and the hardware pop really nicely thanks to more contrast, and as much as Sherry and I might chose moodier built-ins for ourselves, we keep trying to remind ourselves that this is a room for a little boy (and it only has one window) – so keeping things lighter isn’t a bad thing.”
xo
s
KN says
It would help if I could read, huh!?! Thanks for nicely explaining what I missed. I’m going to blame reading on my phone.
YoungHouseLove says
No worries at all! We’re wordy buggers, so sometimes things get missed :)
xo
s
Jackie says
I think what you’re doing is awesome but no offense – I think I liked the color of the stained primer more. I get what everyone is saying about having it be light and neutral, but the shade of gray is a miss for me. Have you thought about painting the back of the bookshelves a bright color or using wall paper? A bicycle pattern would look cool. I love the inspiration photos you picked – especially those 3-4 inch drawers in the one of the office. I’m sure you’ll be able to customize this even more with neat cubbies down the road – and I think that’s truly special. You both really do beautiful work down to the smallest details and it’s super impressive.
Best,
Jackie
YoungHouseLove says
Thanks Jackie! We’re definitely excited to fill the bookcases up and see what we think for the back (we have debated everything from bright green paint to wallpaper or fabric on foam core, so it’s removable).
xo
s
Jackie says
Thanks for the reply! Can’t wait to see :)
Melly says
Your hard work certainly paid off. Those look really sharp! Can’t wait to see them finished with the bookcases.
Brit [House Updated] says
Looks so good! All those steps are tedious, but make it look so nice! I’ve done the same thing with IKEA furniture and it works out great. We used a besta for our entry and built it in, in a similar manner, and now I love it!
YoungHouseLove says
Sounds really cool Brit!
xo
s
Susan says
Ace of Bases… hahahaha!
Great Ikea hack, can’t wait to see it finished. I really like your choice of staining the top; it looks fab with the hardware.
As always, you guys are inspirational!
Ally says
Awesome job! It really looks fantastic. Are you guys dead-set on painting the baseboard senora gray? I actually think it looks great in white — it looks seamless with the existing baseboard.
YoungHouseLove says
Yeah we’ve already started and it looks really nice! Since the upper cabinetry (even the crown around them at the top) will all end up painted, we think it’ll be an awesome built-in look. You know, like they’re big Restoration Hardware floor-to-ceiling pieces or something. Here’s an example of a painted built-in with the baseboard and the crown in the same color: http://www.pinterest.com/pin/253820128970759142/ We just love that look!
xo
s
xo
s
Kathryn says
Ally, I had the same thought. I’ll be interested to see the end result, because my first thought was, “but doesn’t that negate the built-in look vibe?” Can’t wait to see it come together. (Still think it looks great with the crisp matching white baseboard)
Chenell says
Nice job! I kind of like the baseboards left white…
Liz says
Looks really good so far, and I definitely would’ve been worried with the wet paint color too!
Have you thought about adding scrap wood to the other side of each so the bottoms are balanced on each side? For some reason the side gap having a scrap piece in and the other side not is looking a little off with my eyes.
YoungHouseLove says
We did consider that but actually like that little detail in person. These pics aren’t doing it justice but when the top shelves are all built-in/painted and the crib and the rug are back in place we think they’ll give it a little something extra – and when we add sconces it’ll be another “added hit of interest” towards the middle on each side that hopefully makes it all look custom. Here’s hoping!
xo
s
Monica says
I agree with Liz. I would have wanted to fill in the other side for more balance. I guess that would be easy enough to do in case you change your minds later. Can’t wait to see the finished project.
YoungHouseLove says
Oh yeah, we can always do that at the end if we change our minds :)
xo
s
Kristin says
Liz, I was definitely thinking the same thing about the wood on both sides of the dressers, but I figured John & Sherry liked that little detail. I’m so OCD sometimes that I can’t see the other options since its not even, but I’m sure once everything is situated it will turn out great, like everything of theirs does! :)
Alex says
I think I like it the way it is best; it makes sense for my eyes to have it be flush against the wall and “tiered” or at least have some variation on the other side. But, if it ever really bothered you guys and you didn’t want it to be different on each side, I suppose instead of filling in the crib-side with another piece you could just paint that 1×2 stuck in there with the wall paint to kinda trick the eye into the original shape of the dresser on both sides.
(omg. Can you imagine having to diagram that^^ mess of a sentence? Please ignore my syntax in favor of the point I was trying to make, ha!)
YoungHouseLove says
Haha!
xo
s
Mallory says
I love them! I’m definitely considering adding built-ins someday when I actually have a house :)
Flagless says
I quite like the look of the bottom thingies as they are. The whole thing, with the white, and the grey, and the brown on top reminds me of cake for some reason. And cake is always a good thing.
YoungHouseLove says
Haha! We had the same feeling about them (should we leave them white?!) but since the tops will be painted, all the way to the ceiling (including the crown) we think the little stripe at the bottom will be odd once they’re all built up.
xo
s
Maggie says
Have to say I concur! I love the way it looks with the white baseboard just wrapping around them…
Jess says
LOVE THEM! That color looks great with the stain. We will eventually need to do some dressers for our girls’ rooms and I love the idea of using the IKEA stuff and painting as we want. They never quite have the right paint colors for me.
Needle littel Balance says
I have to say I like the lighter color you chose in the end so much better than the one in the photoshop pictures. Nice! It´s more of this soft grey like old swedish furniture now, do you know which ones I mean? I also found your tips how to deal with the knots helpful!
YoungHouseLove says
Aw thanks so much! I definitely think we were nervous at first, but really love how it looks now. It’s such a sweet but still masculine tone-on-tone look. And with only one window I think it was the best thing we could accidentally do! Haha!
xo
s
Kelsey says
It is awesome because as he grows, there is so much room to change and repaint if needed. So for now, that color would be so adorable for a little boy. I love it, guys!
caroline [the diy nurse] says
I had forgotten about the tops because they look soooo good. I feel like if I did that it wouldnt have such a clean and professional look. Really well done! Jealous of your baby lol :p
YoungHouseLove says
Thanks Caroline!
-John
Teresa @ wherelovemeetslife says
I really like the color choices. I love seeing it all come together… I’m really looking forward to that green door :)
I actually accomplished a TON this weekend.. and I may get to blog about it too! That’s exciting for me these days. One boy’s bedroom 99% done and an entry way revamped with enough coat hooks for our family of 6.
YoungHouseLove says
That’s so exciting Teresa! Congrats!
xo
s
Lynn @ Our Useful Hands says
That looks stellar! Even without the build up it looks so kid pleasant. I think the color is spot on. Your wee one is going to have some kind of room to come home to it’s looking like.
My best, Lynn
*yesterday we had twins born into our friends family. Twins!
YoungHouseLove says
Congrats Lynn! That’s so exciting!
xo
s
Heather says
To me if the trim is painted the same color as the piece (gray) rather than the same as the rest of the room (white) it screams piece of furniture with trim attached rather than built-in. I’ve never seen built-ins with a different color trim than the rest of the room’s trim. What am I missing?
YoungHouseLove says
I definitely think it could look good either way, but to us since the crown will be painted as well (at the top) we think the entire piece from floor to ceiling in the same tone will look better – just so there’s not an odd looking slice of white on the bottom while 99% of it is another color. I guess one way of describing it would be that we prefer for it to all look seamless, and not draw attention to something as boring as a baseboard by contrasting it (especially since we already have a contrasting wood top on the dresser). Here’s an example of a painted built-in with the baseboard and the crown in the same color: http://www.pinterest.com/pin/253820128970759142/ We just love that look!
xo
s
Melissa Breau says
Did you do anything special to ensure the pieces between the wall and the upper half of the dresser looked seamless? It looks great — just wondering how you managed it!
YoungHouseLove says
We just tried to keep them flush with the dresser and then caulked the seams and primed/painted everything to get the smoothest look.
xo
s
candicemcc says
My goodness, these look awesome! Love them. Love the stained tops, love that hardware. Love.
Also, I’m in the middle of our kids’ bath redo? Busted out the Oyster Grey grout stuff? Oh. Em. Gee. I’m in love with that, too. It makes me think I can actually live with our tile now. And it makes me want to do the downstairs tile, which is a ginormous job. But seriously. I might. Thanks for all the inspiration! (Did I mention the shower curtain for the new kids’ bath has raindrops on it?) :)
YoungHouseLove says
SO GLAD about the grout stuff. Oh man, and a raindrop curtain sounds so cute!
xo
s
Jacki F says
Are you going to fill in the exposed side on the three shorter drawers like you did on the wall side?
The designer in me is thinking the four different widths is a little busy — but, that could be because the baseboards in the photo are such a stark white. I also think it would prevent a little head from hitting that lip when the Barnacle is old enough to move around on his own.
YoungHouseLove says
Just added an update to the post about that for ya :)
xo
s
Isabel says
Wow, this looks so nice! I think the color of the built-ins worked out really well and the stained top looks so handsome. I finally convinced hubby to let me do my DIY counter like your old desktop and it came out so nicely, he really loves it now :)
Pam says
I like the stained tops.
You guys must have really big bedrooms to be adding this much additional storage into the room itself? I have 3 kids and they all have used every ounce of floor space for playing, toys, sleepovers – especially as they get older and we rearrange their rooms for more specific tastes and privacy needs.
Also, I’m curious why the baseboard would be painted to match the dresser (which would imply “part of the dresser”) instead of the rest of the baseboard (which would imply “built-into the baseboard”)?
YoungHouseLove says
This room isn’t too big (it’s 11 x 13 I think) but we’ve noticed that even some very small houses (like tiny Cape Cods) tend to have built-ins for added storage (sometimes those little rooms need it the most). We’re hopeful that our son won’t miss a few square feet of floor space in those corners, since it seems like a nice trade for all of that floor to ceiling vertical use.
As for the molding/baseboard being painted, we’d rather not draw attention to something as boring as a baseboard by contrasting it (especially since we already have a contrasting wood top on the dresser). Here’s an example of a painted built-in with the baseboard and the crown in the same color (we just love that look): http://www.pinterest.com/pin/253820128970759142/
xo
s
Laura B. says
This looks amazing! It’s so incredible to think about how John’s carpentry skills have flourished over the years.
Any thoughts on keeping the baseboard and crown molding white? I saw a response to an earlier comment about how the baseboard would look odd since you’re planning to paint the molding…but maybe leave the molding white, too? I’m sure your vision will be amazing; I just thought I’d throw it out there that white might bring out the contrast of the beautiful built-ins.
YoungHouseLove says
Thanks Laura! A bunch of folks have asked about that so I added an update to the post :)
xo
s
Laura B. says
Awesome, and I love the example!
Lauren says
Love how they’re coming along! I have to say, though, I would definitely have left the baseboards and crown white. To me, that makes them seem “built-in” to the room. The contrast from the white base was nice, too!
Ah well, to each their own though. Can’t wait to see the finished product.
Jena says
Loving the way things are lookin’ in here, kids. Great job! Am I the only one who’s kind of loving the contrast of the white baseboards? I wouldn’t cry big buckets of tears if the baseboards surrounding the chests were left white.
I probably won’t cry either way. I have whoa-impressive control over my tear ducts when it comes to other people’s home improvement projects.
YoungHouseLove says
Haha!
xo
s
Laurea says
I like the lightness of them…they seem less obtrusive :)
YoungHouseLove says
Thanks Laurea!
xo
s
Emily says
This is turning into a really beautiful room! It’s quietly masculine and something your little barnacle can really grow into :) Great job!
Shannon [Our Home Notebook] says
This look amazing! I can’t wait to see how the rest comes together!
Jamie B says
Whoa! That looks super snazzy. Is it bad to be jealous of a baby’s bedroom? ‘Cause I am!
Great vision, and great job, so far!
YoungHouseLove says
Haha! I totally am – I want all those drawers!
xo
s
Reenie says
WOW!!! Looks great ~ love it.
Dana c says
LOVE the color and what a great way to create the built-in look!! Very inspiring ideas!! Thanks!
Penny says
Did you have to sand the dressers before staining or painting? These are going to be beautiful.
YoungHouseLove says
Thankfully since they were raw wood (not stained or sealed or anything) we didn’t – but if yours are it’s an important step to rough them up!
xo
s
Kerri says
Those look great! Working around trim can definitely be pain.
I helped install vinyl plank flooring (spent a lot of time cutting it to fit around trim) and painted trim this weekend (still have the paint on my nails to prove it!).
Can’t wait to see the end results!