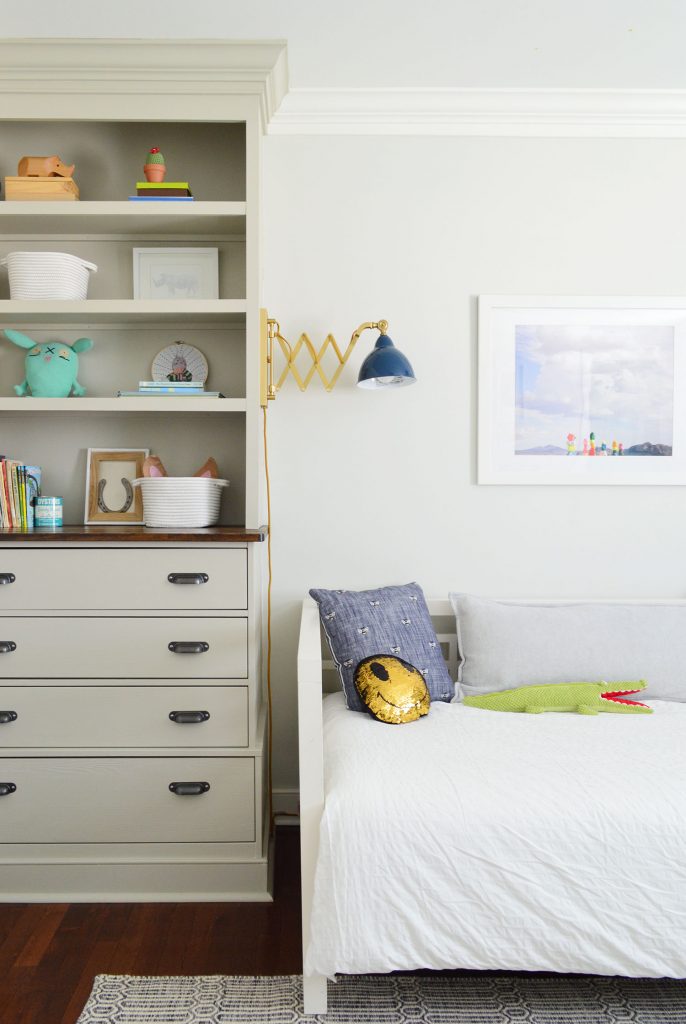
Today we’re going to show you how we built the bookshelves in our son’s room. It’s an easy project that we’ve since used to create custom shelving everywhere from our living room to our beach house pantry. But these bedroom shelves were our very first attempt at them and we absolutely loved how they turned out.
This tutorial specifically focuses on building the actual shelves, aka the top portion of these built-ins. You can separately read about how we first built-in the cabinet bases (it’s an Ikea hack!) and later finished them off with crown molding. But since not every bookshelf needs those features, we’re talking just about the shelving today.

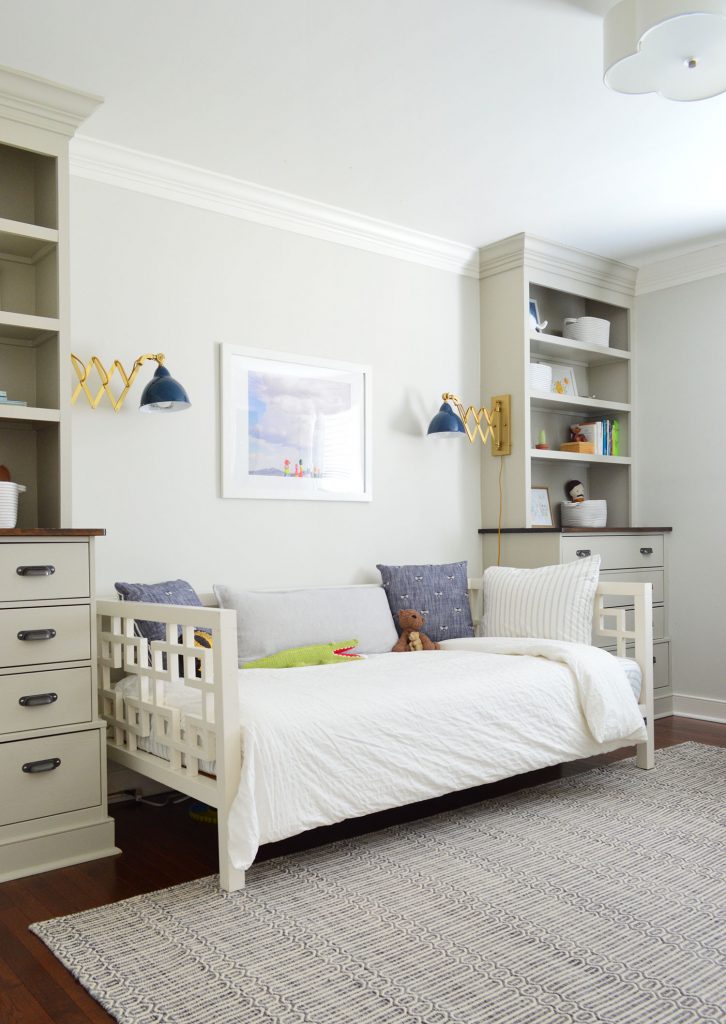
You also can take a tour of the finished room both in it’s initial version as our son’s nursery and then later when we updated it with a big boy bed.
Tools & Materials To Build A Bookshelf
Here are the supplies and tools you’ll need to build your bookshelf. If you don’t have a table saw or circular saw, try renting one from your local home improvement store. Some stores will also cut your wood for you, but this is a project where you’ll really like having one around.
- 1/2″ MDF or plywood for the shelves
- 1×3″ pine (ripped in half) for support pieces
- 1×2″ pine for face pieces
- 1×4″ or 1×6″ pine for top brace
- Measuring tape
- Stud finder
- 24″ level
- Clamps
- Nail gun with finish nails
- Miter saw
- Table saw
- Circular saw
- Power drill/driver
- Wood glue
- Paintable caulk
- Primer & paint
- Painting supplies
The exact amount of wood you’ll need depends on the specs of your bookshelf build. That’s why the first step is so important!
Step 1: Plan Your Build
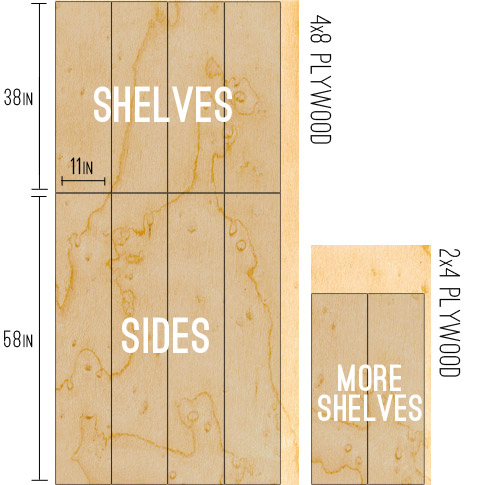
Start by measuring your space and sketching out your bookshelf on paper. This will help you figure out how material you may need. You can still adjust as you build (like you might change your shelf spacing as you go) but always take time upfront to make a plan. For us, this made sure we bought enough – but not too much! – plywood for our shelving. You can see below how figuring out exactly how to maximize a 4×8′ sheet of plywood was almost like a puzzle.
NOTE: We used plywood for this build to better match the subtle wood grain in the base cabinets. However, for a smooth, painted finish we recommend using MDF instead.
Step 2: Cut Your Shelf Pieces
The first building step is to cut your plywood or MDF into the big shelves and side pieces. You can do this with a table saw or circular saw, like you see below. That photo is actually from our pantry shelf project because we got our plywood cut in-store for these bedroom bookshelves. The Home Depot guy ripped my plywood into 11″ strips after seeing my sketch, which was a huge help. He was able to lock his big saw into place to ensure I got equal and even cuts on all of my shelves.

If you are cutting at home, I recommend careful measuring and taking your time. You can also see above that I had clamped two pieces of MDF together so that I could make two cuts at once to ensure the shelves matched.
Step 3: Prime & Paint Your Shelves
We find it easier to paint all of our big pieces BEFORE installing them. It’s typically easier to paint flat surfaces with a roller when you don’t have to worry about edging against walls or cutting in to corners. You will still need to do some touch-ups after building, but this saved us a lot of time.
Just be sure to prime the pieces first, especially if you’re starting with raw plywood or MDF. The color we used was Benjamin Moore Senora Gray.
Step 4: Build Your Bookshelf Frame
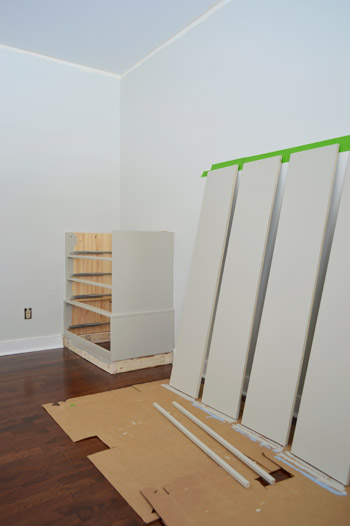
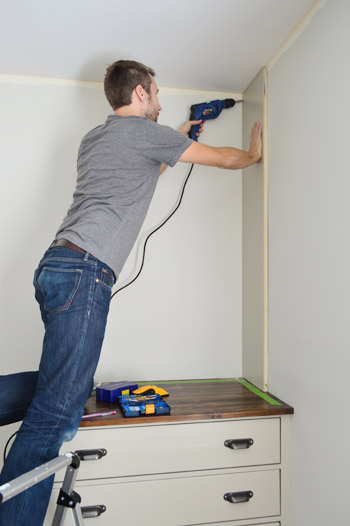
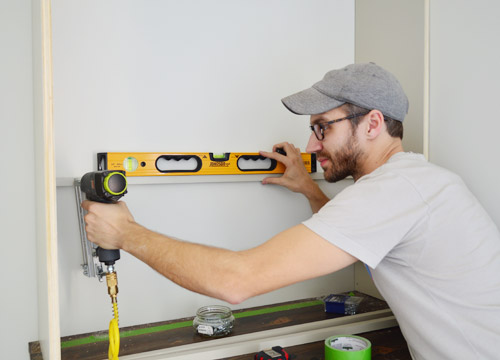
One our paint was fully dry, we began construction by securing one of the tall side pieces directly into the wall. We used a stud finder to locate studs and attached the piece with countersinking screws that we could putty over later.
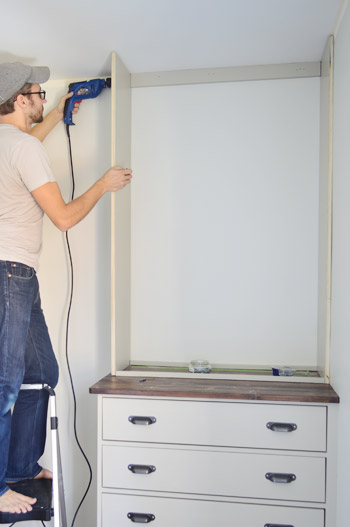
Attaching the next side piece was a bit more involved since I wasn’t screwing directly into a wall. I knew it would become sturdy once I added my shelving, so the challenge was to keep it in place in the meantime.
To do that, I attached a 1×3″ brace piece along the top of the back wall into a couple of studs. This piece wouldn’t be visible in the final bookshelf, but it gave me a place to screw the vertical side piece into. An alternative plan would’ve been to purchase a large piece of MDF or plywood to act as a solid back behind the bookshelf. We opted to just use the wall itself instead, mostly to cut down on cost.
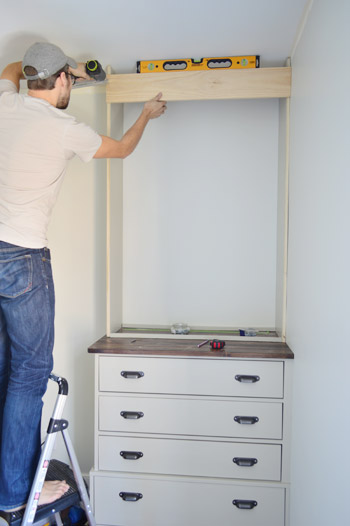
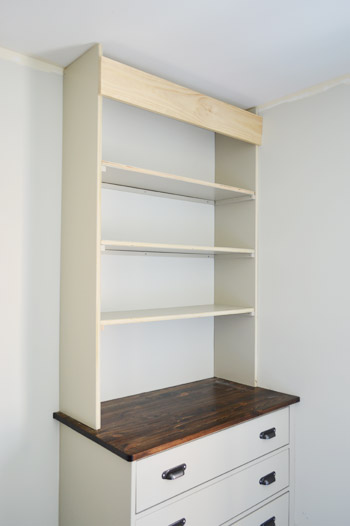
I also add a 1×6″ brace piece across the front of the bookshelves to help keep things square. I hadn’t planned on this piece originally, which is why it’s not painted.
You can also see some pieces at the bottom helping to keep things square down by the base of the bookcase. These were cut to the same length as the eventual shelves just laid there temporarily.
Step 5: Add Your Shelves
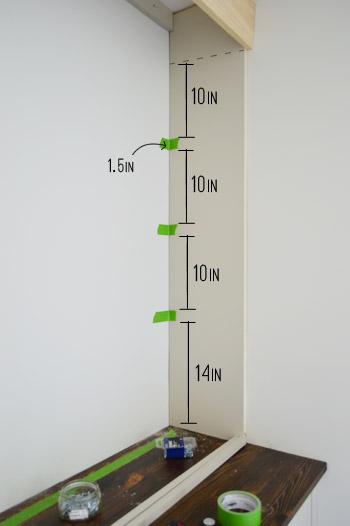
With the sides in place, we turned our attention to the shelves. First we needed to finalize our shelf spacing, so we broke out a ruler and some painter’s tape to help visualize spacing options. Ultimately we ended up with evenly spaced 10″ shelves with a little bit of extra room at the bottom. Just be sure to account for the 1.5″ width of the shelves themselves, as represented by our painter’s tape.
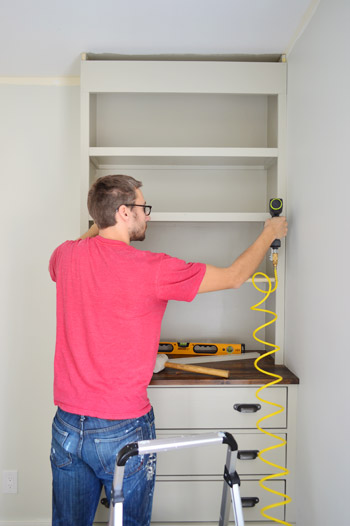
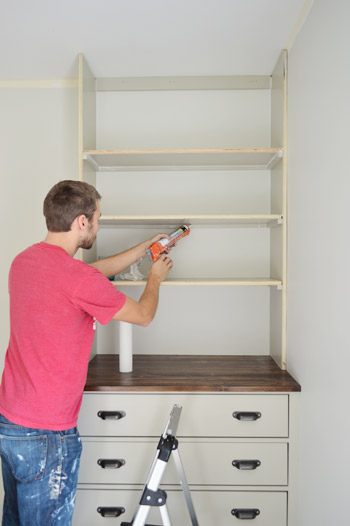
Next it was time to attach the shelf supports. These are thin strips of wood under each shelf on 3 sides. I cut these pieces by ripping a 1 x 3″ along my table saw into .75″ wide pieces. This will make more sense in a moment, but any thicker than that and the supports would be visible below the face pieces added later to the front of each shelf.
I first nailed the braces into the wall and the sides being sure to keep things level as I went. This was just a speedy way to get everything in the right place. Then I went back and screwed each piece more securely into a stud (along the back) and into the wood (along the sides). This enables the shelves to bear more weight over time.
Once all of the support pieces were screwed in, it was easy to pop the plywood shelf pieces into place. After all, we’d already cut, primed, and painted them!
I also nailed each shelf down into the brace piece so they won’t pop out or jiggle or anything.
Step 6: Finish With Face Pieces
The next step is my favorite because it makes the bookshelf look way more finished. We cut and nailed in 1×2″ pine pieces (already primed and painted) to cover all the exposed edges along the front of the shelves. This not only hides the raw edges, but also makes your shelves look thicker than they actually are! This is also why you want those support pieces cut thinner in the previous step.
You can also see before this step I had done some painting – both the back wall and the brace piece at the top. I also had done some caulking, but you can do this as a final step as well.
Step 7: Caulk & Touch-Up Paint
Once everything is constructed, you’ll want to caulk your seams, fill any nail holes, and do any necessary touch-up paint. The caulking will take some time, since you’ll want to caulk any place two surfaces meet: shelf meets wall, wall meets support piece, support piece meets shelf, etc. We did a little bit of this as we went, especially to fill gaps where our wall wasn’t very flat.
Once your caulk is dry, you’ll need to do touch-up paint over it. This may feel tedious because you already painted, but I promise you this is much faster to do quick touch-ups than be painting from scratch at this point.
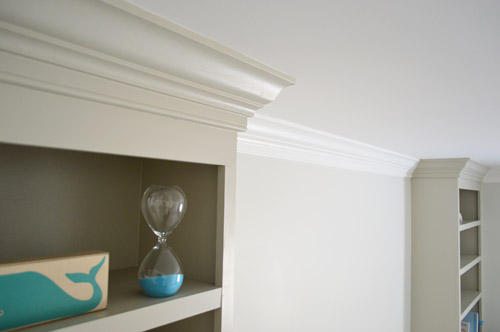
Step 8: Add Crown Molding (Optional)
For our bookshelves, we decided to finish off the top with crown molding that integrated with the crown we’d put installing around the whole room. We would be using a “beefy crown” method we’d tried first in our daughter’s room. It’s involved putting a piece of baseboard around the top of the room first, to make the crown look thicker.
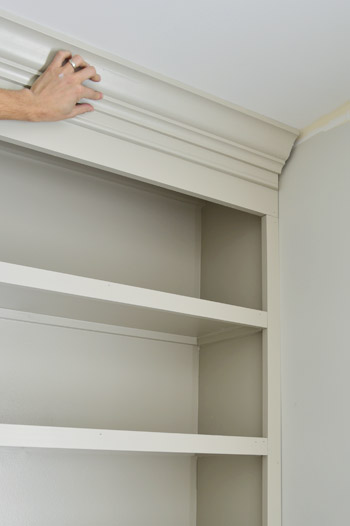
You can read more about the process of installing crown molding in this room.
We love how these bookshelves turned out, especially how easy and affordable they were to create – they were about $60 each. And that includes all of the material for the bottoms too! They’ve also been great for both functional storage and cute display items.
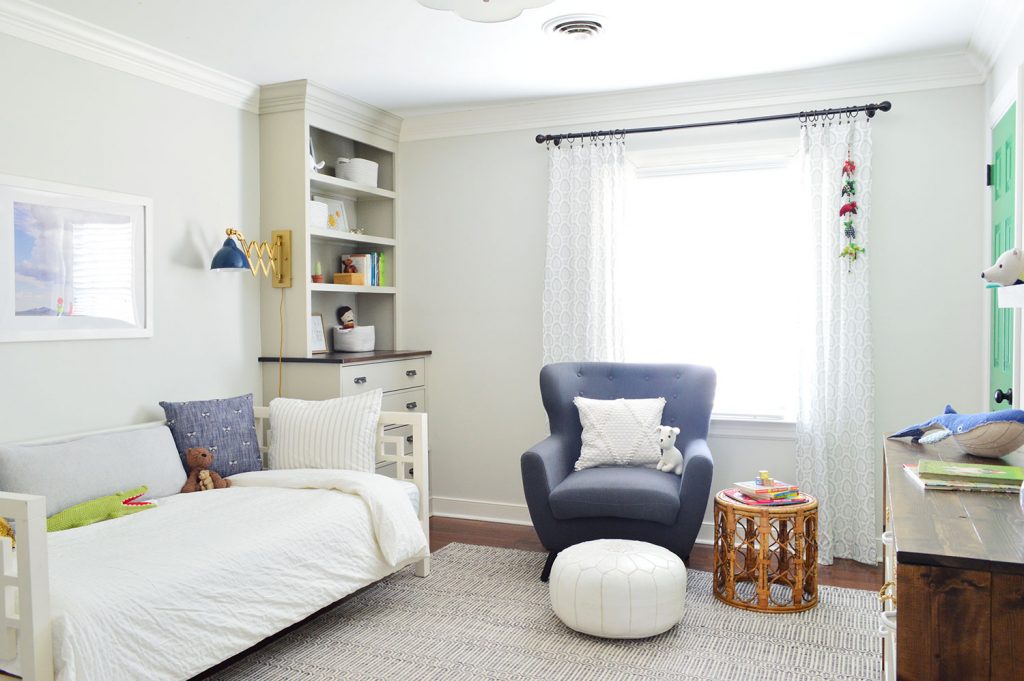
Again, you can read more about how we finished this room in its first iteration as his nursery, and then a few years later as a big boy room.
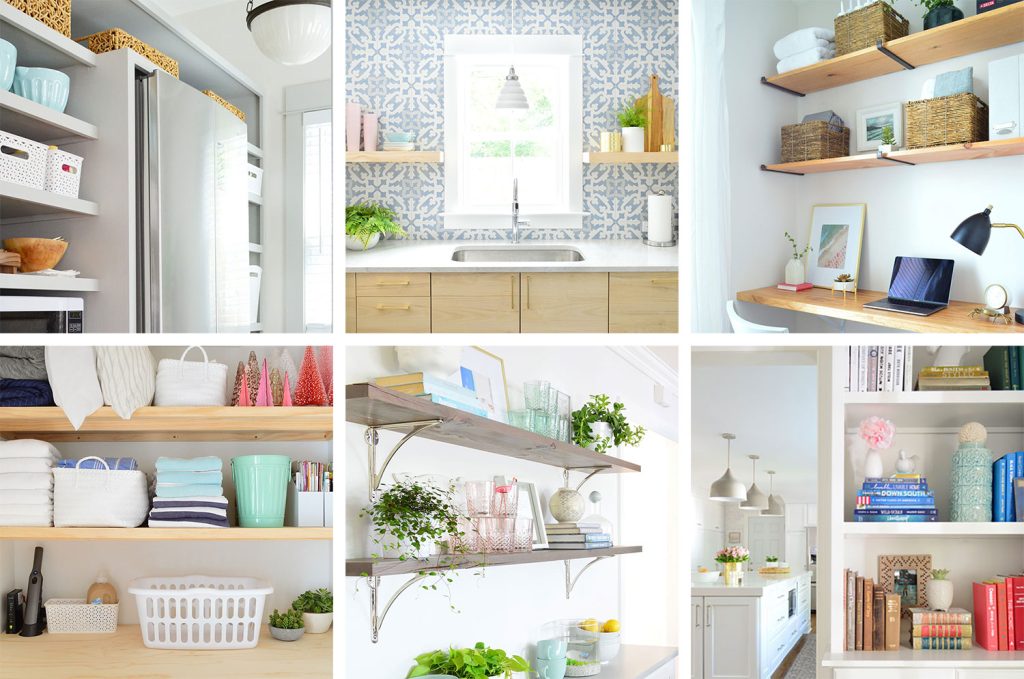
More DIY Shelving Projects
If you’d like more DIY shelving ideas, we wrote a roundup of 15+ shelf projects you can build yourself. You can even see how we used a similar technique shown here to create kitchen pantry shelving!
P.S. And when it comes to the items in our house, we hear “where’d you get that?!” a lot – so here’s a page full of our home’s paint colors & stuff we’ve bought/loved.
*This post contains affiliate links*

Mary | Lemon Grove Blog says
This post excites me way. too. much. This looks a-maziinggg!! So excited to see this room continue to transform! P.S. Loving the lighter color on the built-in!
Megan CC says
Amazing!Such an inspiration; hope you don’t mind if I totally copy this in my daughter’s ‘big girl’ room!
MP says
Just gorgeous and elegant. John, you are a true craftsman!
Josh says
Those look so good! Well done.
We’re considering a more built-in look for our ikea window seat. Think I might steal some tips/tricks from you guys if ya don’t mind. :p
http://thisnestisblessed.com/tag/window-seat/
Jess says
Love, love, love them! Great job.
Sarah says
They look great! I have the rugby stripe bins for our Expedit and I love them! They look great and the larger size is awesome.
Heidi says
Those built ins are just gorgeous. I’m glad I”m not the only one who suffers from uneven walls. Thank goodness for caulk! And I’m going to have a very difficult time getting my husband to wear safety goggles if John isn’t even wearing shoes when he builds things!
http://jax-and-jewels.blogspot.com
YoungHouseLove says
We definitely have shoes on when we’re sawing and cutting lumber out in the garage, they just get covered in sawdust so we slip them off at the door (hence the barefoot look upstairs when we’re doing lighter duty things like nailing or screwing).
xo
s
Paula says
We do stuff like this in barefeet all the time, but when my inlaws visit (they always end up helping us with projects) my father-in-law will take a very serious time out and say “can we all put shoes on before we proceed?”
Like you, we laid our own hardwood floors and I am VERY protective of them, so I guess I figure if my floors are safe, my feet are safe, and I am NOT letting anything happen to those floors! =)
karen says
hahaahahaha…OH SHERRY!! where is my mind? i almost spit out my soup at the last part of your reply.
YoungHouseLove says
Ha! How did I not see that?! Walked right into that one…
xo
s
Nina says
Looking good!!
Now, I know you guys are a barefoot household and all, but don’t you even wear shoes when you’re working with power tools and heavy stuff? Not to get all parental on your butt … but put something on your feet! :-)
YoungHouseLove says
Thanks Nina! We definitely have shoes on when we’re sawing and cutting lumber out in the garage, they just get covered in sawdust so we slip them off at the door (hence the barefoot look upstairs when we’re doing lighter duty things like nailing or screwing).
xo
s
Lisa says
Beautiful job on the built-ins.
Lisa @ Double Door Ranch says
I love love love these!! My wheels have been turning about installing some built-ins in my dining room. We don’t ever use that room (we’re couch eaters…for shame) So I’m thinking we could do similar built-ins and add a window seat in between which would still be seating for our dining table. That way we still have the option to actually, you know, DINE in the dining room. Wild.
Anywho…my point was…good job. ;)
http://www.doubledoorranch.com
sarah says
looks so good! lucky little Barnacle. I would move into that room if I could.
Kate says
I LOVE those! I’m a little scared of putting in anything built in (what if I feel a need to rearrange later on and they no longer work?) but I love how those have turned out! I especially love the idea of shelves over dresser. I’m wondering if something along that line would work well for my daughter’s eventual “big girl” room (well, if she ends up getting a little sibling – if not, she can keep her furniture!).
Siobhan says
Looks great!
Would it be possible to add a shot of the whole wall with the crib in place? Just trying to get the whole picture….
Thanks!
YoungHouseLove says
Yes, it’s a mess right now (stuff in it, etc), but we’ll be sure to include that in our next post!
xo
s
Kara says
Everything is looking great! We’re expecting our first in March and I was thinking maybe our 6 drawer dresser and closet was storage overkill, but now I’m thinking I’ll be glad we made the investment in the furniture.
Also, in case you’d like to make fun of my morning brain…
When I read “but we’re trying to invest time and money into more permanent-but-flexible pieces for this guy, especially since we plan to be here long-term”, my brain read that you guys were planning for him to be here long-term. I was thinking, well that’s nice, they plan to let their son stay for a while lol.
YoungHouseLove says
That’s hilarious!
xo
s
Kate says
Don’t worry Kara, it fills up more quickly than you realize! If you end up with extra room when they’re still a baby, you can also always use the space to store the next size up clothing, clothes they’ve outgrown but you haven’t gotten a chance to pack up for storage yet, etc.
Kristen says
I read the same thing! I read it “since he plans to be here long term” and I thought “well gee, I hope so” hahaha
YoungHouseLove says
Announcement: Barnacle gets to stay!
xo
s
Megan CC says
You won’t be sorry to have what might seem like overkill storage now. Babies grow fast, along with their collection of stuff. We got the 8 drawer Ikea Hemnes dresser (doubled as changing table), plus have a good size closet. Like Kate said, you can always use the extra space for bigger/smaller clothes until they fit/you pack away.
betty says
amazing, john!! you really have become quite the craftsman! I cant wait to see the rest of it come together!!
YoungHouseLove says
Thanks Betty!
-John
Sherri Eakin says
These look incredible!! Absolutely love the color…and the finished tops…and the drawer pulls! Ok loves it all. Great job! I’m thinking paint the crib to match the built in color, and possibly do the slats in green? Or even incorporate the same stain as the built in counter tops? Get to Photoshopping, Mamasita!
Emily R says
They look so good! I love the paint color (I love anything gray, so I’m easy to please) and I think you are spot on about the the crown molding matching the bookshelves.
YoungHouseLove says
Thanks Emily!
xo
s
Alexandra says
wowza these look great guys! john i especially love the wood grain details on wood cut size illustration
Caroline says
Amazing. Loving this room already! I’m drooling for some built-ins around our fireplace. It’s built out with 2 perfect nooks. Not sure whether we’re going to try to tackle them ourselves or pay an expert but I can’t wait for the day, either way!!
Lisa | Winter Heights says
Bahaha, the gollum impression, I can totally see it. Looks so good, I’m baffled that on top of all of this, you guys are doing the show house as well! I hope you guys sleep peacefully to give your minds a break! ;)
Mallory says
LOVE THEM. Seriously, guys. I can’t WAIT to have my own house so I can copy, I mean be inspired by, you! I have to admit, I was on the fence about the lighter color before, but now that the shelves have been added on top, I can totally see how it works. Especially once all the finishing touches are added in.
Alisa says
We have the same crib for our daughter and I’ve been staring at the drawer for weeks trying to figure out what color to paint it! Can’t wait to see if/how you tackle that!
Taya says
L-O-V-E!
MinneAppleGirl says
Wow, they look amazing! I would have never guessed it all started with basic Ikea drawers!
Sandy says
They are beautiful! Dreaming of built-ins now, for sure!
Connie S. says
The built-ins look fabulous and you can NEVER have too many drawers!
katie says
Looks Great! I agree with Sherry’s random thoughts about the crib drawer looking out of place. I think bright green is a perfect option to add a splash of color. I love the direction the room is heading.
Rebecca says
My unsolicited opinion: I think if the built-in’s were a darker color it would provide a little more much-needed contrast. Also, another personal opinion, I think the shelf on top of the dresser is a little weird. :-(
Kristen says
I have to agree – they look great, I just wish they were a little darker.
Amy says
Funny, I LOVE the shelf on top of the dresser. I think it’s my favorite part of the built-in!
Anele @ Success Along the Weighn says
Wow, those look awesome! I can’t wait for the crown to go on there, that will be the perfect finishing touch! Maybe I’m not as adventurous but I like the white crib and do pops of the green in accents.
BTW, I like the beard! :)
jessica says
I think once you get the crown molding up, the crib won’t look so out of place.
Children spaces are my favorite to watch evolve. I can’t wait to see how this works out. You guys are knocking it!
Necole@seriouslysassymama says
I love the addition of the green. It is such a great color.
Evie says
Beautiful job, John and Sherry. Or wait, should I say HANDSOME job since it’s for a little GUY? Yeah!
I know you’re planning to put sconces on the ends of those uppers. I love the idea, but I’ve been worrying about something, so I’m just going to blurt it out. I’m afraid if they’re down lights they’ll shine right into the little guy’s eyes! I bet you’ve already thought about this, but I have to mention it… Please think about not letting bright lights shine into his baby eyes… 8-)
YoungHouseLove says
Yeah now we’re leaning towards putting them on the wall, so they’d be like reading lights when there’s a bed in there (lots of people do wall sconces over a bed so they shine down on books and not in their eyes- but if we installed them with the crib in place they’d only be on when he’s playing in the room (not in the crib) since that would totally blind him!
xo
s
JMK says
How will the wiring for the sconces work? I haven’t seen any mention of hard wiring while building the cabinets. Are they going to be like lamps and a cord will hang down the outside of the cabinet to a wall plug?
YoungHouseLove says
We’re thinking of adding them to the back wall (above where the eventual twin sized bed will go) so the wiring will just drop down from the attic and pop out for those two sconces without interfering with the cabinet :)
xo
s
Justin says
John,
These built-ins look amazing. You did an awesome job! You definitely made the right choice on the crown. I could see these working with a RH bedroom when your barnacle is older, and waaaaaay down the road they could function nicely for a guest bedroom.
Have ya’ll ever thought about making custom stuff (furniture, decor) and opening an Etsy shop? How about your own line at Target?
YoungHouseLove says
Thanks Justin. That all sounds awesome! We’d just have to figure out how to clone ourselves and we’d be all about it…
-John
Kim says
OMG can you IMAGINE the success of a YHL line at Target??!! Ahhh, even the mere mention of it makes me want to start a petition with Target :) What a great idea!!
YoungHouseLove says
Ahhhh! Stop making our brains explode. Haha!
xo
s
Kate says
That made me think of something… I could be remembering this wrong, but didn’t you guys use to sell some decorative prints and stuff way back when before Clara was born? I started reading YHL a couple weeks before you announced you were pregnant the first time (though I still feel like I’m a “newcomer”, haha), and I thought I remembered you two doing that.
If Sherry designed things for Target I have a feeling there would be a very high percentage of white ceramic animals, lol!
YoungHouseLove says
Aw, yeah! We had a little print shop! Those were the days. And yes, if Target gave me free rein to design stuff, it would be shelves and shelves of ceramic animals. Haha!
xo
s
Courtney H says
Dude if John and Sherri had a line at target, or even a private line through their blog or etsy, I would literally buy every single item that came out! Obsessed with their style. They DO have their lighting line out already and one book… Hmm keep em coming J&S. We love you!!
YoungHouseLove says
You’re so sweet Courtney! Stop making us blush!
xo
s
Emily says
John–are you growing a for-realz beard?
YoungHouseLove says
Heck yeah, he has his winter look going on ;)
xo
s
haverwench says
I like it! I say keep it long-term–you’ll never have time to shave with two kiddoes, anyway.
Jennie G says
I just love everything about these so much that all I can think of to say is “I just love everything about these so much!” I can’t wait for Sherry to unleash and for the rest of the room to come together! You two are the picture of class and it is truly a highlight of my day to read your blog! THANK YOU!
YoungHouseLove says
Thanks so much Jennie!
xo
s
Kendra says
SO good! Where did you find the black and white baskets?
YoungHouseLove says
Container Store!
xo
s
Anna Kelly says
Thanks a lot, John. Soda just came out of my nose from the visual of Sherry creeping around whispering CRIIIIBB SKIIIIIIRRRRT
YoungHouseLove says
That really happens. Like ten times in the last 24 hours.
xo
s
Jenny says
I love it. It’s great how they are sort of from scratch, because building a dresser is kind of scary :) I’m to imperfect to build perfectly square things, but I could definitely handle the bookcases on a dresser.
Linda says
Dang, I’m impressed! And I love the step by step descriptions – they encourage/inspire those of us who never even contemplated being able to do anything close to this. I’ve got to say, though, I continue to be impressed with John’s woodworking skills, and how he shares how he’s been learning more with each project. Thanks again!
YoungHouseLove says
Isn’t he awesome?! I have been gushing on him hardcore for this. They’re my favorite things he’s ever made.
xo
s
Alex says
Seconded! It is very encouraging! Also, Clara’s nursery shelves must seem even more precious now. It’s great that you were able to build shelves for each of the kids. Y’all are growing up! Love the blog, love keeping up with your family. :) :)
YoungHouseLove says
I love those dang things. I’m going to be that mom trying to hang them in her house when she’s 25 and saying things like “mom, those are my baby shelves!”
xo
s
Beth says
Second that skills comment. Very sophisticated colors between the rug/walls/bookcases. Lucky little guy!
Stefanie says
Wow, I love the way these turned out to be really substantial real deal pieces. They look like they were hand crafted (which they 1/2 are) and not DIY’ed. Great job you two!
As far as “too much storage” is that even a thing?! I for one would rather have the option of storage than not. Plus as a mom of two nearly 7 year olds I can tell you that those drawers will be so handy later on in little Barnacle’s life.
Can’t wait to see what you have planned for the rest of this space.
YoungHouseLove says
It’s so great to hear that, Stefanie. We figure for the relatively small footprint they take up in those two corners, they were well worth all that vertical storage that we gained.
-John
Shadlyn says
There are few feelings greater than the feeling of an empty shelf, or drawer, or cabinet. As someone who’s lived in small spaces my whole adult life, I assure you the luxury of a shelf with just one beautiful thing on it is highly underrated.
Now I just have to make one again. :/
Tara @ Sock Monkey Smiles says
Very cool – love them! I’m excited that Sherry can now do her decorating thang! :)
Janet says
You guys continue to amaze me. I am one of those people who can’t seem to envision things in a blank room, but knows what she likes when she sees it and can copy the look :). I am loving how this room is coming together. I think it is just so awesome when people take something pre-made and turn it into a one of a kind and personal piece. Way to go! Keep the pics coming and have fun filling those shelves, Sherry! Nest away ;)
YoungHouseLove says
Thanks Janet!
xo
s
Chloe says
Holy moly!! Those look amazing!
Mara says
Great job, John! I love that you’re not forgetting the attention to details with caulk, trim, etc. that really make the piece look well finished and professionally put together.
Tiffani says
These look awesome! We bought a home with too many built-ins (if there is such a thing) and I’ve been thinking about painting them a different color than our crown molding. Excited to see the full room with the finished crown!
Christina P (NS) says
These look so great, I am about to start a built in project in my daughters playroom so I welcome the inspiration and guidance.
Just curious as to why you removed your ‘blogroll’? I used to go there after I read your posts to follow my other faves and now I don’t know who they are were :(
YoungHouseLove says
So sorry, we clicked a button to turn the blogroll off last week (we’ve received a few complaints about it not being updated, linking to blogs that were inactive or that people didn’t like, etc). It has always been a challenge to keep that current, so we just disabled it for the time being. We noticed a lot of other blogs seem to have been phasing them out as well, so we’ll have to see where we end up :)
xo
s
Kaesey says
Great job! Now you’ve got me sketching how to do something like this around our windows in the den….but it’s a snow day and I have two munchkins bouncing off the wall, so we’re turning potatoes into stamps instead. =)
YoungHouseLove says
Sounds like fun!
xo
s
Sarah says
Those look amazing! I think the shelving above the dresser is genius- they will fill up with books and toys and trophies faster than you think. Great idea to plan ahead.
Annaliza R says
You rock John! They look great.
Reenie says
WOW!! Those look great~ good job John!!
I can’t wait until Sherry “colors them up”!!
:)