Laundry room update? Don’t mind if I do. To jog your memory, so far we’ve replaced the washer/dryer, taken down window shutters & cluttered shelves along with frosting the door (all here), filled some ceiling cracks, and painted the room the same color (Benjamin Moore’s Sesame) as the kitchen. And voila, we’re all up to speed.
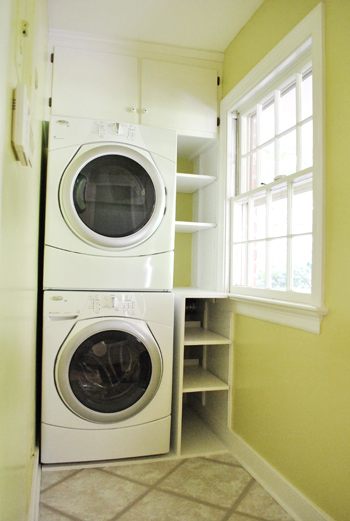
Well, if you really want to be up to speed, now it looks like this:
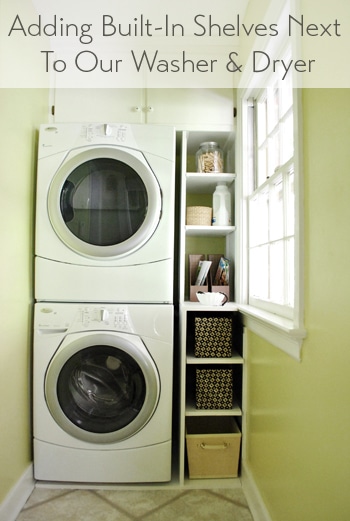
But let’s back up so I can blather on about how those shelves came to be. Even during our initial walk-through of this house we decided to maximize that sliver of space with some built-ins to add a lot more function.
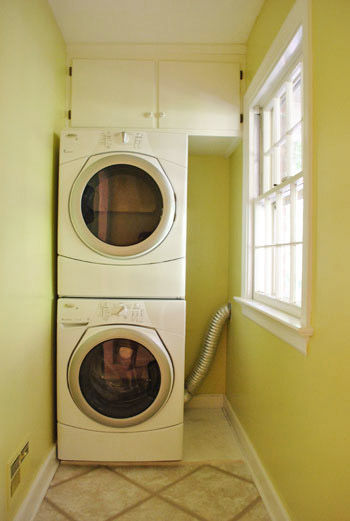
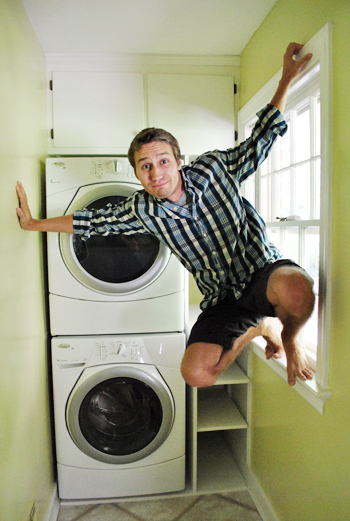
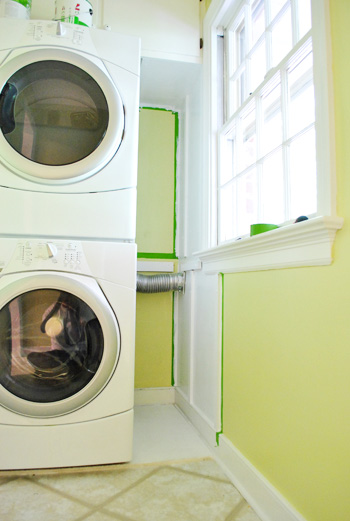
Did we mention the room is just 3.5′ wide? That means the washer and dryer doors wouldn’t even open if they were placed on the other wall under the window or fuse box. So if anyone’s still having trouble getting how narrow this space is, I broke out my spider monkey skills (and crazy toes) to demonstrate. Don’t try this at home, kids.
Since the room is so skinny, we knew adding that vertical storage next to the washer would be key (we can’t really go “out” for fear of bashing into fold-out shelving or counters or drying racks – so we might as well go “up” instead!). Speaking of up, since the built-in cabinets above the dryer are completely out of Sherry’s reach (poor thing, but at least she can reach the dryer buttons), more accessible storage was just the thing. And since no ready-made bookshelf skinny enough to fit into that 14.5″ gap won us over (they were all too shallow to allow us to take full advantage of the nook), we opted to build something instead. It certainly couldn’t be harder than the behemoth console that we built, right?
Wrong.
Just kidding. It definitely was easier. So here’s a quick-ish recap of how it went down. First I measured the space and marked up a little sketch that I did with a few measurements. I’ll pause while you marvel at my technical drawing skills.
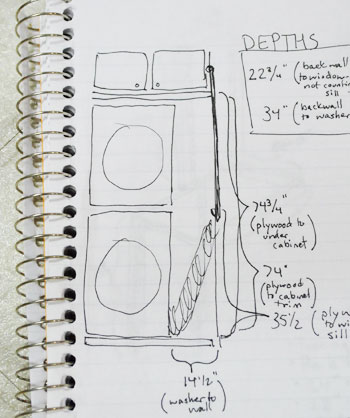
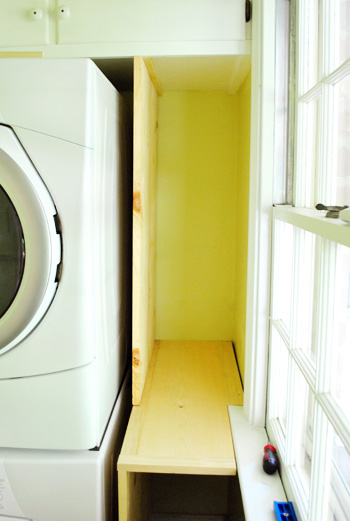
After much consideration, we opted to use the right wall (with the window on it) as side #1 of the bookshelf and to build a vertical divider of sorts to be side #2. We wanted the whole thing to be as deep as the appliances, but then it would partially cover the window. So instead we’re decided to split it. The bottom half would be washer-depth and the top-half (above the window sill) would be window-depth. Confusing, I know. And I’m sure this drawing below (which helped me determined wood cuts) doesn’t help. But here it is anyways. Enjoy!
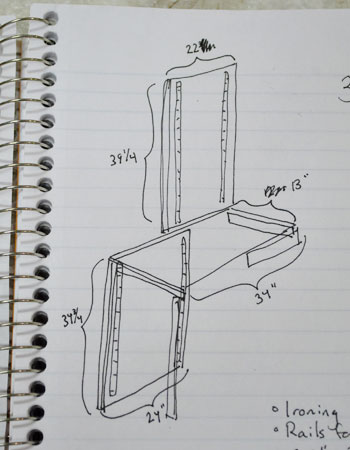
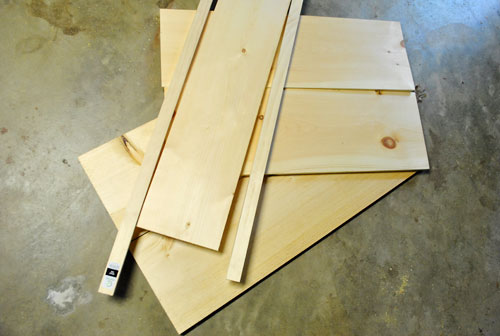
I got the guys at Home Depot to make most of my cuts, so here’s the bulk of my wood pile by the time I got home. We used whitewood with 1 x 2″ poplar boards mixed in (since they don’t sell whitewood planks that thin) just like the console. Also like the console, I’d be screwing two 1 x 12″ boards side-by-side to get a wider board for the bottom and top portions of my vertical divider. And then a 1 x 10″ trimmed with 1 x 2″s for the middle shelf that would connect the two divider halves. Not pictured, nor sketched above, are some more 1 x 12″ boards for my shelves and some miscellaneous 1 x 2″s for trim.
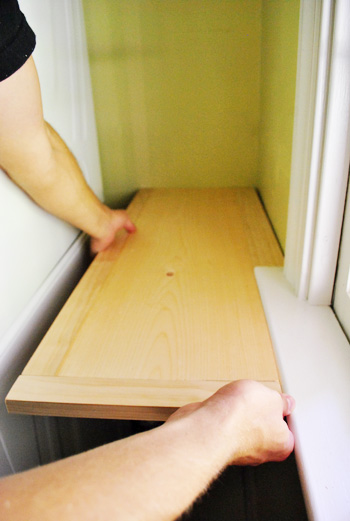
The middle shelf would sit flush with the window sill, so I cut and attached the 1 x 2″ trim pieces so it’d leave a sill-sized notch. Here I am testing the placement, which fortunately worked out really well.
Then I screwed bottom half of the divider directly into the “floor “(which is actually a piece of plywood that runs under the appliances for extra stability – more on that here) and into the middle shelf using my Kreg jig. It hung over the plywood a bit (I forgot to calculate the added trim on the middle shelf when cutting my board) but I solved that later with another piece of 1 x 2″ trim on the floor to finish things off.
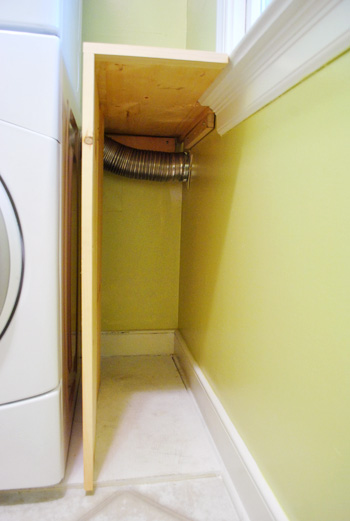
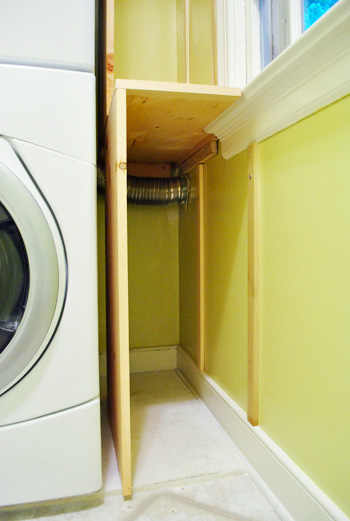
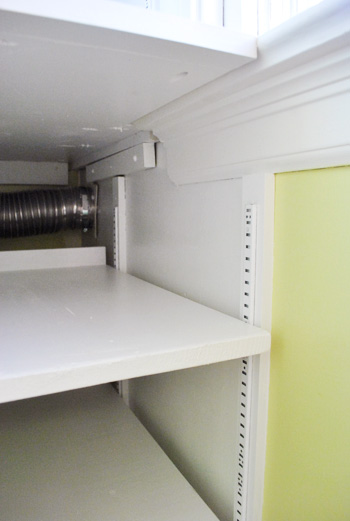
You can see above that I screwed in a couple of pieces of wood on the back and side walls for the middle shelf to rest on. That’s because the vertical divider doesn’t go all the way back to the wall (to leave some access to the washer and the dryer duct).
Speaking of which, I updated our old aluminum-foil-ish dryer duct to a safer rigid all-aluminum version from Lowe’s (since we hear they’re less of a fire hazard). It was an easy switch (remove the other guy, clamp new new one in place with metal clamps and metal wall piece, that’s it).
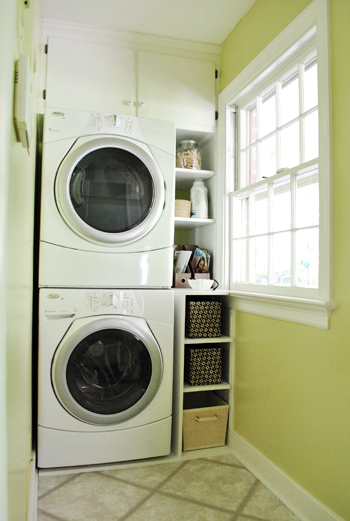
Here’s the top divider now attached, just like the bottom guy. Notice how he’s set back to be even with the window? Is this making more sense now? It’s sort of a two-tiered profile so it uses all of the depth that we can use without oddly overlapping the window.
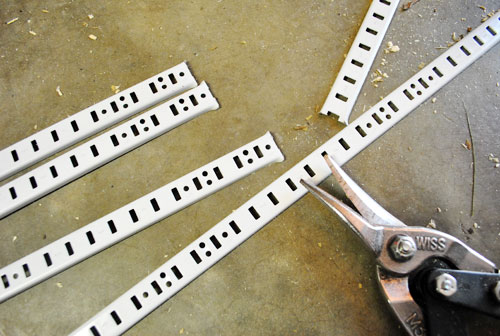
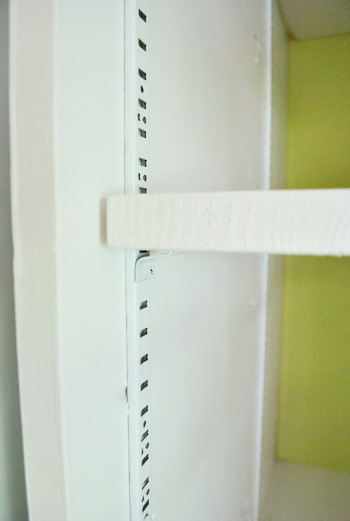
As for the rest of the shelves, we wanted them to be adjustable and removable. Adjustable because, well, sometimes you want to adjust your shelves dagnabbit. Removable because it’ll help us gain access to the back of the washer/dryer if need be. So I purchased four 6ft lengths of metal shelf tracks at Home Depot (the same kind that we have in our built-ins and master closet) and snipped them with metal cutters to the right lengths.
The space between the divider and the wall was shaping up to be a smidge wider than my 1 x 12″ shelf pieces, so I added some additional 1 x 2s to bridge the gap. In the long run, I think this actually make the metal tracks more secure (since otherwise they’d just be nailed into drywall). So maybe a happy accident?
A not so happy accident? Realizing at this point that it’d be very difficult to paint all of the wood in place. So out it all came so we could access everything more easily. The good news is that it was pretty quick and easy to take out, which will be appreciated if ever it has to come out for some serious appliance maintenance.
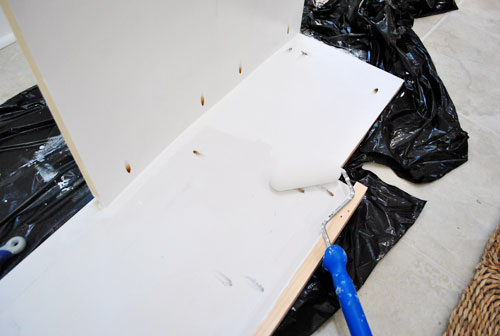
In the sunroom (the laundry room is waaay too small to attempt to paint these big pieces) we applied two quick coats of primer (Kilz No-VOC) followed by two coats of white paint (Olympic Premium No-VOC semi-gloss off-the-shelf white paint) on all of the framing for the built-ins to make sure we were getting our whitest white without any wood bleed going on. But after lazily painting the shelves with just two coats of paint the next day (no primer) we realized we probably would’ve been fine without primer on the framing too. Oh well. It certainly didn’t hurt.
Oh, and we also painted that side wall on the right white (to make it look more like it was part of the bookshelf). But we left the back alone for a shot of color that would be seen through the shelves.
Then I reinstalled everything, nailed in my metal shelf tracks, added the clips, and took them for a spin.
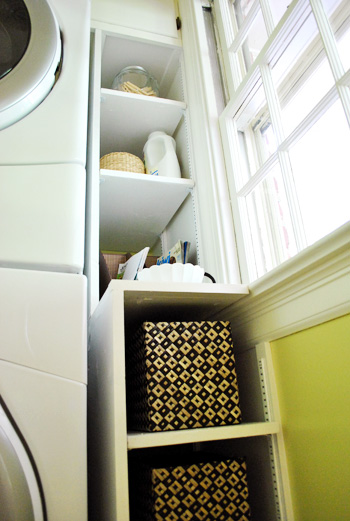
On the bottom half I also added a little lip at the back of the shelf since, unlike the top, they don’t go all the way to the wall. This will hopefully prevent things from sliding off and getting lost back in there. But if something does sneak back there over the lip somehow, we can still easily retrieve it thanks to the shelves being removable.
But enough “how we built it” mumbo jumbo. Let’s check out the finished product:
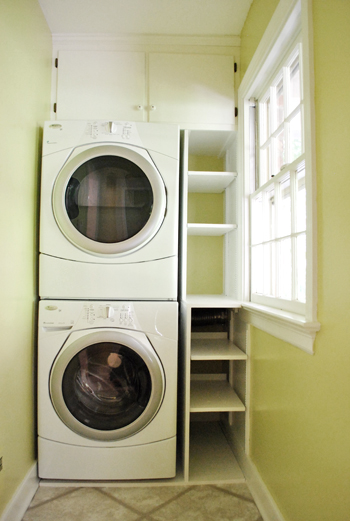
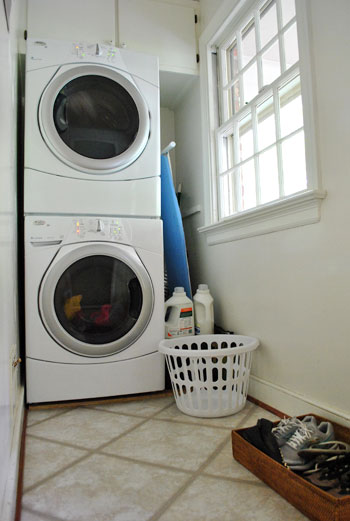
That 2″ gap between the appliances and the shelf was intentional so that when the washer starts a-rockin’ things on the shelves don’t start a-knockin’ (if you know what I mean). Actually, that’s literally what I mean. It’s not a euphemism.
Admittedly she’s not the prettiest thing in the world when she’s empty (I think I would’ve preferred the look of fixed all-the-same-size shelves). But the function of adjustable shelving made a lot more sense, and we can now store something small and something tall without worrying that things won’t fit.
And there’s no denying that we’ve gained a lot of usable storage space when it comes to the max-depth that we worked hard to obtain. We haven’t quite figured out all that we’ll put here (besides the obvious detergent, iron, etc – maybe a basket that can be used for winter gloves & scarves and a larger one for flip flops and sandals). Just for fun Sherry went ahead and fancied it up a bit with some – you guessed it – baskets.
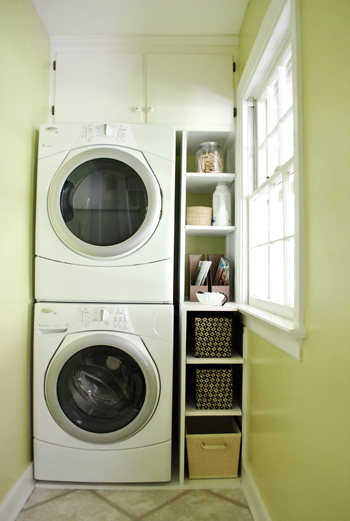
Along with a few other things we already had (magazine files, a scalloped bowl, a jar full of clothespins, etc).
We’re toying with the idea of this becoming our new drop spot for mail, coupons, and other miscellany. So maybe it’ll look like this in the long run?

As for the cost on this one, it definitely was more than if we’d gone with a not-quite-right existing solution (like this narrower, shallower version from Ikea). But we totally think it was worth getting something that looks more seamless and really makes the most of the space (so we can use the full width and depth and adjust the shelves to customize it even further whenever need be). Here’s the ol’ budget breakdown:
- Wood (from Home Depot & Lowe’s): $59
- Metal shelf tracks & shelf clips (from Home Depot): $15
- Primer & paint (Kilz No-VOC primer & Olympic No-VOC paint): already owned
- Baskets, magazine files, the bowl, etc: already owned
- TOTAL: $74
Oh, and the aluminum dryer transition duct was $10 from Lowe’s.
If you’re searching around for more ideas for making shelves yourself or adding vertical storage, this post is full of 16 ideas for adding shelving.
As for our laundry room to-do list, these days it’s looking more like this:
Paint the odd brown quarter round near the baseboards glossy white
Redo all the dinged up trim (also in semi-gloss white)Paint the wallsReplace our dryer hose with a safer all-metal oneAdd adjustable built-in shelving in that nook next to the stacked washer & dryer- Replace the hinges and knobs on the upper cabinetry
- Get a new light fixture <- DIY something? maybe a small chandelier?
- Add a window treatment (maybe a homemade one?)
- Add other functional storage near the door for shoes, Burger’s leash, etc
- Hang some art to keep it cheerful and obscure the giant metal fuse box
Even though we’re only about halfway through, we’re feeling pretty good that in the past few weeks, this space has already gone from this…
…to this:
As for where we’ll store the ironing board- we have a plan for that. More details to come after we tackle it (we wanna make sure it works first, haha). In the meantime we’d love to hear what storage solution you’re loving (or lusting after) in your laundry space. Got some sweet cabinets or drawers? A cool collapsible drying rack or ironing board? Your very own laundry sink? We know there are some pimped out laundry rooms out there, so let’s hear it.

Sarah W says
Looks great! I once had a small powder room/ laundry with stackables. Laundry is much easier for me when I have a counter to fold on near the dryer, so I installed an ikea norbo http://www.ikea.com/us/en/catalog/products/30062572. It does protrude 3+ inches into the room, which may not be worth losing if youre not fold in the laundry room people.
Sarah W says
So sorry to repeat this suggestion! Didn’t see the others til after I submitted.
YoungHouseLove says
No worries at all! That’s a cute little solution for sure!
xo,
s
Liza says
For my fuse box (In my dining room, Argh!)I glued heavy duty magnets to a lightweight canvas that wouldn’t be damaged if it fell and it never has.
YoungHouseLove says
So smart!
xo,
s
Bill says
We really like the update and I almost spit out my drink when I scrolled down to the picture of John as a spider monkey. Definitely something I’d do.
J'Ann says
Great job spider monkey!
A Girl’s Next Best Friend
Amanda says
I’ve seen on a couple of the “design blogs” really space conscious drying racks that look like this… http://blog.embellishedbayou.com/2010/01/diy-in-progress-drying-rack.html (not my site). I know it’s a narrow space, but it might work on the wall opposite the window, maybe even with a bulletin board style back that would truly hide the fuse box <– could be lifted off for access.
YoungHouseLove says
Those are fun! We’re definitely trying to figure out if we like the idea of anything folding down (or if it’ll just feel too claustrophobic since it’s about the width of a bathroom stall in there, haha).
xo,
s
LibraDesignEye says
I think the stepped depth on the shelving actually ADDS a lot to its functionality – just a little bit of counter space handles a grocery bag or “stuff” that you haven’t yet “sized” a cubby to handle. I hear you about the closet sized claustrophobia herein, but now I think it looks brilliant. Heck, you might even find a step stool for Sherry (less height challenged than me at 5’3″) that will sit sideways on the bottom floor board “shelf.” That made me think about the industrial round rolling steps that you get in office supply houses that sink down and lock in with your weight but can be kicked about when in the way. Too big for the shelf, BUT they are the perfect size to hold a round basket full of clothes up off the floor as you load, unload, drop down, etc. Ummmm . . . Not sure the locking casters come close to being Clara safe I fear, but perhaps worth an instore test drive? Here’s one in b&w http://www.amazon.com/gp/product/B001GN7QWA/ref=pd_lpo_k2_dp_sr_2?pf_rd_p=486539851&pf_rd_s=lpo-top-stripe-1&pf_rd_t=201&pf_rd_i=B003VNGGTM&pf_rd_m=ATVPDKIKX0DER&pf_rd_r=0B94YTX40DW858Q2MEHA
since the celery might not be grellow enough!
YoungHouseLove says
Always an option for a 5’2″ gal like myself! Haha. Although I must admit I like the setup now because it’s conducive to John doing more (ex: honey I can’t reach the iron can you get it down and just iron Clara’s fabric that I have laying out in the living room? Thanks!).
xo,
s
Jennifer says
It looks great! We have a tiny laundry room and did something similar. My husband built vertical shelves next to our washer and dryer for storage and topped it off with a counter. It’s amazing how much we can fit in that space now.
Heather Grilliot says
LTS-FTP (Long Time Stalker – First Time Poster) love you guys, My house is so much nicer because of you two, so thank you. I had no idea what you would do with that space but just had to say how much I love this, really it is great. And thanks to you my laundry room got a little sprucing up too! Wow for a LTS-FTP I said “love” twice here. Definitely will go back into stalking mode now!
YoungHouseLove says
Haha, as a lover of abbreviations, you get 500 YHL points for that. Hilarious.
xo,
s
Ana Silva says
You guys are so talented. It looks so much better.
hillary says
Looking good! It’s amazing what an improvement just painting the quarter round made.
Our laundry machines used to be in the kitchen. It was terribly convenient but also really loud and a waste of good kitchen real estate. When we remodeled the kitchen we put them in the garage. Unfortunately it’s kind of a sad state out there. I have a laundry sink (yay) but no place to fold clothes (boo) and it’s dark and a little yucky (boo). I put a bright rug on the floor, which has helped! But I would like to whitewash all the dark spidery garage wood or something! In my wildest dreams we completely finish the garage but I don’t think it’s going to happen any time soon.
jo says
Your laundry room is looking beautiful. Growing up, my parents had the most awesome laundry chute, from the upstairs bathroom to the laundry room in the basement. I loved the idea of a laundry chute. So when I remodeled my house, though it was all on one level, I took the opportunity to put a laundry pass-through from the bathroom to the laundry room, and from my bedroom closet to the laundry room on the other side. I never got the chance to live in my house and use my cool pass-throughs, but my tenants say they like them.
YoungHouseLove says
That’s so much fun! Love it.
xo,
s
Angela says
Love it!
Nick Klaus says
Is the ironing board going to be suspended from the ceiling by pulleys? If yes, that would be super cool.
YoungHouseLove says
Oh man, that would be amazing, but sadly no. The room is too narrow to actually do any ironing in it (it’s like a bathroom stall) so it needs to be removable so we can take it out into another space to actually iron. But yes, that would be amazing.
xo,
s
Kate says
You’ve made a huge improvement on the old room!
In Australia a trough (laundry basin) is an integral part of any laundry – I don’t think I’ve seen any laundries without them.
Also, we mainly line dry our clothes – I guess because it’s only alpine areas that get snow. Have you thought about making/buying a suspended drying rack – like this: http://www.usethings.com.au/drying_rack.html
You can hoist them up out of eye level when now using them. Also it’s a pretty enviro conscious way to dry your clothes :-)
YoungHouseLove says
We’ve definitely debated if we want something like that (that folds down) although the room is so narrow we’re afraid it’ll just make it feel super tight when it’s folded down. We usually lay out our cloth diapers in the living room windowsill or on the sunroom daybed to dry, so someday getting a line or some sort of indoor system does make sense!
xo,
s
Morgan says
Hi roamed the comments just in case you’ve already answered this question, but where did you find those magazine holders and baskets? I’m on the lookout for some pretty (but simple) versions of both – and I love yours :).
YoungHouseLove says
Those are from Target a while back. Hope it helps!
xo,
s
Aron says
I have a mudroom that functions great as a laundry room. It used to have a large utility sink that I liked but it had only a washing machine to the right of it. Dryer was behind a door blocking a window. Thought about stacking but would have to tear out the above built in cabinetry. Uh no. Also have an original 1920 built in ironing board in the kitchen. Odd place but kitchen is right off the mudroom so it works! Your laundry room makeover is very functional and attractive. Great job!
Elizabeth says
Looks great! We just freshened up our basement laundry room by 1) throwing stuff away. 2) rearranging the appliances and a vintage enamel table used for folding; and 3) buying a trash can and pretty basket for cleaning rags etc, plus a little cafeteria-style tray to hold the detergent etc on existing shelves at the SPCA rummage store. Also bins for clothes sorting and a coincidentally coordinated and cute ironing board cover (little blue and green irons and good thick padding) from K-Mart. Also a new drying rack from BB&B. Next will be hanging curtains stuck up in the attic from when we moved here…32 years ago. Never too old to improve.
Missy says
Looks great guys! Love storage solutions.
AntoniaB says
Looks *fab*.
I laughed when you wrote that Sherry could reach the drier buttons because – I can’t! I’m so short that I can’t reach the buttons on our drier. Good thing I’m more of an air dry type ;-).
Benjamin says
Well this is pretty cute, It really is.
I was just *wishing* for something “more…
Like maybe… a fold up skinny table (like a murphy bed – or like those wall-iron boards) that folds down to reveal the storage, but also acts as a skinny laundry table when down.
Or even a roll out table from the bottom.
Or maybe a combination of the two.
Oh the possibilities!
But this is fine, cute and functional. Maybe I just have too much daydreaming time on my hands at the moment. (I’m stuck in a jury assembly room at the moment! – been here 2 hours, thank heavens for wireless!)
YoungHouseLove says
The room is only as wide as a bathroom stall (maybe narrower, haha), so we’ve realized that we’ll always do our folding and sorting in a larger space (we like the bed or the couch these days). Hence no folding or rolling tables (since it’s just too claustrophobic in there). Hope that makes sense!
xo,
s
Reva says
That paint color looks so amazing in this room. love it in the kitchen, but here it’s just phenomenal! And nicely done on the shelves.
Trude says
It looks gorgeous! Well, as gorgeous as it can for squeezing in storage in that teensy space! :)
Ashley Keylor says
It looks so wonderful! I love seeing your visions come to life. I would have just thought, “too skinny, can’t do much with it,” but you guys always blow my mind. Great job!
liz says
WOW! I love it!
Jennifer says
Hey Sherry this chandelier reminded me of a few I’ve seen on your pinterest… I Love the sea glass beads, might make a good diy canidate?
http://www.serenaandlily.com/Decor/Lighting-Seychelles-Chandelier?utm_source=email_prspcts&utm_medium=email&utm_term=main-Seychelles&utm_campaign=0719_Mandara
YoungHouseLove says
I have that page torn out of my catalog and shoved into my binder of project inspiration! Love it.
xo,
s
Lindsay says
WOW! That looks great!!!
DeeJay Conley says
Woot woot yeah, woot woot, woot woot yeah, woot woot!
btw…am now follower #27147 on your Pintrest. heh
YoungHouseLove says
That is totally insane. My brain just exploded.
xo,
s
Maura says
This post makes me want to iron! You read my mind with the very last paragraph because immediately after seeing the before photo I wanted to know where that iron was going! Perhaps you’ll somehow create a hydraulic ironing board that can be suspended from the ceiling? Maybe this would be the time to really investigate steamers and their pros/cons? Maybe you’re all revamping your wardrobes and going with linen – why iron something that wrinkles when you even just look at it? The options really are endless!
Maura says
*where the ironing board was going, not just the iron…my b!
YoungHouseLove says
Haha- yes, we’re only going to wear linen and crushed velvet so we no longer need to iron. Haha. Just kidding!
xo,
s
Lisa says
Love your blog and this project in particular. I am in the process of moving to a 3 story town house that is in good shape but needs a little pizzaz. Laundry room is under the stairs, boring tan and a weird shape.This has inspired me to tackle that as my first project…right down to copying your color choice. Thanks for tips and inspiration.
Sara B. says
I love what you ended up doing with the space! Those shelves look awesome. :)
Jennifer says
Speaking of the washer rockin’….Does it ever? We have the exact same washer and dryer and our washer makes a crazy thumping sound with any load that is slightly heavy. Don’t even ask about a full load of towels. We have checked and checked to make sure it is level (our washer is on the bottom) and it seems to be, but it still acts like it is out of balance. Curious if you have the same issue at all. Otherwise we love this washer and dryer! Thanks!
YoungHouseLove says
We have a big piece of plywood under it bracing it (and it’s anchored using a stacking kit) so ours doesn’t really rock or make lots of noise but it sort of vibrates as it runs if that makes sense. Hope it helps!
xo,
s
Alisa says
John- do you think this set up would be stable enough to set a microwave on? I’m trying to convince the hubs that this would be the best solution to the wonky pantry side of our laundry room, but I wasn’t sure how much weight the metal tracks could hold (we would make the shelves slightly wider).
YoungHouseLove says
Hmmm, putting a microwave on there could be dicey – at least from my experience with them. I don’t recall a specific weight limit listed on them. But the nails that come with the tracks aren’t the longest (though you could substitute them for screws/anchors instead) and unless you install them perfectly level, your shelf could be bit wobbly (which might become annoying when the microwave turntable gets going). But Lowe’s & Home Depot had some other similar options that might be more heavy duty. You might want to investigate those too. Sorry I can’t be more certain either way.
-John
gb says
It looks great and I love the little counter top you created with the two different depths. Sorry if you answered this, but where did you end up putting your ironing board?
YoungHouseLove says
We actually hung it on the wall! More here: https://www.younghouselove.com/2011/07/oh-the-iron-y/
xo,
s
Tish says
So I know you said you found the metal shelf tracks & shelf clips at Home Depot… I looked and they were nowhere to be found, not even on their website. The only ones I found were at least a 1/2 inch thick and went with their shelving systems. Would you mind sharing the brand of the tracks and clips? I was counting on them for one of my closets. Any help would be appreciated.
YoungHouseLove says
Sorry you had no luck finding them, Tish. We can’t see any brand names on what’s visible on ours, so I’m sorry we can’t offer any help that way. Our Home Depot had them back where they’ve got all of the garage and closet systems. Did you try there? And if your Home Depot just has different inventory, maybe try Lowe’s?
-John
Rhune says
Lowes calls them Pilaster strip, which I think it’s the common name. (Real Organized brand)
http://www.lowes.com/pd_107819-46882-25209PHLLG_
Home Depot wasn’t as descriptive, calling them E5 Upright. (Rubbermaid brand)
http://www.homedepot.com/buy/decor/shelves/72-in-white-e5-upright-64266.html
You will find the corresponding clips info in the Description section for HD; and in the ‘Customer Also Viewed’ box for Lowes.
Abbey says
I know this is an old post, but I had a question about converting your dryer vent to the more rigid accordion type of vent. Ours would have to make two bends: one after it leaves the dryer to run against the wall, and another to connect into that wall (picture an “S”). It seems like yours is only making one bend (more like an “L”). Still – did you have any problems with it not being flexible enough to make the turn? Our installers said they could not get it to work and ended up putting in the softer type but we want to switch to rigid. Thanks!
YoungHouseLove says
Thankfully ours went in just fine (we just worked with it a little to shape it the way we needed it to go and were done in about ten minutes). Hope it helps!
xo,
s
Derek says
I’m trying to do something just like this, but basically a floating version, next to some cabinets that were already installed. Our studs aren’t uniform. Do you have a suggestion on how to do this in a floating format ?
YoungHouseLove says
Hmm, maybe try using heavy duty anchors? We used metal ones to hold up giant 72″ floating Ikea shelves in our first house and we could load them up with dishes no problem!
xo,
s
Rachel says
I know this is an old post, but I read it when it was new. That was the first time I learned that standard size washer/dryers could be stacked. It was life changing information! lol. Well, our old dryer just died this morning, so operation stack the dryer has begun! We bought the appliances and stack kit today, it’s delivered and installed on Wednesday. I’m so excited to free up some floor space in our laundry room. I just pinned this post so hubby and I can create our own custom storage solution for our room as well. Thanks so much for sharing all your great tips, it’s incredibly appreciated!
YoungHouseLove says
Aw, I’m so glad Rachel! All the best of luck with everything!
xo
s
Christine says
I know this is a bit late (since you’re onto house #3), but I remembered this post – and now i’m looking to stack a front loading washer/dryer. Did you have any issues reached the controls on the top? Or taking clothes out of the top? Thanks!
YoungHouseLove says
No issues at all and I’m 5’2″
xo,
s
Rich H says
Excellent use of space and explained so very well.
Laundry rooms always seem to be the last thing attended to.
Great job!
RichInSC says
Love the way you took wasted cluttered space and turned it into something so useful! Great job.