Laundry room update? Don’t mind if I do. To jog your memory, so far we’ve replaced the washer/dryer, taken down window shutters & cluttered shelves along with frosting the door (all here), filled some ceiling cracks, and painted the room the same color (Benjamin Moore’s Sesame) as the kitchen. And voila, we’re all up to speed.
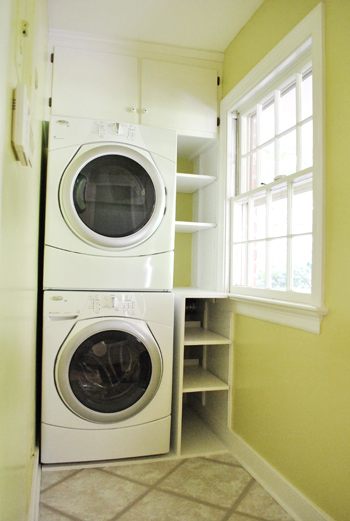
Well, if you really want to be up to speed, now it looks like this:
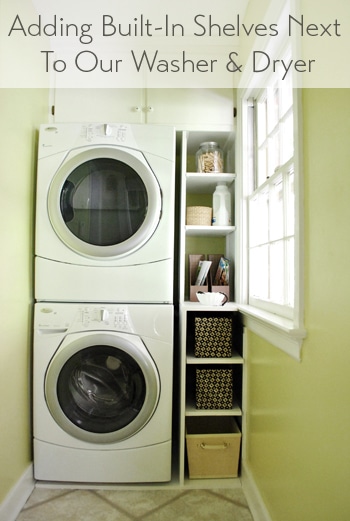
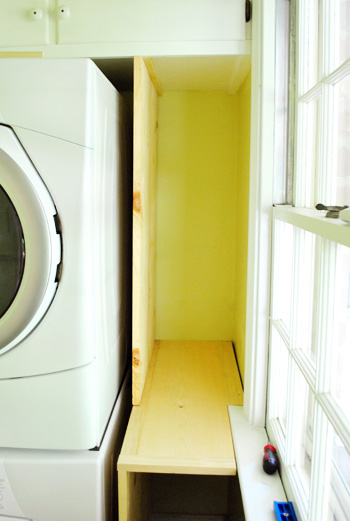
But let’s back up so I can blather on about how those shelves came to be. Even during our initial walk-through of this house we decided to maximize that sliver of space with some built-ins to add a lot more function.
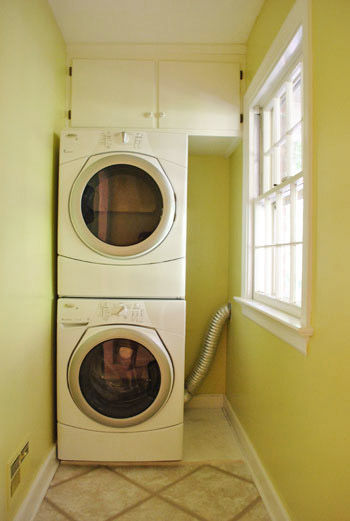
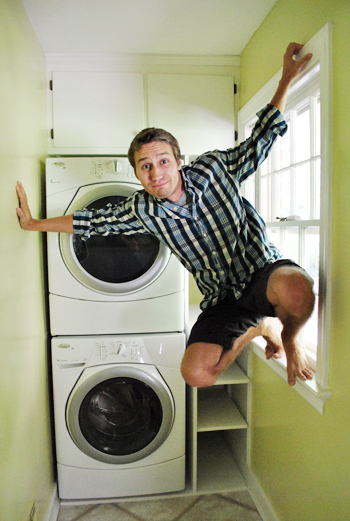
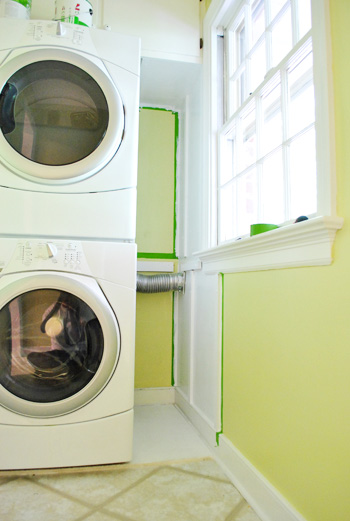
Did we mention the room is just 3.5′ wide? That means the washer and dryer doors wouldn’t even open if they were placed on the other wall under the window or fuse box. So if anyone’s still having trouble getting how narrow this space is, I broke out my spider monkey skills (and crazy toes) to demonstrate. Don’t try this at home, kids.
Since the room is so skinny, we knew adding that vertical storage next to the washer would be key (we can’t really go “out” for fear of bashing into fold-out shelving or counters or drying racks – so we might as well go “up” instead!). Speaking of up, since the built-in cabinets above the dryer are completely out of Sherry’s reach (poor thing, but at least she can reach the dryer buttons), more accessible storage was just the thing. And since no ready-made bookshelf skinny enough to fit into that 14.5″ gap won us over (they were all too shallow to allow us to take full advantage of the nook), we opted to build something instead. It certainly couldn’t be harder than the behemoth console that we built, right?
Wrong.
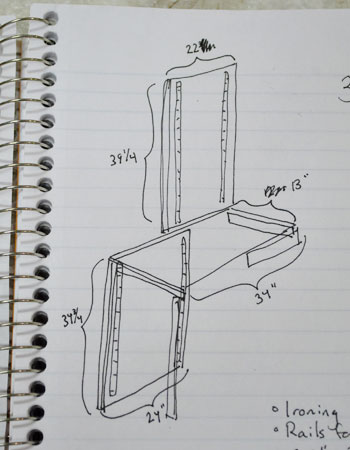
Just kidding. It definitely was easier. So here’s a quick-ish recap of how it went down. First I measured the space and marked up a little sketch that I did with a few measurements. I’ll pause while you marvel at my technical drawing skills.
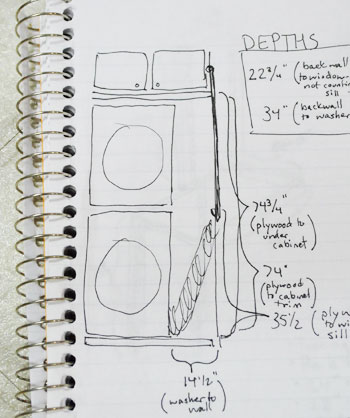
After much consideration, we opted to use the right wall (with the window on it) as side #1 of the bookshelf and to build a vertical divider of sorts to be side #2. We wanted the whole thing to be as deep as the appliances, but then it would partially cover the window. So instead we’re decided to split it. The bottom half would be washer-depth and the top-half (above the window sill) would be window-depth. Confusing, I know. And I’m sure this drawing below (which helped me determined wood cuts) doesn’t help. But here it is anyways. Enjoy!
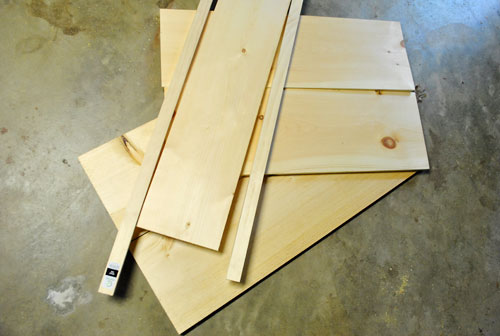
I got the guys at Home Depot to make most of my cuts, so here’s the bulk of my wood pile by the time I got home. We used whitewood with 1 x 2″ poplar boards mixed in (since they don’t sell whitewood planks that thin) just like the console. Also like the console, I’d be screwing two 1 x 12″ boards side-by-side to get a wider board for the bottom and top portions of my vertical divider. And then a 1 x 10″ trimmed with 1 x 2″s for the middle shelf that would connect the two divider halves. Not pictured, nor sketched above, are some more 1 x 12″ boards for my shelves and some miscellaneous 1 x 2″s for trim.
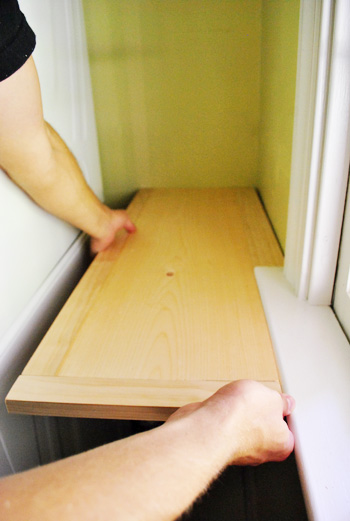
The middle shelf would sit flush with the window sill, so I cut and attached the 1 x 2″ trim pieces so it’d leave a sill-sized notch. Here I am testing the placement, which fortunately worked out really well.
Then I screwed bottom half of the divider directly into the “floor “(which is actually a piece of plywood that runs under the appliances for extra stability – more on that here) and into the middle shelf using my Kreg jig. It hung over the plywood a bit (I forgot to calculate the added trim on the middle shelf when cutting my board) but I solved that later with another piece of 1 x 2″ trim on the floor to finish things off.
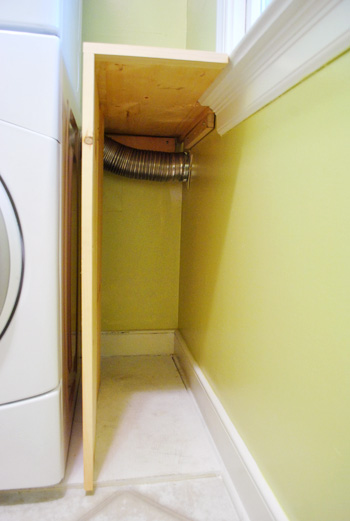
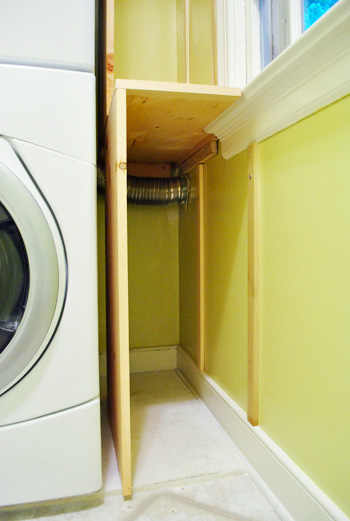
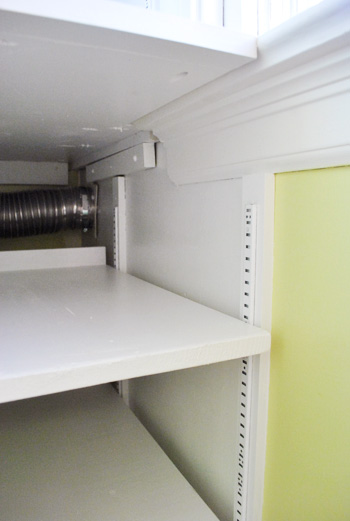
You can see above that I screwed in a couple of pieces of wood on the back and side walls for the middle shelf to rest on. That’s because the vertical divider doesn’t go all the way back to the wall (to leave some access to the washer and the dryer duct).
Speaking of which, I updated our old aluminum-foil-ish dryer duct to a safer rigid all-aluminum version from Lowe’s (since we hear they’re less of a fire hazard). It was an easy switch (remove the other guy, clamp new new one in place with metal clamps and metal wall piece, that’s it).
Here’s the top divider now attached, just like the bottom guy. Notice how he’s set back to be even with the window? Is this making more sense now? It’s sort of a two-tiered profile so it uses all of the depth that we can use without oddly overlapping the window.
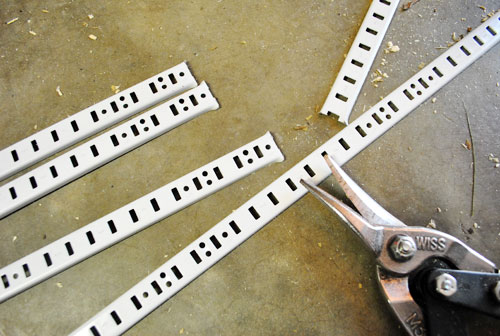
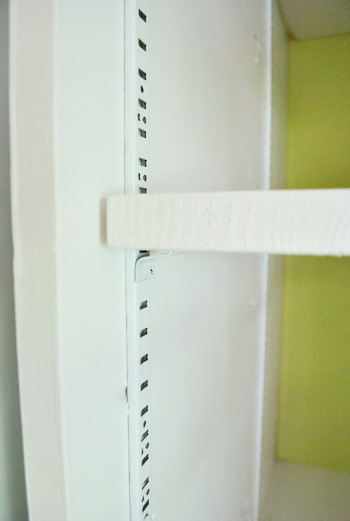
As for the rest of the shelves, we wanted them to be adjustable and removable. Adjustable because, well, sometimes you want to adjust your shelves dagnabbit. Removable because it’ll help us gain access to the back of the washer/dryer if need be. So I purchased four 6ft lengths of metal shelf tracks at Home Depot (the same kind that we have in our built-ins and master closet) and snipped them with metal cutters to the right lengths.
The space between the divider and the wall was shaping up to be a smidge wider than my 1 x 12″ shelf pieces, so I added some additional 1 x 2s to bridge the gap. In the long run, I think this actually make the metal tracks more secure (since otherwise they’d just be nailed into drywall). So maybe a happy accident?
A not so happy accident? Realizing at this point that it’d be very difficult to paint all of the wood in place. So out it all came so we could access everything more easily. The good news is that it was pretty quick and easy to take out, which will be appreciated if ever it has to come out for some serious appliance maintenance.
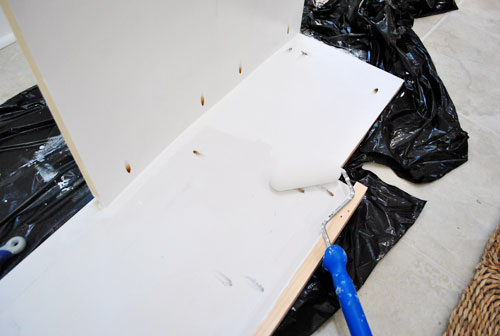
In the sunroom (the laundry room is waaay too small to attempt to paint these big pieces) we applied two quick coats of primer (Kilz No-VOC) followed by two coats of white paint (Olympic Premium No-VOC semi-gloss off-the-shelf white paint) on all of the framing for the built-ins to make sure we were getting our whitest white without any wood bleed going on. But after lazily painting the shelves with just two coats of paint the next day (no primer) we realized we probably would’ve been fine without primer on the framing too. Oh well. It certainly didn’t hurt.
Oh, and we also painted that side wall on the right white (to make it look more like it was part of the bookshelf). But we left the back alone for a shot of color that would be seen through the shelves.
Then I reinstalled everything, nailed in my metal shelf tracks, added the clips, and took them for a spin.
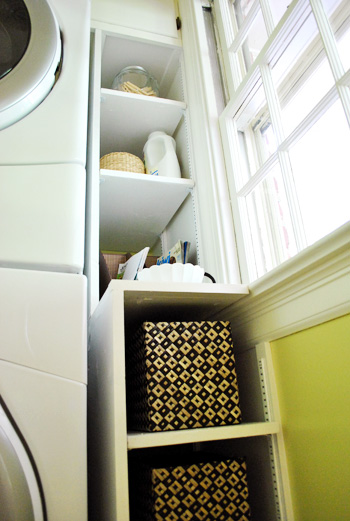
On the bottom half I also added a little lip at the back of the shelf since, unlike the top, they don’t go all the way to the wall. This will hopefully prevent things from sliding off and getting lost back in there. But if something does sneak back there over the lip somehow, we can still easily retrieve it thanks to the shelves being removable.
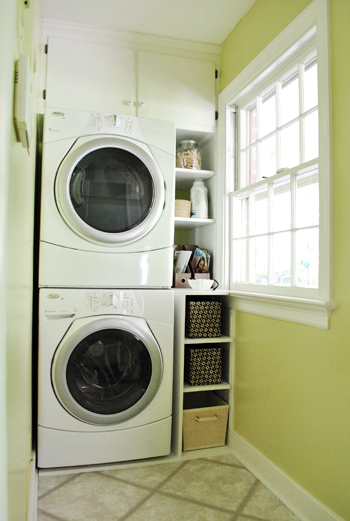
But enough “how we built it” mumbo jumbo. Let’s check out the finished product:
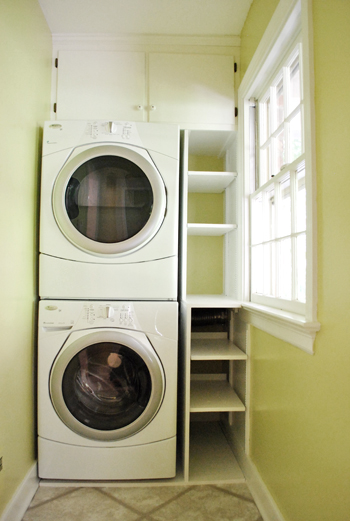
That 2″ gap between the appliances and the shelf was intentional so that when the washer starts a-rockin’ things on the shelves don’t start a-knockin’ (if you know what I mean). Actually, that’s literally what I mean. It’s not a euphemism.
Admittedly she’s not the prettiest thing in the world when she’s empty (I think I would’ve preferred the look of fixed all-the-same-size shelves). But the function of adjustable shelving made a lot more sense, and we can now store something small and something tall without worrying that things won’t fit.
And there’s no denying that we’ve gained a lot of usable storage space when it comes to the max-depth that we worked hard to obtain. We haven’t quite figured out all that we’ll put here (besides the obvious detergent, iron, etc – maybe a basket that can be used for winter gloves & scarves and a larger one for flip flops and sandals). Just for fun Sherry went ahead and fancied it up a bit with some – you guessed it – baskets.
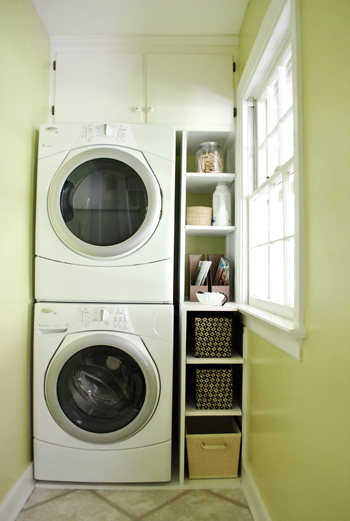
Along with a few other things we already had (magazine files, a scalloped bowl, a jar full of clothespins, etc).
We’re toying with the idea of this becoming our new drop spot for mail, coupons, and other miscellany. So maybe it’ll look like this in the long run?

As for the cost on this one, it definitely was more than if we’d gone with a not-quite-right existing solution (like this narrower, shallower version from Ikea). But we totally think it was worth getting something that looks more seamless and really makes the most of the space (so we can use the full width and depth and adjust the shelves to customize it even further whenever need be). Here’s the ol’ budget breakdown:
- Wood (from Home Depot & Lowe’s): $59
- Metal shelf tracks & shelf clips (from Home Depot): $15
- Primer & paint (Kilz No-VOC primer & Olympic No-VOC paint): already owned
- Baskets, magazine files, the bowl, etc: already owned
- TOTAL: $74
Oh, and the aluminum dryer transition duct was $10 from Lowe’s.
If you’re searching around for more ideas for making shelves yourself or adding vertical storage, this post is full of 16 ideas for adding shelving.
As for our laundry room to-do list, these days it’s looking more like this:
Paint the odd brown quarter round near the baseboards glossy white
Redo all the dinged up trim (also in semi-gloss white)Paint the wallsReplace our dryer hose with a safer all-metal oneAdd adjustable built-in shelving in that nook next to the stacked washer & dryer- Replace the hinges and knobs on the upper cabinetry
- Get a new light fixture <- DIY something? maybe a small chandelier?
- Add a window treatment (maybe a homemade one?)
- Add other functional storage near the door for shoes, Burger’s leash, etc
- Hang some art to keep it cheerful and obscure the giant metal fuse box
Even though we’re only about halfway through, we’re feeling pretty good that in the past few weeks, this space has already gone from this…
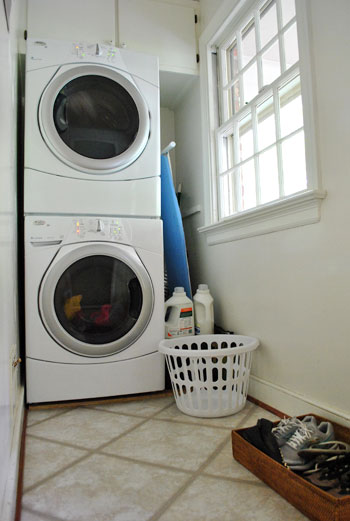
…to this:
As for where we’ll store the ironing board- we have a plan for that. More details to come after we tackle it (we wanna make sure it works first, haha). In the meantime we’d love to hear what storage solution you’re loving (or lusting after) in your laundry space. Got some sweet cabinets or drawers? A cool collapsible drying rack or ironing board? Your very own laundry sink? We know there are some pimped out laundry rooms out there, so let’s hear it.

Shannon says
Fuse box idea:
Use a piano hinge to attach a message board or bullitan board to the front of your fuse box. (Could also do one of those bullitan boards with the criss-cross ribbon on it) This adds yet another bit of functionality to your room!
Absolutely LOVE what you’ve done so far! Keep up the good work!
YoungHouseLove says
Fun idea!
xo,
s
Ashley @hookedonhickory says
looking better and better each day guys! love the move of standing in the window! that’s awesome.
working on our mudroom/laundry area as well!
stop on by if you would like! i’d love it! ;)
ashley
http://www.hookedonhickory.blogspot.com
YoungHouseLove says
Fun! Love those inspiration pics!
xo,
s
Casey says
John, you’re so hip — you’re clearly “owling” (the new planking) in the laundry room!
YoungHouseLove says
Holy cow I am. I’m accidentally hip.
-John
Wom-mom Ethne says
Already fabulous! The checklist that remains isn’t entirely time consuming, at least as much as the putting in shelving was.
Amanda- Hip House Girl says
That looks so good! It started as kind of an awkward room, but you guys have made it look like it was planned that way. I can’t wait to see your ironing board solution.
Alanna says
looks great! you can never go wrong with storage in a laundry room! we added some cabinets and made some other changes in our laundry room several months ago (www.alanna-wendt-to-tennessee.blogspot.com) and we abolutely love having the extra storage space!
Shunta says
Did you guys do the trim in a semi-gloss finish? Was reading your entry on pickign a paint finish and getting ready for a paint job this week with bold blue paint (flat) and white trim and wanted to know what type of finish you used on your trim in the kitchen and laundry room. What type of finish do you use on trim in other rooms? particularly in the guest room where you had such a bold blue color on the wall. thanks so much!!
YoungHouseLove says
Yup, we use semi gloss trim in all rooms. It’s easy to wipe down and nice and consistent throughout.
xo,
s
Joy says
Monkey picture really showed how narrow that room is. Good job on that shelving unit – from the final photo it looked like a ‘push in Ikea shelving unit’. The actual shelving used the space to the max and looks even better.
Debbie says
Looks awesome! I love that Spider-Man pose. Your toes did crack me up though! :)
Paula R says
Hello! I’m similarly vertically challenged like Sherry. Top shelves drive me crazy! (No wonder my kids have learned to climb like monkeys, they watch me!) You might want to put a small cute footstool or something into that bottom shelf. I’m forever looking at places to hide things like that. Guess that’s what happens at my place when 5’5″ marries 6’1″. :)
Ciao
Paula R
LMN says
we live in an older house (well, like 30 yrs old), are you worried about the washer/dryer getting too hot? our handyman told us not to put it too close to the wall and not to slide things in next to it…
YoungHouseLove says
Thankfully there’s lots of open space for things to vent (it’s about 6″ from the back wall and heat can sneak out the top, the back, and through the shelves since they’re just open frames (the bottom ones aren’t against the wall and the side panel doesn’t go all the way back either since the dryer vent is there). Hope it helps!
xo,
s
Candice says
Brilliant as always. =) At this point I would be ecstatic with a laundry room on the main floor. Right now, dirty clothes find their way to the basement easily enough, but are forgotten until we’re scraping for decent items to wear. And also, I dream of owning a washer/dryer set like your lovely pair.
Lisa says
The shelves look great! I looked at the bottom one and thought, “Could they sew a tiny pillow to fit in there and give Burger a little space of his own?” ;)
YoungHouseLove says
Aw cute! I don’t think he’d go in there but I could try luring him with a treat or two. Haha.
xo,
s
Reading (and chickens) says
Ah, this was totally inspirational. We have three closets in our entire house, and nothing in the laundry room. I’ll have to look into doing something like tihs.
Diana says
This is so CUTE and functional.
Elizabeth says
We painted our fuse box (in our kitchen) with chalkboard paint but also use it as a magnet board. We decorate it for b’days and holidays and add photos all the time. No covering up here!
YoungHouseLove says
Cute!
xo,
s
Ashley says
Love it as always! Especially the jar with the clothespins – cute!! :)
Jessica says
You guys need a super cute lime green (or insert any fun color here) step stool! A very practical accent, so that all shelves and buttons can be reached! Perhaps an “easy” weekend project or sweet thrift find!
YoungHouseLove says
Cute idea! Right now I have to say that there are definite perks to not being able to reach things (John has to do it – haha).
xo,
s
cathy s says
Homegoods sells a really cute and ultra handy step stool (I just bought one!) for less than 10 bills! I got a green polka dot one and it folds up like a charm!!! hooray for short people!!!
ruthie says
you need to start a show called “pimp my laundry room”!
YoungHouseLove says
Haha. Done. Burger will be the host (with his cohost Clara).
xo,
s
carolinaheartstrings says
Wish I had a laundry room to pimp out. More like a closet. Oh well, I will just have to live through you!
Jason says
When you go to do the fuse box cover up and considering safety since there is lots of wiring behind that wall going into the panel that you do not want to disturb or cut, etc. I’ll suggest magnetic hooks are a great solution.
At my Mom’s old house the fuse box was on the wall like this and as in your old den – but it was in my bedroom – still don’t know why they did that. She used some super strong magnet hooks to hang a large glass framed Ansel Adams over mine – I still have the picture and it’s relatively heavy.
They are I’d say 3x3ish inches square flat metal magnetized hooks with a very slim profile hook that doesn’t protrude from the wall much and are strong.
These work great so you don’t have to worry about putting a nail or screw through wiring behind the drywall going into your fuse box panel, which everyone needs to be careful of if they have this situation!! Just make sure the panel cover is screwed in all the way as it will be holding the magnet hook and art.
This looks similar but it’s round…there are other examples if you google around and I’d imagine they are probably sold as office supplies as well.
http://reviews.crateandbarrel.com/7258/34904/white-magnet-hook-reviews/reviews.htm
YoungHouseLove says
Such a smart idea!
xo,
s
Heather Andrews says
That looks awesome!
We want to build some cabinets with pull out storage for the dog food bin, and our recycling. They have to be tall & skinny (because the bins are tall & skinny), but be able to support a good bit of weight. We looked at IKEA’s super functional, slide out organizer cabinet things, but they were a bit pricey (surprisingly). We may DIY one with unfinished cabinets & hardware from Lowe’s or HD. We’ll see when that time comes. Our laundry is still waiting on tile and new windows before storage can be tackled.
I painted my nursery this weekend, and your cutting-in video from the guest room came in very handy! It took half way through the 2nd coat to finally get the hang of it, but once my brush and I had that “A-AH!” moment, it all went perfectly. :) Thanks guys!
YoungHouseLove says
You have no idea how excited that makes me. I’m such a geek for cutting in. Haha.
xo,
s
Emma says
Looks great! Very wise of yall to make some flexi-shelving. On a side note, how sad is it that Million Dollar Decorators is ending soon? What am I going to do without Martyn’s accent?!?
YoungHouseLove says
I know! It’s not delicious. The end I mean. I can’t handle it either. At least I still have my Jeff Lewis (and Zoila).
xo,
s
Heather W says
I know right???? I hope they come back with Million Dollar Decorators next season because DAHLING it is delicious! At least we still have Jeff and Zoila!
katie says
I LOVE this! So cute and so functional…
Robyn @ Imperfect Nest says
Love the bright color in the laundry room. The shelving looks to be a great addition of storage.
My husband and I were discussing all the changes we wanted to make in our house. The laundry room was on it. We are going to lose a closet to increase the size and add a pocket door. We are fortunate to have a good amount of closet space so this won’t really effect our storage. Back to counting pennies to make all these changes happen.
Sarah says
Looks great! John got mad skillz! Can I put in a request for more “people in photos” action shots please?! It’s really good to see the space with someone in it, (even doing their best spider monkey pose) makes it more real! Love you guys x
YoungHouseLove says
Duly noted! I always love sneaking Burger and Clara in, but maybe we’ll slide in more if we remember.
xo,
s
Kath says
ABSOLUTELY LOVE what you did with this space!! I wish I had your vision (and patience and skills!!)
Kay says
“Sherry, poor thing” ????? Hmmmmph. Sherry, the next time a Bed Bath and Beyond 20% off coupon finds its way into your mailbox, treat yourself to a step-stool that folds up to fit in a 1-1/2″ wide space. Has a handle on top, too. It’s very empowering for those of us who are vertically challenged…or merely dainty and petite. Just don’t let that tall guy use it… ;-) http://www.bedbathandbeyond.com/product.asp?SKU=10218314
YoungHouseLove says
Haha, love it.
xo,
s
Handy Man, Crafty Woman says
Great spider man pose! Oh, older houses…they always have those awkward spaces. Way to go making a custom built-in shelf! Looks great!
Lindsey says
Yeah!!
I’m so glad you guys did this! It looks very finished and clean :)
emily @ the happy home says
LOVE seeing you guys tackle odd little spaces in the house. since we live in a rental, nothing is even remotely close to ideal. AND it seems like a lot of other house bloggers live in new builds, where they don’t have to tackle the challenges of living in old little houses.
for all these reasons and more, i adore YHL.
Michelle says
The previous owners of our house turned the laundry room into a really awesome kitchen so they could rent out the basement. So our laundry room is pretty sweet–it has lots of cabinet space, stainless steel appliances, and granite countertops!! I’m really glad they did it, because we never would have spent that much to fix up a laundry room.
Dawn Levasseur says
Really love the outcome so far. We are in the process of starting our laundry room. Our dryer is a stackable, which we got for a great price at Lowes (because someone custom ordered it in blue and never picked it up). We are looking around for the matching Duet washer. My problem is that the paint colors in our house seem to be leaning towards blues and grays and blue with gray and gray with blues…..you get the picture. I really wanted the laundry room to be a different color, but bright (subtle bright, not crazy bright) Do you have any recommendations for a color. Love the color you have, but not sure if that would read as too dark in a space with no windows.
YoungHouseLove says
I would bring home some soft celery green paint swatches (like Benjamin Moore’s Dune Grass) and just see what you like. Good luck!
xo,
s
Kelly says
Such a creative use of space! Great job!
I currently live in a studio apt and was blessed with a large separate kitchen and large separate bathroom. The only other “door” I have in the apt is the bathroom door. (I just have a doorway into the kitchen.) And having lived in multiple apts for so long, I was done dragging my clothes to the laundry room. So, I bought a portable washing machine last year! It’s on wheels and lives in my one and only giant closet in the bathroom. I wheel it out, hook it up to the sink and just hang the drainage hose over the side of the bathtub. Once the laundry is done, I bust out my drying rack in the bathroom under the window and hang everything up. Dries in a snap. Plus, I bought one of those over the door, drop down ironing boards. My clothes are in that only closet, so it works perfectly.) When not in use, everything is tucked away out of sight.
It was a sweet setup for me, but I am currently in the process of moving into a lovely guesthouse (unfortunately with no w/d), so I will now be figuring out how to turn the kitchen into my laundry room. (The bathroom will be too small.)
Kristel says
Hah, I wish we had a pimped out laundry room! Unfortunately our laundry “room” is just part of our bathroom. Can’t complain though… at least we have our own washer and dryer and don’t have to lug around our dirty laundry to the laundromat. We put some shelves above the washer and dryer and to keep the space hidden we put up some white curtains…so people don’t have to stare at our washer and dryer while they’re in there. ;-)
Mollie says
completely unrelated to this post, but i just came across a spray paint can cocktail shaker…ha!
http://www.perpetualkid.com/graffiti-spray-paint-cocktail-shaker.aspx
imagine the spray paint masterpieces after this!!
YoungHouseLove says
Funny!
xo,
s
elaine says
it looks wonderful! Great job.
Katie J. says
It looks great! John, you did an awesome job! I would love for a space like this to do my laundry because I currenly do laundry between my stove and microwave…:/.
cathy s says
Hi ya! I just scrolled down to the end so maybe lots of others have suggested this one: a folding/drop leaf type table under the window to do some laundry folding???? Love the good use of small space! as ever, cathy
Kacie says
How in the world do you do so much! I will be blogging about this before and after! Wow!
Kacie
http://acollectionofpassions.blogspot.com
Heather says
It looks awesome! Great job!
Karen deBlieux says
Great job! Love the color and spider pic. John, you need a router to sink the shelvf brackets in for a sleamless look. Think you should put the shutters back … they are great insulators. Keep up the great work! Please continue to be an inspiration to all ages!
Dawn S. says
I made an ironing board cover for my odd-sized board out of the same fabric as this etsy seller used: http://www.etsy.com/listing/54255383/ironing-board-cover-made-with-alexander?ref=sr_gallery_4&ga_search_submit=&ga_search_query=apple+ironing+board+cover&ga_search_type=handmade&ga_facet=handmade. Then I hung it using this rack so that the board hangs over our fuse box. http://www.amazon.com/gp/product/B000050ASK. I can’t use the iron-holder part of the rack, but I keep my iron tucked away in a horizontal Expedit shelf I mounted to the wall above our washer and dryer for organization.
The color and the added shelving really are making that room feel like it has more function than JUST the washer and dryer alone. Way to go! That is definitely a tricky room to work with, I’m sure!
YoungHouseLove says
Such cute fabric! Love it!
xo,
s
Hooked on Hickory says
every time you post it keeps getting better! working on my mudroom/laundry as we speak. thanks for keeping me inspired!
Heather says
Two things:
I know everyone has been wondering where you are going to put the ironing board, but I’m more concerned about folding the clothes. Your “tote it to a different room with more space” plan might be working now, but might not be so great in the future… when Clara (and her clothes) are bigger and other kiddos are added to the mix. I propose the following solution: a pull-out shelf stacked between the washer and dryer! Here’s an idea from Martha Stewart: http://www.marthastewart.com/photogallery/laundry-room-ideas#slide_5
Second, how does Sherry always have baskets lying around to spruce up a newly completed project? I think I remember something about a decorating cabinet in the kitchen at your first house, but where do the baskets come from? Also, speaking of that decorating cabinet… could we get a re-cap on suggested decorating items to collect? Thanks!
YoungHouseLove says
All those baskets live in the messy playroom! There are still tons more (insanely enough). In the old house they were all in use in closets and the basement and stuff but I’m not that organized here yet. Someday I’ll get them all in rotation again! As for your folding suggestion I like it but I doubt we’ll ever want to fold in there (it’s like folding clothes in a bathroom stall, just too cramped even with a cute shelf) but you never know. And as for what to collect, I have a sickness for baskets nd pillow covers and vases and candle holders and trays. Whatever you like works though. Good luck!
xo,
s
Annalea says
So, here’s random for you . . . I keep wondering what the Petersiks are going to blog about when this house is pretty much done. I know no space is ever really “done”, but a room can only be redone so many times before the occupants want to tear the wallpaper down with their fingernails, right?
Soooo . . . I’d love to hear sometime what’s down the line for y’all . . . or at least know you’re working on it, so YHL has a future. :o) Maybe design services again? Mood boards? The sky’s the limit . . .
YoungHouseLove says
We honestly have no idea! Our last house took 4.5 years and this one is bigger and we have bigger plans (building a deck, enclosing the carport, changing the roofline) so we’re sure it’ll keep us busy for a while!
xo,
s
Connie says
I am loving how the laundry room in evolving! It looks so fresh and clean. I’m telling ya, I can smell it. LOL! What’s really funny is the picture of John in the window, it reminds me of spiderman. LOL!
Amy says
Forgive me if this has already been asked before – but where did you anchor the shelves? You said to the board on the floor, but are they also anchored to the cleats? Or are they just resting on top of the cleats? Looks like maybe you’ve also attached to the cabinets above? I’ve built a few bookcases (gotta have them when you have a small house!) and I’m always looking for new tips!
Thanks,
Amy
YoungHouseLove says
The shelves just rest on the shelf brackets and the lip that we installed in the back since they’re removable. The vertical piece of wood next to the washer/dryer and the long shelf that’s not removable with the bowl on the back are screwed into the floor and upper cabinet though. Hope it helps.
xo,
s
Amy says
Sorry, didn’t see a reply button for your comment, so just responding here. Aren’t you worried about Clara trying to climb onto those shelves when she gets older (and possibly pulling them down)? I was just wondering how sturdy everything was. I have a 3-year-old, and he tries to climb up on everything!
Thanks,
Amy
YoungHouseLove says
Clara could totally surprise us when she’s 3, but we have the same shelving in our bedroom’s walk-in closet and she doesn’t do anything but pull baskets and clothes off the shelves these days. Haha. Since the shelves are removable we could always make the first one extremely high (and slide a hamper or tall basket in there) so they’re not climbable if we need to though. Thanks for the warning!
xo,
s
Jussara says
Looks great!
Just an idea: have you seeing those DIY twine ball light fixture? I think it would look great in there!
YoungHouseLove says
Oh yeah that would be cute!
xo,
s
Dianne says
maybe for shoes/near the door you could do one of those back of the door organziers but mount it on the wall…maybe “frame it” and then you could use some of the pockets for leashes, flip flops, gloves, etc. I love your blog and enjoy all of your creative ideas. We also have a little laundry area (a pass through from the kitchen to the garage) where the washer/dryer have to be stacked up…I am inspired to make more creative use of the space next to the appliances, THANKS!
YoungHouseLove says
That’s a fun idea!
xo,
s