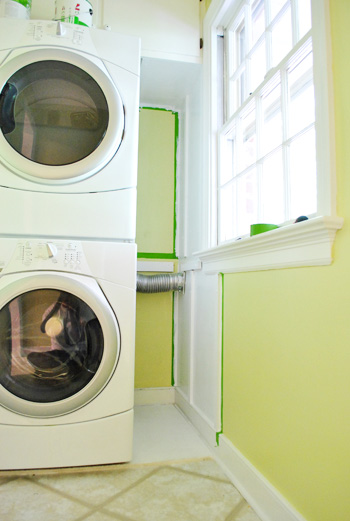
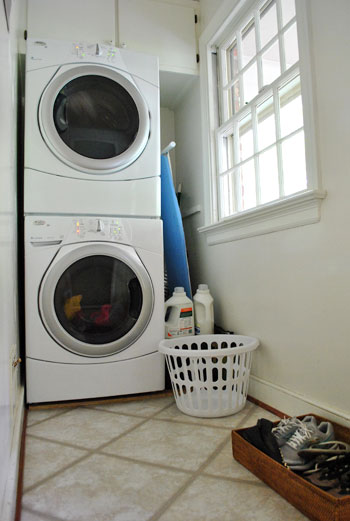
Laundry room update? Don’t mind if I do. To jog your memory, so far we’ve replaced the washer/dryer, taken down window shutters & cluttered shelves along with frosting the door (all here), filled some ceiling cracks, and painted the room the same color (Benjamin Moore’s Sesame) as the kitchen. And voila, we’re all up to speed.
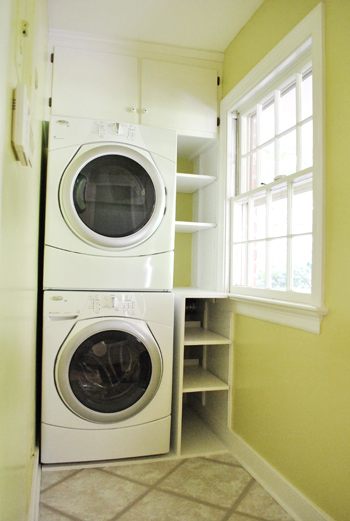
Well, if you really want to be up to speed, now it looks like this:
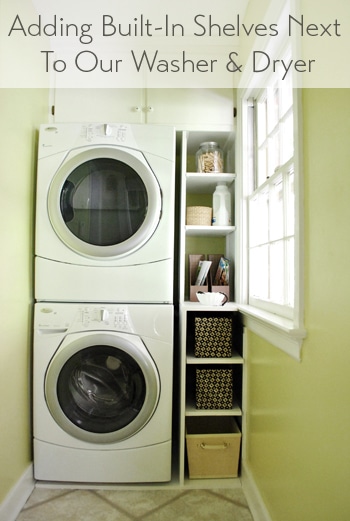
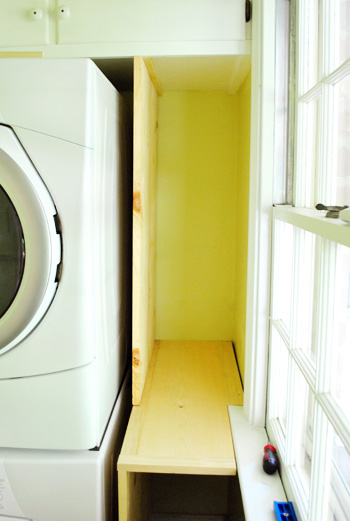
But let’s back up so I can blather on about how those shelves came to be. Even during our initial walk-through of this house we decided to maximize that sliver of space with some built-ins to add a lot more function.
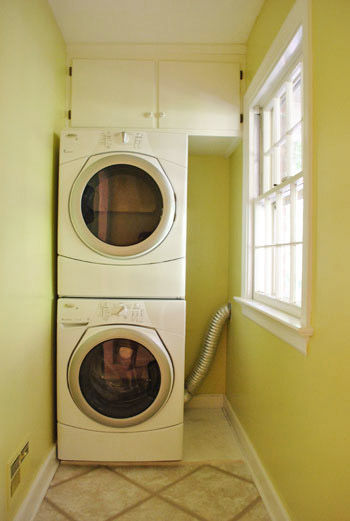
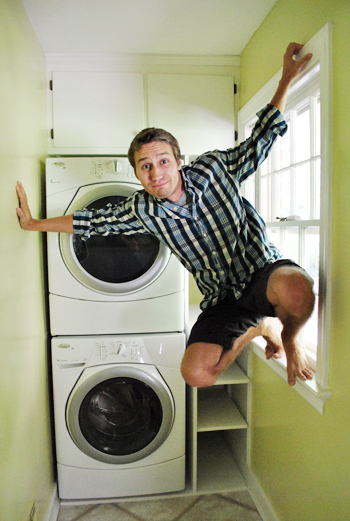
Did we mention the room is just 3.5′ wide? That means the washer and dryer doors wouldn’t even open if they were placed on the other wall under the window or fuse box. So if anyone’s still having trouble getting how narrow this space is, I broke out my spider monkey skills (and crazy toes) to demonstrate. Don’t try this at home, kids.
Since the room is so skinny, we knew adding that vertical storage next to the washer would be key (we can’t really go “out” for fear of bashing into fold-out shelving or counters or drying racks – so we might as well go “up” instead!). Speaking of up, since the built-in cabinets above the dryer are completely out of Sherry’s reach (poor thing, but at least she can reach the dryer buttons), more accessible storage was just the thing. And since no ready-made bookshelf skinny enough to fit into that 14.5″ gap won us over (they were all too shallow to allow us to take full advantage of the nook), we opted to build something instead. It certainly couldn’t be harder than the behemoth console that we built, right?
Wrong.
Just kidding. It definitely was easier. So here’s a quick-ish recap of how it went down. First I measured the space and marked up a little sketch that I did with a few measurements. I’ll pause while you marvel at my technical drawing skills.
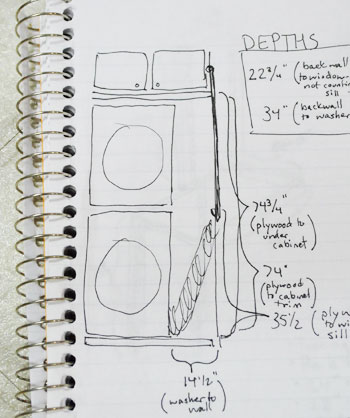
After much consideration, we opted to use the right wall (with the window on it) as side #1 of the bookshelf and to build a vertical divider of sorts to be side #2. We wanted the whole thing to be as deep as the appliances, but then it would partially cover the window. So instead we’re decided to split it. The bottom half would be washer-depth and the top-half (above the window sill) would be window-depth. Confusing, I know. And I’m sure this drawing below (which helped me determined wood cuts) doesn’t help. But here it is anyways. Enjoy!
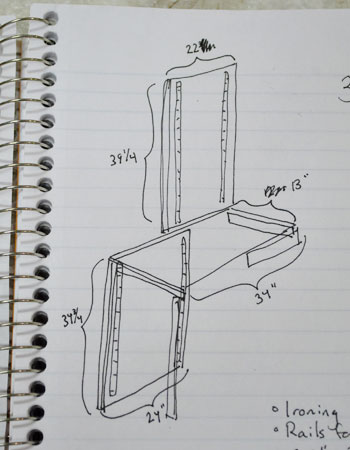
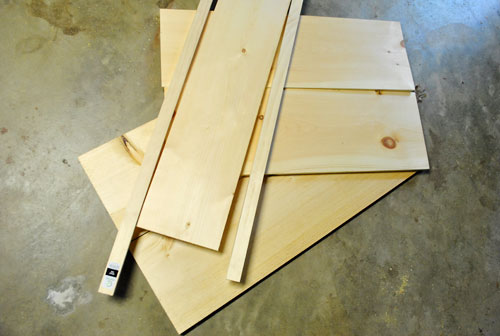
I got the guys at Home Depot to make most of my cuts, so here’s the bulk of my wood pile by the time I got home. We used whitewood with 1 x 2″ poplar boards mixed in (since they don’t sell whitewood planks that thin) just like the console. Also like the console, I’d be screwing two 1 x 12″ boards side-by-side to get a wider board for the bottom and top portions of my vertical divider. And then a 1 x 10″ trimmed with 1 x 2″s for the middle shelf that would connect the two divider halves. Not pictured, nor sketched above, are some more 1 x 12″ boards for my shelves and some miscellaneous 1 x 2″s for trim.
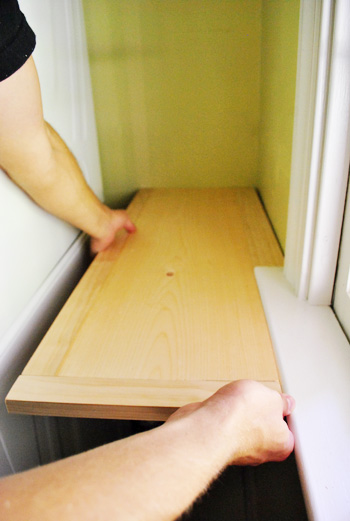
The middle shelf would sit flush with the window sill, so I cut and attached the 1 x 2″ trim pieces so it’d leave a sill-sized notch. Here I am testing the placement, which fortunately worked out really well.
Then I screwed bottom half of the divider directly into the “floor “(which is actually a piece of plywood that runs under the appliances for extra stability – more on that here) and into the middle shelf using my Kreg jig. It hung over the plywood a bit (I forgot to calculate the added trim on the middle shelf when cutting my board) but I solved that later with another piece of 1 x 2″ trim on the floor to finish things off.
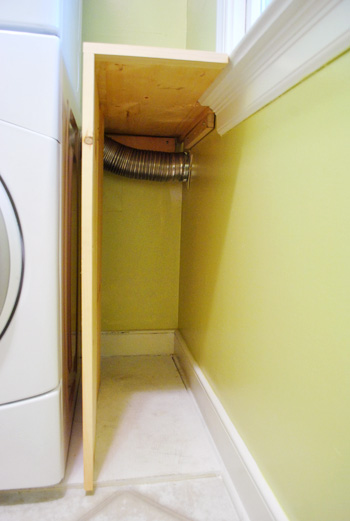
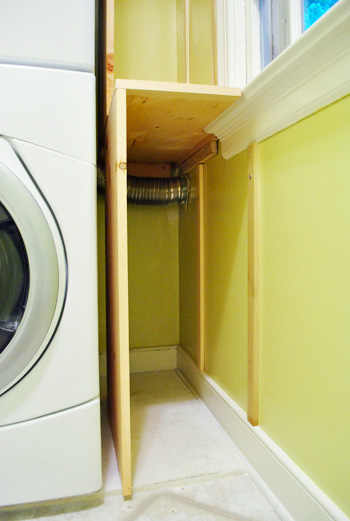
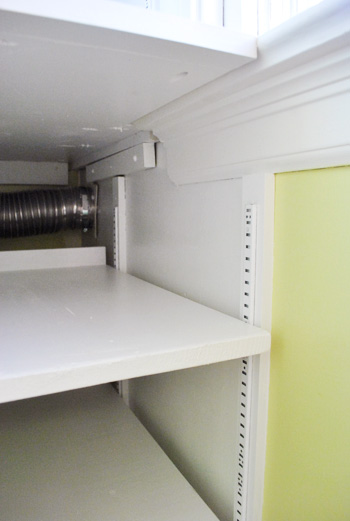
You can see above that I screwed in a couple of pieces of wood on the back and side walls for the middle shelf to rest on. That’s because the vertical divider doesn’t go all the way back to the wall (to leave some access to the washer and the dryer duct).
Speaking of which, I updated our old aluminum-foil-ish dryer duct to a safer rigid all-aluminum version from Lowe’s (since we hear they’re less of a fire hazard). It was an easy switch (remove the other guy, clamp new new one in place with metal clamps and metal wall piece, that’s it).
Here’s the top divider now attached, just like the bottom guy. Notice how he’s set back to be even with the window? Is this making more sense now? It’s sort of a two-tiered profile so it uses all of the depth that we can use without oddly overlapping the window.
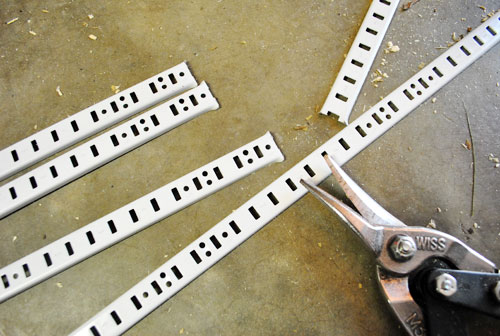
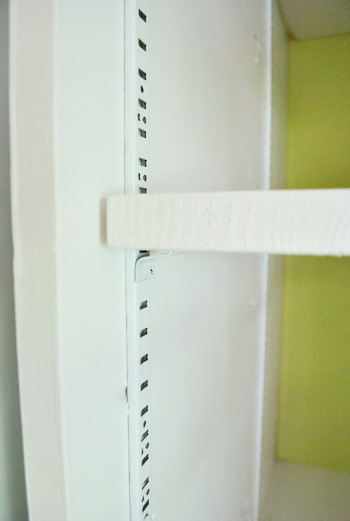
As for the rest of the shelves, we wanted them to be adjustable and removable. Adjustable because, well, sometimes you want to adjust your shelves dagnabbit. Removable because it’ll help us gain access to the back of the washer/dryer if need be. So I purchased four 6ft lengths of metal shelf tracks at Home Depot (the same kind that we have in our built-ins and master closet) and snipped them with metal cutters to the right lengths.
The space between the divider and the wall was shaping up to be a smidge wider than my 1 x 12″ shelf pieces, so I added some additional 1 x 2s to bridge the gap. In the long run, I think this actually make the metal tracks more secure (since otherwise they’d just be nailed into drywall). So maybe a happy accident?
A not so happy accident? Realizing at this point that it’d be very difficult to paint all of the wood in place. So out it all came so we could access everything more easily. The good news is that it was pretty quick and easy to take out, which will be appreciated if ever it has to come out for some serious appliance maintenance.
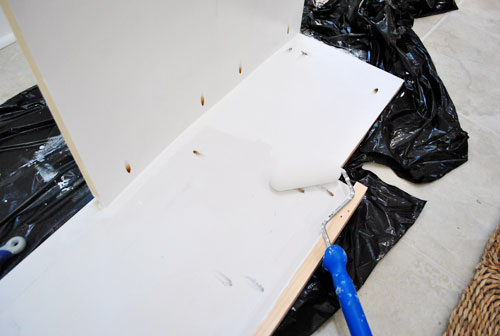
In the sunroom (the laundry room is waaay too small to attempt to paint these big pieces) we applied two quick coats of primer (Kilz No-VOC) followed by two coats of white paint (Olympic Premium No-VOC semi-gloss off-the-shelf white paint) on all of the framing for the built-ins to make sure we were getting our whitest white without any wood bleed going on. But after lazily painting the shelves with just two coats of paint the next day (no primer) we realized we probably would’ve been fine without primer on the framing too. Oh well. It certainly didn’t hurt.
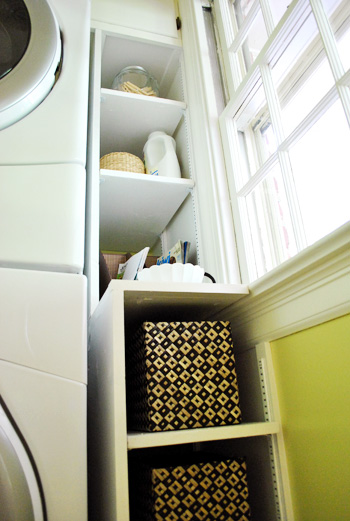
Oh, and we also painted that side wall on the right white (to make it look more like it was part of the bookshelf). But we left the back alone for a shot of color that would be seen through the shelves.
Then I reinstalled everything, nailed in my metal shelf tracks, added the clips, and took them for a spin.
On the bottom half I also added a little lip at the back of the shelf since, unlike the top, they don’t go all the way to the wall. This will hopefully prevent things from sliding off and getting lost back in there. But if something does sneak back there over the lip somehow, we can still easily retrieve it thanks to the shelves being removable.
But enough “how we built it” mumbo jumbo. Let’s check out the finished product:
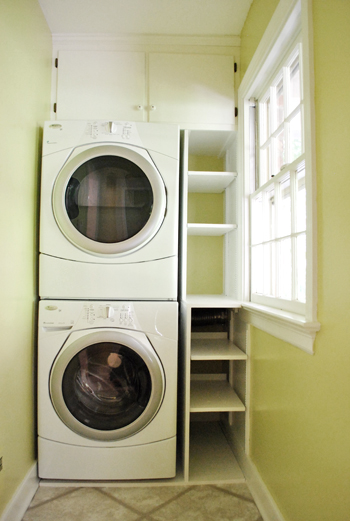
That 2″ gap between the appliances and the shelf was intentional so that when the washer starts a-rockin’ things on the shelves don’t start a-knockin’ (if you know what I mean). Actually, that’s literally what I mean. It’s not a euphemism.
Admittedly she’s not the prettiest thing in the world when she’s empty (I think I would’ve preferred the look of fixed all-the-same-size shelves). But the function of adjustable shelving made a lot more sense, and we can now store something small and something tall without worrying that things won’t fit.
And there’s no denying that we’ve gained a lot of usable storage space when it comes to the max-depth that we worked hard to obtain. We haven’t quite figured out all that we’ll put here (besides the obvious detergent, iron, etc – maybe a basket that can be used for winter gloves & scarves and a larger one for flip flops and sandals). Just for fun Sherry went ahead and fancied it up a bit with some – you guessed it – baskets.
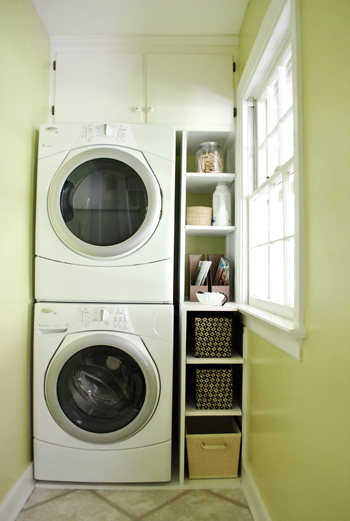
Along with a few other things we already had (magazine files, a scalloped bowl, a jar full of clothespins, etc).
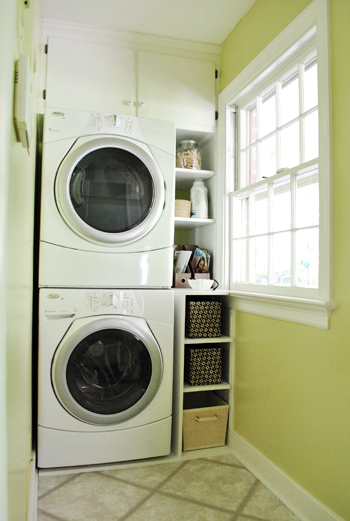
We’re toying with the idea of this becoming our new drop spot for mail, coupons, and other miscellany. So maybe it’ll look like this in the long run?

As for the cost on this one, it definitely was more than if we’d gone with a not-quite-right existing solution (like this narrower, shallower version from Ikea). But we totally think it was worth getting something that looks more seamless and really makes the most of the space (so we can use the full width and depth and adjust the shelves to customize it even further whenever need be). Here’s the ol’ budget breakdown:
- Wood (from Home Depot & Lowe’s): $59
- Metal shelf tracks & shelf clips (from Home Depot): $15
- Primer & paint (Kilz No-VOC primer & Olympic No-VOC paint): already owned
- Baskets, magazine files, the bowl, etc: already owned
- TOTAL: $74
Oh, and the aluminum dryer transition duct was $10 from Lowe’s.
If you’re searching around for more ideas for making shelves yourself or adding vertical storage, this post is full of 16 ideas for adding shelving.
As for our laundry room to-do list, these days it’s looking more like this:
Paint the odd brown quarter round near the baseboards glossy white
Redo all the dinged up trim (also in semi-gloss white)Paint the wallsReplace our dryer hose with a safer all-metal oneAdd adjustable built-in shelving in that nook next to the stacked washer & dryer- Replace the hinges and knobs on the upper cabinetry
- Get a new light fixture <- DIY something? maybe a small chandelier?
- Add a window treatment (maybe a homemade one?)
- Add other functional storage near the door for shoes, Burger’s leash, etc
- Hang some art to keep it cheerful and obscure the giant metal fuse box
Even though we’re only about halfway through, we’re feeling pretty good that in the past few weeks, this space has already gone from this…
…to this:
As for where we’ll store the ironing board- we have a plan for that. More details to come after we tackle it (we wanna make sure it works first, haha). In the meantime we’d love to hear what storage solution you’re loving (or lusting after) in your laundry space. Got some sweet cabinets or drawers? A cool collapsible drying rack or ironing board? Your very own laundry sink? We know there are some pimped out laundry rooms out there, so let’s hear it.

Amy @TriangleHoneymoon.com says
So inspiring to tackle our own messy laundry area. Looks great guys!
Amanda T says
What are you using for laundry detergent nowadays…last I knew it was Charlie’s. Did you find a better cloth diaper detergent?
YoungHouseLove says
We use Seventh Generation whenever we run out of Charlie’s (like now). Haha. Charlie’s is harder to find (a local eco shop has it so whenever we’re out that way we’ll get more).
xo,
s
Miranda Williams says
I love love love your laundry room! It’s turning out amazing! Can’t wait to see what else you do in the space.
P.S: Sherry I wish my husband was as handy as yours! :)
Megan says
My launddry room is in an unfinished side of my basement that is also a storage room for everything from clothes, old toys of mine from when I was a kid, and our tools. It’s a HUGE mess! I wish I had something I could make cute and it’ll actually make me want to do laundry and organize. Maybe some day…
JennyB says
Looks terrific. It’s funny how everyone, myself included, wants to know where you’re going to put the ironing board. I look forward to seeing your solution because it’s such a pain to find space to store it.
Love those finger toes, John! I have them, too. They come in handy, don’t they?
YoungHouseLove says
Oh yes, I can pick things up with them, pet Burger with them, etc.
-John
Kara says
Looks so good, and you make building a shelf look pretty easy, almost like I could actually do it, and when I say “I” I mean my husband!
OwningSingle says
Great use of space! I really wish that I could build stuff. I need to try it one day on something small.
Tina says
You are lucky to have that clean space for the laundry! Our laundry room is not “finished”, our whole basement is except for that. We have the A/c unit and the water heater all in that space too, so I have no idea how to make it sweeter looking. We do have a laundry sink though, except I never use it:(
I’m lovin that color you used in both rooms, I havent found the RIGHT yellow for our kitchen yet…I’ve been looking at HD, maybe I’ll look at Lowes next;)
Love the laundry re-do!
beth in dc says
How about turning the ironing board into, essentially, cute art? Paint the frame, make a cover out of great fabric and hang on the wall over the fuse box, like a decorative element. Sort of how bicycles hung on a wall can be so appealing. …
YoungHouseLove says
That just might be the plan…. haha. We’ll share the details when we get ‘er done!
xo,
s
Emily says
Looks great!! I want to stack our washer and dryer too but hubby is not convinced. Maybe this picture will convince him! We have a little bit more room than you (width) but not much so I think it would be a great solution. Can’t wait to see what you do with the ironing board!
my honest answer says
I agree that adjustable shelves are worth compromising the look for. So annoying when you have something too tall, or a wasted space!
Maybe you’ve thought of it already, but how about hanging the ironing board? Kind of like how you hook a bike to the wall in a garage.
Anyway, can’t wait to see what you come up with, whatever it is.
YoungHouseLove says
That just might be the plan, at least for now – haven’t done it yet though!
-John
Blake says
You guys are great. Your blog is great.
For being so awesome and detail oriented….how can you live with your washer & dryer having opposing door swings?
Please consider a dryer door reversal kit (W10277499)
Sincerly,
Your (not so) local OCD Appliance Guy/Blog Fan
YoungHouseLove says
Funny you say that because when we first got them we were dead set on reversing the door. But then it ended up not really bothering us… so it’s kinda just stayed that way. Surprising? Yes, because we’re usually super OCD about those things too. You never know!
-John
Laura C in Indy says
LOVE it!!! Great job guys!
TracyJ says
The shelves are wonderful. You guys NEVER cease to amaze me! :)
candace @ thecandace.com says
Wonderful progress – the custom built ins are just what this little nook needed! As always, great job! Sherry, you have magic fingers when it comes to putting on lovely finishing touches!
Leslie Ann says
Well I for one am looking forward to seeing if you can “flair up” some in-window shades! That would be *really* awesome, because usually the only kind of curtains that renters and college students can put up are in-window treatments, such as curtains hanging from tension rods, like my friends have. (that or hanging the curtains from strings that are attached to thumbtacks/tiny nails small enough not to leave holes… I’ve seen that route as well!)
Leslie Ann says
Very functional, and I like how the longer lower tier of the shelving gives you a “mini-counterspace” for mail or something similar.
One question thought: How are you going to manage window treatments , when your window is shoved against the shelving?? There’s no room for Sherry’s patented “High & Wide” curtains!!!!
Leslie Ann says
By the way, John’s clearly having WAY too much fun :P
YoungHouseLove says
Good question, Leslie Ann. We’re thinking we’ll probably end up with a simple roman shade or something that’s mount inside the window frame. And of course you’ll hear all about it once we actually take on that project.
-John
Leslie Ann says
Aw, simple Roman shades? Never thought Sherry would have to resort to those! Poor girl.
YoungHouseLove says
Maybe they’ll have some flair. Ya never know. Haha.
xo,
s
Leslie Ann says
Well I for one am looking forward to seeing if you can “flair up” some in-window shades! That would be *really* awesome, because usually the only kind of curtains that renters and college students can put up are in-window treatments, such as curtains hanging from tension rods, like my friends have. (that or hanging the curtains from strings that are attached to thumbtacks/tiny nails small enough not to leave holes… I’ve seen that route as well!)
Amanda says
Personally I like it without curtains/roman shades, it lets all the light in it can possibly let in! And looks cleaner, since it is such a nice room. But I’m sure it’ll look nice with whatever you decide.
Amanda says
Though it is a nice room, that should say small room …
YoungHouseLove says
Hmm, never thought about that option (I was planning to add some color/pattern with curtains) but now that you mention it, it’s nice and clean without anything too. Something to think about for sure!
xo,
s
Amy @ this DIY life says
Looks great! I’m looking for someone to talk my husband into moving our laundry to the second floor into a closet in our bathroom. I need to convince him that a laundry room doesn’t have to be big to be functional. Interested?
YoungHouseLove says
We’re on it! :)
-John
Barb says
John, John, John….
Something so simple….I might add this is brilliantly done!! Did I also mention that Sherry has such a “catch” in you. Your DIY skills are superb and she is one lucky woman!!! Sherry…you better be appreciatin’ (slang) this man!!! He is pretty great!
FYI…..I am also married to one and it has almost been 36 years of wedded bliss… right!
He can build anything, draw anything, sew, make anything, cook, I could go on and on. He should have been a surgeon, but I say he is to kind to be one of those!!! Seriously!!
One last question…I finally convinced my husband about painting our fireplace after showing him pictures of 2 of yours and numerous others. We do have a gas insert that sticks out of the opening. Do you think the brick needs some sort of heat resistant primer and paint? Or will normal primer and paint do. I just don’t want to have the paint peel because of the heat. I might add…we don’t use the gas insert much. Would love your take on this one.
And once again John….BRAVO to the builder and homeowners!!! Looks magnificent!
B.
YoungHouseLove says
Hmm, you could ask at the home improvement store just to be sure. They sell high heat stuff there too so hopefully you’ll come home with whatever you need. And as for John, yup, I thank my lucky stars everyday! He’s the man.
xo,
s
Amy @ this DIY life says
Hi Barb, We just had an experience repainting our charcoal grill and learned the hard way about not using high heat primer. The first time we used it, it bubbled all up. I definitely recommend the high heat stuff. Here’s the link to the good part (http://thisdiylife.wordpress.com/2011/06/29/chillin-grillin/) and the “we learned the hard way” part (http://thisdiylife.wordpress.com/2011/07/04/diy-reality/). Hope our mishaps can help.
Sarah Hamilton says
I recently redid my laundry room. I painted the back door with chalkboard paint, and added green stripes to the walls. I love it!
See it here.
http://gettinby.wordpress.com/2011/07/05/laundry-room-make-over/
YoungHouseLove says
SO CHIC AND CHARMING! I love it.
xo,
s
Sarah Hamilton says
You guys just sent over 20 viewers to my little blog! You rock!
YoungHouseLove says
Totally deserved! Love those bold stripes!
xo,
s
LaMadre says
Me? I’d slide that ironing board right in between the washer/dryer and the shelves. Who wants to be reminded of ironing?
ginai says
I love this sooo perfect! and my golly! Sexy John! even his feet are super sexy!!! ((:
YoungHouseLove says
Haha- finger toes are the new six pack!
xo,
s
Becky Jo says
I love those shelves! They’re functional and beautifully presented! Good work, guys! We’re renters currently (nothing fancy, just your typical beige carpet, 30 layers of paint on the walls, random lumps in the carpet NoVa apartment), but my honey is honing in on his carpentry skills by building some nightstands for our bedroom. Hopefully by the time we purchase our first house, we’ll be able to tackle these kinds of simple, but oh so necessary, projects to customize our home! I love the inspiration we get from you guys!
Sharon @ mamadoitall.blogspot.com says
This is amazing. I love how you not only customize so well for your space, but also give forethought to future fixes (making the shelves removable? brilliant!). I aspire to someday be this handy – and it’s so cheery and functional to boot – well done! Looking forward to reading more! :-)
meaghan says
Looks great! I’d add a little vase of flowers or a small fern to take advantage of the different depth and the window spot (and to make the task of laundry just a bit more pleasant!).
Jessica says
What about a waste paper/garbag basket for dryer lint and crap you find in your pockets before you put them in the wash? Love the cheery and organized look! Good job!
YoungHouseLove says
I figure that’s what we can use the bowl for (old change, pens, link, etc). Burger’s leash will soon (hopefully) get a hook on the wall near the door to free up that bowl.
xo,
s
Allyn says
“Actually, that’s literally what I mean. It’s not a euphemism.”
Bahaha. That seriously made me laugh out loud, and since I’m the receptionist for a fairly good sized company, it’s a good thing that no one was in the lobby when I read it.
Love the way it looks! Our washer and dryer are in our dining room. Like, hello laundry, you look great with a glass of merlot. Sadly, they aren’t exactly in a corner, so I’ve yet to figure out a way to obscure them that isn’t just as annoying as they are. Sigh. One day.
Haley Y says
Yes! This was my favorite part of today’s post. I can really appreciate someone who understands what “literally” means, haha.
Lizzy says
and, once again, the award for most used kreg jig goes to….
ha!
looks great and you must be relieved to have some reach-able storage!
Kristen Windle says
What about something like this for the ironing board?
http://pinterest.com/pin/69299668/
YoungHouseLove says
That’s super fancy! We don’t have room for it sideways (the room’s just 3.5′ wide) but we’ll have to see where we end up!
xo,
s
Britt@knewlywifed says
Ooooooh, great space saver! My hub and I need more room in our laundry as well.
Jennifer says
We have super small pantry/laundry space and in order to store the ironing board, we put two screws in the wall and the ironing board “hangs” on them. Kind of suspended between them. It works really well.
Katie says
Love the updated laundry room!! I have to admit I recently found your blog through Daily Garnish and it has become an addiction that I check daily! I love your style both for decorating and writing, I usually laugh out loud while reading. Based on your wonderful instructions, I felt confident enough to tackle painting our paneling and fireplace in our family room and it has been 3 weeks and I still love being in my “new” room. I think my next task will be redoing our laundry room that is scary enough to give me nightmares. Keep up the great work!
YoungHouseLove says
Aw thanks for the kind words Katie. We’re glad you found us. And you can totally paint that paneling and fireplace! Have fun and feel free to post after pics on our Facebook page!
xo,
s
cristina s says
I love this project :)
We bought out first place a few months ago. Our home has a slim closet space built by the developers to hold our hurricane shutters & we always thought that would be all its good for. Our neighbors have the same floorplan & taught us how to stack our shutters (very tightly)to clear some room. We purchased a rolling-shelf-unit-thing (for quick access to our shutters in case of warnings) & installed some heavy duty hooks to hand our ladder, power cords etc. The closet now houses all of our cleaning supplies & tools (we have no little ones yet so no concern for safety) & couldn’t be happier with the extra closet space!
Can’t wait to see the ironing board update!
Hil says
Looks great already!
When I have painted shelves and furniture before, I have noticed that if I leave something on it for a couple days, it sticks to the paint a little. A paint store employee said that can happen because latex paint isn’t completely dry for up to 30 days.
Do you folks ever have that problem? Or did you just put stuff on the shelves for the picture and then clear it off again? Or perhaps my coats of paint are too thick and take an extra long time to dry…
YoungHouseLove says
We apply really thinthinthin coats. Seems to help with things curing. We did build and paint these shelves a few days before putting stuff on them though (it usually takes us a few days to complete projects and then we have to take pics and write the post so sometimes that delay comes in handy for letting paint dry- haha).
xo,
s
Morgan says
This looks awesome! Totally inspiring me to jazz up my basement laundry room!
Kristal says
You guys are DIY geniuses!!! We don’t own a home yet…we’re still stuck renting but the more I read your blog the more I’m inspired to get a fixer upper rather than a fully finished house so that I can make it my own.
Teresa (Our Corner House) says
Wow, really like how the vent hose is hidden now. Great work!
Celia says
One thing I always keep near the laundry is a jar in which to throw the coins that seem to emerge from clothes…think of it as a savings account for your next detergent purchase.
YoungHouseLove says
Haha- love it!
xo,
s
Kristal says
Ps: you two seem to be fans of open storage. So…and idea for the cabinets would be to remove the doors and turn it into more shelving! As for the ironing board, are you going to hang it somewhere? Also, I liked the idea one poster had about putting a runner in there. It would def make it more cozy (and your feet warmer)!
YoungHouseLove says
We like the idea of keeping the upper cabinet doors since we hide ugly stuff like trim paint up there (John gets it for me since I can’t reach, haha). As for the ironing board, we do plan to squeeze it in (more details when we get there). And a runner would definitely be fun!
xo,
s
Kristen @ K Leigh Ford Blog says
You guys! This is such a great simple transformation! I seriously love how the shelves really helped the space look better! I’d love to do laundry in that room!
Can’t wait to see what else you guys do!
Karen says
I love how much brighter the shelves make the room. And the color in bright(er) sunlight is divine. Great job!
Sabrina says
Looks great! Just stumbled across your website and you guys have been a life saver! My husband and I kind of got into an overwhelming slump with our new house, which we bought a year ago, and added a second child to lol BTW Does Clara like younger men? My 5 month old laughs and grabs at the screen whenever her picture pops up.
YoungHouseLove says
Oh yes, she’s cool with five month olds I think. But she might call him “baby” if she sees him. Haha.
xo,
s
Lisa says
I will totally be doing this to my sad, little pantry. At this point, the stacked washer/dryers are my unsung heroes. Well, I have an LG so I guess it does actually sing when the loads are done.
bungalowbliss says
Spider-monkey. You guys crack me up!
Looks TONS better–the paint, the shelves, the organization. Bravo!
Katharine says
You guys are great! I just want to give you a pat on the back!
Jess says
How convenient that your laundry detergent comes in a nice white bottle! My giant orange container with a clashing purple cap probably wouldn’t look QUITE as nice with your laundry room color-scheme. You lucked out! :)
YoungHouseLove says
Haha- hooray for Seventh Generation. The other stuff we use (Charlie’s Soap) also comes in a white tub. So funny, I never thought about how nice that is!
xo,
s
Alison says
Great use of space.
That dryer hose that you used poses a fire hazard they collect lint and catch fire. You might look into using a solid sheet of hose sold in pieces that you piece together.
YoungHouseLove says
We actually addressed that in this post – we replaced the old floppy fire hazard one for a rigid all metal one!
xo,
s
K (Barking Babymama) says
Do you have any fabric leftover from Clara’s first year weekly photos? (I know you used most of it on the runner and quilt and everything) – I think you should make roman shades out of some of that fun fabric!
YoungHouseLove says
I still have some leftover but since I used it to make her birthday quilt and table runner and birthday banner there aren’t big enough squares for big projects like that. But I’m definitely no stranger to hunting for more fabric…
xo,
s
Sue says
Get job on this project! Did you do something with the floor in the laundry room too? In your “before” pictures, it looks like the flooring has come away from the walls, but not in the “after” photos. If you did fix the floor, I would be interested to know how you did it as we have the same problem in our home and we don’t want to get new flooring quite yet, if possible.
YoungHouseLove says
In the last step before this one we painted that brown quarter round trim near the floor white, so it looks a lot cleaner in there. Hope it helps!
xo,
s
Cher says
Great job!! I wasn’t liking the way it looked before, it looks waaaaaaaay better now!
Jen @ The Decor Scene says
I LOVE your new storage. Love the way it turned out. Feels nice and custom now. Can’t wait to see what else you add to the room. :)
We have been updating our Laundry Room over the last few months. We are almost done with it actually. Here is some of the storage we have put into it so far. We have installed white Ikea shelves over the washer & dryer also, but I have not blogged about those yet. ;)
http://thedecorscene.blogspot.com/2011/03/laundry-room-cabinets-installed.html
http://thedecorscene.blogspot.com/2011/04/laundry-room-added-storage.html
YoungHouseLove says
Love that awesome cabinetry!
xo,
s