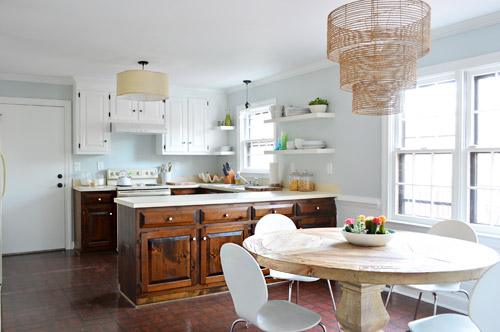
The stain on our kitchen cabinets was too orange and dated-looking. We loved the wood grain, but just wanted a darker, more contemporary color. We just didn’t love the idea of sanding or stripping off the old finish. Luckily, we found a product that would let us skip that messy and tiring step while still giving us the end results we wanted.
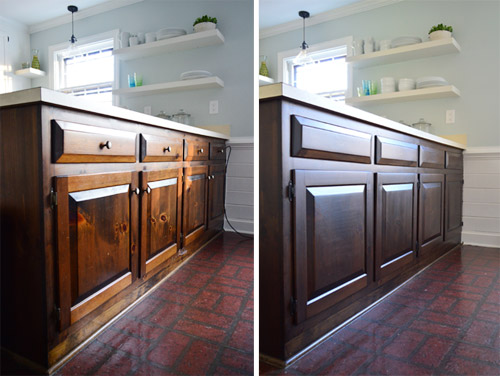
You can see our results above, and read below for how we got there!
What Stain Product Did You Use?
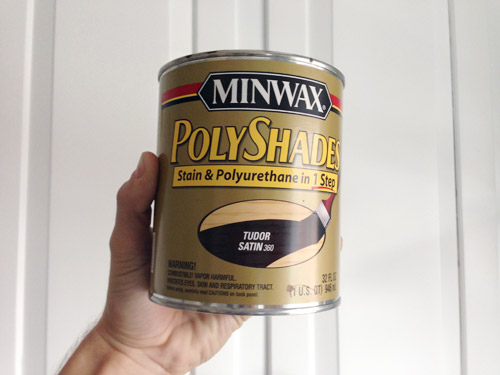
We used Minwax Polyshades for this project, which is similar to a gel stain. Unlike traditional wood stains, which have to soak into the wood to work, a PolyShades coat or gel stain product sits on top of the existing stain, much like a paint application would. Like paint, you need to take a bit more care when applying PolyShades to avoid drips or brushstrokes – but we’ll cover that in more detail below (even on video)!
These products come in lots of colors, but we chose one called Tudor in a satin finish. We had previously used a darker PolyShades color on our bathroom vanity (Espresso) but wanted something slightly lighter in the kitchen. Keep in mind that your final color will be impacted by the color you are staining over, so you may want to test a few colors in an inconspicuous spot (like the back of a door) before starting. And you should always go darker – so from light to medium, or medium to dark.
These products are also oil-based, which means you can skip the usual last step of sealing the stained surface with a coat of polyurethane sealer (like you have to do with water-based stains).
Can You Stain Your Cabinets Darker Without Sanding?
While yes, you can avoid completely sanding and stripping an old stain finish off of your kitchen cabinets, you will need to do some light sanding as part of this project. So be wary of any tutorials that suggest otherwise. But don’t fret – this is the type of sanding you can easily do by hand with a simple sanding block or sheet of sandpaper. Lightly roughing up the surface will help your new stain adhere for longer-lasting results.
What Materials Do You Need?
The best part of this project is probably what you DON’T need. You don’t need any polyurethane sealers or varnish. You also don’t need any chemical strippers, power sanders, or other heavy-duty products to get your already stained cabinets down to their raw wood. Still, you will want to have these supplies on hand:
- Minwax PolyShades or similar gel stain product (we only needed 1 quart for two coats)
- 2 or 3 stain-grade paint brushes (small enough to fit in mouth of stain can)
- 220-grit sandpaper or sanding block
- Extra fine steel wool (#000 grade)
- Screwdriver or drill
- Dropcloth or old cardboard
- Nitrile gloves (optional)
- Wood filler & putty knife (optional)
- Painter stands (optional)
- Degreaser or liquid deglosser (optional)
You will also need a space – like a garage or maybe a basement – to lay out your cabinet doors while staining and drying.
How Long Does It Take To Stain Your Cabinets Darker?
The process is very straightforward as DIY projects go (if you can paint a room, you can do this) but it does take a bit of time, mainly due to the drying process. Ours took about five days total, but yours may vary depending on the size of your kitchen or the amount of cabinetry you’re staining (we were only doing our lowers).
- Prep day
- First staining day
- Second staining day
- Drying & curing
- Reassembly
Step 1: Remove Cabinet Doors & Hardware
Before beginning, you’ll want use your screwdriver to remove your door, drawers, and any hardware (knobs, pulls, hinges, etc) so you’ll have unobstructed surfaces to apply stain too. You also want to spread out your doors and drawers apart from the cabinet frames so that those two surfaces don’t accidentally come in contact during the process (which could make things stick together).
We propped all of our doors up on old paint sample cans, but you could also use a set of painter tripods if you’re fancier than us.
Step 2: Patch Any Hardware Holes
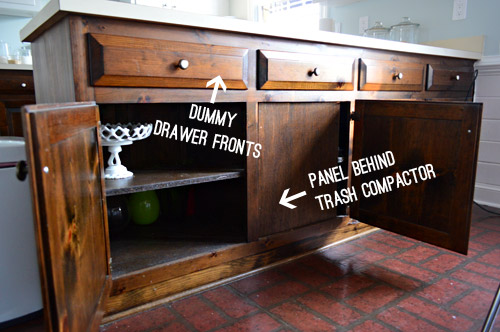
If you are changing any hardware (like using a different pull size or hinge style) you’ll want to fill any useless hardware holes now. We chose to eliminate all of the knobs on the backside of our kitchen peninsula for a cleaner look. The drawers were just dummies anyways (they pulled out on the other side) and doors were just secondary/less used access points to the front cabinets.
So Sherry wood puttied the holes, let them dry, sanded, and repeated. We always like two coats of wood putty on big holes like this to account for any shrinking or dips. In retrospect, we should’ve used a darker wood filler that was closer to the original cabinet color.
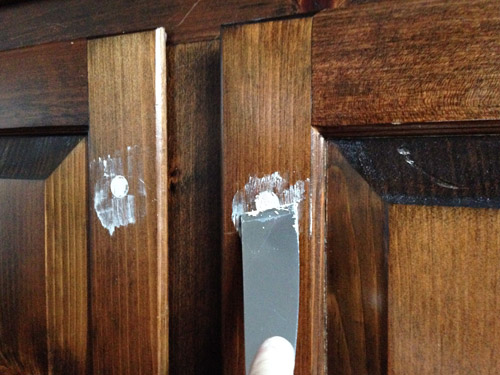
This lighter wood filler is what we had on hand and we made it work by dabbing a little more stain on the puttied parts with each coat of PolyShades.
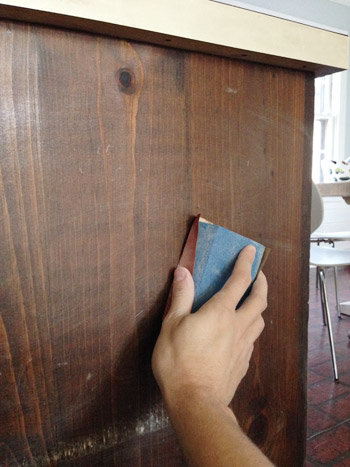
Step 3: Give Your Cabinets A Light Sand
To prepare for staining, you’ll want to sand everything – drawer, doors, and frames – lightly with a high grit sanding block. Again, you’re not trying to remove the old stain. You just want to rough up the surface slightly so that the new stain can adhere.
After sanding, be sure to wipe everything down with a damp rag or paper towel to remove any sanding dust or dirt. Also, if you have any spots that are coated with grease or grime, you may need to use a spray degreaser to make sure the surface is fully clean. We wiped everything down with a liquid deglosser just to be safe before beginning.
Step 4: Apply Your First Coat of Stain
PolyShades is best applied with a paintbrush and you’ll want to systematically do your frames, drawer fronts, and both sides of any cabinet doors. We actually chose to not stain the backs of our cabinet doors (shhh!) but if you do, be sure to not flip them over until your stain is fully dry.
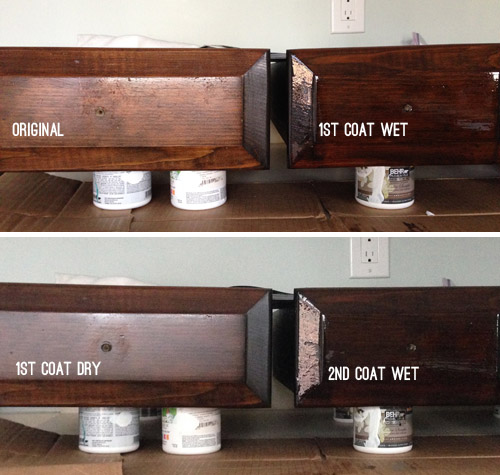
Also, don’t be alarmed if your first coat doesn’t look much darker going on. It will dry darker and you can always do additional coats until it’s dark enough for you. We ultimately did two coats.
Note: These are dummy drawer fronts that are screwed in place, which is why we didn’t remove them.
Tip: Applying PolyShades For A Smooth Finish
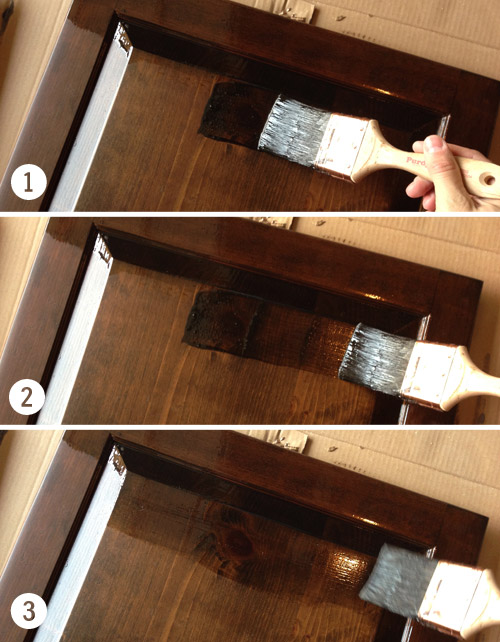
We had learned from our first project using PolyShades that applying it is pretty straightforward, but it can be a little challenging to keep it from looking drippy or streaky. We came up with a simple method of dragging the brush along everything after it’s applied to smooth it out. I filmed this quick video of myself putting one coat on a door so you could see it in action:
Note: You can also view this video on YouTube
In case you can’t watch the video, here’s the gist:
- The stain goes on pretty thick, which is exciting if you’re going for a darker color. Resist the urge to leave it thick because that excess stain will create drips.
- Don’t worry too much about brush marks at first. Focus first on covering the area that you’re working on.
- Once you’ve got the whole area covered, go back over the whole surface with long, even strokes. This will thin everything out and make your brush lines more even.
Although do as I show in the video (not in the pics below – oops) and brush in the direction of the wood grain. This will help any lingering brush lines blend with the wood grain better.
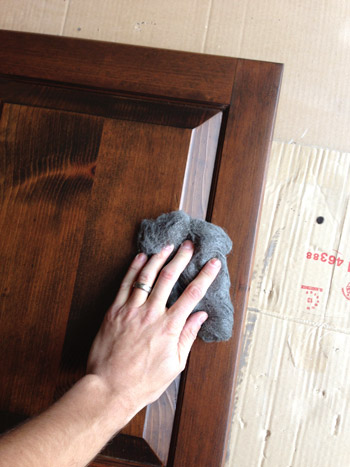
Step 5: Let Dry, Buff, & Recoat
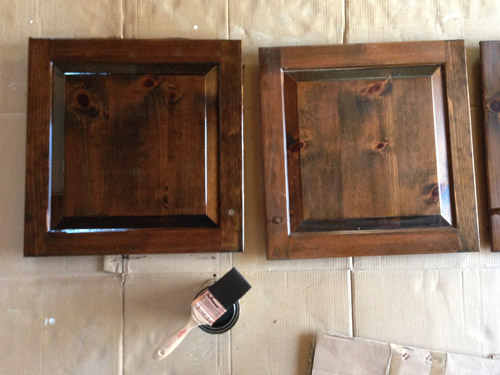
After our first coat fully dried (we gave it 24 hours) it was substantially darker than it looked when wet – phew! If you’re happy with the color, you can be done here. We wanted our slightly darker so we chose to apply a second coat of PolyShades.
Before beginning the second coat, we followed the manufacturer’s instructions and buffed the first coat with some very fine steel wood (000 grade). This doesn’t visibly damage the finish, it just roughs it up enough for the second coat to hold nice and firmly.
You can see below how these coats “build” and gradually get darker. Also, you can tell how the “wet look” wasn’t a good predictor of how it’d dry.
Step 6: Let Second Coat Dry
The next day, as our second coat was almost fully dry, we could finally see the results of our efforts (thanks to not staining the backs of the cabinet doors!). You can see in the side-by-side below that we definitely achieved the darker and more contemporary, less orange and dated look we were hoping for. And we loved that you could still the wood grain coming through!
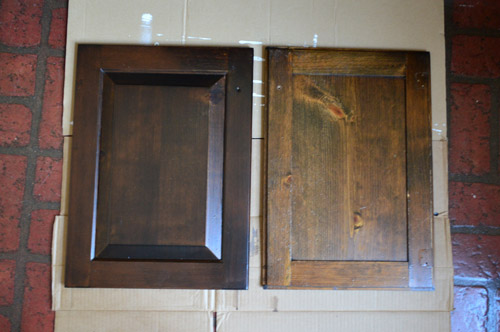
Again, this is the part with a traditional stain you would need to seal your wood cabinets with varnish or polyurethane. But since PolyShades is an oil-based stain and poly in one, you can skip it!
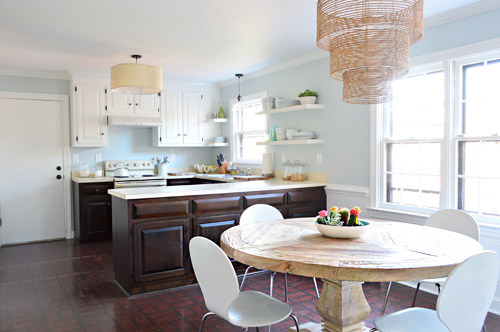
Step 7: Reassemble Your Kitchen
With everything done, you can reattach your drawers, doors, and hardware. If you’re installing new hardware, we’ve got a fully tutorial on how to easily (and quickly!) make new holes for cabinet knobs and pulls. For us, we just used the existing holes and added darker knobs that almost disappeared against the dark stain. So here’s our final look!
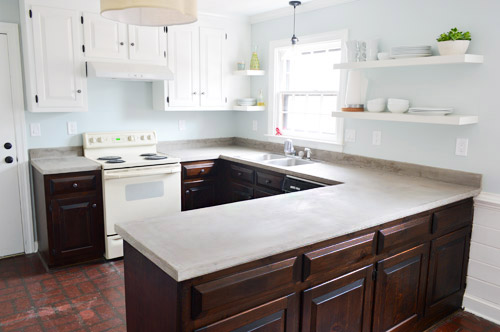
As a reminder, this is where we were last week with those redder and more knotty lowers. Although, this is after we had painted the upper cabinets white.
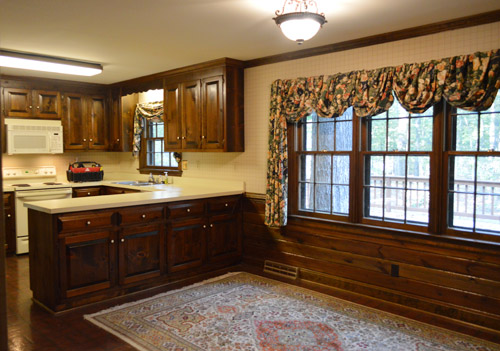
And it’s a far cry from where we started when we bought the house!
UPDATE: Since originally completing this project in 2014 we soon updated the laminate countertops by applying a faux concrete finish to them using Ardex.
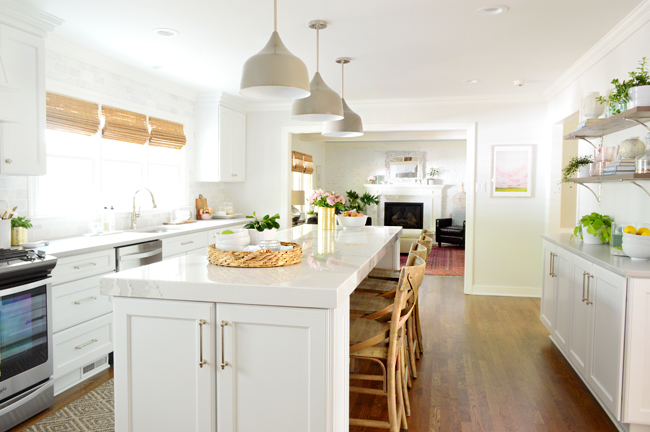
And two years later, we fully remodeled this kitchen with a completely new layout. But the old cabinets held up great for two years while we waited to begin the remodel. You can read all about that in these posts:
- Choosing A New Layout
- Gutting & Rebuilding
- The Big Reveal <– You can find all of the sources for the room right here!
- A Video Tour Of How We Organized Our Cabinets & Drawers
*This post contains affiliate links*
PS: Wanna know where we got something in our house or what paint colors we used? Just click on this button:


Michelle @ A Healthy Mrs says
Love the darker tone — what a difference it makes!
YoungHouseLove says
Thanks Michelle!
xo
s
Lacey says
I would not recommend painting the appliances. The previous owners of our house did this and although it looked really good when we bought the house (kind of even fooled us into believing the appliances were newer), they did not last. Although I can’t comment on their process for painting or supplies used, the finish started coming off within a couple of months (especially the stove which gets regular cleaning). I know you guys would do the right steps, research etc. before jumping in but I wanted to let you know my experience, and if you plan to criaglist the appliances later it might not be worth the risk.
YoungHouseLove says
Oh man, that stinks! So many people were saying it was awesome and held up well even with lots of wear! Will definitely have to keep researching!
xo
s
Amanda T. says
Oh my! That polyshades is like a miracle in a can! I am loving the tuxedo look :)
Danielle says
We did a floating (read: no glue, the weight of the product and securing it at the edges holds it in place) in the kitchen at our old house, which is now a rental. Relatively easy to do and I actually really love the look; we went with a stone-look style and every single person who sees it has to bend down and touch it and can’t believe it’s not real. Might be a good phase 1 option depending how long you plan to stay in that phase!
YoungHouseLove says
That sounds awesome!
xo
s
Angela says
Looks great! I was also busy with a paintbrush this weekend. After my son finished painting our 1990’s oak vanity a deep navy blue (SW “Naval”) I applied polyurethane on it. It’s looking much better in our “make-do for now” phase.
YoungHouseLove says
That sounds awesome!
xo
s
Angie says
It looks amazing! Have you seen the vinyl wood flooring they sell (I’ve seen it a Home Depot)? I’m not sure how involved you want to get wth “phase 1,” but it’s definitely a nicer look without being expensive.
YoungHouseLove says
That stuff is fun! We just wonder if it’s weird to do that when it runs up against real wood (the kitchen connects to the dining room and the living room which are both hardwood, so we thought fake wood next to real wood might be weird).
xo
s
Katy says
I don’t like it. I think the exposed hinges above throw the look off. I think you should paint them gray like you planned. Then I think you should remove the false doors and so something creative there. I also think it would be great if you did new counters and extended them to make room for stools.
For the record (like the rest of the world) I usually like everything you do, but this seems off.
YoungHouseLove says
Thanks Katy! So far we’re really happy with the changes and just try to make calls that work best for us (for example, an overhanging bar would interfere with our eat-in-table, and we debated doing beadboard or raised panels where those false doors are but thought it would be too busy with the horizontal planking that surrounds the rest of the room). But there are definitely a ton of ways to go! If we ever change our minds (that definitely happens too) we’ll be sure to keep you posted!
xo
s
Katy says
Sorry, I reread and I guess that was a little harsh. I am one of those people who walk into a room and instantly redecorate it in my head. I even look a real estate pics and do the same.It is a handicap, sort of like having a big mouth (or fast typing fingers in this case) and no filter. My humble apologies.
YoungHouseLove says
No worries at all Katy!
xo
s
Holli Coats says
Thanks Sherry! Will add these to my list. Now if only we can keep the cold away….
Kristin says
I also had, and loved that Darkness album. It was totally underrated, if you ask me!
Kate says
I love the cabinets! I wonder if it would work on our 90’s builder grade oak cabinets…
We had a lot of car issues this morning due to the -16 degree weather (Yes, negative 16 degrees in Madison, WI. Wind chill around -40. Finally made it to work…), but there’s a guy at our house right now working on installing a new floor, so I guess my day is mostly good!
YoungHouseLove says
Oh no! But the floor sounds exciting! Good luck and send pics!
xo
s
Kate says
My husband sent me a photo of the kitchen floor all done, and now I keep imagining what it would look like with darker stained cabinets instead of golden oak, ha! Maybe someday I’ll get up the guts to try it.
YoungHouseLove says
Oh my gosh, that’s so exciting! They were so fast with those floors!
xo
s
Laura B. says
That looks awesome! Are you less than thrilled with the results? You guys usually gush in your posts when you make updates like this about the results, and this post seems very straightforward. I’m not criticizing whatsoever, I just wonder how you feel about the update!
I hope your whole house feels better. We have a kid in daycare, so she always brings us home some great colds ;).
YoungHouseLove says
Oops, forgot to gush, but we’re really happy with it! I think sometimes if we wax poetic too much about a product it feels like a commercial for it, so sometimes we err on the side of “straightforward” – especially John (he’s less gushy than I am in general). We’re really into the new stain though, and how the whole room is shaping up! Every time we walk into the room we’re like “ahhh” (and then we look at the counters and floors and groan, ha!).
xo
s
Andrea says
It looks great, guys! All the light and white is gorgeous, and the dark lowers are rich. Loved clicking over to the eyeball knobs post. I will not show that to my children… too tempting to do it in real life!
YoungHouseLove says
Haha!
xo
s
Annie says
Love the new stain color! I know you have plans to re-do the counters, but are you planning to make the peninsula stool-friendly? It seems you have the space for it, so just curious.
YoungHouseLove says
In real life we actually don’t have the space for that (our dining table couldn’t be centered on the windows or under the light if we did that) but thankfully we don’t think we need stools and a dining table right behind it, so we’re just going with the table in here!
xo
s
Jessica Hill says
My then-boyfriend, now-husband went to their first ever show in America. It was pretty awesome. Getting our car illegally towed and then having to walk through the hinky parts of Milwaukee afterwards was not so awesome.
Still love that song though.
YoungHouseLove says
Oh man! Glad you lived to tell the tale!
xo
s
Crystal says
Love it! I want to steal your kitchen. Looking great guys.
YoungHouseLove says
Aw, thanks Crystal!
xo
s
Elise says
Query re: painting/staining:
You guys did the staining perpendicular to the direction of the grain, and I’ve always heard that you should brush along with the grain with the intent of hiding brush strokes in the finished product. I’m certainly not an expert, and you guys have been doing this for awhile! I’m wondering if there was some strategy there that I should learn about :0
YoungHouseLove says
Oh yes, just check out the bulleted copy right above that pic. John wasn’t thinking when he snapped those shots, but that’s the wrong way to go (in the video it’s right – always go with the grain!). John was just rushing to take pics and made a mistake, but it was just the first coat and a second coat in the right direction made it just fine.
xo
s
Elise says
Wow, overlooking a lot on my end here! Obviously your photography skills are so good that I was dazzled temporarily word-blind x___x
YoungHouseLove says
Aw, no worries Elise! We’re wordy, so sometimes the details get lost in big blobs of text :)
xo
s
Em says
These came out really great! i love the color! I have oak cabinets, do you think they’d come out the same?? I suppose i could test it out an on inside cabinet door or something first?? Looking great – can’t wait to see what you do with the floors.
YoungHouseLove says
I think ours were oak (just stained oak), so they should hopefully turn out similarly with the same gel over them. I’d test on an interior door just to be sure.
xo
s
Ariana says
Have you thought about chalkboarding the fridge and then just keeping it for the garage? My parents put a fridge in our garage just because we weren’t in the mood to get rid of it and it has actually REALLY come in handy. Since you never open it it keeps sodas extra cold (lookin at you John) and because they are in the garage you only drink them when you really want one (out of sight, usually out of mind) . Also it especially is helpful when entertaining which I know you guys do quite a bit. Keeps the big pre-made/pre-ordered dishes out of the way and you don’t have to empty your fridge to clear space.
YoungHouseLove says
Thanks Ariana! That’s definitely another possibility!
xo
s
Jamie says
How smooth is your finished product? I used polyshades with a satin finish on a nightstand (one coat only) and it felt a little rough. It seems to be smooothing out with use but I’m curious about yours.
YoungHouseLove says
Ours feel as smooth as they did before, so in some areas they’re gnawed and rough (those stayed that way after staining) but the smooth parts stayed smooth. Sanding beforehand and doing the steel wool between coats seemed to help keep it from getting globby though!
xo
s
Rachel says
This was what I came here to ask about! We bought IKEA Rast pine dressers (to use as nightstands) and used PolyShades this weekend. We didn’t sand before as they were so smooth, but did wipe them down with a wet cloth and let them dry before staining. We used steel wool between the two coats, but now that the stain has dried, it feels rougher than other products I’ve used Minwax regular stain on before.
So I came to ask if giving it a light rub with steel wool would damage the finish too much to make it worth it. (I’m sure it would look the same to our eyes, but we want the furniture to be protected, too.)
YoungHouseLove says
Anyone have advice for Rachel? I figure since they recommend using steel wool with it that it should be ok I hope!
xo
s
Cassie says
Is it the color of chalkboard paint you want for the fridge or the chalkboard function? What if you made your own white chalkboard paint and used that?
YoungHouseLove says
That would be really fun! I love that it comes in a number of colors now, so if I can get John on board it’ll be fun to pick something!
xo
s
Jessica C. says
Love how it’s coming together! Have you thought of adding an inexpensive backsplash (even just on the wall w/ the stove)? In our last house we added white subway tile and got them at lowes for something like $.12 cents each! Very easy to install ourselves too and it totally transformed the kitchen. You guys could probably knock it out in a few hours. :)
YoungHouseLove says
That’s fun! I have thought about something simple and removable (ex: painted tin tiles, beadboard painted a pretty color, etc) but we’re not sure how far we want to take Phase 1!
xo
s
Tania @ Run To Radiance says
It looks awesome! :) I love the two tone look.
YoungHouseLove says
Thanks Tania!
xo
s
Marianne in Mo. says
Love the darker shade, getting the orange out. We used appliance paint in our old house, and it held up great. Did not do the range though, it was already the color we were going for. Did the fridge, range hood and dishwasher. I would lean away from painting the floor. Seems to me that it could crack if you should have a flex in the flooring at all. Rhoda at Southern Hospitality used that counter transformation product, it didn’t seem bad, but sounded like a messy job. You may want to check that out.
Spent the weekend anticipating a blizzard here in STL, and got 11″ and sub-zero wind chills. Gonna make our dog a sleep pad today, she won’t get in those big fluffy things. So I use foam bed toppers. I make them for all our doggie friends!
YoungHouseLove says
So sweet! Sounds really cozy! And I love hearing that appliance paint held up great for you.
xo
s
Jessie says
Wow! So we are selling our house this year,and it is in a neighborhood where all houses look similar,so I want to stain the bathroom cabinets dark like this for a sleek look and you all just gave me the confidence! I would love to do the same in the kitchen but those are not real wood and I am afraid painting would not be the best choice in there,oh well,at least I have the bathrooms! Thanks for all of your helpful posts!!!
YoungHouseLove says
Of course! All the best with everything, Jessie!
xo
s
ashley @ sunnysideshlee.com says
looking great guys!!
Jennifer I says
A suggestion on the fridge — here in Pa, it is common to have more than one fridge in your home. We keep one in our garage that serves as a “drink fridge” — holds beer, sodas, etc. and an extra freezer is also nice. It is great for entertaining. If you kept it for the garage, then it would not matter — thaw out the turkey at Thanksgiving, overflow, etc. If you chalk board painted it…no worries about Craigslist resale value it is going to your garage. Might have to wait a little longer for your new fridge purchase, but once you have that extra fridge, it is hard to go back.
YoungHouseLove says
Thanks for the suggestion, Jennifer!
xo
s
chrissie lynn says
LOVE this! can’t believe the transformation so far for your kitchen, looks amazing.
and PLEASE PLEASE paint the floor! i am a sucker for a painted floor and you made the one in your closet area look so amazing, this room would be AWESOME with a painted floor!
i’ll admit we used peel and stick for our kitchen and definitely don’t hate it, don’t love it either, but if my husband hadn’t feared the floor paint I would have LOVED to do that instead!
Natalie says
Chalk paint the floor or paint and follow up with 3 coats water based poly so it won’t yellow
YoungHouseLove says
Thanks for the tips Natalie!
xo
s
Meggan says
ESP moment…I was thinking about that song last night and thought “I should add that to my i-tunes tomorrow”. Lo and behold, I check your blog and there it is! WHOA!!! I loved The Darkness too, thanks for that trip!
Love, love, love how the kitchen is looking! I was thinking about appliance painting and thought it would be fun to do something different with your stove. We just did a kitchen remodel and put in a copper stove. It is a showstopper for sure! I know you’re down with ORB :) You are an inspiration for so many DIY projects, it’d be fun to see you tackle something a lot of people maybe wouldn’t try since it’s temporary anyhow. As for re-listing on Craigslist, maybe it’s a cost/benefit thing for blog inspiration! Happy New Year to your cute family!
YoungHouseLove says
Ooh that’s something I’ve NEVER thought about! I just don’t know how it would do in high heat. Will have to do some more research…
xo
s
Katie says
Regarding the comment about using the concrete mix on floors — I thought I read in Kara’s blog that the stuff is often used on floors in retail locations. I believe one of the two links you posted reference the fact that if you see concrete floors in a retail location, it’s probably this stuff. I just wanted to point that out if using it on the floors might have been a serious consideration for you guys.
YoungHouseLove says
Sorry for the confusion, I should be more thorough with my comments. Yes, it works on concrete floors, but vinyl floors with subflooring and crawlspace under them sadly have a lot more flex than concrete floors, so it would crack in our application!
xo
s
Sara S says
Question: did you use POLY stain just because of the wear and year on cabinetry? I ask because my contemporary house has lots of woodwork that is jarringly red and shiny that I would love to darken/tone down. But I’m scared of poly stain because our dining room floor was done with some combo stain that bubbled up and is so ridiculously shiny that every footprint shows!
YoungHouseLove says
We used it just because we had good results with it on the cabinets in our bathroom, so based on that (and living with that for a few months without any issues after everyday use) we felt like this would hopefully hold up for us. Will have to do an update post in a year or so!
xo
s
Jenny says
Hahahaha! I love The Darkness reference. I used to listen to that CD over and over while driving back and forth from college to my parent’s house. It’s so bad, but sometimes that kind of bad is really good, you know?!
The kitchen looks good. Good, good: no bad is good there!
YoungHouseLove says
Haha, thanks Jenny!
xo
s
Michele says
What about that Allure flooring? It’s a vinyl plank type flooring. I’ve been wanting to put that in my kitchen, but don’t have the nerve to do it on my own. o_O
YoungHouseLove says
Could be fun too! Just don’t want to sink too much into Phase 1, but if it’s cheap like peel & stick ($1 a square foot) we might be down!
xo
s
mollie d says
Oh my gosh, THANK YOU for reminding me of that song!! I was obsessed with them, and that video? Fab, whatever 50 worst videos. So happy, putting on spotify right now
Lindsay Ross says
Professional question: if you spray paint your appliances, what do you do about the handles, knobs, and control panels? Would you change out the seals on the fridge? Thanks for your input!
YoungHouseLove says
No idea! This is one of the things plaguing me. Like how would we read the dial of the stove if we sprayed it. And if we didn’t, it wouldn’t match. Will keep you posted as I dig deeper :)
xo
s
Kaitlyn says
Looks so much better!
Brenna says
Love seeing the phase 1 progress! It’s already transformed into a completely different room. I spent the weekend working on our master bedroom. We painted and put in new furniture, but now comes the fun part: decorating! We are going for a New York/urban chic vibe (My husband is originally from Jersey and we took a trip to NYC right before we got engaged, so the area has special meaning for us). So far I’ve managed to get 2 pictures and a curtain. It’s slow going over here, but I can only do so much while taking care of a 2 month old!
YoungHouseLove says
That sounds awesome Brenna! And congrats on your two month old!
xo
s
em says
This looks great, but now the cream colored counters are making me crazy. I can’t wait until you make those go away!
Katharine says
The Darkness is still one of my favorite albums! So sad they broke up. :'(
Christine says
The kitchen is looking FANTASTIC! I could definitely live with what you’ve done so far. We redid our kitchen a few years back, replacing some white appliances with stainless. However, the range and wall oven were both still in great working order so we didn’t want to replace them until we have to. A few years later…..they are still in great working order but I’m tired of the white. We are starting a bathroom reno tomorrow so I don’t want to pay to replace these appliances yet. Is there stainless appliance paint? What do you guys know so far? Thanks!!
YoungHouseLove says
Yes, I have just done some googling and searching on pinterest for “appliance spray paint” and “spray painting appliances” – it seems like there’s stainless spray, although some photos look more convincing than others. You also should be sure it’s made for high heat if you’re using it on things like an oven. We’ll share more info as we learn more :)
xo
s
Holli Coats says
Wow, I love that cabinet combo so much! The stain is perfection! I spent the weekend moving from NoVa to Midlothian… Any tips on favorite kid friendly spots in Richmond? My in laws live here so we’ve visited quite a bit and done Maymont, the zoo, Cary street, the Byrd, but I’m hoping to find some hidden gems now that we’re living here ourselves.
YoungHouseLove says
Ooh those are all good ones! We also love Pony Pasture. It has river access and walking trails, but it’s usually a lot less crowded than Belle Isle (although we love Belle Isle and go there a lot as well). Clara also loves the Children’s Museum (all locations) and the Science Museum. There’s also a little indoor area at Maymont with otters and turtles that she adores. Oh and young-kid-only morning jumping hours at Jumpology are fun too (we avoid the big kid times since it can be kinda crazy for little ones).
xo
s
Isabel says
Sorry you guys have been under the weather, hope your colds are gone for good! Such a small but impactful change, it’s coming along really well and the angle without the floor really does show how awesome things will look once you tackle that. I can’t wait to try the PolyShades on a side table I got an estate sale for $6. The can might actually cost more than the table! I’m glad to know John is not always on course with your ideas, the magic of the Internet makes it looks like you guys are always so in-sync. 75% of the time I have an idea my husband looks at me like I grew an extra head, and 90% of the time he ends up being on board but the convincing takes a while… After a year and a half of staring at a 2/3 wall in our kitchen and after a few consultations to make triple-sure the wall wasn’t load-bearing, my husband cut a hole through that sucker so we can create a counter a la your second kitchen. I’ll be reading and re-reading those posts as we tackle it. Also going on is cabinet painting… 2014 is off to a good start!
YoungHouseLove says
Wahoo! Congrats on all your progress Isabel! Good luck with everything!
xo
s
mary | millay vintage says
What an improvement, I love it! And this post could not be more timely for me — I’ve been on the fence wanting to take my favorite home vintage find (this dresser | http://instagram.com/p/igzWLlqkJM/) and make it a bit darker but have been too timid to take the plunge. I’ll definitely be referring back to this | your cabinets look so great I think I’m convinced my little dresser would benefit from the same treatment :) Love how your kitchen is coming together so organically!
YoungHouseLove says
Good luck Mary! Hope it turns out awesome!
xo
s
Nicole says
I’m looking forward to the appliance paint project if you choose to do it. It looks great so far you all are amazing!
Lesley says
Chalk board mactac/shelf liner will work on your fridge – don’t know if you were looking for full coverage or just an area. I used it on ours, do the same chalk board prep of rubbing the side of the chalk on it before using and it works like a dream… an peels right off when you go to sell the appliance.
I got a roll of mine at a local dollar store. But I did find a link to mactac’s official WallChalker product.
http://mactac.com/fileadmin/user_upload/Graphic/Sales_Literature/MAC2853_wallCHALKER_SellSheet.pdf
YoungHouseLove says
Thanks for the link Lesley!
xo
s
Ruth says
It looks amazing!! I am watching with great interest as you use polyshades on your banister and cabinets. We jus moved out of a rental where our landlord had used polyshades on the kitchen cabinets. The application was poor and had lots of drips. She also didn’t put cabinet pulls on any of the cabinets and during the 3 years we lived there, the area of there, we wore spots on each of the doors/drawers where we grabbed them to open them. Never were rough with them, just regular use. Maybe the cabinets weren’t prepped well before staining? I hope you don’t run into the same issue!
YoungHouseLove says
Oh man, that stinks! If these things wear poorly we’ll be sure to share all the grody details! One thing that can cut down on cabinet wear in general is knobs (even painted cabinets can look more worn if you grab the cabinets themselves to open them over the years) so hopefully having knobs in our kitchen will help. We’ve lived with the Espresso stain on the bathroom cabinet upstairs for a few months now and it’s still going strong, but we’ll have to do an update in a year or so!
xo
s
Megan smith says
I would love to see you guys tackle the floor with paint. I’ve even thought about painting my faux-oak laminate floors with a stencil or something just to hide it a little bit…I think you could make it durable enough with the right top coat. I’ve used Varathane Diamond Floor Finish on my countertops and it has held up really well to 3 years of abuse. Good luck!
YoungHouseLove says
Love that! Thanks for the specific sealer recommendation!
xo
s
Jann says
looks great! So, the entire cabinet was wood (doors and trim/sides?) I want to darken up our cabinets, but I think the side panels on the island and side of the cabinets are pressboard or something.
YoungHouseLove says
A few others have asked this. We have never tackled it (ours are solid wood here, and were in our last kitchen as well), but if anyone has, feel free to weigh in with details or advice!
xo
s
Heidi says
Looks great! My husband and I just demoed our kitchen this past weekend and it’s really exciting, yet scary! We’re down to the plywood subfloor at the moment and it’s very daunting not having a kitchen in the house. Contractors are taking out a wall tomorrow and then we’re on duty with putting in new hickory hardwood floors. We’ve lived in our house for 2.5 years so I completely understand how tempting it is to just rip everything out from day 1.
YoungHouseLove says
SO EXCITING! Take lots of pics and enjoy the chaos! I know that sounds crazy, but weirdos like me are envious! Big messes = big makeovers!
xo
s
Kari says
I desperately want to paint our cabinets, but our countertops are laminate JUST on top, and the side is wood. Is it even possible to do this without it looking totally dumb? Every tutorial I see has countertops that look the same on top AND on the sides…
YoungHouseLove says
Ok, so you want to paint your cabinets or your countertops or both? If your cabinets are wood but partially laminate, you should be able to prime and paint them with success. I would think the same is true with counters that are wood and laminate (just have to ask the paint pros which stuff they recommend, but they sell kits that work on laminate now). The only issue would be if you wanted to stain them (stain might not work on the laminate parts) but paint should be fine!
xo
s
Kari says
We would like to paint the cabinets, but we can’t figure out what that would look like when the wood from the cabinets goes right up to the top where the countertops are. I’m not sure how to explain it well… Okay, so you know if you have a granite countertop, it’s granite on the top, and then you also see it on the sides? When you look at the sides of ours, you only see the wood. The countertop is laminate, but it is only a flat laminate surface on the top of the cabinet. None on the sides.
Kari says
You know what… I’ll go take a photo and post the link.
Kari says
http://farm4.staticflickr.com/3672/11807852173_b1715c6ac1_c.jpg
YoungHouseLove says
Oh man, I could never have pictured that without a picture, so thanks for sharing it! Hmm, I would paint that part too I think! Just because a strip of that wood with the rest painted would look off I think!
xo
s
heatherB says
It just looks so awesome, you guys! Great vision for the space, and even though is only phase 1, very liveable for a long while. Phase 1 is often my favorite…seeing how much can be accomplished on a very small budget…LOVE IT!
On a separate note, I was thinking you should do some sort of chalkboard and/or magnetic treatment on the panel covering the trash compactor. Great place for the kids to play with magnetic toys and games and draw and such other than the fridge, and then close the door to cover when not in use or there’s company. Mine are always underfoot playing at the fridge!
YoungHouseLove says
So funny, I was thinking about what we could do with that sliver of space too! Will have to see where we end up!
xo
s