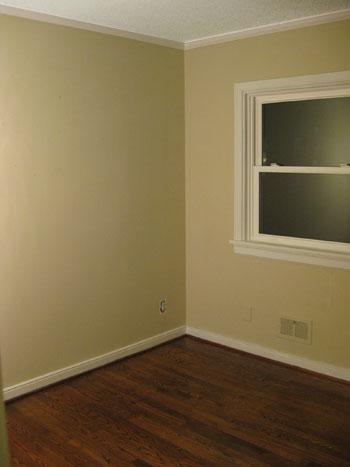
Woo to the hoo. We finally finished the nursery! And at just four weeks before the beanette’s estimated arrival (although we’re sure she’s gonna be late) we’re beyond excited to have a cheerful and functional room waiting for her. It definitely has come a long way from the blank canvas that we started with:
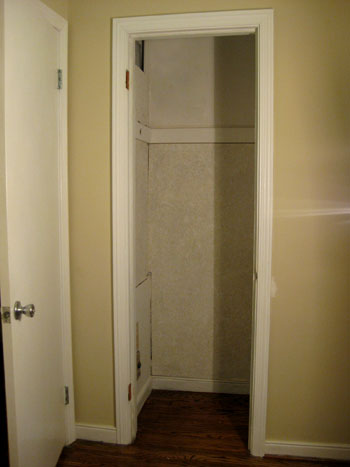
And that closet. Let’s just say it was one of our major challenges when it came to storage space, function, organization and all that good stuff:
Luckily we were able to introduce a ton of stash space thanks to a crib with a large built-in drawer, a generously sized double dresser (snagged on Craigslist for just $20), an already owned storage ottoman, and a side table with retrofitted basket “drawers.” Plus adding a padded bench with a large toy bin slipped under it (two more things we already had on hand) gave us even more spots to tuck toys, clothes, books, and everything else that comes with having a wee one. Oh and did we mention that the room is only 8′ x 10.5′? Yup, it’s the smallest room in the house (except for the bathrooms). But without further ado, the big baby-tastic after pics:
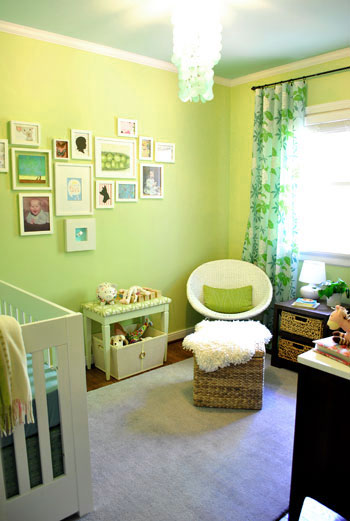
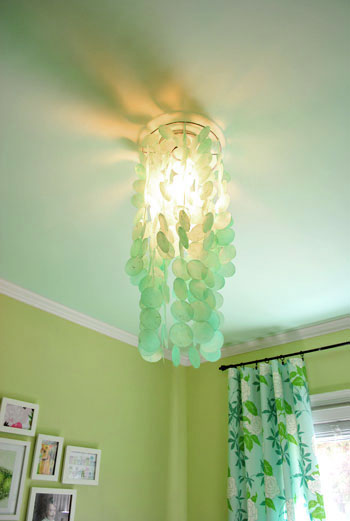
We had so much fun hunting down deals like this playful $50 aqua capiz chandelier from a local lighting outlet (which casts so many fun shadows on the ceiling for Baby P to enjoy).
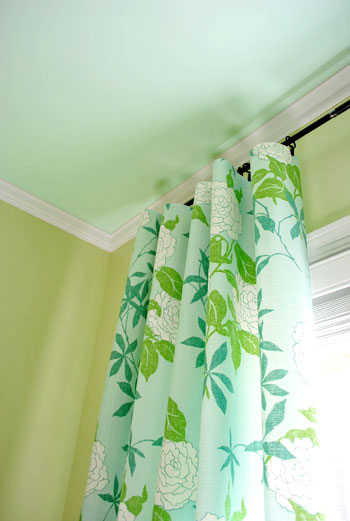
And DIYing our own no-sew curtains with some cheerful printed fabric allowed us to create a much more balanced and grand look on a wall that formerly boasted a small-ish window that was off to the side (we’re all about cheating windows with curtains so they look centered). Is there nothing that a set of high and wide fabric panels can’t solve?
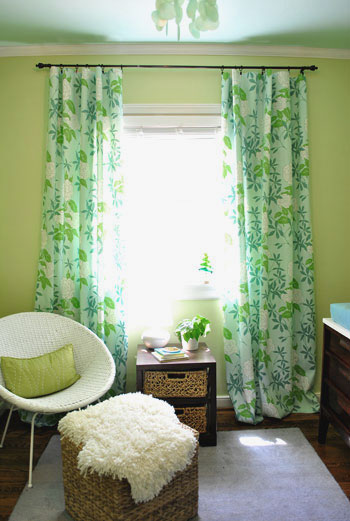
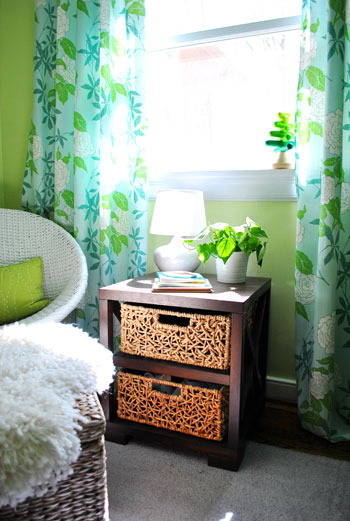
Bringing in the former side table from our guest bedroom (originally from Target) creates a nice spot for a glass of water, a reading lamp and some books. And the super insane coincidence was realizing that some woven baskets that we already owned slipped perfectly into the side table’s open shelves to create two basket “drawers” (which offer up even more room to house books and toys out of view- anything to keep the clutter factor to a minimum!). And because the baskets are woven and don’t have any harsh pointy corners, we even think Baby P will be able to easily use them to put away her own toys when she gets older and a bit more mobile (which of course will be our cue to switch out the real plant on the table for something less dirt-riddled).
And we can’t forget about the super cozy sink-in-able bucket chair that we snatched up for just $20 at a thrift store. Paired with an already owned ottoman (topped with a homemade faux sheepskin rug) it creates a nice little feeding and reading corner that even Burger thinks is the bee’s knees.
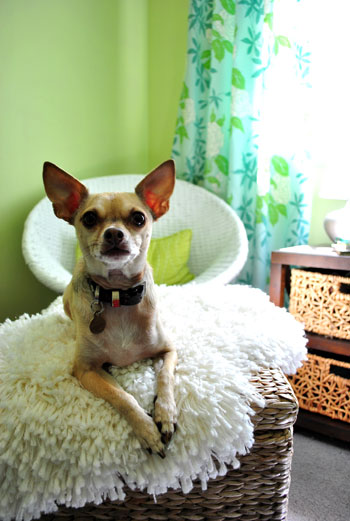
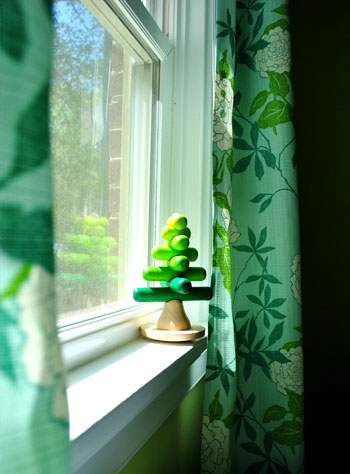
We also love that we were able to place the chair next to the window so we can appreciate the natural light streaming in during the day, along with the view of our big green backyard (which is sometimes accentuated by a playful chihuahua on an intense bug hunting expedition). And isn’t that little wooden tree in the windowsill adorable? We got so many great baby gifts from friends and family, and the makers of this one (Plan Toys) are extremely eco conscious and use only the greenest materials and non-toxic dyes and glues.
Oh and we can’t forget how much the soft aqua ceilings (Mythic’s Adanna Aire in a flat finish) next to the crisp white molding and the pear green walls (Mythic’s Autumn Bloom in eggshell) transformed this formerly tan-walled guest room into a dreamier place for our little girl (read all about the painting process right here). Plus we figure she’ll constantly be gazing up at the ceiling when she’s in her crib, so it’s nice to know it’s sort of sky-reminiscent as opposed to plain old white.
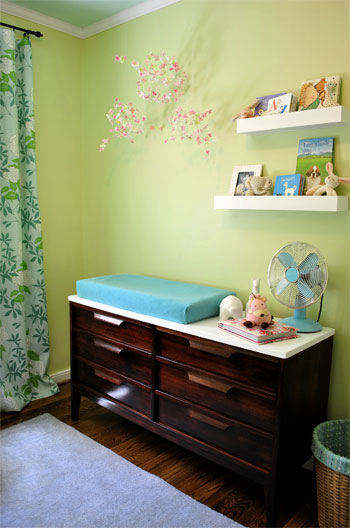
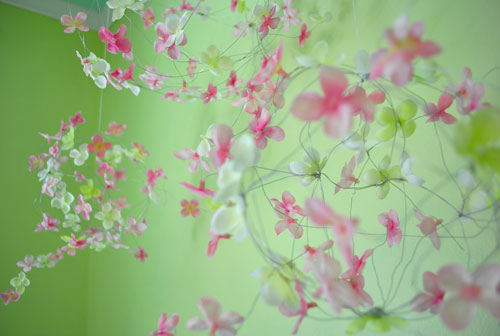
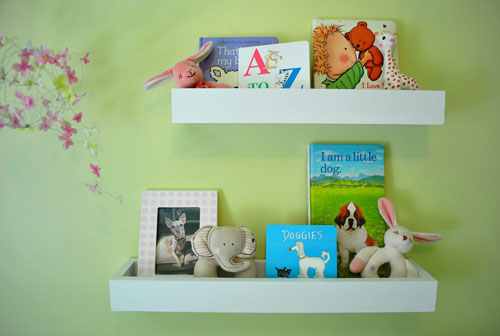
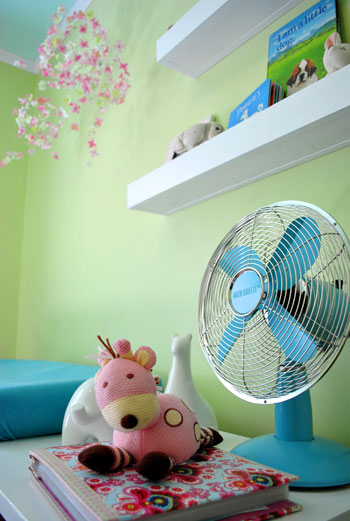
Here’s a shot of the $20 Craigslist double dresser that we totally refinished (earning ourselves six generously sized drawers for storing everything from diapering supplies to clothes and even tiny socks, bibs, and other pint-sized accessories). And the wire and faux flower mobiles that we made to hang over the changing pad along with the DIY shelves built by my handy hubby really add kid-friendly function and form to the entire wall.
You might notice that small basket to the right of the dresser in the photo above. Well let’s zoom in, shall we?
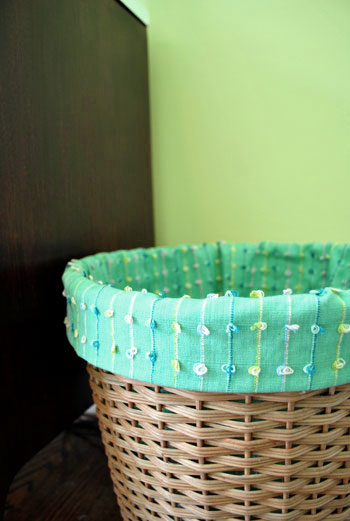
It’s actually a cheap-o Ikea basket which we then lined with extra crib skirt fabric that we already had on hand. Bam- instant hamper for under $5. And we like how the lighter woven texture ties into the basket “drawers” in our makeshift side table under the window- and even the textured ottoman that we paired with our thrift store chair.
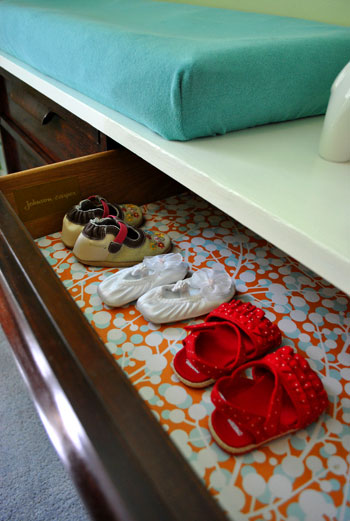
But back to the dresser for a minute. Remember when we lined the drawers? They definitely add a splash of happy to the space every time we slide them open to gaze at all the tiny outfits and accessories awaiting Baby P. Is there anything cuter than baby shoes?
Here’s a closer shot of the three-orb mobile that we crafted while parked in front of the TV one night for less than $12. We love how it gently sways above the changing pad and we have our fingers crossed that it’ll really come in handy once the beanette gets more wiggly and we have to keep her distracted while we hurriedly change her.
And here’s a detail shot of those lovely shelves that my manly man built with his own two hands (ok, and some power tools). We love that they’re constructed like long skinny wall mounted boxes to keep books from toppling down as they might on an open shelf. And we can easily switch out those books, frames, and toys to keep reinventing that wall as our baby girl grows.
And because we’ve heard that well ventilated rooms with fans can help when it comes to scary things like SIDS, we sprung for this vintage-looking turquoise charmer (by Deco Breeze in “sky”) which is just as easy on the eyes as it is functional. Plus we love the fact that small fingertips can’t fit past that protective wire cage.
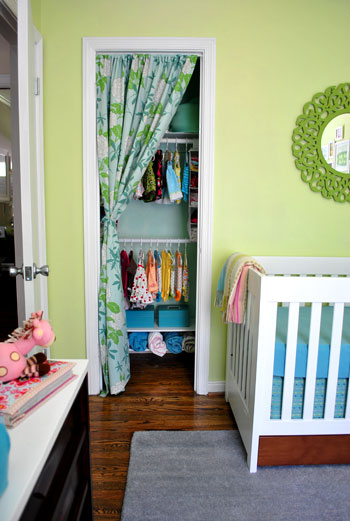
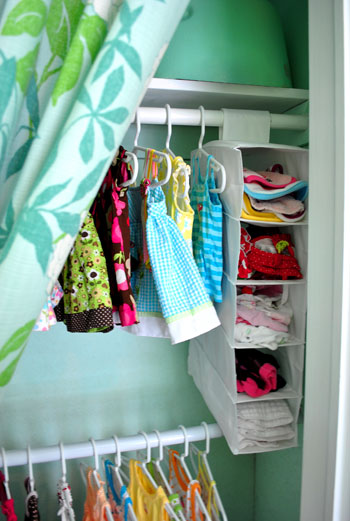
But let’s swing over to that formerly sad little closet. We livened things up by painting the inside of it the same soft aqua color as the ceiling, hung a fabric curtain for some pattern and interest, and added a second hanging bar along with baskets, shelves, and boxes to store a lot more than we thought we ever could in that tiny enclave. Check out the whole closet transformation here.
And maybe I have to revise my “is there anything cuter than tiny baby shoes?”question. Because the answer might be “baby clothes.” Oh and we love that we were able to repurpose a hanging shoe organizer from Ikea as a caddy for everything from bibs to burp cloths and even tiny leggings.
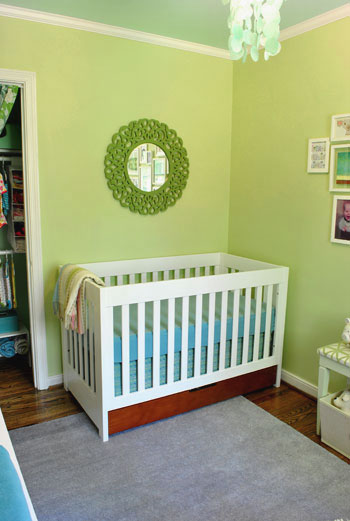
Here’s a shot of our crib tucked into the corner to keep as much open rug space available for playtime as Baby P grows. We love that the crib we chose has that drawer built right in for even more storage space (it’s actually empty right now, along with the storage ottoman- which we think is a good sign since we’re sure to accumulate more stuff as we go). And we even got to whip up a no-sew crib skirt to the tune of just $14 to add texture and hide the formerly open space between the bottom of the mattress and the top of the drawer.
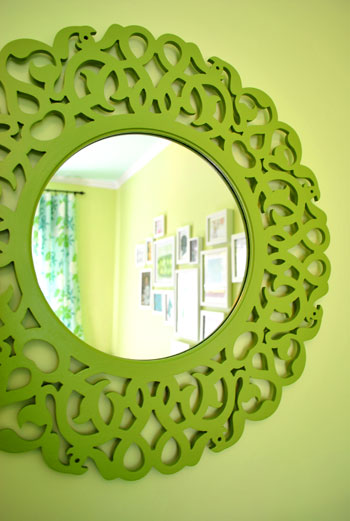
Here’s a close up of a super affordable Marshall’s mirror that we grabbed back when it was black. Reinventing it with some cheerful green paint and hanging it (extremely securely) across from the window allows it to bounce some nice light around the small room. And we figure between staring up at the blue ceiling, the aqua chandelier and this whimsical mirror while she’s in her crib, the beanette will have no shortage of places to peer while she dozes off.
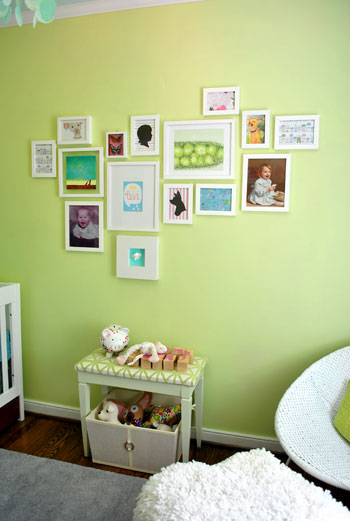
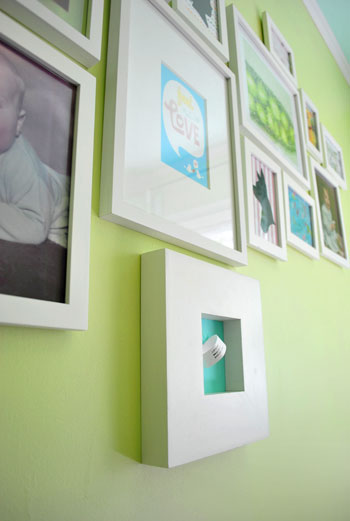
And here’s our art wall which we recently refreshed with some under-one-dollar decorative craft paper, a few photos and prints that we already had, and two new pieces from Etsy and Wall Blank. We especially love the mixed and matched feeling of playfulness that it adds to the room (and the fact that we can switch things out whenever the urge strikes). Plus the asymmetrical arrangement makes it feel more fun and less formal, which seems fitting for Baby P’s cheerful pear and aqua nursery.
We already mentioned the old thrift store bench that we brought in with a bin of toys under it for more display and organization space in our modestly sized room. We really love how the soft celery color and the patterned upholstery fit right into the room without competing too much with the curtains. Talk about a happy accident since we redid that $7 bench over a year ago without ever knowing that it would someday be worked into our future nursery.
But back to our art wall for a moment. Here’s a closer shot of one of our favorite sentimental ideas. We’ll be placing the beanette’s hospital wristband in that chunky frame on the bottom (and until then we made our own little placeholder version). We also plan to create a paper silhouette of her sweet profile once she’s here (to match the one that we already have of her four-legged brother Burger). Gotta love some fun and easy personalization- especially when it’s free.
So that sums up our recent guest-bedroom-to-nursery makeover. And because we’re suckers for photo documentation, we glanced at this picture from the beginning of the project…

… and just knew that we had to replicate it a few months later now that the room is done:
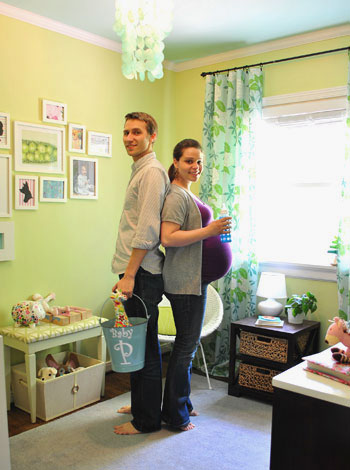
There’s that belly shot so many of you have been requesting. The funny thing is that while I’m definitely bigger in the after shot than I was back in January when the first back-to-back picture was taken, it’s crazy to think that in it’s been three months since that photo and I haven’t grown all that much. I guess it’s safe to say that I popped early.
But enough bump chatter, let’s talk budget. We headed into the nursery makeover assuming we’d spend around $1500 (since we had absolutely nothing and needed lighting, paint, a chair, a dresser, a changing area, a crib, a rug, storage solutions, a closet makeover, a mirror, art, curtains, shelving, a mobile, and more). We arrived at that estimation since some simple online shopping revealed that even affordable places like Target charge around 1K for a crib, a dresser and a changing table (which doesn’t include other major items like a chair, a rug, lighting, art, shelves, etc). Of course we hoped to whip things together for less, but we always like to be realistic instead of overly optimistic when it comes to budgeting (since it feels a lot more triumphant to come in under budget when you take the time to land on a feasible estimate- as opposed to completely blowing a budget that was way too low to start with).
Here’s the full budget breakdown:
- No-VOC wall, ceiling and closet paint: $80 (Mythic paint was a much-loved splurge)
- 100% wool 5 x 8 rug from a local outlet: $99
- Aqua capiz chandelier also from a local outlet: $50
- DIY window & closet curtain fabric: $105 (another splurge, but they make the room)
- Curtain rods and ring clips on clearance from Target: $10
- White faux wood blinds from Home Depot to block all light: $37
- Modern crib with built in storage drawer: a gift from my sweet mom
- Organic crib mattress: generously provided by Savvy Rest
- Thrift store chair: $20
- Chair pillow from TJ Maxx: $6.99
- Ottoman, bench, side table and baskets: already owned
- Faux sheepskin rug on ottoman: $19
- Marshall’s mirror & paint to transform it: $50
- Craigslist dresser & refinishing supplies: $31.51 ($20 dresser, $11.51 supplies)
- Drawer lining project: $1.30
- Closet makeover: $18.36 (hanging bar, storage systems, etc)
- No-sew crib skirt: $14
- DIY mobile: $12
- Organic crib sheet and changing pad cover: $29 with coupon
- Blue fan from Target: $55
- Homemade wall shelves for books and toys: $14
- Ikea lamp on side table: $19
- Ikea basket for hamper: $4 (along with already owned leftover crib skirt fabric)
- Art: $42 ($25 Wall Blank print + $12 Etsy print + $5 worth of craft paper)
- TOTAL: $717.16
Not too bad, right? Especially when you think about shows like Trading Spaces having 1K to transform a space. And the fact that we were able to pick up two major pieces (the chair and the dresser) for just $20 a pop definitely allowed us to take on a ton of smaller projects that might not have originally worked within our budget. Now granted the gifted crib and mattress definitely helped when it came to staying under a thousand dollars (and coming in at less than half of our original $1500 budget) but we’re thrilled that we were able to whip up so many under $20 projects with that freed up moolah (from our mobile making and shelf building adventures to our drawer lining project, no-sew crib skirt and even our big closet makeover).
So what do you think? Are we ready for a baby or what? And what really is cuter… baby shoes or baby clothes? We’re so excited to finally share our big nursery reveal with you guys and we’d love to know if any of you are making over a nursery in your home- or sprucing up a kids room for your own growing bambinos. Heck, even if you’re kid-free, are you planning to take on any of the projects that we tackled for this space like ceiling painting, curtain making, dresser refinishing, closet organizing or shelf building? Do tell.
Psst- Wanna see our nursery progress from the very beginning? Here’s our painting post, our big shopping spree, our crib hunting rundown, our curtain-making tutorial, our fun little chair search, our mirror-painting extravaganza, our DIY faux sheepskin project, our big dresser makeover (and subsequent drawer lining project), our closet makeover, our homemade crib skirt undertaking, our DIY mobile, our shelf-building adventure and our art wall makeover. Oh the memories…

Kelsey D says
The nursery is is ablsolutley freakin adorable!! I also love that it is not baby-ish, yet still very baby friendly with all the thoughtful details and comforting colors. I am in love with the chandelier and nothing is cuter than little baby shoes! The little beanette is going to love her room and of course what little girl wouldn’t love all those shoes and clothes!! :) Crongrats to you, enjoy these last few weeks and every second after the beanette arrives. Can’t wait for the name reveal when the time comes!
Aimee says
The nursery looks fantastic. . . I love how it’s not overly “baby” and will work for a long time to come. I have a line up of several furniture refinishing projects and can only hope they turn out as well as your dresser!
{The Classy Woman} says
Your baby nursery transformation is beautiful! I have really enjoyed following along with every projects you’ve done up until the reveal.
It was nice to see it all put together. Funny thing-I actually saw that mirror in Marshall’s a couple weeks ago, they had 2 and I really liked them but they were both broken. :(
Thank you for your inspiration. This is a good reminder that girl’s rooms don’t have to be pink! ;)
Rachel says
I love it, and I know your beanette will too! You guys truly did an amazing transformation on this one. All the details are sweet and well thought out, and I especially love your color scheme and the two-tone furniture. It looks so chic yet comfortable! Have fun enjoying your new space with your little one. :)
Susan says
Love, love, love the nursery! What a wonderfully happy place for little beanette to reside. You look spectacular and I know you and John are so excited about the new arrival. Look forward to seeing what the future holds. Oh yeah, just love baby shoes! They are sooo cute!
JMB says
Despite seeing all of the progress throughout…it really is amazing to see it all put together! Beautiful job! We have no need for a nursery, but one of the things I like the best is that so many of the ideas and projects here could work in virtually any space. Thank you for sharing a beautiful space that could work with or without the addition of a baby :o)
Lauren says
I love the fact that this room is def for a baby, but without being “babyish”. It is certainly something that your little one can grow into! And you will love that crib. We have the same one and I adore it. Our son’s room has grown to be my favorite room in our whole house. =)
Misty says
Fab as usual Youngsters!!! Good luck with all things baby! I know you will all have so much fun =)
Jill Stigs says
OMG…………..it all looks fabulous! Great job and cute room, shoes, clothes and can’t wait to see the cute baby!!
Ashleigh says
Oh my god, you guys, the nursery is positively amazing! I’ve been so looking forward to seeing the Big Final Reveal and I am super impressed. It’s so beautiful! Congratulations on creating such a gorgeous space for the beanette.
Four weeks to go huh? Lucky she hasn’t come early – I was six weeks early, freaked the hell out of my parents!
Much love xoxo
Laura says
Oh my gosh, Sherry, you are all baby. Your legs & shoulders are so skinny. You look so beautiful! (You too, John)
What a great room and I’m so glad you did a budget breakdown. I’m thinking of re-doing my boys’ dresser like yours to match their bunkbed. Thanks for the inspiration!
Kara says
Amazing. I completely love it. It’s beautiful but not at the expense of kid-friendliness.
candace says
YAY, the big reveal! It’s absolutely out of this world stunning, perfect, stylish and FABULOUS. Baby P is very lucky! (Sherry, your baby bump is SO CUTE). Nice job and thank you for sharing with all of us!
Jacquelin Seybert says
SOOOO beautiful! Can’t wait to see a baby bean photo in the nursery :)
John-I’ve noticed the shoe collecting has already begun! Get ready!
Sherry-You look wonderful!
Erin C. says
I am in love with this room. You two are really giving me “baby fever!” I am looking forward to designing our own nursery… (soon??)
Samantha says
It’s BEAUTIFUL!!!!!!! I’m calling you guys when I have another bambino!!!
And Sherry, I gotta say it, you might be the cutest preggo I’ve ever seen!!!
Nicole B says
Awesome!!!!!
Where do you get el cheap-o baskets???? I am in need :)
YoungHouseLove says
Hey Nicole B,
We actually registered for those baskets back in ’07 when we got married. They hailed from Linens N Things but you can find something similar at Michael’s, Ikea, TJ Maxx, Target, and Home Goods. Hope it helps!
xo,
s
Amy says
ahhh! It looks so good!! I love the little nook with the chair, ottoman and side table. It looks so cozy. And I love the idea of framing her hospital bracelet. I’m going to pass that on to friends who are pregnant!
RJ says
Wow! What a beautiful nursery.
I had some storage baskets in my son’s bedroom, similar to the ones you put in the sidetable and that you have for your laundry basket. When he started crawling, he was able to grab a few pieces of the basket and take a small piece off and he choked on it. Thank goondess for his strong gag reflex- just watch her around the baskets.
YoungHouseLove says
Hey RJ,
So good to know! They’re woven pretty tightly (from a more rope-like material than a flaky banana leaf one) but it’s a great tip and we’ll definitely keep that in mind!
xo,
s
cynthia says
LOVE the room!!! you did such a wonderful job. i love the color too. i’m a mom too so when i had my son, i didn’t want just all blues because there were so many other wonderful colors to enjoy. also, i have to add, i love the book “i love you through and through” on your bookshelf. i read that to my son all the time and he loves it! he even imitates what the boy in the book is doing sometimes. too cute! :)
Dana @ House*Tweaking says
Congrats on such a happy, colorful place to feed, diaper, soothe, play with and read to your lil’ beanette! This is just too cute. I love that you repurposed items you already had (makes me wonder what’s goin’ on in the guest room where that side table use to live) while incorporating thrift finds and store bought items alike. The way everything meshes together is AMAZING! And the blue/green color palette is anything but predictable pink and fits into the rest of your home so nicely. Awesome job! Thanks for sharing your home with your readers.
Bromeliad says
Great job. I especially like your wall of artwork and your DIY mobile.
Hard to believe that someone’s little feet are going to go into those teeny tiny shoes.
Amy says
What a great space for baby P! You two constantly amaze me with your creativity, great style, and attention to budget. Who ever heard of coming in at less than half of their budget? You are an inspiration. Our baby boy is due about two weeks after your little one and I only wish I’d found your blog earlier in our nursery-planning process! Well done!
Jaimie says
I love the nursery! It is beautiful and so cheerful! I especially love the colors you chose. Baby P sure is one lucky little gal!
Elisa says
Love, love, love the room. What a lucky baby!!
Kim says
Beautiful job! I have to say I envy you two. My “baby” is a teenager, and while I certainly don’t want to start over with a new baby, I remember all the excitement and possibility of being where you are now. And I’m so happy for you, and I love how you appreciate and savor it!
And the only close runner-up to the cuteness of baby shoes (and baby socks) are baby toes, which you’ll see a lot of very soon :)
Bridgit says
How did you make the liner for your adorable laundry basket?
YoungHouseLove says
Hey Bridgit,
I used my trusty iron-on hem tape the create what looked like a pillowcase (I ironed it together when it was inside-out so the seams were on the inside when I flipped it around). Then I slipped it over the basket just like a plastic bag that you would use to line a garbage can. Hope it helps!
xo,
s
Katie says
This is amazing! I love everything! I would paint my whole house in this color pattern if my husband would let me :) I love that you guys chose blue and green for a little girl instead of the traditional pink. The room has plenty of feminine touches that make it (in my mind at least) the perfect baby girl room!
megan says
You two are so cute. I’m very excited for you. Best of luck in the next several weeks!
Patti says
Great job guys! I love how this room can grow up with lil P, it doesn’t look baby-ish at all, just young and fresh. When I saw the baby shoes I actually said “awwww” out loud … so precious, especially those red sandals! Very cool of you to show us your updated baby bump…you look great Sherry! It’s amazing how you really didn’t gain much from 3 months ago. Looks like you’re one of the lucky ones who doesn’t look pregnant from behind, just all belly, good for you!
Beth says
Must say this is the one of the few rooms you’ve designed that I wouldn’t glance twice at. Not my cup of tea at all. BUT, to each his own. What matters is that you love it. For me, I won’t miss posts about the nursery.
Eryn Chandler says
you guys, I am totally swooning. I could sing sweet melodies to the beauty that is this nursery.
we’re kidless, but just gazing at your nursery gets me so excited for when that time finally comes.
the colors, the furniture, the delicate touches, and adorable plush toys make my heart go aflutter :-)
brava!!
Sherry, you’re so beautiful, the bump really suits you!
Danielle@Newlyweds Paradise says
Now you have to update your home tour tab! Great job on the nursery. I love how it is not your typical nursery!
Susie says
I hope you take imitation as the highest form of flattery because we’re expecting a little one (our first as well!) in August and just LOVE what you’ve done. We really didn’t know where to start but this has just given us so much inspiration. I love how you give things such personal flair and are so fearless – it’s truly inspirational and I’m SO happy I found this blog. Thank you for sharing your awesomeness!
Peggy says
Absolutely darling! I wish I had a room that beautiful! Great job and good luck with Baby P!
courtney says
our little girl, who we refer to as Butterbean, just turned one. we thought she needed a few upgrades to her room since she was ‘growing up.’
http://davidcourtneyandcamryn.blogspot.com/2010/04/room-update.html
love your nursery! my favorite part is the dresser and shelves – i am a sucker for organization (we have sophie the giraffe, too).
can’t wait to see pictures of your Beanette. and your bump looks great ;)
Sandy a la Mode says
WOW, you guys did SUCH a fantastic job!!! I love all the different colors and details and everything about this room!!! The mirror is my FAVORITE piece, soo nice!!
Lexie says
I have absolutely loved following you and John on your nursery makeover. My husband and I just found out a week ago that we’re expecting a little one, and I can’t wait to turn our office in to a nursery – with lots of inspiration from you guys, of course! Unfortunately, putting the nursery in the office means having to move the office in to our basement, which means (gulp) dry walling. I’ve heard these nine months fly by, so we had better get to work!
Amber @ Two Nuts in a Shell says
Wow you guys–the room actually looks BIGGER! Amazing what some paint can do for a room. I love it! Now for the final “accessory:” the baby!
Carol says
Hi,
I have been following your blog for a long while now and have enjoyed every single entry but I have to say Baby Bean’s room has been my favorite!
A few months ago I was talking to my best friend since high school (we live in seperate states now) and we were talking about our favorite blogs and I said “oh, and there’s Young House Love, it’s just fantastic.” and she said “I know, I love that one too!”. Nice to still be bonding with my friend after all these years and over your blog no less!!
Thanks for all the enjoyment you provide!!
Sophie says
I love the room! We’re in the process of converting our daughter’s room into more pre-school mode (getting rid of the crib, bringing in small table and chairs) – and I hope you don’t mind if I “steal” a lot of your ideas!
Jessi E says
You guys did a great job! I can’t believe you only spend a little over $700. And I would have never thought that room was as small as it is!
K says
The room is beautiful. And the mirror is my favorite part – I’m totally inspired.
Kate says
The room looks great! I can’t wait for the “real” after pictures (you know, with the kiddo looking all cute and happy in her new room!).
As for taking these projects on, I definitely plan to redo some old dressers of my parents once we get a house (for craft/random storage, but maybe repurposed some day for a nursery…). I definitely want to line the drawers with fun paper, it looks so nice!
Amanda says
I am so much in love with this nursery – especially the price tag! Congratulations on your beanette to be and on doing such a fabulous job on her nursery!
Visty says
So lovely! I adore the details. I don’t know how you have your mirror attached to the wall, but we started buying these for things in our house that could be knocked down by kids: http://www.ooks.com/c-179-ook-30lbs-tremor-hanger.aspx We get them at Home Depot.
YoungHouseLove says
Thanks for the link Visty! We used heavy duty anchors and actually plan to take it one step further and drill right through the mirror and into the wall to completely secure the mirror once Baby P starts sitting up and getting more mobile. Can’t have the mirror falling on the baby!
xo,
s
Dannielle says
Love the nursey!! It’s so serene and beautiful! Great job! (: You guys def. came in under budget and are a true inspiration! My sister is having twins this August and I’ve forwarded your blog address to her so she can see your big reveal! (I’m a daily follower though!)
Congrats again on your bundle of joy!
Amy E. says
amazing make over and amazing budget! my favorite part would have to be the mobile over the changing station. very inspiring.
i have to ask though: Sherry, are you on your tippy toes in those pictures or are your feet just so super tiny that your jeans cover everything but your toes? it just boggles my mind cuz my boot cut jeans only cover about half of my size 9s!
YoungHouseLove says
Hey Amy,
Yup, busted. I’m totally on my toes in both pics. John’s 6′ and I’m a mere 5’3″ so I often try to bridge the gap in photos. Mystery solved!
xo,
s
Amy G says
Ahh! It’s gorgeous! You guys did an amazing job transforming that teeny room into such a beautiful baby pad :D
Yvonne says
OMG this is sooooo cute guys! great job..babies are too expensive so were ok with 3 puppies=) but when the time is right..im definitely going to be back to this post for inspirations =)
http://yvonnehuynh.blogspot.com/