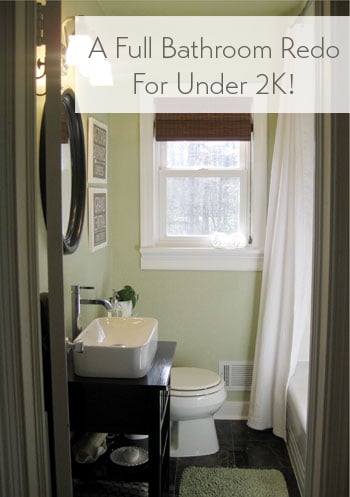
Oh happy day. We’re here to share all of our bathroom after pictures complete with a full timeline and a budget breakdown to detail every step of this month-long weekend and evening project of ours.
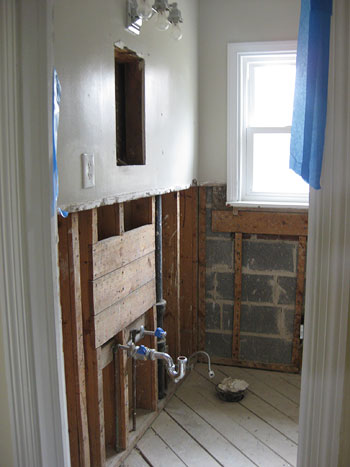
First we should remind everyone what the room looked like at the bleakest moment of the makeover. When it comes to most major renovations like installing a wet wall board, rooms usually have to get uglier before they turn the corner and start looking good, so let’s take a moment to appreciate just how un-aesthetically-pleasing our bathroom was when it was all stripped down after John demo’d the entire thing by himself over the course of about 24 hours spent in the bathroom (my hero!):

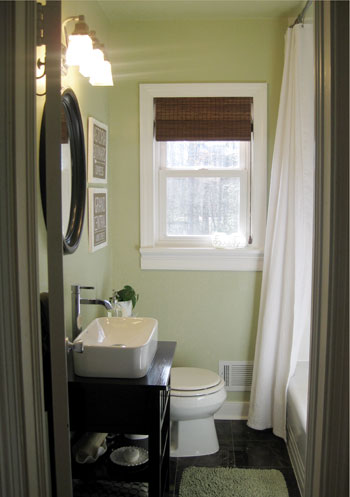
Now look at the same room all put back together again. We’re thrilled that everything seemed to click into place in the home stretch, and now our bathroom is honestly one of our favorite rooms in the house. Weird, but true.
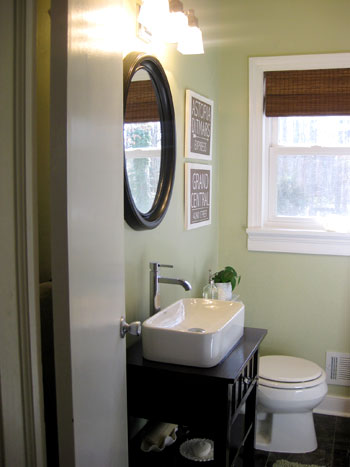
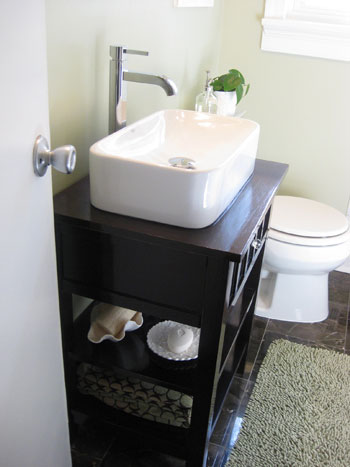
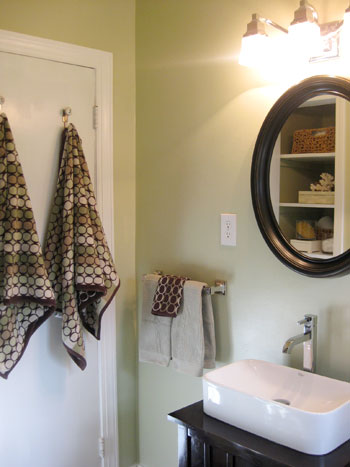
You can see that we hung a dark wood mirror (which we scored for $27 on clearance at Target) above the similarly toned vanity. We love that it also picks up the rich mocha color in our discount marble flooring (which you may remember we snagged for around $2.50/square foot at Lowe’s on clearance).
You’ll also notice some art on the wall… and you know we weren’t about to pay for something when we could make it ourselves, right? John actually came up with the idea of creating vintage-looking wood signs (he’s the brains of this operation, I’m telling you) after I lamented that the thought of square frames next to the rounded mirror could look a bit chaotic. So we picked up one $6 piece of wood, had it cut into two equal pieces right there in the wood cutting area of Home Depot and took them home to transform them into something worthy of our brandy new bathroom.
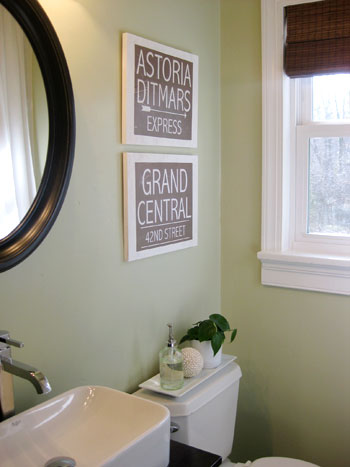
We took inspiration from our time spent in NYC (where we met and fell in love) so we thought making signs that mimicked the look of old NYC subway signs (like these that we hunted down on google) would be a special way to add more of that customized feeling that we love in our home. Of course we adapted ours to be a bit less dark to complement all the white in our bathroom (and in our house for that matter). We also picked two subway stops with the most meaning to us (we met working together near Grand Central and both lived in Astoria Queens at different times).
After bringing home our pre-cut planks of wood it was as easy as painting them white with craft paint that we already owned (it was thinner than latex wall paint so some of the wood grain still showed through) and designing two “signs” in Photoshop (we printed them out ourselves for free). Then we roughed up our prints for a weathered, creased, and vintage look and Mod Podge came in handy when it came to attaching them to the wood planks (the waterproof protection it added was also a plus since they live in a bathroom). Note: we’ll be doing a follow up post with more step-by-step sign making details for anyone who wants to take on this project themselves so stay tuned.
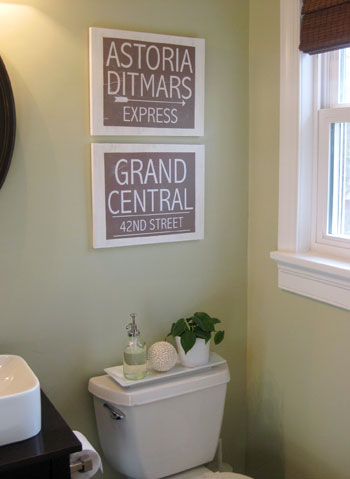
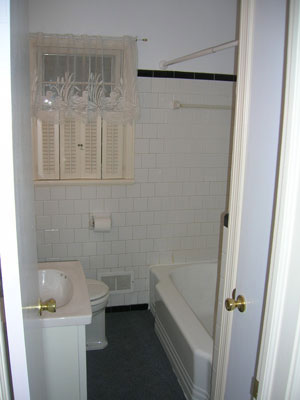
But on with the bathroom tour! If you look at the photo above, you’ll see that we actually opted to attach a simple chrome toiler paper dispenser to the side of the vanity since we didn’t want it attracting attention from the hall (which it would do if we placed it on the other side of the toilet under the window). We also picked up a simple white ceramic tray for the top of the toilet (we actually cut a thin strip off of one of our rubber rug-pads to form sort of a grippy buffer between the toilet and the tray to keep it “stuck” in place for the long haul). Then we used the tray to corral our favorite soap pump (which we waxed poetic about here) along with a cute little shell ball and a leafy green plant.
Although there was room for a soap dispenser on the back corner of the vanity behind the sink we thought it looked cuter a few inches to the right on top of the toilet- so while we know other people might want their soap pump right on the top of the vanity, we personally liked it on the tray (to each his own, right!). It really keeps the top of the sink uncluttered and sleek looking, and we always have the option to simply move the pump over to the sink if weeks of use make us rethink our nearby toilet-top placement.
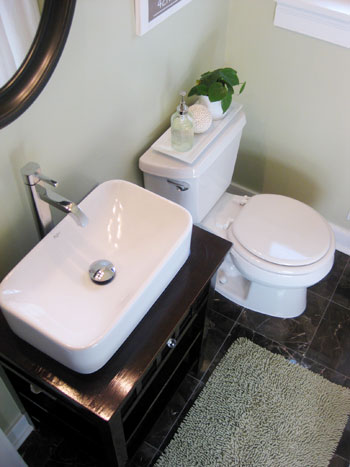
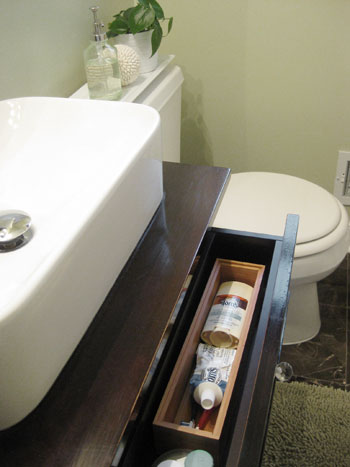
We also love that we were able to save the vanity’s drawer by shortening it (read more about the process of building the vanity here) so we can still fit a few staples in there: toothbrushes, toothpaste, and deodorant in a bamboo tray along with contact cases and John’s hair stuff.
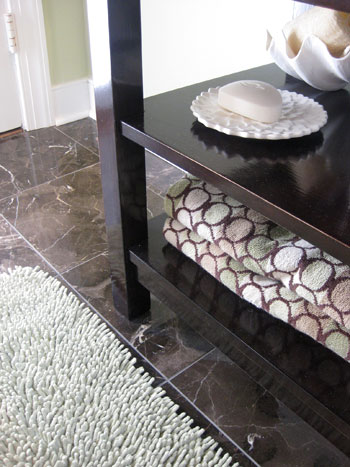
We love that our vanity also allows us to store a bunch of extra bath towels (picked up for just $6 each at TJ Maxx) along with a few cute decorative items like a loofah in a faux clam shell and a pretty scalloped plate with Dove soap on it for our guests (we use a bar of organic stuff in the shower, but when guests stay and want to shower/wash their face we can just mention that the soap under the sink is all theirs).
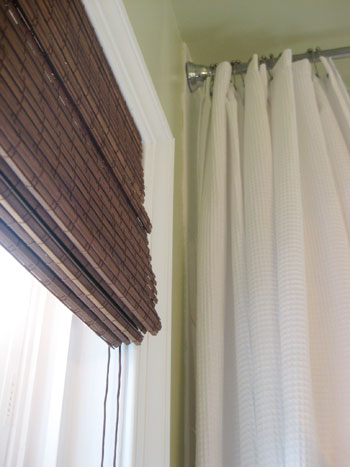
We also rehung our existing white waffle floor to ceiling shower curtain (read more about that project here) and really love that the shower tile now goes right up the ceiling to meet the bar for even more height and drama in the room. We’re so glad we spent the extra time tiling all the way up… the ceiling seriously feels over a foot taller. You’ll also notice that we snatched up a simple inside-mount bamboo blind from Home Depot for just $25. We love the texture and mocha color that it adds to tie in with the tones in the marble floor and even the vanity and the mirror.
At the very end of our renovation we also had our tub professionally reglazed for a completely convincing like-new look. The tub was actually already reglazed when we inherited it with the house and that treatment lasted over 12 years (we received the original paperwork from the first time the job was done years ago from the last owners). And this new reglazing job should last just as long even with everyday use. The key is finding the best professionals who use the best equipment and the best formulas for a long lasting finish that looks amazing (we call for references, look them up with the Better Business Bureau, etc).
As for why we opted to get ours reglazed instead of replacing it, we love the large, deep, original cast-iron tub. It was too great to send off to a landfill (and too heavy and expensive to try to remove & replace). We’re all about working with what we have, so because we couldn’t salvage the bathroom’s old tile, the least we could do was salvage the tub by refinishing it (to the tune of $399- oh and it would have only been $299 if our tub hadn’t already been reglazed for anyone out there looking for a cost estimate). Oh and because we’ve lived without putting shampoo bottles around the edge of the tub for years (since it was previously refinished and that’s not recommended) that’s not an adjustment for us at all when it comes to the newly reglazed finish. Note: we used this top rated family owned local company and are extremely pleased with their work.
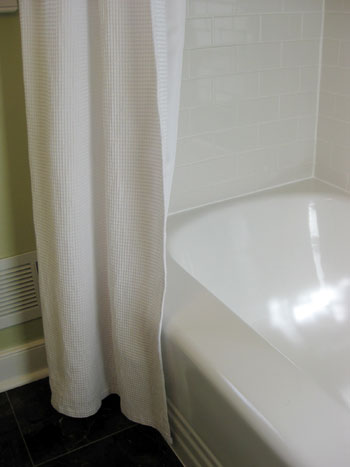
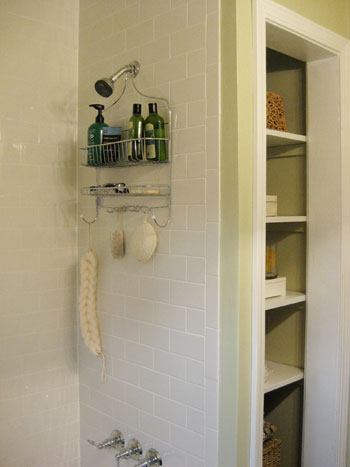
Here’s a shot of John’s amazing tub to ceiling subway tile. Doesn’t it look like the work of a pro? I couldn’t be more proud of my man and his first attempt at tiling! We also opted to add a simple chrome shower caddy (although we debated adding white porcelain corner shelves or even creating an enclave for shampoo and soap before we tiled) since we don’t mind the look and love that it kept our first tiling job sweet and simple.
You might also notice that we replaced the shower fixtures with an insanely affordable $69 chrome set from Overstock since our old fixtures felt a bit too cottage-y with our new sink & faucet. The best part is that we Craigslisted our old fixtures (since they were only used for a few years and were in mint condition) and actually made back $30 of the $69 we spent on the new ones. Not bad, eh? Gotta love Craigslist. And on another note, how delicious does that twenty cent subway tile from Home Depot look up close? It’s so bright and shiny and clean looking- perfect for a tub surround. Mmm.
Oh and this is one project where we weren’t afraid to call in the pros. We paid $100 for an hour of an expert’s time so he could remove our old fixtures (they were soldered in place behind the wall) and put in our new ones (also soldering them in place for long-lasting durability and performance). It was totally worth it to avoid any potential plumbing issues down the line and after receiving many $300+ estimates for a simple shower-hardware switcheroo we found a great local plumbing company (Advanced Plumbing – 804.358.1616) who gave us a much more reasonable price- so we’ll definitely be using them again in the future.

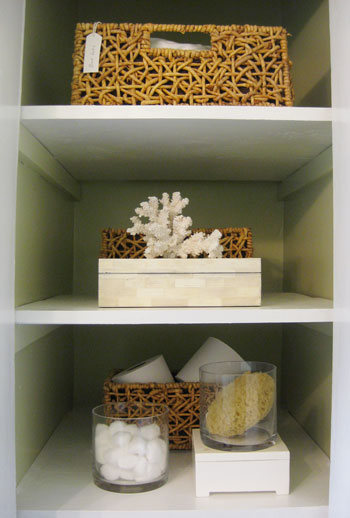
We also have our doorless linen closet (learn about how and why we removed the door a while back) which feels even more integrated into the room since we removed the threshold and tiled the floor of the closet (which used to be wood) so the entire bathroom now has seamless mocha stone squares underfoot. The difference really is amazing! It’s like it was always meant to be an open nook instead of a disparate linen closet. It’s a great place to store all of our extra towels, my hair dryer, my make-up bag, and other linen-closet stuff. But thanks to pretty boxes and bins (that we already had laying around) all the ugly stuff is hidden away for a clean and inviting look that’s organized and still super functional.
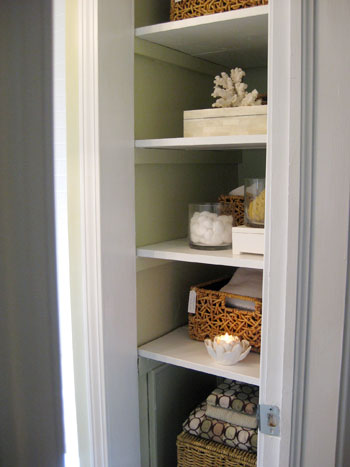
Oh and you might notice the tags on a few of those woven baskets (which we made back in the day). They keep us even more organized and John can’t claim he doesn’t know where anything is or fail to put things back in their places- gotta love a foolproof system that costs zero dollars and zero cents.
Here’s a shot of the other side of the bathroom with our new $6 TJ Maxx towels hanging on the back of the door (see a close-up of our personalized towel hooks here). We also hung a small towel bar next to the sink for easy hand-drying. We actually adapted that towel bar to fit our bathroom so stay tuned for a follow up post with those details from John…
It’s the little things that really make a room feel finished. It was amazing how adding some towels and a few accessories seemed to bring the entire space from “in-progress” to “thank goodness we’re done!” And those last-minute touches only seem to emphasize and complement the more major materials like the veiny marble flooring, the crisp white trim and the soft taupey-green walls. Oh and speaking of the details, we scored our bath mat for $9 on clearance at our local West Elm (which is sadly closing its doors but that meant everything was marked down like crazy). It adds so much softness to the dark stone floors and the cushy texture is so inviting for bare feet.
And now for the budget breakdown. First we should mention that we got two informal bathroom estimates from contractor friends of ours (so we would have a pro price to compare to our DIY price) and both of them came in right around 10K for the entire demolition, room rebuilding, floor and shower/tub tiling and vanity installation (which they knew would be harder than a more modern redo since our 50 year old house had mortar and metal-mesh behind those walls – not to mention some old floorboard rot).
Of course we knew that we could save a significant chunk of change by doing everything ourselves but we also knew that just because a job is DIY doesn’t make it free (thanks to materials and supplies) so we headed into our bathroom makeover assuming that we’d spend around 3K on everything from demo to the final stage of accessorizing- especially because we were replacing everything from the floors and the walls to the vanity and the tile. Needless to say we were thrilled when we crunched the numbers and found out we came in blissfully under budget! Here’s how it all shook out:
- Demo: $67 (for the rental of the demolition hammer and a few other simple supplies)
- Subway wall tiles: $101 (from Home Depot for 21 cents a pop)
- Marble floor tiles: $120 (thanks to an amazing clearance price of around $2.50 at Lowe’s)
- Grout, spacers, sealer, caulk: $70
- Drywall, furring strips, hardibacker, plywood, nails: $136
- HD truck rental to get the big stuff home: $19
- Trim, quarter-round & supplies: $100
- Thinset & notched trowel: $75
- Manual tile cutter: $15 (we went halvsies on it with John’s dad)
- Wet saw: borrowed from John’s dad
- Circular saw: borrowed from John’s dad
- Miter saw: borrowed from John’s dad
- Drywall mud, tape, sandpaper & spackle knives: already owned/borrowed from J’s dad
- Primer: $11 (Valspar Drywall Latex Based Primer)
- Paint: $26 (Olympic No-VOC paint color matched to Benjamin Moore Dune Grass)
- Vanity: $410 ($165 Crate & Barrel nightstand after coupon+ $119 Overstock sink + $109 Overstock faucet + $17 Low-VOC eco-varnish)
- Shower Fixtures: $69 set from Overstock + $100 installation
- Toilet: already purchased a few years back
- Professional tub reglazing: $399
- Towels: $30 from TJ Maxx
- Mirror: $27 on clearance from Target
- TP dispenser and towel bar: $37 from Target
- Art: $6 for the wood (we already owned the paint/Mod Podge & printed ’em ourselves)
- Bath mat: $9 on clearance from West Elm
- Blinds: $25 from Home Depot
- Other small accessories & miscellaneous expenses: $67
- GRAND TOTAL: $1819.00
* It definitely bears noting that we were fortunate enough to get to borrow some tools and a few other supplies from John’s dad (ex: the wet saw, circular saw, and miter saw). If you were to purchase these items they’d probably come in around $450 but you could also rent them for far less from places like Home Depot and True Value.
Yeah we’re pretty excited about that final number. There may or may not have been some geeky high-fives being thrown around when we finally hit “=” and saw it come up on the calculator. Not only did we come in over eight thousand dollars cheaper than a professional most likely would have charged, we even came in more than 1K under our original budget. Thank goodness for clearance tile and places like Overstock, Target, and TJ Maxx for affordable accessories. And boy were we ready to have our new and improved bathroom back in action after exactly 40 days sans shower (although showering at the gym and John’s sister’s house weren’t all that bad after you got used to it).
Of course it wasn’t 40 solid days of work, it was more like four and a half weekends and a few evenings spent gettin’ her done. And we can’t forget that Christmas and New Years were thrown into the mix so we spent quite a bit of time taking a break with family and friends. Here’s a more detailed timeline rundown:
- Pre-project planning & shopping: 5 hours or so
- Removal of toilet/vanity before demo: 2 hours
- Tile demo: 24 hours (two twelve hours days)
- Getting supplies and installing drywall, hardibacker and new plywood floor: 42 hours (three and a half twelve hours days) Note: this step can be substantially shorter in newer homes where you’re not dealing with furring strips to build out walls to match old mortar depths, for example John’s dad tackled this step alone at his house in less than one seven hour day.
- Tiling the shower surround: 17 hours (one seven hour day and two five hour evenings)
- Priming and painting walls: 2.5 hours
- Tiling the floor: 11 hours (one seven hour day and one four hour evening)
- Grouting & sealing the shower & floor: 3 hours
- Buying, cutting, installing & painting trim: 9 hours
- Reinstalling toilet: 30 minutes
- Building and installing the vanity: 5.5 hours
- Hanging the mirror, art, shower curtain, towel bars, etc: 1.5 hours
- GRAND TOTAL: 123 hours (which breaks down into a little over five weekends of work)
The bathroom was definitely the biggest DIY projects we’ve taken on to date. We had never demo’d tile, used a wet saw, tiled anything, or even used a miter saw before! So we love to point to our latest big makeover as proof that anyone can tackle something like this in their own home with a good amount of research and some tireless enthusiasm and determination (for more info on how to evaluate whether a project is too big to DIY, click here).
So we’ll leave you with a photo of our bathroom as it looked when we purchased our sweet old house three years ago. Can you believe the previous owners actually had gross matted carpet covering the old basketweave tile?
You’ve come a long way old friend.
Would we do it all over again? Heck yeah. We’re interested to see how much faster and more efficient we could be now that we’re not such newbies in so many areas of the bathroom renovation process. But would we start another bathroom remodel this weekend? That might be stretching it. While we love the pride and self-satisfaction that our big bathroom project elicited, we’d be flat out lying if we didn’t admit that it was hard work and we’re happy to take a little break from sledgehammer swinging and tile cutting for a little while. We’re not robots, ok? In fact, a nice long bath sounds about right after all that blood (some), sweat (lots) and tears (just a select few).
So what do you guys think? Is there anyone out there who recently took on a similar DIY bathroom project? Any first-time tilers who are about to take the plunge? We promise it’s not nearly as scary as thinking about it. Really, once you stop dreading the whole thing and dive in it’s kind of a relief to be “doing” instead of “anticipating.” Happy renovating to one and all!
Wanna read each detailed post about the big bathroom makeover? Check out Chapter One (Planning), Chapter Two (Demo), Chapter Three (Wall Reconstruction), a little teaser post, Chapter Four (Tiling), Chapter Five (Grouting), Chapter Six (Trim) and Chapter Seven (Building The Vanity).

Meg says
I just LOVE your bathroom! My boyfriend and I bought our house in July, and have been (slowly) renovating the bathroom and took it down to the studs. We just put in a plywood floor this weekend, and I was wondering what your thoughts are with Ditra (the orange waffle looking sub floor) or the traditional wonder board. Thanks!
YoungHouseLove says
We prefer the traditional wonder board, just because that seems easy and straightforward. Both probably work really well though. Good luck!
xo,
s
Sacha says
Hi guys,
I am shopping around for some bamboo blinds and love the color of the ones in your bathroom. I know they are from the home depot…are they the nepal or providence maple blinds?
Thanks for your help!
S
YoungHouseLove says
We’re so sorry we don’t remember, but the photos are very true to life (so maybe just buy the ones that look most like our pics?). Good luck!
xo,
s
cwong says
Found your site searching the web. We are renovating our bathroom too and LOVE what you’ve done. Our bathroom layout is almost exactly just like yours. Thanks for your site and all the great pictures!
Jane says
Hi Sherry,
I’m looking to replace my bathroom faucet, and Overstock is also my go-to source for affordable, quality house wares. But I’ve noticed on Overstock that they don’t carry the faucet brands that I know are most popular/quality, ie – Delta, Moen, Kohler, etc. So is there a brand other than that that you would recommend that Overstock carries? Thanks!
Jane
YoungHouseLove says
We like the one we got, but we know what you mean about not recognizing the brand. Unfortunately we don’t have a specific recommendation for you. Maybe just rely on consumer ratings or “stars” for each product? Good luck!
xo,
s
tricia says
Hey Guys! Just a quick question…I know you are so busy unpacking and getting settled in the new house! Where did you get the light fixture over your sink? I love it. We are redoing our bathroom and I keep finding myself going back to this post for ideas! Thank you so much!
tricia says
JK. I found the answer in a previous post! Thank you:)
Katie says
What color is the trim? I can’t tell if it’s a white or not. Looks really great!!!
YoungHouseLove says
Yup, crisp white trim.
xo,
s
tricia says
Hi Guys! I know you tiled tub to ceiling, but did you actually tile your ceiling in the shower? Thanks!
YoungHouseLove says
Nope, but we did paint it the same semi-gloss khaki green tone as the rest of the room (so it felt more seamless).
xo,
s
Abby says
Hi S&J,
We got our shower tiled yesterday and we’re hoping to grout tonight. How long did you wait to apply the grout sealer? I’ve seen some sites say the grout should cure for several weeks before sealing which is way to long for us. We’re really wanting to get our shower back in working order ASAP!
Thanks!
YoungHouseLove says
Hmm, we don’t remember! Maybe click the links at the bottom of this post to go back to the post where we mentioned that specifically and see if we said how long we waited? My instinct is that it was a few days (3?) but not weeks. Not sure though! You also could just follow the directions on the specific bottle that you get.
xo,
s
April specht says
Love your bathroom and this site. Such an inspiration! I am considering using the brown marble tiles in my bathroom and my husband thinks they will be slippery. What did you think? We have a small bathroom with little room to slide so I tend to think it won’t be a problem. I’m in love with them so I’m hoping you tell me they weren’t slippery.
YoungHouseLove says
We always used a bath mat (as I assume most people would) and never had an issue. We wouldn’t suggest taking a running start with wet feet and trying to slide around, but with regular use for over a year we never so much as slipped even a little on the tile after stepping out onto the bath mat. There are etching treatments you can add to the tile if you have an issue with slipping though. Hope it helps!
xo,
s
ButterYum says
I love absolutely everything about it, and I’m not kidding when I say I would purchase your subway art in a heartbeat!
Bravo!!
:)
ButterYum
Tina says
Thanks for sharing. We just bought our first home and LOVE what you have done! Hope you don’t mind but we’ll be taking some of these ideas to a home in VT! Thanks again for posting. You are very creative.
Tina and Tim
PS We love the color of the nursery!
s leigh says
quick question, if you spent $101 on subway tile at 21 cents a pop that would be about 480 tiles… is that correct? That just seems like a lot. I am redoing our shower in subway tile and without hurting my brain with math I am trying to estimate how many tiles I’ll need.
YoungHouseLove says
That sounds right! Some of them broke or were cut wrong so we probably purchased an extra box just to have enough to account for those oops moments. Maybe just figure out how many tiles it takes to do a square foot of space and then multiply that by the amount of square feet you have in your bathtub? I think they’re priced by square foot at the store so it should be easy if you go there. Good luck!
xo,
s
Pat says
Hi! I’m fairly new to your site and I just love it! We used the same subway tile from Home Depot(it’s 23 cents now)and purchased all of the items you recommended from The Tile Shop. Everything looks great! It’s now time to seal the tile and I’ve read not to get the sealer on the tile itself..if you don’t get it wiped off quickly it has to wear off! It will take forever if I seal each grout line separately! John, do you remember how you did this step? Thanks so much!
YoungHouseLove says
Yes! Here’s a post about it: https://www.younghouselove.com/2010/06/how-to-seal-grout/
It worked out really well, so we hope it works for you! Don’t see why it shouldn’t if we used the same materials! Good luck!
xo,
s
Kevin Carney says
I am impressed! I know how much effort was involved. That was a lot of work for evenings and weekends. Completing this is only one month shows true dedication!
Frankie says
The bathroom looks very nice..
We are copying your paint colors because they are so lovely with the black floor tile..
What color specifically is the white trim on the baseboards and around the window?
Thanks so much,
Frankie
YoungHouseLove says
That’s off-the-shelf white paint by Freshaire from Home Depot. Hope it helps!
xo,
s
Tanya says
Can you please tell me the color you used on the walls? Its beautiful!!
YoungHouseLove says
That’s Dune Grass by Benjamin Moore color matched to Olympic’s No-VOC paint. Hope it helps!
xo,
s
Kate says
May I ask where you got the tank tray? I am looking for my bathroom, and I love the one your bathroom!
Thanks!
Kate says
Oops! Should say “I am looking for ONE for my bathroom”! ;)
YoungHouseLove says
That’s actually from Target. Just a long white dish from the cooking/serving section. I brought the tank measurements and picked up a long serving tray for it. Hope it helps!
xo,
s
Kate says
Thank you so much! I have tried BB&B and Home Goods, but will hit up Target this weekend. Many thanks for the uber-quick reply, and the endless home decor insipration you provide :)
Jessica says
My husband and I are house hunting right now- and much to our dismay it seems as though whatever house we buy we will be renovating the bathroom(s). My husband, a self-diagnosed penny pincher, kindly reminds me that the bathroom is the most expensive room in the house besides the kitchen, and if renovating a bathroom is a must… it MUST be done ourselves. That being said, we have never renovated a single thing in our lives, we are both 24 years old and work full time, and (this probably goes without saying) on a tighter-than-tight budget. After DIYing most of our wedding, we feel confident that it can be done, and I have been studying your blog like I’m gonna be taking a final exam on it. I’m not gonna lie though, its a bit intimidating! Thanks for the inspiration!
YoungHouseLove says
Good luck! You can do it!
xo,
s
Nicholin says
Great job. I want to re-do our bathroom, and this post makes me think that we can do it ourselves. Thanks so much for sharing.
Karen says
Dude, I am so into this bathroom. Granted, it’s not my personal preference but even I can see it’s GORGE.
Emily says
About to start renovating my bathroom and I picked out a similar marble. Did you feel that the floor was extremely slippery when wet?
YoungHouseLove says
With a bath mat on the floor where we stepped out we never had any slipping issues. But if we did we planned to put etching cream on the marble to degloss it so it wouldn’t be an issue. Hope it helps!
xo,
s
Tanya says
Hi Sherry! I am in love with this bathroom and being a complete copy-cat in the new house my hubby & I are building. I am obsessed with finding the match to the paint color used in the bathroom…I went to my local Benjamin Moore for their Dune Grass paint chip…hum…does not look green at all – more of a light tan color? Just wondering if that’s how it looked for you b/f a couple coats – or do you have similar paint-chip ideas that would work?? Thanks!!
YoungHouseLove says
Yup, it looks very taupe-y but it has a green tone too. That’s the one we used (although different lighting can change how paint reads). Maybe get a test pot of it and apply a few thin and even coats and see how it looks after a day of drying? Hope it helps!
xo,
s
Fouzia says
Awesome DIY!! My hubby and I are on a house hunt since we are moving to Cali in the near future and your blog has definitely opened my eyes to seeing the bigger picture…and given me courage to know it is possible to tackle demos. Thank you for the inspiration guys! P.S. I love the chrome shower caddy and how its big enough to accommodate 3+ hanging loofahs. Where did you purchase it? Thanks again!
YoungHouseLove says
Aw thanks for the kind words. That was from HomeGoods. Hope it helps!
xo,
s
Jenny says
How in the world did you snag bamboo shades at Home Depot for so cheap? What type of bamboo shade is it? Thank you for helping me out- you guys are awesome. Seriously!
YoungHouseLove says
Wish we knew the name! We just walled into the bound area and that width was well priced (it’s not very wide). Hope it helps!
xo,
s
Scott says
Are you still happy with the re-glazing job from (A&J resurfacing right)? I know there are several places here in Richmond and I need a recommendation for some good work.
Thanks!!!
YoungHouseLove says
We moved about a year after that reglazing job, but it was still looking awesome when we moved!
xo,
s
caralee says
Wow – love it! What’s the name of the soft green paint color?
YoungHouseLove says
That’s Dune Grass by Benjamin Moore. Hope it helps!
xo,
s
Buffie says
I have a question. In the shower, did y’all caulk the corners and the bottom or did you grout the entire area? Oh, and what color is the grout? We are getting ready to tackle this in our bathrooms. Thanks and <3 the site!
YoungHouseLove says
We caulked around the lip of the tub and the corners up the wall. As for the grout info, just follow the link at the bottom of this post for those details. Hope it helps!
xo,
s
Buffie says
Thanks sooooooooo much! I heart your site! Best of luck on the new house! XO
Amy says
I was looking at this for inspiration for a bathroom we’d like to redo, but one thing I didn’t notice on the breakdown of cost was the shower curtain. (maybe it’s there… I have a 6 wk old and am sleep deprived. It seems longer then the regular ones. Where did you get it, and how much was it?? Thanks.
YoungHouseLove says
We already had that for a few years prior, so we only add stuff that we purchase for current projects to our breakdowns (just because previous materials and accessories are in other post breakdown from the past and we don’t want to double count them). We got that extra long shower curtain from amazon.com for around $20-25 though. Hope it helps! Just search for “extra long shower curtain” or “95 inch shower curtain” – hope it helps!
xo,
s
Mary says
Thank you so much for this post; it was exactly what I was looking for! The breakdown of the costs and the time spent on each part of the renovation is going to be so helpful to us when we actually start planning our remodel. We are about to close on a house and have multiple projects that need to come before the bathrooms.
Jen says
Coming in under budget always feels good, but it must feel even better when it looks this amazing! Great use of the space, and I love the taps. Classy!
christine says
great reno…quick question…where did you guys find such a long shower curtain? or is it fabric that was custom cut to the right length??
YoungHouseLove says
Amazon.com has extra long ones (just search “95 inch shower curtains” or “extra long shower curtains”). Hope it helps!
xo,
s
christine says
thanks. just realized you answered it a few posts up. duh. but thanks for reposting. :)
YoungHouseLove says
No worries!
xo,
s
Robin says
Absolutly amazing. I’m so envious of the talent put into this bathroom.
Emily E says
I know that this is an older post, but I wanted to tell you that I can sympathize with all the work you guys did on this bathroom. I spent two entire weekends remodeling our bathroom while also moving our stuff in. I have never been so tired in my entire life. (and that includes giving birth and taking care of an infant.)
YoungHouseLove says
Haha, isn’t it funny how some renovations can seem harder than bringing a new life into the world? But it’s so worth it when it’s over – sort of like childbirth! Haha.
xo,
s
Leesa Kline says
Wow! Would you believe the layout of your bathroom is exactly as ours is? Our home was built in 1985. Window is same, even linen closet is exactly the same and I’d lOVE to get that door off! Only difference? We have a fiberglass brown shower stall where your bathtub is. Instead of those tiles going up, we have brown fiberglass same height as your finished project. The shower has glass doors (one of which shattered, so now one with a shower curtain! LOL! I’ll send a pic if you can help.
Thanks!
Leesa Kline
YoungHouseLove says
That’s so funny! Why not post a pic on our Facebook page for suggestions from everyone! Good luck!
xo,
s
Brooke says
First time checking out your blog and I absolutely love it!! I just bought an old table and chairs set that I’m planning on refinishing and your site has great tips! Thanks, I’ll be reading more :)
YoungHouseLove says
Aw thanks Brooke! So glad you found us. Good luck!
xo,
s
Katie says
Hi John and Sherry!
We love your blog! We’re redoing parts of our bathroom right now and planning on reglazing our tub. What criteria did you look for when picking a company? How do you know if they have the best equipment and best formulas?
Thanks!
YoungHouseLove says
We just asked around for referrals from friends and neighbors (always important to hear how someone else likes their work) and looked them up on the Better Business Bureau to make sure there weren’t any outstanding complaints. Of course also when we got an estimate we asked some questions to see how comfortable we were with their answers/knowledge/personality and they were so nice and full of info!
xo,
s
Suzy says
Amazing job. My hubby would never have the patience to tackle that job. Beautiful workmanship & love the stairs.
So professional. You might want to limit the texts as your next text will be ” when can you come & help with our new deck.” LOL
Cindy says
These posts have always inspired me and I am happy to say that we are FINALLY re-doing our bathroom just like this! I was very nervous to select all the tile, sink, etc but your remodeled bathroom posts will be our guide. Thank you so much!
Judy says
Fantastic job on your bathroom. I was wondering if you purchased the subway tiles manufactured by Daltile? Home Depot and Lowes sells them. I ask because we are using those tiles and have noticed that the tiles are scratched due to the way they are packaged in the box. The rough back of the tile is placed against the smooth glazed surface of the next tile behind it. This results in scratches on a new tile and we are very unhappy about it.
Did you have any problems with this?
YoungHouseLove says
Oh no! I think ours had paper between each tile in the box so they didn’t rub. If they’re scratched I’d definitely return them.
xo,
s
Jennifer says
Hi, guys. I know this post is wicked old, but I just got my tub surroud re-tiled (using the Lowe’s subway tile, not Home Depot like you guys used). My tub has not been refinished. Here’s my issue — next to the tub, the “white” subway tile looks almost creamy! I know there are different whites, but I honestly didn’t think the tile looked creamy until it was set in mortar and grouted next to the tub. Did you guys notice any white difference between your Home Depot tiles and your refinished tub? And if so, did it bug the crap out of you? Thanks:)
YoungHouseLove says
Oh no! We didn’t really see any difference in ours. Is it possible that you just used super white grout and regrouting with something darker could help? Otherwise it’s tough because the tile and the tub are permanent things, but maybe once you hang the curtains and accessorize the room it won’t be noticeable at all!
xo
s
Jennifer says
Yeah, I’m going to wait until everything’s staged before I completely freak out:) Your comment on the grout is probably right. Worse comes to worst, refinishing (as in the tub AND tile surround) is always an option, I guess…
YoungHouseLove says
Good luck Jennifer!
xo
s
Ryan says
You should lower the cost of the project by $30 since you sold your old bathtub fixtures on Craigslist!!!
Amazing work!
Amy says
Do you know if the products used to refinish the tub are non-toxic? I have been looking into the process but I’ve read that several pro’s in the refinishing business have died while working. I have a newborn and two little dogs so I’m very hesitant…any thoughts?
YoungHouseLove says
The people we used were licensed and registered with a great rating from the Better Business Bureau (an A). They used professional machinery to vent the fumes out of the room and out the window (there was a system that sucked it outside, and it stunk outside but I stayed inside since I was pregnant). The house itself didn’t have an odor thanks to venting it out, and we were really impressed with the process. I would ask whoever is doing it how they control the odor/fumes (and skip anyone who doesn’t have a pro system for venting it out of your house).
xo
s
Gracia says
I subscribed your blog to rss reader :D
Chris Larivee says
Hey guys, I just installed a new bathroom vanity so I don’t have a use for this. But I thought I’d share in case any of you do! Cabinets To Go (who I got my vanity from) is actually giving away a free bathroom vanity. Just click the link: http://www.cabinetstogo.com/Bathroom-Vanity-Contest.asp and vote for which vanity you want. Then you’re entered to win that exact one…pretty easy! GOOD LUCK :))))
YoungHouseLove says
Sounds like fun!
xo
s
Ashley says
What would do if you had a window in your shower?
YoungHouseLove says
Maybe try frosting it? I think other commenters have said it worked?
xo
s
Robb says
Great job. Wondering what the color is on the bathroom walls
YoungHouseLove says
It’s Benjamin Moore’s Dune Grass.
xo
s