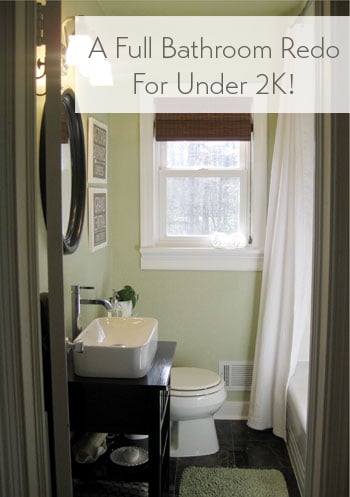
Oh happy day. We’re here to share all of our bathroom after pictures complete with a full timeline and a budget breakdown to detail every step of this month-long weekend and evening project of ours.
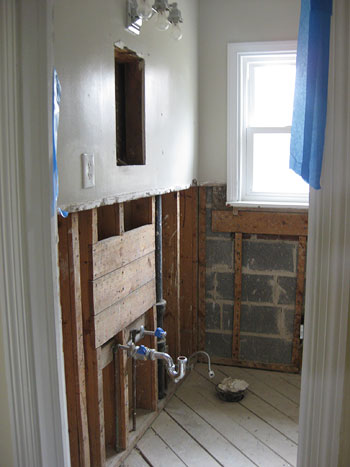
First we should remind everyone what the room looked like at the bleakest moment of the makeover. When it comes to most major renovations like installing a wet wall board, rooms usually have to get uglier before they turn the corner and start looking good, so let’s take a moment to appreciate just how un-aesthetically-pleasing our bathroom was when it was all stripped down after John demo’d the entire thing by himself over the course of about 24 hours spent in the bathroom (my hero!):

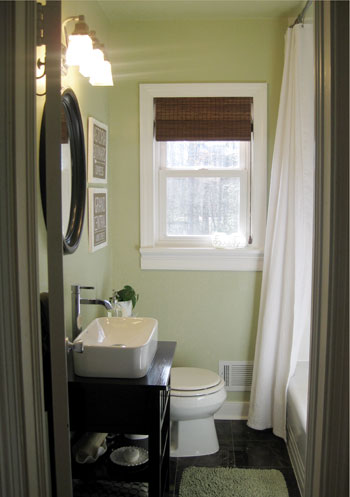
Now look at the same room all put back together again. We’re thrilled that everything seemed to click into place in the home stretch, and now our bathroom is honestly one of our favorite rooms in the house. Weird, but true.
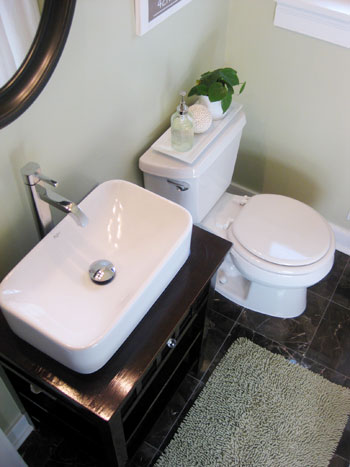
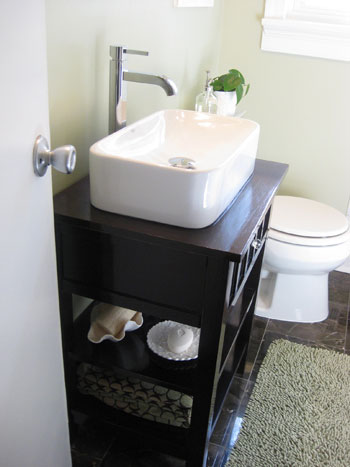
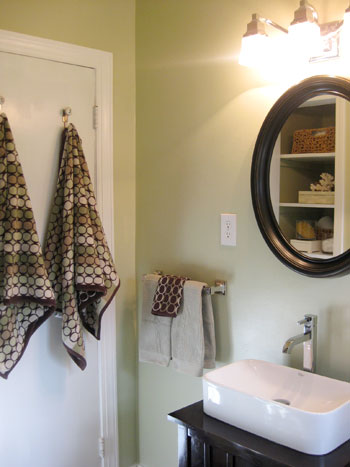
You can see that we hung a dark wood mirror (which we scored for $27 on clearance at Target) above the similarly toned vanity. We love that it also picks up the rich mocha color in our discount marble flooring (which you may remember we snagged for around $2.50/square foot at Lowe’s on clearance).
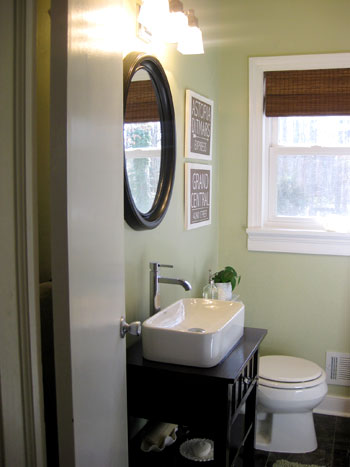
You’ll also notice some art on the wall… and you know we weren’t about to pay for something when we could make it ourselves, right? John actually came up with the idea of creating vintage-looking wood signs (he’s the brains of this operation, I’m telling you) after I lamented that the thought of square frames next to the rounded mirror could look a bit chaotic. So we picked up one $6 piece of wood, had it cut into two equal pieces right there in the wood cutting area of Home Depot and took them home to transform them into something worthy of our brandy new bathroom.
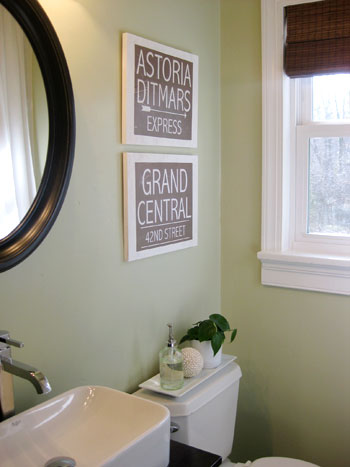
We took inspiration from our time spent in NYC (where we met and fell in love) so we thought making signs that mimicked the look of old NYC subway signs (like these that we hunted down on google) would be a special way to add more of that customized feeling that we love in our home. Of course we adapted ours to be a bit less dark to complement all the white in our bathroom (and in our house for that matter). We also picked two subway stops with the most meaning to us (we met working together near Grand Central and both lived in Astoria Queens at different times).
After bringing home our pre-cut planks of wood it was as easy as painting them white with craft paint that we already owned (it was thinner than latex wall paint so some of the wood grain still showed through) and designing two “signs” in Photoshop (we printed them out ourselves for free). Then we roughed up our prints for a weathered, creased, and vintage look and Mod Podge came in handy when it came to attaching them to the wood planks (the waterproof protection it added was also a plus since they live in a bathroom). Note: we’ll be doing a follow up post with more step-by-step sign making details for anyone who wants to take on this project themselves so stay tuned.
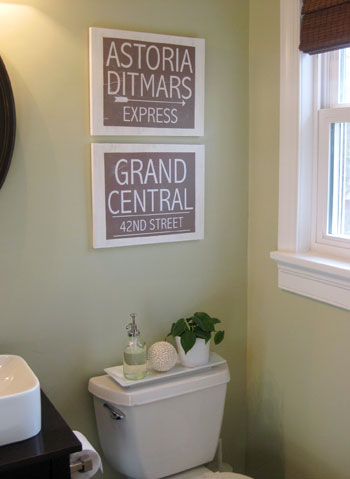
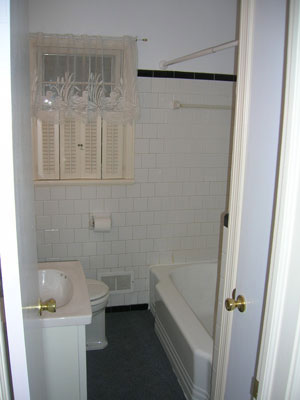
But on with the bathroom tour! If you look at the photo above, you’ll see that we actually opted to attach a simple chrome toiler paper dispenser to the side of the vanity since we didn’t want it attracting attention from the hall (which it would do if we placed it on the other side of the toilet under the window). We also picked up a simple white ceramic tray for the top of the toilet (we actually cut a thin strip off of one of our rubber rug-pads to form sort of a grippy buffer between the toilet and the tray to keep it “stuck” in place for the long haul). Then we used the tray to corral our favorite soap pump (which we waxed poetic about here) along with a cute little shell ball and a leafy green plant.
Although there was room for a soap dispenser on the back corner of the vanity behind the sink we thought it looked cuter a few inches to the right on top of the toilet- so while we know other people might want their soap pump right on the top of the vanity, we personally liked it on the tray (to each his own, right!). It really keeps the top of the sink uncluttered and sleek looking, and we always have the option to simply move the pump over to the sink if weeks of use make us rethink our nearby toilet-top placement.
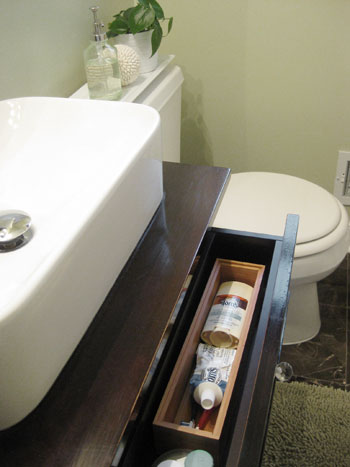
We also love that we were able to save the vanity’s drawer by shortening it (read more about the process of building the vanity here) so we can still fit a few staples in there: toothbrushes, toothpaste, and deodorant in a bamboo tray along with contact cases and John’s hair stuff.
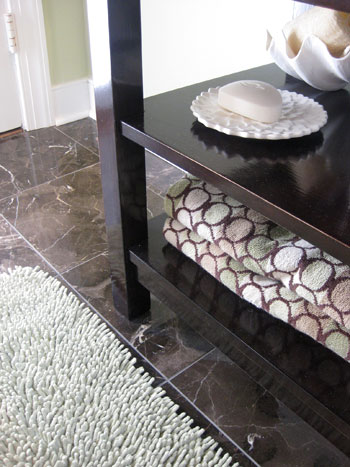
We love that our vanity also allows us to store a bunch of extra bath towels (picked up for just $6 each at TJ Maxx) along with a few cute decorative items like a loofah in a faux clam shell and a pretty scalloped plate with Dove soap on it for our guests (we use a bar of organic stuff in the shower, but when guests stay and want to shower/wash their face we can just mention that the soap under the sink is all theirs).
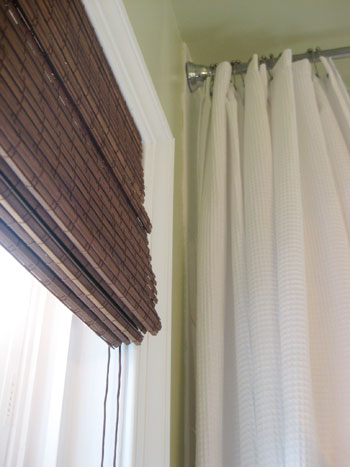
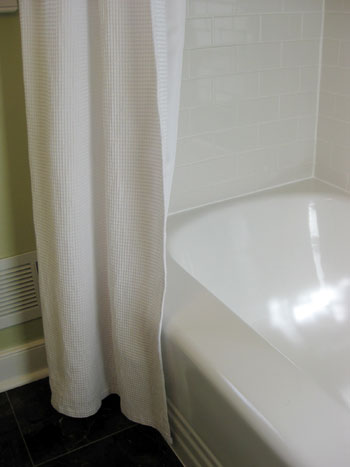
We also rehung our existing white waffle floor to ceiling shower curtain (read more about that project here) and really love that the shower tile now goes right up the ceiling to meet the bar for even more height and drama in the room. We’re so glad we spent the extra time tiling all the way up… the ceiling seriously feels over a foot taller. You’ll also notice that we snatched up a simple inside-mount bamboo blind from Home Depot for just $25. We love the texture and mocha color that it adds to tie in with the tones in the marble floor and even the vanity and the mirror.
At the very end of our renovation we also had our tub professionally reglazed for a completely convincing like-new look. The tub was actually already reglazed when we inherited it with the house and that treatment lasted over 12 years (we received the original paperwork from the first time the job was done years ago from the last owners). And this new reglazing job should last just as long even with everyday use. The key is finding the best professionals who use the best equipment and the best formulas for a long lasting finish that looks amazing (we call for references, look them up with the Better Business Bureau, etc).
As for why we opted to get ours reglazed instead of replacing it, we love the large, deep, original cast-iron tub. It was too great to send off to a landfill (and too heavy and expensive to try to remove & replace). We’re all about working with what we have, so because we couldn’t salvage the bathroom’s old tile, the least we could do was salvage the tub by refinishing it (to the tune of $399- oh and it would have only been $299 if our tub hadn’t already been reglazed for anyone out there looking for a cost estimate). Oh and because we’ve lived without putting shampoo bottles around the edge of the tub for years (since it was previously refinished and that’s not recommended) that’s not an adjustment for us at all when it comes to the newly reglazed finish. Note: we used this top rated family owned local company and are extremely pleased with their work.
Here’s a shot of John’s amazing tub to ceiling subway tile. Doesn’t it look like the work of a pro? I couldn’t be more proud of my man and his first attempt at tiling! We also opted to add a simple chrome shower caddy (although we debated adding white porcelain corner shelves or even creating an enclave for shampoo and soap before we tiled) since we don’t mind the look and love that it kept our first tiling job sweet and simple.
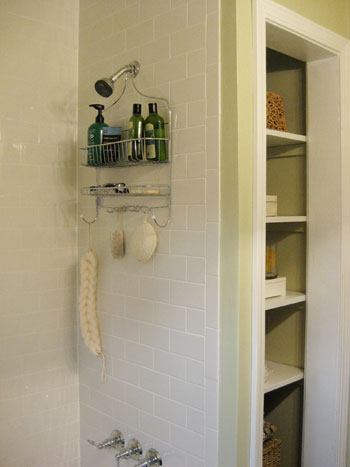
You might also notice that we replaced the shower fixtures with an insanely affordable $69 chrome set from Overstock since our old fixtures felt a bit too cottage-y with our new sink & faucet. The best part is that we Craigslisted our old fixtures (since they were only used for a few years and were in mint condition) and actually made back $30 of the $69 we spent on the new ones. Not bad, eh? Gotta love Craigslist. And on another note, how delicious does that twenty cent subway tile from Home Depot look up close? It’s so bright and shiny and clean looking- perfect for a tub surround. Mmm.
Oh and this is one project where we weren’t afraid to call in the pros. We paid $100 for an hour of an expert’s time so he could remove our old fixtures (they were soldered in place behind the wall) and put in our new ones (also soldering them in place for long-lasting durability and performance). It was totally worth it to avoid any potential plumbing issues down the line and after receiving many $300+ estimates for a simple shower-hardware switcheroo we found a great local plumbing company (Advanced Plumbing – 804.358.1616) who gave us a much more reasonable price- so we’ll definitely be using them again in the future.

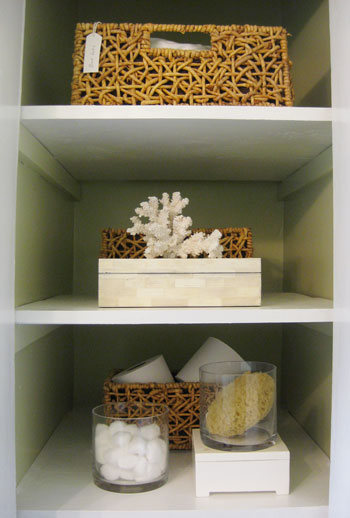
We also have our doorless linen closet (learn about how and why we removed the door a while back) which feels even more integrated into the room since we removed the threshold and tiled the floor of the closet (which used to be wood) so the entire bathroom now has seamless mocha stone squares underfoot. The difference really is amazing! It’s like it was always meant to be an open nook instead of a disparate linen closet. It’s a great place to store all of our extra towels, my hair dryer, my make-up bag, and other linen-closet stuff. But thanks to pretty boxes and bins (that we already had laying around) all the ugly stuff is hidden away for a clean and inviting look that’s organized and still super functional.
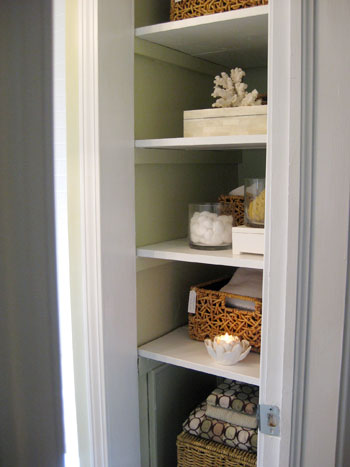
Oh and you might notice the tags on a few of those woven baskets (which we made back in the day). They keep us even more organized and John can’t claim he doesn’t know where anything is or fail to put things back in their places- gotta love a foolproof system that costs zero dollars and zero cents.
Here’s a shot of the other side of the bathroom with our new $6 TJ Maxx towels hanging on the back of the door (see a close-up of our personalized towel hooks here). We also hung a small towel bar next to the sink for easy hand-drying. We actually adapted that towel bar to fit our bathroom so stay tuned for a follow up post with those details from John…
It’s the little things that really make a room feel finished. It was amazing how adding some towels and a few accessories seemed to bring the entire space from “in-progress” to “thank goodness we’re done!” And those last-minute touches only seem to emphasize and complement the more major materials like the veiny marble flooring, the crisp white trim and the soft taupey-green walls. Oh and speaking of the details, we scored our bath mat for $9 on clearance at our local West Elm (which is sadly closing its doors but that meant everything was marked down like crazy). It adds so much softness to the dark stone floors and the cushy texture is so inviting for bare feet.
And now for the budget breakdown. First we should mention that we got two informal bathroom estimates from contractor friends of ours (so we would have a pro price to compare to our DIY price) and both of them came in right around 10K for the entire demolition, room rebuilding, floor and shower/tub tiling and vanity installation (which they knew would be harder than a more modern redo since our 50 year old house had mortar and metal-mesh behind those walls – not to mention some old floorboard rot).
Of course we knew that we could save a significant chunk of change by doing everything ourselves but we also knew that just because a job is DIY doesn’t make it free (thanks to materials and supplies) so we headed into our bathroom makeover assuming that we’d spend around 3K on everything from demo to the final stage of accessorizing- especially because we were replacing everything from the floors and the walls to the vanity and the tile. Needless to say we were thrilled when we crunched the numbers and found out we came in blissfully under budget! Here’s how it all shook out:
- Demo: $67 (for the rental of the demolition hammer and a few other simple supplies)
- Subway wall tiles: $101 (from Home Depot for 21 cents a pop)
- Marble floor tiles: $120 (thanks to an amazing clearance price of around $2.50 at Lowe’s)
- Grout, spacers, sealer, caulk: $70
- Drywall, furring strips, hardibacker, plywood, nails: $136
- HD truck rental to get the big stuff home: $19
- Trim, quarter-round & supplies: $100
- Thinset & notched trowel: $75
- Manual tile cutter: $15 (we went halvsies on it with John’s dad)
- Wet saw: borrowed from John’s dad
- Circular saw: borrowed from John’s dad
- Miter saw: borrowed from John’s dad
- Drywall mud, tape, sandpaper & spackle knives: already owned/borrowed from J’s dad
- Primer: $11 (Valspar Drywall Latex Based Primer)
- Paint: $26 (Olympic No-VOC paint color matched to Benjamin Moore Dune Grass)
- Vanity: $410 ($165 Crate & Barrel nightstand after coupon+ $119 Overstock sink + $109 Overstock faucet + $17 Low-VOC eco-varnish)
- Shower Fixtures: $69 set from Overstock + $100 installation
- Toilet: already purchased a few years back
- Professional tub reglazing: $399
- Towels: $30 from TJ Maxx
- Mirror: $27 on clearance from Target
- TP dispenser and towel bar: $37 from Target
- Art: $6 for the wood (we already owned the paint/Mod Podge & printed ’em ourselves)
- Bath mat: $9 on clearance from West Elm
- Blinds: $25 from Home Depot
- Other small accessories & miscellaneous expenses: $67
- GRAND TOTAL: $1819.00
* It definitely bears noting that we were fortunate enough to get to borrow some tools and a few other supplies from John’s dad (ex: the wet saw, circular saw, and miter saw). If you were to purchase these items they’d probably come in around $450 but you could also rent them for far less from places like Home Depot and True Value.
Yeah we’re pretty excited about that final number. There may or may not have been some geeky high-fives being thrown around when we finally hit “=” and saw it come up on the calculator. Not only did we come in over eight thousand dollars cheaper than a professional most likely would have charged, we even came in more than 1K under our original budget. Thank goodness for clearance tile and places like Overstock, Target, and TJ Maxx for affordable accessories. And boy were we ready to have our new and improved bathroom back in action after exactly 40 days sans shower (although showering at the gym and John’s sister’s house weren’t all that bad after you got used to it).
Of course it wasn’t 40 solid days of work, it was more like four and a half weekends and a few evenings spent gettin’ her done. And we can’t forget that Christmas and New Years were thrown into the mix so we spent quite a bit of time taking a break with family and friends. Here’s a more detailed timeline rundown:
- Pre-project planning & shopping: 5 hours or so
- Removal of toilet/vanity before demo: 2 hours
- Tile demo: 24 hours (two twelve hours days)
- Getting supplies and installing drywall, hardibacker and new plywood floor: 42 hours (three and a half twelve hours days) Note: this step can be substantially shorter in newer homes where you’re not dealing with furring strips to build out walls to match old mortar depths, for example John’s dad tackled this step alone at his house in less than one seven hour day.
- Tiling the shower surround: 17 hours (one seven hour day and two five hour evenings)
- Priming and painting walls: 2.5 hours
- Tiling the floor: 11 hours (one seven hour day and one four hour evening)
- Grouting & sealing the shower & floor: 3 hours
- Buying, cutting, installing & painting trim: 9 hours
- Reinstalling toilet: 30 minutes
- Building and installing the vanity: 5.5 hours
- Hanging the mirror, art, shower curtain, towel bars, etc: 1.5 hours
- GRAND TOTAL: 123 hours (which breaks down into a little over five weekends of work)
The bathroom was definitely the biggest DIY projects we’ve taken on to date. We had never demo’d tile, used a wet saw, tiled anything, or even used a miter saw before! So we love to point to our latest big makeover as proof that anyone can tackle something like this in their own home with a good amount of research and some tireless enthusiasm and determination (for more info on how to evaluate whether a project is too big to DIY, click here).
So we’ll leave you with a photo of our bathroom as it looked when we purchased our sweet old house three years ago. Can you believe the previous owners actually had gross matted carpet covering the old basketweave tile?
You’ve come a long way old friend.
Would we do it all over again? Heck yeah. We’re interested to see how much faster and more efficient we could be now that we’re not such newbies in so many areas of the bathroom renovation process. But would we start another bathroom remodel this weekend? That might be stretching it. While we love the pride and self-satisfaction that our big bathroom project elicited, we’d be flat out lying if we didn’t admit that it was hard work and we’re happy to take a little break from sledgehammer swinging and tile cutting for a little while. We’re not robots, ok? In fact, a nice long bath sounds about right after all that blood (some), sweat (lots) and tears (just a select few).
So what do you guys think? Is there anyone out there who recently took on a similar DIY bathroom project? Any first-time tilers who are about to take the plunge? We promise it’s not nearly as scary as thinking about it. Really, once you stop dreading the whole thing and dive in it’s kind of a relief to be “doing” instead of “anticipating.” Happy renovating to one and all!
Wanna read each detailed post about the big bathroom makeover? Check out Chapter One (Planning), Chapter Two (Demo), Chapter Three (Wall Reconstruction), a little teaser post, Chapter Four (Tiling), Chapter Five (Grouting), Chapter Six (Trim) and Chapter Seven (Building The Vanity).

Carla says
Oh goodness gracious you two…good for you!! I’m such a proud reader. And I gotta say that I’m jealous that I don’t have a handy husband. But I’m a semihandy wife.
That’s a lot of work though!!!
I’m looking for new flooring for our bathroom and I love the marble flooring!! Is it hard to install? Maybe we should hire someone for that! lol.
ANDREA says
The bathroom looks SO amazing!!! It all came together so nicely. Congrats!
I don’t know when you bought your marble flooring for the bathroom, but if you bought it less than 30 days ago, the price is now $1.49 per square foot. As I’m sure you know, Lowe’s does price matching and they will refund you the difference in cost. I know it is a long shot, but figured it may be worth mentioning for some extra savings! $2.50 per square foot is still an amazing deal though =)
-Andrea
YoungHouseLove says
Hey Andrea,
Thanks for the tip! We actually bought our tile more than 30 days ago (closer to 60, actually) so it seems like our $2.50 a tile deal is for the long haul. The great news is that we purchased a lot of extra tile just in case, and when we recently returned it with our receipt they honored the $2.50 cost and fully reimbursed us for every tile that we brought back! Plus all the mocha marble was gone from the clearance section just days after we snagged our boxes so we’re glad we didn’t wait for the price to drop further. Hope it helps! We were definitely happy to spend just over $100 for a marble floor so it’s kind of a fairy tale ending in our book! Sometimes we miss great deals because we wait too long and things are gone so we’re just so glad we snatched up that tile when we saw it!
xo,
s
Alison says
Love it! I cannot believe how little you spent! Congrats! I also wanted to point out that we have the exact same shower fixtures from Overstock!/
One tip – the tend to slowly unscrew after turning them on and off for a while, so you’ll have to twist the knobs occasionally to tighten them back up :)
staci z says
You did a beautiful job on this!! I am in awe of your budgeting skills! We just bought a new (to us) home that was built in 1948. We have the professionals there now, doing some major remodeling in the floor plan, but we’ll be finishing most of it ourselves!! (for example, they are framing and dry walling our new master bathroom, but we’ll be left to actually fill that bathroom in from the lighting to the floors). So glad you detailed your bathroom project for us to refer to time and again.
Jennifer says
Hi–I’m sure you’ve answered this somewhere, but where do you get your window shades? It seems like most of the discount stores have stopped carrying them.
Thanks, and love your blog!
YoungHouseLove says
All of the window shades in our house are from Walmart but since they’re having a recall we snagged our bathroom’s bamboo blind at Home Depot. They actually have a pretty good selection (along with Lowe’s). Hope it helps!
xo,
s
Liz says
Thanks for answering my tub question!
Wow I still can’t believe the transformation of your bathroom! I’ve come back a few times today just to keep looking at all the photos! You two are really an inspiration, and I can’t wait to be a homeowner :)
Kendall says
It just looks amazing! I’ve been checking back every day for the big reveal, but missed yesterday. Squealed when I saw it today! Loved all the play-by-plays along the way. I enjoy your blog so much. Think I might just go buy a miter saw now….yep….gonna do it!
Krista Haws says
You two did a great job!!! I can’t believe you did it for such a low cost too! Congratulations and I bet it is wonderful to finally have a nice, new bathroom! By the way, we just got our first dog, a miniature dachshund named Myles and he wanted to say “hi buddy” to Berger!!!!
Morgan says
Wow and wow!! Beautiful!
We are getting ready to tackle our bathroom makeover (and hopefully change a 1930’s hall bathroom into the master bath) and you guys have done an incredible job! Thank you for sharing and for the inspiration!!
Morgan
Cristina says
ups.. by mistake I posted my comment in the frosting project post instead of here…
I wanted to say : great great great great great great job!
Rita says
It’s amazing!
I love it… good job!
Would you like to come to Italy for my old bath? ;-)
Rita
Kim says
One word…Amazing!
Eileen says
This is lovely. You guys are wise! Saving $$ and building equity by improving your home yourselves. We have a 1930’s cottage & are ready to give it a modern look. Got any recommendations on what to do with our old antique white floor tiles? Are you re-purposing yours? Is there a market for re-sale?
YoungHouseLove says
Hey Eileen,
Unfortunately since all of our tiles were laid in a thick bed of mortar they couldn’t be removed without being completely destroyed (many of them were cracked or discolored anyway so we never intended on selling or even donating them) but perhaps you can see how your floor tiles come up and go from there. If they come out cleanly and still look to be in good shape you could try listing them on Craigslist or eBay or even donating them for a write off to a place like The Habitat For Humanity ReStore. Hope it helps!
xo,
s
Laurie says
It is beautiful! You did an amazing job, way to go!
Janet aka:TheHeaddog says
Oh how I wished I had your motivation…you both deserve an outstanding round of applause for this gorgeous redo. I simply can’t wait to see what is coming next.
Christin says
Your bathroom looks absolutely incredible. Congratulations on finishing it! You guys really did a TON of work on it – I’m super impressed. If not for you telling us this was your first time gutting and tiling and such – I would’ve thought this was done by experienced pros. You guys have such a talent for vision; to see not what a space is but what it can be. Thanks for sharing your journey with all us readers – the pictures are just stunning. :)
Mary says
No hand-held shower nozzle? I’m surprised. They’re great for rinsing down shower walls. And rinsing kids hair after their bath.
YoungHouseLove says
Hey Mary,
Not for now, but that’s an easy switcheroo when we have a gaggle of mobile kiddos and find a need for one! Thanks for the tip.
xo,
s
Jennifer F says
Love it…so sleek and clean. Where did you get your baskets? And where did you get the cute white platter that you placed on top of your toilet? Im searching for a way to organize our bathroom countertop and linen closets and love what you did. Also, how do you come up with “decor” for a bathroom…like the glass canisters with soap or a loofah in it. I feel like we have so much bathroom junk as it is, I don’t have room to make it look pretty, nevermind add decorative items. Thanks!
YoungHouseLove says
Hey Jennifer F,
The baskets were ours from a while back (originally purchased at the sadly departed Linens N’ Things, but we’ve seen similar versions at Michael’s, Ikea, Target, etc) and the white platter on top of the toilet hails from Tagret (it was included under the miscellaneous accessory line item in our breakdown). As for how we come up with decor for the bathroom, we just use what we have (the glass cylinder vases were leftover from our backyard wedding) and try to balance form and function so our closet is full of hidden storage and a few easy-on-the-eyes accessories.
Almost everything that we use on a daily basis (toothbrushes, toothpaste, deodorant, contact cases and hair stuff) are easily accessed in the vanity drawer, so things tucked into boxes in the linen closet are less heavily used (think extra hand towels, my flat-iron, a thermometer and some cough drops, etc). That way it’s worth adding some pretty accessories since it’s not like we have to move them every morning or evening to get to things stored in those boxes and bins in the linen closet (but it’s still relatively simple to do from time to time). In the end, paring down things in your bathroom is probably the answer to making room for a bit of “pretty” in there, so you might want to check out this post all about how we keep things simple.
https://www.younghouselove.com/2009/01/the-simple-life/
Hope it helps!
xo,
s
Brenda says
Love the new bathroom! Nice work! I really like how you guys give the break down of the cost, it makes it not so scary to realize you can do things on your own. I love the mirror, I actually just got the same one for our bedroom at Targert, even cheaper than you did I must say :o). Again, wonderful job, all the hard work paid off!!
CSB says
Hey just an FYI, the phone number you link for “Advanced Plumbing” (Justin, who is awesome), is not the same as the website you list, AdvanTAGE plumbing. Just FYI. IIRC, Justin doesn’t have a website, even though Google lists the website to some place in Georgia next to his phone number.
YoungHouseLove says
Thanks for the heads up CSB! We meant to delete that incorrect link after we added the direct phone number (before publishing the post) but forgot. No worries, it’s all fixed now thanks to your help!
xo,
s
Mike and McGee says
Love how the vanity turned out! Very nice! Thanks as well for sharing the cost breakdown. I have to admit that from a personal taste perspective, I’m not a huge fan of the brown marble floor tiles, but overall, the room looks great.
onepianomom says
It looks wonderful. It’s really nice the way you broke down the time you spent on the project as well as the budget.
Kelly says
Beautiful!! I love it!! Great job as always!!
Katharine says
I LOVE it! It came together beautifully, as always. :)
Sarah @ Dream In Domestic says
Holy cow! You two are INCREDIBLE! Not only does the bathroom look amazing but just thinking about the value you’ve added to your house (even though I know you aren’t planning on moving any time soon) by saving so much and doing things yourself makes me so ready to follow in your footsteps once I have a place of my own. I love every single thing you did and think it looks just as good as professionals could do. Man – just when I think I can’t be surprised by your money saving techniques you blow me away again. Great job, youngsters!
Kate says
Sherry,
Shower head question for you…
Did you look at low flow options? I’ve just started the search for a new shower faucet set and I’d like to switch to something that not only looks better, but saves water. It doesn’t seem that Home Depot (online) has that as an option. Is that because all new shower heads are “low-flow” (if so, there has to be some that are better)? Do you know how many gpm your new shower head uses? Any information you have would be helpful. Thanks!
And…your bathroom looks amazing!! You both must feel so proud after accomplishing such a huge project. Way to go!
YoungHouseLove says
Hey Kate,
Yup, many of the current shower heads that are being manufactured are naturally a lot more “low-flow” and eco-friendly than the ones of the past. Of course you’re right that there are even more intense systems that you can install to further slow the flow (some can even be installed behind the wall of the shower) and there must be some even lower flow options that can be attached right to the shower nozzle but we haven’t looked into those options quite yet since we’re sure ours is pretty low flow to begin with (although we’re definitely interested in upgrading someday). We’re afraid that we don’t have any idea how many gpms our existing shower head uses but we do know we’re big fans of taking quick showers and turning off the water when we brush our teeth so we’re certainly interested in saving as much water as possible. Maybe that’s a future project for another day! Let us know if you find anything you love so we can check it out!
xo,
s
UPDATE: This showerhead is extremely similar to ours (looks wise and price wise) and it’s listed as “super low flow” and also states that it “puts out 1.5gpms” – so we would assume that ours is either the same exact thing or something very very similar. Hope it helps!
Christine says
Hey Sherry + John,
Just wondering what John did to prepare for his first job of tiling the bathroom? We really want to pull out the ugly vinyl flooring in our downstairs bath but we’ve never done anything like this! Any books, tutorials, etc you can recommend for first-time tilers?
Thanks!
-Christine
YoungHouseLove says
Hey Christine,
Check out John’s original post about that stage of the project (complete with a few helpful reference links at the end): https://www.younghouselove.com/2010/01/tackling-the-bathroom-chapter-four/
Hope it helps!
xo,
s
Liza says
I don’t know if this has been addressed but what type of texture do you put over the new drywall? Oh… And great job! And don worry, the simple elegance of your home will be maintainable even when the little one arrives (I have 3 and people would never know, and yes we do arts crafts runny and jumping and all things that kids do!)
YoungHouseLove says
Hey Liza,
We actually didn’t texturize our walls at all (all of the other walls in the house are smooth as well) so we just taped and mudded our drywall seams and smoothed everything out with a nice sanding. Then it was time for primer and paint. Hope it helps! And of course it’s great to hear that you think our house will survive the arrival of little ones- we hope so too!
xo,
s
caitlin says
Ha! You guys scared the crap out of me with this reveal! I live in Astoria, Queens and really thought my mind was playing tricks on me: “How did they know!!!!”
Anyway, the bathroom looks AMAZING!!!!
Candy from Candied Fabrics says
Fantastic job y’all! What a beautiful space! One of our first big renos was our 2nd bathroom – many many years ago (12 I think?) We didn’t have the major demolition you did – instead of tile on the walls there were 1 x 6 planks stained dark brown set on the diagonal…don’t ask me WHAT the previous owners were thinking! We were so lucky that we already had a working full bath – but I remember the joy when we’d finished our 1st tile job! Beautiful cobalt blue tiles with WHITE grout – I remember being very worried when the tile was up but not grouted – I could see every little imperfection in less than perfect alignment. I was amazed at how much the grouting minimized those flaws, you would think it’s the opposite!
We’ve long since moved away from that house, but it was our 1st big redo, and gave us the courage to redo our kitchen in house # 2!
Struggler says
Thank you so much for including the time as well as cost breakdown… for those of us who bit the bullet and paid more like $10k for our bathroom re-do, it’s comforting to know about the “sweat-equity” you have clearly invested. And personally speaking, my marriage might not have survived a DIY bathroom attempt :)
Congratulations on a beautiful room, your choices are lovely and I agree that the accessories are the icing on the cake.
Struggler says
PS, regarding tiling, I did try it once and swore never again. My attempt to do just a very small part of my London kitchen involved way too many tears and trauma. It didn’t help that Beloved Husband had gone off on a 4-month jaunt to California and was living the high life while I grappled with the project :)
Lesson learned: know your limits!
Stevie says
Hi! I just started reading your blog the other day and I LOVE it! Your wedding looked gorgeous and so unique, by the way.
This bathroom post is exactly what I’ve been searching for. My husband and I are planning to redo our bathroom in the next few months and our layout is identical to yours. Thanks so much for the pictures and breakdown on cost/supplies. This will be so helpful to us!!
Susan says
UNREAL!!! I hope to use tons of your ideas to remodel our bathroom soon!
FrankiJo Tran says
I LOVE your bathroom and I absolutely love the color on the walls. I was looking for a soft green for our family room and I think I’m going to steal your color! Only question, why did you have the Benjamin Moore color tinted in the Olympic paint? Is it better paint, or cheaper, but just as good? Was just curious. I definately am noticing that different paints are better than others and just wanted to know your thoughts. Sorry if this is a duplicate question. Absolutely beautiful bathroom!
YoungHouseLove says
Hey FrankiJo,
Good question! Benjamin Moore paint is definitely high quality stuff, but we wanted something with less fumes since I’m prego (hence the idea of color matching it to Olympic’s super affordable and readily available No-VOC line). Of course adding color to the No-VOC base resulted in a Lo-VOC end product, but it’s still better than the less eco stock Benjamin Moore option (which is also a lot pricier and not available at Home Depot where we usually like to snag our paint). Olympic definitely isn’t low quality but it’s a bit of a compromise from the superior industry-known Benjamin Moore formula. The good news is that in the end we found that two thin and even coats of the Olympic stuff provided excellent coverage and we’re really happy with the outcome. Hope it helps!
xo,
s
Susie @ Maddie's Nest says
Wow, this transformation is nothing short of amazing. I am so in awe of people who can do things themselves. Spectacular!
Jamie says
What type of soap and shampoo is that in your caddy?
YoungHouseLove says
Hey Jamie,
The shampoo and conditioner are the peppermint kind from Avalon Organics, the bar of soap is Dr. Bronner’s (almond scented), and the body wash is also Dr. Bronner’s. You can pick them all up at Target in the organic aisle with the Burt’s Bee’s stuff. Hope it helps!
xo,
s
FrankiJo Tran says
Thank you! I have never used Benjamin Moore or Olympic, so I was curious what you thought. Thank you for the quick reply! That totally helps and glad to hear the bean is protected. :) I love your site and can’t wait to see what you do with the nursery.
Meleah says
Wow! That bathroom closet doesn’t look anything like ours! Our bathroom closet scene could contend with the shower scene from Psycho for gruesomeness! Love your bathroom, BTW!
Amanda says
Your new bathroom is so inspiring! My husband and I just moved into out 1st house last April and have I got some wheels turning for our bathroom (and rest of the house)now, Let me tell you! Beau-ti-ful!
Can’t wait to see what you think of next!
Amanda
Christy says
Beautiful bathroom! I love it. Can’t believe that was your first bathroom remodel!!! I just painted a room in our house in Valspar’s Garden Fairy (have you seen it?). Curious how that compares to BM’s Dune Grass? Mine might be a bit more yellowy green than beigy green.
YoungHouseLove says
Hey Christy,
We actually haven’t seen Valspar’s Garden Fairy but it would be interesting to compare them! Definitely let us know if you get your hands on a Dune Grass swatch and notice anything interesting!
xo,
s
AD says
We are in the process of remodeling our guest bathroom and are “copying” a lot of your design, we just love it so much! Just a quick question, did you paint the ceiling the same color as the walls or is it white? Thanks and keep up the good work!
YoungHouseLove says
Yup, we went with the same color to keep things open and boundary-less since it’s such a small space and such a light color. Hope it helps!
xo,
s
Karen says
I hope I find u feeling well today. Quick question I didn’t realize u painted the ceiling same as wall in bathroom. My husband is soooo against doing that {old school I guess}… Do u really think it opens up the room? My bath that i am doing over is currently is 6×7 Your color scheme is an ispiration to me BUT I have to keep my basket weave floor tile black and white tile and white wall tile… I hope I can pull this off. I will go with a sand white maybe a little darker. Do u recomend a wall color?
YoungHouseLove says
Painted ceilings are really all about personal preference, so your husband is definitely entitled to his opinion. We obviously believe that it looks best in our space since we did it (if it closed in the room we certainly wouldn’t have made the choice). We’ve seen firsthand that as long as you’re using a subtle and soft color (nothing too bright or dark), painting the ceiling the same color as the walls actually blurs the boundaries of a room so it feels more open and expansive (when the ceiling is a different color it’s so defined that the room’s boundaries are much more obvious to the eye, which can make it feel more closed in and less open.
As for Sand White, that’s a great color for your tile situation and we also would recommend checking out Water Chestnut by Glidden or even Quiet Light by Benjamin Moore (a soft blue-gray that would also looks gorgeous with your tile). Hope it helps!
xo,
s
Peggy says
Thank you so much for sharing the whole process you went through! My husband and I are in the planning stages of reno for our bathroom and I learned so much reading about yours. I’d have never thought to measure the tile cuts needed that way and the resources you listed are so helpful.
Your bathroom turned out BEAUTIFULLY! It’s modern and yet classic, really nice job! (now I know where to turn to when I try to convince my hubby that we need subway tiles to the ceiling)
Rachel says
It is beautiful. I’m so jealous. You should see my bathroom. It’s scary.
karen says
I got your suggestion on the Quiet light color I checked It out I’m not sure if theirs enough color…The hallway leading to bathroom is green large print [beautiful, it’s staying] I didn;t want to repeat green in the bathroom [I have a light green in family room] so I am trying to stay with water chestnut, or Dapper tan, both neaturals.. I just don’t want the colors to clash w/the black and white tile floor? Did I mention my bath is like yours was but my tile looks like it was installed yesterday[lucky] and the wall tile goes 3/4 the way up with a black cap and black thin stripe going around the whole room.. The vanity I picked out is Espresso in color then I would like to have some sage green accesories!Not sure about a mirror/medicine chest. U and your husband do such a wonderful job that any suggestions you may have are GREATLY appreciated…
Take care kay
YoungHouseLove says
Good luck with everything! Sticking with the Water Chestnut or Dapper Tan sounds like a lovely plan!
xo,
s
Becca says
Beautiful job you two! Do you know if reglazing tile flooring is similar to reglazing a tub? How long did it take? Our kitchen floor is white tile and there are scratches and chips on all the tile, it constantly looks dirty and dingy. We don’t want to pay a lot to have it retiled and would have to uproot our kitchen to do so. I wonder if this is a possible alternative.
YoungHouseLove says
Hey Becca,
We actually have heard that other than reglazing sinks and bathtubs (and sometimes vertical wall tile), reglazing any type of floor or counter isn’t recommended. This is because it gets a ton more wear and tear (people wear shoes, you drop heavy objects, etc- it’s all much more intense than what happens in a tub). We just wouldn’t want you to pay someone for something that will be cracking and bubbling within about a month or so. Hope it helps!
xo,
s
Musings of a Housewife says
I absolutely love this. I’ll be linking over to it this weekend. We have done a few tiling jobs, and you’re right, it’s really not that hard. And it improves a place SO much.
TJ says
Lovely bathroom! It’s like seeing into the future of my bathroom! Mine is gutted down to the studs and has the same 1960 layout as yours, closet included. The new subfloor goes down this weekend-yay! I was just going to put some neutral vinyl flooring down but your tile is very inspiring. Did you put or think about putting a heating system underneath it? Why or why not?
TJ
YoungHouseLove says
Hey TJ,
We did think about heated floors but unfortunately our limited budget and super tight timeline had us ruling them out this time around. Maybe someday we’ll have luxuriously amazing heated floors (under our whole house while we’re at it- since we’re fantasizing, why not go big here?!).
xo,
s
Cari says
I’m catching up on your posts and love the new bathroom!
Question, I see that you use a lot of the same organic health and beauty products that I use (yay for less junk), do you also use Dr. Bronner’s bar soap? I haven’t tried the body wash yet but I love the Tea Tree bar soap for my face and body.
YoungHouseLove says
Yup, we love it! Hope it helps.
xo,
s