Truth: Sherry was oddly into fan hunting and the idea of adding two new fans to keep our freshly-opened sunroom cool (and to create a nice mosquito-warding-off current while we’re out there relaxing), but I was NOT excited about said fans.
We actually have quite a bit of practice removing fans (I submit to you Exhibits A, B and C) – and just look at how happy it made me.
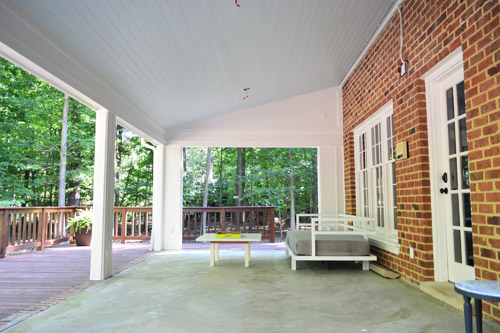
Generally we’ve had 7.5 to 8′ ceilings in most rooms with them, and being 6′ tall, I’ve always felt like they were low-hanging oversized pinwheels that were one inch shy of giving me a haircut – although we’re suckers for function, so we’ve always kept a few around wherever they were especially useful (we kept them in the sunroom and den of our first house, and the sunroom and guest room of our second house). In other words, a few got to stick around, but we’re not really in the practice of adding to our total-house-fan-number, if you know what I mean.
This is actually the first time we’re increasing our count, by going from one out here to two thanks to this wiring that we had done after we ripped out the ceiling. We knew two fans would more efficiently cool the space (and make mosquitoes say “ain’t nobody got time for that”) and thanks to the freshly lofted ceilings we hoped the fans wouldn’t feel too low-hanging or heavy. But the thought of installing new fans STILL wasn’t something that my brain could get excited about. So it settled on assuming the task would be difficult and the results would be underwhelming. Awesome attitude, self.
After looking everywhere from craigslist and thrift stores (it was hard to find two of the same kind secondhand) to more obvious places like Lowe’s and Home Depot, we settled on this model from Home Depot (which we found to have a better fan selection in general, by the way).
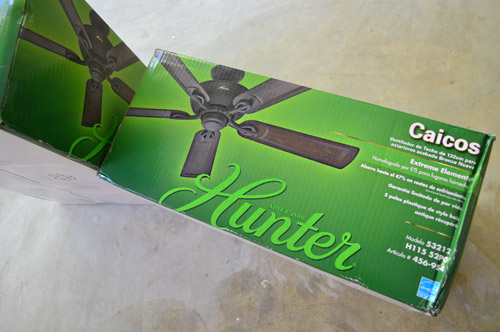
They were $119 each, plus a $10 downrod that we had to add to each of them since our ceiling is lofted. You may be surprised that we didn’t buy white fans, but with so much lightness in the ceiling area already we thought something dark would add some nice contrast and play off the dark floors (once they’re tiled).
Beyond just looks, we also had to be sure to buy something that was safe for use outdoors and that could be installed on an angled ceiling.
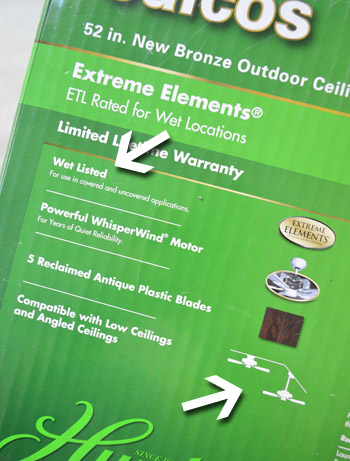
They’re not shown here on the box, but we also checked with the store associate to make sure it was compatible with light kits (check) and remote controls (double check) in case we wanted to add either of those things down the line (we’re currently planning to add sconces on the columns around the room for softer eye-level lighting instead).
Before diving into installing each one – a task I was certain would involve a few missteps and lots of upper body strain – we made sure the power was off, both at the breaker and the light switch. And then Sherry still insisted on triple-checking things with our little live current tester (sometimes outdoor wiring can be tricky – for example in our first house a few outdoor things got power from a shed way back in the woods).

Before I go further, I should be clear that Hunter doesn’t know us from Adam and certainly isn’t in cahoots with us or this post. So the gushing I’m about to do about their instructions is purely because, having dealt with plenty of sub-par instruction books in my day, it makes me downright joyful when I encounter a manual that’s well done and easy to follow (like the one for our Nest thermostats). For example, this manual included a section for double-checking that your ceilings aren’t too angled for the fan to be compatible. They even marked the corner of the page so you could fold it down and hold it against your ceiling to check the angle and be sure. So simple. So smart. Maybe this install wouldn’t be so bad after all?
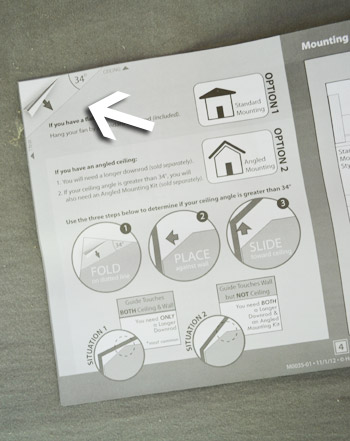
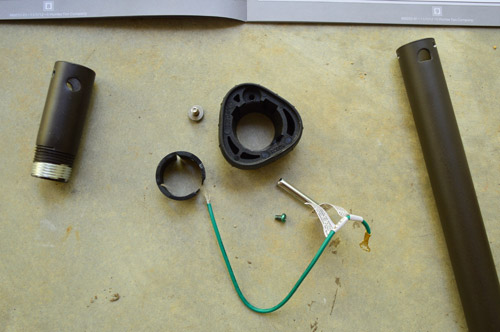
Another little ingenious touch: the hardware was separated into different bags and labeled by step with a unique symbol that the manual referenced whenever it was time for that particular batch of parts to be used.
![]()
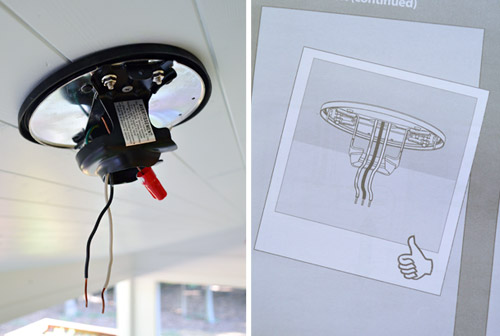
Obviously you’ll want to consult the installation instructions for your fan since they can vary, but for anyone else who is tackling a fan installation, we wanted to cover the general process for you – especially since it was something we had never done before (and I was convinced would suck). Our first task was to assemble and install the mounting bracket to the fixture box. This is basically what secures the fan to the fixture box, which needs to be braced properly for the weight of a fan. The good news was that the electricians took care of that bracing step for us when they added the two fixture boxes, so we just needed to secure the top of the fan to our already braced box.
I also liked how the instructions gave you a thumbs up at the end of each step. Nothing like a big confidence boost from a little hand icon.
The next part was actually what I was most anxious about – adding the downrod. This was where we had to modify the parts included with the fan (i.e. sub out that nubby rod with the longer one) so that ours would drop down from the ceiling a bit. For some reason I assumed this would be the point I’d screw up.
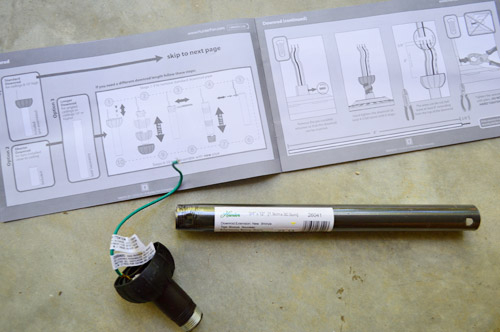
But once again, the instructions made it error proof. Basically we just removed a couple of screws and stuff from the rod they included…
…and reattached them to our new one.
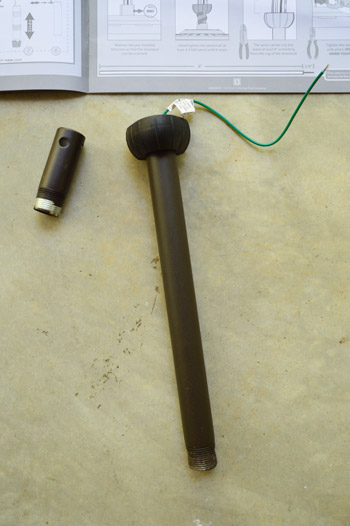
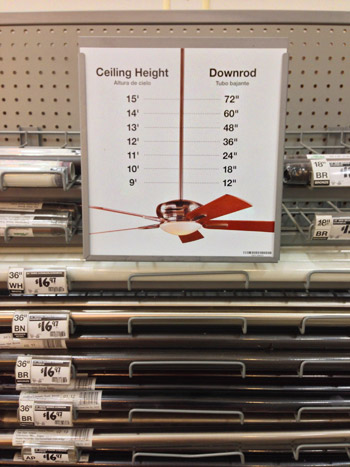
Oh, and if you’re wondering how we knew what sized downrod to buy: Home Depot had a guide on display along with all of the differently sized rods. Our ceiling was a little over 9ft at that point, so we got the 12″ rod.
The fan had tons of extra wire, so it was just a matter of threading it up through the longer rod.
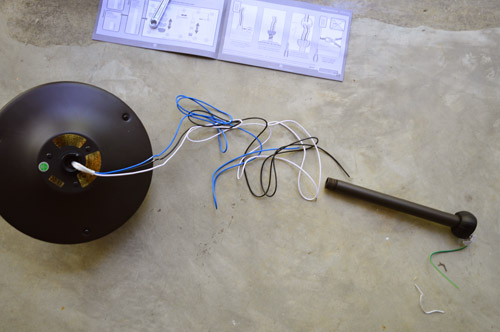
Then I attached the rod to the fan (it twisted in and got held in place by a screw) and I clipped most of the excess wire off.
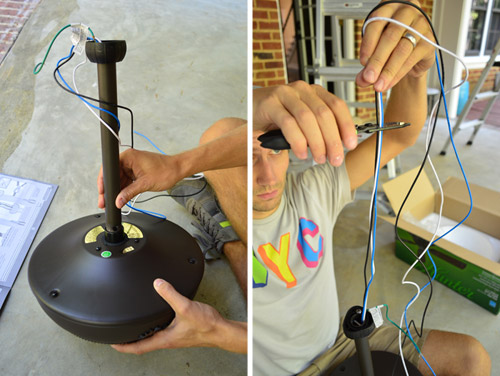
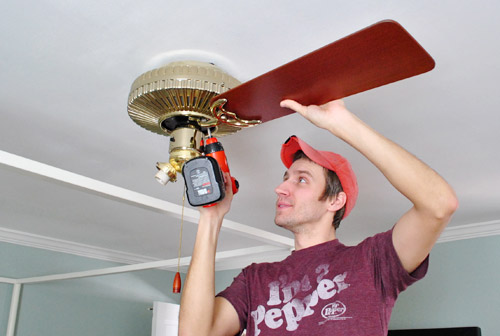
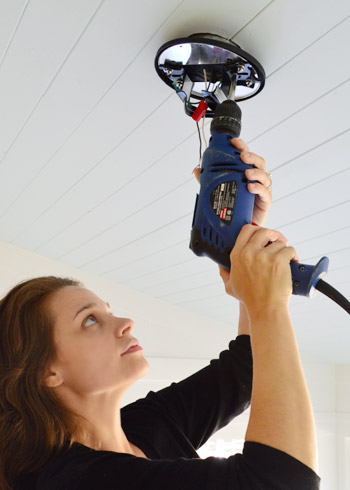
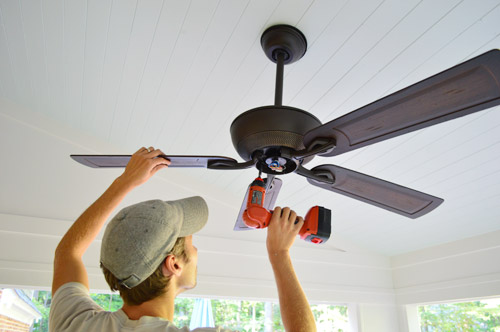
Even this part – where I expected to be exhausted by meager upper body strength while holding the heavy fan up for hours minutes to get it in place – was no big deal at all. The little ball at the top of the rod slid into the mounting bracket with virtually no effort and within seconds my arms were free. Seriously, it was a motion that took ten seconds tops. Well, except for the added time that was required to pose for this picture (it took me a few tries to nail the “focused, but not too strained” look that I’m sporting).
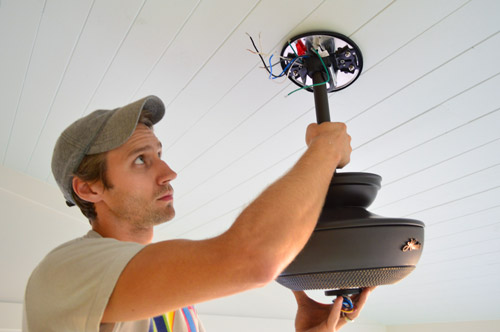
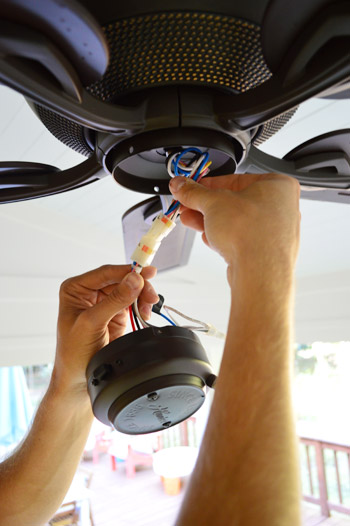
With the mounting bracket doing the work of holding the fan up, it didn’t strain me at all to connect the wires (and the instructions were very clear about what color went where).
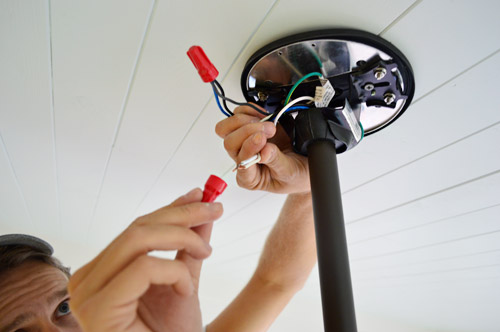
And then while I screwed the canopy in place…
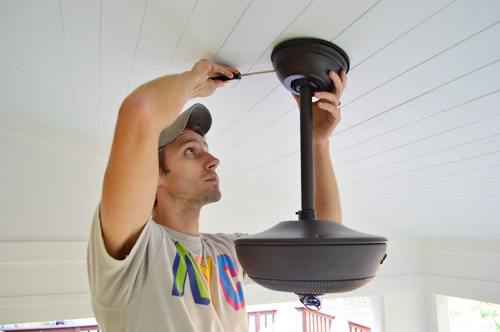
… Sherry got the fan blades prepped by adding rubber washers and screwing them into each of the five metal arms.
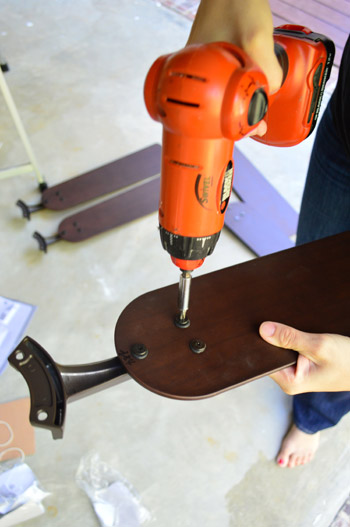
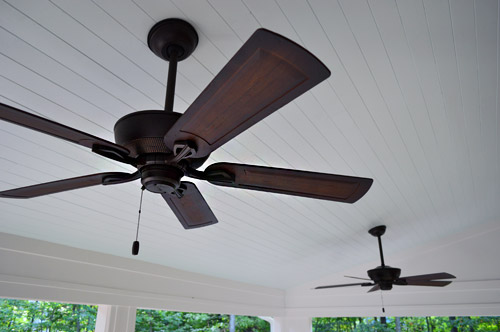
Then up those went, finally making this fan look like a fan.
Last but not least was installing the cap at the base which is where a light kit could go eventually, if we ever decide we want one (hence all of the wires that get tucked away in there).
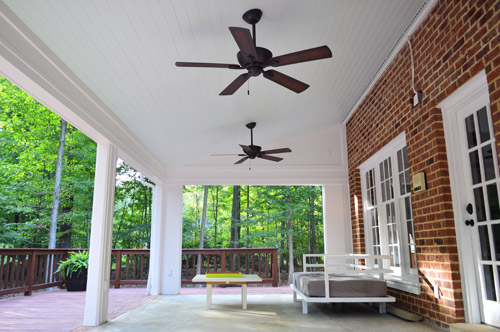
As much as we wanted to sit back and celebrate our first-fan-ever-installed victory, there was the minor detail of getting the second one up. The first one took us a bit longer because of instruction reading and photo taking, but I still think we got both fans up in about 90 minutes. Zero missteps. Minimal arm strain.

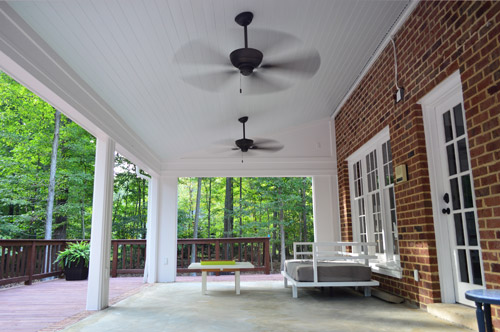
And, here comes the real shocker, we LOVE them. I didn’t know my heart had such a great capacity for loving fans, but I couldn’t stop smiling once they went up. Maybe it was knowing that it marked the end of working above my head for a while? Or maybe it was just how finished they made the room look (assuming you kinda held your hand over the lower half of this photo). But seriously, picture them with the dark slate-like floors that we’re putting in. Not bad, eh?
I think they’re just one of those “moments” in DIY that really hit home how far a room has come. From this…
…to now this.
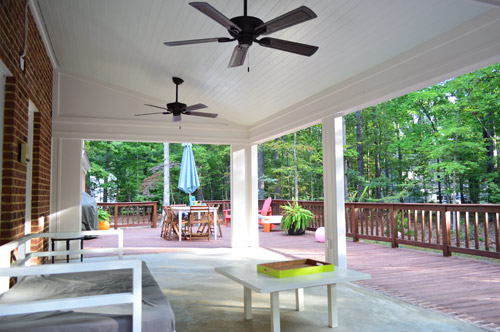
We’re also relieved that our instinct to go dark with the fans was one that were really happy with. Sunny spaces like this can usually use some contrast, and these fans are finally giving the light blue ceiling and all of that white trim a little pow, if you know what I mean.
Now, if only we had finished this project about a month ago when their cooling action was actually still needed. Oh well, at least it gives us something to look forward to for next year.
New truth: I’m crazy excited to have our fans installed in the sunroom.
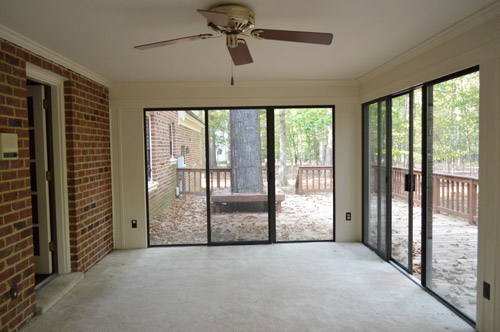
Secondary truth: I have no idea why the ceiling looks so light/not-blue in these photos (see the first picture of this post for a more accurate color depiction). Or just ignore the ceiling and keep oogling the fans.

Wrenaria says
For some reason, my brain had already assumed you were getting dark fans for this space, so my brain thanks you for not confusing it it by picking white. ;)
Also they look fantastic. This “room” is coming along very nicely.
Joe Faraoni says
Man, that looks good. Nice work.
As for your ceiling… I can tell its blue but looks like you are getting a lot of reflection from your red deck and the brick. Compare the white on the windows to the ceiling and you can see the difference.
Also, since you mentioned the thermostat, wondering your thoughts on the new Nest Protect –> http://nest.com/smoke-co-alarm/life-with-nest-protect/
I ordered one for our place as everything that was left from the purchase of our home was garbage.
Be good.
YoungHouseLove says
We’re excited about the new Nest product! Sounds cool, although not as cool as their thermostats (probably just can’t be that fancy about things like smoke/alarms) but we definitely will be checking them out.
-John
Lindsay James says
Thank you for helping to convince me that replacing our new (to us) house’s existing 2 dangerous fans might not be a total disaster!
We have one in the breakfast room which has no box (really?!) and wobbles all over the place – our home Inspector dryly said not to use it at all in case of injury. The one in the sunroom is set so low down that decapitation is a real possibility every time I walk out there.
Knowing that HD has a guide as to rod hanging length as well as a brand which has fab instructions included is really cheering me up. Thank you again!
Beth R says
Love your Sweet Brown reference! Ain’t nobody got time for that!
Bridey says
Wow. I am seriously crushing on your porch!! The fans pull the whole room together. Staring out the window at my back porch with a glint in my eye as I type…
Wilma says
I love the box: “antique reclaimed plastic”. hee
Looks great!
YoungHouseLove says
Isn’t that hilarious! A few other people noticed that (I hadn’t) but seriously… what does that mean?!
xo
s
Sarah | The Cyclist's Wife says
Wow, that space is really looking great! Nice work!
GreenInOC says
The fans look fantastic and the contrast is delicious!
John, have you read about Nest’s latest product? It sounds really cool:
http://www.forbes.com/sites/aarontilley/2013/10/08/like-the-evolution-of-apples-ipod-and-iphone-nest-is-building-one-product-at-a-time
YoungHouseLove says
Yes, it looks very interesting. I can’t wait to check it out.
-John
Kristen says
You know those tv showsfeaturing places in warm climates that have a really airy, beachy indoor/outdoor space, usually where celebrities spend their vacations? I feel like your sunroom has that sort of vibe going on. Looks great!
YoungHouseLove says
Aw thanks Kristen!
xo
s
Emily @ Life on Food says
I love the look of the darker fans in this space
Natalie says
I love them! As always, thanks for the step-by-step tutorial. So glad you went with the dark fans instead of white ones – they looks so great! :)
Crystal says
I’ll admit I wasn’t sold initially on converting the sunroom to a covered porch. But with the few steps you’ve already taken I’m finally starting to see your end vision and think it will be a great space.
Cara says
Daily reader but rarely comment – but had to come by to tell you that I just LOVE what you’ve done with this space! The transformation is already awesome and I have a feeling it’s going to become one of your favorite spaces in the entire house. Well done!
Have you addressed your furniture plans for the space? Dying to hear what you have in mind and hoping we don’t have to wait a long time for it. I can’t wait to see this all finished (but could also see why you might not be in a rush since we’re entering in the colder seasons).
YoungHouseLove says
Thanks so much Cara! I think we’ll slowly furnish it with outdoor pieces (hopefully a lounging area with a loveseat or sectional or sofa, maybe in wicker, along with other outdoor furnishings like occasional tables and some armchairs). I have no idea what the layout will be since I think it depends what we find!
xo
s
Meredith says
So funny that you guys typically aren’t fan fans – we install them left and right at our house. I love looking at pictures of rooms with only light fixtures, but they make me hot, haha. Maybe the problem has been with the outdated-ness of all the fans you’ve removed?
So excited to see your finished space! I’ll let you know when to expect me for iced tea. ;)
YoungHouseLove says
Haha! Sounds like a plan!
xo
s
Carli says
I’m not typically a fan of fans either, but ooooooeeee! Those look great! Dark was definitely the right choice. Good work you guys!
Michelle says
Wow! What a huge difference. Job well done you guys. Do the previous owners know all the work you have put into the house?
YoungHouseLove says
Our buyers agent told their sellers agent what we do and how we blog about it, but we haven’t heard from the previous owners. We did after a while at our first and second house though, so we’d love to!
xo
s
Christa @ BrownSugarToast says
WooooooooW! Love seeing the before/in progress pics! Crazy how much things have changed over just a few months! Great job, guys! Can’t wait to see the finished product – but in the meantime, I think this looks pretty great already!!
Connie says
All instruction manuals should be written as clearly as you fan’s manual but most companies don’t want to spend the money or take the necessary time for good documentation, which is too bad because Hunter likely sold fans on the basis of your post today.
Wendy R says
I think you can tell what part of the country people live in by looking at their light fixtures. Here in Texas, ceiling fans are selling points when buying a home – haha! We’ve got one in almost every room. There are lots of prettier lights I’d love to replace them with, but it’s just too hot to not have a ceiling fan.
Cindy says
We’ll be putting in 2 new ceiling fans on our patio too, which is a large space like yours. We’re looking for fans which move a lot of air. How do you feel that yours do? I like how your fans look.
YoungHouseLove says
They do especially well on the high setting if you’re looking to move a lot of air! We’re very happy with them!
xo
s
Steph says
This looks so great! I can’t wait until you put the floor in. :)
And I feel you on the fan-fear, John. I’m 5’10” and I used to hit my hand on the fan in my bedroom all. the. time. if I lifted my arms too close to it. Never hit my head but it wasn’t fun.
Mia says
Fans are a great accessory to the space; surprised but totally agree that the bronze was the better choice. And John, HD would definitely be able to tell you from Adam–he wouldn’t have had a belly button!
YoungHouseLove says
Ha!
xo
s
Heather @ Forsythia + Oak says
I think the dark fans look nice against all the lightness in the room! If you guys added lighting down the road, would it need to be a specific outdoor brand?
YoungHouseLove says
Yup, we’re going to need outdoor safe sconces, but those are pretty easy to find at Home Depot or Lowe’s or even at overstock.com.
xo
s
Kaelyn says
What a lovely, lovely space. You guys have totally blown the socks off what it originally was *Claps* Can’t wait to see it continue to transform! :)
Shelley @ Calypso in the Country says
The fans look great and I love the ceiling color. I think having the fans will make you look up and notice the ceiling even more. Very nice!
-Shelley
Terri Simmons says
Aside from looking great, dark fans are the way to go because the fans will soon be very dirty. Nothing you can do about it, but having dark ones helps it to be less noticable. We have double outdoor fans in both our homes and dirt just clings to them. After six years in Georgia, the current fans are starting to droop and will need replacing. Thanks for reminding me that it’s not the end of the world.
Shannon [Our Home Notebook] says
I have a hard time loving fans too but those dark ones in your sunroom? They look sharp!
Amanda says
Wow, looks really, really great you guys! Do you think you’ll have it furnished before winter? I could totally see you getting a nice outdoor set and then Sherry (or John!) reupholstering the cushions yourselves with a cute fabric!
YoungHouseLove says
I wish! Unless we happen across something awesomely under budget we’ll probably have to wait until spring just because between the ceiling and the fans and the tile we’re a bit over budget in here, but if a good deal comes along….
xo
s
Stephanie says
Your fans look fantastic…well done! And you made me feel good about our recent decision to go with oil rubbed bronze trim on the new can lights in our just renovated kitchen! With ceiling-height white cabinets (and a white ceiling), the room already felt tall, bright and airy…so the the little detail of the canned light trim gave a little definition to the ceiling and looked purposeful. AND they match our pendants and hardware. Back to you guys…well done!
Rachel says
Okay Miss Sherry….now that you are preggo, no more standing up on (what I presume is) a ladder.stool holding power tools over your head. M’Kay? :)
YoungHouseLove says
Haha, thanks Rachel! I was super careful while prego with Clara and am still the same paranoid gal this time around. My rule is that nice secure ladders are still ok if I’m only going a few steps up, but bending over backwards for hours on them (to paint ceiling beams for example) or trying to cut down giant tree branches that could fall on me = no no. But I can totally test wires and drill a light little plate into the ceiling while on the third step of the ladder. At least I can for now. Once my belly gets giant, all bets are off! Haha!
xo,
s
Jamie D says
I am unreasonably excited about the sconces! I love sconces (never thought to put them outside, now thinking about where I can put some at my house) and I think it will dress up the space as much as the gorgeous new fans have. Can’t wait to see which style you choose and how it will look glowing in the evenings, beautiful!
Karin Bunton says
Do I get to give you props? (Sorry, couldn’t resist!) They turned out wonderful! I love Hunter fans, they are the best brand that we’ve ever installed. We currently have Hunter Bay fans, and have had some issues, though we love the remotes. I agree with a previous post that fans should be utilized more often, especially considering how they cut down on our heating/cooling.
The first time I ever installed one was in the middle of a sweltering AZ summer, and my husband had his eyes bandaged due to an eye infection (fiberglass during taping some walls). SO, not having ever done ANYTHING with electricity, I was freaked out. I was balancing the motor while wobbling on a bed, and trying to talk to a temporary blind man about his project, asking which colored wire connected to the motor, which was the ground wire and more. My husband really must love me, because he was wonderful throughout the whole process. Now ceiling fans are so much easier to install! I have since installed about another 5 of these suckers, and always love how they look in the room. :D
YoungHouseLove says
Haha! Fans! Props! I get it. And I like it.
xo
s
Sally says
Argh! A pregnant woman up on a ladder, screwing in a fan!
Seriously?
YoungHouseLove says
Thanks for your concern Sally. And as you can see from the pics, John actually hung the fan – so I just did the lighter work up front. I was super careful while pregnant with Clara and I’m still the same paranoid gal with this baby, so you won’t see me on the top of a ladder with a chainsaw doing tree-work out front… but I can definitely take a few steps up a nice secure ladder and screw something that weighs as much as a dinner plate into the ceiling. It’s no different than walking up a flight of stairs or changing a light bulb :)
xo,
s
Jackie says
The fans look spectacular!!!! I’m glad you went with a darker color fan and not white. The contrast will look so classy with the your choice of tile.
You guys inspire me!!!!
Thank you,
Jackie
Alicia says
I’ll admit, I always kinda thought y’all were a bit weird because you kept removing every ceiling fan you came across. One of the first things we did in our house was install ceiling fans in the bedrooms. We live in DC and though we definitely need the AC in the summer, nothing beats opening the windows and putting the ceiling fan on. I’m glad you’ve finally come around. Perhaps some more ceiling fans inside before too long? You won’t regret it!
Jackie says
“The contrast will look so classy with your choice of tile”. blah….I need to read my post before I hit send…LOL! I get so excited!!
Kate in New Zealand says
You bought the fans without a discount? Who are you and what have you done with John and Sherry?! ;)
Love the way you guys flaunt your frugality (TV Rock feat. Seany B – Flaunt It – http://youtu.be/mtIbcXlFHGI)
x
YoungHouseLove says
Haha! Well we did use our Home Depot card since they’ll match the same 5% promotion that Lowe’s runs, but other than that, we went full price!
xo
s
Tiffini S. says
Being in the south, I’m surprised you didn’t use Haint Blue on the ceiling. Supposed to keep mosquitos away!
YoungHouseLove says
Aw thanks Tiffani! We actually did use a soft blue color on the ceiling (you can see it best in the first photo of this post). Love it, and so far no bug issues!
xo
s
Kate says
Love how this room has changed! And love the fans, too. I’m one of those people who is a firm believer in ceiling fans even though so many consider them a “decorating don’t”. Spend one hot summer in the muggy south and those folks might change their minds. ; )
I also can’t help but wonder if the people you bought the house from are stalking your website now, spying on the changes you’re making. If it were me, I’d be completely obsessed with checking in to see what’s happening. Please never buy a house from me or Future Me will have totally crap productivity levels.
YoungHouseLove says
Haha! Future Me promises never to buy a house from Future You.
xo
s
Chrissy says
This post is perfectly timed! We need to install 2 fans, and were looking at these exact fans at Home Depot recently. Thanks for the review and tutorial. Having never installed anything electrical other than a Nest before, I was a little anxious about doing this myself. Now I’m pretty confident we can do this ourselves. Thanks!
Michelle @ A Healthy Mrs says
Looking good! I love the dark fans against the light ceiling!
Bethany @ Dwellings By DeVore says
I love how this space is coming along, it’s going to be so pretty!
Karen says
J & S,
Love that patio!
[Off subject question]:
Ok, I get it; the number seven (7) has some significance for you guys. I see it all over your site and your sweet home. What’s up? (And I tried searching on your bloc, but couldn’t find an archive on it) :)
YoungHouseLove says
We got married on 7/7/07 (started dating on 7/7/05) so it has always been a number we love. When Clara was born on the 14th (7 + 7) that made us smile too!
xo
s
Stephanie Haworth says
So gorgeous! I love how much charm the ceiling fans add. Nice choice going dark!
Sarina says
WET LISTED… I really had no idea about that rating! We have an outdoor porch on our tangier island home and the blades on the fan droop pretty much just from heavy coastal humidity.. I’m gonna get one of the wet listed ones now and that should stop the problem! THANK YOU for posting this:)
YoungHouseLove says
Good luck Sarina!
xo
s
Jodie says
This room is going to be so awesome! I LOVED that you took the doors down, and now the fans… just awesome! It feels luxurious and reminds me of a breezy lobby at a nice hotel in Hawaii (obviously a different backdrop)!
Kate Craig says
I’ve never seen instructions like that! One of my favorite things about your site is that you share experiences with specific products!
Janet says
Visited a couple that had some type of pull-down screen on their sun porch. Located in Ohio so late in the evening it reduced bugs and wind.
Cindy says
Sherry and John: This room is looking great! I love how you had a vision and went for it. I think too many times, we settle for the way something is because major changes are scary. You two always prove that risks pay off! Cindy
Cathy says
So, so awesome. I’m also kind of mixed about fans in inside room, but I almost always love them on open porches. There’s something so romantic about them; it kind of harkens back to a slower time when people sipped lemonade on their porches while chatting with the neighbors. I love them!