I never pictured myself painting a wall in our house black, let alone doing it at 5am. But that’s what I found myself doing two weeks ago. Allow me to explain.
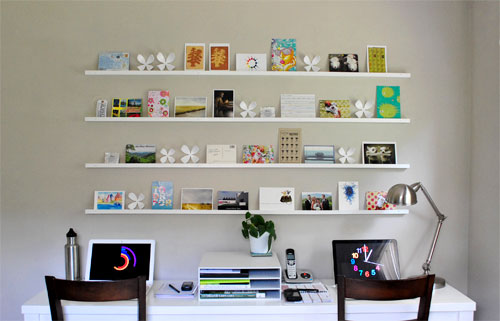
When our postcard wall moved into place last week, it meant our much loved wallflowers above the desk had to be relocated…
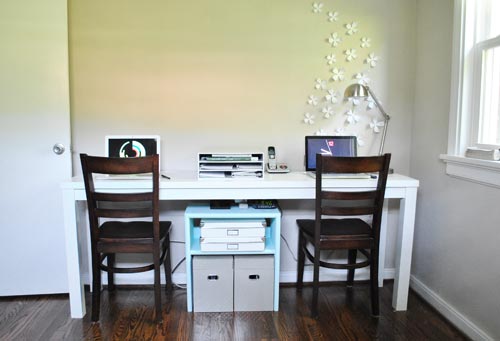
… well, some stayed in place when we decided we liked leaning a few on the shelves of our postcard wall– but the rest needed a new home.
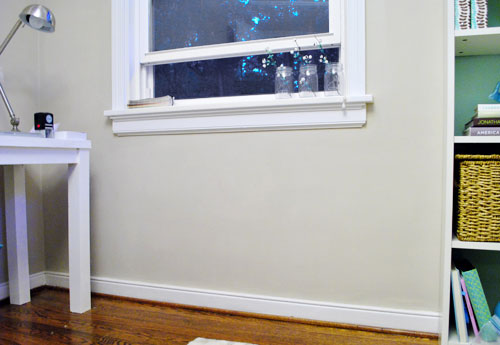
Well, they didn’t go far. We decided to move them just one wall over to the small space under the office/guest room/playroom’s one and only big window.
Why? That’s probably best explained by answering the “how” first. Instead of relying on the special nails that came with our magnetic wallflower kit- which firmly affix the arrangement in one spot thanks to the magnet-backed flowers which stick to the magnetized nail heads- we decided to try something new: magnetic paint (note: some of the new wallflower kits snap instead of being magnetized). We thought magnetic paint would be just the thing for this project since we’d been dying to try it for years and were just waiting for the right project. We often wondered if the rumors were true- did it really work? We were about to find out.
See, by creating a large magnetic canvas we could design a spot where the wallflowers could be displayed, but instead of being limited to the fixed spots where we placed the magnetic pins in the wall, this time the wallflowers (along with any other magnets) could easily be moved around into an infinite number of fun formations, adding a nice element of “play” to our office/guest room/playroom- especially once Clara becomes mobile enough to move them around. And they’re definitely at a kid-friendly height!
Luckily the magnetic paint rumors were true. Well, mostly – it’s actually magnetic primer. We found this $21 quart of Rust-oleum Magnetic Latex Primer at Home Depot (next to things like chalkboard paint, dry erase paint, and glow-in-the-dark paint). Update: Here’s an affiliate link to it over on Amazon if you can’t find it in stores.

Oh and before heading home we noticed the instructions actually suggested having it shaken by the store’s paint department to help keep the iron particles from settling on the bottom – so don’t forget to shake yours like crazy! The instructions also suggested two or three thin coats to achieve the best results as opposed to one or two thick and gloppy ones. Good to know.
Well… we did seven.
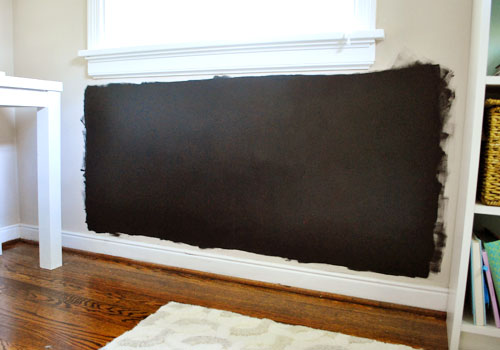
And we made sure they were all extremely thin so there wasn’t any bump or delineation where the magnetic paint started or ended. Maybe four extra applications were overkill, but we were determined to make this stuff work. Plus I realized only after coat number two or three that I was supposed to be vigorously stirring between each application. Oops. But since the coats dried really fast it only took me an evening, a morning, and one random 5am painting session to apply all seven (Clara had woken us up for a surprise feeding- she usually sleeps from around 10pm to 9am!- so I figured I’d be productive while Sherry sleepily nursed her). And ultimately… drumroll please… it worked. Woo hoo!
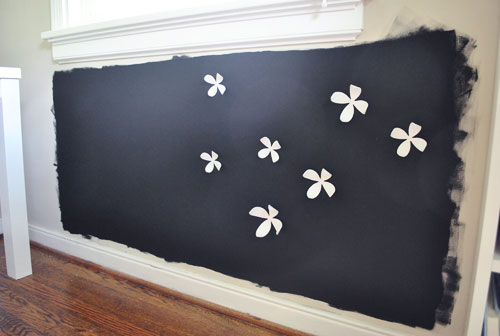
Well, it mostly worked. After each coat I tested variously sized wallflowers to see if they would stay up. The smallest sizes stuck almost immediately but despite my persistence I never could get the larger ones to stay in one spot (they’d just slide down the wall, hit the baseboard, and fall off). So we’d say that magnetic primer works, but not with anything terribly heavy. Now you know why some ended up on the postcard shelves. Oh well – happy accident.
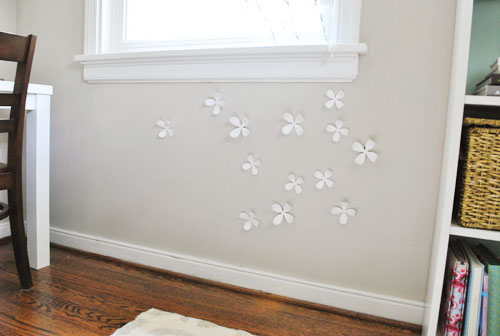
But in the good news category, despite the fact that we had just painted a huge black spot on our wall – it barely took two coats to cover it up completely with the original wall color (Glidden’s Sand White). Phew. Heart attack averted. And it didn’t seem to lose any of the magnetic attraction when covered with other non-magnetic paint. It’s also 100% non-toxic and kid-safe when dry (obviously it’s not safe for a kid to drink it in liquid form). We did keep Clara out of the room with the windows open and a fan on for the full drying period (and about three days after that since we happened to be out of town for the weekend anyway) just to be safe.
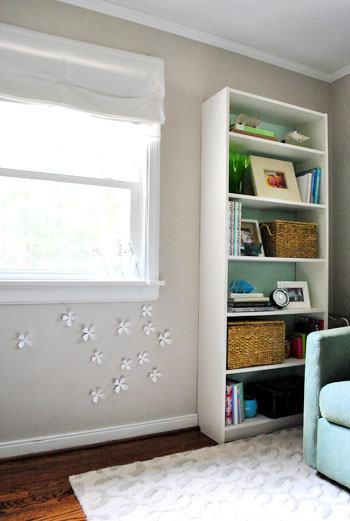
Even though we couldn’t get all of the wallflowers to stick, we’re actually really happy with how it turned out. And we can’t wait to find some other fun magnets to put up there so Clara can play with them when she’s a bit older. Speaking of which – does anyone know where we could find an all-white set of those alphabet magnets? We googled around for a while with no luck- and we think they would be a fun and educational addition to the little slices of “playroom” that we’re trying to squeeze into this small space for our favorite little girl.
Has anyone else tried magnetic primer? Or any of those other wacky chalkboard/dry erase/glow-in-the-dark paints? We’d love to know what you guys thought about using those newfangled products. Did they work? Were they messy or hard to apply? Spill the beans.
Psst- Wanna follow the entire office/guest bedroom/playroom makeover? Click here for the intro post, here to read about the big sleeper sofa hunt, here for the DIY desk play-by-play, here for the homemade light fixture project, here for our hacked Ikea bookcase, here for the file storage we built, here for how we squeezed in some toy storage, here for how we picked out some DIY art that we could agree on, here for how we wrangled our wires, and here for the play-by-play of creating our postcard art wall.

leanne says
That paint it awesome! Just remember that whatever you have out for your baby to play with will make it into her mouth at one point or another, even when you think she is over the “teething on everything” phase. Great ideas, I love your blog.
Danielle says
I am really surprised that you guys actually used the magnetic primer. I purchased that when we first moved into our home with the intent of using it underneath my son’s chalkboard wall. When I opened it though, I was literally knocked off my feet by the smell. I couldn’t believe how toxic it smelt. I put the lid back on it and sadly returned it to the store.
YoungHouseLove says
Hey Danielle,
It’s actually a new formula (according to the manufacturers it has been reformulated to be safer) and it’s now 100% non-toxic and kid-safe when dry (of course it’s not safe for kids to drink it when it’s in its liquid form). It still smelled a bit paint-like when John applied it (we stayed out of that room while he did) but once it’s dry and painted over it’s completely odor free. We even left for the weekend after applying it so it could cure up without us around (so that’s a tip for other paranoid moms, plan to paint before you leave town for a bit so it can dry). Hope it helps!
xo,
s
Anna says
What about these? I’ve seen them in circle, flower and heart shapes.
http://images.michaels.com/online/images/product/large/fr0530.jpg
You could glue paper to the back to cover the magnet, although I think they are too big to swallow. You could print letters, numbers, designs or just use colored paper in them. The inserts could change whenever you wanted!
joni says
That’s funny, cuz as i was reading your post i was thinking wow i bet you got bombarded with comments about not using primary colors for your alphabet letters! haha but it is so sweet that everyone looks out for you guys and cute Clara!
As always, great post! Love all your ideas and i’ll be sure to re-read them when i have a little one of my own :)
Amanda @geekdetails says
I tried the Rustoleum whiteboard paint on a table. It *looked* great at first, good enough to get on apartment therapy. It never properly worked though and then it started to crack and yellow. I was so stinking upset! My table looked awful!
I ended up using a heatgun paint stripper to get it off my table and also hand to sand down the table. Table has recovered and looks great in stained wood. I’ll never use the whiteboard paint again.
Chalkboard spraypaint on the other hand… it’s amazing!
Josh says
I love this idea; I never even knew magnetic PRIMER existed…amazing…I love this…….This would even be a great addition for a kitchen wall; to keep a clutter free refridgerator. You could put up a “to do list” or even random pictures….thanks for the ideas :)
Kim at Yellow Brick Home says
Love this. A good friend of ours had a wall of dry erase paint in his studio apartment, and we often times spent our weekend evenings playing Win, Lose, or Draw until the sun came up. It’s entertaining even as adults!
And most recently, I’ve helped to convert a friends children’s photography studio, and we coated 1 of the studio rooms with chalkboard paint. We can’t wait to see what the little ones come up with while we snap their happy faces!
tiffany says
A friend of mine sells the cutest fabric abc magnets :
http://www.etsy.com/transaction/23126320
she is sold out right now but I am sure she will be making more down the road or could do custom all white!
LOVE this idea by the way and I just LOVE your blog. I need to email you soon and tell you about our new house!
YoungHouseLove says
Hey everyone,
Thanks for all the DIY-ideas for white magnetic letters! We figured we could make something ourselves if we couldn’t find ‘em, we’d just have to be sure to use kid-safe things (no toxic spray paint, etc). We do love a challenge though!
xo,
s
Adam says
I used the magnetic primer beside a desk in a child’s room where the parents insisted upon using semi-gloss paint for its easy cleaning properties. The magnetic primer left a much rougher texture on the wall which was only intensified by the semi-gloss paint. It worked quite well for magnets, but I would caution not using anything glossier than a satin finish in a well lit room.
YoungHouseLove says
Great tip Adam! We’re happy to report that our flat paint made it completely undetectable!
xo,
s
ell.uu says
Your review of the magnetic primer confirmed my suspicions. I had it in my cart at home depot just the other day with plans to make a magnet board for my daughter. after hemming and hawing about it, I decided not to spend the $21 on something I feared wouldn’t work. I bought a 24×36 piece of sheet metal instead, spray painted it bright pink, framed it in a large frame I already had around the house, and it turned out great!
Erica says
Whoa! This is so cool! I had no idea something like magnetic PRIMER existed!!
I really love your blog, I’m always learning such cool new things!
Awesome!
Carolyn says
I love the magnet wall idea, and I can definitely see another DIY project with the magnet letters! Although, maybe this is a silly question, but what is wrong with coloured letters?
Actually your project has just given me an idea for a magnet chalkboard to sit on top of our small entryway bookcase. Could be a good & fun way to fill out some of our blank, white rental wall. Thanks for the inspiration.
YoungHouseLove says
Hey Carolyn,
Absolutely nothing is wrong with colored letters, we just thought white ones would fit in with the white wallflowers and keep that wall from looking too cluttered and crazy. Clara has lots of books, wooden blocks, and flash cards in all of the colors of the rainbow- so we’re sure she won’t have any shortage of colorful items to help her learn all about hue!
xo,
s
Laura Durrer says
I framed a couple spots in my kitchen that I painted with the magnet paint. Here’s a link:
http://www.oliveandlove.com/2009/02/home-communication-center-will-always.html
If I did it again I would paint a piece of wood and attach it to the wall since if I ever wanted to move it, I’d have to sand and retexture the whole wall!
Brittany says
We tried magnetic paint for my brothers room nearly 8 years ago! i think we may have done 8 coats or so, it was not strong stuff. We did a road around his entire room with the pain underneath so that he could move cars along the road. The stuff was not very strong even after all those coats, the only thing that ended up sticking up were foam cars with magnets attached. Not the look we were going for 100% but it worked!
GreenInOC says
Sorry if this is a repeat but there are too many comments to read!
Instead of getting new letters from plastic (boo!) and more than likely made with sweatshop labor (double boo!!), how about handmade felts ones?
I bet one of the Etsy sellers would do a custom order of all white for you:
http://www.etsy.com/search_results.php?search_query=alphabet+magnet&filter%5B0%5D=handmade&filter%5B1%5D=children
Hannah says
I was just planning a chalkboard wall for a playroom and I’m so glad I saw this post. Now I can make it a magnetic chalkboard!
Cheers J & S.
kodie says
i have used magnetic paint in my kitchen. after a complete to-the-studs reno, i used paintable wallpaper instead of tile as a backsplash. much cheaper and easy to remove if i get tired of it! anyway, before i painted the wallpaper white, i painted a couple of coats of magnetic paint underneath. my vision was to have a backsplash that could hold my recipe cards while i was cooking. well, i ended up having the same problem ya’ll did…while it will hold light magnets, it is not strong enough to hold both a substantial magnet AND a piece of paper, let alone a recipe card. oh well. lesson learned!
oh! and i think you should get a colored plastic set of letter magnets, then spray paint them. i just had my second attempt with spray paint over the weekend and i am now a believer. (currently considering a sandwich board with something like “Spray Paint Will Change Your Life!”)
April says
My husband and I thought about magnetic paint but the reviews all seemed unfavorable so we went with chalkboard paint for our entire foyer, top to bottom! Our friends leave messages there all the time, and it’s great to have rotating decor! I made my own chalkboard paint with flat base paint and unsanded tile grout. It took about two weeks to do such a large space because I could only do so much at a time to keep the brush from gumming up with too many chunks. And it ruined the four brushes I used throughout the whole project, but it was worth it! And as far as dustiness goes, I only have to dust and mop after I erase a lot of wall space at once.
Maybe you could just chalkboard paint the front or back of a door to keep it low commitment but still fun!
Shaye says
Fabulous idea for your wall, and I’m sure Clara will love it!
I got a hand-me-down armoire/computer desk from a friend when I decided to start homeschooling my son. I used the whiteboard paint on the inside of both doors, and we’ve been very happy with it. It is now our version of a chalkboard for school, and it’s really convenient for jotting notes and phone numbers when I’m working at my desk.
Tanya says
Try a teacher supply store if you have one in the area. I have bought sets of all-white magnetic letters (and numbers) there for my classroom. They also sell all-black sets.
Shauna says
I just wanted to thank you guys for proving that it IS possible to have a child without making your house look like a Toys R Us :) I have two sons and I have been adamant from when my first son came home (they were both adopted.) about keeping my house looking neat. My house was a fixer upper and me and my husband worked SO hard to get it looking how it is now and I wanted to keep it that way! I’m sure Clara is getting tons of stimulation and colors else where! (although I know everyone just means well!) you two seem so hands on with her!
amanda says
I used chalk board paint to paint a mural in my son’s room. He loves to draw on the walls and the paint lived up to its promise. It took 2 coats with the roller and 5 with a paint brush. Unfortunately there were a lot of areas that required a paint brush. I used the rust-o-leum brand which can be tinted a bunch of different colors. You can see pics on my blog, http://namesakedesign.blogspot.com/2010/01/new-year-new-house.html.
Agnes says
Might some animal magnets (like the PP suggested) be more age appropriate? I can’t see any appeal in letters for a nine month old, even if they’re colored. And white ones have nothing going for them.
flo says
count me as another chalkboard paint user. my husband came home with the most amazing pile of old chalkboard slates, that his school was just going to throw away! unfortunately, they were that forest green colour, but with a little coat of black chalkboard paint, they look as good as new and serve as our shopping list board!
Julia says
I did not have success with the magnetic spray paint I used for a chalkboard I was making. It wasn’t magnetized even after many many MANY coats and then the chalkboard paint was a dud too, nothing would erase off of it. Ended up pitching the whole project! I think the paintable versions (as opposed to spray versions) have a better success rate though.
Amanda says
This is a cute idea for Clara to play with as you said! As for the magnets, you can always spray paint them white — come on, do it DIY style!
Nicole says
Love the ideas of making the wall flowers magnetic! We have the same flowers and used them as part of the decor in our soon-to-arrive baby girl’s room (I have pics on my blog).
Thanks for showing the ease of using magnetic paint – this would be a great thing to try for a kiddo’s room!
Erin says
You could actually make some alphabet magnets for her pretty easily, and they’d be light enough that they should work – all you need to do is cut the letters out of white felt. Cut two layers for each letter, sandwich a magnet in between (or glue on the back), and sew around the edges either with a sewing machine or by hand, either would look great. You could even do a fun color thread if you wanted to keep them mostly white but add some fun in. You can also stuff them slightly if you think they need a little more oomph!
YoungHouseLove says
Hey everyone,
Thanks for all the DIY-ideas for white magnetic letters! We figured we could make something ourselves if we couldn’t find ‘em, we’d just have to be sure to use kid-safe things (no toxic spray paint, etc). We do love a challenge though!
xo,
s
Kate says
You could also use magnetic inkjet paper to create custom magnets with pictures, etc: http://www.escapadedirect.com/mainpa.html
Brittany says
Wow! This is so neat! I have never seen a paint like that… how interesting. Oh, the possibilities! Your project ended up looking fantastic. Great job!
Kari says
I’ve thought about this a couple of times today, and saw your follow-up comment about teaching Clara colors in other ways. Just to clarify, I didn’t mean that the magnets would teach her the colors, but that the colors would help her organize the letter in her head perhaps better. But this still doesn’t mean you need to go bright, primary colors. Like so many people have suggested the diy approach, what if you did them in the browns and greens of the room?
On a side note, it must get exhausting to have to read through all the comments, making sure you keep a drama-free zone (especially for the fact that parenting is an inherently personal task, yet one that, especially in today’s communication environment, is replete with strong opinions that are so readily shared).
YoungHouseLove says
Thanks so much, Kari. The more we’ve thought about it through the day we like the idea of keeping a few colors in the mix. Stay tuned to see where we end up!
xo,
s
Angela says
I used magnetic primer with a layer of chalkboard paint inside my kitchen cabinets. I too found that the heavier magnets didn’t stick. Overall it’s really useful, I hang the baby tylenol dosage chart in one of my cabinets. PS I used your tutorial for our crib skirt. Very helpful!
Kate Blaylock says
My parents painted the wall behind their kitchen table with five coats of the same primer, then wallpapered using Graham & Brown’s Frames wallpaper by Taylor and Wood. Over the years, as the wallpaper has contracted, you can see a bit of the dark primer around the wallpaper seams, but the end result is still wonderful. They use the space to display magnets from their travels… and they’ve paired it with the Dignitet from Ikea, which they use to track wedding invites and graduation announcements. They move the attachments from one side to the other once they’ve purchased and sent the gift or card.
You can see a picture of the finished product here.
Thank you for all you do to keep those of us who are addicted to change and lovely things satiated. The world needs more folks like you three.
YoungHouseLove says
Wow Kate- your parents’ creativity is blowing us away right now! We’ve always loved that wallpaper and pairing it with magnetic paint is genius!
xo,
s
Kelly Dokimos says
My daughter has ugly slab sliding door in her room to her closet. When we did a mini makeover in her room, we painted them with chalkboard paint. My husband thought it was crazy and that we were “teaching her to draw on walls.” To the contrary, she loves them, and whenever her friends come over they draw on the doors, and their parents comment on what a good idea it was. As far as the drawing on the walls go, we haven’t had an incident. I think giving her an outlet where it was ok, made her realize where it wasn’t ok.
As far as white alphabet magnets, just get some that you like then spray paint them. There’s not much a can of spray paint can’t make better.
Katrina says
Love this! Really intrigued by the dry-erase paint… hmm…. might have to play with that!
Jenna says
The repeating the exact same reply verbatim like ten times is a bit strange to me.
YoungHouseLove says
Hey Jenna,
That’s just our way of keeping people from having to scroll all the way back through 223 comments to read our responses to suggestions and questions that get repeated. Forgive us but we just can’t find the time to rephrase things like that every time! Hope it helps.
xo,
s
Nicole says
That’s so funny…I was actually at looking at the magnetic paint and chalkboard paint at Home Depot today!
I was going to paint some terra cotta planters with the chalkboard paint so that way I can identify what’s planted without having to use cards. And I can decorate them however i want!
I was interested in the magnetic paint for a while now, and seeing as how I know that paint works I may have to actually go buy some!
Christina says
I actually just finished a little play-room area for my soon-to-be 4 year old daughter on the weekend. She’s constantly playing ‘teacher’ and I thought it would be fun to do the old chalkboard paint thing. I didn’t think that it would work too well, but it was actually really easy and not messy at all. I just rolled it on with a paint roller. My husband cut some trim to make a frame, which we painted white.
My daughter loves it and school is officially in session!
Pamela says
I am anxious to try dry erase paint on a tabletop to allow for the drawing and redrawing of roads and railroad tracks for a three-year-old’s myriad cars, trucks and trains. Just haven’t found the right table yet.
I found magnets in the Container Store (might be called “mini mites”) that are smaller than a pencil eraser, weigh nothing, and could hold up the cat through the scruff of his neck if he would hold still. (Kidding. He’s sleeping on the keyboard right now.) They are expensive and should never be near babies or toddlers, but would surely hold recipe cards on a backsplash.
Amy says
I’ve used the chalkboard paint before and LOVE it. Once I made a “menu” board for an old boyfriend who liked to cook. After I painted the board with the chalkboard paint, I took acrylic paint pens and did a design on the top like you see in cafes and some restaurants and we hung it in our dining room. We would update the “menu” every week after we went grocery shopping.
Jarrod says
Hey John and Sherry!
For the alphabet letters, I think your best bet is to buy a set and spray paint it the way you want it. That way you can have the exact proportion of color to white as you’d like and not break the bank buying a custom set. I arrived at that conclusion after I couldn’t find an all white set online. :)
That being said, here are a few you might like:
http://www.etsy.com/listing/7848083/alphabet-magnetic-tiles-red-dots
http://www.amazon.com/Restoration-Hardware-Magnetic-Alphabet-Magnets/dp/B001UI7D9C
http://miniandmaximus.blogspot.com/2010/03/grimms-spiel-holz-alphabet-magnets.html
There are so many cool, typography-inspired accessories out there. I even found typography coasters!
YoungHouseLove says
Hey everyone,
Thanks for all the DIY-ideas for white magnetic letters! We figured we could make something ourselves if we couldn’t find ‘em, we’d just have to be sure to use kid-safe things (no toxic spray paint, magnets that can be swallowed, etc). We do love a challenge though!
xo,
s
Chrissy says
We had a similar problem with the magnetic paint. We did lots of extra coats too and then covered with chalkboard paint. The chalkboard paint worked great but the magnetic part … well, it could only hold up small magnets (like the alphabet letters) but not the larger magnets (the animals that make noises when you put them in the Leap Frog thing). Bummer …
JessieBelle says
Not sure if anybody had asked this or not yet, but what did you guys do about all the little tack/nail holes left behind by the old placement of the flowers? Did you just pull out the tacks, patch them and paint them over? Or just leave them?
If so, was it a pain after putting them up so recently? Do you think you’re going to nail any more up in the future? Or just use them as magnets on places like your newly painted wall and the fridge?
YoungHouseLove says
We just removed the tacks, spackled, lightly sanded, and painted one coat to cover them. Easy peasy. It definitely wasn’t a big deal, and seeing as we put them up over a year ago we feel like we got good use out of them there for a while. We did save the tacks for future use, so we’re definitely not ruling them out!
xo,
s
chole says
I only skimmed some of the comments (there’s so many! how do you keep up?) so maybe this has already been said, but did you look for glow in the dark magnets? they would look white… I used to have a set in my dorm in college.
JessieBelle says
You guys are so prompt and awesome at responding to questions! Snaps and props to ya’ll!
<3
Rebekah says
I love this idea for the magnetic wall! I especially like the tutorial posted for the fabric magnetic paper alphabet! We have a 2 year old who has an affinity for “little things” so we are a magnet free house right now but I am sure bookmarking this post so her playroom can grow with her! Cheers for all the great comments!
Andrea says
I love the idea!
Well, gotta tell you, love your website!!!
:)
Jessica says
I can’t beleive you said that Clara is sleeping from 10pm to 9am… she is a BF baby and my son who is a week younger is still feeding twice in the night.
Here is to hoping we can figure out how to get him on Clara’s sleep schedule :)
Juli says
We did a magnetic wall at our house a few years ago and we’ve been pretty happy with the results too. I use it to hang up our kids’ artwork. The best magnets I’ve found for it, because some of our magnets slide right off it too, are the super strong ones. I can’t remember the name of them, but I found them in the craft aisle at Walmart. They work great!
Danielle says
Thanks for posting this! I had been wanting to make a magnetic chalkboard, but had heard the magnetic primer doesn’t work very well. After your success I’m going to give it a go!