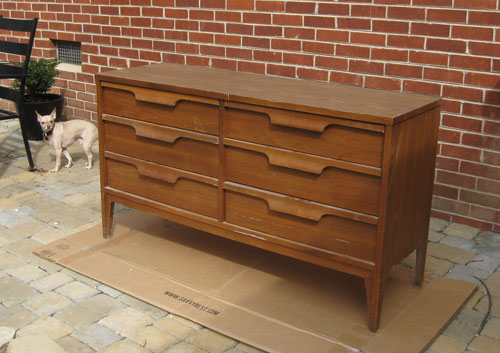
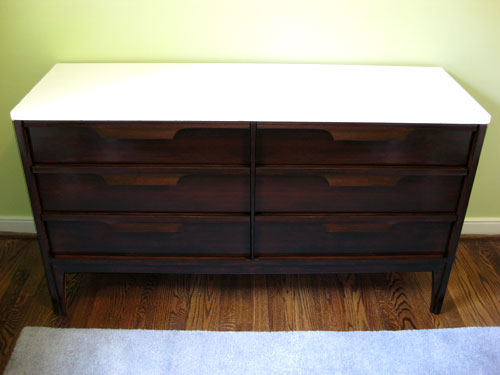
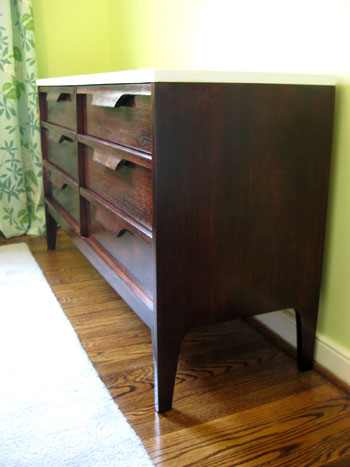
On Tuesday we shared how we refinished a Craigslist dresser for the nursery, taking it from this…
… to this:
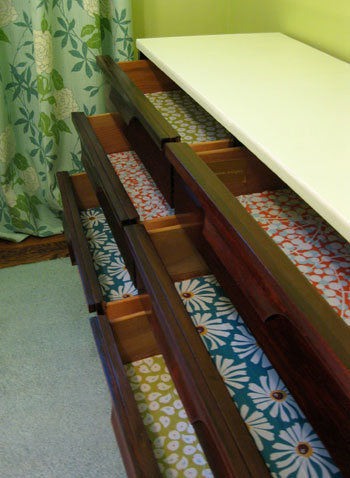
So now we’re back with all the dirty drawer lining details as promised. This project actually only set us back around $1.30 because we already had everything on hand that we needed except for two foam craft brushes which we picked up at Michael’s for around sixty-five cents a pop. Our other already-owned project materials were Mod Podge and six sheets of wrapping paper (given to us by friends who founded this awesome local paper shop called Ink + Paper). And just for fun we selected three different patterns to use inside of our six 50+ year old drawers to give them a totally fresh look and a nice clean texture (as opposed to the raw wood that they came with).
We were lucky that the drawers were pretty clean (nothing a wipe down with a moist rag couldn’t remedy) and there wasn’t any musty smell or sticky stain to be found. But if you’re dealing with a slightly grosser old drawer scenario (like mustiness and odor that slaps you in the face every time you open a drawer) we’ve heard that wiping them down with mineral spirits and letting them sit out in the sun or air out in the garage for a bit might do the trick. Murphy’s Oil Soap is also said to be one of the best ways to thoroughly clean wood drawers that are past their prime to rid them of any stains or smells. And as extra credit you can place bowl of fresh ground coffee inside of each drawer to absorb any lingering odor afterwards (we’ve also heard that bowls of untreated charcoal briquettes work the same way). Gotta love a cheap and natural solution like that.
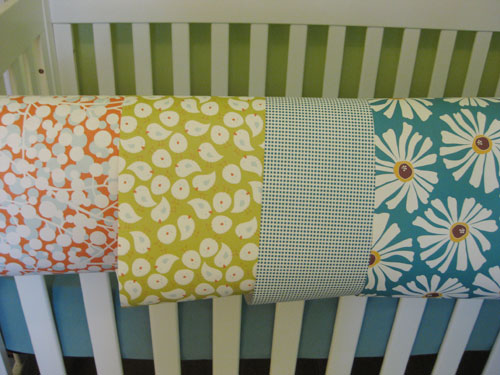
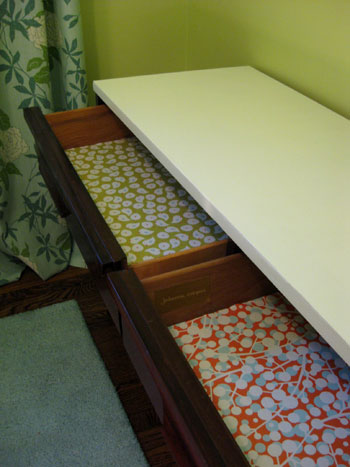
Anyway, here are four of our potential patterns that we laid out over the lip of our crib to evaluate as a group. We actually opted to use the three boldest ones twice (since we had six drawers to line) so each drawer would have a punchy little surprise inside. This meant that we had to eliminate one pattern so after a bit of deliberation we settled on two drawers with the orange bubble pattern, two with the green birdie design and two with the bright blue flowered paper. We figure that they’ll never all be open at the same time so it’ll hardly be overwhelming and we liked the idea of Baby P pulling open each drawer when she’s older to see something fun and graphic while she’s grabbing a pair of socks or putting away her crayons.
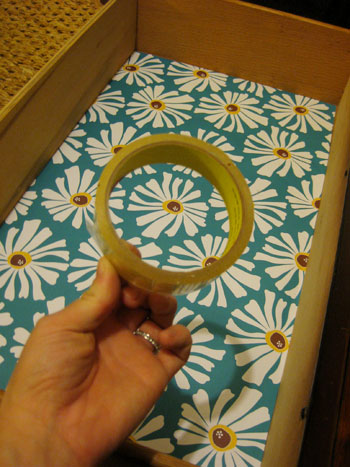
So after selecting our six sheets of wrapping paper (in three different patterns) it was time to cut each of our six sheets down to the size of the drawers (luckily they were all the same size so we cut one out and just used it as a template to quickly snip out the other five. Then we just had to decide how to adhere our “drawer liners.” Initially we debated using some simple double stick tape to hold the paper down around the edges, which probably would have worked just fine. But after a bit of thought we realized that we wanted something a little more heavy duty (that could take a bit of a beating for the next 15+ years and still look pretty good).
So that’s when we settled on Mod Podge. We recently used it to create “vintage” sign art for our bathroom, so we know how well it holds up to moisture and general wear & tear (thanks to the protective coating that you can apply right on top of any sort of paper to make it a lot more durable than it was before). The first step was not to Mod Podge over the paper though, it was to apply a thin and even coat of the stuff to the bottom of the drawer so that our pre-sized pieces of gift wrap could be securely adhered.
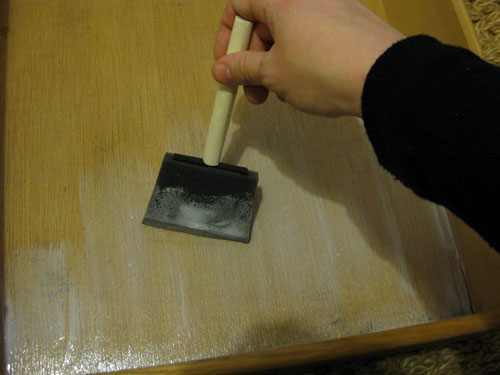
We always go for the “matte” kind of Mod Podge because we’ve found that it cures up more solidly and never feels tacky or sticky after it fully dries (usually within a few hours) so that should help keep the drawers from feeling grippy and tacky even in the warmer months. So after we slicked that onto the bottom of the dresser it was as easy as sticking down our already-cut-to-size gift wrap rectangle and pressing it along the center and out towards all of the corners to eliminate any bubbles or wrinkling. Note: we did not apply Mod Podge to the back of the paper, only to the bottom of the drawer.
I then worked my way around each of the other drawers, applying the Mod Podge to the base of the drawer and sticking down each pre-cut rectangle of gift wrap. Oh and the reason I didn’t go right to applying a layer of Mod Podge over the first wrapping paper swatch after it was stuck down was because I wanted to give it ample drying time before moistening the front of the paper and possibly causing bubbles or wrinkles. In fact, I gave all of the drawers about four hours to fully dry before applying that top coat of Mod Podge over the paper for added protection.
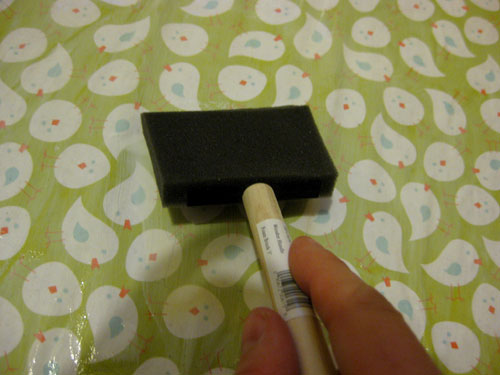
I was sure to apply the top coat evenly and thinly (not too gloppily so as to avoid wrinkles and bubbles). And after letting them dry overnight, we were left with durable and cheerful lined drawers that should last for the long haul (while providing a little dose of happy every time they’re opened). Oh and we love that Mod Podge is 100% water based and non-toxic so it’s not going to stink up our baby clothes or pollute the nursery like some other more chemical-ish sealers might. Good times.
So there you have our under-two-dollar drawer lining adventure. We’d definitely suggest looking around your house for anything from decorative scrapbooking paper and gift wrap (even tissue paper) to swatches of wallpaper or even flash cards or playing cards to create your very own custom drawer liners on the cheap. Mod Podge + pretty much anything that’s flat = interesting drawers that make you smile every time you slip them open. And you could even line drawers with old swatches of fabric, we would just use dots of fabric glue or even glue gun dabs on the back of each piece to hold them down as opposed to Mod Podge.
What about you guys? Have you lined any drawers with something that you already had around the house? Or even hit up Target or the dollar store for festive paper with just that purpose in mind? We’d love to know if you’ve added some unexpected personality to the inside of a dresser or cabinet so spill the drawer lining beans.
PS: Wanna see another cool way to spice up a thrift store find? Check out this cool paint pattern we applied to a secondhand desk.
Psst- Wanna see our nursery progress from the very beginning? Here’s our painting post, our big shopping spree, our crib hunting rundown, our curtain-making tutorial, our fun little chair search, our mirror-painting extravaganza, this DIY faux sheepskin project, and our big dresser makeover. Fun, fun, fun.

Chelsea says
Wow! I just found your blog and am so excited to see that you’re doing similar colors in your nursery as I’m doing in mine! :) I’m having a boy in April and LOVE the aqua/limey combo. Check out my blog when you have a sec…I’m certainly no DIYer like you guys are…but I try a bit! :) Can’t wait to see the finished product!
P.S. LOVE the paper with birds on it…I have a bit of a nest/bird theme going in my nursery…
sheng yang says
omg i love what you guys did. it looks awesome. gives me hope for a new diyer like me :D btw i love your blog. it’s like an addiction. i must check it at least 5 times a day for updates. keep it up.
Sandi says
I lined a sideboard I found in a junk shop with some wallpaper from the Laura Ashley seconds bin for £1. It made a big difference to the finished piece. Pics are here.
http://skirtsandwellies.blogspot.com/2010/02/new-addition.html
Briony says
Your cute idea caught the eyes of this website.
http://www.ohdeedoh.com/ohdeedoh/decorative-accessories-pillows/lining-drawers-110472
YoungHouseLove says
Thanks so much for the tip. We’re so excited about it!
xo,
s
Bromeliad says
Lovely. Classy without being too baby-ish.
Katharine says
Love the papers! I need to get me some Mod Podge I think.
I lined our kitchen cabinets with wallpaper, but I just stuck it down with double-sided tape, since it doesn’t get wear. Best part was I got the wallpaper scraps for free from a garage sale. I asked the lady at the sale how much she wanted for this bag of wallpaper and she said “Please! Just take it! Get it off my hands!” So I did. Considering how much they expect you to pay for real shelf paper, I was pretty proud of that find.
Toni Roberts says
Great job!!! Love it : )
Rachel says
The Mod Podge is such a great idea! Is there anything it can’t do? Thanks for the details, I’ll be linking to this.
Kathy @ HomeWorkshop says
I love the idea of hidden surprises in furniture. If the dresser were whimsically painted one might expect a fun touch inside, but with the classy stain all the more unexpected.
And the colorful, graphic patterns will help wake you up when you are changing a dirty onesie at two in the morning (trust me).
Fun!
Heather says
Great job! That piece is very reminiscent of a buffet I made over last year with, yep you guessed it, paint. Instead of lining the drawers with mod podge and wrapper paper though, I just used contact paper. And since it was going to be used for feeding animals on, I topped it with a piece of plexiglass for easy cleaning. You can see my entire process and the contact paper I chose here: http://www.flickr.com/photos/ornerypuss/tags/buffet/
Rachel says
I just love these drawer liners! I love Modpodge and I love doing different stuff with wrapping paper-so underutilized in my opinion! (I just did a post on different ways to use it over on my blog The Cozy Green Cocoon.) This is such a great idea I posted a pic and a link to your post here-hope thats okay!Thanks for the inspiration (= We’re expecting our first little one in September-can’t wait to try this out in our nursery!
Nicole RJ says
Super cute! I recently re-acquired my childhood dresser from my mom’s house, and lo and behold it still has it’s {now very retro} wrapping paper liner in it.
Brittany says
I’m in the process of painting a bathroom vanity that previously had ugly dark stain and scuff marks, and I love your clever drawer liner idea. I have some scrapbook paper that I bought just because it had a cute vintage print, but since I don’t scrapbook, I haven’t used it. Now it will have a purpose in life. Thanks for the tips!
Shantel says
Love it! Did you put a matte top coating (its a spray you can use ontop of mod podge) or just the mod podge?
YoungHouseLove says
We used the matte finished Mod Podge as the top coating to seal everything and keep it nice and durable. Hope it helps!
xo,
s
Tumaini Rivera says
Very pretty! Are you selling this dresser?
Wondering if you’ve ever worked with fabric? How does ModPodge handle fabric?
I have a TON of fabric I would line the drawers with!
Tumaini Rivera
http://www.flippinfactory.wordpress.com
http://www.refresheverything.com/garbagetogold
YoungHouseLove says
Hey Tumaini,
Nope, it’s definitely not for sale- we made it for our little girl’s nursery and can’t wait for her to grow up with this cool reinvented piece of furniture that’s over 50 years old. As for how fabric handles Mod Podge, unless it’s super thin it’s probably best to use something like fabric starch or fabric glue to line dressers that way (since Mod Podge is best for thin items like paper). Just hit up your local craft store and ask what material would work best to hold fabric in place for drawer lining. You might just be able to use four dots of glue at the corners of each rectangle of fabric to hold them in place on the bottom of each drawer. Hope it helps!
xo,
s
Lindsey@Kindred Spirit Mommy says
This is soooo inspiring! I am excited to do this. :-) I think I’ll do my dresser drawers and everything else in the house like shelves. :D
Gretchen T says
What a great surprise when you open the dresser drawers! And I love the wrapping paper because it provides a nice, bright pop of color! I just started following your blog and I’m loving reading about all of your projects. How inspiring!
Hayley says
I’ve been redoing a dresser for my son (coming soon, in November!) and the owner (got it off craigslist) smoked, so I had read online to seal it with poly. Problem being, 2 months later, it still reeks like poly! I’ve tried all the natural solutions to getting the poly stink out for 2 months now, vinegar in small bowls (for like 3 weeks, nothing), charcoal drawer liners, coffee, etc. Still stinks. Do you think if I tried lining the bottoms with paper, then mod podging the ENTIRE drawer (paper and all) would de-stink it any? Thoughts? Just found your website, had I found it earlier, I might not have a stink issue due to Safecoat! :)
YoungHouseLove says
Hmm, we’re not quite sure. Our best advice would be to sit it out in the sun on a long hot day (heat causes things to offgas faster, hopefully getting rid of that stink more quickly for you). So as annoying as it is to drag it out into the middle of the driveway or the backyard, just set it outside on a couple of sunny hot days (the more the better). We’re not sure the mod podge would de-stink it at all, so that’s our best suggestion. Hope it helps!
xo,
s
Heather says
I can’t tell you how much I LOVED this article. It was perfect timing that I ran across y’alls site. I was so…excited that I actually read just about all of the projects in one night! :-) My husband and I just bought an antique dresser the day I found y’alls site and we are using it as a changing table too. I just finished lining it last night and it came out AWESOME!!! THANKS guys!
We intend on also making a mobile as well!!
Jen says
I love your dresser drawers by the way. but I just tried to modge podge some paper onto the back of some bookcases I’ve been redoing and they look terrible. the paper is all wrinkled and I can’t fix it. i used a thin coat of modge podge on the bookcase and not the paper… I think I need to redo it but I’m afraid I’ll mess it up again. Any tips/tricks or alternative to Modge Podge?
Jen says
hey again!! just wanted to update that after the modge podge fully dried all the air bubbles had relaxed, still left with a big wrinkle or two though, but I was mighty impressed how it dried after what it looked like wet! In the meantime I had taken an extra section of paper and used spray adhesive and loved the application much better and it dried perfectly smooth.! so needless to say I reordered more paper to retry but just wanted to give a heads up that the modge podge dries much better than it looks wet. as long as one can avoid wrinkles in the process!!!
YoungHouseLove says
Thanks so much for the update Jen! So glad it got better as it dried and we love the tip about the spray adhesive!
xo,
s
gk says
i lined some dresser drawers this past weekend with wrapping paper from target. i wanted to report that while i tried to be very careful on the first drawer, i ended up with a decent amount of wrinkle and air bubbles that i couldn’t get rid of (i think it’s b/c the wrapping paper i used was pretty thin?). so for the remaining drawers, i just said the heck with it and tried to make it as wrinkly as humanly possible – thinking that it would look like i tried to make it textured on purpose! but then…it all dried fairly wrinkle-free! almost all the wrinkles are gone, and i’m left with some very smooth, pretty drawers drawers. mod podge is kinda awesome! thanks for the inspiration and breaking down the steps for us all! :)
Danielle Allen says
I know Sherry and John are super busy…I can’t even imagine how they keep up…so if anyone else has advice that would be great…how permanent is the Mod Podge…I have never used it…I would like to line the back of my bathroom cabinets…but if I do ever sell my home…or change up color schemes…I would imagine I would need to get it off…can it be taken off later?…if not…does anyone know of an alternate product…thanks in advance for any assistance…
YoungHouseLove says
You might want to use rubber cement instead, which should be a lot easier to remove. Good luck!
xo,
s
Rebecca says
Hi John and Sherry,
just a quick question about mod podge… i recently covered a bunch of frames with scrap booking paper with mod podge (SUPER cute by the way :) ) but i got some of the mod podge on my kitchen counter and now i’m not sure how to get it off! any ideas??? thanks!
YoungHouseLove says
Hmm, Mod Podge is water based, so we’re thinking you can hopefully scrub it off with a textured sponge and some water (it kind of has to be scratched/peeled off, but try not to scratch your counter in the process). Hope it helps!
xo,
s
Karolina says
Beautiful work on the dresser! I was wondering, what did you use for paint/stain, to get the dresser’s exterior that dark? Same with the white top? Thanks so much, and keep up the great blog! :)
YoungHouseLove says
Hey Karolina,
If you click the link in the first sentence of this post it will take you back to the post all about what we used and how we refinished and painted the dresser! Hope it helps.
xo,
s
Emily says
Hi, I am doing the same thing for the dresser in our nursery- we painted it white and I plan to line the drawers with wrapping paper. However, I was wondering if you would suggest using the ones by Ink & Paper, or do you think Hallmark wrapping paper would work just as well? Thank you!
YoungHouseLove says
Oh yes, any reasonably thick wrapping paper should probably work. And remember to let them dry before judging the final product (they felt kind of bumpy before they dried but they shrunk up when they fully cured). Hope it helps!
xo,
s
Lori says
I love this idea! I actually tried it, but the paper kept wrinkling. Any advice as to how to reduce wrinkling while using mod podge?
YoungHouseLove says
There are always some wrinkles when everything’s wet, but when it dries it shrinks up and nearly all of the wrinkles should disappear. We use the “Matte” Mod Podge, which seems to help, and also apply it to both sides of things (in this case the paper and the drawer base). Good luck!
xo,
s
Courtney says
Do you think this same process of using the paper and mod podge would work to decorate the top of a desk to transform it from plain white to a pretty pattern?
YoungHouseLove says
We would actually consider using other glue to hold the paper down and then Mod Podging over it (sometimes small ripples and seams occur when you Mod Podge the underside and top of the paper, which weren’t a big deal in the drawer, but might be annoying on a desktop. Maybe try using Aileen’s Tacky Glue to hold the paper down (applying it with a sponge brush) and then just Mod Podging the top is the way to go. Good luck!
xo,
s
RBC says
I am about to apply this method to mount a giant paper map on hardboard (the stuff that goes on the back of bookcases). Fingers crossed that it will work! (Planning to make a frame out of baseboards to finish it off)
Sarah says
Love it!
Just wondering how the paper and mod podge has held up over time? Has it peeled or gotten sticky at all?
YoungHouseLove says
Still looks great even after a big move and 10+ months of use!
xo,
s
Terri says
Great idea! Here is another idea a friend at work gave me for lining the drawers in my our baby nursery. I had saved all of the cards from the showers before my son was born. I don’t know why I as saving them, but they were just too cute to throw away (recycle, of course :) ). Anyways, my friend had the idea to use the cards to line the drawers. So I cut the the fronts of the cards off and trimmed them down as needed then glued them on a backing sheet of paper that was measured and cut to the size of each drawer. I then laminated each piece (I am a teacher so I have access to a laminator). And now we have each drawer filled with small keepsakes from our friends and family! ps- I LOVE your site! I’ve gotten many great ideas, thanks! :)
YoungHouseLove says
Such a cute idea!
xo,
s
Sarah says
This is such a cute idea! I am planning a much-needed update to my dresser this summer, and think this would be a fun idea to brighten it up! I am a huge fan of Mod Podge, but as you stated, I noticed that the glossy type I have tends to leave surfaces slightly sticky. Just wondering how your drawers are holding up now, just over a year later. Did you notice any sticking at all? I think I might have to buy myself some matte Mod Podge now!
YoungHouseLove says
We thankfully have had no stickiness to worry about at all. It’s holding up really well and nothing sticks or rubs in any weird way. We did leave them out in the sunroom for dry for about a week so we were sure they were fully cured before installing the drawers back into the dresser (because we worried they’d always be tacky if we closed the drawers before they fully dried). We’ve definitely heard that matte Mod Podge is the way to go, so that probably helped too. Good luck!
xo,
s
Maura says
Was the wrapping paper a special or super heavy weight? I just tried this with my drawers and as I was smoothing with the card, I kept getting tiny rips and tears in the paper. I ended up ripping it out (as much as would come out) and am not sure what I did wrong.
YoungHouseLove says
Oh yeah, your paper might be the thinner kind. Ours was almost like craft paper (it was the kind that came as a big sheet from a gift shop and not in a long roll). Hope it helps!
xo,
s
Alison says
Any thoughts on using this same technique for inside of kitchen cabinets? I’m debating about this because I know that mod podge would be a more permanent solution, but I feel like the inside of our cabinets could use some life! AND I’ve found (or rather, not found) that contact paper does not come in cute/modern prints. I would obviously be choosing a color/pattern that is rather neutral instead of crazy/bold and none of our cabinets have glass fronts, so we or the new owners would only see the color/print when the doors are opened. Any thoughts and opinions would be greatly appreciated! Thanks!
Alison
YoungHouseLove says
I would use spray adhesive to attach good thick paper (nothing too thin and brittle) and then Mod Podge over that once it’s set (for a nice seal). Oh and use the matte Mod Podge because it typically results in less bubbles.
xo,
s
Jenny says
Thanks for the quick tutorial!! I used your instructions to line my old kitchen cabinets and they look so fantastic! I went the tape route (since I’m renting) and so far…so good!
Here’s my before and after: http://jennygilson.blogspot.com/2011/05/first-diy-in-new-house.html
YoungHouseLove says
Sweeet! So glad it worked for ya.
xo,
s
Christina says
Hey guys! I came across this project (looks fabulous, by the way) and was wondering if ya’ll think it could work in a bathroom? We have REALLY old drawers and I hafta do something with the inside…what do you think?
YoungHouseLove says
Yeah, I think so! I wouldn’t recommend it on drawers that will be soaking wet or anything, but some normal moisture should be ok (we use a humidifier in Clara’s room and stuff).
xo,
s
Sylvia Renshaw Smith says
Just as a note: My daughter is 24 and before she was born I refinished a dresser given to me by my mother. This was before the internet and I can’t remember where I read it, but the tip was to line the baby’s dresser drawers with the wrapping paper received via baby gifts. I was careful about unwrapping all those gifts and carefully folded the paper and created a sea of color and patterns inside each drawer. As another note, that dresser still has the lining and it brings back memories each time I open a drawer. Someday I might use a piece or two of that paper to wrap a gift for my grandchild!
YoungHouseLove says
So cute!
xo,
s
Tiffany says
I finally tried this! http://thetastefulllife.blogspot.com/2011/08/quick-and-dirty-diy.html
YoungHouseLove says
Cute!!
xo,
s
Tonya says
I found some wonderful Jonathan Adler wrapping paper I want to use and your idea is wonderful, but I want to put it on a kitchen or dining room wall. Do you think the same process you used for the drawers could be applied to walls? This will be my first “mod-podge” experience?
Also did you have any “stickiness” problems during summer, as one lady mentioned/asked about.
Thanks.
YoungHouseLove says
We didn’t have any issue with stickiness or tackiness so I think it could work for mod podging walls! There are some awesome tutorials over on Pinterest.com I think. Hope it helps!
xo,
s
jenn says
i recently moved and lined all the cupboards & drawers in our new kitchen with woodgrain contact paper. it’s adorable but it ALREADY started curling up in the corners on some shelves. definitely going to whip out the modpodge for my baby’s new dresser drawers, and i just love that the possibilities for prints is endless!!!
Kelsey says
Hey Guys!
I love the added touch of modge podging them down, I recently refinished a dresser and was planning on lining the drawers…never thought to modge podge it. LOVE the idea! I also am taking old cardboard from around the house and wraping it in paper to create drawer dividers cause sometimes those big drawers are just too big ang baby clothes! So i am using dividers to lable each area ( long sleeve onsies/shirts/socks) this will also help so the hubby and I always put things in the same place! ( wishful thinking that I will get laundry help I know-lol)
Anyway keep up the good work!
Amanda S. says
This looks great! I just refinished a dresser for my baby that was my mom’s as a kid, then mine, and now his. After looking for decent drawer liners, I took your suggestion and used paper from Ink & Paper. Can’t wait for it all to be finished!
Tara T says
As usual, thanks for the tips guys!! Pregnancy has brought out a whole new crafty side to me. I’d never even heard of Mod Podge before, but following your directions, I just successfully (well, almost, there seem to be some wrinkles despite my best efforts) lined the baby’s drawers on his dresser. We refinished an old 1960s dresser, added new hardware, and now the drawers are all set to go. I can’t wait to put his little clothes in it!
YoungHouseLove says
Aw that sounds adorable! And a few wrinkles just give it character so he knows mommy made it with love!
xo,
s
Nikki says
http://www.twolooniesandapenny.blogspot.com/2012/02/lining-pennys-drawers.html
Unfortantely, I couldn’t get the cheap wrapping paper from the dollar store to stop wrinkling but owell, they are made with love. And I couldn’t resist the polka dot paper which matched the dresser handles. Great tutorial though, thanks :)
YoungHouseLove says
It’s adorable!!!
xo,
s
Smerby says
Ahhh, I’m so frustrated! I got wrinkling in my drawers following all of your instructions :[ No one else seems to have had this problem–what could I be doing wrong?
YoungHouseLove says
Are you using the matte Mod Podge? We hear the glossy one can be wrinklier. Also did it all dry? Sometimes small wrinkles that you see when it’s wet shrink up and practically disappear when it’s dry. One other thing to try could be to use double stick tape to hold it down from below and just Mod Podge the top if you think that might keep the wrinkles at bay!
xo,
s
Smerby says
Haha, I’m glad you followed up, because I just came back to comment… everything disappeared overnight! I had used matte Mod Podge, was super disheartened… then woke up and everything looked fine! Yeah, I guess no matter what I do, it wrinkles when wet, but it all looked fine in the end. Thanks!
YoungHouseLove says
Yay! So glad! It really shrinks up when it dries.
xo,
s
SarahDavid says
Any cutting tips you can share? Your lines look very straight, and the right angles look perfect in the picture. I have had much less success lining shelves in the kitchen, and I’m about to do a dresser for the twins. Don’t want it to look sloppy, especially after spending countless hours refinishing the exterior. :)
YoungHouseLove says
I like to use an craft or exacto knife against a straight edge (like a ruler) instead of scissors when I can. I find I get straighter lines that way. I also find leaving myself a little bit extra (even if it curls up slightly around the edge) looks better than having too little and seeing a gap. Good luck!
-John
Kirin says
Just wondering, now that it’s been a couple years, how are the drawer liners are holding up? Still no stickiness? What about scratches or peeling? I’m thinking of doing this to my recently refinished Craigslist find . . . as always, thanks for all your great tips. Love your blog!
YoungHouseLove says
They’ve held up great! Granted they’re usually so covered with clothes we haven’t really noticed if they’re getting worn or scratched, but they’re definitely not peeling. And they are getting worn it certainly hasn’t been noticeable!
-John
Svathi says
Hi, I lined my dresser drawers with colorful adhesive contact paper.
YoungHouseLove says
That sounds really sweet!
xo,
s
weatherkim says
This is a great idea. Just wondering if doing this to the top of an old dresser might work? Concerned about it feeling tacky on a hot/humid day… Thanks!
YoungHouseLove says
I think it would work if you were sure not to load things on too thick and made sure they dried thoroughly before using it. I have heard of people decoupaging the top of a table so it seems pretty common!
xo,
s