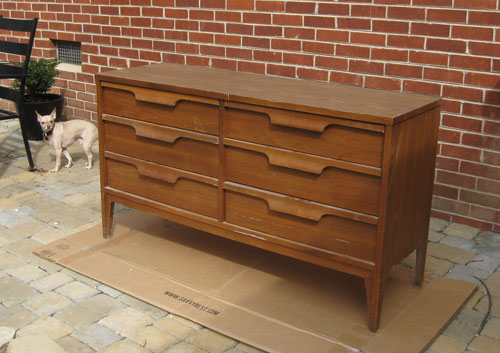
On Tuesday we shared how we refinished a Craigslist dresser for the nursery, taking it from this…
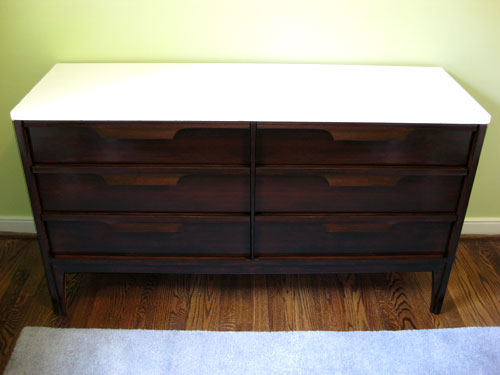
… to this:
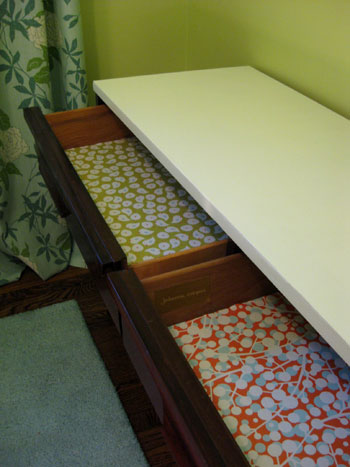
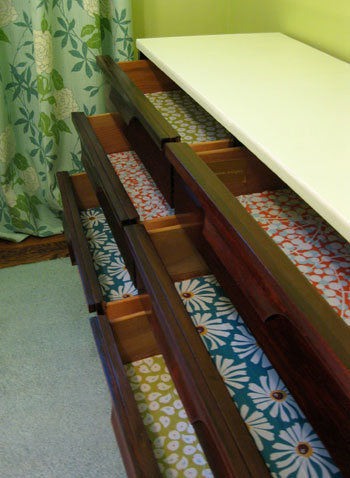
So now we’re back with all the dirty drawer lining details as promised. This project actually only set us back around $1.30 because we already had everything on hand that we needed except for two foam craft brushes which we picked up at Michael’s for around sixty-five cents a pop. Our other already-owned project materials were Mod Podge and six sheets of wrapping paper (given to us by friends who founded this awesome local paper shop called Ink + Paper). And just for fun we selected three different patterns to use inside of our six 50+ year old drawers to give them a totally fresh look and a nice clean texture (as opposed to the raw wood that they came with).
We were lucky that the drawers were pretty clean (nothing a wipe down with a moist rag couldn’t remedy) and there wasn’t any musty smell or sticky stain to be found. But if you’re dealing with a slightly grosser old drawer scenario (like mustiness and odor that slaps you in the face every time you open a drawer) we’ve heard that wiping them down with mineral spirits and letting them sit out in the sun or air out in the garage for a bit might do the trick. Murphy’s Oil Soap is also said to be one of the best ways to thoroughly clean wood drawers that are past their prime to rid them of any stains or smells. And as extra credit you can place bowl of fresh ground coffee inside of each drawer to absorb any lingering odor afterwards (we’ve also heard that bowls of untreated charcoal briquettes work the same way). Gotta love a cheap and natural solution like that.
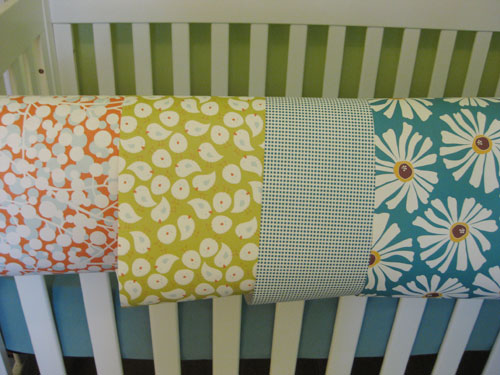
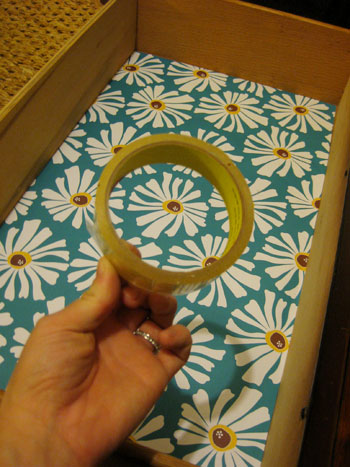
Anyway, here are four of our potential patterns that we laid out over the lip of our crib to evaluate as a group. We actually opted to use the three boldest ones twice (since we had six drawers to line) so each drawer would have a punchy little surprise inside. This meant that we had to eliminate one pattern so after a bit of deliberation we settled on two drawers with the orange bubble pattern, two with the green birdie design and two with the bright blue flowered paper. We figure that they’ll never all be open at the same time so it’ll hardly be overwhelming and we liked the idea of Baby P pulling open each drawer when she’s older to see something fun and graphic while she’s grabbing a pair of socks or putting away her crayons.
So after selecting our six sheets of wrapping paper (in three different patterns) it was time to cut each of our six sheets down to the size of the drawers (luckily they were all the same size so we cut one out and just used it as a template to quickly snip out the other five. Then we just had to decide how to adhere our “drawer liners.” Initially we debated using some simple double stick tape to hold the paper down around the edges, which probably would have worked just fine. But after a bit of thought we realized that we wanted something a little more heavy duty (that could take a bit of a beating for the next 15+ years and still look pretty good).
So that’s when we settled on Mod Podge. We recently used it to create “vintage” sign art for our bathroom, so we know how well it holds up to moisture and general wear & tear (thanks to the protective coating that you can apply right on top of any sort of paper to make it a lot more durable than it was before). The first step was not to Mod Podge over the paper though, it was to apply a thin and even coat of the stuff to the bottom of the drawer so that our pre-sized pieces of gift wrap could be securely adhered.
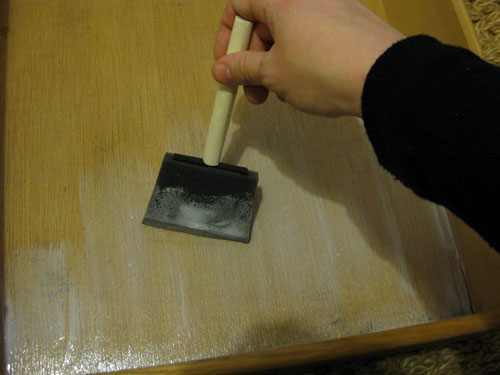
We always go for the “matte” kind of Mod Podge because we’ve found that it cures up more solidly and never feels tacky or sticky after it fully dries (usually within a few hours) so that should help keep the drawers from feeling grippy and tacky even in the warmer months. So after we slicked that onto the bottom of the dresser it was as easy as sticking down our already-cut-to-size gift wrap rectangle and pressing it along the center and out towards all of the corners to eliminate any bubbles or wrinkling. Note: we did not apply Mod Podge to the back of the paper, only to the bottom of the drawer.
I then worked my way around each of the other drawers, applying the Mod Podge to the base of the drawer and sticking down each pre-cut rectangle of gift wrap. Oh and the reason I didn’t go right to applying a layer of Mod Podge over the first wrapping paper swatch after it was stuck down was because I wanted to give it ample drying time before moistening the front of the paper and possibly causing bubbles or wrinkles. In fact, I gave all of the drawers about four hours to fully dry before applying that top coat of Mod Podge over the paper for added protection.
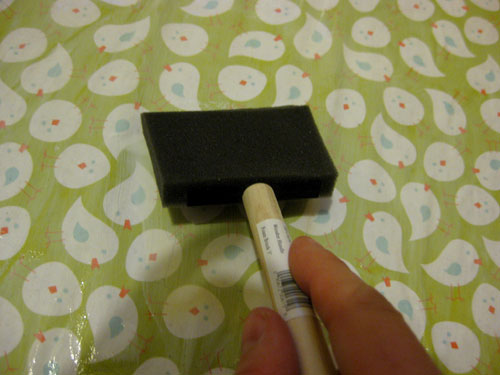
I was sure to apply the top coat evenly and thinly (not too gloppily so as to avoid wrinkles and bubbles). And after letting them dry overnight, we were left with durable and cheerful lined drawers that should last for the long haul (while providing a little dose of happy every time they’re opened). Oh and we love that Mod Podge is 100% water based and non-toxic so it’s not going to stink up our baby clothes or pollute the nursery like some other more chemical-ish sealers might. Good times.
So there you have our under-two-dollar drawer lining adventure. We’d definitely suggest looking around your house for anything from decorative scrapbooking paper and gift wrap (even tissue paper) to swatches of wallpaper or even flash cards or playing cards to create your very own custom drawer liners on the cheap. Mod Podge + pretty much anything that’s flat = interesting drawers that make you smile every time you slip them open. And you could even line drawers with old swatches of fabric, we would just use dots of fabric glue or even glue gun dabs on the back of each piece to hold them down as opposed to Mod Podge.
What about you guys? Have you lined any drawers with something that you already had around the house? Or even hit up Target or the dollar store for festive paper with just that purpose in mind? We’d love to know if you’ve added some unexpected personality to the inside of a dresser or cabinet so spill the drawer lining beans.
PS: Wanna see another cool way to spice up a thrift store find? Check out this cool paint pattern we applied to a secondhand desk.
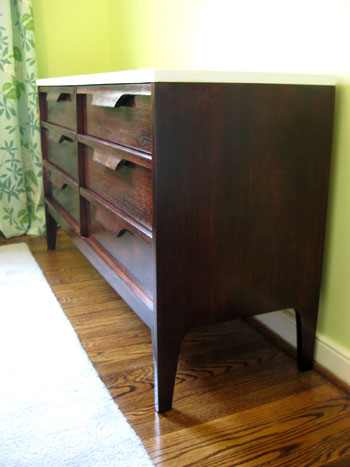
Psst- Wanna see our nursery progress from the very beginning? Here’s our painting post, our big shopping spree, our crib hunting rundown, our curtain-making tutorial, our fun little chair search, our mirror-painting extravaganza, this DIY faux sheepskin project, and our big dresser makeover. Fun, fun, fun.

Heather says
Such a darling idea!
Shari says
When I was pregnant with my two boys, I used the cute tissue paper that came from shower gifts to line their drawers. Everytime I opened the drawer, I remembered how generous people can be. Now that they are older, I’ve taken the baby tissue out, cut out squares of it and put in their baby books.
You have done another wonderful job and the baby is going to have a beautiful nursery!
Kelly says
I lined our pantry with extra fabric I had from our wedding!
Abby says
So cute! I love it. I recently bought and refinished an old craigslist dresser and I lined the drawers with scented drawer liners I bought at World Market. They are so adorable! And I’m loving how my t-shirts smell like lavender when I pull them out. :)
Jen says
This is such a cute and fabulous project! I would go in there and open the drawers all the time just to peek at the charm that was just created! So fun and fresh!
You guys rock!
Felicity says
What a great idea to use the mod podge to secure the paper. I always get frustrated when the liners shift around and eventually tear. Also a good tip about the matte mod podge, I covered a chair with paper and the glossy stuff never really dried…even after 12 years.
I’ve been thinking about wall papering the inside of the built-in bookcase in my office-someday-a-nursery. I love the way your different patterns look. Perhaps I’ll give that a try sometime soon.
Nicole says
I lined my baby’s dresser drawers with wrapping paper from the baby shower. I carefully unwrapped each gift (my guests were dying at how long it took me to open the gifts!) and then wrapped it around the already existing drawer liners and secured it with tape. I didn’t want it to be too permanent because the dresser is on loan from my mother in law. So, changing the lining and the hardware was all we were able to do to spruce it up. It turned out cute, though, and was a very cheap project – it cost nothing! Now I always wrap baby gifts instead of putting them in bags, incase the new mother-to-be wants to do the same!
Katie @ The NOC says
Looks great!
I am in the middle of my own dresser rehab project as well, for our master bedroom, and purchased a few rolls of wallpaper on sale at a local thrift store in hopes of using it to reline the dresser drawers (you can see pictures of our current dresser and 70’s-tastic drawer liners here: http://normallyoddcouple.blogspot.com/2010/01/cleaning-mode.html)
Do you thing Mod Podge would work with wallpaper too?
Katie
YoungHouseLove says
It probably would, but you can also pick up wallpaper paste at a home improvement store (it’s really not that pricey at all) just to be sure that it’ll be “compatible.” Hope it helps!
xo,
s
Katie @ The NOC says
Woops! My end parenthesis messed up the link…
Here it is: http://normallyoddcouple.blogspot.com/2010/01/cleaning-mode.html
Katie
Audrey says
I have an old dresser that could use some serious lining and I never even thought of using fun papers! thanks so much for the tip!
Amanda H. says
I just had to say, these are so cute!! :) Great job guys! You really brought that chest of drawers to life!
Laura Durrer says
I love this idea of mod podging paper to line drawers. In fact I just blogged about lining a dresser the same way on Tuesday. I cut a variety of scrapbook papers to 2×2 for the drawers and 6×6 for the cabinet. I didn’t have any problems with bubbling when applying the mod podge to the bottom and top at the same time, but it is a good recommendation.
Here is a link to the dresser I upgraded:
http://www.oliveandlove.com/2010/03/furniture-evolution-small-buffet.html
Thanks for looking! I adore your blog! I have three kids and have loved preparing the nursery every time!
Sarah Sarniak says
I’ve never thought about using gift wrap for this. Thanks so much for the ideas, it turned out just fabulous.
Colleen says
What a great project! I just wanted to let you guys know that I love what you are doing with your nursery. I will be starting to do the same in a couple of months as we are expecting our first in early September and I have found all of your nursery stuff very inspiring!
I cant wait to hear about the crib skirt because I plan on making all of the crib bedding myself (other than the fitted sheet) and that was one thing I wasnt sure how to tackle.
Keep up the good work!
Christen says
Oh man! Restaining is a total pain. I’m feeling it now because I’m doing it to a chair. Stripper then sanding, it’s no easy project! I’ve actually taken a break from it so it’s not even stained yet. Good job- I totally feel you on this one!
Bethany G. says
Love this whole project, and Burger looks so cute in the Before picture!
Barbara says
You two are so imaginative that I expect the Bean to be born with a fabric swatch in one hand and a design in the other. This spring I’m dragging my mid-century dresser outside and refinishing it in your color. You’ve inspired me!
__
Barbara
http://ifididnthaveasenseofhumor.blogspot.com
Denise Stark says
I love your blog, it is so inspirational to me. I am in the process of a small bathroom renovation due to mold and was just about to order fabric from fabricguru.com and saw this post, and added 2 more yards to do the drawer liners!
Nikki says
Great prints! I use wrapping paper, but didn’t adhere it, I just cut it to size and put it in baby boys dresser.
http://nikkisnacs.blogspot.com/2009/12/finished-nursery.html
Rachel says
You two are really an inspiration! It’s amazing how you come up with these ideas. I had put contact paper in all of my (rented) kitchen drawers and it was a major pain with not-so-cute printed paper. I am definitely going try it this way!
Kristen says
I love the dresser! We are considering redoing an old dresser for a changing table as well (due August 5th). I was wondering how you plan on attaching the changing table pad and making sure that its safe. I’ve seen this done a lot (dresser turned changing table) but I always wondered about safety. Not being critical, just wondering! Thanks!
YoungHouseLove says
Just as many of John’s sisters have done in their nurseries (lots of babies in the family = lots of ideas) we’re going to use an anti slip liner to keep our changing pad in place and will always have our hands on the baby. No funny business up there! She’ll always be held or she won’t be up on the pad. Of course we also plan to change her in other places (like on a blanket on the floor of the living room) as most new parents do. Whatever works! Hope it helps.
xo,
s
UPDATE: We just learned that our changing pad came with tabs so we can screw it firmly onto the back of the dresser (that way we don’t have to mar the top but we can add even more security). Hope it helps!
Natalie says
I love the papers you chose! The drawers look fabulous :)
Christie says
A comment to an earlier comment:
The anti-slip liner is a great idea. Some changing pads also have extra strapping that is intended for attaching to the back of the dresser, using a screw.
And to comment on the post:
WOW! Its perfection! Beautiful drawers and the liners, while modern, fit perfectly with the mod-vintage dresser. Sweet.
scenelady says
The dresser and drawers looks great! Recently I mod podged some colorful paper to the underside of some open shelving I installed in the kitchen. We have 12 foot ceilings and would never see the top of any of the shelves, so this adds a little interest and color when looking up.
a-m says
I was just explaining your blog to my hubby this morning over coffee… how when you two do something, you do it to perfection… and then wham… this post… see?…. perfection….. every… time… really…. you so inspire me A-M xx (I still can’t get over your bathroom).
Lara C says
What a fantastic idea! I love gift wrap (and anything bright found at stationery stores) and am happy to see Modge Podge again…ahh, memories from Girl Scouts (and decoupaging flower pots using printed paper napkins)…my mom always kept a huge container of it in our crafts closet. Thanks for the smile – little P will love it!
Meredith says
My mom and mother in law both gave us receiving blankets from when we were kids, and I ended up lining the dresser drawers with those. It’s nice, because when she grows out of a size, I can just take all that size out of the dresser at once by picking up the receiving blanket (and thus all the clothes on top), and tossing it into a vacuum bag.
Rose says
You do do everything to perfection and you both are on same page which helps heaps…..
I am trying to get hubby to build me a pottery barn bed which he is very able to do (having rebuilt an entire house) but he doesn’t feel like it!!!!! Arrrh if only I was so skilled… What I should do maybe start building and then he won’t be able to resist taking over.
I think you have great patience…see I would get frustrated after sanding and then way too lazy to do a gazillion coats…but I am happy to see that it is slow and steady that wind the race and that if I took the time to do something well it may not turn out half bad in the end…..well here’s hoping!
Navya @ Pitcher and Pearl says
I love that you lined the drawers with such pretty paper, and love even more how “permanent” the lining is. I think I my self would chose softer patterns and the same paper across all the drawers, but that’s just a personal taste decision. Your dresser turned out fabulous.
The Starr Family says
Fun, bright, fresh. Love.
Carrie says
I restored an old desk and lined the drawers with comics from the Sunday paper. It’s super cute but I never see them anymore since I obviously use the drawers for my supplies. Love your daughter’s drawers!!
betty in munich says
I loved this! Your dresser is so cheerful when you open up the drawers. But what I loved the most is how Burger “photo bombed” the very first picture in this post. I had a good laugh at that. Whenever, I take pictures around the house our cat always seems to “photo bomb” them too.
Rachel says
Hi Sherry,
I love the dresser how cool..My questions is would you say refinishing a piece is harder (for a novice like myself) or painting a piece is more of a challenge? I have a nice solid would desk that is just the wrong shade but I could go either way (refinishing or painting a nice white) and just wanted to seek your advice. I love all of your tutorials they really help so much!
Thanks, Rachel
YoungHouseLove says
Hey Rachel,
We would definitely say that painting a piece of furniture is easier because you can usually skip the sanding step and the staining & wiping step, so you just go straight to priming and painting it (unless it’s veneer, in which case you might want to sand it a bit just to rough it up). You also get easy and consistent coverage with paint whereas stain takes a bit more concentration. Both are totally doable but on a difficulty scale we’d put painting a piece of furniture at a 4 and staining/refinishing at a 5 (just due to the extra time and diligence it takes). Here’s a tutorial all about painting a piece of furniture for you (so you can see how simple it really is): https://www.younghouselove.com/2009/02/how-to-paint-furniture/
Good luck!
xo,
s
mrslimestone says
Looks fabulous!
This will last your baby forever!
Cecelia says
I love this project, and I love your choice of paper!
I’ve lined drawers in the kitchen with laminated paper and have lined dresser drawers with scented paper, but I had not thought of doing it with giftwrap.
I love it!
My daughter and I are going to do this project too!
As usual, thank you for a doable project and thank you for your great taste!
Roeshel says
I love the paper! The entire dresser turned out amazing – of course! :)
Christina says
That dresser came out amazing!! I love the dark tone. The paper inside is super cute too!
Jen Z. says
Thanks Sherry! I think I’m going to take the magazine holder project on. I have never use mod podge before. Do you think I would do the same process that you did with the drawers? put on the magazine holder first, let dry, then put more mod podge on top of the paper? And the last question, where do you buy mod podge? I’m from Long Island. Micheal’s or AC Moore? Now I just have to find pretty wrapping paper to work with. And Ikea has the cardboard ones cheap too, so it wouldn’t be that expensive of a project. ;-) I love DIY. And I sure will send pictures to you guys. Thanks!
YoungHouseLove says
Yup, that process should work perfectly. Just be sure to get the matte kind and not the glossy one (we find it dries better). And you can get it at Michael’s. Hope it helps!
xo,
s
Trish says
This looks great, as does the entire nursery. While reading, it struck me that this may be something I could use in kitchen cabinets? What do you think? I have a 70’s kitchen and am trying to freshen it up – changing hardware and a good scrubbing of the outside (I hate the thought of painting wood) but the interiors are kind of yukky and the shelf liner doesn’t stay in place.
YoungHouseLove says
Oh yeah, you could definitely use this method to line your kitchen cabinets! Of course if you’re selling your house in a year or so you might want to opt for something less permanent (like Mod Podging the paper to cardboard and dropping that onto each shelf). But it’s definitely a nice little added bonus to freshen up your kitchen (and it’s easy to wipe down if you apply a few extra coats of Podge on top of the paper for long lasting durability). Hope it helps!
xo,
s
Andrea K says
LOVE this!!!
Shannon says
I don’t comment all that often, but I just have to say that this project is amazing! You guys did a great job with the dresser makeover! I love the dark stain and the crispy white top! Fantastic, it’s so inspiring…
Becky says
Looks fantastic guys. When my siblings and I were babies, my mom lined our dresser drawers with wrapping paper from our baby presents and our first birthdays… I still have that vintage wrapping paper in perfect condition in my old dresser! It makes me smile and think of my Mom as a young mother every time I open the drawers. I think I’ll have to carry on the tradition when we have little ones. Anyway, I just thought I’d share a different take on your adorable project. Keep having fun!
Jen Z. says
Thanks Sherry!
The Virginia House says
So cute! Maybe I would look forward to puting the clothes away if I had all my dresser drawers so cutely lined…doubt it;-)
Mod Podge Amy says
I love this! Please e-mail me if I can post on my Mod Podge blog! modpodgerocks (at) gmail.com. Thank you!!
candace says
Adorable paper!! The dresser turned out so beautiful!
Laura says
Great project. After my baby shower I kept some of the best wrapping paper on my gifts. Yes I was a bit anal about it! But then I lined the baby’s drawers with my favorites. The paper then had sentimental value and reminded me of that fun day and all the well wishes that came with it. It was also a nice way to acknowledge my friends and family that put so much time into wrapping beautiful gifts! I still love my drawer paper and my son is now four! As usual, a fun project from you both! Thanks.
Leslie says
Amazing makeover! Really love the colorful drawers liners!
Jessica says
I love the paper you picked out!! Looks great! Last summer I lined my nursery’s dresser and closet drawers with thin foamcore wrapped in fabric…I just cut the foamcore to the size of the inside of the drawer…wrapped the fabric around, securing it with masking tape and set them in the drawers. I like to change things up quite often, so I didn’t want something permanent! I’ll take some pictures and send them to you soon. :)
YoungHouseLove says
Great idea. We’d love to see pics!
xo,
s
Carmie of the Single Nester says
What a great job! Simple yet lovely.