Ok, so we completed the door-painting process a few days ago (picture us doing the droopiest super-tired happy dance that you’ve ever seen) and we’re now into the “waiting game” portion of the cabinet painting process. But we couldn’t wait to share all the photos of everything both during the painting-process and now that they’re all glossy and finished, so here ya go:
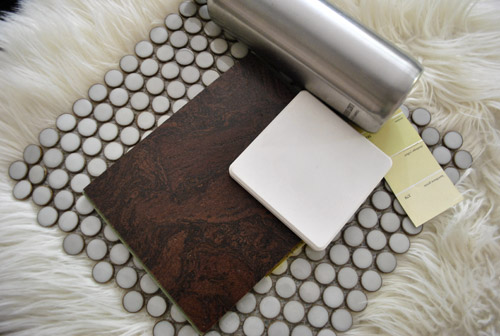
We used Benjamin Moore’s Advance paint in Cloud Cover in a satin finish (it’s a soft tonal taupey-gray color, so it’s not quite as bright as our glacier white counters for a subtle layered look). Benjamin Moore Advance paint (in the satin finish) actually came recommended by a few pro cabinet painters that we know. We used it on our office cabinets a few months back (which still look mint after Clara has beat on them relentlessly with wooden toys) so it’s safe to say that we’ve been extremely happy with it. The fact that it’s low-VOC, self-leveling, and amazingly durable is pretty much the cabinet paint trifecta.
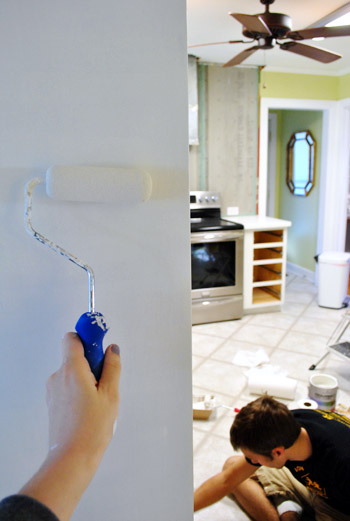
Just like we did for the office cabinets, we applied it with a high quality 2″ angled brush to get into all the cracks and a small foam roller to smooth everything out and ensure that we were applying super thin and even coats. As for applying any sealer or topcoat, the general pro recommendation for cabinet painting is to use high quality stain blocking primer and 2-3 thin and even coats of super high quality paint with ample drying time between coats (Benjamin Moore’s Advance paint is meant for cabinets without any top coat, since sealers can drip, yellow, and even cause things to stick/crack since they thicken the application). We’ll be back with a video on Wednesday to share more actual application details/tips along with the big full monty reveal (we thought it would be helpful to share one exhaustive how-to-paint-cabinets-post with a detailed tutorial, application video, and the after pics all in one spot).
Using high quality primer and good self-leveling paint helps hide a lot although it doesn’t guarantee 100% invisible grain (we don’t see any evidence of grain on the oak cabinets in the office but do see a hint of it on the kitchen cabinets, so it probably just depends how much grain your cabinets have to begin with). We don’t mind painted wood that looks like painted wood though, so a little grain is ok with us, as long as the paint is nice and even and glossy.

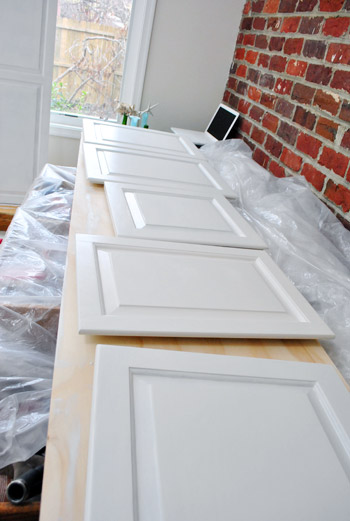
For those wondering how those few retrofitted doors that we whipped up are doing with primer and paint (more on that process here), some of them are completely seamless (the two corner cabinet doors might even stump a detective) while a few others are a tad less than perfect. By this I mean if you look at them from an inch away for five minutes (bobbing your head back and forth to catch the light bouncing off of them) two out of ten people might notice a tiny seam. See the über light horizontal seam on the door with the arrow in this pic below?
![]()
Yeah, me either. Haha. It’s nearly invisible and impossible to photograph. But once we hang them all we’ll take some close up pics for ya. Even in person it’s so subtle that we can’t decide if it’s worth doing anything about (thankfully at least two of the five doors are seamless, so we’re leaving those for sure). We’ll keep you posted if we decide to sand the other three one more time and use some sort of buildable primer and a few more coats of paint to hopefully make them as perfect as the two corner cabinet ones).
We’re psyched to have two perfect ones among the group because it gives us faith that if we want to be super type-A about things, we can probably get all of them to look that good with a little more work (if none of them worked out we’d bag it and go with Plan B). All in all I’d say we’re really happy about being able to work with our existing cabinets to save some major loot (thereby making other upgrades like new appliances, cork floors, new counters, new backsplash tile, and a big opening into the dining room possible).
So for $40 in paint (ya know we used a $10 off coupon, haha) and $22 in primer, we’re beyond overjoyed at the new layout and the lighter look! Painting cabinets is right up there with painting wood paneling or dark brick – we think it’s one of the biggest bangs for your buck. It’s amazing what 60 bucks can get ya. Well, 60 bucks and a week of puttying, sanding, deglossing, priming, painting, and waiting not-so-patiently to put everything back together.
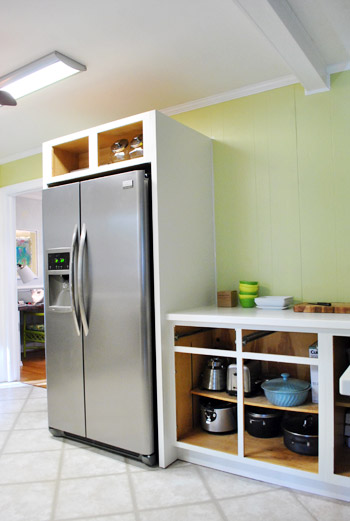
Oh and we primed and painted the outside of the frames and the front and back of the doors while leaving the inside of the cabinets oak. This way we can toss things in there and pull them out without worrying about scratching or peeling paint. We also like the two-toned effect of clean paint with wood interiors (we did that in our old kitchen and in our office built-in cabinets and really love the surprise of natural wood when you open the door).
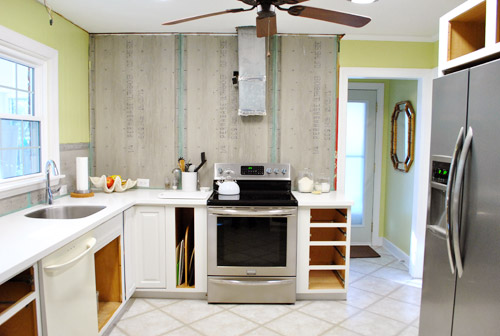
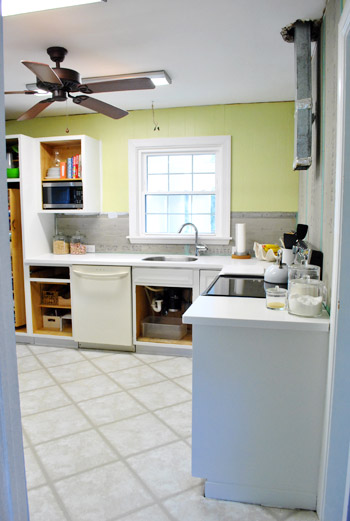
Of course the room’s still pretty white-washed since the rich cork floors aren’t in yet, but we’ll get there eventually. And now for a bunch more random doorless pics. This is fun because you can spy on all of our kitchen items like my pretty blue cassarole dish:
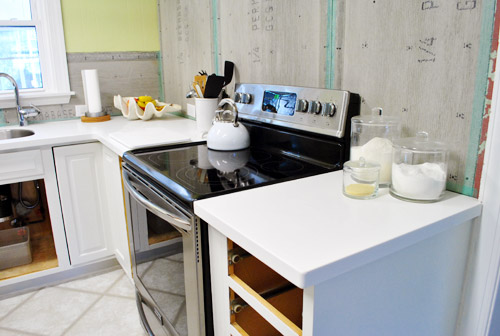
This shot makes me long for our backsplash tile to go up (after we hang our cabinet doors and add hardware it’s next on the agenda!).
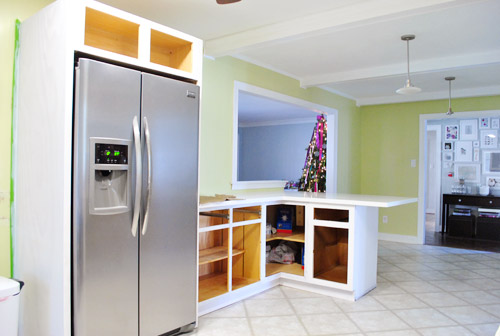
Yes, our tree is still up. I always hate taking down my glowy happy friend.
It’s so light and airy in here now… except for that terrible bisque dishwasher. Egads. Can’t wait to install the new one (after we lay the new flooring so it can run under it).
These two views (the one above and below) are a lesser seen angle (taken from the office doorway). I still do that “ahh!” thing when I walk in that way because I keep picturing the dark old kitchen that used to be there.
You know, the one that looked like this (although John didn’t always stand on the counter like that).
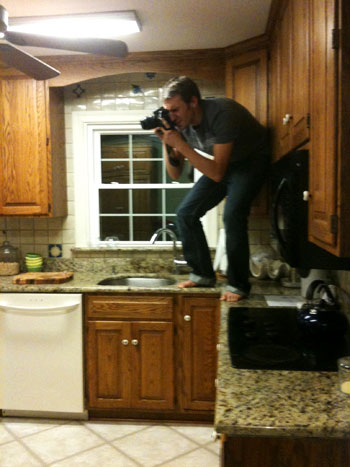
I like it a lot better now.
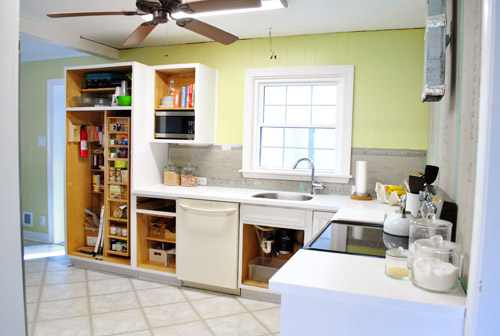
And once we add the 12″ deep floating shelves and a range hood over the stove, things like the sink window will look a lot more balanced (there will be 14″ of space on either side of it):
We’ll be back with an entire cabinet-painting tutorial complete with a detailed video and lots after photos on Wednesday when things are finally cured enough to hang the doors and add hardware. Ahhhhhhhhhhhhh, even typing that is more thrilling than I should admit. I’m off to watch paint dry. Literally. Ok, and write more book stuff. There’s nothing like an entire-manuscript deadline of the 4th to get the year off to a ca-razy start! But just like fiiiinally finishing our painted cabinets, handing in our huge 260+ page beast of a book should feel pretty darn good! Then we just have to shoot 100 secret photos/projects in our house over the next two months. Ah chaos, come on in and get comfortable. I hope you don’t mind an in-progress kitchen…
Psst- In case you were off caroling and cavorting, here’s a roundup of all the posts that you may have missed over the “holiday break”:
- Our ribbon-rific holiday card (here)
- A whole lotta cabinet puttying and sanding (here)
- Making some 2012 resolutions (here)
- Priming our pants off (here)
- A superlative-riddled December recap (here)
Glad to have ya back!

Chantelle says
Ahh, looking amazing guys! Can’t wait to see it finished!
You really are an inspiration – after reading through a lot of your posts over the last year or so I feel a lot more confident in tackling some of the things in our home!
I would LOVE to paint our kitchen cabinets. They’re not terrible – a kind of cherry colour – but not the white that I would ideally like to see (and the kitchen doesn’t get a whole lot of light so it needs all the help it can get)! Unfortunately, as is the case with a lot of kitchens over here in England, the cabinets are some kind of cheaper grade wood with a laminate finish stuck on top. Because of this, I’m terrified to try painting them and then have it go horribly wrong — we can’t afford to fix any mistakes on that sort of a level!
Do you guys have any experience with painting laminate and have any tips you could share??
PS. Was lovely to find out you guys are in Richmond… Hubby and I were just there (and Roanoke, and NC & SC…) for a holiday in October/November. Missing it like crazy!
Thanks :-)
Take care,
Chantelle
YoungHouseLove says
Aw man, we have no experience painting laminate but what I’d do is remove a door or drawer and bring it to a really good specialty paint shop and see what they recommend. Good luck!
xo,
s
alg at rental house rules says
I know this is kinda off topic, but I just get SO happy and excited for you guys when I catch a glimpse through the new kitchen-to-dining room doorway!!!
It makes all the difference in the world!
Happy 2012 :)
Ali says
Can’t wait to see all the “after” pictures. I know it will look great with everything hung and all the finishes!
BTW, can you use cork flooring like that in a bathroom? We’re looking into other options besides ceramic and vinyl (ick on the vinyl) for our guest bath.
YoungHouseLove says
Hmm, I don’t think it’s recommended since it’s more than just slight moisture (a kitchen and half bath are cool but I don’t think a full bath…).
xo,
s
erin says
This might sound a little strange, but I’m really loving the unfinished walls here. Not saying I would leave them unfinished, or that what you’ve got planned won’t be great, but the nice stoney grey color of the unfinished wall (dry wall, sheet rock, whatever it is) with the pop of teal vertical lines looks so great with the bright whites and green paint. I mean, finish what you’re doing, but you might have just inspired something different for my kitchen renovations!
YoungHouseLove says
Haha- I love that. Send pics of your backerboard inspired kitchen!
xo,
s
mp says
Looks terrific!
“Low-VOC, self-leveling, and amazingly durable is pretty much the cabinet paint trifecta” — indeed, it’s the holy trinity! I’m converted.
Morgan says
Wow!! It already looks so great! Can not wait to see the finished result. I love the penny tiles you’ve chosen and I adore the greenish color of them (very similar to the tile we’ve just installed in the new bathroom). Great job!!
Kristal says
Just curious what (if anything) you two are planning to do w/the fan in the kitchen? I never noticed it before!
YoungHouseLove says
All new lighting in there is on the agenda! Two pendants will hang over the peninsula and there will be some can lights in the cooking area. Wahoo! Can’t wait!
xo,
s
Kari says
Looks wonderful! Can’t wait to see how it turns out. Did you do two coats of primer and two coats of paint? How long you wait for the prime/paint to dry before you did the next coat?
YoungHouseLove says
We read the labels on the primer and paint that we use since it can even vary by finish! This primer’s label said not to overprime, so we did one coat and the coverage was good so we moved on. It took two coats of paint and we applied those after the suggested drying time passed on each coat from the can’s directions. Hope it helps!
xo,
s
Melissa says
Loving the kitchen updates! It’s like watching your favorite show on tv…just as it’s getting REALLY good: until next week sigh.lol I could read posts about your kitchen renos all day. :)
Emily says
It looks soooo great. SOOO great!! Can’t wait for the next update!
Ericka says
Good Lord! HOW do you guys do it?! I’d be stressed just getting the book deal done – but, remodeling a kitchen on top of that?! You absolutely amaze me. You guys deserve a vacation – for sure!
YoungHouseLove says
Aw thanks Ericka! It’s one of those when-it-rains-it-pours times, but you know we like to stay busy! Haha.
xo,
s
Ruth Abbott says
I have realised that, just like a person-to-person stalker I am carrying out an entirely fictional and marginally obsessive relationship with your kitchen of which it is entirely unaware. I would like to apologise to your appliances and hardware and can only excuse myself pleading dissatisfaction with the current state of the old wooden doors in my 5ft by 5ft kitchen (it doesn’t even make an effort to please me anymore!). In all seriousness though I hope you are getting those crazy little flutters when you walk in and you’re as excited about the big reveal as we all are!
YoungHouseLove says
Bwahahaha. Comment of the day goes to Ruth!
xo,
s
Nicole says
Looking GOOD! Can’t wait for the backsplash to go up. You inspire me daily to take a ho hum house and make it beautiful for our next move (which is getting scary close – still saving for the ol down payment!).
YoungHouseLove says
Woot! Happy saving! That’s so exciting.
xo,
s
Donna says
SUCH a great difference! We just painted our dark cabinets white and ORB’d the knobs and hardware, and it feels like I’m cooking in someone else’s kitchen! It really is amazing what a little paint can do, eh? Looking forward to the end result for you guys.
YoungHouseLove says
Wahoo! That sounds amazing!
xo,
s
Heidi P. says
So. awesome. I’ve just been catching up on your holiday posts. I actually like the wood grain look under the white. It’s kinda texturey and unique.
I don’t know if anyone else does this, but sometimes when I come here to comment, it makes me want to post on my blog about the stuff I’ve been working on, just so I can share it w/ you guys here. *blush* :) But alas, my holiday projects aren’t quite ready to be posted yet. Soon. Soon. (The saddest part about all the projects was that when I went to buy clear glass ornaments to do some of the things I’ve seen here and on pinterest, ALL the stores were completely sold out! Like hot cakes!
YoungHouseLove says
Aw man that stinks! It seems like Christmas stuff is selling out faster and faster these days! Weeks before Christmas it’s gone! So strange…
xo,
s
Anna says
What a difference paint makes hey? I painted my 1950s retro style kitchen last year (from a lovely combination of mustard yellow and lemon yellow – I know, what were they thinking?) to bright white. With our grey walls, it is rather lovely, I think!
Loving the new look and can’t wait to see the before and afters!
Amanda says
How exciting – it’s looking amazing! I can’t wait to see it all finished (I’m sure you can’t either, haha) :)
Kate Copanic says
Looking great. It looks so much more light and airy now. Can’t wait to see more!
Malissa says
Wow, everything looks so fresh and pretty or fresh and so clean-clean if you like :)
How much paint did you end up using?
YoungHouseLove says
Felt like barely anything. Maybe a third of a gallon?
-John
Kristen says
AMAZING!! You are so close to being done! The cabinets look great! I love white cabinets! And I hate taking the tree down too, such a drab way to start the new year with trees out by the street waiting for the trash pick up. Love that yours is still up.
I can’t wait to see it finished. I’d love the pennisula idea and if I ever redo ours I’m totally copying it.
Amanda Robinosn says
Looks great!!! You have helped inspire me to actually pick out a paint color for my cabinets and paint them…it looks daunting but doable!!! How long are you keeping the doors off to let them dry???
YoungHouseLove says
We’re just following the recommendations on the can (around 5-6 days of cure time). Can’t wait to get them hung on Wed!
xo,
s
Sheela says
Very impressive progress! I know what hard work it is to paint anything, let alone something that really requires a beautiful finish. Great work, and I look forward to seeing the final result!
pattilouwho says
I looked through the original post on painting cabinets and didn’t see it there, but do you guys have any sort of numbering system you use to make sure the doors go back in the right place? Or is that even an issue for your layout? Our doors are all very similar in size/shape, so I imagine when we go to remove/paint/reinstall, we will need to have some kind of numbering system in place. I can’t think of anything to do but lay them out and put numbers on the drop cloth below each door/drawer. Is there a better way? Thanks! And can’t wait to see the finished product – great work so far!
YoungHouseLove says
We didn’t have that issue because all of our doors are different enough that there’s no possible way to confuse them – but it did help to lay them out in the sunroom in a certain order to jog our memories about where they went. We also got a tip from another reader who said they numbered each door by putting a small piece of painter’s tape where the hardware would later go, since that area would be drilled through anyways and wouldn’t need paint. You could try that, just be very careful when committing to not painting even a small dot. If that sounds too risky, your system of numbering on the drop cloth could work. Once we laid out our doors in the sunroom they didn’t move!
-John
Kaysi-Ann Spence says
Hey Sherry and John,
I’m loving your kitchen reno so far. Your fan caught my eye just wondering if you have any plans for it or leaving it as is?
Kaysi
YoungHouseLove says
Nope, right now we’re planning to remove it and replace the fluorescent lights next to it with some can lights. We’re expecting it to help open up that space a bit more. We’ll be sure to share it when we do!
-John
Penni McNamara says
I was wondering…..how will the cork floors look against your other wood floors. And…are you planning on changing out parquet floors in the future???? Just curious. Kitchen is looking great!
YoungHouseLove says
Eventually we’d love to refinish the other wood floors in our house in the same rich mocha tone as the new cork ones, so it’ll feel more seamless and cohesive in tone (although some rooms will be cork, hardwood, or parquet).
xo,
s
Suzanne @TheWineabe says
Amazing!!! What a great transformation…and so gratifying I’m sure. Can’t wait to see more progress. Happy New Year!
Nicole says
Oh my goodness those look amazing! I cant wait to see them up. I’m so inspired!
Rachael@LovelyCraftyHome says
Looking good so far! Can’t wait to see the flooring and tile come together. I used Advance on my cabs Nov ’10 and it’s still going strong, love it! http://www.lovelycraftyhome.com/2010/11/01/tutorial-painting-fake-wood-kitchen-cabinets/
YoungHouseLove says
Wow- that looks amazing! So glad to hear the Advance is holding up too!
xo,
s
Erin says
If it were my kitchen, you can believe I would be gazing lovingly at the cabinets every time I passed! Isn’t it great to see the changes you want come to fruition? Seriously, it is looking so great! Thanks, too, for the paint recommendation – I have been working up the courage to start painting ours, but am still finalizing the color scheme – thinking a creamy white on the uppers and a mousetrap gray on the lowers. Hoping it won’t look strange!
Erin says
Mouse-y … I blame autocorrect. ;)
YoungHouseLove says
I dunno, “Mousetrap Gray” has a ring to it… :)
-John
Robyn Lowry says
We are planning on doing the same thing in our kitchen. We have wood cabinets (knotty pine..woooohooo!) that are in great condition but not our style. Thanks SO much for the inspiration and step by step guide! Can’t wait to see your finished project!
Wendy says
I am glad that your retrofitted doors turned out so well. Did you use wood putty in the holes in the back of the doors? Did it shrink very much? I have tried to fill larger holes in the past before I painted and I can usually still see them after I paint.
YoungHouseLove says
Yes, we used wood putty on both sides and did a few applications (a second one if things shrunk up) so it’s nice and flush! We love the filler we used because it didn’t seem to shrink much so the second pass of putty and sanding seemed to get ‘er done!
xo,
s
tjack says
Did you ever think of staining the inside of the cabinets and/or using glass doors on the bottom cabinets too?
The paint job looks great.
YoungHouseLove says
Thanks! We just thought since we’re adding open shelving over the whole stove wall that we’ll appreciate having some concealed storage for less pretty stuff on those lower cabinets. We definitely could stain the inside of them down the line, but for now we don’t mind the natural wood look!
xo,
s
Pip says
Such a huge difference – You might not want to be ‘whitewashed’ in the long run, but gee it’s a breathtaking change from the woody den of darkness you had before.
Tip says
I know this may seem like an odd question, but where did you get those containers that are holding your flour and sugar on your counter? I have been looking for some clear containers for a long time. Also, following your blog gives me hope that I can do my own DIY home projects so thank you for all your details and explanations. Thanks!
YoungHouseLove says
Yep! They were from West Elm, but we’ve seen similar version at Target if you don’t have a West Elm convenient.
-John
amybeth says
Yay!!!!
Bromeliad says
What a fabulous improvement already.
brandi says
Amazing! You guys are making great progress! Such a great team you both are! We mistakenly bought an eggshell/satin finish for our cabinets, but it ended up being a happy accident. Surprisingly, the cabinets are easy to wipe down, without having such a glossy shine! So excited to see everything come together!! Happy New Year!
Teresa @ wherelovemeetslife says
Your going to need a drumroll to announce the completion of those cabinets!! :) Can’t wait! You know your dedicated when “watching paint dry” is an exciting time!
Colleen P. says
Your tree is lovely, and I know a lot of people that don’t take their tree down until the Epiphany on Jan 6th. So just leave it up already if it makes you happy!
I’ll admit I was pretty skeptical about the pieced doors but as you said, what’s the worst that can happen if it doesn’t work? Kudo’s to you for giving it a shot. I really doubt anyone will ever notice and even if they do they’ll think it’s just a trick of the light.
My cabinets are so far beyond salvaging it’s not even funny but we are lucky in that the kitchen area is one big architecturally uninteresting rectangle and we can use stock, unprimed, unpainted cabinets when we do remodel it because we don’t have to work around anything whatsoever-even the plumbing and electrical are easily accessible and could be easily moved. Kinda why we bought the house really-we knew the kitchen in any house we could afford would need to be redone eventually but this was the only house we found that wouldn’t require knocking down walls to make the space work-it’s a big ol room with the kitchen crammed into one end. The poor dining table is so lonely out there all alone.
Wandering back to the point of my post-I assume your techniqes for painting also apply to entirely unfinished cabinets as well? I eagerly anticipate seeing the video!
YoungHouseLove says
This method should actually work for any cabinets (previously painted or unfinished or previously stained) – so you just want to fill any cracks or holes, sand stuff down to rough it up, use deglosser to get rid of sawdust and grime and oils and then prime and paint! Hope it helps!
xo,
s
Pamela Heller says
Looks great! Did you paint that lazy susan cabinet without removing it? How did that work? We have the same situation and I am not at all sure that we could even get the door off to paint it.
YoungHouseLove says
Yes, we couldn’t get that off so we just very carefully painted it in place with the same 2″ brush for the cracks followed by a small foam roller method that we used on the other doors and frames. Using the roller we could gently press the door in either direction so it would spin a bit so we could get the sides. It wasn’t too bad actually! Hope it helps!
xo,
s
ColleenwithMurals&More says
Ahhh, to have energy and be in my 20’s again. Oh. Wait. John’ 30 now, isn’t he? ;)
I painted some kitchen cabinets. Once. I still have nightmares.
WhooHoo on the ProBlogger love for YHL. You guys deserve it!!
YoungHouseLove says
Aw thanks! We were totally shocked and are still giddy over that! And yes, my man is 30 now. Haha. And it’s creeping up for me too (only 2.5 more months to be in my 20s…)
xo,
s
Melissa says
Thank-you so much for your wonderful blog. I’ve been so so so excited with your kitchen reno. Our kitchen isn’t very old (7yrs) but the layout is all wrong (I shouldn’t have left the planning upto the kitchen designer). We’ve been living with it because of the huge cost of a total redo. Our cabinets are a custom colour and we were told it would be best to rip out the entire kitchen and start fresh. You’ve given me the confidence that we can take on the project ourselves and not go into debt to do it. What a relief to be able to reuse our existing cabinets add a few new ones and move stuff around. Basically what you did to your kitchen is what we need to do to ours. Thank-you!!!
YoungHouseLove says
You can totally do it! Good luck Melissa!
xo,
s
Wom Mom Ethne says
I’m almost as excited as you are to see the finished project. I’m pretty certain that I want my next kitchen to have yellow cabinets. Also, like the ‘you might like’ links at the bottom of your posts now. We have that on ours and it always auto-picks good semi-complementary-to-the-post links.
Laura S. says
About how long did the painting project take from start to now?
YoungHouseLove says
We’ll lay all that out in tomorrow’s post (full timeline and budget breakdown for ya!). Hope it helps!
xo,
s
Pamela Heller says
One more question – did you wood putty the holes in the cabinet boxes as well as the doors? Will the new hardware be in a totally different location, making this necessary? Will drilling into the putty work ok?
YoungHouseLove says
We didn’t have to putty the frames since our new hinges would be using the same holes. You can drill into the putty if needed, but it may knock out more of your putty than you’d like. We found this on our doors that if we were trying to drill too close to a puttied hole that our drill would slide right in the middle of the hole, not next to it where we intended.
-John
bonnie says
I painted my cabinets using a brush and a very good leveling paint. I found that the roller left a stipple effect. My cabinets came out very smooth. Your kitchen is looking awesome! Did you ever have any concern that you will have three types of flooring – hardwood, parquest, and cork? I know it will look great in the end, but was just wondering if you thought the “flow”.
YoungHouseLove says
Down the line we hope to refinish the hardwoods and parquet in the same rich mocha tone as the cork to help unify them (we did that in our last house to tie spaces together and it seemed to work!).
xo,
s
Sherry F says
You guys did a frickin AMAZING job on that play kitchen. Seriously.
Mike Grant says
The kitchen project is looking great. I can’t wait to see the penny round backsplash go up and the cork floor put down. I just finished a quick DIY in my kitchen – I added those shock absorbers that keep the cabinet doors from slamming shut. The cost was about $3.50 per door. I just uploaded a blog post at http://www.mikegrant.com/2012/01/03/soft-closing-cabinet-doors
Keep up the great work.
YoungHouseLove says
Ooh those sound awesome!
xo,
s
Kacey says
Great job guys! Love all the tips we get from you :) We are currently painting our cabinets and are running into a little problem. We used a stain-blocker primer (two coats) and then the paint we chose and still are seeing a yellowish/brown color coming through. Luckily we have only painted one of our cabinet doors but we are stuck and wondering how to correct this, any suggestions??
YoungHouseLove says
Hmm, I’m not sure. I would wait for everything to cure a while (24 more hours?) and then get the Zinsser Smart Prime stuff we used. It’s amazing and no bleed!
xo,
s
Sara says
Love the cabinets! So I have two questions….
We just painted some built-in wood cabinets and drawers in a spare bedroom, but the paint just doesn’t sit well and is already starting to show wear. We sanded the wood beforehand and put on two or three coats of paint with primer included. Any suggestions as to how to correct the finish of it so it won’t show the wear and tear?
I would love to paint my kitchen cabinets, however they are laminate. Could I still pain them? Would I need to sand them and stuff too?
YoungHouseLove says
Hmm, I think using the primer + paint is the culprit (that’s not stainblocking primer, it’s just sort of a thickening agent that works on walls but not so much on furniture or cabinets sometimes). I’d sand it all down and use the primer and paint we recommend here! It definitely has a leg up on the all-in-one stuff!
xo,
s