Alternate post title: Look how domestic my wife is.
I don’t know why I’m writing this post since Sherry is the mastermind/executor of this project. Maybe just to brag about her mad ironing skillz? I just watched the baby and approved comments while she did her thang for the better part of the day yesterday. The first step was cutting our 12.5 yards of our on-sale $8.49/yard yellowy green fabric (more info on that here) into perfectly sized panels for each side of the two bedroom windows (leaving enough leftover for one closet panel). Lucky for us, the living room rug made a great guide for keeping our cuts straight and our corners square. Especially since it’s 8′ long – so it was easy to lay a tape measure next to it so Sherry could cut five 90″ panels without breaking a sweat. As for the width, we left them the same width as the bolt itself, which was around 61″ wide. This means two panels can easily be drawn to cover each of our 39″ windows without feeling too taut or stretched.

Within about fifteen minutes she had cut all five 90″ x 61″ panels (two for each window and one for the closet) and we realized that we apparently cut it very close when buying those 12.5 yards (pun intended). This is all that we had leftover:
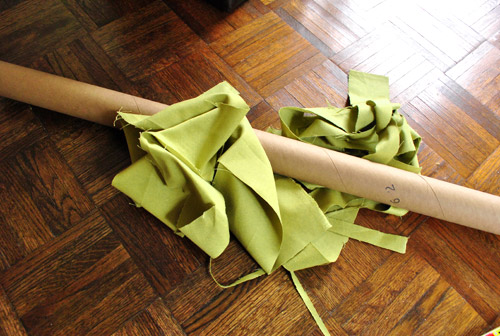
Not necessarily a bad thing (since we’d hate to dole out cash for more yardage than we needed).
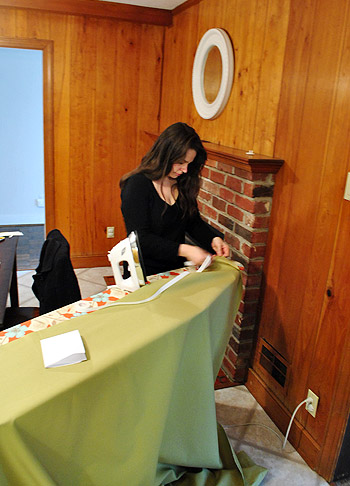
Then came hemming, which Sherry tackled using her favorite trick: heavy duty no-sew hem tape. Read more about that process and learn how to make DIY curtains in general right here (for even more iron-on hem tape info, we made a video of the process here and we have even more in-depth pics of its use here). It basically involves ironing, peeling, folding, ironing, and moving onto the next seam.
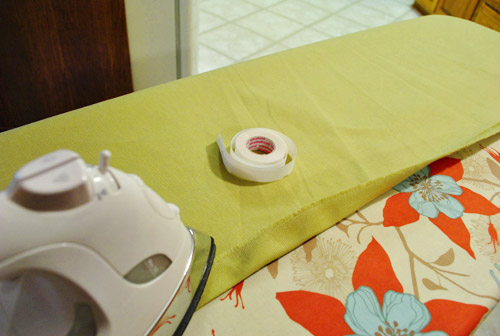
It wasn’t exactly a quick task to hem all four edges of all five panels (Sherry kept yelling out “1 down, 19 to go” which got old by about “3 down, 17 to go”) but getting that nice finished edge is certainly worth it. Plus, Clara and I kept the ol’ ball and chain company in the kitchen by singing, approving blog comments, and, um, eating while she ironed the day away. Quick, everyone freak out, Sherry’s hair is down:
But let’s fast-forward through all of the tedious stuff (the ironing, the clipping of curtain rings to each panel, and the hanging of all three curtain rods, which you can learn more about in this post of yore) and get to the fun stuff: the finished product.
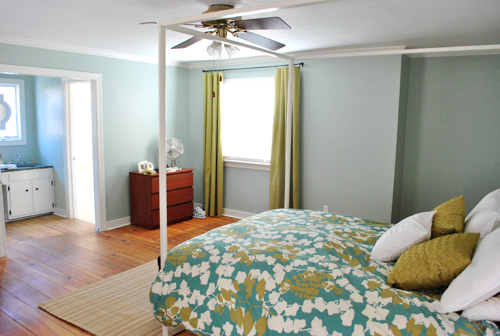
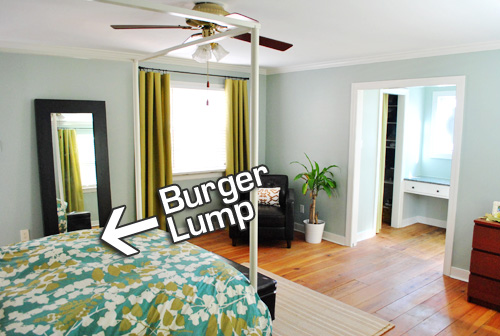
Oh and don’t mind the dresser or the fan or the lack of wall art and everything else that’s amiss. This room is definitely one of those works-in-progress that we’re taking one day at a time.
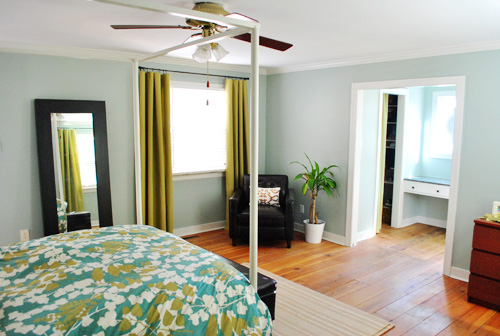
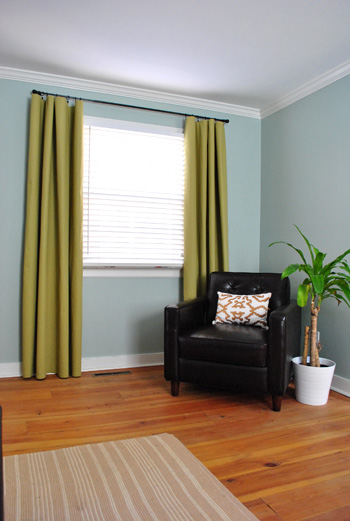
We’re really happy with how our DIY curtains turned out. And it should be no surprise that we chose to hang them higher and wider than the window itself to give the whole thing a bit more height and presence. We’ve actually had a reader tell us that she dreamed about us and Sherry mentioned something about hanging curtains “high & wide” in the dream. How crazy/hysterical/awesome is that? Nice catch phrase, babe. Who wants a “high & wide” bumper sticker?
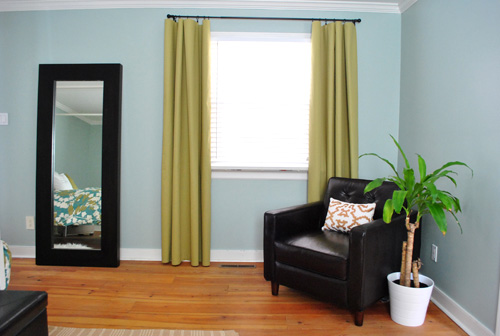
Sometimes we like curtain fabric to “pool” a bit on the floor, but after looking at it both ways we decided to let these babies barely graze the floor boards. It kept them looking crisp and modern (and created that cool loopy draping effect, which didn’t happen as much when I held the rod lower and they bunched up on the floor). So that would be our tip. Clip your panels to the rod and then move the rod around on the wall to pin down the perfect placement. That way you can raise it and lower it by hand and eye everything until you find the perfect height. Then just mark your curtain brackets and hang them right where you like them best – so your panels graze or pool to your heart’s content. It definitely beats hanging the rod and then clipping up the curtains only to find out they look all dorky and short.
We also hung one panel on the inside of our closet to act as a less-intrusive alternative to the bi-fold door that used to be there. Most of the time it’ll sit pulled to the side like this:
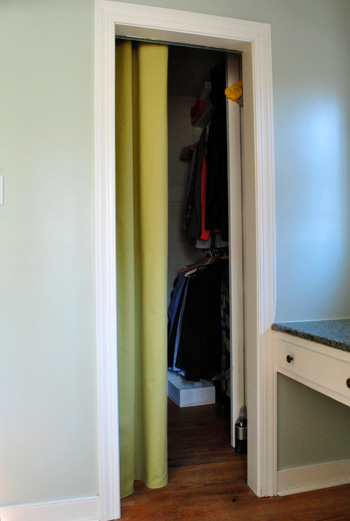
But if we ever need to conceal our mess (or duck in there for privacy if someone’s over but we need to make a quick change) we can pull it closed like this:
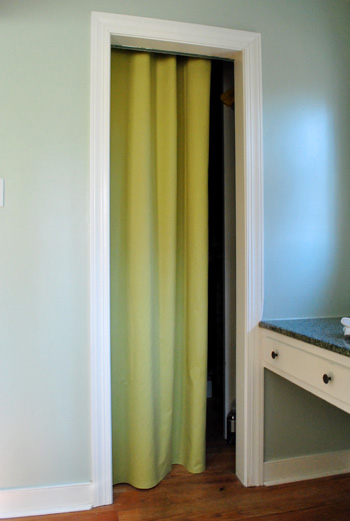
It’s kinda like a mini dressing room in there now- there’s even a light. And Sherry gets a kick out of picturing Clara doing puppet shows and other stage-related things from within the closet when she gets bigger and has that amazing imagination that only kids have.
Oh and if you’re wondering, here’s how it’s hung from the inside. We placed the rod high enough so that it’s not seen from the outside, and wide enough so the curtain can be completely closed (for privacy) or fully opened (so it’s not in the way of anyone walking in or out). It’s kinda the best of both worlds.
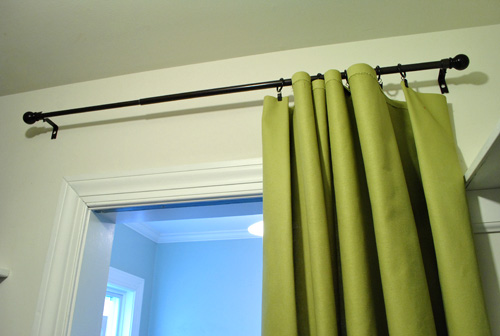
Oh and we got our oil-rubbed bronze curtain rods and ring clips from Target (aka Tar-hay) for cheap. It was around $40 for all three rods and all five packs of ring clips thanks to a few sales going on in the curtain aisle (and the 5% off we get for using our Target card). We love ring clips because they make curtain-creating a lot easier (no grommets or sleeves or pleated details to deal with, so you can literally clip up bedsheets or tablecloths as curtains if you’d like, or just hem fabric on four sides like we did). We also like ring clips because they’re particularly kid-safe. Should Clara decide to go crazy and try to swing on them like a monkey, the clip will release the fabric, which will fall to the floor while the rod and the rings will remain on the wall. Gotta love a safety feature that looks this good.
As for the finish, Sherry prefers oil-rubbed bronze rods (even in a nursery) because she says they’re “like eyeliner for the window.” And I have to agree that I like the look too- especially with the deep wood furnishings that we gravitate towards (along with some white things and even some painted pieces). But again I ask, why am I the one writing this post? Makeup references & hemming aren’t exactly my forte.
Anyway when it comes to the panels, beyond the function, height, and softness they add, we’re really happy with the color. Which means those three days of fabric hunting were all worth it. The yellowy green tone does exactly what we wanted it to do – it brings out the golden-green color of the bedding without matching it exactly (Sherry has this song she likes to sing called “Matchy-Matchy, Tackly-Tacky” which came about when she was imitating her sweet Italian mom, which is always amusing). But getting back to the curtain color, we’re glad we went a bit greener (instead of browner or yellower) than the bedding, because it looks nice and fresh against the Caroline Went Clubbin’ Aqua Carolina Inn Club Aqua wall color (get that joke here) while still obviously relating to the color in the duvet.
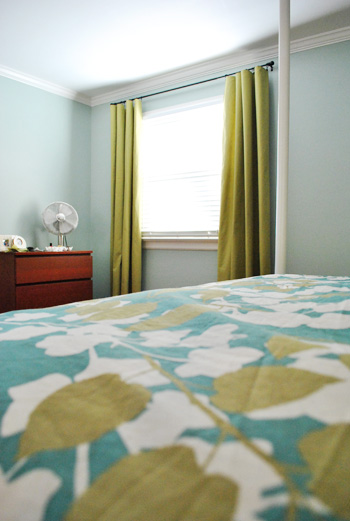
The curtain color also goes nicely with the new pillows that we snagged purloined for the bed too. So between them, the curtains, and the bedding we feel like we’ve got that golden green color sufficiently injected into the room. Now we can start layering in some other colors and textures for a little dimension and interest. Eggplant? Navy? Charcoal? Inky blue? Who knows where we’ll end up. But let the fun begin. Oh yeah, and pardon the missing nightstands, bedside lamps, etc. They’re also on the ol’ to-do list.

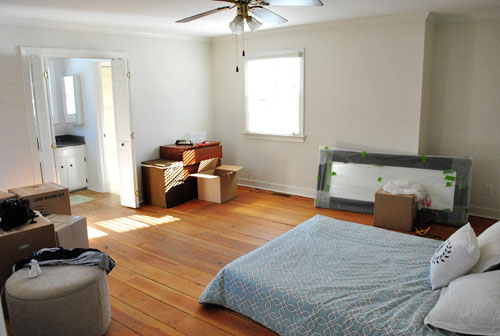
We definitely still have a lot more things to do in here (and we’re happy to take our time), but it really has come a long way in the past seven weeks or so. We almost don’t recognize this bedroom shot taken right after we moved in:
Oh, and last but not least, we thought you might appreciate a little “behind the scenes” tidbit. Sometimes we have to work around a sleepy chihuahua who refuses to get out of bed. Such a diva. But at least Burger doesn’t mind when I make the bed right over him. And our new fluffier duvet makes him nearly invisible. Yup, he was hiding in bed the entire time we shot these after pics.
And so ends the curtain diatribe that is this post. The whole process – as long as it was – has given us a bit of curtain fever. At least that’s what Sherry’s calling it when we drive by fabric stores and she presses her nose against the car window and says things like “I’ll never let go” in her best Rose-from-Titanic voice. We need them in a bunch of other rooms and we’re determined to choose bold and patterned textiles to add some serious interest. Because we definitely don’t want to end up with white Ikea curtains everywhere again (not that we don’t love ’em, but we’re just ready to have some fun and take some risks). So don’t be surprised to find us posting about our fabric store adventures again sometime soon. A guy can only listen to those Rose-from-Titanic impressions for so long before parking just to make it stop.
Psst- Burger’s totally letting fame get to his head. Check out his big DogMilk interview here.
Psssst- We just announced this week’s giveaway winner, click here to see if it’s you.

Jenni says
Is there a special “formula” that you guys use in order to know how much fabric to get for the curtains? I am going to try and tackle that project this weekend…. We’ve been living in our new house now for almost 7 months (eeek!) I think it’s about time we put up some window treatments!
YoungHouseLove says
We just measure how long we want the panels to be and multiply that length by how many panels we need. For example, we wanted five 90″ curtain panels so it came out to 12.5 yards with little waste leftover. When it comes to width, we just use the width of the bolt, which are usually around 60″ wide if you’re working with upholstery fabric. Hope it helps!
xo,
s
AmyLynn says
Curtains! I love them, my husband loves blinds, but we all know who will win that when I can finally decide what I want. :) We bought our house 14 months ago and me and curtains have not seen eye to eye at all. A little background: Our house was a poor neglected soul that needed a *lot* of TLC. When we walked into our 1910 project for the first time I looked at my husband and said “I love it! I want this house.” My husband said “Are we in the same house?” The carpet with holes, the English Cottage wallpaper everywhere and the ceiling that was (literally) half-collapsed didn’t phase me when I saw the stunning original woodwork in our house. Great big wide trim and baseboards with fabulous victorian detail and a craftsman twist around every window and door. This is why I’m having a problem. I can’t bring myself to cover up one of the main reasons we fell in love with our house. I’ll post it on FB too, but, any quick ideas since you just went through the curtain phase of life?
YoungHouseLove says
We love hanging curtains so high and wide that they’re not obstructing the trim or molding. They might cover it where the panels overlap, but the rod should be well above that gorgeous trim, like we did in our house (just imagine your gorgeous trim and not our basic stuff, haha).
xo,
s
Stacey says
Was just on West Elm and the ruffle looking shams are 20% off (bedding sale.) Not loads, but it makes it a bit more affordable…
Love the room! You are giving me inspiration to finish my bedroom…finally!
Autumn says
Love the color combo! I had no idea curtains could look so professional without sewing, that opens up so many options now! Also thanks for your response about the gray walls and beige carpet the other day, I think it’s all starting to come together now.
Jacqueline says
Wow! Your curtains are beautiful and you’ve inspired me to finally tackle the curtain issue in our new home. We just finished renovating the den and now have a wall with a sliding glass door and one window on each side. Do you suggest 3 separate curtain rods or one super long one? Also, any idea on how many curtain panels I’ll need? Thank you!
YoungHouseLove says
One super long one! Then we’d do two panels on the outside only (to soften things a bit) or four panels (two on the outside and two in front of the trim between the slider and the windows) to make it look even softer and mimic the effect of one huge window. Both could work!
x,
s
Ashley says
It looks great guys! Everything is coming together so beautifully! I already can’t believe it’s the same house.
Great job!
Cathy says
For anybody interested in lining their drapes (for light control, for a uniform view from the street and to insure your drapes look the same color whether against the wall or in front of a window), this is the product I’ve used, using the same iron-on tape: http://www.joann.com/joann/catalog/productdetail.jsp?pageName=search&flag=true&PRODID=zprd_07962640a
http://www.roc-lon.com/products/total_light_control.html
Works great!
Molly says
Thank you so much Cathy! I have been searching all over the internet (and these comments) to try and figure out if the iron on hem tape would work to line the curtains…and you answered my question!
DENISE says
A girl after my own heart! I often purchase dress pants (I work in a corporate environment) and the hem’s come out because of the way they are made. I keep the hem tape on hand for that. However, you have taught me a new trick! I love it!
Denise
Extreme Personal Measures
Jessica says
#1- I would TOTALLY take a “High and Wide” bumper sticker.
#2- On top of the general humor/DIY advice found on the blog, an added bonus of being a blog-stalker is knowing which posts you’re referencing so I don’t have to click on every link like I did in my more naive days of blog-stalking.
Curtains look awesome! :)
Kerry says
Oh I love Burger’s easy going attitude towards life! My little ewok of a puppy would not be near as agreeable if I were to tuck him right into the bed making process… :)
Rachel says
Love what you did! Definitely an elegant pop of color. I am in the process of making some pillow covers. Do you think the no sew tape would work? Any tutorials? ;)
YoungHouseLove says
Hmm, we’ve never tried it for pillow covers but I guess it’s worth a shot! I usually hand sew pillow covers (just stitching three sides when it’s inside out and pulling it rightside in and stitching the last edge closed from the outside). Hope it helps!
xo,
s
Erika says
I love your bedroom, its come togeather so amazingly!
Amy says
Hey, kind of off topic, but have you ever used fabric as wallpaper? I just read about it online and am considering it for the wall behind our bed. I just don’t know how easy it would be for a first timer.
YoungHouseLove says
Never done it but it sounds awesome! We’ve heard good things about starching it to the wall so it’s 100% removable (which sounds a lot more error-proof than wallpaper). Maybe you can google or even search youtube for a tutorial? Good luck!
xo,
s
Karen P. says
Does Target in Richmond sell bronze curtain rings? At my Target I was only able to find silver, black, brass, and mocha. Would any of these go with an oil rubbed bonze curtain rod?
YoungHouseLove says
Yes! We actually got black rings (you can’t tell the difference in the rings, although you’d probably see the difference in a rod) and we believe we got mocha ones last time (in Clara’s old nursery) and those worked just as well. Just hold them up to the rod to see which ones look best. Good luck!
xo,
s
Chandeen says
Thanks everyone for the radiator tips, I have radiators too and have always worried about the heat, now I know I can rest easy with my long curtains!
Kristin says
Nice work, it definitely finishes off the room!
P.S. I believe it’s pronounced Tar-jay… http://www.urbandictionary.com/define.php?term=tarjay
Unless you’re referring to some kind of inside joke going on that I don’t know about… :)
YoungHouseLove says
Haha, yes we are. Here’s that crazy post for more explanation: https://www.younghouselove.com/2011/01/purloined/
xo,
s
Erin says
The master bedroom is looking wonderful, I love checking in to see how it is progressing. One question, did you secure your floor mirror so it does not fall over, if so can you fill us in on how? I have worries about little toddlers and my pup getting to close and curious about the mirror, and it tipping over. Thanks!
YoungHouseLove says
Hey Erin,
Yup, we picked up a wall anchoring kit from Home Depot (they sell them for securing TVs and bookcases). We’ll have to post the details!
xo,
s
Stephanie says
Oh my goodness! I saw that picture of Sherry with her hair down and thought: “…who is that strange woman in their house?” Hahaah!
Dee says
To those looking for radiator tips:
Radiators can be framed on the sides and with slats or an attractive grading on the top and front. For curtains hang a curtain rod wider than you normally would, and that’s that. :o)
jja says
Curtians should be 1 cm longer ;-) to be perfect.
jennie says
great job! I’m thoroughly impressed with your domestic capabilities! I’m probably in the minority on this, but my favorite window treatments for both appearance and function are plain white faux wood blinds. it probably has a lot to do with having two cats, and any time I’ve tried curtains they ended up constantly coated with cat hair.
leigh says
Curious…where is the chair from? Love the size, style, etc. AND you guys are wonderful. Love following your work! So inspiring :)
YoungHouseLove says
It’s from target.com a while back. Hope it helps!
xo,
s
leigh says
Rats! Found it on your room by room source list…should have checked there first!!!
YoungHouseLove says
No worries!
xo,
s
Rachel says
As inspired as I am by ALL of your projects, I got so excited to see you making your own curtains! I had been craving to make some of my own, and after watching you OWN that DIY project, I went out, bought fabric, and gave it a try. Now I have a B-E-A-UTIFUL shower curtain that looks like a million bucks. I’m going to tackle the bedroom next. Thanks for being awesome!
Jessica says
Could you please tell me what size hem tape you used for this project? Thanks a bunch!
YoungHouseLove says
I use the heavy duty 3/8ths stuff by Heat N Bond from Michael’s. Hope it helps!
xo,
s
Carly says
Hi John and Sherry! First of all, the curtains look great! Im totally loving the idea, especially after rethinking my white ikea curtains and pricing out some of my options.
I have a dilemma. We have base board heating in most of the rooms in our house. Although we rely on other heat sources mostly, we need treatments that will allow us to turn on the electric heat if necessary. Any suggestions without all the curtains looking “dorky and short” ??
YoungHouseLove says
Many people with baseboard heat have mentioned that scientifically using fabric that drapes over them isn’t a hazard (something about the amount of dry heat that fabric can retain isn’t something that can ignite on its own or something). We’re probably butchering the explanation completely, so maybe try googling it or posting the question to our facebook page so the experts can weigh in? Good luck!
xo,
s
Amy says
Random question: How far are you spacing the ring clips on the curtains? And how many do you have on each curtain panel? Also, I’ve been searching high and low for the cute fabric you have in your baby girl’s room, but sadly, I don’t think they make it anymore. It’s totally cute!
YoungHouseLove says
There are 7 clips on each curtains. So two are placed on the ends of the panels and the rest are evenly spaced within those two (probably around 9″ apart). Hope it helps!
xo,
s
Carol says
Hi guys…LOVE LOVE the progress in your room. I’m somewhat new to Young House Love so I’m loving getting caught up on all the posts :) What is the name of the paint in your bedroom? I really like it!!
YoungHouseLove says
That’s Carolina Inn Club Aqua by Valspar (color matched to Olympic No-VOC paint). Hope it helps!
xo,
s
Kara J says
Sherry,
I am interested in DIY-ing some curtains for our house. I was wondering if there’s a certain kind of fabric that you recommend. (heavy duty, upholstery, etc..) Thanks!
YoungHouseLove says
Pretty much anything except for something super thick (like a chunky tweed) or super thin (since you’d see the hem tape through it) should work!
xo,
s
Nicole says
Hi Guys!
Just wanted to let yall know how inspiring you are to me. So inspiring, in fact, that I’ve used this blog post in my own blog! (http://d0mesticdropout.wordpress.com/2011/02/27/proof-i-can-be-trained/)
Thanks for everything you guys do on a daily basis to keep us all very happy and encouraged to make our homes shine :) You guys rock!
YoungHouseLove says
Love them! Definitely an excuse for a dinner!
xo,
s
Karrie says
Where did you get your large black floor mirror? I have been looking for one for our master bedroom and this is perfect. Thanks!
YoungHouseLove says
That was a wedding gift from John from West Elm, but we’ve seen an almost identical (cheaper version) at Ikea. Hope it helps!
xo,
s
Wendy says
I’m so excited to give this a shot! Quick question though – I have really low ceilings (only 7 feet). We’re thinking of moving in a couple of years, so I thought maybe I’d buy extra fabric and hem all the extra fabric up so I could potentially let them out and create a smaller hem in a future house if I want to take them with me. Do you think that would work? Can you undo the hem tape? And is the seam obvious from the front, so you would notice it up higher?
YoungHouseLove says
Good question! That probably wouldn’t work since you can’t easily undo it and I think you would see a seam forever as you mentioned. But you could use this method to make extra long panels and then loop them over the curtain rod and safety pin them with about a foot of extra curtain hanging over the back of the bar (unseen from the front). Safety pins are easy to take out, so hopefully that works!
xo,
s
Wendy says
Hmmmm, and then instead of ring clips, you’d just drape it over the top and pin it? I really like the look of the ring clips so maybe I should just make them to fit. I do owe you a big thank you here though! I saw curtains on the crate and barrel website and was able to find the EXACT same fabric online. It would’ve cost me $650 + shipping if I ordered from c&b, but the fabric is costing me $170. Woo Hoo!
YoungHouseLove says
Wow- that’s amazing! Good luck with whatever you decide! I agree that ring clips can really make the look! So maybe just make the panels extra long so they look billowy and drapey, but they’ll work in your next place too? Even with standard 8′ ceilings, panels that are 78″ can work thanks to the rod and the clips and some breathing room on top. Maybe you could get away with that length and then they’ll work again when you move? Good luck!
xo,
s
Wendy says
One more question – if a fabric is dry clean only would you dry clean it before hemming?
YoungHouseLove says
Nah. It shouldn’t shrink up from that so you should be good to go. Good luck!
xo,
s
Wendy says
I did it! I did it! Well almost – I still have to hem the bottoms, but I want to move my rods up (higher and wider) and then hem the bottoms. I LOVE them! Big thanks!!!
YoungHouseLove says
Wahoo! Congrats!
xo,
s
Wendy says
Ok, I’m so excited about what I’ve done for my bedroom that I already know I want to do more curtains for my dining room. I’m not even done with the bedroom and I’m already searching for more fabric. Anyway, I just saw this and thought about Sue the Napkin… figured I’d send a link in case you like it.
http://www.fabric.com/home-decor-fabric-drapery-fabric-p-kaufmann-home-decor-fabric-collections-p-kaufmann-home-decor-fabric-p-kaufmann-zebra-stripe-palm.aspx
YoungHouseLove says
So pretty!
xo,
s
Natalie @ Queen of Whirled says
Those ring clips do not always release. I have the exact some rod/ring clips from Target on the curtains I made for my nursery. My daughter pulled on the curtain and the rod bent. The fabric didn’t budge from the clip.
Lovely room! The colors are great!
YoungHouseLove says
Woah- good to know! Maybe it’s a good idea to test them (when I hung on ours they slipped out). It could have to do with the fabric too I guess (if it’s smoother or something?)
xo,
s
Tara Wilhelmsen says
Question about curtains…we have a HUGE sliding glass door in our living room (140″ w). I finally found a curtain rod from crate and barrel that will be wide enough, but I’m having a hard time deciding on buying curtains or following your lead and making my own. To cover this 140″ space, should I four curtain panels? I would do 3, but we use this door all the time and I worry about having the middle panel in the way. Any suggestions?
YoungHouseLove says
I’d do four so they look full and balanced for such a long rod. And buying or making them should work either way, so you can’t go wrong. Good luck!
xo,
s
Chelsea says
Ok, after searching for months for the “perfect DIY blog,” I think I have officially found it! Your blog is wonderful, with the perfect amount of humor and realistic instructions. I was thinking, “I wonder how exactly he hung that curtain over the closet door?” and BAM, that was your next photo. Love it, will definitely keep reading your blog!
YoungHouseLove says
Aw thanks Chelsea! Glad to help.
xo,
s
megan says
Speaking of curtain fever…
My hubbins-to-be (one more week! woot october 1st!) and I were in search of a canopy bed as I was eager to make it into a draped wonderland, but we couldn’t find one we agreed upon. I was sad b/c I really love the feelings of drapes around the bed. Well, then i remembered a bedroom I once saw did something I had (and still haven’t ever seen again) never seen before: attached curtain rods to the ceiling, and draped the curtains like waves through multiple rods (so no curtain was actually hanging down). She had I think 3 different ones up there. Have you ever tried this, or know of any sites that have? I can’t find that exact look and how-to online, and I’m dying to try it! I figured if anyone knew, you two would!
Thanks for all you do, love your blog!
YoungHouseLove says
Hmm, I would probably just google and pinterest around for “DIY canopy” or “drapey canopy” or “curtain rods ceiling canopy” and see what turns up! Good luck!
xo,
s
Ann says
Your curtains are absolutely gorgeous! I love the whole bedroom actually. Went to our Lowe’s today and cannot find that paint color to save my life. :( I would love it for our master bedroom too but it just wasn’t there. I wonder if they re-named it after all your comments? lol Just kidding!! :) Any chance you would actually have the # of the paint color. Tried to see it in the picture but my eyes just aren’t that good.
YoungHouseLove says
Maybe try googling for the code? We are on vacation so I can’t look it up for ya, but hopefully googling the name might turn up the formula!
xo,
s
Ann says
Found it! Thanks for the reply and have lots of fun on your vacation!! For anyone else that may want it, it’s #5004-3B in the “Blue Neutrals”. :)
YoungHouseLove says
So glad!
xo,
s
Danielle says
Thank you, Ann, just wondering about the paint color!!
YoungHouseLove says
It’s Carolina Inn Club Aqua by Valspar. Hope it helps!
xo,
s
Danielle says
Hiya, love your site! Your bedroom looks great and I’m totally inspired, especially since I’m a DIY-er with two little boys in tow, so I need my projects to be easy (or at least attainable with few sewing skills needed) or else they never get done.
You may have answered this question eons ago but since I’m new to the site I have to ask – what brand/color did you use on your bedroom walls?! Thanks!
YoungHouseLove says
This color is Valspar’s “Carolina Inn Club Aqua.” Hope it helps!
xo,
s
Christy says
Thanks so much for this! My husband and I just moved into a new apartment, and we have a hideous view from our window (barbed wire). I want to get the windows covered as soon as possible, and these curtains seem like a great way to do it! Also, I love how you write about how awesome your wife is. I keep a blog about marriage, and this entry reminds me that I should invite my husband to post too!
Jessica Mullins says
I LOVE this post! I used your instructions to make my own and posted about it (complete with link back to you!) on my blog, rufusramblings.com. Thanks!!
YoungHouseLove says
Yay! So glad!
xo,
s
patty says
do you always find a bolt of fabric for curtains? So there’s no seam down the middle and so you don’t have to worry about hemming the pieces together? I have been looking for curtain fabric and have yet to find anything wide enough. Thanks!
YoungHouseLove says
Yes, ask for the upholstery section (those bolts are usually double wide). Hope it helps!
xo
s
Wendy says
What color/brand paint did you use on your walls? They are so pretty…
YoungHouseLove says
Thanks Wendy! It’s Valspar’s Carolina Inn Club Aqua.
xo
s
Wendy says
Never mind…Found it on a previous comment. Thank you! Your room is lovely!