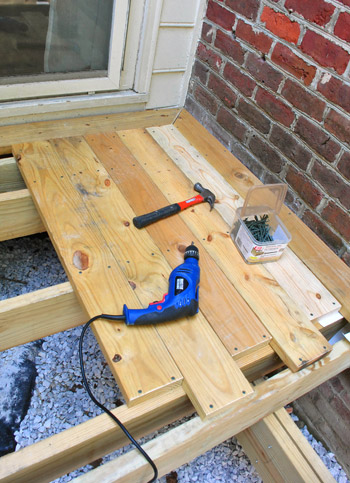
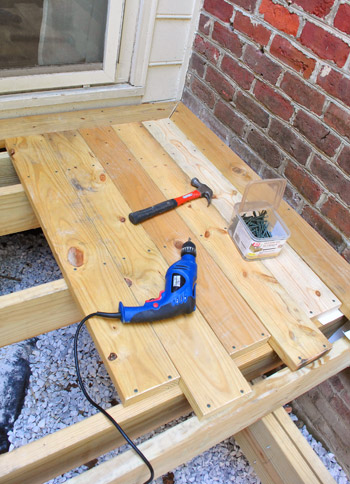
What party? The decking party, that’s what. Never been to a party where people put decking down? Then you have not lived, my friend. But come to think of it, my party didn’t have any guests so maybe I’m the one who should reconsider my definition. Anyways – let’s talk deck boards, since I gave you this sneak peek of my progress last week:
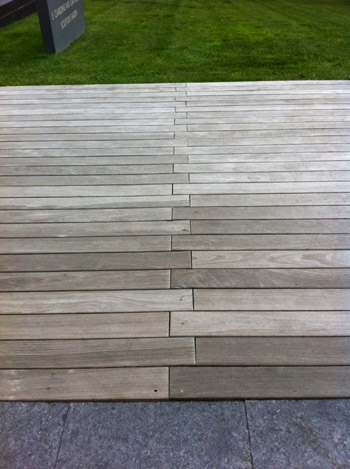
As you may be able to tell from that photo, we bit the bullet and went for the “zippered” seam pattern that we saw at our local art museum.
But before we talk about planning for that, we actually had two commonly asked questions on our last post, which were:
- What made you guys chose to go with exposed screws instead of hidden ones?
- Is it ok to lay decking boards that close?
So without further ado, those answers for ya:
- Sherry and I both grew up with decks with traditional exposed screws and they were beautiful and held up for decades, so we’ve decided to keep it classic and just line up all of our screws like the zippered seam deck that we included above as our inspiration (it’s hard to see, but in person the screws are visible, they’re just all very clean and nicely lined up instead of randomly drilled in). Not only was this choice something that we thought would be easiest, we also thought it would be the most functional (we can easily tighten any screws that might get loose over time since they’re so simple to access from above).
- And as for the board spacing, since we’re using pressure treated wood the local engineers/designers said can be placed pretty close (pressure treated wood is known to contract over time). So there are no worries about things being laid too close (and it’ll all shrink up over time – so we’ll end up with gaps for water drainage and leaves to fall through, etc).
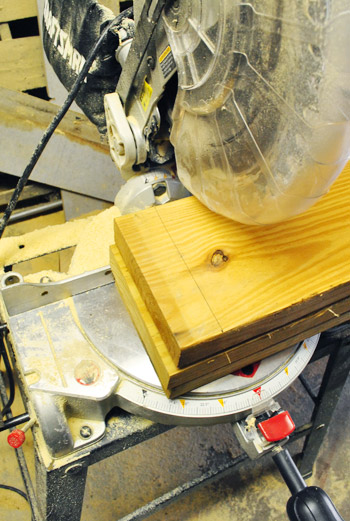
But even before laying our zippered seam, first we had to plan for another feature of our deck design – the “picture frame” border. That’s when you basically add a, well, frame around the outside of your deck with boards that run parallel to the edges (meeting at mitered corners) and then fill in the interior with the rest of of your pattern. Since most of our decking would run the long way (parallel to the brick siding), this meant adding some boards at either end that ran parallel to the sliding door. We figured it was one of those touches that would make it look a bit more polished. But it did take some extra planning since I needed to make sure all of our boards still screwed securely to the joists below.
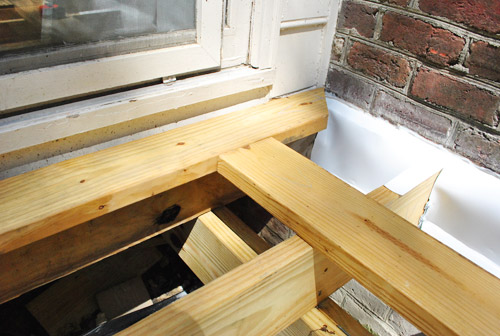
To make sure all of my boards ended on a joist, I actually had to add an additional joist here since my “frame” board rested across the entire first joist, leaving the deck board hanging out to dry (it’s one of those code things to attend to to ensure things are really secure for the long haul).
You can see I also added a small block of spare 2 x 8 between the two joist so the frame board had another place to rest on / screw into.
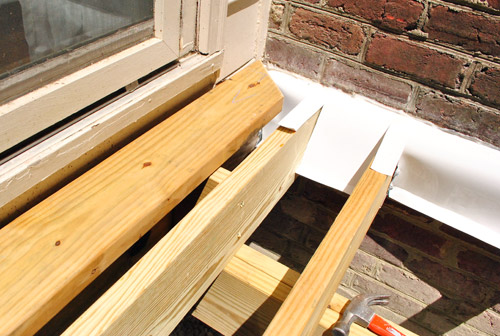
You can see better here how the picture frame is starting to shape up. I actually only did these two sides to start with (rather than the entire frame) since I figured I’d work my way out from here.
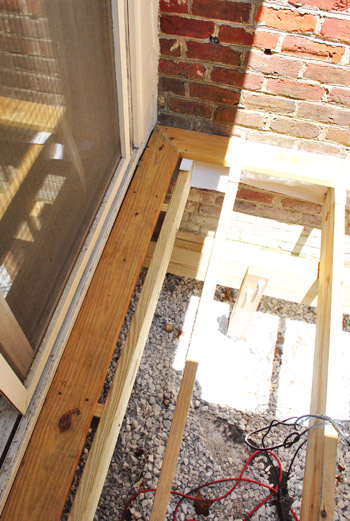
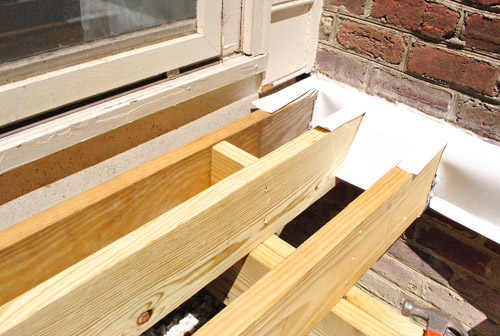
But before I could start adding more deck boards I had to actually add two joists to help me achieve the zippered pattern. We wanted the boards to be staggered about 5 inches at the seam, which didn’t jive with my current standard-joist set up (which were 16″ apart).
But no biggie here either. I just added two additional joists (one shown below and another at the end of these boards) and I was ready to go. I could’ve added these when doing the rest of the joists, but Sherry and I wanted to wait until this step to decide exactly where on the deck we wanted the zippered seams to be (because of the length of the deck we’ll have two of them). We chose the spot that we did because it’ll help define the area where our outdoor dining table will eventually go (it will be centered between the seams so they’ll be visible on either side of the table like in this rendering).
So with all of my extra support added, I could finally start cutting boards, laying them in place and screwing them in. Ha. Lay. Loo. Yah.
You may notice that we’re using pressure-treated 2 x 6″ boards for a decking instead of the 5/4″ stuff. This wasn’t really a conscious decision – it was just what 84 Lumber suggested when they gave us the quote. But I’m glad we went with it because in the long run it should help the deck feel more solid and warp less.
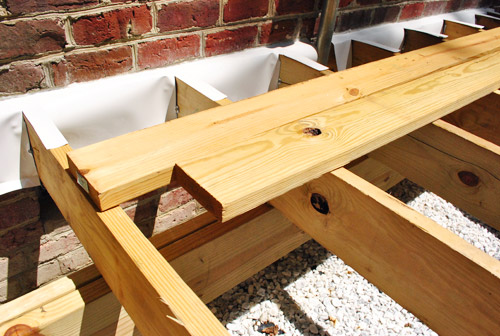
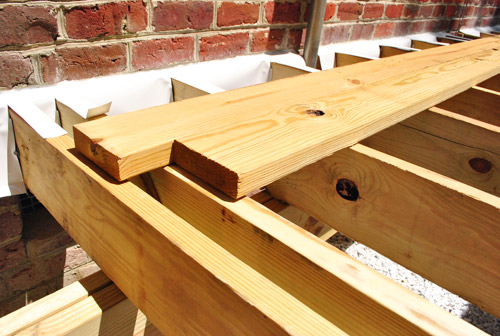
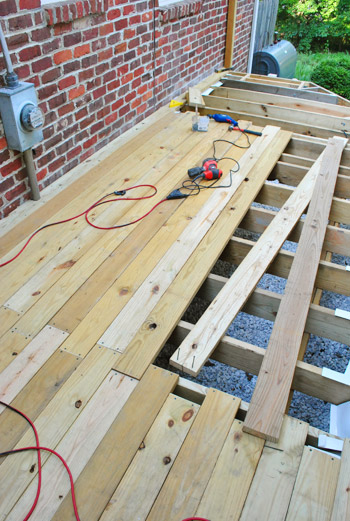
Here’s the first section of the deck nearly all laid in place with the zippered seam on one edge. At this point I had only screwed in the ends but planned to go back later and put the rest of the screws in (I’m putting in two screws everywhere a deck board meets a joist). I had already read in our county that all deck boards must span at least four joists, which is exactly what these do. Whew.
When it came to the last board I got sort of lucky. I wasn’t sure if I was going to be left with a sliver of a space to fill – giving me both an awkward look and the challenge of filling it (had it been less than 2 inches I probably would’ve just substituted one 2 x 6 for a 2 x 8). But luckily my 2 x 6s fit almost perfectly as-is. I did have to shave about a 1/4″ off the edge of the frame board. But since that edge is hidden under the siding it didn’t really matter how clean or perfect my cut was. And yes, our siding still needs some sanding / caulking / power washing / repainting. Haha. It’s on the list!
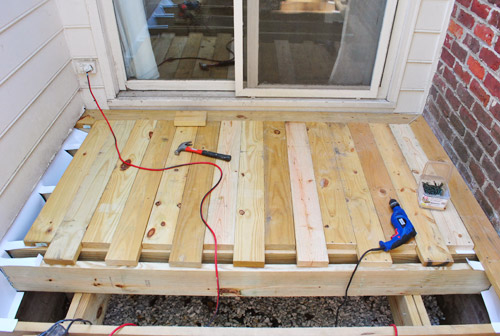
With my first (albeit small) section done, I was feel pretty excited. On to the middle section where I’d just be placing full boards (10 feet long) in place.

Well, this is where my planning got a little off. The end joists that these boards were supposed to rest on were a little less than 10 feet apart. Less by 1 and 1/8th of an inch to be exact. That meant I had to trim every single 10-foot board by a smidge so that the ends would rest exactly at the middle of a joist to be screwed into place. Not the worst thing that could ever happen (since I was able to cut three at a time) – but it was still a bit of a time suck.
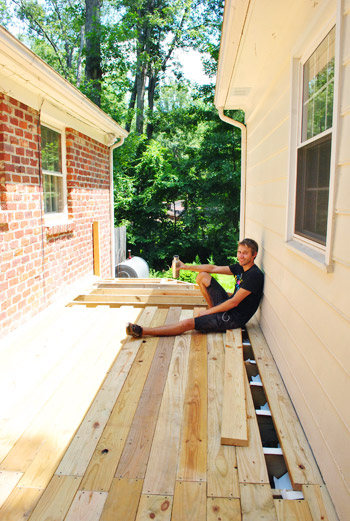
By the end of my first afternoon of laying decking I had gotten this far before the sun started to set and it was time to close up shop for a late dinner with the wifey (who had been blog/Clara wrangling all day along with churning out some last minute book edits).
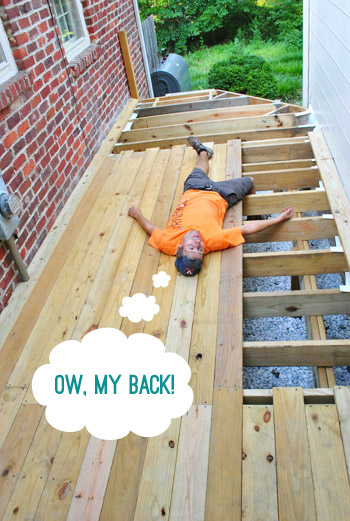
But first I had Sherry snap this picture to represent how I was feeling after my first day of board laying. For starters, I was feeling accomplished that I had finally created a solid platform. This thing is actually starting to feel like a deck!
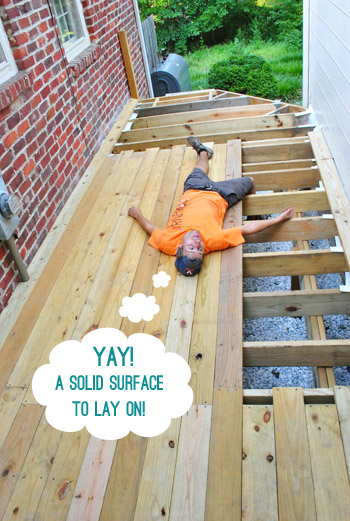
Secondly, I was feeling pretty darn exhausted. It had been nearly a full day of work and although it wasn’t nearly as scorching as some of my previous days of work out there, it was still August in Virginia – which means heat and humidity were my party guests all day.
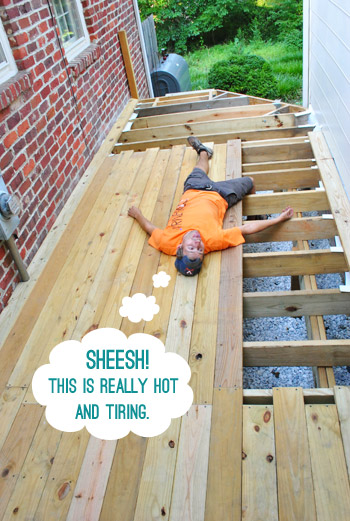
Last but not least, I was in pain. Why? Because after who knows how many hours of walking atop these joists without issue… I fell. Early in the day I was carrying a 2 x 6 and I didn’t put my foot squarely on a joist and it slipped off. I fell through, but caught myself when my back connected with one joist and what can only be described as my “lower buttock” hooked around another. It hurt. But I’ll take a bruised lower buttock over a stinging middle groin any day. (Seriously, I was a couple inches off from having a great America’s Funniest Home Video submission). So I’d say it was a mix of bad luck and good luck going on during that fall.
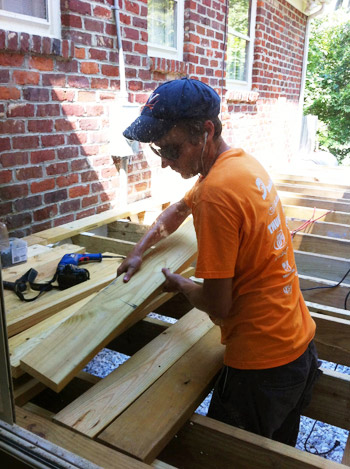
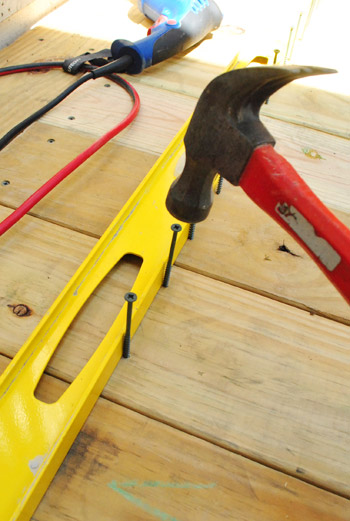
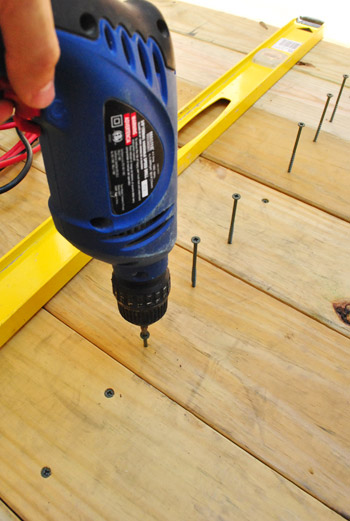
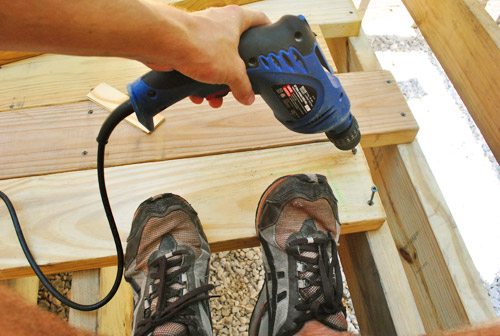
But I got some food in my belly, milked my injury to the wifey, and got a good nights sleep before heading back out the next day to pick up where I left off (and take some better process pictures along the way). For instance, here’s how I was setting my screws. Rather than pre-drilling all of my holes, I just used a hammer to get the screw stuck in the wood (and a level as a straight edge to help keep them all lined up) before taking my power drill to them.
Drilling isn’t as simple as I’d like, since 84 gave me screws with a standard top and they tend to slip and strip a bit more than I’d like. Some of you had suggested getting screws with the star-shaped bit, which I definitely would’ve preferred. But at this point I’m just plowing through with what I’ve got on hand.
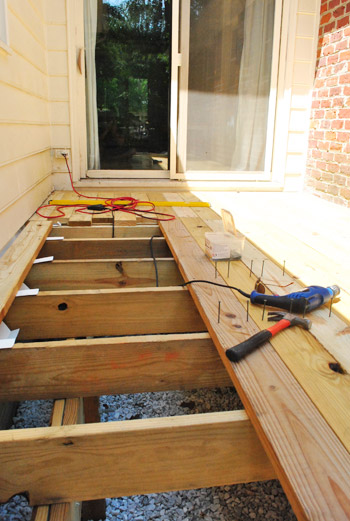
Summer was back in full force on this day and it was too brutal to be out in the sun so I (very cowardly) just worked in the shaded area. So even though I still had screws to set in some of my boards from the previously day, I went ahead and kept adding more boards. Oh and I checked which way the boards “cupped” since that always makes a difference when laying things like decking (more on that here).
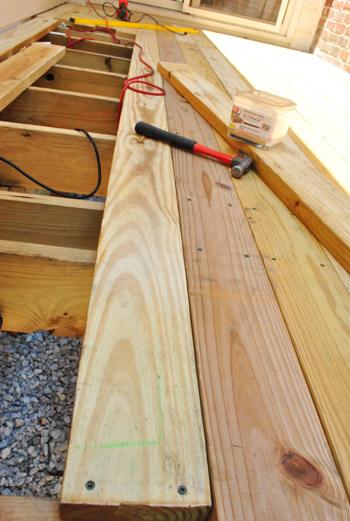
One other challenge that kept progress from being lightning fast was dealing with warped boards. When you’re using 10-foot long boards it’s virtually impossible to get one that’s perfectly straight. So often I’d set one end and find the other looking like this.

So to conquer the gap, I’d set my screws in the deck board far enough so I wouldn’t have to hold them in place (but not far enough that they’d come through the other end yet). Then I’d use my body to force the board against the other. Sometimes this was pretty easy to do. Sometimes it took everything in me.
But once I had it where I wanted it, I used a free hand to drive the screws in and secure it.
I almost finished the middle section and was about to trim the side of my frame piece so it would fit when I had to pack things up because we had an appointment to get to. I asked Sherry to snap one picture of me and my sweaty self when Clara pushed past Sherry for her first trip on what she calls “the pretty, pretty deck.”
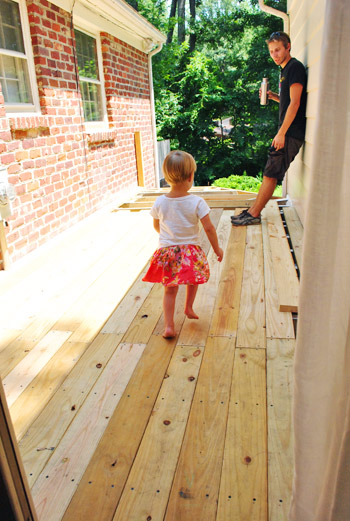
I guess she just wanted to get a closer look at my progress…
… which she appeared to approve of.

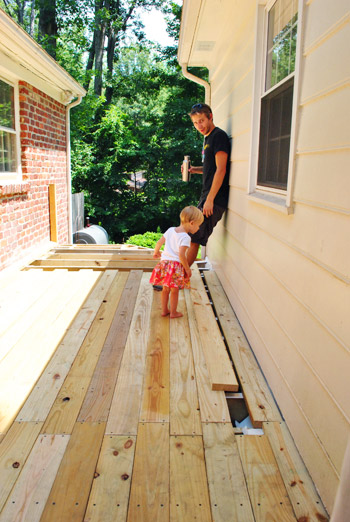
But it really turns out she just wanted to mooch off my water.
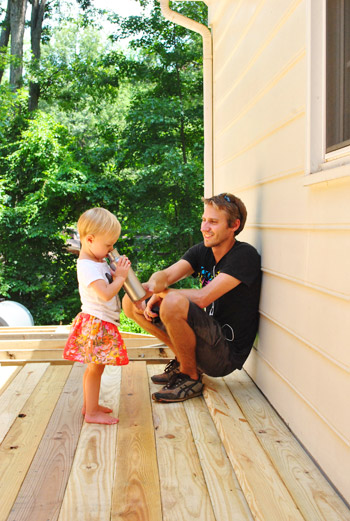
And cast a keen eye on the area I still had to finish. Maybe she was playing the role of the inspector?
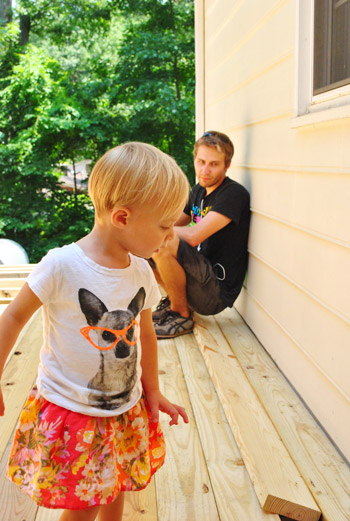
But she finally headed back in so Sherry could get her shot. Sadly it doesn’t capture exactly how sweaty I was (okay, maybe you guys aren’t sad about that). Let’s just say I had literally soaked through every piece of clothing – shirt, shorts, boxers… even my belt was damp. Sherry had a good time wondering how the heck a belt can get wet (Sherry: “wait, so you sweated through your boxers, through your shorts, and through your belt?!?!” Me: “I’m a man! Doing manly things on a hot day!”)
But it was totally worth it. We’re especially in love with the zippered seams, and we think when the wood shrinks up a bit and we stain it, it’ll be even more noticeable (like the inspiration picture we included up top). As for the schedule, I probably have one more day of deck laying (since half of these boards are still missing screws through the middle) before I can move on to the final phase: the railing and stairs. Which means the finish line is almost in our sights – assuming the weather cooperates. Although by now I’ve worked in heat advisories and thunderstorm warnings, so the forecast isn’t really fazing me that much anymore. Hope I didn’t just jinx myself. Hurricane season is upon us after all…
What have you guys been working on lately? Anyone else ever manage to sweat through a leather belt? Or have a two year old come out and examine their work?
Psst- Wanna catch up on all of the deck action? Here’s where we shared our vision for the space, then we removed the plantings and the old balcony, followed by selecting our materials and documenting our first day of building progress. Then we dug our post holes, learned that we failed our first inspection, revised our plan and dug more holes (which got approved) and proceeded to set posts. Next it was time to install our joists, do a bunch of last minute prep for deck boards, and whip up a mood board with our design plan. Whew, all caught up.

Julie says
Looking good! Maybe Clara was just looking for the slide at the end of the deck!
YoungHouseLove says
Haha- probably!
xo,
s
barbara says
You guys are amazing! You inspire and remind me that there’s always a light at the end of the tunnel.
emily says
ok, this might be the strangest thing ever written, but seriously: that is one sexy board-seam. what a great idea! so much better than the “haphazardly screwed in boards” of the decks of my childhood!
Dana J says
LOVE that deck! I looks amazing– way to go! I can’t wait to see how you style this space!a
Dana J says
Sorry– that should have been “space!”– attack of the toddler typist!
YoungHouseLove says
Haha, I have one of those too!
xo,
s
Iris says
Seriously, if you look under my “Most Visited” tab, Young House Love is 2nd only to my work site. I totally love seeing all things Petersik. Even my boys ask, “what’s Clara up to today?” and “can we watch the video of her sorting clothes?” Oh, and the question I had was, John, why did you pick the hottest time of the year to build this deck? It looks great btw.
YoungHouseLove says
Aw thanks Iris! You’re so sweet! As for John’s timing, we really were hoping to enjoy it by fall, but we didn’t exactly account for the fact that it meant building it in the summer. Haha. Live and learn!
xo,
s
Crystal @ 29 Rue House says
I love your deck and can’t wait to see it finished! After you get a chance to enjoy it for a bit, I’d love to know how you like it compared to patio…like ambiance-ish. I’m hoping to do something next year and don’t know if I want just a deck or just a patio or a combo of a deck and patio.
YoungHouseLove says
Will do! I think just because of the location off the kitchen it’ll be much more of a dining space (well, hopefully even a breakfast and lunch place too) while the patio is something we use more casually (think chalk and rock box fun with Clara, Burger’s bug hunting, reading, etc). We’ll let you know if it gives off a different vibe thanks to the wood vs. paver thing though! Feel free to poll us a month or two after it’s done!
xo,
s
Haley says
I think that I see you with earphones in during your pics…what are you listening to? (how’s that for a totally unrelated-to-all-things-decking inquiry?)
YoungHouseLove says
Anything to take my mind off the heat! Haha. Lately it has been the Walk The Moon album. And also Pandora.
-John
Vanessa Gasca says
Great job John. You should be so proud you put so much into this yourself. Its makes it so much more sweet once its all done and your family can enjoy it!
Sarah@SBrandesDesigns says
Looking good! I really like the zippered seam!
Jillian {Her Split Ends} says
First of all…thru the belt…that’s insanity…that’s a hot day!! Secondly…I LOVE the staggered joints…so lovely!!
Cheers
~ Jillian
http://www.hersplitends.com
Melissa says
Beautiful work! I have been watching closely to see the deck progress! I love the design!
Lately, we haven’t put any house projects in line..but we are expecting our first child in March:) So I suppose our next project will be nursery:)
YoungHouseLove says
Wahoo! Congrats Melissa! That’s so exciting!
xo,
s
Stephen says
Great Job – looks like it’s really coming along.
Was wondering about water drainage. Since the boards are so close together (before the wood contracts), are you concerned about drainage during/after a bad storm? Do you suspect the water will pool on the deck, or is there enough breathing room between the deck boards for proper water displacement?
You guys John seriously. Well done.
SL
YoungHouseLove says
Great question! although it’s hard to see, there are cracks about as wide as two quarters in our current install (you can’t put deck boards much closer than that just due to the fact that they’re not 100% straight and flush, so that’s as close as they get). So that’s definitely enough space for water to go through. In fact we got some rain last night and it dripped right through. We also installed the deck on a very very very slight grade away from the house (towards the back end of it) so things like water and leaves can run off that way as well.
-John
Cara says
My two-year-old dictator supervises EVERYTHING I do. She once had a tantrum, because she disagreed with my choice of bodily functions in the bathroom. True story.
Heidi P. says
W.OW. aMAAAAAAAazing! You covered all my questions, too, so good work on the deck and good work on a thorough post! :) Oh, and don’t worry, you can still see the sweat from that far away ;)
LARY@ Inspiration Nook says
Yey!! Almost done! Can’t wait for the final deck reveal post!
Ann says
While I commend you on doing an incredible job so far, I mist say that you forgot to leave gaps between the boars for drainage! The boards will collect rain and mold will develop. Also, over time the boards will begin to bow because of the moisture. I would advise that put a minimum of 1/8″ spacing between boards. If this has been brought up already by other readers, I apologize.
YoungHouseLove says
Check out the beginning of the post for that info! Pressure treated wood installed in the summer in our area shrinks up as it dries out in the sun, so you’re instructed to install it without large gaps in our area (it’s standard for contractors to install it this way, without any issues with mold or bowing). There will be nice gaps when it contracts – in fact we’ve actually already seen a few forming! Hope it helps.
-John
cherise says
So impressive John! Gold for you in the deck Olympics.
Nora Rose says
We have a serious belt sweating problem. Mainly caused by a manly man doing manly things in any kind of heat. It does take particular manly skill though.
John@Our Home From Scratch says
That is a crazy deck party. I like the zipper look. Looks like it added some extra work, but it’ll be worth it when you can just chill out there.
Jessibee says
This is awesome. I love the zippered seams…so modern and fancy!
John, you are too cool (obviously not physically …sweat through leather? Is that a thing!?!) So sorry about your ‘lower buttock’. Ouch.
Sherry from BC says
It is looking amazing. I love the zippered seams. I have be doing one of my “Get on that Dude” projects. Clearing out and cleaning all my kitchen cabinets and drawers. I can’t believe the crap I was saving. Not sure what for, the apocalypse maybe. Do I really need 50 sets of chopsticks for example? Anyway. I have scrubbed and purged and reorganized and it is so much more rational. Just tweaking the one large glass fronted cabinet that holds my “pretties”. So hard to get that right. I don’t have your knack Sherry. I was inside but couldn’t believe how hot and sweaty I got from shifting and scrubbing. I also managed to create some colourful bruises that show when I wear short sleeves and capri pants. They make it look like I have a much more exciting life than I do so I have to cover up out in public for a while. Next job is the bathroom cabinets and then finally lay the carpet tiles in the upstairs bedroom. What a fun vacation…….I would love to have Clara supervise at my place. She looks very knowledgeable.
YoungHouseLove says
Haha, she’s very knowledgeable but also terrible about putting her tools away!
xo,
s
Ellen says
We are in the midst of a den remodel. What was going to be a simple carpet install has turned into PROJECT CREEP! There is now insulation, rewiring, new drywall, etc. etc. Our house is in shambles while this is getting done…
http://www.kellyandellen.org/house/2012/07/it-has-to-get-worse-before-it-gets-better/
YoungHouseLove says
Ah the dreaded Project Creep! Good luck with everything Ellen! You can do it!
xo,
s
Ally says
Ha. Lay. Loo. Yah. for NO stinging middle groin injuries!
YIKES! I’m sure the very thought strikes fear in the hearts (and groins!) of men everywhere! Glad you’re OK, JBoom :)
I’m sure there will be many many fun parties started on this wooden work of wonder :)
xox
Brandi says
It looks AWESOME!! So excited for you guys!
Momcat says
I love the deck. I know exactly where that zippered seam came from too! That VMFA zen garden deck is exactly what I want too, that’s the one right outside the cafe, right??
I’m not normally one for giving advice, but I have to say, I hope that is the only time Clara takes those sweet feet barefoot onto the deck. As it weathers (even if it’s sealed) it will put up splinters. We had a 12×30 ft deck on our lake house (kept sealed, every year, ugh!) and it was all fun until visiting kids ran around barefoot, and ended up with splinters in their feet. So our house rule became, “No bare feet on the deck, ever.”
(I hate to say it but *I* was the worst offender. DH has taken more splinters out of my feet than I’d care to admit. But he is now very, very adept at it!) Just my $.02 to keep Clara’s feet sweet! ;)
YoungHouseLove says
Yes, it’s the deck right outside the cafe. Love it there! So gorgeously landscaped too! As for the splinter tip, thanks! She definitely will have shoes on when she plays out there (she just snuck by me as I was taking a picture of John for that series of pics). So “no bare feet on the deck” sounds like a great rule!
xo,
s
Lauren says
My husband is a commercial fisherman/plumber down here on the coast of NC and he sweats through his leather belt almost every.single.day. You’re not alone, John!
YoungHouseLove says
Nice! Give him a fist pound from me.
-John
linda says
and FINALLY the question we’ve all wanted answered all these years: tightie whities? or boxers!
:oP
the deck looks GREAT!
YoungHouseLove says
Hahahahahahahahaha.
xo,
s
Amy says
Looks awesome! I so excited for how you decorate it all…I need some ideas!
You were a hot topic in our house this weekend! We painted our kitchen and ended up moving on to our giant paneled family room. There was a lot of YHL discussion and referencing. Two coats of regular primer and then we broke down for oil-based. Thanks for all your help! After a year in our paneled cave it is sooooooooo amazing and bright. Benjamin Moore Precious Ivory is a gorgeous buttery yellow, btw. I want to lick my walls just a little bit!
YoungHouseLove says
Yay- so glad! I bet it looks awesome!
xo,
s
susan says
Looks great. We know that so sweaty that your skin and clothing become one-we ripped out an entire front and back “yard” in our once abandoned abode.
We put down flagstone-three pallets worth( a $75 craigslist best find ever)across one third of the front yard.
The backyard got gardens and more sod than I ever knew existed. We did it all ourselves. Ouch.
here’s a quick link -http://sharingourpath.blogspot.com/2012/06/before-and-after.html
YoungHouseLove says
Wow – that’s an amazing amount of work! You’re my hero!
xo,
s
Andrea says
This must feel so good… there is a light at the end of the tunnel!! It looks awesome, and I bet there will be some memorable summer dinners out there yet :)
Julia at Home on 129 Acres says
We are reshingling our roof ourselves. This is not a job that I’d recommend to any DIYers, but we’re at the bottom of the budget bucket, and so it falls to us. And it is a sweaty, dirty job. Between stacking 110 bundles of shingles on the roof, stripping the old shingles off and laying the new ones down, we’ve sweated through all of our clothes for the past three days. Yummy.
YoungHouseLove says
Woah! Sounds rough but I bet you’re doing an awesome job! Good luck Julia!
xo,
s
Jaslyn Dobrahner says
Hi John,
The deck looks great! And, I have enjoyed reading about your trials and tribulations which are all too familiar….including the recent fall. Ouch! I hope you heal fast.
Also, thank you for mentioning the importance of not using arsenic-treated wood for outdoor structures such as decks (May 23rd post). The EPA has a lot of information on arsenic treated wood, or chromated cooper arsenate (CCA), including this guidance brochure for outdoor wooden structures:
http://www.cpsc.gov/cpscpub/pubs/270.pdf
Most lumber that folks can buy at retail home improvement stores will have the ‘pesticide label’ stapled to the end. I noticed the labels on your wood in your Deck Day One, June 11 post.
Thanks again for sharing! It looks great – can’t wait for the finish!
Jaslyn
HK says
Could Clara be any cuter?! Do they make that outfit in adult sizes?? Oh, and nice work on the deck John! That looks good too :)
Lauren says
It is looking great! Also, in my family it is tradition to have “deck parties” or “roofing parties”. My parents actually built their deck (it stands ~11ft off of the ground and is the size of a living room) in three weekends with the help of all of my cousins. The cost? Pizza, burgers, snacks, and drinks. My cousin was also able to re-roof his entire house in one weekend with the help of all of the cousins.
YoungHouseLove says
That’s amazing! We need relatives like that! Haha.
xo,
s
Anna Sebok says
Really really impressive guys!! This is by far one of my most favorite projects of yours – you’re practically adding on a whole new room/space!
PS – do they make Clara’s outfit in my size? :)
YoungHouseLove says
Haha, I want one too!
xo,
s
Jennifer W says
That appointment you had to make wouldn’t be baby related would it?
Am I the only one who had that thought flash through my mind?
Love the zipper look! Great work!
YoungHouseLove says
Nope! We’re not ready for that yet. Haha. Alas, it was book related.
xo,
s
Valerie j. says
Looking great! So close, that’s exciting! Thanks for providing some entertainment while on bed rest.
anna says
Hello! Sorry to be grammar b*tch but you meant albeit (not albiet) and fazing (not phasing).
:)
YoungHouseLove says
Thanks Anna! Off to fix those.
xo,
s
Kate says
I’m loving it!
Georgia says
Looking awesome John! Totally feeling your exhaustion and sweat soakedness. Not sure if I missed a post, but what’s the deal with the white stuff (plastic?) around the edge before you put the decking down?
YoungHouseLove says
That’s called “flashing” and it’s meant to direct water away from the house – particularly where I have wood bolted to it. We talked about it a bit in our original deck post: https://www.younghouselove.com/2012/06/deck-day-one/
-John
Jayme says
My hubby is in the Army, so long sleeves plus long pants and boots with an added bullet-proof vest (he’s military police) means a sweated trough belt every day in the summer. Between him and my newborn, laundry is a real joy at my house.
Donna says
Looks great, John! I can’t wait to see how it looks all stained and decorated!
Dani says
Your deck is looking awesome! I love the zipper look. Also, in hopes of making you feel better, my husband has soaked through a leather belt before. He also soaked through all the layers of his leather wallet. The entire thing was damp and I asked him if it fell in the sink or something, but nope, it was just sweat. I can’t even remember what he had been doing. Something very manly, I guess.
Tamara says
AMAZINGGGG!!!!!
Jessica says
I just read on noaa.gov that July 2012 was the hottest July on record for Virginia! Poor John! We’re in NY and we tried weeding our garden last week and lasted 5 minutes before we decided to make it a pool day instead. We’ve been saving the outdoor work for dusk. Can’t do that while building a deck! I don’t know if the link will post, but here is the link to the article on it: http://www.weather.com/news/noaa-report-july-20120808
YoungHouseLove says
Woah! That’s crazy! Poor John indeed! Haha.
xo,
s
Dawn Spurling says
The deck looks great guys! I like the varied colors in the wood. It reminds me of our current project. We are laying laminate floor in our kitchen, dining room and living room. The color is Italian Walnut which had colors from a pine-type all the way to a cocoa brown and all has a red vibe. Just looking at it makes me fall in love with it all over again! Anyway, Iowa summers make for very hot saws on the front deck. And I run inside and mark a board, then outside to cut it and then inside to lay it and mark the new one and all the hot to cold to hot was so exhausting! I feel for your hot sweaty self.
Susan says
Hi guys,
Are you using “clear” pressure treated wood? Normally it’s green-ish, but yours is not. Our local hardware store is starting to carry clear pressure treated which I am so excited about.
/S.
YoungHouseLove says
Ours has a very very slight tint but it’s not green! Wahoo! So far we like it.
xo,
s
Dave Coates says
Geez guys. Well done! :)
Looking forward to seeing the result.
D