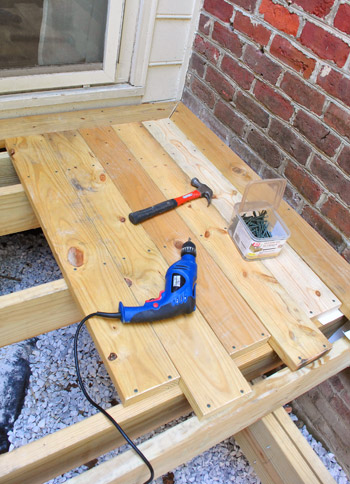
What party? The decking party, that’s what. Never been to a party where people put decking down? Then you have not lived, my friend. But come to think of it, my party didn’t have any guests so maybe I’m the one who should reconsider my definition. Anyways – let’s talk deck boards, since I gave you this sneak peek of my progress last week:
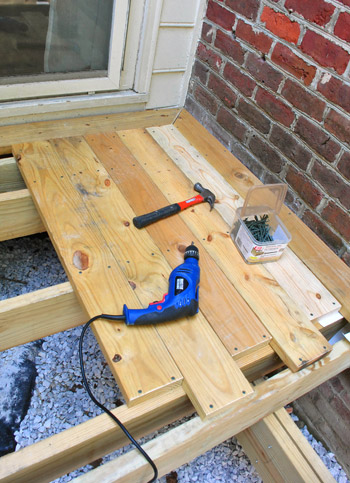
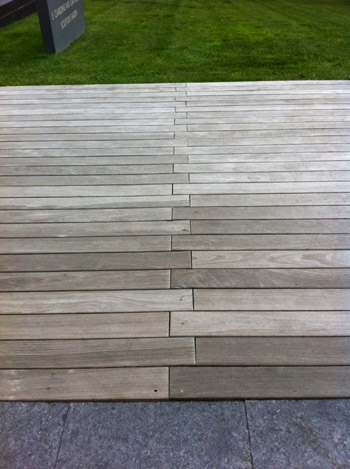
As you may be able to tell from that photo, we bit the bullet and went for the “zippered” seam pattern that we saw at our local art museum.
But before we talk about planning for that, we actually had two commonly asked questions on our last post, which were:
- What made you guys chose to go with exposed screws instead of hidden ones?
- Is it ok to lay decking boards that close?
So without further ado, those answers for ya:
- Sherry and I both grew up with decks with traditional exposed screws and they were beautiful and held up for decades, so we’ve decided to keep it classic and just line up all of our screws like the zippered seam deck that we included above as our inspiration (it’s hard to see, but in person the screws are visible, they’re just all very clean and nicely lined up instead of randomly drilled in). Not only was this choice something that we thought would be easiest, we also thought it would be the most functional (we can easily tighten any screws that might get loose over time since they’re so simple to access from above).
- And as for the board spacing, since we’re using pressure treated wood the local engineers/designers said can be placed pretty close (pressure treated wood is known to contract over time). So there are no worries about things being laid too close (and it’ll all shrink up over time – so we’ll end up with gaps for water drainage and leaves to fall through, etc).
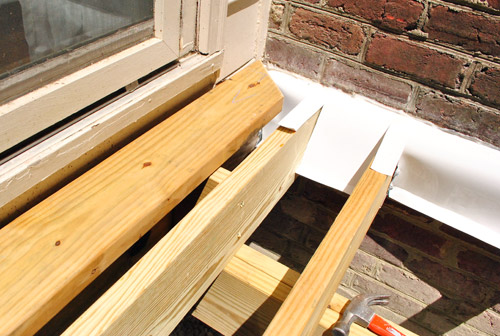
But even before laying our zippered seam, first we had to plan for another feature of our deck design – the “picture frame” border. That’s when you basically add a, well, frame around the outside of your deck with boards that run parallel to the edges (meeting at mitered corners) and then fill in the interior with the rest of of your pattern. Since most of our decking would run the long way (parallel to the brick siding), this meant adding some boards at either end that ran parallel to the sliding door. We figured it was one of those touches that would make it look a bit more polished. But it did take some extra planning since I needed to make sure all of our boards still screwed securely to the joists below.
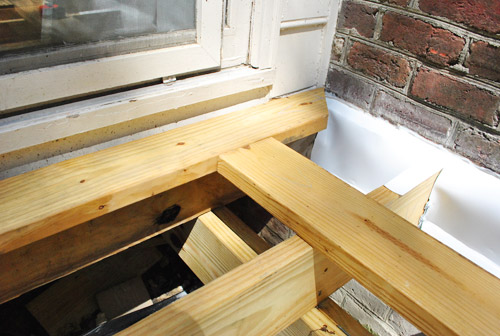
To make sure all of my boards ended on a joist, I actually had to add an additional joist here since my “frame” board rested across the entire first joist, leaving the deck board hanging out to dry (it’s one of those code things to attend to to ensure things are really secure for the long haul).
You can see I also added a small block of spare 2 x 8 between the two joist so the frame board had another place to rest on / screw into.
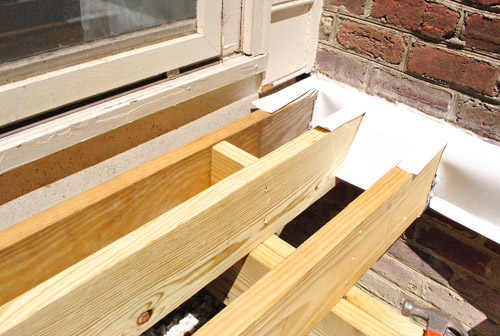
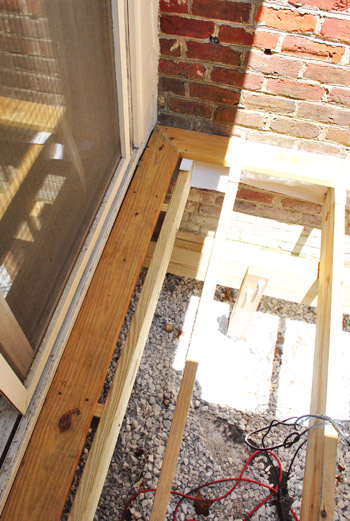
You can see better here how the picture frame is starting to shape up. I actually only did these two sides to start with (rather than the entire frame) since I figured I’d work my way out from here.
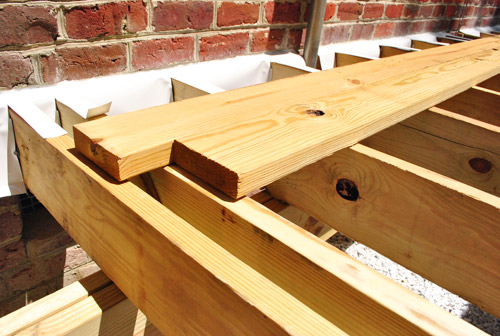
But before I could start adding more deck boards I had to actually add two joists to help me achieve the zippered pattern. We wanted the boards to be staggered about 5 inches at the seam, which didn’t jive with my current standard-joist set up (which were 16″ apart).
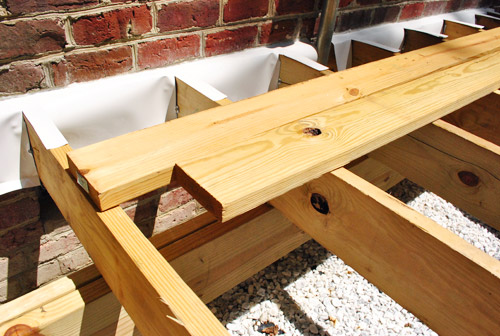
But no biggie here either. I just added two additional joists (one shown below and another at the end of these boards) and I was ready to go. I could’ve added these when doing the rest of the joists, but Sherry and I wanted to wait until this step to decide exactly where on the deck we wanted the zippered seams to be (because of the length of the deck we’ll have two of them). We chose the spot that we did because it’ll help define the area where our outdoor dining table will eventually go (it will be centered between the seams so they’ll be visible on either side of the table like in this rendering).
So with all of my extra support added, I could finally start cutting boards, laying them in place and screwing them in. Ha. Lay. Loo. Yah.
You may notice that we’re using pressure-treated 2 x 6″ boards for a decking instead of the 5/4″ stuff. This wasn’t really a conscious decision – it was just what 84 Lumber suggested when they gave us the quote. But I’m glad we went with it because in the long run it should help the deck feel more solid and warp less.
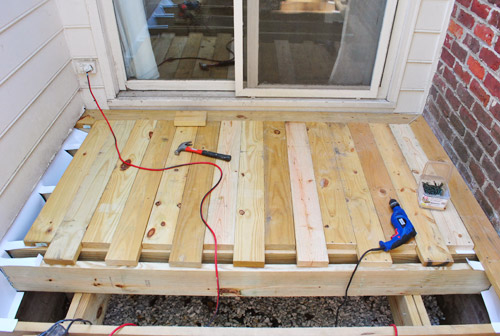
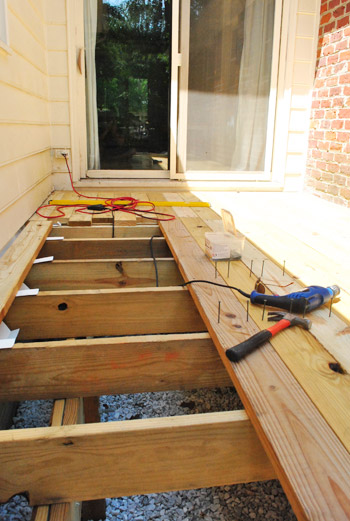
Here’s the first section of the deck nearly all laid in place with the zippered seam on one edge. At this point I had only screwed in the ends but planned to go back later and put the rest of the screws in (I’m putting in two screws everywhere a deck board meets a joist). I had already read in our county that all deck boards must span at least four joists, which is exactly what these do. Whew.
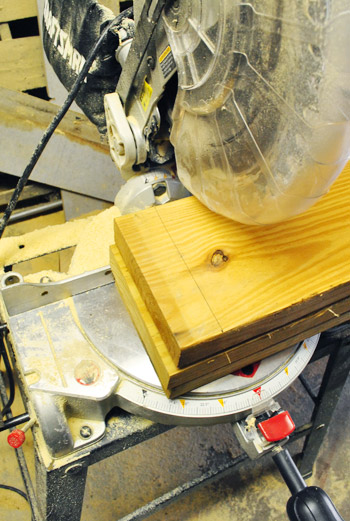
When it came to the last board I got sort of lucky. I wasn’t sure if I was going to be left with a sliver of a space to fill – giving me both an awkward look and the challenge of filling it (had it been less than 2 inches I probably would’ve just substituted one 2 x 6 for a 2 x 8). But luckily my 2 x 6s fit almost perfectly as-is. I did have to shave about a 1/4″ off the edge of the frame board. But since that edge is hidden under the siding it didn’t really matter how clean or perfect my cut was. And yes, our siding still needs some sanding / caulking / power washing / repainting. Haha. It’s on the list!
With my first (albeit small) section done, I was feel pretty excited. On to the middle section where I’d just be placing full boards (10 feet long) in place.

Well, this is where my planning got a little off. The end joists that these boards were supposed to rest on were a little less than 10 feet apart. Less by 1 and 1/8th of an inch to be exact. That meant I had to trim every single 10-foot board by a smidge so that the ends would rest exactly at the middle of a joist to be screwed into place. Not the worst thing that could ever happen (since I was able to cut three at a time) – but it was still a bit of a time suck.
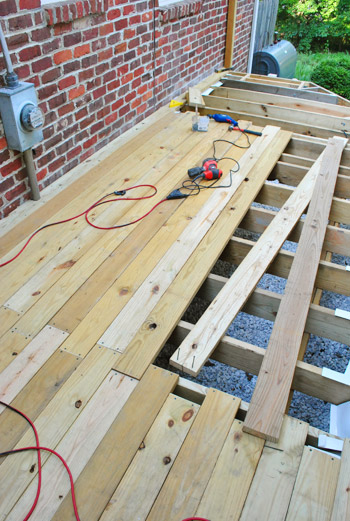
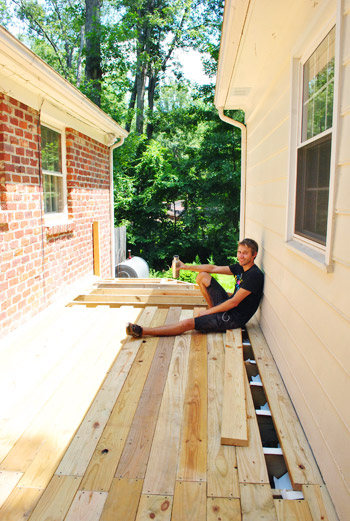
By the end of my first afternoon of laying decking I had gotten this far before the sun started to set and it was time to close up shop for a late dinner with the wifey (who had been blog/Clara wrangling all day along with churning out some last minute book edits).
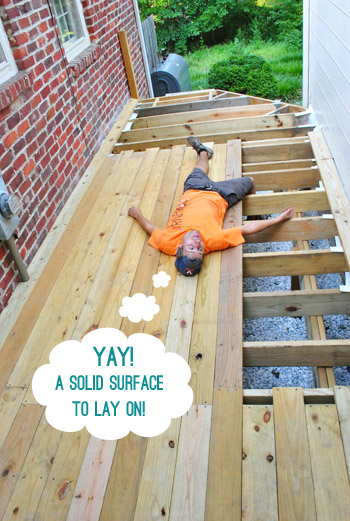
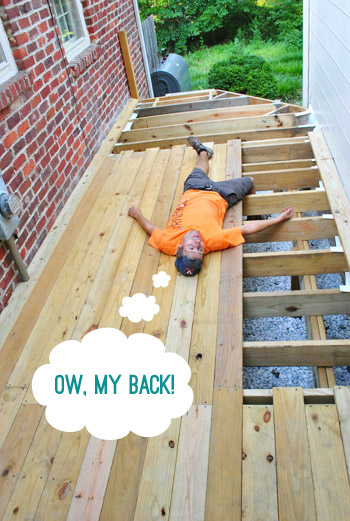
But first I had Sherry snap this picture to represent how I was feeling after my first day of board laying. For starters, I was feeling accomplished that I had finally created a solid platform. This thing is actually starting to feel like a deck!
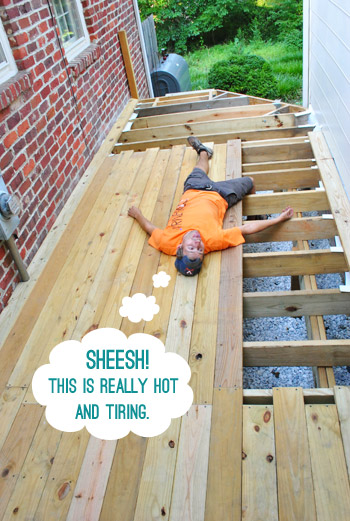
Secondly, I was feeling pretty darn exhausted. It had been nearly a full day of work and although it wasn’t nearly as scorching as some of my previous days of work out there, it was still August in Virginia – which means heat and humidity were my party guests all day.
Last but not least, I was in pain. Why? Because after who knows how many hours of walking atop these joists without issue… I fell. Early in the day I was carrying a 2 x 6 and I didn’t put my foot squarely on a joist and it slipped off. I fell through, but caught myself when my back connected with one joist and what can only be described as my “lower buttock” hooked around another. It hurt. But I’ll take a bruised lower buttock over a stinging middle groin any day. (Seriously, I was a couple inches off from having a great America’s Funniest Home Video submission). So I’d say it was a mix of bad luck and good luck going on during that fall.
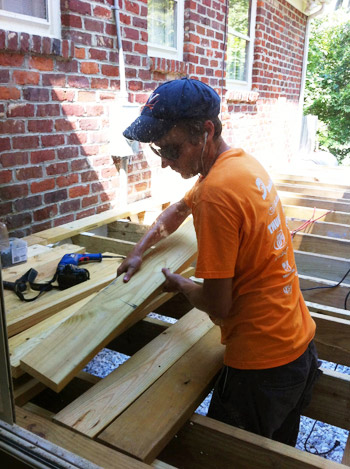
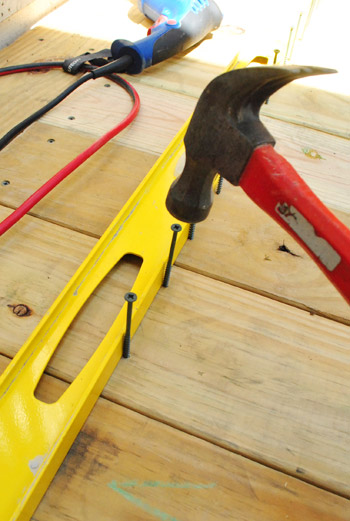
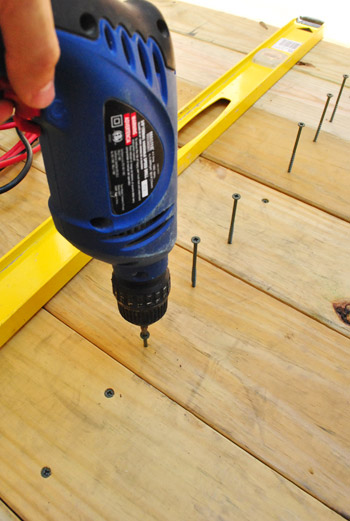
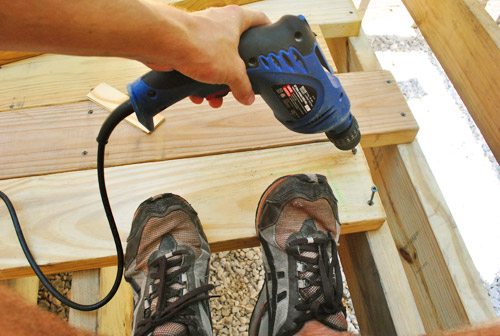
But I got some food in my belly, milked my injury to the wifey, and got a good nights sleep before heading back out the next day to pick up where I left off (and take some better process pictures along the way). For instance, here’s how I was setting my screws. Rather than pre-drilling all of my holes, I just used a hammer to get the screw stuck in the wood (and a level as a straight edge to help keep them all lined up) before taking my power drill to them.
Drilling isn’t as simple as I’d like, since 84 gave me screws with a standard top and they tend to slip and strip a bit more than I’d like. Some of you had suggested getting screws with the star-shaped bit, which I definitely would’ve preferred. But at this point I’m just plowing through with what I’ve got on hand.
Summer was back in full force on this day and it was too brutal to be out in the sun so I (very cowardly) just worked in the shaded area. So even though I still had screws to set in some of my boards from the previously day, I went ahead and kept adding more boards. Oh and I checked which way the boards “cupped” since that always makes a difference when laying things like decking (more on that here).
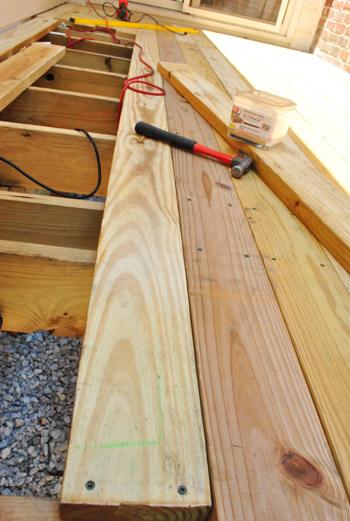
One other challenge that kept progress from being lightning fast was dealing with warped boards. When you’re using 10-foot long boards it’s virtually impossible to get one that’s perfectly straight. So often I’d set one end and find the other looking like this.

So to conquer the gap, I’d set my screws in the deck board far enough so I wouldn’t have to hold them in place (but not far enough that they’d come through the other end yet). Then I’d use my body to force the board against the other. Sometimes this was pretty easy to do. Sometimes it took everything in me.
But once I had it where I wanted it, I used a free hand to drive the screws in and secure it.
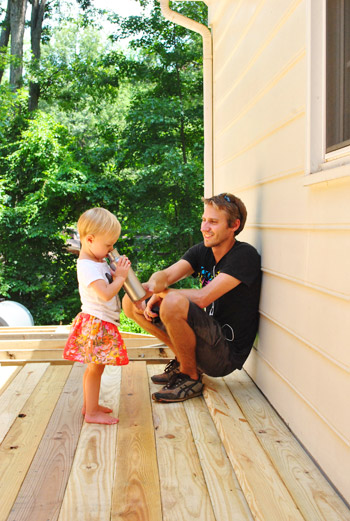
I almost finished the middle section and was about to trim the side of my frame piece so it would fit when I had to pack things up because we had an appointment to get to. I asked Sherry to snap one picture of me and my sweaty self when Clara pushed past Sherry for her first trip on what she calls “the pretty, pretty deck.”
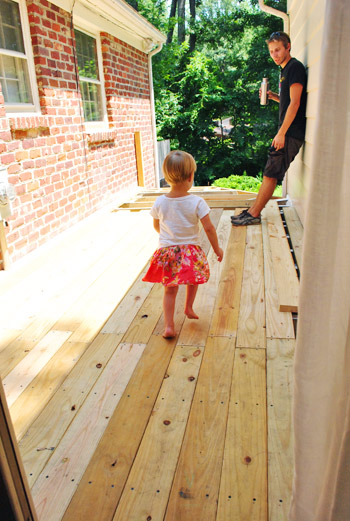
I guess she just wanted to get a closer look at my progress…
… which she appeared to approve of.

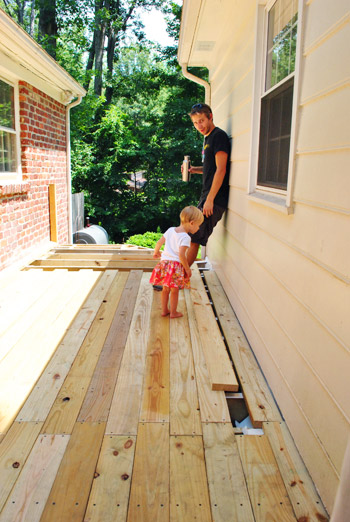
But it really turns out she just wanted to mooch off my water.
And cast a keen eye on the area I still had to finish. Maybe she was playing the role of the inspector?
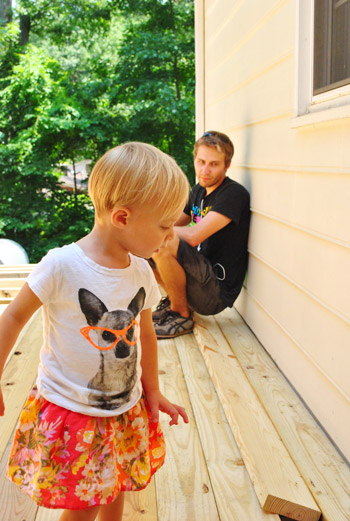
But she finally headed back in so Sherry could get her shot. Sadly it doesn’t capture exactly how sweaty I was (okay, maybe you guys aren’t sad about that). Let’s just say I had literally soaked through every piece of clothing – shirt, shorts, boxers… even my belt was damp. Sherry had a good time wondering how the heck a belt can get wet (Sherry: “wait, so you sweated through your boxers, through your shorts, and through your belt?!?!” Me: “I’m a man! Doing manly things on a hot day!”)
But it was totally worth it. We’re especially in love with the zippered seams, and we think when the wood shrinks up a bit and we stain it, it’ll be even more noticeable (like the inspiration picture we included up top). As for the schedule, I probably have one more day of deck laying (since half of these boards are still missing screws through the middle) before I can move on to the final phase: the railing and stairs. Which means the finish line is almost in our sights – assuming the weather cooperates. Although by now I’ve worked in heat advisories and thunderstorm warnings, so the forecast isn’t really fazing me that much anymore. Hope I didn’t just jinx myself. Hurricane season is upon us after all…
What have you guys been working on lately? Anyone else ever manage to sweat through a leather belt? Or have a two year old come out and examine their work?
Psst- Wanna catch up on all of the deck action? Here’s where we shared our vision for the space, then we removed the plantings and the old balcony, followed by selecting our materials and documenting our first day of building progress. Then we dug our post holes, learned that we failed our first inspection, revised our plan and dug more holes (which got approved) and proceeded to set posts. Next it was time to install our joists, do a bunch of last minute prep for deck boards, and whip up a mood board with our design plan. Whew, all caught up.

Shannon says
Looks great, y’all! LOVE the zippered seam and Clara’s approval of your work. :)
Rebecca @This Nest is Best says
This is looking so awesome! Our backyard has not seem much love lately but this is really getting me excited to get our’s together. I just still stare longingly at my Pinterest board (http://pinterest.com/thisnestisbest/backyard-decor/) and dream of the day (summer 2014, here I come!) that we’re able to make our big changes!
You’re almost there!
Katie Donnelly says
I am so impressed! Loving the zippered seams too. Can’t wait to see the finished product!!
Vidya @ Whats Ur Home Story says
Yay! Looks awesome. Love Clara’s skirt. Did she get a hair cut?
I too shared a sneak peak on my latest project on the blog today. Another Royal Design studio wall stencil project underway!
http://whatsurhomestory.com/to-do-list-update/
YoungHouseLove says
I just gave her mullet a little snip in the back. Haha. It won’t grow on top or on the sides, so just a little hair at the back of her neck was looking weird. Can’t wait til it grows! Oh and I love your sneak peek- awesome stencil!
xo,
s
Kristen | Popcorn on the Stove says
The deck is looking good! I like the zippered effect you guys decided on!
Molly says
Tis’ one sexy zippered seam! Keep up the good work, you are doing a FANTASTIC job!!!
Meg Smith says
Looks great, John!
Penni McNamara says
Looks great…and like a lot of work! Just wondering…do you think you will use this small deck in a practical way or just decorate it so it looks good out the sliding doors? Just curious! Can’t wait to see the finished product.
YoungHouseLove says
Check out the deck mood board we linked to at the end of the post for how we’ll use it functionally (and how we plan to set it up). We definitely plan to clock a ton of time out there!
xo,
s
Haley says
Well I’m impressed. It’s coming along great! Are you going to stain it? I bet you are ready to get some furniture out there and celebrate al fresco.
YoungHouseLove says
Oh yes, we can’t stain it for a while though (in our area you wait for it to acclimate a few months first).
xo,
s
Katy says
Hahaha, no sweat induced soaks on my end. I did repaint a room which meant, I kept finding other things that needed to be touched up. It was like if you give a moose a muffin, one thing kept leading to the next. So i repainted the room, which then meant I had to repaint the woodwork. That lead to repainting other things, and fixing the door and making a new valence etc. etc. Don’t you feel the same?
~Katy
YoungHouseLove says
Haha- yes! It snowballs!
xo,
s
Karen F says
great analogy! my kids love those books!
Alisa D. says
Awww, Clara the inspector…so cute!!
The deck is looking good and the zippered seams look very nice.
Lilly says
Wow, good job man. Power to u.
Tamrah Ryan says
Looks fantastic!! You guys are rock stars!
Barb says
Fabulous results. You deserve a big party!!!
Lesley L says
Looks great! Saw your link to Danny Lipford. He lives in my area. Does alot of great work in South Alabama. Really like the zippered look of the deck! It will be worth all the hard work!
Monika says
The zippered effect combines well and ties into the brick pattern on the walls (happy accident?). I think this space is looking bigger, sunnier, and much more cheery with the deck in place! It looks like you’ll have more sun on the deck than everyone thought. Cool!
Allyn says
I love how much Clara wears that shirt. So awesome
And don’t you guys feel better knowing that your deck is pretty pretty?
Seriously though, way to go!
Jen@The Decor Scene says
Love the zipper seams. You’re almost there! YAY. You guys must be getting excited. I’ll pray for the weather will stay good so you can finish up your project and get to enjoy the deck sooner. ;)
Melanie @ MJ says
Go John, Go!
Love the pictures of Clara out on the deck w/ the captions. haha. She’s one funny little lady.
Rebecca says
Questions 1 and 2 don’t line up with Answers 1 and 2. Although I think we can piece together which goes with which.
YoungHouseLove says
Thanks Rebecca! All fixed!
xo,
s
Annaleise says
This will do you no good, since you’ve already done it, but it may help others reading.
The reason you put space getween boards is only partly for expansion. It’s also to let bits of leaf and sticks and seeds and things drop down instead of getting stuck in a small gap. We have a deck with tight spacing like yours and one would need to crawl over it on hands and knees picking debris out for it to ever look clean.
Also, hammerring screws is very bad. They’re made for twisting forces, not sharp shocks. It will probably be fine on your sheltered deck, but it can cause the screw heads to break off under stress later on ( like in a hurricane).
YoungHouseLove says
Oh yes, we’ll end up with space between the boards for leaves and sticks and things to drop down since the boards will shrink up over time (the sun dries them out and they contract) and there will be a gap! As for hammering the screws, thanks for the tip! John drilled them all in to install them – he just tapped them with a hammer to get the hole started. Never knew that about not hitting them, so thanks again for that tip!
xo,
s
Brenda says
Yay, it looks like a real deck! The zippered seams do look really nice. It’s the little details, like the frame and zippering, that add that extra polish. So excited for the finished deck!
Audrey says
BRAVO!!!
Have y’all though about putting up some sort of roofing? or just something for shade? My mom put a deck in her backyard and put up some screen for shade, then went ahead and put a roof on top so she can watch the rain come in (she lives right on the southern texas coast, and we have always loved watching the rain come on over the bay). That back porch is our favorite place to sit and talk when we visit.
YoungHouseLove says
We have thought about a pergola or a sail shade but we’re not sure where we’ll end up since that side of the house is in full shade after 3pm, so we might like leaving it open with just some string lights draped overhead!
xo,
s
Emily Morrison says
The deck is looking amazing! I want to sit out there with a glass of chilled chardonnay, best of the 90’s music, and delicious cheeses. Boom.
You’re giving me the inspiration to tackle our (high above the ground) deck! Errrr….maybe getting my hubs to tackle it while I assist? ;-)
Kyle says
Looks great! I can’t wait to see the finished product (although I assume you guys are even more excited!)
In terms of the weather–you could run a tarp or some kind of shade-giver (h-u-g-e blanket, perhaps?) between the wings of the house, duct taped to the gutters, to give you some kind of shade/relief from the weather. But you’re almost out to the open so maybe I’m too late with the advice. :/
YoungHouseLove says
Oh yes, we have thought about building a pergola or adding a sail cloth for shade but since the deck is in full shade after 3pm we’re not sure if we’ll need it! We’ll have to live with it a bit to see!
xo,
s
Kyle says
Oh, I meant just during the build process if it continues to be this hot. Yikes, please don’t duct tape tarps to your gutters as a long term shade solution! Haha
YoungHouseLove says
Hahahahahha- gotcha!
xo,
s
Erin says
Pretty, pretty deck! (Small fix: I think you mean “*role* of the inspector.”)
YoungHouseLove says
Oh yes, thanks for the tip Erin!
xo,
s
Bron Strydom says
Awesome guys!!!! I had to hold myself back from scrolling down to the bottom right away without reading, just to see the pretty pictures. We are nearing the end of our bathroom renovation and man it feels good!!! We have finally finished grouting the walls and floors!!
You guys inspire us to keep going and also show us we are not the only ones that encounter so many hiccups throughout projects, but thats just d.i.y for you.. How hard could it be? It won’t take that long! Yeah right :)
Rachel says
My man likes to wear longer running shorts when he does his manly things outside. The moisture wicking helps and I just throw it in with all his running clothes when I do laundry.
Nice work progress!
YoungHouseLove says
Smart!
xo,
s
Cherri Porter says
I’ve invented a man-sweat product called “mani-pads.” I know, gross, but just think about it. A panti-liner on the inside of the shirt would soak up some of that sweat!
Of course, these are the kinds of dorky things my husband and I discuss on a regular bases.
YoungHouseLove says
Haha, hilarious! John wants to put in an order for a dozen or so.
xo,
s
Ashley@AttemptsAtDomestication says
It’s looking so good! I LOVE the zippered seam! It’s such a fun detail!
Matthea says
So. Impressive. This feat of engineering tops the list of your accomplishments, in my opinion!
Way to go, John!
Patti says
Love ‘the pretty pretty deck’! Rock on YHLovers!
marcy says
This is absolutely amazing! You should be extremely proud of yourself! If you guys ever get the itch to build more decks, you’re always welcome in St. Louis! =)
Lynn @ Our Useful Hands says
Lookin good guys, lookin’ good…I love that zippered look because it’s such a thoughtful design element. People will see there was alot of thought put into the creation because it won’t be the “norm”. We currently are at a standstill on our office project because we are the new parents of a Ryobi table saw – and have no idea how to change the saw out! Our friends borrowed it and we need to put in a new saw to cut the floor boards and so far, no dice. You have any tutorials on here?
My best, Lynn
YoungHouseLove says
So sorry, we don’t. Anyone have tips for Lynn?
xo,
s
jennT says
maybe it’s in the manual?
http://manuals.ryobitools.com/
Melissa says
Great progress!!! Can I just say that I am most excited at how adorable Clara’s shirt is!!! What a cutie.
paige @ LPD says
I love it! I will say that having boards that close is going to be a total b-word to clean. I speak, unfortunately, from experience.
YoungHouseLove says
Sorry if this is unclear, the boards won’t stay this close at all. Over time they will shrink up and contract to make gaps between them! Hope it helps!
xo,
s
KathyG says
How much will the boards shrink… like 1/2 inch?
YoungHouseLove says
It really depends how swollen they are when you put them in (it has been super hot and humid here, so we think ours are probably really bloated, but as the sun dries them out and the moisture inside of them is evaporated, they’ll contract – maybe about a quarter of an inch?)
xo,
s
Kim says
Looks awesome :) John, you’re such a trooper. I hope you hang up a big sign when you’re finished proclaiming to the world, “JOHN BUILT THIS WITH HIS OWN 2 HANDS!”
Emily says
Looks great! It’s a deck, of course the screws will be visible.
Congrats on almost being complete.
Jennifer says
John…The deck looks great. Sherry….I LOVE Clara’s shirt! She always looks so cute.
YoungHouseLove says
Aw thanks! That’s my favorite shirt ever of hers, so I might make her wear it until it’s a belly shirt and she’s six. Haha.
xo,
s
Ashley says
I love that shirt too! You should wrap it around a canvas and add it to the frame wall when she outgrows it(if it’s not completely threadbare by then)! ;)
YoungHouseLove says
I LOVE that idea!
xo,
s
Lauren@FilingJointly says
My mom totally still has the shirt I wore to bed every single night when I was little because she thought it was hilarious. I guess I sort of latched on to one of her OLD tees as a security blanket sort of thing. Now sometimes when I go to my parents’ house I look at the shirt and think “That is a very inappropriate thing for a three year old to wear.”
It’s not anything TOO terrible, just Betty Boop, who should probably change her name to Betty Boob, just saying.
Reenie says
Or….. make a pillow out of the shirt. :)
The deck looks so good. Love the zippered look. Can’t wait to see it all accessorized up!!
YoungHouseLove says
Love that too!!
xo,
s
Karen F says
that is a GREAT idea, Ashley!
Goldie says
Count me in as a huge fan of the shirt too! The past few weeks in my zumba class we have danced to a song in which I think the lyrics are “Ay chihuaha, shake it… ” I could (and probably am) hearing it wrong but every time I think of you guys and Burger!
YoungHouseLove says
Hahahahha- nice!
xo,
s
Heidi P. says
HA!
Whitney Dupuis says
It is looking great! My husband just built a deck for us and it is gorgeous. Unfortunately, it is also August in Florida so between the heat, humidity, and mosquitoes we won’t be able to fully enjoy it until the fall. Hello football parties!!!
Kate English says
Great job!!
Paige says
AWESOME! It is looking so great! Rock on you guys!
Melissa @ HOUSEography says
Looks great John! At this point I would be trying to assemble the table while my Handy Hubby grumbled and continued work on the other end :)
Jaye @ Just Trying to Make Cents of it All says
Love the zippered seam! I’ve never seen that before! Great job. It’ll so be worth it when you are sitting out there with an adult beverage (or lemonade – whichever you prefer!) admiring your hard work!!!
jennT says
WHOPA!! it looks really great! :) what an awesome job on the zippery-doo-dah!
and I sweat through belts on a regular basis working on the beach in the hot hot hot caribbean. (is it grosser that I’m not a man doing manly things?)
I’ve learned that canvas or synthetic cloth belts are best because I just throw them in the washer without even taking them off my pantS! in case you decide to sweat through your belts more often, http://www.chacos.com/US/en/Accessories-Belts
:)
YoungHouseLove says
Haha, I love that tip!
xo,
s
Ashley says
You’re hard work is really paying off. It’s already gorgeous! Good job, J-boom! Out of everything in your mood board, I’m most excited to see your string lights on it. I’m a real sucker for those things.
Sheri says
Wow!! That is so awesome guys!! Love the way John is watching Clara in the shots. So sweet.
Kristyn M says
This looks great! Do you have any tips for staining wood? We have 276 linear feet of fencing around our yard that is scalloped (highest point is 6ft) that we have begun to stain. We bought a sprayer and 7 gallons of stain based on the calculations on the can so that we could stain the front and back of all the fencing. Well we got about 1/6th of the fencing done with those 7 gallons. Before we buy more, any tips?
YoungHouseLove says
Oh no! We haven’t tackled that. Anyone else have info for Kristyn? We hear in general that sprayers (with stain or paint) usually go through a lot more paint/stain. What a pain for you!
xo,
s
audra kelley says
The deck is looking great! I’m a little (okay- a lot) jealous of all the great things you are doing with your home. I have a list that I can’t seem to get started on. My husband sweats through his leather belt too (and his hat, and his clothes…) I can’t tell you how many times this summer I’ve had to wash his hat in the dishwasher.
Amanda w says
I have actually been to a deck-building party. It was pretty fun. Luckily only the guys had to work, but the entire deck got built in one day. I’m pretty sure the posts were in the ground already when we got there, but everything else was done that day.
YoungHouseLove says
That. Is. Amazing.
xo,
s
kathy says
Amanda, did you come to our house?? haha, we did that last year!