Alternate punny post title: Joist to the world. (I’ll pause while you golf clap)
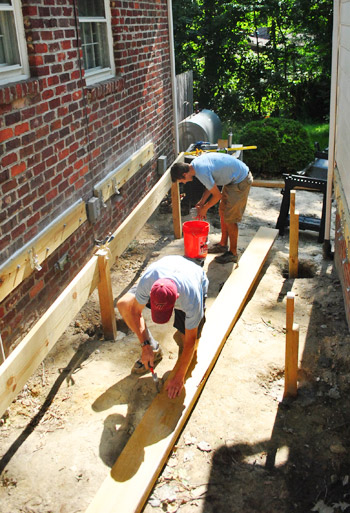
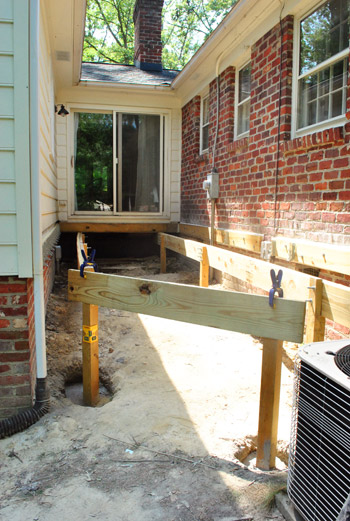
Good news! My dad made it back from my grandma’s house in West Virginia so operation double-up the girders and bolt them to the posts was able to commence with him at my side. As I started to tell my dad “Okay, you’re going to hold the board in place in the air while I drill pilot holes…” he cut me off and suggested we just put both girder boards on the ground, nail them together and that way they’d both rest on the notched posts – no air-hold required. Smart. I knew there was a reason I picked him as a father.
So we clamped the girder boards together so what-would-become-the-top-edge was perfectly lined up (boards are never perfect, so even two boards marked 2 x 10 might be slightly different widths). Then we nailed them together.
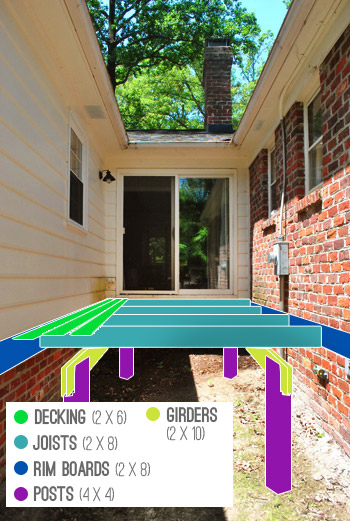
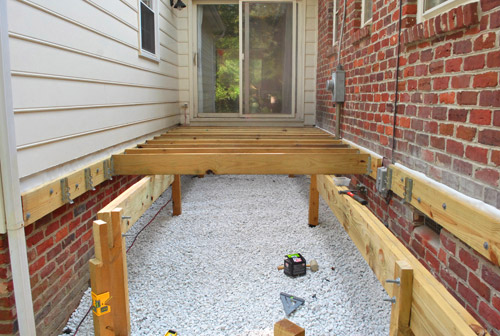
To refresh your memory about how this deck will come together, here’s this handy little graphic that hopefully makes it a bit more clear:
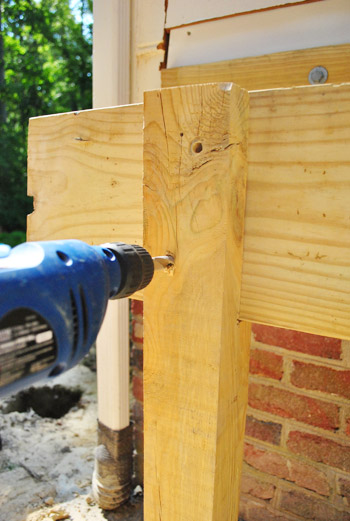
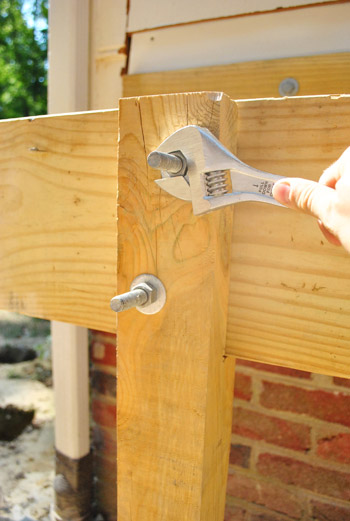
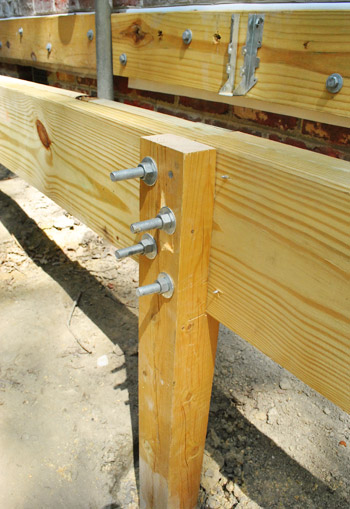
Next we were able to rest the now double-thick girder on the notches and proceed with bolting them together. Our county requires us to use “two 1/2″ through bolts” – which meant I had to drill 1/2″ pilot holes through about 4.5″ inches of wood – which was a little bit of a challenge since my longest drill bit was barely that long.
But we got it done and were able to slide the bolts through with a bit of hammering, and then tightened the nuts on the other end.
It was actually a remarkably simple process, and it probably took us about two hours to do the whole thing. Not necessarily a short time when you’re standing in 95-degree morning heat. But, I’d say it’s the first part of this process that has actually been faster than we anticipated.
Oh, and here you can see how we joined the girders on the long side where it’s actually two sets of boards that butt up against each other on one post. It’s like a through bolt party up in here.
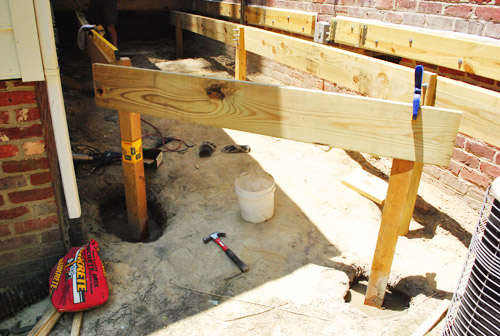
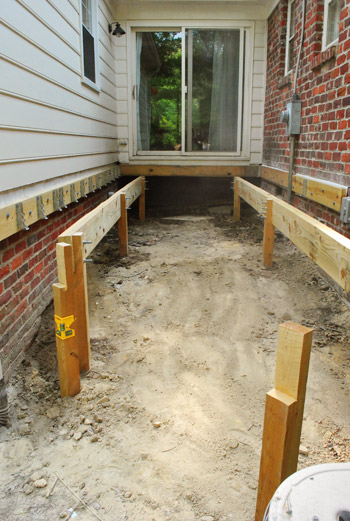
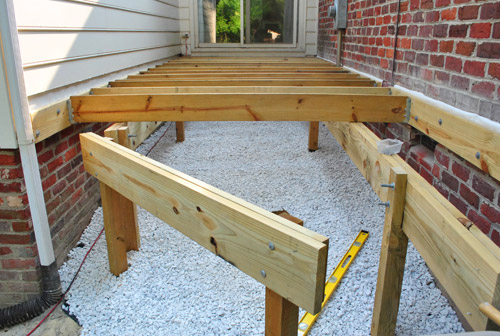
Since our morning was going so speedily, I even convinced my dad to help me go ahead and get the diagonal girder and posts measured, cut and set in place.
So by about noon we were looking at having accomplished pretty much our entire goal for the day.
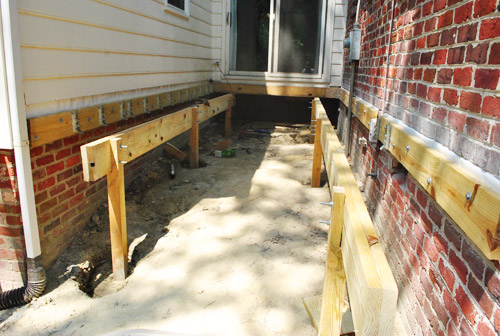
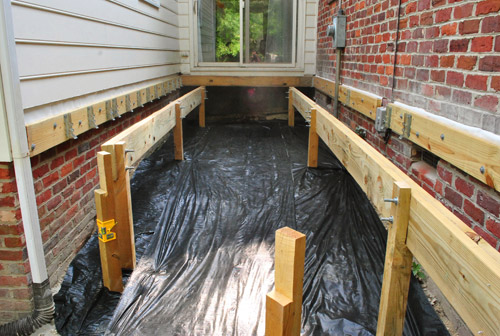
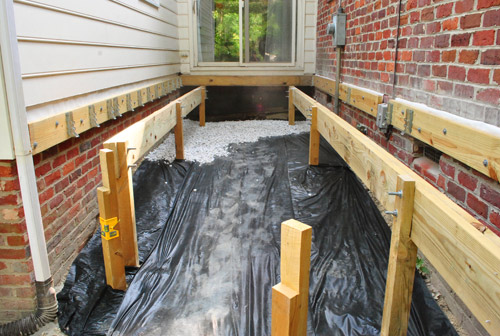
Does that mean we get to stop? Of course not. Well, it did for my dad since he had other things to do at home. But after taking a breather (by which I mean working on something else inside with Sherry for a couple of hours) I returned to my slowly-getting-completed deck for my next step: laying weedblock and gravel.
A bunch of you guys have recommended taking some weed-preventative measures and I figured this was my last chance to have easy access to the entire space under the deck (since adding joists will mean lots of new obstacles). So I removed one existing obstacle – the diagonal girder that we hadn’t bolted in yet.
Next came the weedblock. Using some leftover from Clara’s rock box plus another $12 roll from Home Depot, I was able to cover the whole area without a problem. I have mixed feelings about weedblock (since my experience has been that some weeds just grow on top of it instead of under it) but I figured it’s better than nothing. And for about $15 (including the ground staples to hold it in place) it’s worth giving it a shot since it’s the recommended method in our area when it comes to dealing with the ground under a deck.
Next up was covering the area in gravel, since it’s harder for weeds to grow in a soil-less environment (and pests will like a weed-block-and-gravel-filled area a lot less than a damp-muddy-and-weedy spot to hide). My original plan had been to get a delivery of rocks from the same stoneyard where we bought the gravel for our DIY patio, but I forgot to place the order and then was too impatient to wait. So instead I picked up two car-loads of this bagged gravel from Home Depot (it was marked down from $3.38 to $2.50/bag, saving me about $35!).
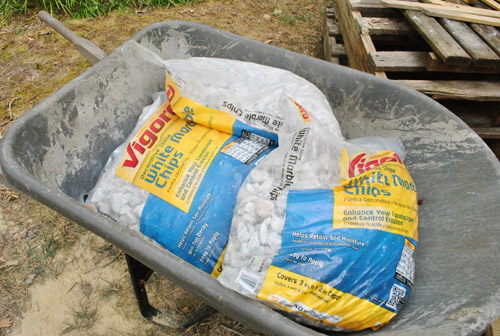
It wasn’t necessarily easy hauling all of it from our driveway to the other side of the house where the deck is going in (again in near-100-degree heat) but by this point I had become pretty accustomed to being sweaty and gross (and the people at Home Depot were unfortunately accustomed to seeing me that way). So here’s the space slowly filling up with rocks…
Almost there…
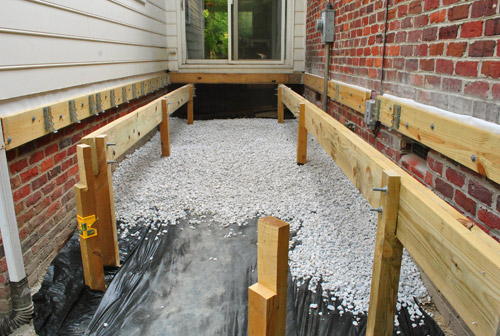
…and complete. It took me 40 bags total. I know I’ll need more once I put the stairs in, but for now I’m just going to cross that bridge when I come to it.
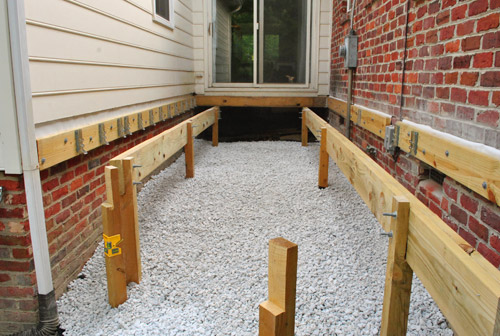
It was about 7:30pm by the time I finished getting my rocks down, so I called it a day. Though I was almost excited enough to keep going because my next step would be joists… which meant it would finally start looking like a deck.
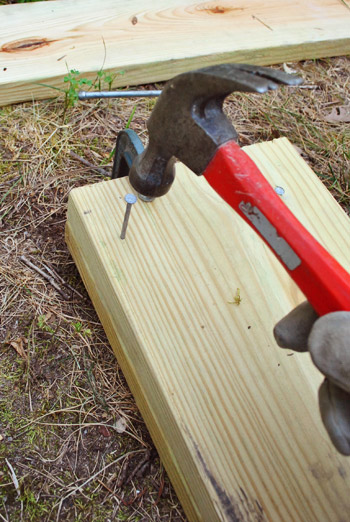
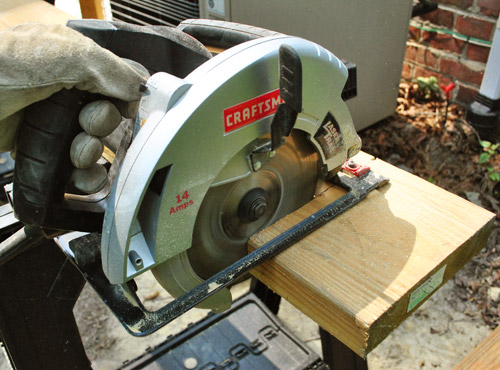
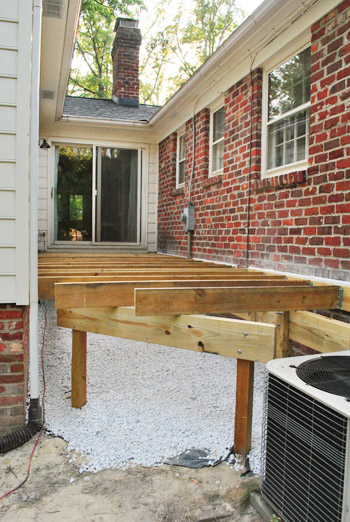
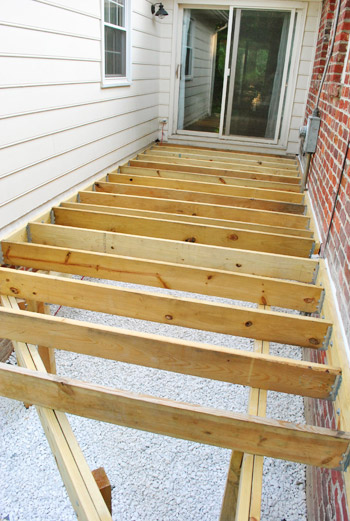
So the next day – despite being more sore than I’ve been in recent memory – I bucked up and got my joist on. Each of my joists would be about 7.5 feet long, so it meant trimming a smidge off of my 8 foot long 2 x 8″ boards.
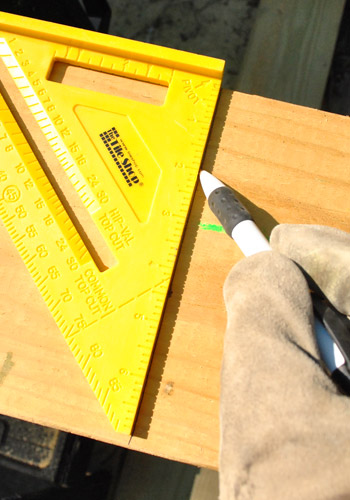
I mainly took this picture of me marking my cut because every time I did this my eyes kept catching the word “PIVOT” in the corner of my straight edge and this scene from Friends would replay in my brain.
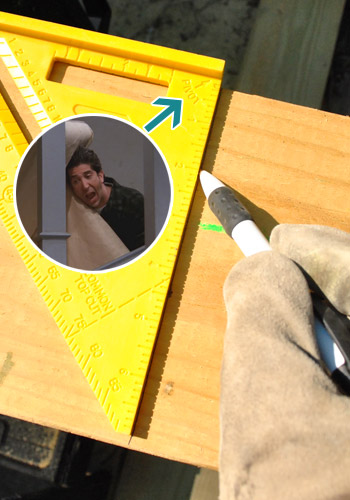
Anyways, once Ross was out of my head, I got to cutting with the circular saw – who’s like my new best buddy on this deck project.
Once cut, the joists actually just rest on top of the girders – so there’s no additional support needed to keep them up. But I did have to add some hangers on either side to give them some stability side-to-side. I had already installed all of the hangers on the siding side of the house, so it just meant adding them on the brick side.
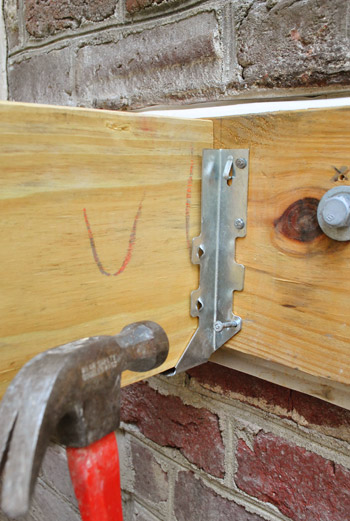
And since these hangers were no longer about keeping the hangers up, it was actually more critical that I nail them in on the side (thanks to the handy angled-nail guides already in the hanger).
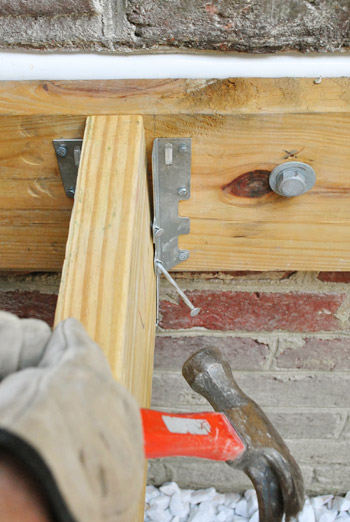
This was by no means a swift process (each hanger required 10 nails) and it didn’t take me long to wonder if I should’ve bought a nail gun for this project. It wasn’t much longer after that that I was actually pretty certain I should’ve bought one. But alas, I just kept plugging along – thinking of how I would look like Hercules when all was said and done (spoiler alert: this did not happen, strangely enough).

As I added each joist, I double-checked my level as I went. If they weren’t level (while accounting for a slight slope away from the house for drainage) there wasn’t a whole lot to be done since my girder was already set. But doing this did help me spot one board that was too warped to use (it curved up on one end). And had anything been too crazy un-level I could buy (or rent) a planer to scrape a bit off the top of the offending joist.

Here’s Clara watching me build what she now called my “pretty pretty deck.” Not the adjective I would choose myself, but as long as she’s showing interest in the project – I’ll take it.
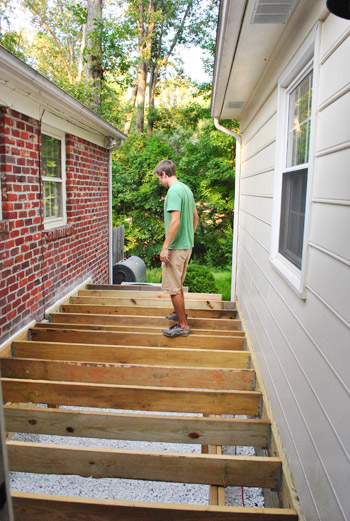
Slowly but surely more joists joined their joist-y brethren and the space started looking more and more deck-ish.
When I got towards the end I did have to go ahead and bolt the diagonal girder in place, since the joists on the end would need to rest on it.
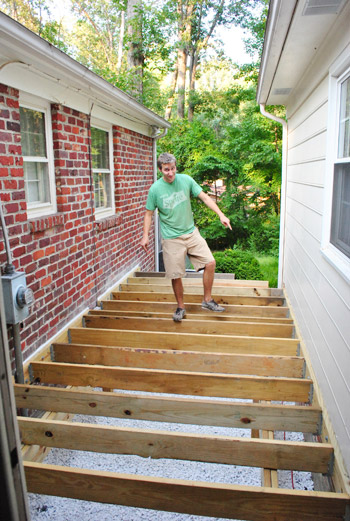
And finally, about four hours later – all of my joists were in.

I still have to add the rim boards along the exposed edge. It will be a bit complex because this is where I have to be precise about the angle I cut, so I didn’t have the mental juice left to tackle it after such a long day. And for now I just left the joists on the end extra long (once I’ve determined my angle, I’ll use the circular saw to cut them more precisely).
Not too shabby though, right?
Before the day was through, I couldn’t help but test out my new creation a bit. You know, to make sure it actually could hold some human weight.
It did! So I broke out a little happy jig. Call it my “Happy Happy Joist Joist” dance if you will.
Once I get those rim boards in, my next step is deck boards. I can’t tell you how excited we are to finally be at this step. This project has taken much longer than we anticipated (for which I blame equal parts on ourselves, inspectors, heat, and the lack of an army of helpers to speed things along). Oh well, that’s DIY for ya. It’ll totally be worth it when we’re sitting out there sipping lemonade, right? What have you guys been up to this weekend? Any outdoor or indoor projects that are finally turning a corner and looking like they’re closer to done than undone?
Psst- Wanna catch up on all of the deck action? Here’s where we shared our vision for the space, then we removed the plantings and the old balcony, followed by selecting our materials and documenting our first day of building progress. Then we dug our post holes, and then learned that we failed our first inspection. We revised our plan and dug more holes (which got approved) and proceeded to set posts. Whew, all caught up.

Amber says
I seriously LOL’d at the “Friends” reference (and may or may not have yelled “Pivot!” a couple of times), and then about fell out of my chair laughing at John’s “Happy happy joist joist” dance. And then both times I tried to “like” the photo. Facebook has ruined me! ;) Looking good guys!
YoungHouseLove says
Hahhahhaha, so funny.
xo,
s
Sayward says
my BFF and I yell PIVOT all the time. It makes moving anything heavy way less miserable. Also, amazing deck work!!!
Whitney says
So exciting that your deck is coming along! I have to say, I loved the Friends reference! I too think of Ross yelling “Pivot!” everytime I see that word. :)
eileen marie says
Congrats, John! It looks great so far -you are sooo close! Your dad is a real gem -I *hope* he’s retired!
YoungHouseLove says
Ah yes! If by retired you mean does-more-than-he-ever-did-when-he-had-a-nine-to-five. Haha.
-John
Tirsa says
Great job, John! You’re almost done. (I bet you can see the light at the end of the tunnel.) What a lot of hard work you and your dad have put in. Very soon you’ll have that awesome feeling of accomplishment. :)
Abigayle says
Oh my god, the “PIVOT!” Friends reference killed me. Friends is one of my absolute favorite shows (I own all 10 season on dvd and have watched the full set at least 3 times all the way through). The picture of Ross is absolutely perfect.
Anna, Sydney says
Amazing work John and dad! Looking forward to finished product. Sherry, is there a mood board for the decorating/furnishing part of the project?
YoungHouseLove says
I need to make one, stat!
xo,
s
Nadine says
Did I miss your anniversary/wedding stuff this year?? I feel like I missed something….Happy Anniversary either way!
YoungHouseLove says
Aw thanks Nadine! We’re sharing a little family anniversary adventure on Wednesday! We just took too many pics so we have to edit them down- haha.
xo,
s
roberta says
Wow! It looks terrific. Don’t know if anyone has suggested this yet, but when you get toward the end (which is clearly coming really soon!) consider putting some chicken wire between the ground and the bottom end boards (sorry i’m not explaining this well) and attached to the inside of the end boards to keep rabbits, raccoons and other animals out. it’ll be easier to do this during construction than trying to retrofit it and the barrier will be hardly noticeable. i learned this one the hard way!
YoungHouseLove says
Thanks for the suggestion!
-John
Cristiane says
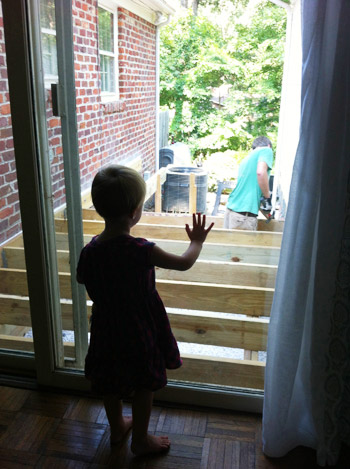
It’s absolutely lovely Clara’s photo checking up on the progress her dada is making :)
Emily says
You guys have inspired me, so 2 weeks ago we tore out our Pepto Bismal pink main floor bathroom with a toilet made for a midget. We have since been slowly putting it back together (2 small children along with it being our 1st major project have definitely slowed things down). But we now have walls so I can see the light at the end of the tunnel. I’ll send you a before and after photo when we’re done!
jennifer says
YOu let your dad wear that hat?! ;)
YoungHouseLove says
My sister went to VT so I gotta throw him a bone sometimes…
-John
Christine Witt (Brush Dance) says
(love the episode of Friends!)
The deck is coming along wonderfully – every time you do a new post on it, I’m reimpressed (it’s a word!) with you and your DIY braveness!
String of party lights is a great idea – we have some commercial grade (leave up safely all year long) in our backyard.
Autumn@fallfordesign.com says
Woohoo! Great Job John & Dad!
This has nothing to do with your deck post, but you know a person reads your blog to much when they come across a white ceramic animal and sees the same animal is spray painted in many different colors and thinks “This Etsy Seller must read younghouselove.com.” :)
http://www.etsy.com/shop/WhiteFauxTaxidermy?ref=seller_info
YoungHouseLove says
Oooh, LOVE!
xo,
s
Jessie says
Looks Great! We just recently drove back to N.Y. from South Carolina and passing through Virginia was really tough… it is sooooooooo HOT over there! Hopefully the weather starts to cool down.
Since we’ve been back it’s painting our half bath and spay painting our kitchen table and chairs… maize (corn). GOOD TIMES!!!!!
Amy says
The deck is looking so great! I wish my husband would read this blog! He is the worst kind of DIY-er, he thinks he knows everything (but he doesn’t!) so he doesn’t take his time and read instructions, or look up how to do things the right way and all that…sigh. Oh well, I can just always do our big DIY things myself instead :-)
Beth says
lol, I quote the way Ross says “PIVOT!” all the time!!! one of my absolute favorite Friends quotes! (right along with, “it’s a moo point…you know, like, a cow’s opinion” or something like that. hahaha great work you guys, the deck looks great!
KarenH. says
Maybe I’m just under thinking this, but couldn’t you just snap a chalk line along the boards to be trimmed for the rim board?
Fair notice, I’m no carpenter, so maybe not, but that’s what I would do.
YoungHouseLove says
Are you talking about the angled rim board on the end that I’ve yet to add? If so, that’s probably what I’ll end up doing. I’m mainly just anxious about getting my angled cuts on the end correct.
-John
MoHole says
great work!!
Tom says
I think you might be afflicted with some type of weedophobia! :) I would say that the installation of weed block was overkill on a nearly enclosed deck that small. Hauling nearly a ton of rock in 100 degrees at a cost of $100 is OVERKILL+ Extreme. :) Weedblock and stone 3ft back from the end of deck would cover any reflected sunlight and stubborn weeds.
I love the blog, and both of your attention to details. Thank you.
Ashley @ sunnysideshlee.com says
Kudos John! I actually want to give you a massive pat-on-the-back for this project! It looks complex and time consuming, and much harder than what I imagined a deck project to look like (not that I spend much time imaging deck handiwork). It’s coming along beautifully and I bet Clara cannot wait to run right out of those patio doors and onto the gorgeous deck!
Looking great guys! Can’t wait to see the finished product!
Annie says
Wow. It looks amazing! Congrats! I do have to say though that while many of your projects inspire me to think “I could do that” this one makes me think “Whatever I’d need to pay for someone to build me a deck would be 100 percent worth it.” You have worked so hard and done an amazing job though.
Jaye @ Just Tryin' to Make Cents of it All says
Wow, you make building a deck look easy!
And isn’t it a special day in our lives when we realize our parents aren’t the idiots we thought they were when we were growing up??
Great job – can’t wait to see it completely finished!!
Ahsamon says
haha love the “happy happy joist joist” ren & stimpy reference. :P
and AWESOME job on the deck, so far!
Kate says
You are making great progress John. =)
I can’t wait to see the finished product!
Sandi says
Looks great! Question: what room does your new deck come off of? I’m sure you’ve mentioned it but…
Anyway; love your blog! I really appreciate the detail in your DIY projects! You guys are truly an inspiration!!
YoungHouseLove says
Right now the only access to the deck are the sliding doors in our living room (sort of behind our sectional and next to where Clara’s drawing desk is located).
-John
Bill says
John, does your county not require hole inspection? In Loudoun I had to have my poured concrete inspected, and then pre-decking inspection.
YoungHouseLove says
They don’t. I called to double-check this because it seemed odd that they just look at my empty holes and then not again until my deck is complete, but they assured me that’s the deal here in Chesterfield!
-John
Elisa says
I cannot stop giggling about the “PIVOT” comment, and photo of Ross…ha!
Jo_Ro says
It looks great!
Jessica says
Re-joisting with you! *cue hallelujah chorus* :)
YoungHouseLove says
Hahah, nice one.
xo,
s
how2home says
Things are looking really really good! You must be really proud of how much work you guys have done! We are proud of you guys :)
YoungHouseLove says
Aw thanks!!
xo,
s
alg says
Great TV references! Friends is my fave, and the hubby loves Ren & Stimpy.
I can never hear the word “pivot” without that scene popping into my head. I love when Ross tries to save his dignity by returning the couch — for store credit “in the amount of four dollars.”
(We’ve all messed up a DIY project & wished we could get away with that, right?!?)
Melissa Bushway says
I’ve followed your blog for quite some time, but this is my first comment.
I am always impressed with all your hard work, and what seems to be constant joy while doing projects.
Thats one of my FAVORITE Friends episodes, and like some of the other commentors have said, I regularly think of Ross when moving a couch.
Can’t wait to see more!
-M
Erin says
Haha, LOVE the visual connection you put in my head of Ross and PIVOT!!!
Carrie says
I looked through other comments and didn’t see anyone else mention this so maybe I’m crazy but why are there fabric and bunk bed pics in this post? Did I miss something or is my computer spazzing out?
YoungHouseLove says
No idea what’s going on but it sounds like it might be on your end. Maybe try restarting your browser (or your computer) or checking out or site from another browser if it’s acting up (ex: Firefox instead of Explorer?).
xo,
s
Kim S says
I’m so excited for you guys! It is really looking deck-ish (deck-ish? deck-y? haha) now! So awesome!
Viviana says
OMG! That “Pivot” episode of Friends with Ross has to be one of my all time favorite. I think all of the episodes that centered around him were the funniest. Another one of my faves is the “fake tan” one with the “one mississippi…” counts. He makes me pee my pants. lol.
Melanie says
One of my favorite (of many!) Friends episodes ever! PIVOT!!!!!!!!!!!!!!!!!!!!!!!!!!!!!! So funny!
Sabrina says
Great Job! I was wondering if, with all your digging, you guys have poisonous snakes or anything like that in your area? I was digging in our yard and saw this snake under our deck, turned out to be a water moccasion! I had no idea we even had them up here!
YoungHouseLove says
So scary! We have only run into friendly (but kinda scary at the time) garden snakes!
xo,
s
Kate says
Looks AMAZING! Can’t wait to see the finished product!
Brittany says
John, you need this shirt… LOL!
http://www.cafepress.com/mf/34847656/_tshirt
The hubs and I love funny t-shirts.
Needless-to-say, we own this one!
<3 F.R.I.E.N.D.S!
Great job, btw!
Have no idea how you guys do it and make it look easy…it's very inspirational! :)
-Brittany
YoungHouseLove says
Hahah.
xo,
s
Kelli says
I’m behind on my blog reading because we were on vacation last week, but you have a grandma in WV? Small world! If you’re ever here to visit, I’ll buy you coffee. :-)
YoungHouseLove says
You’re so sweet! Yes, John’s mom’s mom lives in Huntington!
xo,
s
Dani says
As if I already didn’t love you guys enough, you go and quote Friends. :)
Cindy * Daisies & Crazies says
I am waay behind on post reading, and watching that video had me laughcrying! Sooo hilarious. I miss “Friends.”