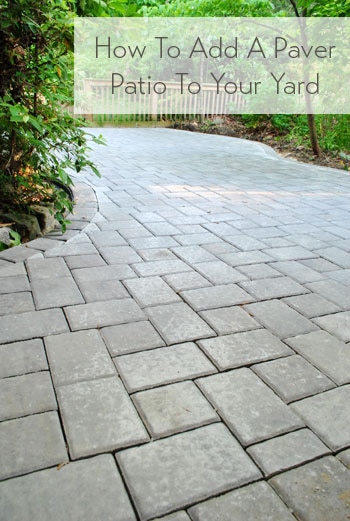
Hallelujah, the patio is done!
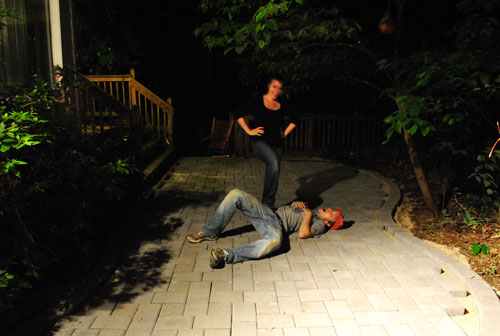
I’ve caught my breath a little bit and regained feeling in most of my muscles, so I’m back to tell you the end of the tale. Let’s see, where did we leave off? Oh yeah, with us me passed out on the mostly-laid pavers late Friday night.
As you know from Sherry’s post yesterday, we took Saturday off to have some family time / start Mother’s Day early. Then on Sunday afternoon, I decided to take an hour or two to finish cutting the pavers around the edge. Apparently my day away from patio made me forget how much effort each step of this process takes. My “hour or two” turned into “seven or eight.”
Allow me to demonstrate my process to explain why. Naturally, curved edges require lots of cuts. This I knew going in. But residual confidence from tiling our old bathroom had me ready to take on this more-than-beginner design.
So to determine where to place each cut, I laid my full stone in place against the border pavers (which I’ve learned is called “a soldier course”) and marked where my cut should go (the area that overlapped the border) with a pencil.
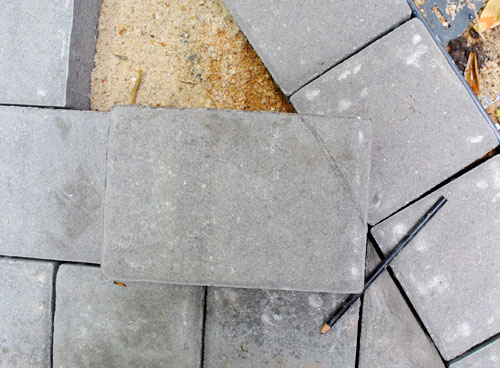
To cut, I entrusted my brother-from-an-inanimate-object-mother: the wet saw. You may remember I fell in love with this guy during the bathroom project in our first house. But after all of the recent patio craziness, we aren’t so chummy anymore (we’re not “tight” or “aight” as the kids say).
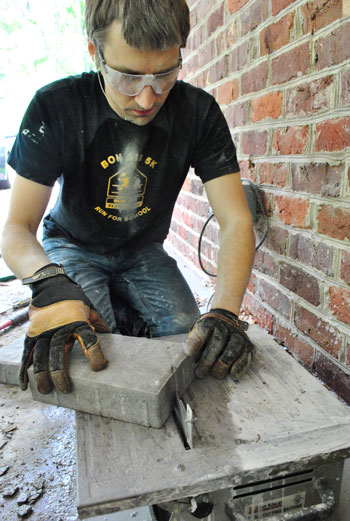
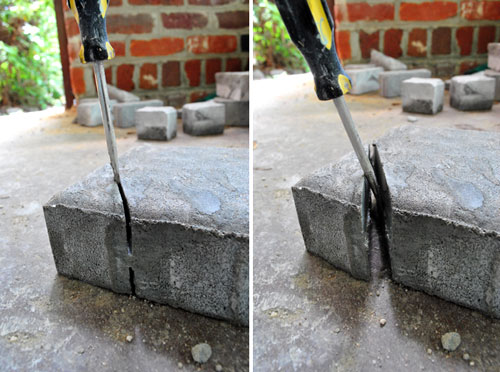
It’s really not the poor saw’s fault. He just wasn’t meant for this type of job. But since he was free (aka, on loan from my dad, who paid $99 for it btw) I wanted to give him a shot, instead of dropping $700 on his big brother. The issue is that my blade wouldn’t cut through all 2.5-ish inches of paver (those suckers were thick). So I had to do 2 cuts per paver – one, then another one from the other side once the paver was flipped over. Some particularly long cuts even required 4 trips down ol’ Wet Saw Lane because part of the machine blocked the whole stone from sliding through all of the way. And even after two to four cuts per paver, I still had to break the stones apart with a quick chisel-like move (thanks to a hammer and screwdriver) to smash the piece in the middle that my blade clearly still couldn’t reach:
So multiply two to four cuts per paver by the 50+ stones that needed cutting and you’ll start to understand why it took me so long. That $700 big daddy wet saw was starting to look well worth the money by about hour three. But I’m cheap. So I stuck with the borrowed (free) one.
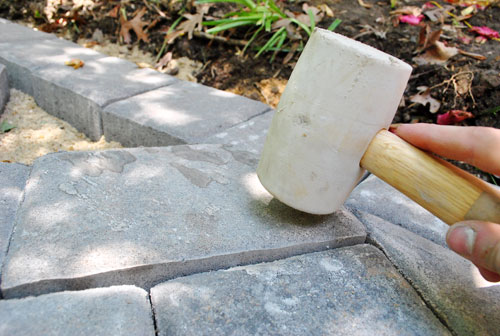
Assuming my cut was accurate (which it wasn’t always, unfortunately) all I had to do was lay the cut stone in place and tap it down gently with a rubber mallet (which we used when setting all of the pavers in the middle and along the border of the patio as well, just so they sunk slightly into the bed of sand and were level/secure).
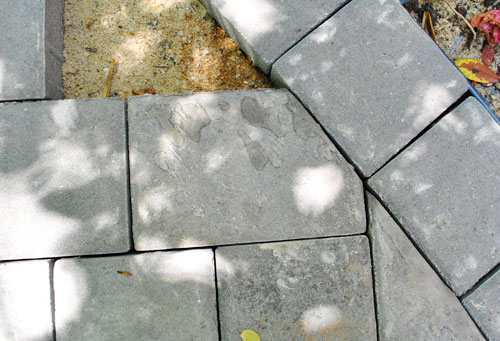
Despite all of the hassle, when it works – it’s a beautiful thing (plus I later learned that the sand that I’d brush between the stones would camouflage some of the less perfect cuts really well).
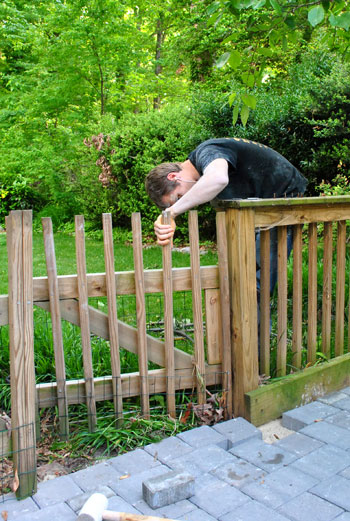
By the end of Sunday I had finished all of my cuts and even had enough energy to remove and re-attach one of our sagging gates (it threatened to scrape the stone a bit when closed).
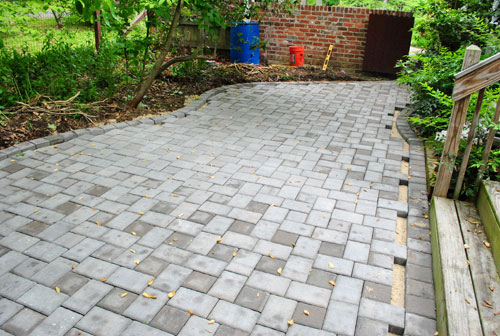
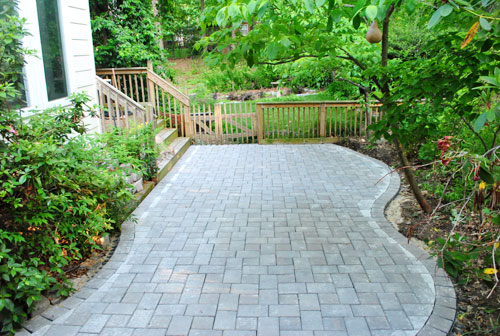
So here’s the patio in all of it’s pre-sand glory (the whiter edge pavers are just lighter from wet saw dust that hadn’t been hosed off yet).
And here I amid all of my post-paver cutting sexiness. Happy Mother’s Day to Sherry, right? That’s spray from the wet saw all over my shirt and face (thank goodness for goggles, wish I had bought a mask). And notice the yellow hands? That’s some sort of strange stain from my work gloves (apparently they don’t like getting wet).

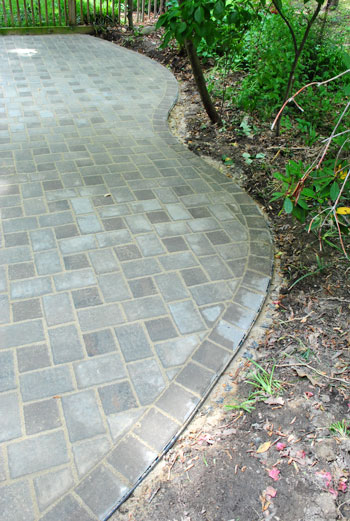
Oh, and since I promised more info about the pattern – here it is a bit closer:
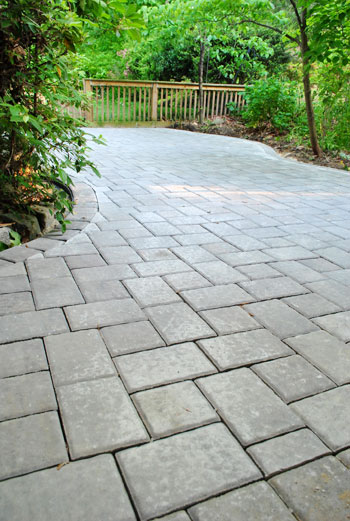
We’ve heard it called both an “I Pattern” and a “K Pattern” (so feel free to split the alphabetical difference and go with “J Pattern”). Although sometimes I see it as more of an “H” – made up of two 6 x 9″ pavers and four 6 x 6″s – and flanked by more 6 x 9″s on all sides. There’s a diagram here that might make seeing the whole H thing more clear than our pic above.
The reason we opted for this pattern in the first place is because it’s what the previous owners chose for the pavers in our driveway (and we wanted a cohesive look). Plus we like that it looks sort of like organized chaos. It appears random but there’s really a method behind it all. We’re nerds for that stuff. The lady at the stone yard warned us that it can be more difficult than some of the truly random patio patterns, but we honestly found it pretty straightforward once we got our first few pavers down. We just constructed one or two of those H-looking shapes and built out from there.
When Monday rolled around, I prepared for the final step by breaking out a broom and some leftover bags of paver sand (when I ran short on Friday and grabbed sand at Lowe’s, I must’ve overcompensated a bit so I still had a lot left). The purpose of this top application of sand is to fill the cracks between the pavers so they don’t shift. The process was pretty straightforward. Step one: dump sand on pavers.
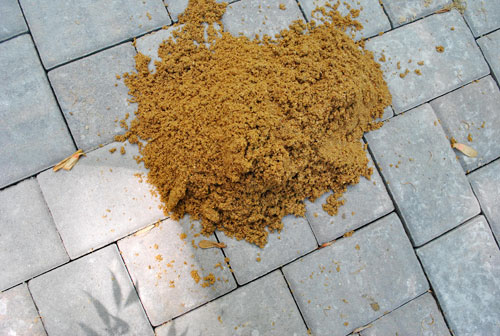
Step two: Push it around with your broom ’til all of the cracks have sand in them (this was just from one bag so far):
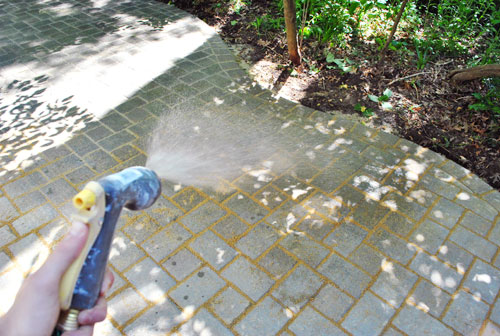
Step three: lightly mist the surface with water so that the sand slides down into the cracks.
Though it really is more like a twenty step process, because like shampoo-ing, it’s one of those “rinse and repeat” situations (or at least it was for me). See, my wet crack sand (wait, that sounds gross) did a lot of sliding between the pavers – making things not so pretty on top.
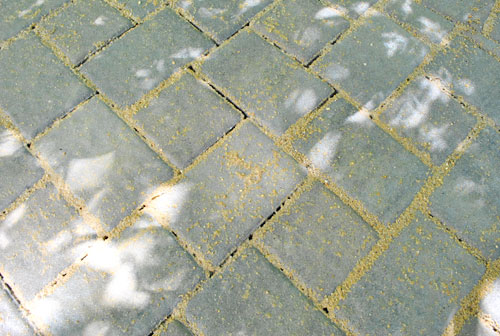
So I repeated. And repeated again. And then did some touch ups. This step seemed to take longer than I expected (consider it to be the theme of this whole project) but by Monday afternoon it all seemed pretty settled into place for a consistent and even look. And happily the yellow-orange tint to the sand disappeared when it dried out (it was really wet and clumpy when we applied it but it thinned and dried to a nice complementary gray tone).
Oh and here’s a note for all you fancy patio DIYers. If you have it in the budget you can splurge for Polymeric Sand (which basically gets brushed on and then misted with water, which turns it into a concrete-like consistency so it sets up hard to discourage weeds and all that good stuff). But thanks to our bursting patio budget, we opted to use standard paver sand which was about $100 cheaper (it was used on the patio at our last house which we enjoyed for 3+ years without much more than very occasional weeding so we knew it would work for now). And we can always upgrade to the good sand later (if we have $100 to spare down the road, it’s as simple as spraying the sand out of the cracks with the highest hose setting and switching to the fancy Polymeric stuff).
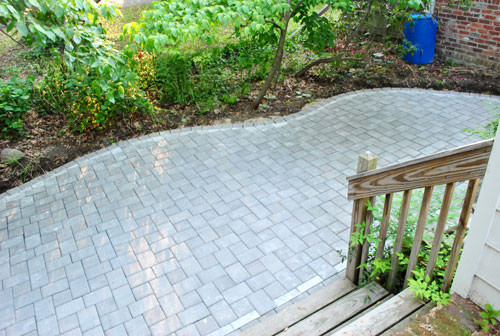
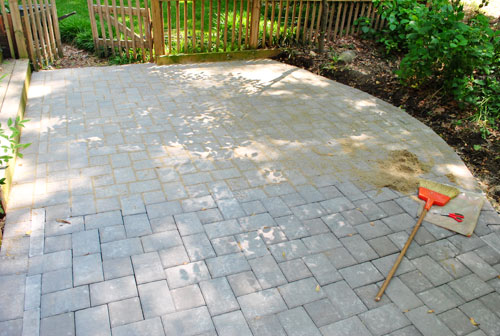
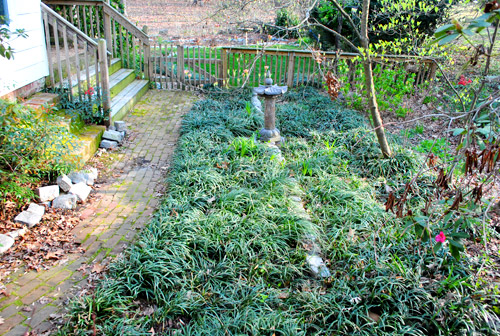
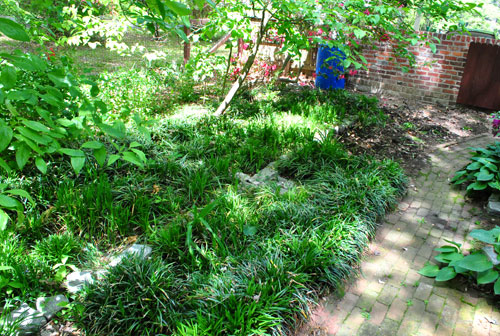
Anyway, with my sand step done, I jubilantly (yes, I was beyond excited to be almost done) moved on to my last task before handing things over to Sherry, which was backfilling the edges of the patio with dirt (since exposed plastic edging is akin to VPL). I forgot to take an “after” of my borders all filled in with dirt, so let’s fast forward to the real after afters. But first, let’s enjoy a look back at two liriope-filled before shots:
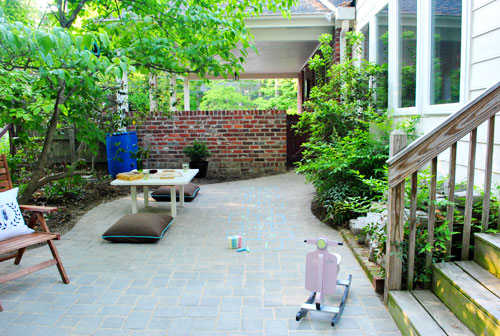
And now the patio-tastic after fest- complete with totally temporary furniture:
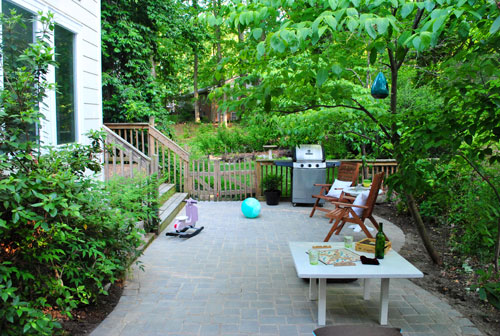
Since we sold all of our old patio furniture before we moved (which wouldn’t have worked well in this layout anyway) this is all random stuff that we had in the sunroom/basement/cluttered playroom. Actually a lot of it isn’t rain-proof at all, so Sherry just dragged it out there for fun (yes, after pics with temporary furniture is her idea of a good time because she thinks an empty patio reveal would have been “a real womp-womp”). I definitely agree that it helps with scale and stuff (and who am I to deny my wife of an hour of playing with already-owned pillows and random furniture?). I think we both just liked the idea of beginning to picture various ways that we can enjoy our new 300 square feet of added outdoor living space. And of course it’ll look a lot better with not temporary furniture when we can invest in some down the line.
Our long-term dream is to have some sort of daybed/loveseat with a coffee table to create a casual “outdoor living room” along with a spot for a sandbox slash baby pool for Clara. Because we have plans for a big outdoor dining zone somewhere else (but with an “outdoor living room” situation on the patio, we could still enjoy casual meals there).
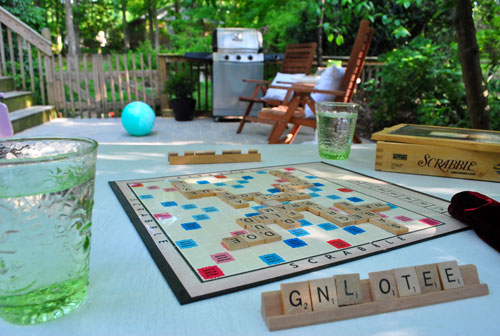
Of course Sherry went nuts with the whole fantasy world and played scrabble with herself to conjure up this cozy scene (and even got two water glasses to suggest that she wasn’t out on the patio alone playing against herself). Busted.
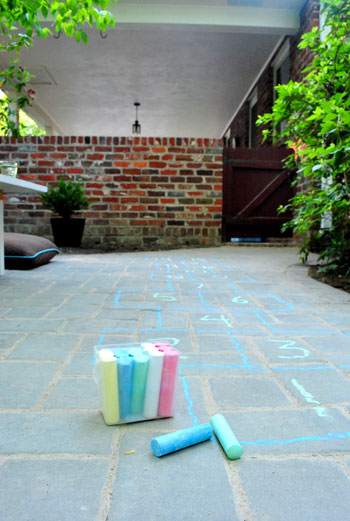
But speaking of playing, we do seriously hope this is a space that Clara gets a lot of use out of. Since we no longer have that huge driveway behind our old house, we’ve wanted a spot where she can be outside, minus the fears of her running into the road. So this gated-on-all-sides area is perfect for whenever she doesn’t feel like playing in the grassy backyard beyond. Because chalk just isn’t as much fun in the grass.
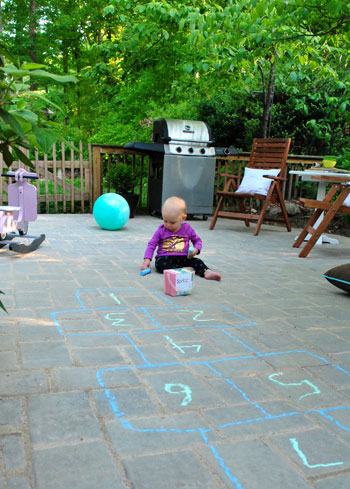
Although Clara may be a few developmental milestones away from actually enjoying a game of hopscotch, at least it’s not too soon to tap sticks of chalk together.
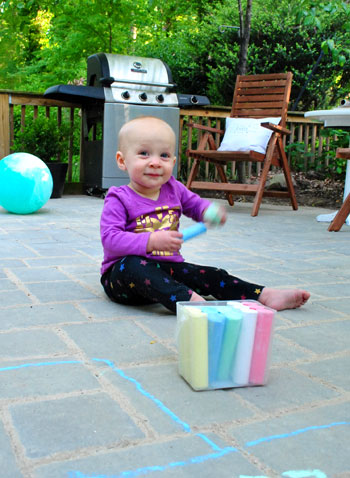
And she only tried to eat it twice. That my friends, is progress.
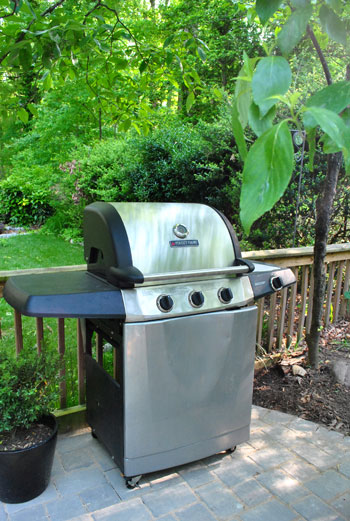
The only item in our 100% temporary patio layout that will be permanent is the grill. It’s been hiding in my basement workroom since we moved because I had no other spot for it (it lived in the carport for a while but that was just weird). So from the moment we first started talking about Project Patio I had an area all planned out for this baby. And although I’m talking like I’m some big macho grillmaster, I’ve probably used the darn thing less than a dozen times. Hopefully its beautiful new home will inspire us to get better acquainted. Especially when we get some permanent outdoor furniture to go with it.
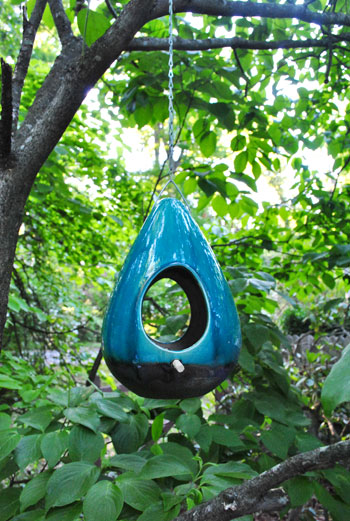
As for Sherry, she’s more excited about the “crowning jewel” of the patio as she likes to call it: a ceramic bird feeder that she snagged at Marshall’s for $9.99 a few weeks back. It’s been sitting on the counter next to our bathroom sink (away from roaming Clara hands) just waiting for a new patio to preside over. And it looks a heckova lot better out here than it did near the sink.
So there you have it, the end to our patio-building party. And it’s just in time to start setting up for the real party (Clara’s birthday on Saturday). Perhaps we’ll challenge our guests to some hopscotch?
We wouldn’t mind a few crossed fingers for good weather this Saturday. It rained on Clara’s birthday last year so we unscientifically decided that it couldn’t rain again this year (although the odds are probably the same every year). And as soon as we finished the patio I turned to Sherry and said “You know what this means right? We finished the patio in time so it’s going to rain on Saturday. We jinxed ourselves.” Here’s hoping I’m wrong.
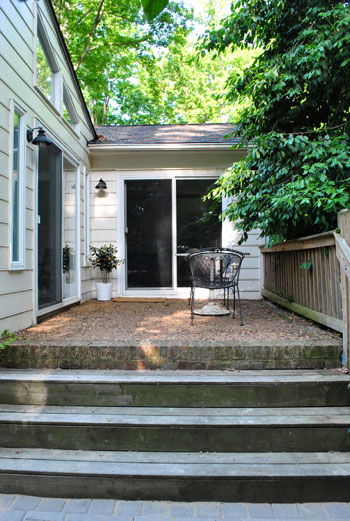
Oh and here’s a rarely seen angle taken from the new lower patio looking up at the upper patio (which was always there) and the sliders in the living room and sunroom that lead out to it. That area was too small to accommodate our grill (let alone any larger seating arrangements) so we’re so glad that we expanded our outdoor living space with the addition of the paver patio below.
We estimate that we spent about 30 hours on the whole patio project, from planning to clean-up (but we did mess around with lots of curves and hit some crazy concrete during the demo phase, so it won’t necessarily take everyone that long). And now for the big ol’ budget breakdown:
- 300 square feet of Cottage Stone pavers (from Southside Building Supply): $621
- Heavy duty plastic patio edging and spikes (from Southside Building Supply): $69.00
- Paver sand (from Southside Building Supply & Lowe’s): $107
- Gravel (from Southside Building Supply): $240
- Delivery for pavers, sand, and gravel (from Southside Building Supply): $145
- Miscellaneous supplies (wood stakes, line levels, nylon string, and hand tamper from Home Depot): $40
- Weed blocking fabric & crampons (from Home Depot): $30
- Grand (ouch) total: $1,252*
*We actually paid $1,332 but got an $80 deposit back when we returned the bags that our gravel and sand came in.
We already chatted about how our original under 1K budget was blown here (well, in the waaay beginning Sherry proclaimed that this would be a two-day-under-$500 project, how wrong she was). But in the end we’re happy to have spent what we did and to have worked our buns off to save nearly 4K instead of hiring a pro (estimates for a patio with curves of this size started around $5,000). Totally worth the blood, sweat, tears, and creepy orange glove-stained hands. But if you’re asking me if I’d do it again tomorrow, the answer is: chiiiill. Let me relax for a hot second.
Psst- Want to look back on the entire patio process from beginning to end? Here’s the first post (about planning), the second post (about prepping the area), the third post (about unexpected budget breakage), the fourth post (about further prepping the area), and the fifth post (about adding the gravel & sand along with the majority of the pavers).

Emily says
Looks great!!! I have been dying to do a back patio and this just might me by motivation for coughing up some moolah. Clara is looking adorable as usual! Congrats!
Jeri Moon says
Sherry & John,
Wow! Your project turned out wonderfully! I wanted to thank you for blogging about this and all of your other projects! I learned of your website from several people that you inspired to do a patio! Thanks for the business!
Jeri Moon
YoungHouseLove says
Aw thanks for the letter Jeri! We loved working with you guys for our stone and are glad other locals are heading your way! Your prices and customer service were awesome!
xo,
s
Ashley @ newhouseontheblog says
Your patio looks amazing!
Erin C. says
oh, it’s gorgeous!! I have total patio envy!
Patchi (Trendy Peas) says
Beautiful! You deserve a nice break from all that work. Well worth it though. Looks amazing.
Kristen @ Popcorn on the Stove says
The patio looks amazing!! I still can’t believe that you did this yourself, John!
You guys should get one of those swinging seats (imagine a couch/rocker). They’re wonderful and cozy. My Aunt has one at her country house and we’re always lounging on it.
Kristen @ Popcorn on the Stove says
Okay, I’ve been Googling and what I’m thinking of is a porch swing but with a stand. Something like this: http://www.amazon.com/Outdoor-Patio-Conservatory-3-Person-Swing/dp/B003W29J4Q/ref=sr_1_2?ie=UTF8&qid=1305131924&sr=8-2 (with or with the canopy depending on the amount of sun you get in your backyard)
YoungHouseLove says
We have a fun glider bench on our front porch that we love!
xo,
s
Cait @ Hernando House says
That looks great! I’m totally jealous!
I really, really want to DIY a patio but we have a pesky bathroom remodel to tackle first (thanks pipe, for exploding in the wall and former homeowner for being an idiot).
Clare says
It looks awesome guys! Congrats!! ANd Clara is too cute as always :-)
Amanda @ Our Humble A{Bowe}d says
You guys, it’s fantastic!! Seriously, great work. I love that Sherry even played Scrabble to make the scene more cozy. And, I love your bird feeder. I actually picked one up at TJ Maxx that is very similar, also $9.99! http://ourhumbleabowed.wordpress.com/2011/03/17/thrifty-thursday-march/ Don’t you love the pop of blue? And the kids like seeing the birds out there. :) Has Clara noticed the birds?
YoungHouseLove says
Yes! But she thinks all animals are doggies. Hilarious.
xo,
s
Amanda @ Our Humble A{Bowe}d says
Ha, that’s adorable. :)
bridget b. says
so cute! my 13 month old things all animals are cats. not sure where she picked that up because we don’t have any pets.
Jeanne says
Looks absolutely FABULOUS!! I saw the pattern as more of a basket weave, but whatever its called, it looks amazing!
Care says
Wow! I am beyond impressed! I showed this to my husband since we also want to put a patio in our yard. I think it had the opposite effect though :( He’s not looking too thrilled at the idea of all the work haha!
Anita says
Wow, talk about a 180! Can’t wait to see what type of furniture you guys choose for this space and the ‘outdoor dining area.’ Keeping my fingers crossed for you guys that it doesn’t rain – so far it’s a 50-50 chance up here in Arlington.
goldensarah says
this is beautiful! congrats you two. it completely transforms your back-of-the-house area. lots of fun times ahead!
Tanya from Dans le Townhouse says
This looks seriously amazing and I am seriously jealous. Awesome work!
Lindsay says
I am beyond jealous. You did an amazing job.
Stephanie Phillips says
Is it possible that it looks even better than I’d imagined?? I LOVE IT!!!
Ivette says
The patio looks great, and I’m sure you feel great now that its done….lol
Do you guys plan on diy-ing your own patio furniture from Ana White? We where actually looking at some of her sectional/loveseat designs for our back patio, just wondering what your thoughts where?
YoungHouseLove says
That’s definitely something we talk about. We did have an issue with a wood table that we sealed and put outside (it started to separate and wood got into the seams and it was ruined) so we’re a little weary but I bet if we did it the right way it could work.
xo,
s
Megan says
That was my vote too! I love the outdoor sectional design she posted. I’m about to start on some outdoor furniture for my patio but don’t have enough room for the sectional. :(
amc says
Very impressive! How do you estimate how many pavers you would need? Do you have a lot of extras?
YoungHouseLove says
We just told the stone yard the total square footage and gave them the perimeter measurement (so they knew how many edging pavers we would need). They calculated the rest and we had a good amount leftover (so I’m plotting our next project much to John’s chagrin).
xo,
s
Deb says
I’ve been thinking and thinking about my patio…I want to get it done, but I’m a little leery of the work and the $$. But yours looks so beautiful, I really want to get mine done now!!!
Way to go!
rachael says
Its beautiful! I’m so jealous of the space you gained. I love that bird feeder, not your typical metal and plastic tube that keeps squirrels out. On a side note: I’ve been noticing that Clara never has socks or shoes on. Like, NEVER. Does she hate socks, do you not put them on her, or is that a total coincidence?
YoungHouseLove says
It’s more like we put socks and shoes on her all the time and she immediately removes them. Haha. Even if we’re going somewhere and put her in the car with them on we see them flying into the air within a minute. Silly girl.
xo,
s
Katrina says
Apparently she’s going to take her time turning into a leopard print shoe fanatic!
YoungHouseLove says
Haha, I know, right?
xo,
s
Jacqueline says
Just wanted to chime in to say that my brother used to throw his shoes OUT the car window!
YoungHouseLove says
Oh man that’s naughty! I’d probably cry if that happened because her baby shoes are so darn cute (and not cheap).
xo,
s
Selina@CreativeJuicesDecor says
You outdid yourself John. The job completely blows me away. It’s fantastic and WOW, you saved around 4K!
Dusa says
I just Pinterest’d your finished product!
YoungHouseLove says
Aw thanks! The ultimate compliment!
xo,
s
shunta says
speaking of pinterest, I requested an invite yesterday and have been waiting for an invite. how long does it typically take? I’m so excited about it!!!
YoungHouseLove says
It can take about two weeks (that’s how long I waited) but if you head over to our Facebook page and ask for someone to send you an instant invite you can get on right away (assuming someone sends on, but everyone’s really nice about it!).
xo,
s
Jenny B says
I like how, at different angles, the pavers look different colors/shades. The pattern is great, too. Good job! I’m feeling inspired, yet again!
Meredith says
Wow–everything came together so well! I think it was totally worth the cost, blown budget and all ;)
PS- Clara looks adorable as usual!
Latoya says
It looks really great…congrats to Sherry for having a very handy hubby to give such a great Mother’s Day gift…now John if you could just maybe perhaps persuade my husband to doing such;)
Melissa@Julia's Bookbag says
I am so impressed I can’t even tell you. Is there anything you guys can’t do??? Seriously?? It makes me feel like my recent musings on Hello Kitty are rather trite. Which isn’t going to stop me from urging you to introduce Miss Clara to Hello Kitty mind you. Wait, how did this become all about Hello Kitty??? Back to your patio. AMAZING!!!!! SUPER FANTABULOUS!!!
Melissa says
Awesomeness!!
For some reason I envision twinkle lights in that little tree that hangs over the patio – would make for a charming evening outside. :)
YoungHouseLove says
Yes! I want big bulbous string lights pronto!
xo,
s
Elisa says
Looks GREAT! I like the grill, too — do you guys cover it?
I’ll be crossing my fingers and toes that it doesn’t rain for ya’ll on Saturday!
I’m also trying to think of a good Gary and Elaine line for those pillows on the ground but it’s just not coming to me. Anyone up for a caption contest?! Hah.
YoungHouseLove says
Hahaha, it’s on! Somebody has to have something!
xo,
s
Amanda @ Our Humble A{Bowe}d says
I forgot to mention the pattern. I really like the one you chose. To me, it looks like a pinwheel pattern with the 6 by 6 paver as the center and two 6 by 9 pavers extending. We chose a pinwheel tile pattern for our basement floor and we love that it looks the same from any angle, rather than a square set tile or even a brick pattern. Just thought I’d share. :)
Melody says
I love it! It looks amazing.
Where did you get that adorable pink vespa rocker?
YoungHouseLove says
That was a Christmas gift from John’s mom from diapers.com!
xo,
s
Ames says
It really looks beautiful! You did an amazing job! I can’t even believe the before and after pictures.
Kim says
It looks totally amazing. It was such the right thing to do for that area. Enjoy!
holly says
it looks amazing!! i’m really in awe. if you were going to take time off of work to tackle a similar project, how many days would you say you need? a full week?
again, amazing.
ps—we found a great patio set from ikea which included a table, four chairs and a bench in a french grey color for less than $600—about 1/3 the cost of what you might find at crate&barrel, but equally as fabulous. it’s called the falster line. you should check it out!
YoungHouseLove says
We estimate that it took us about 30 hours total (but we added some harder curves and also ran into hidden concrete under the soil that we had to demo in the beginning, so it could be a 20 hour project for someone else. Maybe two full weekends (four seven hour days total) would be a good guess? And thanks so much for the Ikea table tip!
s
Julie says
Ooo, I’m patio furniture shopping at the moment and didn’t even think of Ikea. I’m debating building some ana white stuff but my build list is super long. Have you had the Ikea stuff long and has it held up well? Is it comfortable? We live in SoCal so it needs to be comfy on the bum for lots of outdoor meals :-)
YoungHouseLove says
I second this question! We’ve had two wooden outdoor chairs from Ikea for a long time (in the reveal pics of this post actually) but they’ve mostly been indoors or on covered porches. Hope they hold up!
xo,
s
Beth says
It looks AWESOME! Job well done!
Rebecca @ the lil house that could says
Once again it’s awesome. Though I’m not seeing the “K”, I definitely get the “I” or “H”!
I think John deserves a massage now too :)
Sandy M. says
High-HIGH Five!
Simply (though not so simply) amazing job!
You guys should write a book – oh, wait, you already did!
Jenn W-M says
Yea, It is done. It really does look great and with more plants and the trees surrounding it will make a great cozy outdoor living room.
Cara says
It’s gorgeous. I’m jealous and John did an awesome job.
sarah says
You just gave yourself another room! I am really impressed with all your hard work. I’d love something just like that for myself. But the work. THE WORK! That was a LOT of work.
Irene says
Looks fantastic!
laura says
It makes me tired every time I read about your patio project! What a great thing to have accomplished and now you can enjoy it for years to come…good work!
Valerie Jackson says
Its gorgeous. This makes it in my “Top 3” projects that I’ve seen you two do. Love it!!!
Reenie says
WOW!!! That’s beautiful. Great job….and you got it done in plenty of time…although I had no doubt that you wouldn’t ;) Those wood chairs look cute out there.
Do you guys or any readers find yourself when you finish a project…..going in that room or outside to stare at it several times? HA! I do =)
YoungHouseLove says
Yes! I keep looking through the living room slider adoringly. And whenever Burger wants to go out I go with him. Haha.
xo,
s
Jessica says
The patio looks amazing!!! You’ll get so much use out of it and it will continue to pay off! Great work…
Chelsea J says
Wow – great work! Very impressed!
Kristin @ everythingZamora says
The top layer of sand, once dried, really completes the whole look doesn’t it?
I would love to do this to part of my side yard. You made it look too easy. Although I know you would never say it was easy. How about achievable? That’s better.
Adriane Wacker@FortheLoveofPainting says
It is gorgeous! Way to go you guys!
Holly says
Looks beautiful!!!!!! Clara seems to love it already!!! Now I am ready to tackle ours! =)
Allison says
What an amazing space! Some big bulbed lights like at your wedding would be great out there. Here’s hoping for lovely weather on Saturday both for your party and for the outdoor wedding I’m attending!
YoungHouseLove says
Yes! I think I still have those in a box somewhere. Can’t wait to break them out!
xo,
s
Hannah says
Wow. So incredible! I know Clara’s supposed to be the star of her party, but she has some major competition now! Haha. How did you decide to start the pavers in the corner by the carport instead of by the steps from the house? I remember that you put a lot of planning into the tiles in your old bathroom, so I’m curious to know if the pavers had the same “star treatment”. Also, what’s the material on the upper patio part? It looks kinda like small gravel/pebbles?
YoungHouseLove says
Here’s the thing. Once you lay that inch of sand and smooth it with the pipe and 2×4″ method, you can’t walk on it. So because all of our stone was delivered to the carport we had to start putting down pavers in that corner so we didn’t walk across the sand with them. We just built out from there all the way across so our bed of sand was undisturbed by footprints. Hope it helps! Oh and as for the material on the upper patio, it looks like concrete that they shoved little pebbles into (so they’re fixed in place). Not the best, but not the worst. Haha.
xo,
s
Melanie says
Just FYI, the “concrete that they shoved little pebbles into” is called exposed aggregate concrete. :) Had that kind of patio at the house where I was raised.
YoungHouseLove says
Good to know! Thanks for the tip.
xo,
s
Nichole@40daysof says
Love the patio! Impressed as usual with what hard workers you guys are and how you always get the job done.
http://40daysof.wordpress.com/2011/05/10/a-curveball/