“It’s like a cable knit sweater on the wall!” That was my description after we installed the marble backsplash tile on the back wall of the laundry room. And under-cabinet sweaters are something I can get behind. It seems like just last week we were installing laundry room floor tile (oh yeah, because we were), but this time around we got to break out the tile we bought a while back for the wall behind our washer and dryer.
Here’s a shot from the future, with the laundry room more completed, so you can see how it all came together in the end:
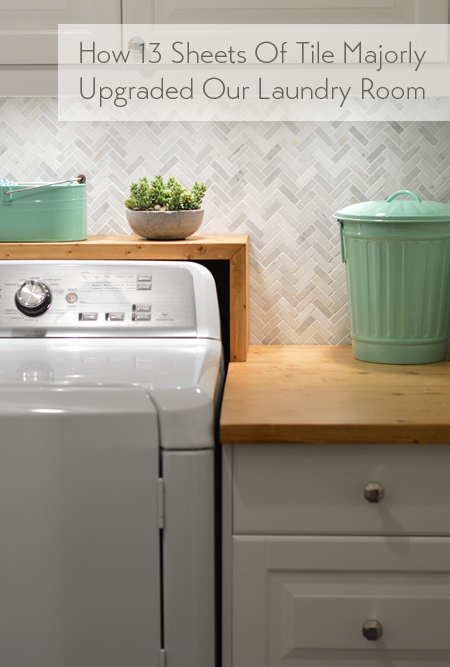
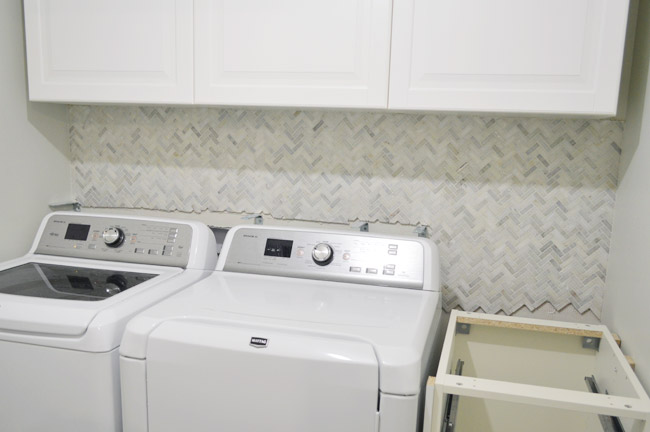
Exciting, right? Ok, we’re back to the present again. Suddenly the room feels a lot more upgraded than the blank box that we started with, and it only took 13 sheets of tile to do it.
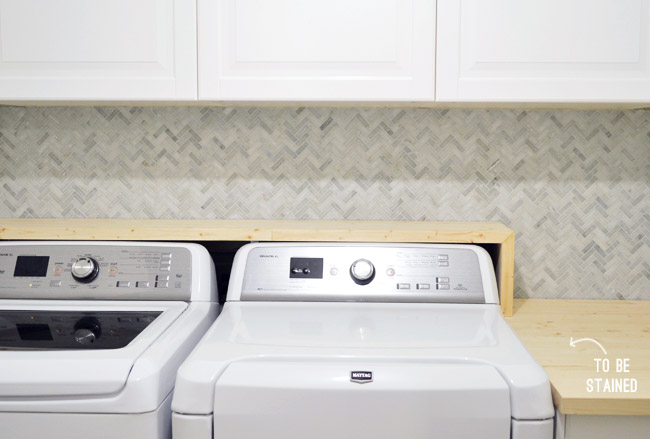
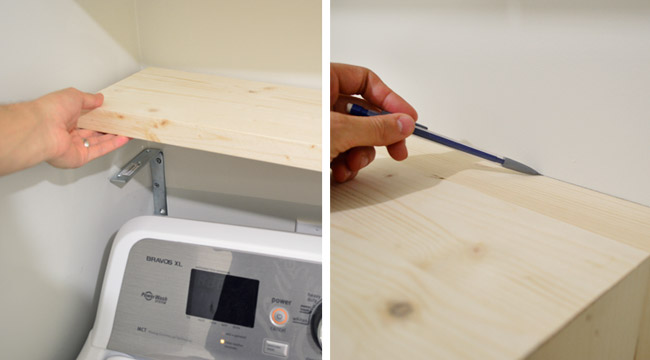
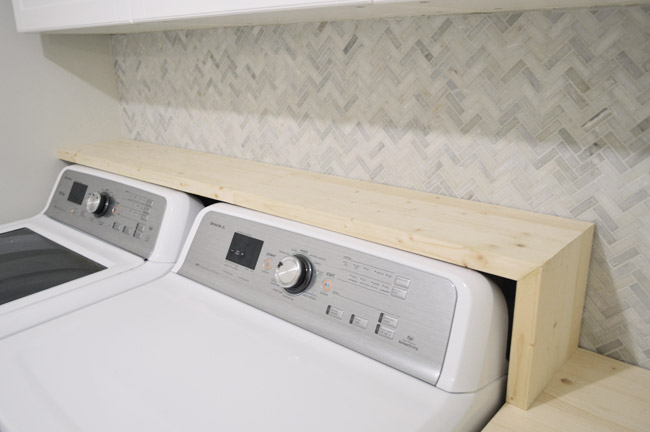
Try to ignore the unfinished shelf /counter since it’s half done (still needs to be stained/sealed/installed, so we’ll tackle that later this week). The important things to note about the shelf is that it will rest on some L-brackets and be completely removable, so we will still have easy access behind the appliances (we can even reach into that triangle between them while the shelf’s in place to shut off the water in an emergency). But thanks to that new shelf, no random socks will fall back behind the washer & dryer anymore – plus it’ll add some nice warmth & texture to the room.
The only reason we constructed the shelf/counter before tiling that area is so we could mark a line to indicate how far down we needed to tile (and make sure we didn’t tile where those brackets would go, since hanging them first and tiling around them would be a lot easier).
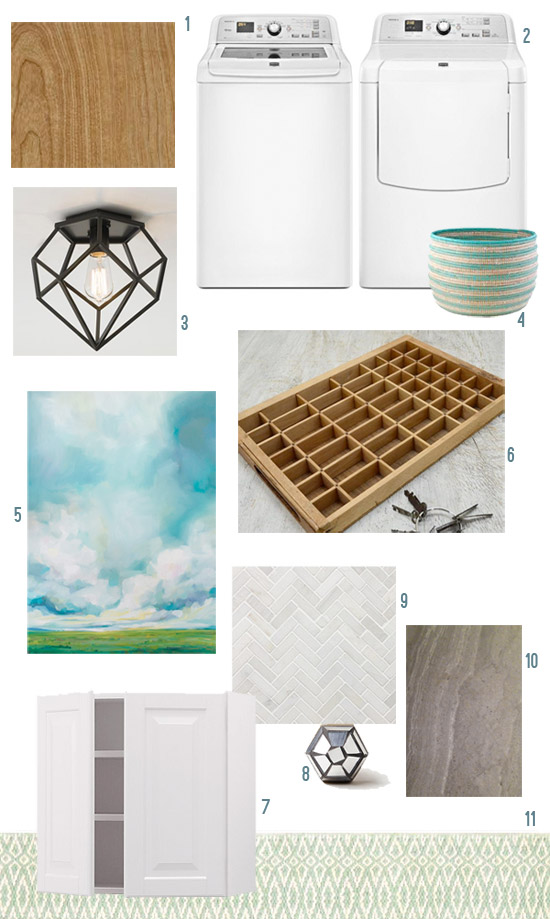
We’ll be staining the wood slightly darker, maybe somewhere in the vicinity of #1 in the mood board below (you can also see the wall tile down there as #9, which is the Hampton Carrera marble from The Tile Shop). Note: all sources from this mood board are in this post.
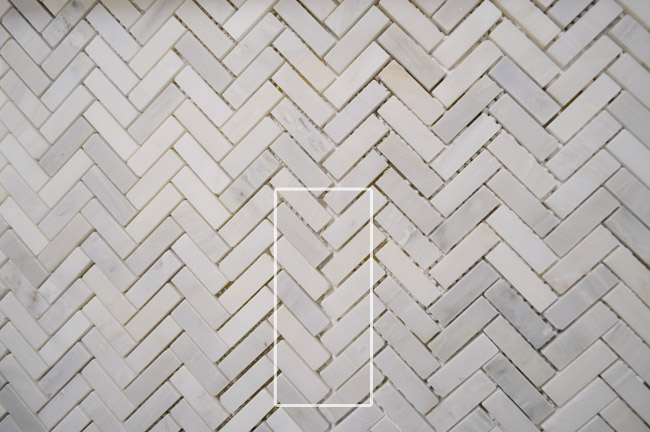
Two things were new about this tile job for us. We were taking a new type of tile for a spin (we made our own larger herringbone pattern out of marble subway tile from Home Depot on our old fireplace, but this tinier marble herringbone came in mosaic sheets, which we’d never used in combination with marble before – just on our ceramic penny tile). We were also using mastic for the first time, which would allow us to tile right over the painted drywall (we did sand it to get it a bit grittier first, though).
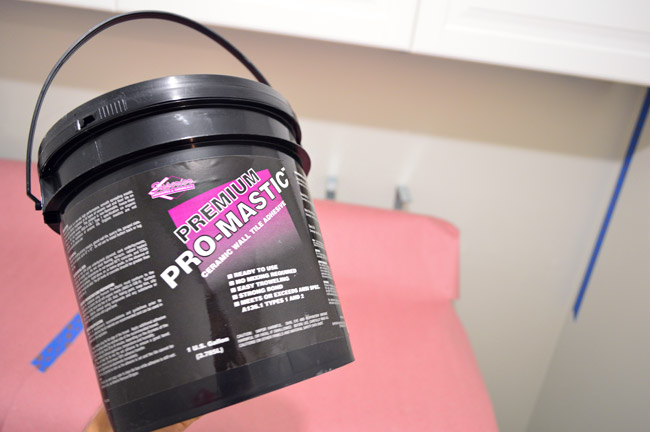
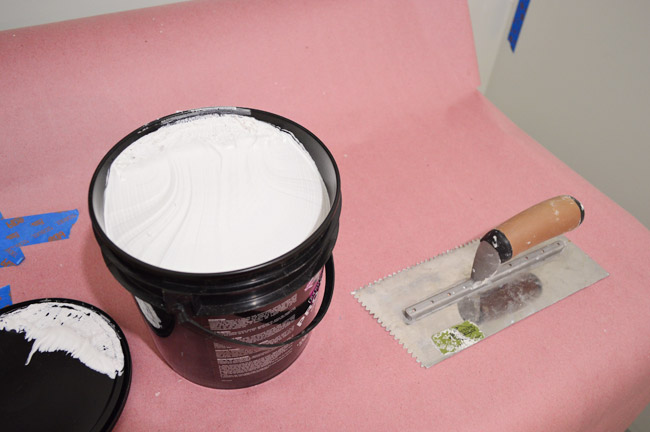
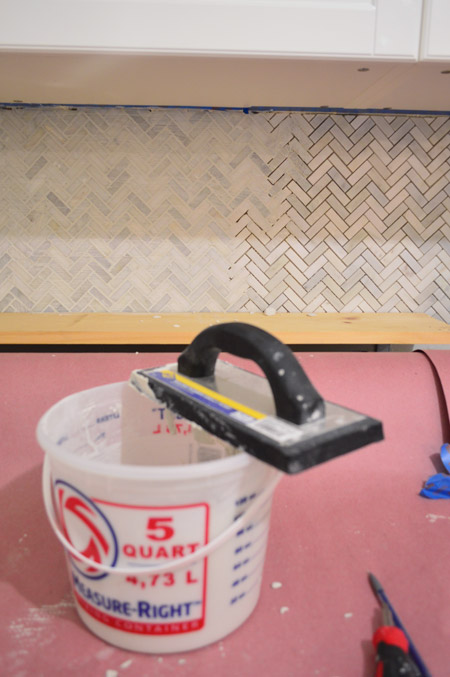
The mastic (from The Tile Shop) comes premixed and is sort of the consistency of spackle or drywall mud, but the process ended up being pretty similar to applying thinset, like we used on the floor. Although for the combination of mastic + this smaller mosaic tile, we used a smaller 3/16″ v-notch trowel to apply it.
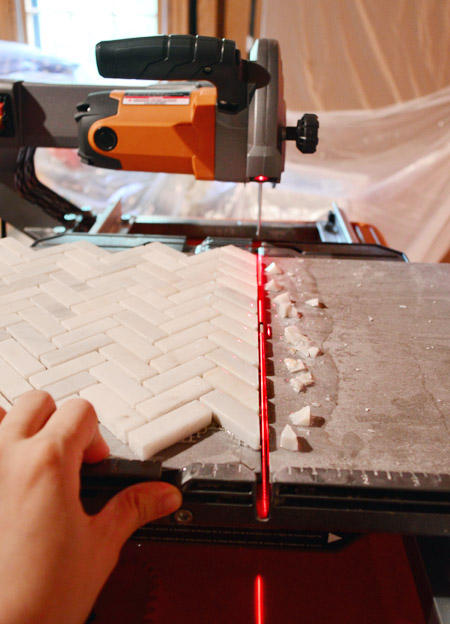
One thing that had us a little nervous about this project was cutting the tile without ruining too many pieces since it’s on back-order. Last time we used a mosaic sheet was the ceramic penny tile in our kitchen, and it took some trial and error to figure out how to make clean cuts (spoiler: the wet saw made a mess of the mesh, so tile nippers ended up doing the trick).
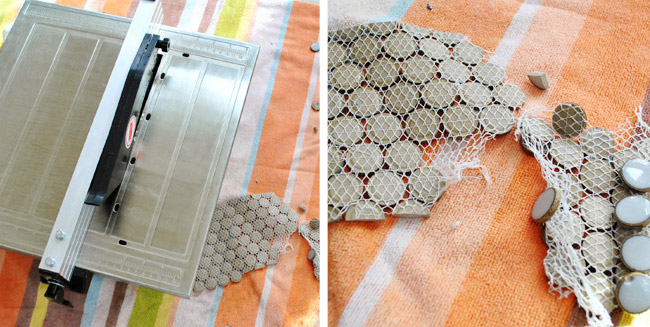
But some tips that we read online about marble mosaics had us convinced that the wet saw was the way to go this time. And it actually worked WONDERFULLY (did you hear our sighs of relief through the computer?). One big help was putting two scrap tiles (we hear you can use wood too) on either side of the blade so the mosaic sheet has a flat place to rest as it goes through and is cut.
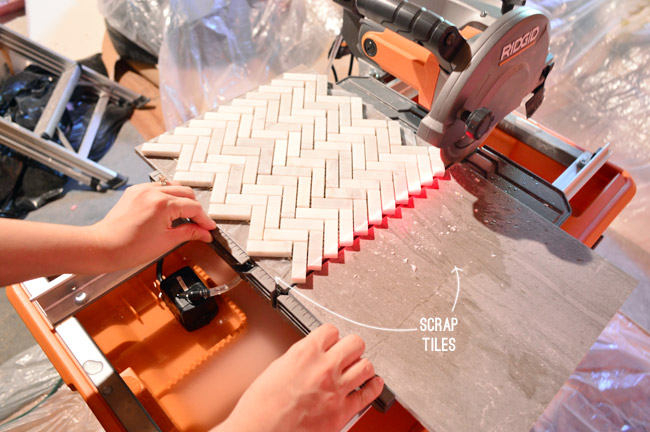
We were mostly just cutting the top off of a few tiles (so they’d sit flush against side walls or the underside of the cabinets), so we worried the blade would just push the little corners out of the way. But as long as we didn’t push too fast (and made sure there was sufficient water on the blade) it cut everything really well. Also, Sherry now wants to take the tile saw out to dinner. We have ourselves a love triangle.
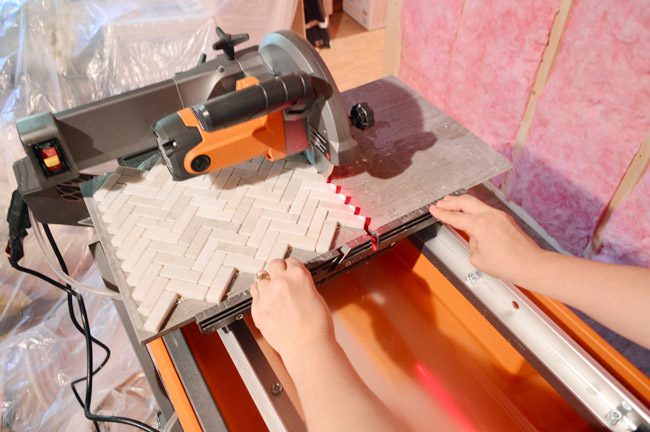
I’m pretty certain we wouldn’t have had the same luck with my old wet saw, since the rolling tray on our new saw helped to make this process really smooth (the laser line really helped us keep our cuts straight along the angled tiles too).
This is the only shot I got of applying the mastic, so don’t mind the skip ahead to being halfway done. Mastic does set faster than thinset (in our experience) so we only spread enough for two sheets at a time.
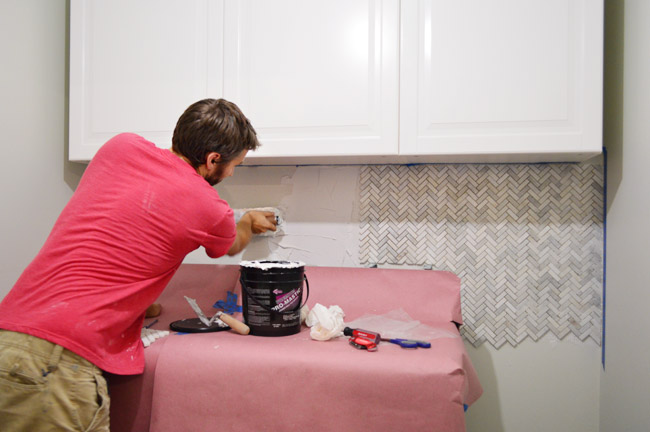
Once I got the mastic spread with the flat side of the trowel and then scraped with the v-notched side, Sherry took on the task of applying each sheet of tile and positioning it so it nested in without a seam. The instructions said to “twist” the tile slightly to make a good bond. Making crazy gnarled looking fingers is completely optional.
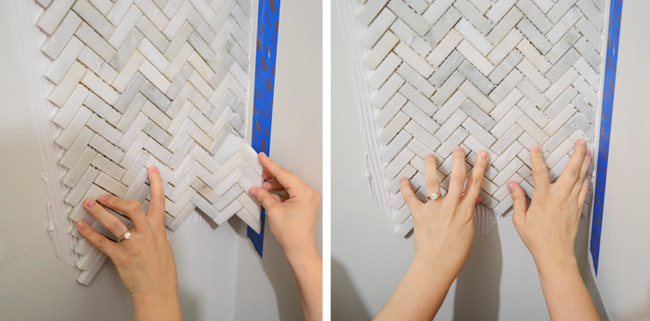
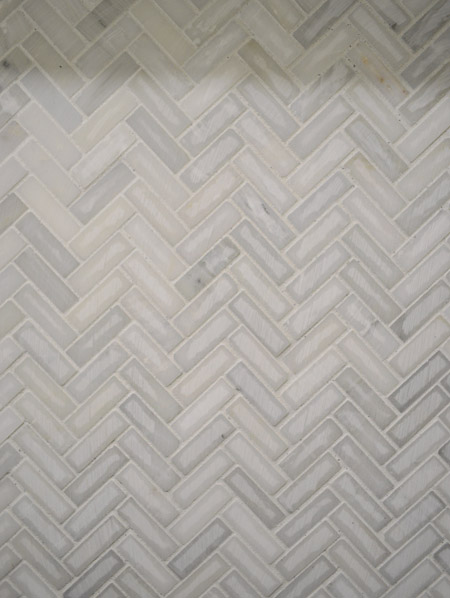
Much like laying sheets of penny tile, there was a careful eye needed (thank goodness I have Sherry) to make sure the pattern lined up between sheets. Some of the spacing on the sheets themselves wasn’t flawless, and sometimes if you stepped back you could see an obvious seam, so you had to sort of maneuver things to get them to fit better. Below is an example of an obvious vertical seam forming (see how that vertical zig-zag seems a little further apart than the rest?). To eliminate those, Sherry slowly smooshed the sheets together, or pushed them slightly higher or lower to bridge those gaps so they matched the rest.
One thing that helped was to snip out some of the mesh backing that hung over the side that would nest better with the already set tile (we found that sometimes it got in the way of positioning the edge tiles close enough, so cutting it out made everything go more smoothly).

The other thing we did was that we staggered our sheets to further disguise any horizontal seams. Since we only needed 1.5 sheets (vertically) for the areas above the appliances (and 2.5 for the two vertical rows above the counter) it made it easy to start one vertical row with a full sheet at the top and a half-sheet on the bottom, and then start the next vertical row with the leftover half sheet at the top and a full sheet on the bottom.
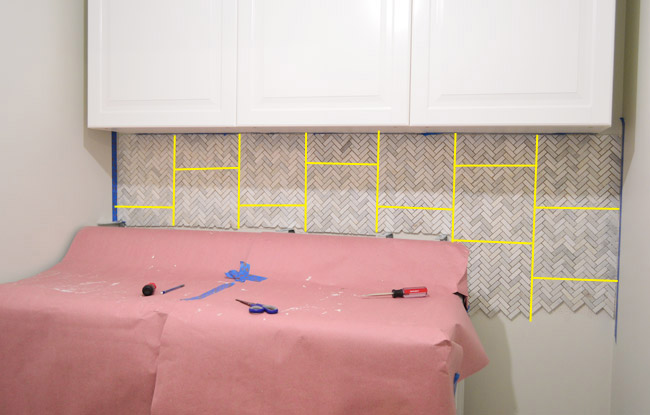
If all of the horizontal seams lined up across the entire back of the splash (for example, if all the top pieces were full tile sheets), it could create an obvious seam across the entire back wall, and we wanted to avoid that.

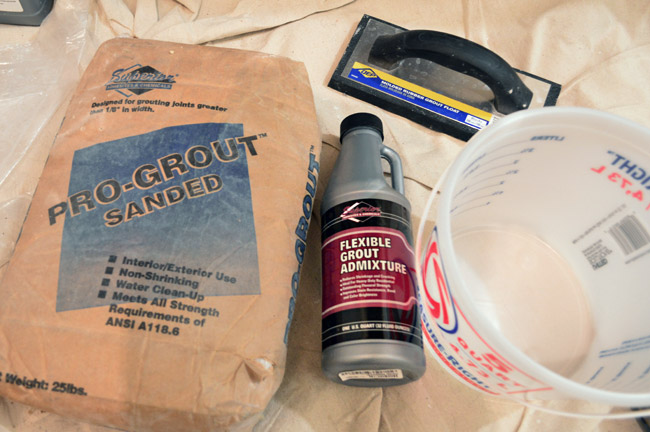
We managed to get it hung in about two hours on Saturday afternoon while Clara napped and Teddy kept himself mostly occupied thanks to a playmat-bumbo rotation (there may have been a nursing break in there). The mastic – which dries a lot faster than Thinset – was probably dry enough to grout on Saturday night, but we waited until yesterday morning just to be safe. Since the spaces between the tiles are larger than an eight of an inch, we used sanded grout (in the Standard White color from The Tile Shop).
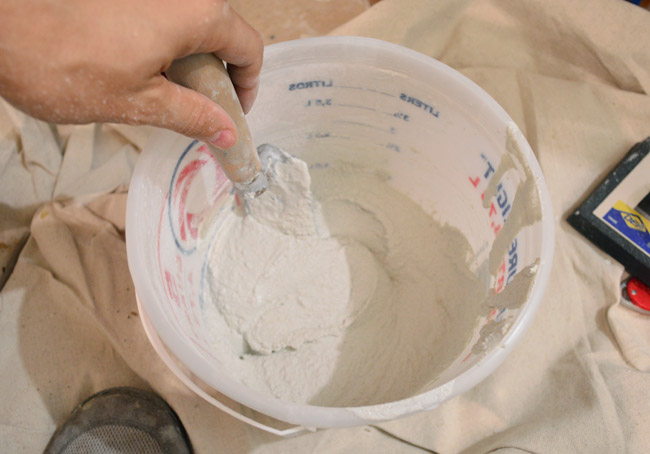
Even though this was a smaller area than the floor, it would require much more grout because of all of the gaps between the tiles. I mixed up enough to do about half of the wall, since I knew it would take more effort than the floor (so many cracks to smoosh it into!) and I didn’t want it drying out on me.
I also laid a scrap piece of wood where the shelf would sit to help catch drips, that way I didn’t grout half of the floor behind the washer and dryer while I was at it.
Once I had fully applied the whole bucket of grout (which covered about half of the wall) I wiped it down with a lightly damp sponge to smooth it out and remove some of the excess.
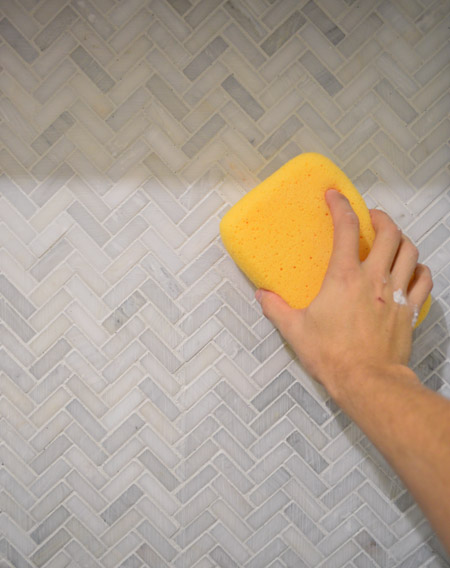
By now we know to expect some haze to appear as the grout start to dry. It used to freak us out (oh no, we didn’t sponge well enough!) but now we know it’s just an inevitable part of tiling (as least for us) and there are a few different ways to get it off.
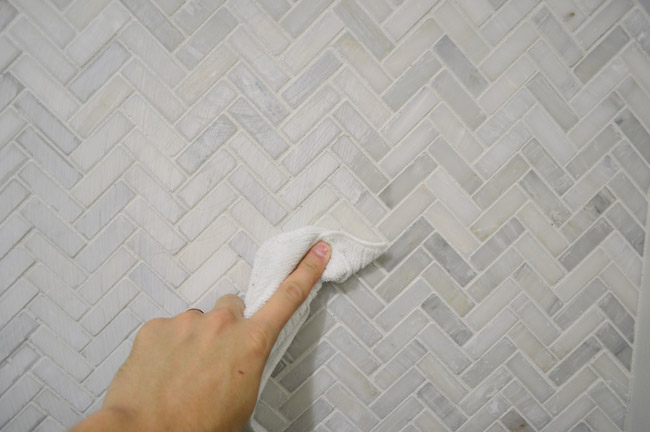
In the case of polished marble, a chemical (like a haze remover) isn’t recommended. So it was up to another weapon I like to call elbow grease. I used a microfiber cloth to buff some of the drying haze off the tile. It wasn’t a fast process, but it made a big difference.
Here it is after two buffing passes, although Sherry wants to do one more, just to get it as gleamy as possible (polished marble can look dull unless you get every trace of haze off of it). I realize the edges looked a little ragged on the bottom, but…
… that’s the beauty of the shelf and counter that will be going over it, once they’re all stained and sealed.
Update: Some questions came in about what happens if we get a new washer/dryer someday and need a new shelf placement and more tile. Width-wise, a new washer/dryer could slip right in since the spacing is standard (that side cabinet & counter could stay) but the height may vary slightly, so we might have to remake the little shelf on top (it’s removable so it wouldn’t be too hard). We couldn’t tile much lower since the brackets were there, but we did save extra tile & grout, so we can add that later if needed.
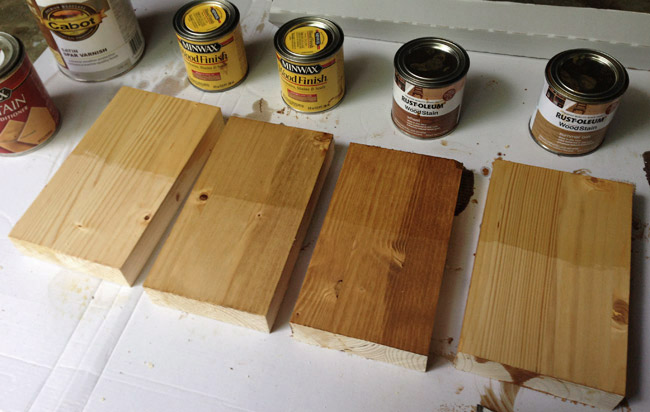
Speaking of staining the shelf & counter, we’ve started doing some tests on some scrap pieces to see what stain/sealer combo we want to use.
We hope to be back with the finished shelf & counter in a few days (just realized we owe you details on installing the washer/dryer and hooking up the overflow drain, so that’ll be in the next post too). Until then, here’s an updated to-do list:
Move washer & dryer and remove cabinetry(more on that here)Demo cased opening, side wall, back wall, part of the floor and the attic stepFrame new walls & doorways
Move laundry plumbing hook-ups & drains
Move laundry electrical plus other outlets/lights(more on those last four bullets here)
Move dryer vent & HVAC duct(more on that here)Hang drywall(more on that here)Add insulation(more on that here)Mud, tape, and sand all the drywall seams in the new room(more on that here)
Prime & paint laundry room and hallway walls(more on that here)
Tile & grout new laundry floor(more on that here)Hang upper cabinets and install lower cabinetReinstall washer & dryer(more on those two bullets here)- Stain, seal, and install the wood counter & shelf
- Rehang the laundry door & add our new glass door to the future bunk-room
- Add cabinet fillers, crown molding, baseboard, & door casings
- Install cabinet hardware & soft-close drawer upgrades
- Add a ceiling light fixture & under cabinet lighting
- Hang art, ironing board, and bring in other laundry room items (drying rack, trash can, etc)
- Finishing touches and repairs (fix the drywall in the garage, add the step to the attic, etc)
We still have seven bullets to check off, but having a working washer & dryer again definitely feels like we’re in the home stretch. Also, there’s a fair chance that Sherry is petting the tile as I type this. An intervention might be necessary.

Amber says
Gorgeous work, as usual! This project has been really fun to watch come together!
Andrea Enright says
I’m curious how you feel about not having a sink in your laundry room. Is that not a necessity? What are your thoughts? I’m in an apartment now with NO laundry, so I’m just curious, especially if I’m ever a homeowner down the road!
YoungHouseLove says
If you have a nice big spot for one it could be nice! We debated adding one but it would have been small and we never had one in our previous houses (what we really want is a utility sink for our garage/workshop for washing paintbrushes and rollers). Thankfully we have a hall bathroom we can use for laundry stuff and a top loading washer (so we can add water & soak things in there, which we couldn’t do with our front loaders since they would drain before allowing us to open the door).
xo
s
Michele says
Hi there, would you mind sharing which washer and dryer you have? I’ve been deciding between a GE line and a Maytag line, but am overwhelmed at the options available these days. Also, what do you like the most and what do you like the least about the set you have?
Thank you for reading. :-)
YoungHouseLove says
So far we love the set we have. No complaints! Here’s the post on why we picked them & what we got: https://www.younghouselove.com/2014/01/and-then-our-house-rebelled/
xo
s
Laura says
where is the art on the mood board from? #5
this room looks amazing!
thanks
YoungHouseLove says
Here’s the link (I’ll add the mood board link to the post as well). We love her stuff!
http://emilyjeffords.com/prints/to-the-stillness
xo
s
Noelle @ Noelle Mullins Design says
I love watching the progress on this project. It’s looking amazing. I can’t wait to see it all accessorized and then the bonus space! So exciting!
Julia says
We recently put that same backsplash in our kitchen! It’s so beautiful – completely transformed the space. I think it’d also look amazing with a dark grout that would really show off the pattern!
YoungHouseLove says
Ooh so pretty!
xo
s
Michelle says
Okay, I already loved this tile before, but now that its actually up on the wall… smitten!
Michelle says
PS – Kudos on your seam work! Even with the illustration I couldn’t find them… and I tried! ;)
It always drives me crazy when people use mosaic tile sheets and leave obvious seams!
YoungHouseLove says
Aw thanks Michelle! You’re so sweet! I’m a maniac about that, so I’d rather take twice as long applying them to get rid of those (because once they’re set they’re there for life).
xo
s
Cori says
I want to pet that wall. I totally looks like a cable-knit sweater!
Question: do you think if you had used this new wet saw with the penny tiles that it would have worked? Or is it only because this tile was marble that the wet saw worked so well?
YoungHouseLove says
It’s hard to tell since this saw glides/cuts like butter, but the issue we had with cutting the penny tile is that the mesh was pulling away due to all the wetness from the saw, and all wet saws have to be wet so I’m undecided. Has anyone used a nicer saw to cut penny tile? Any thoughts?
xo
s
jaclyn says
I’d like to acknowledge your talents and say that I have full confidence that in the event you ever need to replace your machines, that you’ll indeed figure out how to handle the lack of tile on the bottom of the wall.
Do some people just not realize what you all are capable of?! So much concern for POTENTIAL situations in the far FUTURE.
Looks fabulous. I’d love to see a dark walnut stain on that shelf and counter though for a good contrast.
Tiffany H. says
I’m loving this reno! I especially love the shelves. The step-up shelf is genius IMO. Anyways, I’m wondering if you have ever tried a wipe-on poly? I love the look of raw, natural wood, but I also don’t love water stains. I started using wipe-on poly and I’ll never go back to the brush-on poly again.
YoungHouseLove says
Never tried it! Sounds awesome though!
xo
s
cecilia says
hello! looks great and similar to what my future laundry room will look like. just curious, how much weight does that shelf/bracket hold? will it hold the detergents/bleach, etc?
YoungHouseLove says
They’re metal brackets from Home Depot that are made to hold stone countertops on kitchen islands and stuff like that, so they definitely can hold big detergent bottles and stuff. We sat some up there to check clearances (if the big bottles would be too tall) but thankfully there was a lot of space, and the shelf did great (no bowing or anything).
xo
s
Catherine says
You did it again, I’m inspired to tile my laundry back splash. Plus great pick on the tile, its lovely.
Kasey Befeler says
Will you seal the grout before you add your shelf? We just added a small section of similar marble tile to our bathroom and I did not realize I wasn’t suppose to use a chemical haze remover on it. It didn’t seem to hurt it though-phew.
YoungHouseLove says
Yes, we’ll seal it but we have to wait a few days until it’s recommended since the grout was just applied yesterday.
xo
s
Kelly B says
I installed black and white hex tile for my bathroom floor, and grouted it in black. Now that’s some haze to remove! The best thing I found? Believe it or not, a Mr. Clean Magic Eraser. It still needed some serious elbow grease, but it was much better than buffing with just a cloth.
YoungHouseLove says
So smart! I wonder if it would etch polished marble though. Was your ceramic/porcelain?
xo
s
Kelly B says
“I wonder if it would etch polished marble though. Was your ceramic/porcelain?”
It was ceramic. The erasers shouldn’t chemically etch the marble (they work via texture, not harsh chemicals), but you might want to try a trial piece first?
YoungHouseLove says
Thanks Kelly!
xo
s
rachael says
“from Home Depot on our old fireplace, but this tinier marble herringbone came in mosaic sheets, which we’d never worked with before”
“Last time we used a mosaic sheet was the penny tile in our kitchen, and it took some trial and error to figure out how to make clean cuts (spoiler: the wet saw made a mess of the mesh, so tile nippers ended up doing the trick).”
You write in one paragraph you never used mosaic sheets that you’ve never worked with before, but then a couple paragraphs later you write that you have used a mosaic sheet with your second kitchen. I’m confused.
YoungHouseLove says
Sorry! We meant we’ve never used marble herringbone in mosaic sheets (we’ve only worked with larger marble not on mesh, and penny tile on mesh, which is ceramic, so it’s a different beast). Just updated the post to hopefully make that more clear :)
xo
s
Susan Z.F. says
Beautiful job. Sleek, functional, upscale pretty…everything you’d want in a laundry room!
Here’s an idea that I haven’t seen come up in comments before.
How about a retractable clothesline?
The Container Store sells them http://www.containerstore.com/shop/laundry/dryingRacksAccessories?productId=10025592
I have one (in addition to other drying racks) in my laundry room and LOVE it. It’s perfect for lightweight items and baby clothes.
Thanks Petersiks for sharing this beautiful reno with your humble fans.
YoungHouseLove says
That’s so sweet! I love it! We thought about a bunch of drying options (fold down or pull-out racks, pull out flat drying shelves, deep hooks or bars for hangers, etc) and we think we’ve found something that will work well for us! Excited to pick it up, install it, and share all the details :)
xo
s
Susan in MD says
Hey! Have you guys tried the tiling adhesive sheets for backsplashes/wall mounted tile? I went to a tiling class at a big box store to see if there were any tricks of the trade and they used this double sided adhesive tiling matt instead of thinset or mastic with the 1 x 1 glass mosaic tiling project. It was ah-mazing!
YoungHouseLove says
We’ve never tried them but hear such good things! Will have to take them for a spin sometime!
xo
s
nicole @ I am a Honey Bee says
OMG I can’t wait to see this done!
Good point about being able to grab the shut offs. When I was growing up our tubing actutally tore and we had 100+ gallons flow out by the time our dog’s freaked out barking woke us up. Since then I actually turn off the valve at the wall between washings so that there is no chance of it ripping open in the middle of the night. It limits the pressure on the tubing (granted it’s metal now) and the washers.
YoungHouseLove says
Oh man! So scary!
xo
s
erin says
Love it. I used that same tile on my fireplace surround during me recent living room reno. I still smile every time I look at it. And after looking at your project I have total laundry room envy!
Sara says
It looks SO great, guys – the room has come so far!
Peggy McKee says
I like the shelf idea but if the shelf touches the washer, the washer vibration when spinning may shake things off the shelf.
It’s hard to tell for sure from the photo, but it looks like it doesn’t touch.
YoungHouseLove says
Yes, no touching allowed! I rests on those brackets about a centimeter above it, so there shouldn’t be any grinding/shaking ;)
xo
s
Vicki says
I have loved the idea of an over the washer/dryer storage shelf forever … But I took the easy way out with these:
http://organize.com/ovwasshel.html
I did line the bottom of the shelf with some terry cloth to avoid items falling thru, and for easy clean-up if containers leak.
YoungHouseLove says
Smart!!
xo
s
Misty says
This tile is beautiful. BEAUTIFUL.
Molly says
Dang, that looks good. Sherry and John, I love your taste!
betty says
looks great guys!!! the next project on my list is to tile my fireplace like your last house.. its been on the list for quite some time.. wah.
Darcy says
Well — I love me a cable knit sweater and I LOVE that tile!! I would totally be petting it too — I am sort of shocked that Clara won’t sit in there with you and pet the pretty tile!!
Seriously — how is Teddy getting so big already — That instagram pic of he and Clara is too cute for words! I would love to see a bumpo pic of him — I don’t know what it is about babies sitting in the bumpo that I just die over!! Is that weird?!?!
YoungHouseLove says
OH MY GOSH HE’S SO CUTE IN THAT BUMBO!! It makes me squeal. And you’re right – he’s suddenly giant! How did my baby get so big?!
xo
s
Sarah H. says
Shoot! Now I want a tile back splash in my laundry room ;)
Ann says
Love the tile! It’s so polished and crisp I would be hesitant to do a stained wood shelf….it’s just my humble opinion but I sort of feel like a white shelf would be best….
Laura & the shell says
Omgosh, it’s looking so good in there! We have a laundry nook much like your first house, and it’s totally cute and adequate, but I must say I’m having a little bit of laundry room envy! In fact, you guys are inspiring me to finally upgrade the shelves in our nook to cabinets. Those Ikea ones look really nice so maybe I’ll price those for us. :)
Jessaca says
I’m sad to see those cabs aren’t two-door variety! It would have looked much more polished and less builder basic IMHO! Have you guys tried out Houzz for inspiration? I’m addicted!
YoungHouseLove says
Yes, I love Houzz! We actually used the Ikea kitchen planner to test out 4 doors or 3, and at least in the renderings the four doors felt busier than three doors up top (which seemed to balance the three things on the bottom – the washer, dryer, and cabinet).
xo
s
Jessaca says
Ohhh, is there a way to show those? I’ve never done something like that and we’re getting an Ikea this month. Might be helpful to see what you saw in the planner.
YoungHouseLove says
We shared the winning rendering in this post. Their software is very helpful! Definitely recommend it!
xo
s
Steph Nelson says
I sooooo want to push the dryer over and put that cabinet in the middle. But thats just me.
I love it otherwise! :)
YoungHouseLove says
We debated that but the always practical John said transferring laundry would be more annoying with a cabinet in the middle. Darn him for being so reasonable! Haha!
xo
s
Melissa says
Looks amazing…
On another note, saw this before and after and it totally reminded me of your kitchen/living room space in your house: http://www.thekitchn.com/kitchen-before-after-a-dark-dated-kitchen-gets-a-fresh-start-207058
YoungHouseLove says
So pretty! Thanks for the link!
xo
s
Sharon says
I literally chose the exact same tile for my kitchen backsplash! I am so so so thrilled you guys provided a tutorial so now I don’t have to scour the web for one. I also have butcher block counters so I am glad to see it will turn out nicely, and it won’t take too long either! :)
YoungHouseLove says
No way! I’d love to see pics when you’re done!
xo
s
Leslie says
That tile is perfection. I want to redo the tile around my fireplace and that is exactly what I have in mind for it.
Debra says
I love this sooo much! Totally inspiring me for my own laundry room makeover. I’m curious: did you debate at all between light and dark grout? The white you chose looks beautiful, but definitely mutes the herringbone pattern, while gray would have made it more pronounced. I just know if it was me I’d have been pulling my hair out trying to decide! What made you choose white?
YoungHouseLove says
I know what you mean! We talked about dark gray, medium, light, and white! The tipping point for us was seeing it on display grouted in white at the store, and loving it, so that tipped the scales :)
xo
s
Emily @ Life on Food says
The room is certainly coming together. My husband is super jealous of your wet saw. He is convinced we need one now. Someday…maybe :)
Mickey says
I just can’t see leaving an unfinished edge on a brand new wall in a brand new room. I think you will regret this one.
Diane says
Will the YHL giveaway winner be announced tonight? Where?
YoungHouseLove says
John’s going to pick the winner now, and will email them and post their first name at the top of the survey post :)
xo
s
Jo says
I adore the tile!
What I’m not loving is the over washer shelf. Not that’s bad per se, but the OCD in me is screaming for the shelf to extend all the way over the bench as well. I don’t know why, or what purpose it would serve, but every time I look at the pic, it taunts me! lol
tom says
Did the guys at Tile Shop say anything to you about the effect mastic might have on marble tile? When we were installing our travertine backsplash, they told us that the mastic might cause discoloration in the marble due to the porosity.
Since it’s probably almost dry by now and that mastic looked pretty white, you are probably in the clear.
YoungHouseLove says
So interesting! They didn’t (they actually recommended it since we were going to buy thinset as usual). Scary about the porosity problem, but ours seems to be good. Maybe for honed or unsealed stone it’s different than polished marble (seems less porous)?
xo
s
Nicole B. says
I love the herringbone design you chose and the shelf is brilliant. I feel like every time I lose an item of clothing, I have to take a peak behind the washer/dryer because you just never know. I’ll definitely keep this idea in mind for when we renovate our laundry room.
Well over half way done with your list – keep up the good work!
Kristine @ I Design Love says
The laundry room look amazing! I wish I was that handy.
Leigh says
LOVE the tile – completely obsessed with it. Already trying to figure out where it can go in my house. Maybe for our next bathroom remodel.
Since you guys are sticklers for pop-up ads, I wanted to let you know that I got one on your home page. It was from AmEx and seem to go with the banner ad that was going across the top of the page. I took a screen shot if you would like one. Thanks!
YoungHouseLove says
ACK, thanks Leigh! You can send that to us at youngsters at younghouselove.com. Would love to get rid of that asap :)
xo
s
Jackie says
Where do you plan on setting up your iron in the room and what is the outlet situation?
YoungHouseLove says
There are two outlets on the wall to the left of the appliances as you face them, and the ironing board will be hung on the wall so it can be set up in the laundry room or brought out (more than likely I’ll iron in the bedroom with the TV on or in Clara or Teddy’s room while watching them). More on that as we go!
xo
s
LJ says
Hmmm, I don’t know. I like the pattern of the tile, but it’s a bit pale – looks kind of insipid at the moment. Hoping that once you’ve stained the wood and brought in some accessories that it will come together.
aude says
so nice!!!!!!!!!!!!!!!!!
Leanne - Lime & Mortar says
I love the shelf over the appliances. Fantastic! I like the 3rd wood stain
Beemie says
This is looking awesome…the excitement about doing laundry again is something to celebrate. A toddler and an infant make this room not only one of life’s necessities, but maybe even a quiet place to hide out for a few minutes.
Erin says
I am so jealous of your laundry room! It’s beautiful. I’m curious how the shelf is attached above your washer/dryer. I am dying to put up a similar shelf because half of my clothes seem to disappear behind my washer/dryer and I have to become a contortionist just to get them out!
Keep up the good work. You guys are so inspiring.
YoungHouseLove says
Thanks Erin! We’ll be detailing all that shelf stuff in the next laundry room post when we install it :)
xo
s
kimi says
Loving everything so far!!! Cant wait to see the color of the stain!!!;) Happy picking!!! lol