Yes, this is a post about how to run dryer duct work and reroute HVAC vents. Why would I make a horribly punny reference to a 22-year-old Disney hockey movie if it weren’t? But first, some background. By the time Monday’s post was going up, David the framer was here putting the finishing touches on our new laundry room by adding that fourth and final wall (the one that will have the door that leads to the hallway).
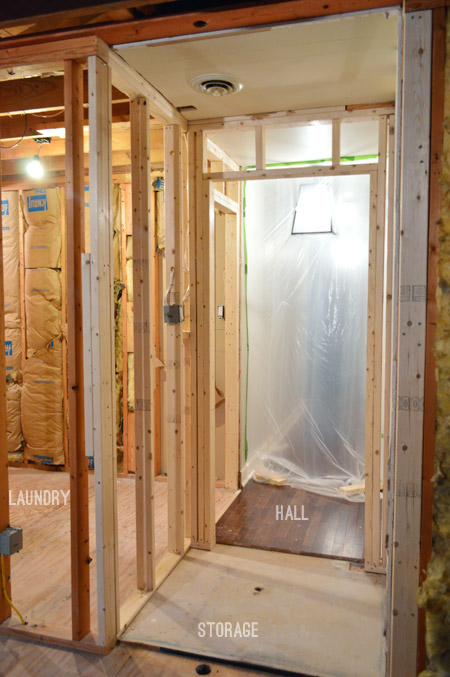
He also added the wall that will eventually house the frosted door to the current storage / future TV room. I took the picture from this side to get around that lovely plastic sheet, which helps us keep some of the attic heat at bay.
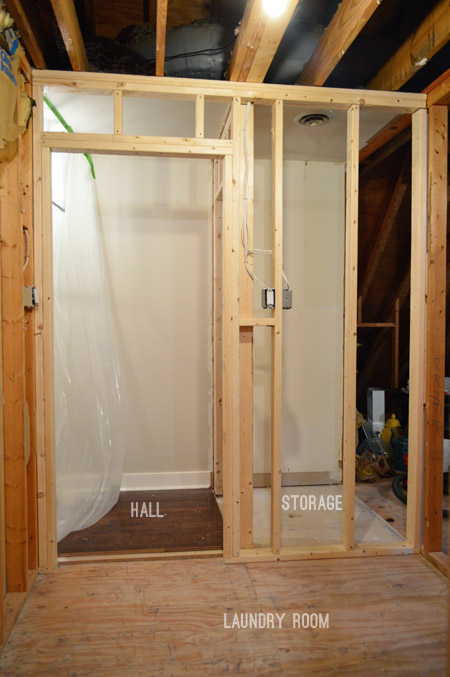
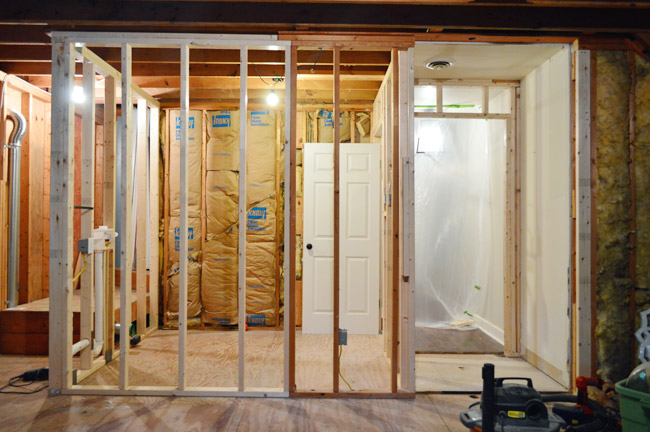
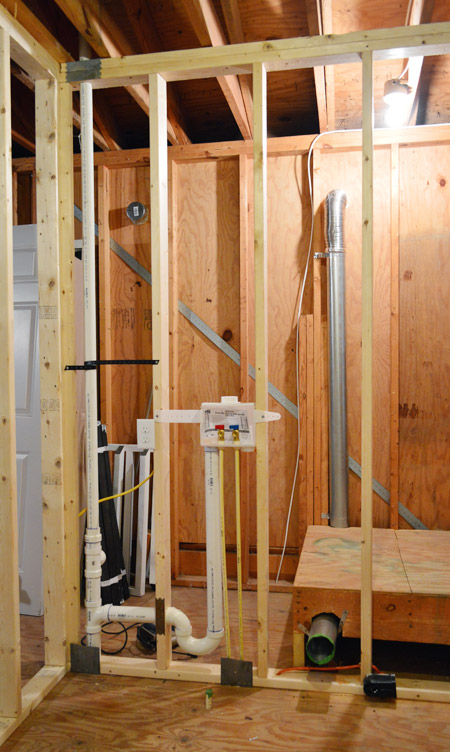
Here’s a full shot of the completed framing. I propped up the door just to give everyone an idea of how much it will swing into the room (it’s 8′ deep, so there’s plenty of room for that door to swing without interfering with our washer/dryer/cabinetry).
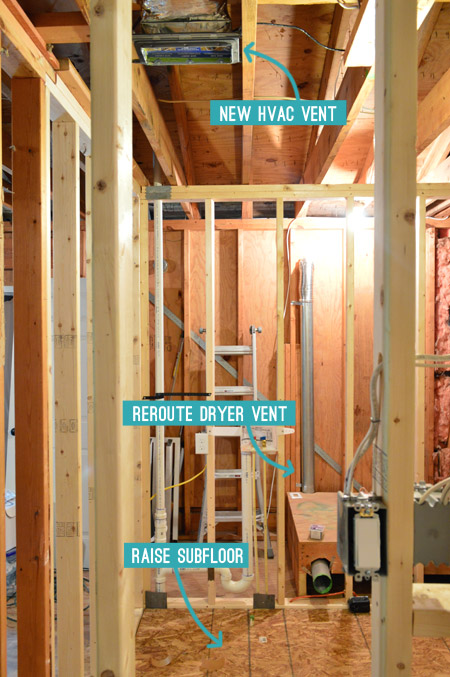
But this post isn’t really about framing, it’s about some of those little annoying tasks that you sometimes forget about in all of the excitement of a big project. Annoying, but no less important. So here are the three items we checked off our list before drywall could begin. They’re not the most exciting, but I hate to skip over them for anyone else facing similar projects… so prepare yourself for lots of photos coming your way.
Let’s start with the new dryer vent. I read that for proper function (i.e. getting clothes dry and not starting lint fires) a dryer vent pipe should be no longer than 25 feet and for every 90-degree turn, you should subtract 5 feet from your length. Here’s what our old set-up looked like, which I think was about 10 feet too long or had about 3 too many turns in it.
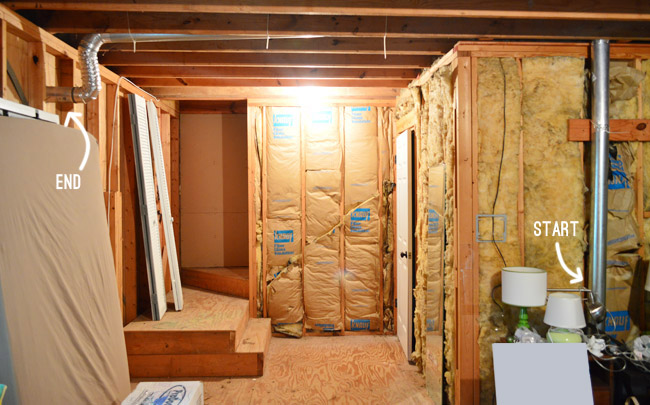
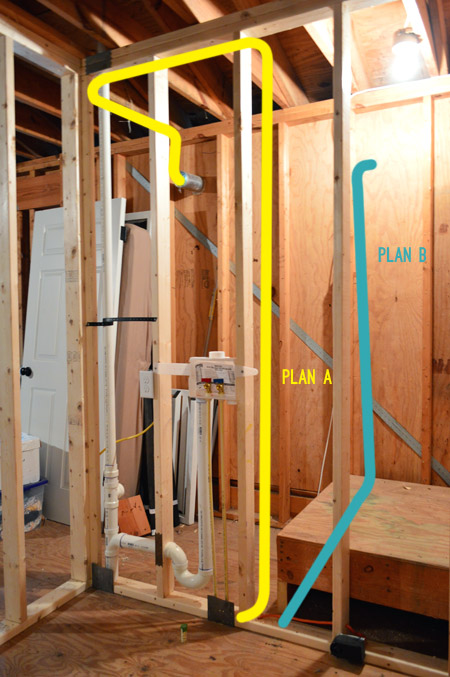
The good news is that by putting our dyer on the back wall of the new room, we were much closer to the exterior wall. But when we initially mapped out where the new vent could go (Plan A) it wasn’t faring much better. To keep the pipes up and out of the way, it took nearly as many turns and almost as much length. Boo. So we found a new path (Plan B) that was MUCH better and shorter by going under the attic steps… only it involved cutting a new hole in the exterior wall. That doesn’t top my list of fun activities, but it had to be done. And I’ll explain later why we chose to still take it up the wall rather than exiting the house under the stairs.
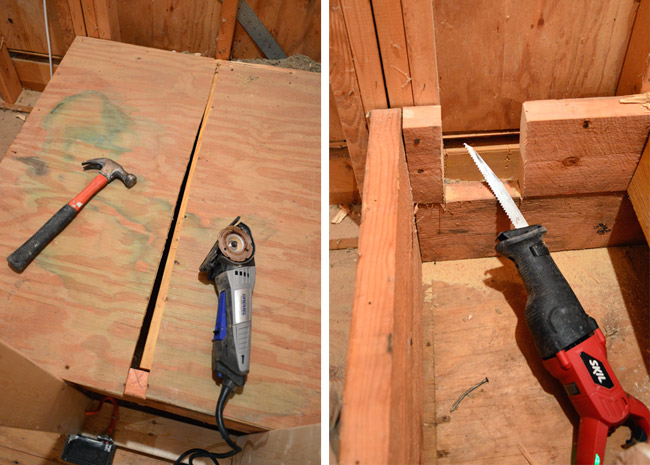
To start, I needed to make a path under the step for the 4″ vent pipe to go. I used my Dremel Sawmax to cut the plywood top along the step joist so that I could easily reattach it later. Then I used a reciprocating saw to cut a 4″ wide section out of the 2×6″ for the vent to rest in.
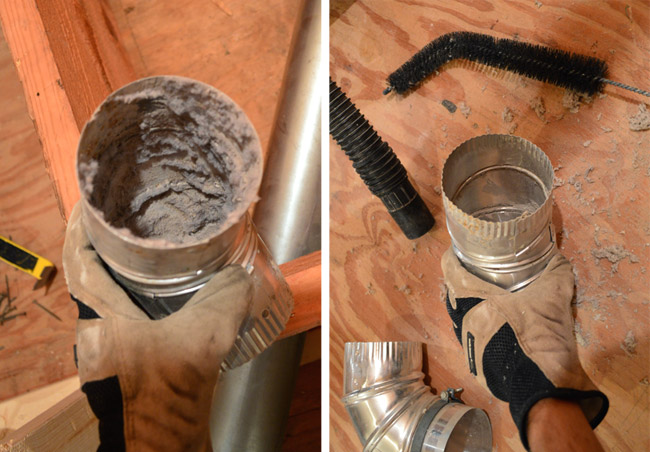
I was planning on reusing the existing metal vent pipes since they were in good enough condition and I had a lot of pieces to choose from. All they needed was a good cleaning first, which I did by taking them all apart and using a long bristled brush to scrape them clean along with my Shop Vac.
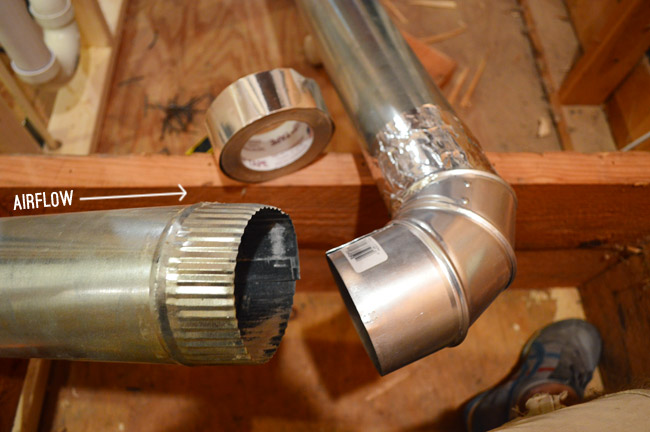
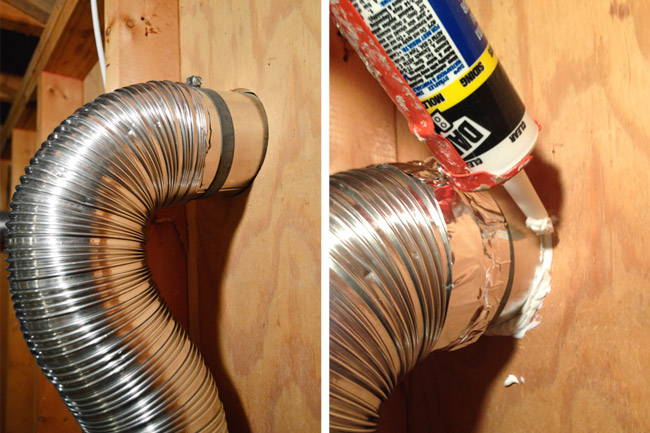
Then I started piecing them back together. Pipes like these have a crimped end that makes them easier to fit together. I read once that you want your crimped ends facing the same direction of the airflow so that air doesn’t escape around the crimping. Once fitted together, I sealed everything with metal-faced duct tape (note: not duck tape!).
Once I had all of my pipes fitted together, I started to position them to run them under the stairs and up the back/exterior wall. You can see that I made an opening in the side of the step for the duct to pass through there, and I held everything in place with some steel hanger straps.
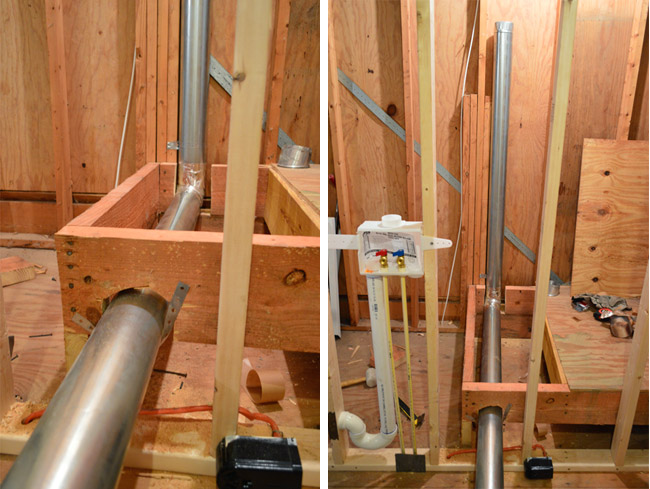
That bottom pipe extended way too far into the room, so I cut it down using my metal snips. I left it a little long so that I can cut it to its final size once the room is more finished. The green painters tape is just so we don’t cut ourselves on the raw edge while working.

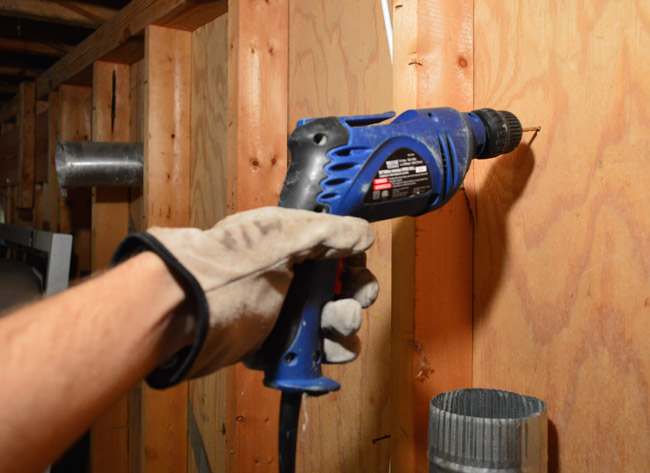
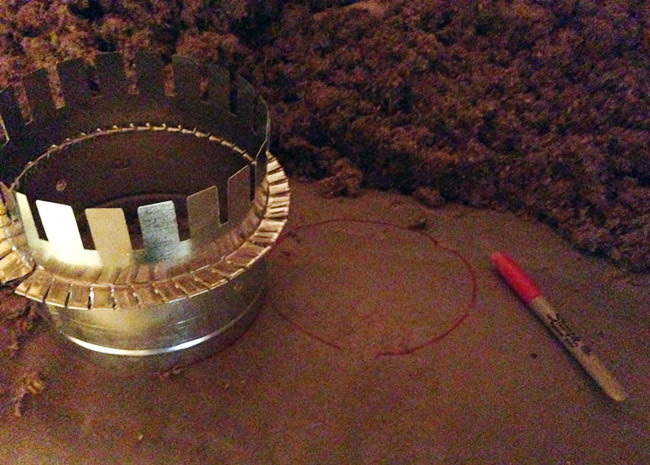
Next up was putting the new hole in the exterior wall. Fun. I started off by drilling a pilot hole from the inside to mark roughly where the new vent hole needed to go. This was mainly to make sure I placed the hole directly above the pipe that I just installed.
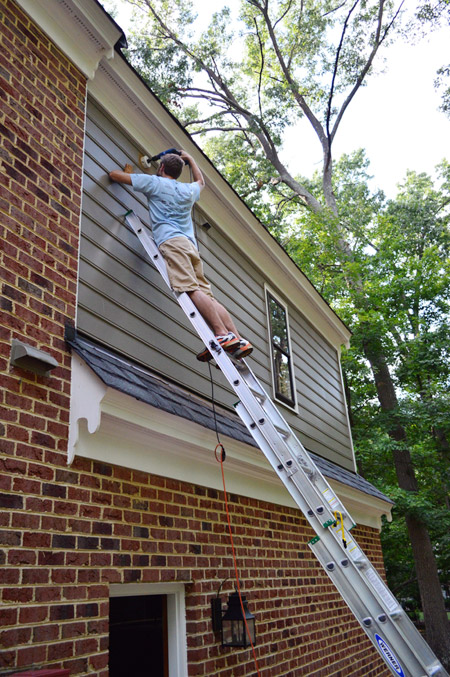
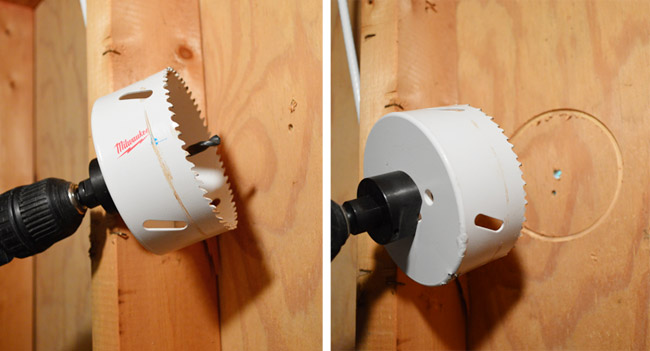
Then I headed outside to start making the big hole in the siding. More fun. Especially the ladder part. Yay. Anyways… I did this using a 4 1/8″ hole saw (which you’ll see closer in a moment). I wanted to start from the outside to make sure I was placing it in the middle of a siding board (and not awkwardly spanning two of them). The pilot hole I made from the inside helped me make sure I was drilling in the right spot.
Outside I only made it through the hardboard siding (not the plywood beneath it). I didn’t want to spend any more time up on that ladder than I had to, so I came back inside to do the rest. The 4 1/8″ hole saw bit made a fresh pilot hole for me to follow so I could be sure everything lined up.
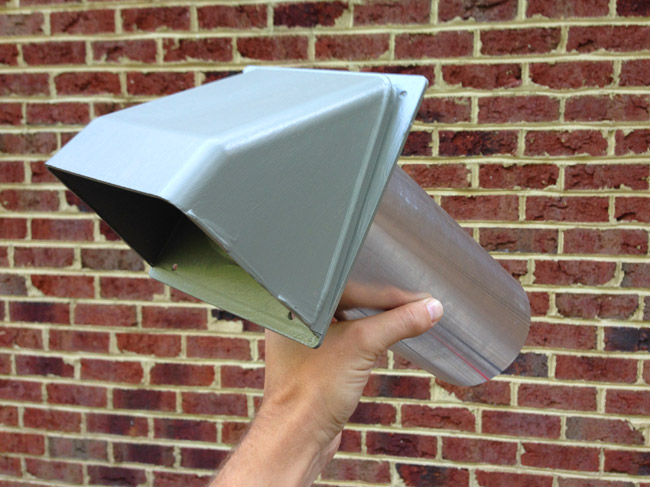
With the hole cut all the way through, I could install the new dryer vent on the outside. I bought one that resembled the original one, since they’ll both be living up there until we go through the trouble of removing the old one and patching the siding (we’ve just capped and sealed it from the inside for now). Oh and Sherry painted the new one to match the siding before I installed it so there’d be less work to do up on the ladder.
Before climbing up I put a ring of silicone caulk around the back of it, that way it’d have a nice weather tight seal from the get -go.
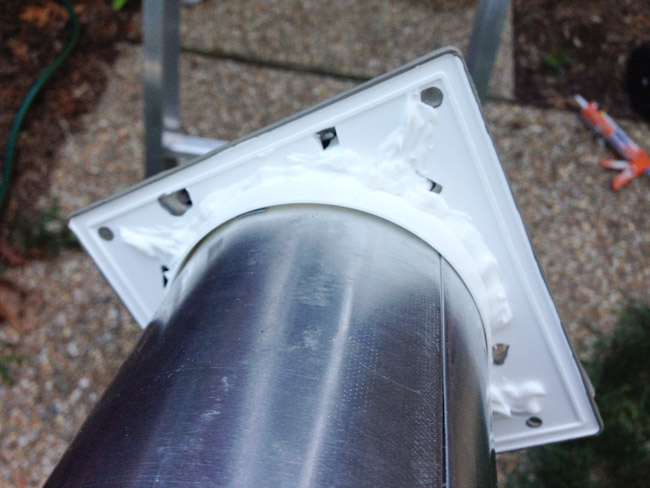
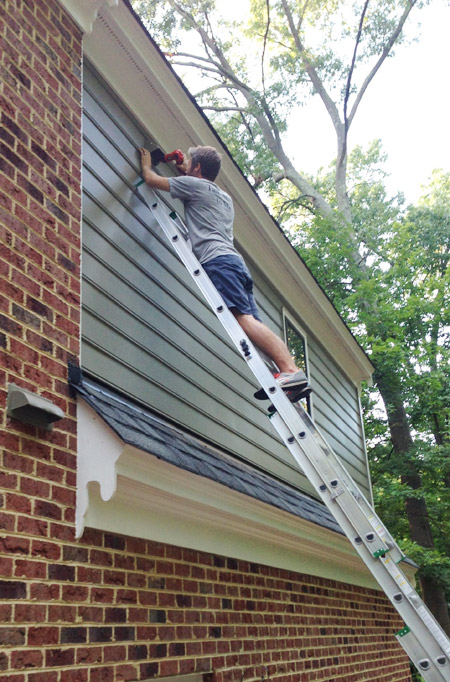
It took a bit of finagling to get it in (the 4 1/8″ hole took some sanding down to get the 4″ pipe through) but eventually it was in and I could screw it to the siding for a nice firm hold. And this photo shows why we chose to put the new vent as high as we did, rather than exiting the house under the attic stairs. That would’ve put the vent barely above that bit of roof below, meaning lint would’ve built up on the shingles. So because we had to take it higher no matter what, we figured we’d put it in line with the old vent, just so things would line up (and not look all diagonally janky until we patch that one down the line).
Back inside I trimmed off a bit of the vent pipe that stuck into the room and connected a semi-rigid vent pipe to it, complete with more metal faced duct tape and another ring of silicone caulk.
Then I just had to reattach the section of the stair that I had cut off and we were back in business. Well, I guess we need the dryer installed to truly be back in business – but you know what I mean.
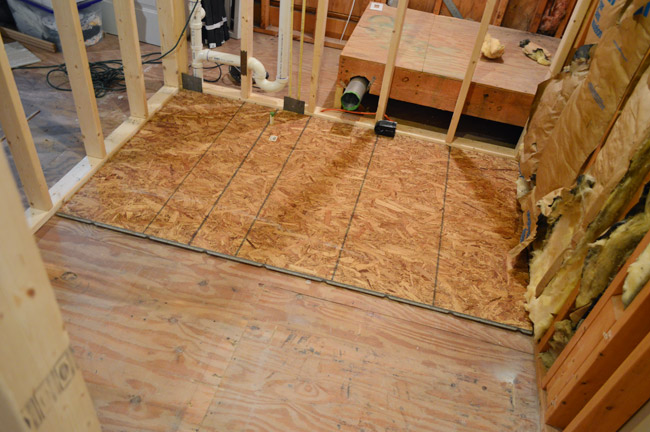
We’ll take a brief interlude from duct talk to address the floor for a second, which you’ll notice is quite a bit lower in the new laundry room at the moment. We want the tile that’s going in there to be as flush with the hardwoods as possible, so we needed to build up the subfloor a bit.
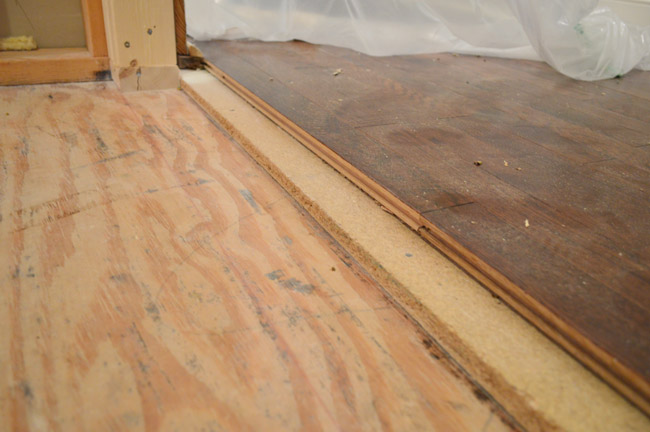
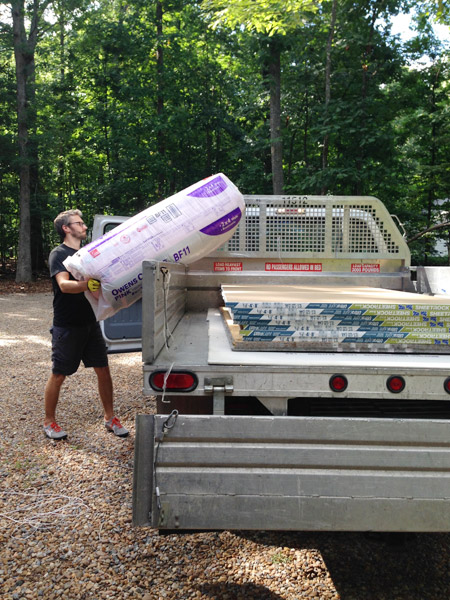
I did some math and figured I’d need a 3/4″ layer of subfloor, a 1/2″ concrete backer board (for tiling on), plus the height of the tile & thinset to get myself flush with the hardwood floor. Since I wasn’t going to fit two 4 x 8′ pieces of subfloor in our car, I took this as my cue to rent the $19 Home Depot truck and get lots of my big materials – including all the drywall and insulation.
The 4 x 8′ pieces of 1/2″ OSB subfloor took a bit of trimming with my circular saw before bringing them up to the room, but all things considered it wasn’t too hard to get the two sheets to fit nicely, and then I glued and screwed them down (gluing can help cut down on any creakiness down the line). Here’s the first one going down.
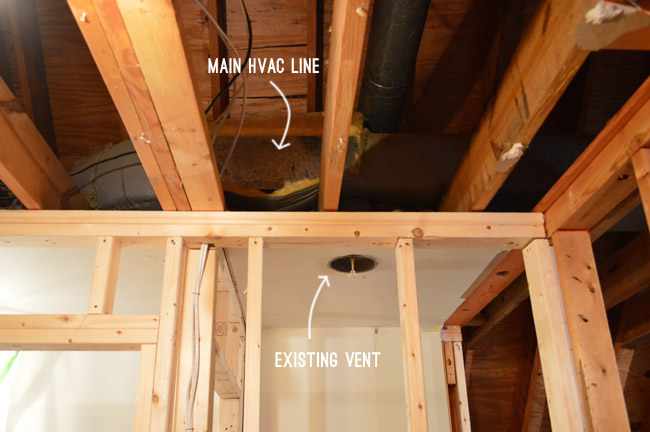
Now let’s get back to ducts. This time we’re talking about the HVAC variety, since this new laundry room has zero heating or cooling coming its way… despite the main trunk line being so close (and the old laundry nook having its own dedicated vent).
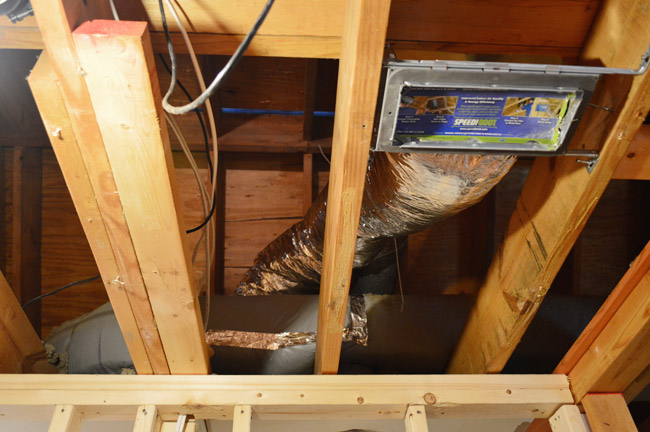
I’m certainly not a pro in this department and I had a bit of trouble finding help online in this arena – but eventually this series had enough explanation and photos to give me the confidence to tackle it. Also, I noticed that Home Depot sold this “Add A Vent” kit – complete with materials, a tool list, and instructions. Perhaps this would be less scary than I expected?
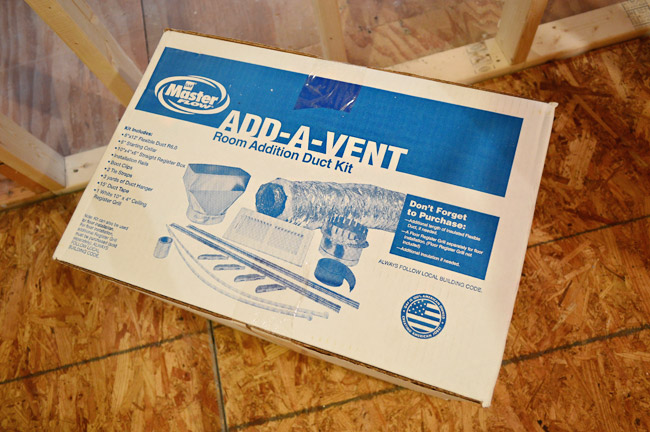
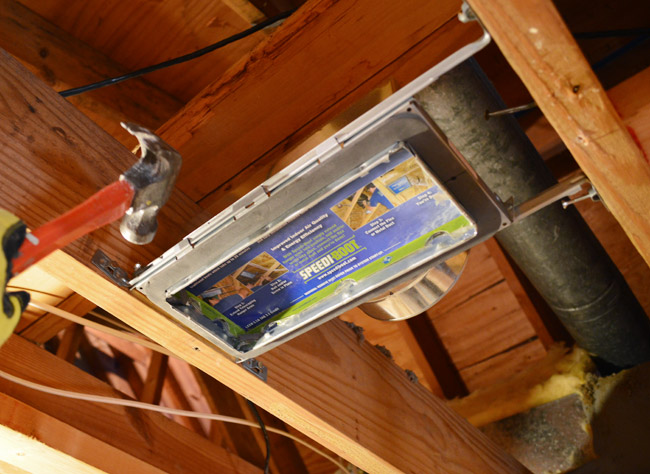
Buuuuut… I didn’t actually use the Add-A-Vent box. After purchasing it (it was $67) I realized I already owned some of the items that were included, and that I could buy the others for about $54 instead. One of those items being this “Speedi-Boot” that makes nailing in the new ceiling vent between two joists really easy. So I just returned the boxed set and used my a-la-cart purchases (but wanted to call out that kit here in case it helps someone else who might not have some of the supplies I already did).
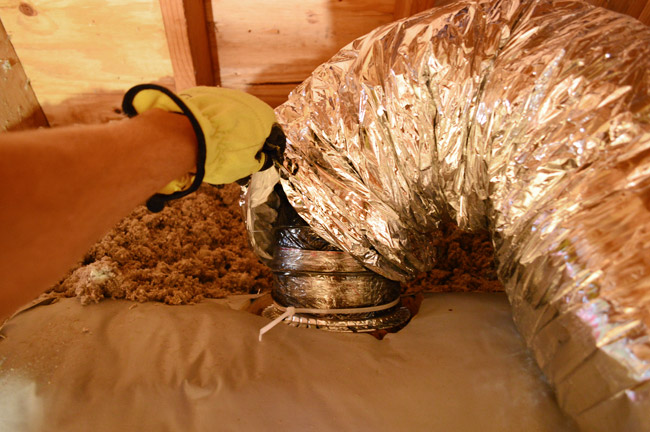
The part where I got nervous was cutting into my main HVAC trunk duct. But with some guidance from this post, I traced out where I wanted my new collar to attach…
…and used a utility knife to cut out the insulation, exposing the metal vent beneath.

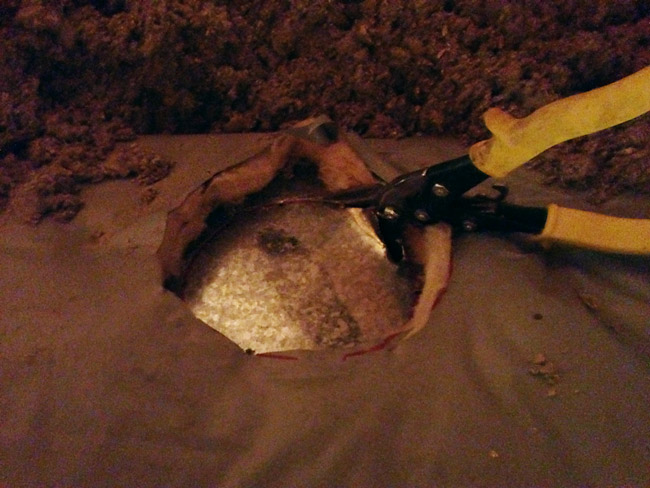
The tutorial I was following didn’t really help me when it came to cutting the hole in the metal, but this video did. Basically I hammered a flathead screwdriver in to puncture it, then used my metal cutters to go around the circle. There are probably better snips for cutting holes than mine, but they did the trick well enough.
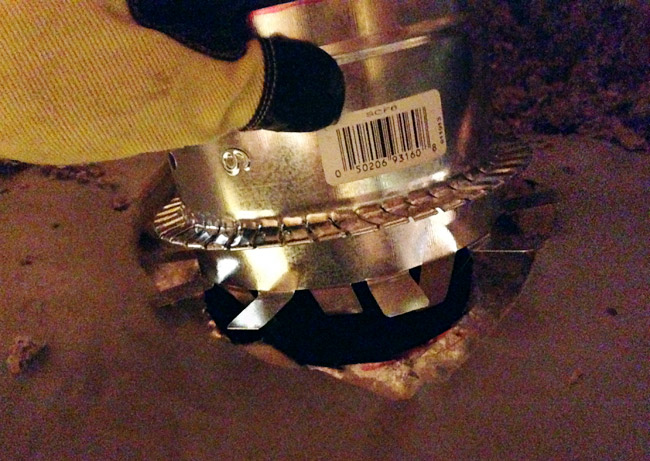
The collar has a ring of tabs on it, half of which I bent outward (to rest on the outside of the vent) while bending the others inward (to go into the hole). Once I placed it in the hole, I reached through the top of the collar and bent the inward tabs the other way so they held snugly against the inside of the vent.
Then I pressed some foil duct tape firmly around the whole thing to create a tight seal.
Next up was attaching the insulated flexible duct that would connect the collar to the ceiling vent. It’s pretty easy to cut to length using a utility knife, but you will need wire cutters to get through the inner wire coil. I held it in place with a zip tie, followed by more duct tape.
I used more zip ties to hang the flexible duct from the ceiling a bit so that it didn’t have any kinks or anything, since I didn’t want anything that might restrict airflow.
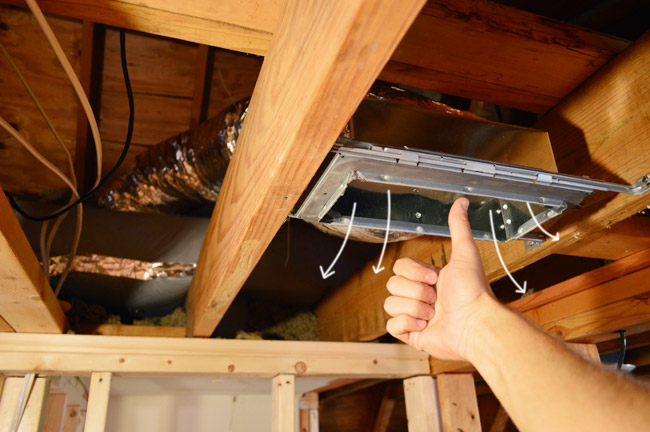
I’m gonna leave that cardboard “dust shield” (their words, not mine) in the ceiling vent until we’re ready to heat and cool this room, but I did quickly kick on the A/C just to make sure it worked. And in case you can’t tell by my thumbs up or cartoon air arrows, it did!
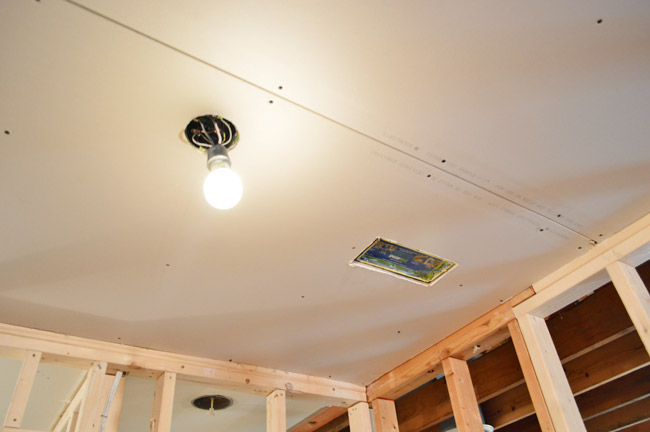
I realize that wasn’t the most fun post in the world, but I’m very glad to have gotten that stuff out of the way so this room can start to come together in more significant ways… like drywalling, which we have already started! It’s actually starting to look like a room in here.
But I’ll share all the drywall-hanging details when it’s done, which will hopefully be by Monday if all goes well. We’ve got book photoshoots today and tomorrow so we’re forced to switch our brains off Laundry Room Mode until Saturday, but at least we were able to get some laundry done at my parents house yesterday so we won’t be stinky for the photographer.

Vanessa says
I cannot wait to see how great this little spot in your home turns out. It looks to be a lot of work- but will payoff in the end!
Anele @ Success Along the Weigh says
What I wouldn’t give to spend a week with you guys just soaking up DIY knowledge. We have good intentions but we have to rely on YouTube videos and hope the contradicting info we can find doesn’t end up confusing us.
If y’all ever want to do more videos of this stuff, I wouldn’t be mad atcha. ;-)
Have fun with your photo shoots and give Burger an ear scratch for me. I miss his photo bombs!
Amy says
I am so impressed by how quickly and well done you are moving through this project! I wish we could get projects crossed off our “home to do” list so efficiently! And I just think your laundry room move makes 100000x more sense then how it was placed! Such a big improvement to your home!
haverwench says
Probably it’s a bit easier to make time for home projects when doing them and then writing about them is your full-time job. (When I grow up, I want to be a Petersik.)
Karen L. says
Yay! Great progress even though it’s things that aren’t so “fun”! I know you’ll love it all when you get it done. Great vision for the space!
Laura @ Rather Square says
I actually like these kind of posts. Designing a home isn’t always all pillow covers and paint colors. A lot of important stuff happens behind the walls too! We’ve been sharing a mix of fun design posts and “structure/systems” posts as we work on our house… it all goes with the territory of homeownership. :)
Amy says
wait. might ducks came out 22 years ago. great. now i feel super old.
Monica Phillips says
I coach hockey and asked my 10 year old players if they ever saw Mighty Ducks yesterday.. crickets…
Jennifer says
Sounds like it’s time for a team building exercise, Monica!
*Quack quack quack, Mr. Ducksworth!*
Barbara says
Yup – had the exact same reaction! WHAT? 22 years ago? No way am I that old?!
Linda says
Two things came to mind when reading this – (1) did you guys ever in a million years think you’d be doing anything close to this when you were living in NYC?; (2) this was fascinating – seriously – and totally explained to me why I would be hiring a pro to do this.
John, I’m in awe.
YoungHouseLove says
Not in a million years could we have ever guessed we’d end up here! If you told NYC John that he’d be redirecting ducts someday I think he would think you were crazy ;)
xo
s
Sarah says
One suggestion for your outside dryer vent: put some sort of cage on the outside vent to prevent birds from flying in. I speak from experience: we had a mama bird set up camp by going into our master bathroom vent and building her nest, complete with baby birds that chirped all night long. I tried to find an example on HomeDepot.com but couldn’t. Those birds love the moist heat, so I highly recommend you find a safe cover to prevent critters from going in.
YoungHouseLove says
Great tip!
xo
s
Heather W says
YES!! I was going to recommend the same thing. My husband had to do that too because I could hear birds in my dryer duct too. Definitely put the cage on and then check to clean every so often.
kerry says
Yes! Or worse, bats!!
Sarah says
But if your dryer kicks out a lot of lint you may have to clean that cover periodically, depending on how dense your grid/mesh is. My dryer is awful so I clean mine about once a month. I know it needs cleaning when the clothes take forever to dry and/or are still wet when it’s “done” with the cycle.
Rose says
You need a dryer vent with a flap on it inside the slanted part, that will keep birds out unless they are really determined I suppose…I’m not sure what you put on (didn’t take the time to go back and look at your photo)
Laura B says
This might be my favorite post title of yours. Pass the cheese, please! :)
Sarah W. says
This is so cool! (pun intended)
I’m so interested to see you take on something you’ve never done before and make it seem possible for a regular person to try. I hope you’re enjoying the new challenge (despite the scary ladder work). The new laundry room will mean that much more to you knowing you made a lot of it happen on your own.
Kudos, J & S!
jackie says
Excellent detail description and photo’s! You make it look so easy! You guys are so much fun to follow. You are my “Rock Stars” of home improvement blogging!
Rebecca says
Hi YHL :D
This post did not show up on my feebly page (though the fab freebie post did).
I came directly to your site to see if you had anymore posts and found this one from yesterday. Yay :D but your site is running really slow, and I keep getting a script error. This may be on my end – but thought it was worth mentioning, as I’ve never had a problem.
YoungHouseLove says
Oh no! Anyone else have feedly/loading issues. We are out shooting book stuff today so we aren’t monitoring that stuff as closely as usual.
xo
s
Rebecca says
** update ** it finally came in on feedly. Delayed maybe??
and your site is working better (still some delay – but not as bad). Sorry for the worry. :)
still getting several script errors
YoungHouseLove says
Thanks so much for the update!
xo
s
Danielle says
My husband owns an HVAC business so I can say with confidence that John doing this himself is super impressive…as usual you two continue to inspire
YoungHouseLove says
Thanks Danielle!
-John
erin says
This seems like a lot of (expensive) work for a laundry room! But hey, whatever floats your boat!
Vicki says
Not just about a “laundry room” since they had that–
about optimum design and flow now and in future–which is priceless really until you need to achieve it with a design already in place…
We bought vacation house with mis-matched (to us anyway) floor coverings–3 versions of luxury vinyl tile ($$$-we saw the receipts), original white ceramic and some dated carpeting in bedrooms…
would love to take it up everywhere but the master area and lay ALL of it in same as master…but that would really be a vanity project…
since this is all functional and in good shape…Not what John and Sherry faced…
Kudos for making your project fit your budget…
Lindsay J says
These are the kinds of posts I love. It helps so much when there is limited information out there. You two do such a great job at eplaining processes and give encouragement to those of us that want to do things ourselves.
Thank you so much for sharing!
Marlena says
Unreal! Yet again, you two impress me with your willingness to learn skills and then do the work. Wowee!
Janette@ The 2 Seasons says
Did you consider pocket doors? Looks like a lot of work that will result in a nice space for you all. I love watching the progress!!!
YoungHouseLove says
Pocket doors and barn doors came up a ton in reader suggestions so we heavily considered them, but we settled on a regular door (like the other six in that hallway) since there’s a nice amount of clearance in the laundry room, and that way a glass one for the storage room can be the star.
xo
s
Jennifer Olszowy says
On your last post about this upgrade I mentioned that we put in an attic fan to suck out the hot air. I would highly recommend this since you will be actually using your attic space. We didn’t use it but for storage and we could see a huge difference. It was a bit loud but you get used to the noise
YoungHouseLove says
Thanks Jennifer!
xo
s
Darlene says
A warning about attic fans. . . unless you’ve sealed every place that something passes from the living space into the attic (wiring, pipes, attic access, etc.) an attic fan can suck the A/C out of the living space.
YoungHouseLove says
Good to know!
xo
s
Caroline says
You typically don’t use an attic fan with the a/c. It’s to such the hot air out of the house when it’s cool outside (and helps draw in the outside air- much like a fan in a window. We are in GA and have a very small time frame to use ours in the spring and fall.
Kathryn says
Great informative post! I’m gonna make my husband read it!
Reenie says
Moving right along…. can’t wait to see it. :)
Vicki says
I have a whole new appreciation for my husband’s efforts with numerous remodeling projects after seeing the step-by-step processes explained in your posts! We have had fourteen addresses in 38 years of marriage, and nine of those homes he remodeled, finished the basements, added decks, etc. I might have to buy him dinner!
Daisy says
Great info. Just wondering- will you be installing a drain in case of accidental washer flooding? Or any other moisture mitigation? Thanks!
YoungHouseLove says
Yes, we had the plumbers install one right under the washer and will detail how we attach the drain pan to it when we get to the washer installation step.
xo
s
Isabel says
22-years ago, really?!? I don’t know if I would have enough confidence to tackle the HVAC stuff but thank you for such a detailed and informative post. John, you seem to love getting up on a ladder as much as my husband. I totally don’t blame you though! I always offer to take my husband’s place since I know how much he dreads it, but he’s too much of a gentleman to let me and I’m always very secretly glad!
haverwench says
I do the same thing…and he always refuses because he says he’d be more scared to have me way up on a ladder than him. Awwww.
Dona says
I really like when John explains all his steps and gives links to where he is getting his information. He makes everything look so “do-able”. Both of you really inspire me.
~Dona
YoungHouseLove says
Thanks Dona!
-John
Andrea says
I hope you put some sort of screen inside that external vent to prevent bats from entering the duct work and getting in your attic!
YoungHouseLove says
Thanks Andrea!
xo
s
Dave says
Nice work there John! Just curious why you didn’t just reroute the old vent that’s now in the doorway over to the new laundry room. Too hard to get to?
YoungHouseLove says
Capping that one and adding a new one ended up being easier due to the length of the old one (it wasn’t long enough so I would have had to add to it anyway and snaking it around was harder than starting fresh).
-John
Kristin Z says
Another little tip about the Home Depot trucks that I just discovered and it blew my MIND! For the same $20 as renting the truck… They’ll load it, deliver, and unload for you if you’re close enough to the store. Up to 3,000 pounds. Not sure if this is at all stores but its available here in Greenville, SC.
YoungHouseLove says
That’s amazing! Thanks for the tip!
xo
s
Lisa | Winter Heights says
Wow! This is so very inspiring. We may switch our laundry around one day in our house and I’ll be sure to go back to this post. Thank you!
Now take a nap. ;)
jaclyn says
I really appreciate these more technical posts! Also I am SUPER impressed at the speed you guys are moving with this project.
YoungHouseLove says
Thanks Jaclyn!
-John
Elle says
Love the post title. I’m sure this has already been asked, but can you talk about how you guys managed without a functional laundry room for [however long this takes]? I want to redo our kitchen but your project made me realize that it also means doing without our laundry for a while and … that just sounds awful. Not having kitchen *and* laundry for weeks? Bleh.
I noticed someone else having an issue with feedly – just FYI, I also use feedly but have not noticed an issue, I got one post from you guys yesterday and one post today.
YoungHouseLove says
Thanks Elle! We brought a bigiad of laundry to John’s mom’s house to help tide us over, but a local laundromat could help in the clutch too! For the kitchen that can be rough (we missed our sink the most) but the microwave and outdoor grill can help!
xo
s
catherine says
Elle, we did a kitchen reno a couple of years ago that involved the laundry room too. Our contractors were good about keeping appliances available until the last second. After that some kind neighbors let me camp out in their laundry rooms a couple of times until we were back in business. The hardest thing to do without was the kitchen sink – even though we have a full bath right across the hall from the kitchen, doing dishes in the bathtub is THE. WORST.
YoungHouseLove says
Yes! We always miss the sink the most!
xo
s
Megan says
Wow! I *really* admire your patience and diligence to get a not-so-fun project done right. Very impressive! I am also thrilled you decided to keep things uniform with your doors… good call.
Oh, and the mention of book photo shoots at the end of your post… does that mean the ‘real families’ have already been selected??? The slim hope of my submission being chosen has now vanished. Womp womp. Back to trim painting it is… :-)
YoungHouseLove says
Not all of them! We had hundreds of submissions so we are slowly working our way through them. Wish we could feature all of you guys!!
xo
s
Flagless says
Agreed on the doors. Pocket doors and barn doors are trendy now (I hate the look of barn doors, though), but in a few years’ time, they’ll be as dated as that blue trim is today. Classic doors are classic for a reason.
Diana says
You make this look so easy! I would never have considered doing something like installing a new vent by myself before this, but thanks for the new confidence! This is why I love YHL so much! :)
http://www.thewonderfullymade.blogspot.com
Cassie says
I think it’s amazing that you guys are tackling so much of this yourself. So I have one big question, how do you know what type of construction / changes require a permit? Adding ducts, moving walls / stairs, plumbing, electric… this seems like big stuff.
I’m just curious because I’m looking to buy an older house and am worried about people who DIY’d the house and don’t read your blog. ;)
YoungHouseLove says
There’s hopefully tons of info on your county’s website (ours has a full list of what needs permits and what doesn’t). We also call them (they have a number with someone there during business hours) if we have any questions. It’s a great resource!
xo
s
Alexandra says
I didn’t even get past the title before I clicked through (from feedly) to comment – BEST. TITLE. EVER. Now, to actually read the post… Thanks for the laugh!
Katharina says
“I didn’t want to spend any more time up on that ladder than I had to…” – I am VERY impressed that you went up there at all! This is quite the project! Good luck!
kimb says
why didn’t the dryer vent just go straight out? Why did you go up the wall like that?
YoungHouseLove says
It would have come out right above the little roof you can see in one of the pictures of John on the ladder (meaning lint would collect on those roof shingles) so we wanted to keep it at the same height as the previous vent.
xo
s
OSUJillyBean says
Love the update but I’m curious – is your A/C / Heat able to add a new room like that to its capacity? Since the laundry room is in previously-un-temp-controlled (too many hyphens!) territory I’m curious how just adding the new air ducting will work out in the long run.
YoungHouseLove says
Since we capped the vent from the former laundry nook and added this one in its place it’s a trade that we hope won’t affect the capacity at all. We did steal some laundry space from the future bunk-room, but that space already has HVAC vents (we just have those closed for now since it’s not insulated and drywalled yet) so the vents in there will now be cooling slightly less and this vent will cool slightly more (so it feels like an even split).
xo
s
Lindsey says
You lost me after you pointed out The Mighty Ducks movie is 22 years old… ouch.
Alice says
Why did you run the dryer vent up the wall, instead of having it come out at the level of the dryer? Is it because you didn’t want the vent in the middle of the siding? Maybe you thought it didn’t show as much higher up, near the roof?
YoungHouseLove says
It would have come out right above the little roof you can see in one of the pictures of John on the ladder (meaning lint would collect on those roof shingles) so we wanted to keep it at the same height as the previous vent.
xo
s
Lauren says
Why would lint collect on the roof? Doesn’t it rain in Richmond? I don’t think it’s common for much lint to come out of dryer vents outside anyway…? Mine doesn’t do that.
YoungHouseLove says
Any surface that is nubby or textured (rough wood fence, asphalt shingles, etc) tends to get furry from lint in our experience, even if it rains. We had a wood fence below the dryer vent in our last house and it always looked like it had cobwebs on it from lint buildup.
-John
Leesha says
Wow, I’m so impressed. It’s going to look so great when its all done! And how satisfying is it when you do things on your own? I’ve never tackled huge projects like that, but I love the sense of accomplishment when I get some of my miniscule things done. :)
Abby says
Great title! Recently watched The Mighty Ducks, both 1 and 2, with my kids. The kids are big hockey fans.
haverwench says
Yep, cutting a hole in the actual side of your house is always unnerving. We had to do it to reroute the vent for our bathroom fan (before that it was venting into, literally, the side of a solid concrete step. I don’t know what these people were thinking.) My husband referred to it as “breaching the hull.” Fortunately in our case we didn’t have to get up on a ladder to do it, but we had to drill through the foundation with a masonry bit and a chisel. Tedious, but oddly liberating.
I just realized from looking at the floor plans you posted when you bought this house that this laundry room addition is the first change you have made to the actual floor plan of the house. Taking down the sides of the sunroom doesn’t count, because the new verandah occupies exactly the same space–but now you have to actually update the layout on the floor plan, not just the labels. Sounds like a milestone that should be celebrated somehow. How would you decorate a cake for a Floor Plan Party? (Oh, duh, you’d draw the new floor plan on top with icing, of course.)
YoungHouseLove says
We plan to party like crazy when we get our washer and dryer back. Haha!
xo
s
Danielle Ferretti in Miami says
John and Sherri,
You two never cease to amaze me !
1) your attention to details and how you make sure to always go that extra step to have everything as perfect as can be up front is just so inspiring… and although someone said: “seems like expensive work for a laundry room”. But at the end, when you go with less than perfect up front, you always pay back at the end when something inevitably goes wrong or breaks. So, kudos to you !
2) the fact that you can climb on a ladder that high and still look awesome doing it – wow. #laddersaremynemesis
3) if I make my husband read this because you are that much awesomer and quicker at fixing stuff (without me begging for months) than him – there might be a divorce in my house. Just saying.
4) I am jealous of the amount of power tools and suppliers you own and have at home…
5) hands down – you two are my FAV DIY blog (and cutest too!) by far. I live vicariously through you guys.
6) “boring” posts like these are also great ! We all want to see the good, the bad and the ugly… not just pretty decorating things. :)
7) the Mighty Ducks. 22 years ago. Just shoot me now. LOL My 5 yo Zoe just watched it last weekend, and LOVED it.
xoxo
D =)
Elaine - Visual Meringue says
Looks great! Thanks for sharing all the nitty gritty. What a feeling of accomplishment you must have getting all these things checked off the list. Really informative post too – thanks :)
Juliet says
Thanks so much for doing such an awesome and informative post. I know that sometimes those things aren’t as “pretty” as the decorative ones, but they are totally necessary to understand the whole process, and that it is always working step by step through the process that tells you what you need to know about a project. As I’m sure that you found when your were researching, a lot of the “how-to’s” just tend to skip past the details and rationales of the nitty and the gritty. Kudos!
Amy B. says
I have to commend you guys for going for this laundry room re-do! Big props to John – you’re doing a great job! Really enjoying watching this come together – it’s nice to watch a ‘meaty’ DIY (mostly-DIY) in progress!
Sarah says
You guys are amazing! I love keeping tabs on your progress. I am creating a new laundry area and remodeling a bathroom and have been at it for about two months and you are already ahead of me, but I haven’t hired anything so far (plumbing is mostly done and I’m in the middle of framing and electrical now). Anyway, one question, did you pull a permit for this? I haven’t heard mention of it and was curious, since you are already on to drywall.
YoungHouseLove says
Oh yes, permits are necessary for this type of work! Thankfully when you use subs you can negotiate who pulls them, so we had our licensed and insured electricians, framers, and plumbers pull the permits they needed. Some sub-contractors are more likely to make you do all the permit work (which really isn’t too bad, we did them ourselves when John built the deck).
xo
s
Emily @ Life on Food says
This was so informative. Who knew they had install a vent kits? Is it just me or does it seem like this project has been going on for more than a week now. How are you doing without any laundry?
YoungHouseLove says
One big laundry trip to Grammy’s has tided us over so far. I think we have at least one more to come before these guys are hooked back up (she says as she crosses all appendages).
xo
s
Jennifer says
We have a second floor laundry set up in our house as well. The previous owners had an old model top-loading washer which they took with them when they moved so we purchased a new front loading washer. I’ve always wondered if there was anything to be concerned about in terms of the floor needing reinforcement for the front-loading type of washer. Do you have any insight into this? I don’t remember you mentioning you reinforced your floor under the new space your washer and dryer are going, but then again you have the top loading washer now.
YoungHouseLove says
We added those plywood pieces john mentioned in this post and also will add cement board and tile, but both contractors we had out to bid the job thought that was more than sufficient for their weight. Does anyone else with front loaders have any insight to add for Jennifer?
xo
s
Ashley says
One thing to consider when swapping a top loading washer for a front loading is to measure the depth difference. Front loaders tend to be quite a bit deeper and every inch counts in some older laundry rooms!
Bridget says
I have to admit, lately I thought you guys had sort of “jumped the shark” with the blog, but this post was extremely well thought out and informative. This is why I started reading your blog in the first place – to make these types of projects seem not so “scary” to the regular DIY home owner!
jaclyn says
@Bridget You must’ve missed the post where they explained that they’d be dialing things back a bit to focus on their FAMILY.
I, for one, think you guys are doing just great with the posts!
Bridget says
@Jaclyn, nope, I’ve been reading for years, so I knew they were going to post less… but that is not the point of my comment. I just (personally) have not been as “wowed” with projects lately – even the “meaty” posts lately are lean and barely informative when you considered other DIY bloggers who aren’t even “employed” solely by their blog (ie, “We painted blue trim… again!” “I spray-painted something… again!”). To each, their own.
Amy says
The origins of “jumping the shark” c/o the Fonz:
https://www.youtube.com/watch?v=t4ZGKI8vpcg
(Also, I agree with Bridget. These posts = why I read.)