If those three things don’t sound like a great time, then I don’t know what does. Amiright? Anyway, we’ve shared a few peeks at the ceiling progress in our sunroom, but have yet to explain how we got there. Hold on to your hats and break out your graphing calculators!
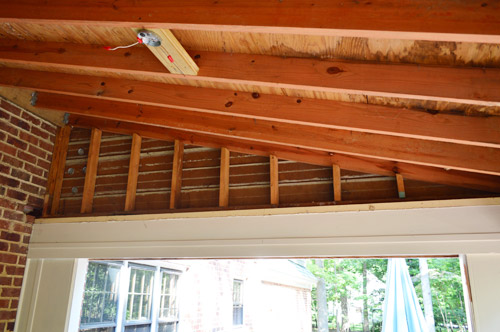
Just kidding about the calculators, because we actually left the engineering part of this job to a professional. The pro we referenced in this post was the builder we’re working with on the show home. He offered to pop by to give us his expert opinion, which boiled down to “those cross beams aren’t supporting the roof, they just created the framing for attaching the ceiling.” That’s exactly the news we were hoping to hear.
The news we didn’t want to hear were the tedious instructions that he gave for removing them and reinforcing the rafters up top (since the ceiling we were removing wasn’t load bearing but the rafters above it were a few decades old, a few additions would make it a lot stronger). It involved adding a lot of new hangers, ties, and bolts, which meant lots of nailing and drilling and ratcheting. Totally doable, just time consuming.
He recommended that we call one of the contractors that he uses a lot and get an estimate, just to weigh what it might cost to have a pro do the work (it would be faster since they’re more well practiced and already have the right tools). That contractor, David, said he could come by the next day and knock out the job with a second guy in 2 hours for $200. Um, SOLD. So within a few days of posting this update, this was happening outside our living room window.
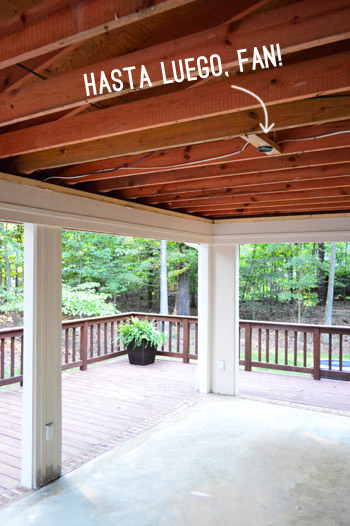
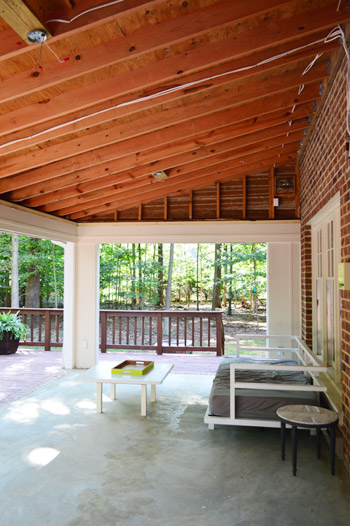
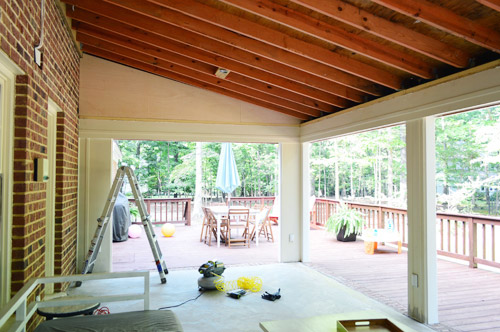
The difference was awesome. The room may have only gained about 4 feet of height on one side, but it feels so much more open compared to the before. Well, except for those dang fan wires ruining the view.
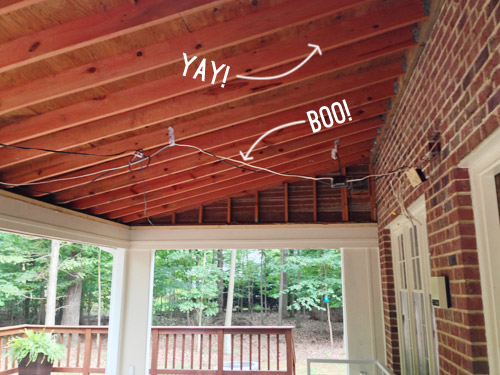
So we put a call into our favorite electrician and got his crew to not only extend the wires so they could be attached to the new/higher ceiling, but also to turn our one fan box into two so we can stay cooler in there (and to hopefully bug the bugs enough that they won’t want to fly into the room at all). We haven’t received the bill from them yet, but we’re guessing that it’s in the $250 range.
Going into this lofting project, we assumed it could be around 1K if we needed to make structural changes (like enforcing things with more beams, getting a permit, etc) not even including any electrical work that we might need to hire out – so it was definitely a lucky break to find out the ceiling framing was just cosmetic and wouldn’t require any extensive restructuring or even a permit to remove it. And getting those two pro-worthy jobs knocked out for around $450 while doing the initial drywall removal ourselves, as well as our plan to re-insulate, hang the fans, and install all of the ceiling beadboard ourselves means we’ll hopefully save a good chunk of change when this is all said and done.
The funny thing is that we realized a few months after moving into our second house we embarked on another outdoor project (laying our stone patio) which came in around $1,200 when we were finished – and with the cost of the tile and the beadboard added onto the expenses out here so far, it looks like this project could end up being right in the same ballpark. Dare I call it an exterior project tradition?
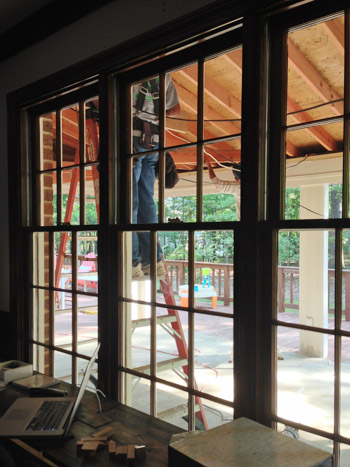
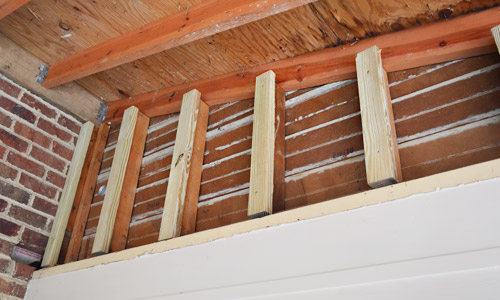
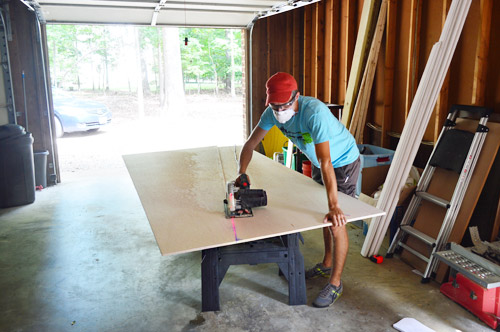
Anyway, with those two tasks taken care of, we could finally turn our attention to rebuilding our exposed ceiling. We decided to start with the two empty triangles on either end of the room, which we opted to cover with plywood that we could paint to match the rest of the room (since the rest of the space is framed out with plywood already).
Dealing with a triangular space sort of sent me into a mathematical tailspin. My brain immediately grasped for every bit of 9th grade geometry I could remember and I found myself furiously measuring angles, calculating hypotenuses, and trying to decide if I needed to remember what a cosine was.
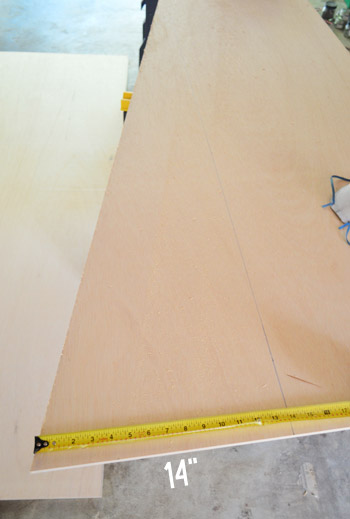
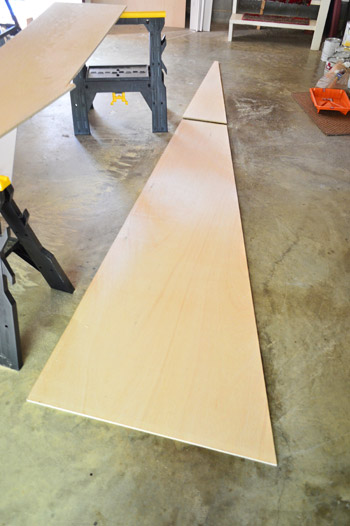
But soon enough I realized I was waaaaay over complicating things. All I needed to know was a few length measurements and I’d be fine. Since my plywood piece was only 8ft long (i.e. 96 inches) I knew I’d have to cut two pieces to fill the space. So I measured the height of the gap at one end (against the brick wall – 40.5″) and 8ft away from that end (17″), which you can see in my sketch below.

Since those two measurements went all of the way to the ceiling (and I didn’t need my board to go all of the way up thanks the beadboard ceiling that would eventually polish off the edges) I trimmed 3″ off those two numbers and marked them on either end of my plywood sheet. Then I snapped a chalk line to connect them.

And just like that the angle of my cut was determined for me. Time to break out the circular saw.

To cut the second piece, I took advantage of the fact that the “scrap” side of the plywood featured the same angle as the good side. So knowing that it needed to match up with the 14″ side of the first piece, I marked that on one side and drew a perpendicular line from there to the angled edge.
Once cut, I had my two pieces ready to be hung.
Well, not totally ready. First I had to build out the studs a bit so that my new pieces of plywood would sit flush with the existing wall. For this I just cut up a spare piece of 2 x 6″ and screwed them into place.
I was a a little nervous when it came time to actually test the fit of my board (such a big piece of plywood wasted by a bad cut would have been a big bummer).
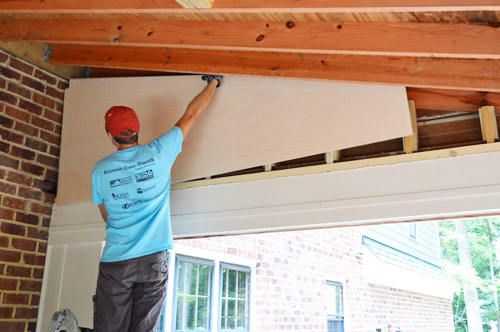
But luckily it went up like a glove (victory!) and I was able to temporarily nail it into place with some brad nails before going back and hammering in some more heavy duty nails by hand.
So here’s one side up (after having put up the small triangle too). You can’t see it here, but it’s not 100% seamless. There’s a line where the new plywood meets the old wall, along the bottom, which we plan to caulk and then cover with trim. And I’ll probably use Bondo or wood filler to try to make the small vertical line where the two pieces meet less visible too.
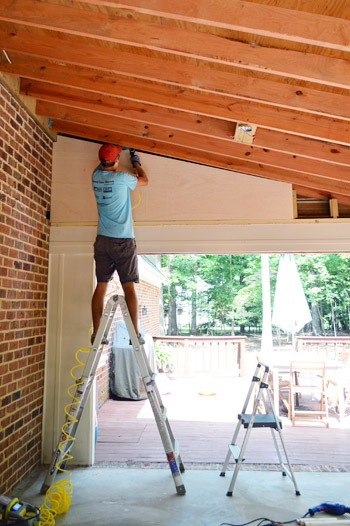
As much as I wanted to celebrate my geometric accomplishment, I had another side to take care of. Back to the drawing cutting board.
So here’s the other side done. It had the slight added challenge of having to cut a hole for an electrical box (something the electricians had to install to corral some of the wires and, for code reasons, it needs to be visible and accessible). Fortunately, once the plywood gets primed and painted white, we think it’ll blend in pretty well.
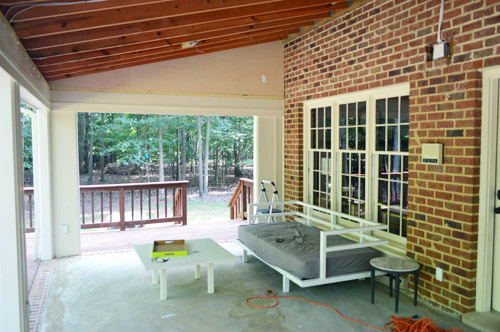
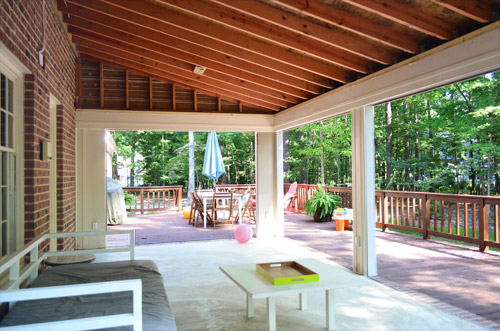
It’s amazing how much more open the room feels now that we’ve removed the doors and popped the ceiling. It doesn’t even feel like the same room.
Now that the boring/mathy part is out of the way, we can finally turn our attention to the light blue beadboard ceiling that we’ve been psyched to install. It’s going to involve pricing a few things out, measuring, priming, and painting before it’s ready to hang – so we’ll probably be back with an update on that early next week if all goes well. What did you guys work on this weekend?

erin says
helped a friend spray paint for the first time ever. and created a design for my nightstand drawer and Poly’d the night stand. so it’s ready to be put back together and preview it in the bedroom1 excited!
YoungHouseLove says
That sounds like so much fun! Would love to see a picture!
xo
s
Melissa says
Can you share the name and number of the builder that did the work? I didn’t know if he/they would be interested in doing other local work. It’s hard to find people these days!
YoungHouseLove says
Sure! Why don’t you email me for it since I haven’t asked him if I have his blessing to post it up here for the internet at large to see yet :)
xo
s
Katie says
What an undertaking! I would have never thought to do this. Seriously genius. It’s like you are taking the glasses off your deck and now she’s a hottie.
YoungHouseLove says
Haha, thanks Katie!
xo
s
Lisa Osborne says
Since math seems to be a topic today and someone mentioned getting Clara interested in Math, thought I’d pass this website along in case you hadn’t heard of it. I read about it in Time magazine. You can sign up to receive a daily email that includes 3 daily math problems at 3 different levels, but all based on the same interesting topic. The site is trying to extend the idea of reading with your child daily, to doing math with your child daily. I think it’s brilliant!
http://bedtimemath.org/
YoungHouseLove says
Sounds like something she’d love (and heck, John would love it too). Thanks for the tip Lisa!
xo
s
Laurie says
Yay for affordable bids! The contacts you are making with contractors are awesome! I wish I had a network like that built up. So far, the ones I’ve had to work with see a single woman and immediately charge me $1000. Even when it is just pulling up one room of particle board underlayment. Ugh.
Your outdoor space is going to look amazing!
YoungHouseLove says
Argh, I know what you mean! Our neighborhood is definitely a bit nicer than where we used to live and sometimes people drive in and think “I can double my bid for this neighborhood” so it definitely can go the other way for us too! We got three roof estimates and the other two companies were crazy high! Even though our house was literally being rained into (there was a gaping hole in the roof) so it clearly wasn’t the swankiest pad on the block! Haha!
xo
s
Kristin F says
Well since you asked….I spent this past gorgeous weekend painting the kitchen. All 200+ sf of her, plus her crown. I need to formally thank you guys, btw. Your adventures in crown molding enabled us to tackle that particular job on our own AFTER we purchased some of your recommended tools. We purchased a pneumatic brad nail gun and Kreg Crown Pro just like you. Once small snafu however: I put the swing angle ruler on the underside of the kreg on backwards. We could NOT figure out why our angles were so terribly off, I kept saying (screaming) “It worked for YHL, why isn’t this working???!!”. Finally, we (my husband) realized I’d assembled it wrong. I will NEVER live that one down.
YoungHouseLove says
Oh no! So glad you got things straightened out!
xo
s
OSUJillybean says
I LOVE the raised ceiling in this room! It’s going to be fantastic when you guys are finished with it. (Is a room ever really “finished” at Casa de Petersik?)
Question – how will you be keeping birds and creepy crawlies from nesting? Our local birds have built nests into every nook and cranny around our neighborhood and the spider this year have been awful. Is that less of a concern up north in VA?
YoungHouseLove says
Thanks Jillybean! We’re planning to cover the whole ceiling with insulation followed by light blue beadboard, so that will hopefully keep anything from getting up into those rafters!
xo
s
Michelle @ A Healthy Mrs says
Looking good! I love what a difference you’ve made so far!
kk says
Maybe this is a silly question …will you add insulation again underneath the new board, would it get really cold in the winter without it?
YoungHouseLove says
We originally didn’t think we would but we heard from a bunch of people and found some articles online that said it would cut down on how hot the room gets with the sun beating down on it, so since it gets a lot of sun we think it’s a worthwhile addition! Happily the insulation we removed from the drop ceiling is in good shape so we can reuse it!
xo
s
Beth Boman says
Exciting changes!
My husband is plumbing-skilled and my brother-in-law is an electrician, so we did a “labor exchange” this weekend- friday night they bought materials together, Saturday my husband did a ton of plumbing upgrades at my brother-in-law’s (about 45 minutes away), and Sunday my brother-in-law installed 3 exterior lights at our place and did a bit of crawling around in our attic for other projects. Our new outdoor lights are so pretty I cat-called at them (nearly involuntarily) when I first saw them installed.
YoungHouseLove says
Haha, they sound amazing! Now I want to cat call them.
xo
s
Anne says
Say it with me:
SOH-CAH-TOA
Wow it looks great!! Such a nice place to hang out when the weather cooperates.
YoungHouseLove says
Hahah!
xo
s
Lisa Osborne says
I’ve been researching and struggling with insulating this exact type of ceilng myself. There is a reason your sunroom ceiling was insulated on the horizontal surface, and not on the diagonal surface against the roof sheathing/ply. That allowed air movement and usually ventilation. If you insulate directly against the roof sheathing and shingles, I think the insulation holds the heat there and bakes the shingles and you don’t get the life out of your shingles that you plan on? Is your reusable batting shallow enough that when you reinsulate with it, there will be airflow? And how to you vent that then? I haven’t been able to find a ridge vent for this application in Canada. Any insight you can share on this issue would be helpful !
YoungHouseLove says
Thanks for that tip Lisa! We haven’t looked into that yet, but have seen other bloggers and DIYers insulate their slanted ceilings so we’ll hopefully find out how to do it with that ever important air flow!
xo
s
Mary | Lemon Grove Blog says
I can’t believe what a big difference the raised roof makes. This space is going to be absolutely amazing when you guys are done with it!
Boulder Painting says
It looks amazing! So much more open!
Alisa says
What did I do this weekend? I bought a trashcan…then returned it this morning because I didn’t check to make sure the lid opened (it didn’t). So yeah, you guys did way more than me! We just moved into a rental townhouse and I’m living vicariously through your projects since we aren’t allowed to paint anything :( LOVE that porch room!
YoungHouseLove says
Oh no! That totally sounds like something I’d do!
xo
s
Emily F. says
Can’t wait to see how you guys put in the ceiling! I’m so looking forward to that because I’d love to put up some kind of beadboard on our covered patio ceiling. Are you planning on going with wood or a vinyl or other material?
I spent this weekend putting the very last coat of polyurethane on 4 little school chairs I bought, inspired by the ones you guys got for Clara! I picked them up for $5 a piece, stripped them, painted the metal pieces (Rustoleum Dark Walnut in a satin finish), then stained the seats and backs a red mahogany. They were not an easy or quick project but I love them and they turned out SO good!
YoungHouseLove says
We originally were planning to use vinyl beadboard sheets but it’s out of our budget (as in over $500! Ack!) so we’re pricing out some stripping options (both in solid wood or vinyl) to see where we end up! As for your little school chairs, they sound adorable! I’d love to see a picture!
xo
s
Jasmin M says
I just love that all the changes you guys decide to make look so organic. Like they were always meant to be there in the first place- the old room looks completely outta place!
Dominique says
Wow. this transformation is amazing! I love the progress and can hardly wait to see the end result. I recently refinished my patio furniture and added a rug to my small outdoor space, so I love seeing this. I’m excited to spend more time on the patio this fall and hope to make my space cozier, though with much smaller, slower steps than you two. :)
Liz says
It looks so great! What you guys have done has really made the space look like that was how it was always destined to look – it makes so much sense now. Fabulous!
Also, I want to thank both of you for being so encouraging about how possible it is to fix up your home DIY (and with a little professional help when called for)! We just bought our first home, and I would never have had the confidence to pick up such a fixer-upper had I not become a YHL addict. Let’s just say, for one, that the kitchen had a mix of pumpkin orange and apple green cabinets – yikes. But they are lovely white now and we’re working on the rest of the room! So thank you for being inspirational while still keeping it real – and for showing that things take time nad nothing happens overnight – and for always being cheerful and gracious along the way.
(Ignore this morning’s negative Nellies!)
YoungHouseLove says
Aw thanks Liz! I’m so glad if out blog helped in some small way! All the best with your place!
xo
s
Andrea says
Yikes! Sorry for the dicey comments on this post earlier in the day! I love reading about what you guys do — big or small. You have inspired a lot of the changes we have made in our own home (and took a lot of the fear out of trying things, including cutting my hubby’s hair, haha!). Anyway, while you replied so well, I know those things tend to stick with you for a while. Hope you have a great day regardless :-)
YoungHouseLove says
Thanks Andrea!
xo
s
Amy says
This is AWESOME!! this is a great post. So often we see quick transofrmations on TV and never realize the behind the scenes real life steps. I love the realistic view of: we DIY this/we hire for that. That really helps me when planning out in our own house and having some ideas about what is best to outsource and how to save money, what products to try, etc. Infact! We recently cleaned and stained our deck and I told my husband: “nope, that cleaner doesnt work…John and Sherry tried it” and “ohhh that stain is best, YHL said so.” :)
Just want to let you guys know you are bright spot in my day, I look forward to your posts everyday! I hope you always focus on the postive comments on your posts and know that what you do is really wonderful.
YoungHouseLove says
Thanks so much Amy, you’re so sweet!
xo
s
Heather @ Forsythia + Oak says
It looks great! We’ve sort of missed the window for outdoor projects on our new house, but we’ve already got plans for next Spring!
Allison says
I’m so impressed with your math-y skills! I remember swearing that we would never need to know the cosine of anything was when we were grown up!! Junior high math teachers everywhere must be jumping for joy!
Hillary says
How did you get the entire 4′ x 8′ piece of plywood home (just curious)? Is this one of those worth-renting-a-truck jobs?
I’m also VERY excited to see you do the beadboard. I just put beadboard in my kitchen (along one plain, straight wall) and it was SO INCREDIBLY EXCRUCIATING! (and still not quite done) I’m sure I made every mistake in the book (and trying to make up for it now with caulk on the back end), so I’m eager to see you guys do it RIGHT!
Love the blog!
YoungHouseLove says
Aw thanks Hillary! We actually rented the Home Depot truck for $19 to get the large plywood home (we also bought a ton of long crown molding pieces since we’re planning to install that in Clara’s room, so it made the rental cost do “double duty” so we weren’t just paying to cart the plywood home).
xo
s
Allie says
Have you picked the blue paint for the bead board? Can you give me a spoiler now? I’m picking my blue porch ceiling color today or tomorrow… so many beautiful blues!
YoungHouseLove says
I haven’t broken out my paint chips yet, but I am also planning to check out Pinterest (maybe search blue porch ceiling) and see what comes up. Hope it helps!
xo
s
ELS says
Looks great! It looks so much better already as a porch than it did as a sunroom–kudos on thinking outside the box.
Have you thought about furnishings out here once the construction is done? Would you ever move the current dining room chairs to the porch? (if I remember, they are outdoor grade). They’d look so pretty there and be so comfortable! Maybe it’s my short-person bias, but I don’t love daybeds as couches because my legs are too short and so they stick straight out when I attempt to sit back.
YoungHouseLove says
I have thought about that! I think we’ll slowly furnish it over time but I’d love to end up with some hanging chairs, a comfy conversation area (whether that’s an outdoor sofa and chairs or a sectional) and a coffee table – maybe an outdoor rug too). Can’t wait!
xo
s
Corien Oranje, childrens' book writer says
well, since you asked for MY weekend DIY-project… I tried to make a beautiful, yummy layered cake for a grade 1-book presentation later on this month (something about a teachers’ race, and a mean teacher trying to steal the cake and cup, and grade’s 1 Miss Feep saving the day). I grabbed three round cardbord boxes in different sizes, bought some insulation foam spray (looks exactly like whipped cream, right?) and candy, and started spraying away. And I ended up with sticky hands and something that looked more like a snowy christmastree or like Bigfoot than the cake in my picture book… :-) http://www.corienoranje.nl/taart/
YoungHouseLove says
Haha, I love that story! Even though it’s not my native language I feel like I could follow it! You’re hilarious Corien!
xo
s
Lindsey says
1.I am SO EXCITED to hear that you’re writing a second book. Your first one was so inspiring:)
2.Great to see progress on your outdoor ceiling – it is going to be so beautiful when its done. I’m in the midst of doing coats of white on our soffit – not my favorite project but I’m looking forward to finishing soon!
3.All of your writing shows your poise and tact, and I have great respect for you because of it. Thanks so much for sharing every day – it’s a bright spot in my online reading:)
YoungHouseLove says
Thanks so much Lindsey!
xo
s
Courtney says
this was the first weekend since we moved in, that we didn’t do home improvement projects or go to a wedding! It was my husband’s birthday and we took it easy. But tonight, we spackle the 50+ nail holes in our bedroom and finally getting painting this week. So. Long. Overdue.
Susan (Between Naps on the Porch) says
Looking good! Love following this process!
Amy@TheBlissfulBee says
Woah! It took me a second to realize I was looking at the same room! The room looks 100 times bigger!
xo, amy
Tiffini S. says
Apparently my two year old twins LOVED this article. (Sorry!)
YoungHouseLove says
Haha!
xo
s
Shell says
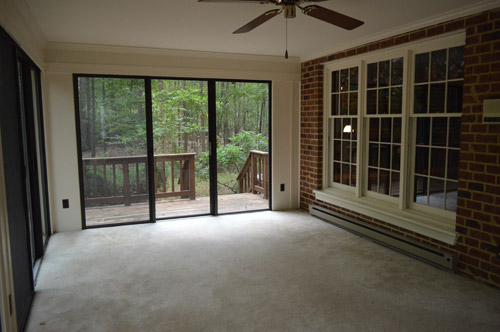
Are the 3 windows in the last 2 pictures (against the daybed) the ones that you plan on converting to french doors? Just trying to visualize this.
YoungHouseLove says
Those will probably remain windows (they lead into the living room and we don’t think we can give up that floor space to doors since there wouldn’t be a spot for the sofa to sit across from the TV) but the windows outside of the kitchen, which lead out to the deck, will be french doors someday!
xo
s
Claire O'Connor says
Great job, you two!! Do you find that you’re seeing more ambient light reflected into the living room now with the lofting progressing? No need to answer here, but perhaps in a future post?
P.S. Kudos to you for doing a beyond fabulous job with every little thang.
I know personally how challenging it can be to moderate, with human nature being what it is, and I applaud you on all fronts. I think you consistently handle things here maturely, professionally, kindly and authentically and I appreciate this about you.
So exciting to see this space come together!
YoungHouseLove says
Thanks so much Claire! It’s so hard to know what to do or say sometimes. If only blogging had a handbook! As for the light in the living room, we definitely get slightly more (nothing too bright since there’s still a huge awning in terms of the roof being there, but removing the screens and doors has definitely helped light pass through more easily – and our view from the sofa in the living room out those back windows is a lot less obscured now (more deer sightings! Haha!).
xo
s
LMN says
y’all have to put up with so much nonsense. :-) Love this post. AND I must say that omg Dexter. Last night was a perfect set up for the final 2 episodes. I’m thinking “sail off into the sunset”. And he is totally not a psychopath. I think that comes out as well. Happy Monday!
YoungHouseLove says
OH MY GOSH! Now I’m thinking (spoiler alert) that they’re setting Deb up to be working for the police again and I’m worried the force will catch on to Dexter and she’ll have to shoot him or something. Sort of like the Laguerta thing but instead of shooting the innocent person she’ll shoot him this time. Ackkkk!
xo,
s
LMN says
ohhhh nooooo. Deb would never kill Dexter. or she better not. I’ll hate on her fictional character forever if she does :-)
YoungHouseLove says
I know, I can’t imagine her doing it either, but I just have this feeling there will be some epic scene between them because girlfriends come and go, but this whole show has really been about the Deb/Dex dynamic.
xo
s
Becky says
I’m dying to see what the loft looks like from the outside. Did I miss that picture?
YoungHouseLove says
Sorry, you can see a shot on our House Tour page! It’s still the same as it looked when the doors were removed since from the outside the framing is still the same, so the lofted thing is mostly going to be enjoyed from inside the room.
xo
s
Kelly says
My weekend consisted of cleaning our exterior doors (they had never been finished and were still primed from the factory, circa 1985) and putting a first coat of paint on them. We’re not even to the drywall phase of our renovation, so having one task that feels “done” is very exciting! Two doors have the “outside” color (a bright turquoise), one has both sides painted (bright turquoise outside, off-black inside), and one more door on order once we realized it was riddled with rust and not worth repairing. I can’t wait to have our new primary entrance door looking the way we want them all to eventually! It really is the little things that keep you motivated to keep moving… :)
YoungHouseLove says
Sounds awesome! I bet it feels great to have that stuff checked off!
xo
s
Peggy McKee says
I’m always interested in technical details. Could you post a photo of the bracing etc that the carpenters did? I’m unclear what needed to be done or why the rafters were not up to code once the joists (non-load bearing) were down.
Many thanks, Peg
YoungHouseLove says
Good question, Peggy! The way they explained things is that sometimes code recommendations change over the years, so what passed three decades ago isn’t always up to today’s standards, so reinforcing things in a few places would make it more durable, even though it clearly wasn’t going to cave in tomorrow since it has lasted for thirty years already. It was just some added insurance, especially since the room will now be open and gusts of wind can pass right through it. So they added these hurricane ties to the beams along the base (where they hit the low part of the roof’s slope) and then bolted the top horizontal board to the house a bit more firmly (it was only nailed in a few places) and then used teco clips like this on each beam where it hits the board at the top of the roofline to keep that more secure as well.
xo
s
Lisa says
I worked on my dining room! primed, painted and started putting up my new wood blinds.paint is dolphin and wood trim is semi gloss white! My drill battery died, so I’ve put it off until I can finish. I love the what you’ve done with the outdoor space!
Sharon says
It has been so interesting and inspiring watching you two update your third house. I love your patience and energy in looking for ways to do it elegantly, simply, and watching the money. My husband and I retired 3 years ago. We live in a 28 year old house that at this point needs some updating. When you are our age, you have acquired many lovely things, but need to downsize your possessions. It has been frustrating, but your blog has really encouraged me to relax, take time to find inspirations, and go one step at a time. I never would have imagined the changes you made with the sunporch. Beautiful! Thank both of you for your wonderful character that shines through all of your posts. Enjoy your family while you take time to do this work. God Bless You all!
Amy says
Seven years ago I salvaged the original door from my grandmother’s house and this weekend I finally started stripping the layers and layers of paint off of it. I swear there are 20 layers of paint and at least 2 layers of straight glue on this thing. Hopefully it’s worth it in the end! I think it will be nice to have something sentimental in my new kitchen (we’re planning to use it as a closet door). Thanks for inspiring so many of us to take on these kinds of projects on our own. You guys are doing a great job and I’m so grateful you take us strangers along, step by step, on your personal home projects. Wait, did I just thank you for making my neck, back and entire arm sore? Did I mention how many layers of paint are on this door?
YoungHouseLove says
Haha! That sounds intense Amy! Good luck with that door – it sounds wonderfully sentimental. Hope it’s your favorite thing when you’re done!
xo
s
rachael says
Well, since you asked, we put up a bead board backsplash! We have yet to glue it in place, caulk and paint it, but in our defense we have two littles and one of them is teething and had a party to go to on Saturday night. Right the outlet covers are holding it on, but it looks SO pretty!
YoungHouseLove says
That’s awesome Rachael! We’ve seen one of those in person and loved it!
xo
s
Eri says
I imagine how it looks when the ceiling is done with beadboard, the floor with the tiles, and the space with some additional pieces of furniture… (and of course, a fireplace someday). Guys, that’s so fun!
Just wonder, does this sunroom-to-covered-patio project count as a “big” project or a “middle-range” project? In other words, am I right that the replenish-the-saving-account phase is mostly over? :) Cuz you know, $’00s projects here and there can add up quickly…
YoungHouseLove says
The sunroom’s budget is definitely coming from money that we saved up last year and set aside when we decided to buy this house (we had a hunk of savings for “off-the-bat and early-on projects” – so our replentish-the-savings-account is very much still in effect, and for down the line things like bathroom and kitchen renos we’ll re-save up and use new funds that we amass over times for those). To us there are those cheaper cosmetic updates, which are probably 95% of what we do to a house (like painting walls, updating light fixtures, getting new bedding, making curtains, buying a new rug, hanging art, etc) and then there are those “restructuring” projects that feel bigger to us because they require more money and time as well as “deeper DIY” (ex: bathroom and kitchen renos, laying a patio or building a deck, lofting a ceiling & retiling a sunroom, etc). So we usually tackle one to two of those a year among lots of other smaller projects, which allow our savings to build back up (2008: redid first house’s kitchen & opened a doorway, 2009: redid our basement, 2010: gutted the bathroom, 2011: laid our new house’s patio and redid that kitchen, 2012: built a deck, 2013: tackled a pergola & laid hardwoods here as well as embarking on this sunroom adventure).
xo
s
Bonnie says
Haha, I was skimming through and thought “Why is there a random picture of another room at the bottom of this post?” I didn’t realize it was the same place. Looks MUCH better!
YoungHouseLove says
Aw thanks Bonnie!
xo
s
Sharon says
What did we do this weekend? Well, we’re also remodeling a 1980’s house! Right now, we’re working on the builder grade finished basement. Eliminating it, actually, and starting over. It’s been a work in progress for 2 years and we’re seeing light at the end of the tunnel. (No one told us that remodeling was harder than starting from scratch.) So, this weekend, DH worked on sanding/painting the stairs. I was in charge of the aesthetics — should the risers be white or black? The stair treads white or black? Decided on white risers and black treads. Runner installation due in a couple of days. We have a deadline to meet! Whew!
YoungHouseLove says
That sounds amazing Sharon! Send pics for sure! I’d love to see how it turns out.
xo
s
Jennifer says
This looks so grand! I can really see it coming together now. And that photo of Clara is just adorbs!
Momcat says
Wow, I love how ambitious you two are! Not much scares off the Petersiks, that’s for sure!!
Quick (possibly dumb) question: You mentioned in your post you plan to re-insulate and hang beadboard. If this is an outdoor space, and if there is not living space above it, why would you spend time & money to re-insulate? I’m curious!
I have serious sunroom envy…….
YoungHouseLove says
We have all that leftover insulation that we took out when we removed the drywall ceiling in there which is in great shape, so we figure if shoving it up against those beams before adding beadboard on top of them will absorb some heat when the sun beats down on that room and result in a cooler space it’s probably worth it!
xo
s
Kathy says
Way to go John! – I agree, 10 a.m. on a weekend and it’s “lets wake up the neighbors!” haha. Side note, what’s happened to your Instagram feed? I’m only seeing like 2 or 3 pics the past week? Usually there’s one a day, or even more than one. My end or yours?
YoungHouseLove says
That’s just us! We’ve been busy running around painting, working on the sunroom, doing book stuff and showhouse stuff, along with getting Clara ready for her first week of school so we sort of dropped the ball on IG. Hope to have more pics once things settle down a bit!
xo,
s
Amy L. says
This is awesome, you guys! It really does change the space already. Can’t wait to see the finished product down the road.
Laura C says
Over the weekend I patched some water damaged plaster in the corner of my living room ceiling. It took forever. I hate doing projects on the ceiling – I always end up with plaster dust in my eyes (despite the goggles) and a stiff neck for days. Also, I don’t know if this happens to other people, but I always end up with bruised shins when I’m working on a ladder – from leaning forward against the top step.
Anyway, I think your beadboard ceiling is going to look amazing but I don’t envy the work you two will have to do to get there. I sure am looking forward to watching the process from the sidelines, though!
YoungHouseLove says
Agreed. Ceiling projects are the worst! Congrats on your plaster victory! And I get bruised shins too! Just checked with John and he agrees. I think someone needs to invent padded ladders asap.
xo
s