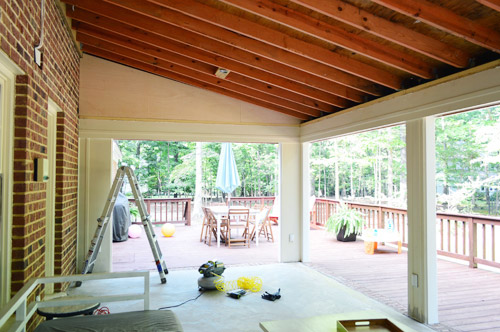
If those three things don’t sound like a great time, then I don’t know what does. Amiright? Anyway, we’ve shared a few peeks at the ceiling progress in our sunroom, but have yet to explain how we got there. Hold on to your hats and break out your graphing calculators!
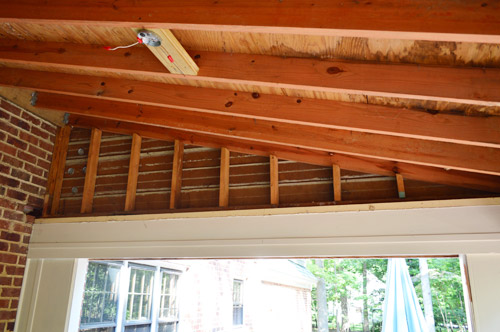
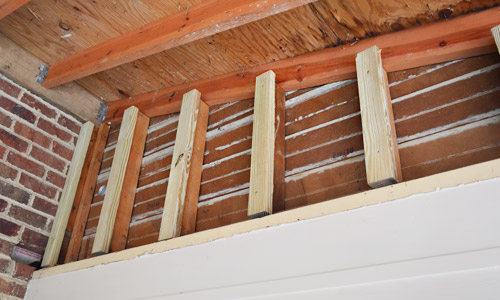
Just kidding about the calculators, because we actually left the engineering part of this job to a professional. The pro we referenced in this post was the builder we’re working with on the show home. He offered to pop by to give us his expert opinion, which boiled down to “those cross beams aren’t supporting the roof, they just created the framing for attaching the ceiling.” That’s exactly the news we were hoping to hear.
The news we didn’t want to hear were the tedious instructions that he gave for removing them and reinforcing the rafters up top (since the ceiling we were removing wasn’t load bearing but the rafters above it were a few decades old, a few additions would make it a lot stronger). It involved adding a lot of new hangers, ties, and bolts, which meant lots of nailing and drilling and ratcheting. Totally doable, just time consuming.
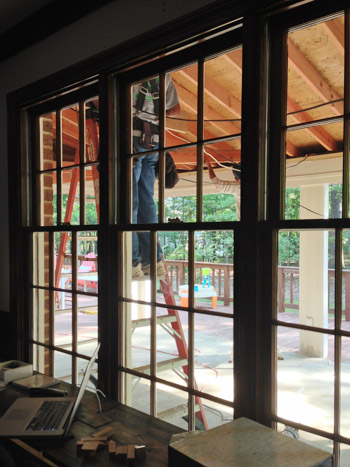
He recommended that we call one of the contractors that he uses a lot and get an estimate, just to weigh what it might cost to have a pro do the work (it would be faster since they’re more well practiced and already have the right tools). That contractor, David, said he could come by the next day and knock out the job with a second guy in 2 hours for $200. Um, SOLD. So within a few days of posting this update, this was happening outside our living room window.
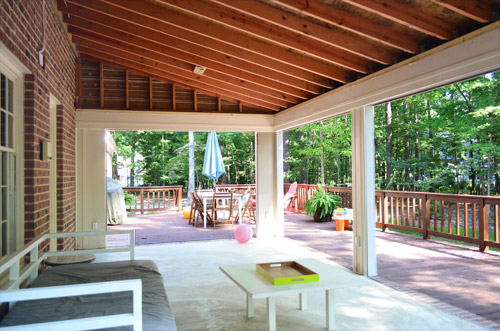
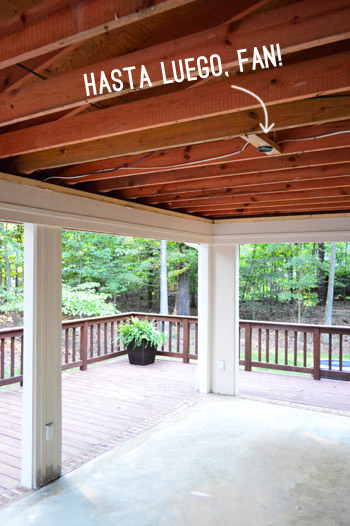
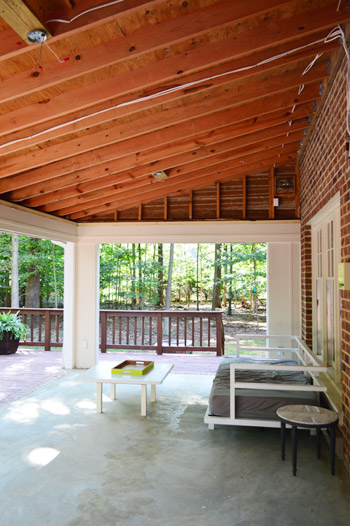
The difference was awesome. The room may have only gained about 4 feet of height on one side, but it feels so much more open compared to the before. Well, except for those dang fan wires ruining the view.
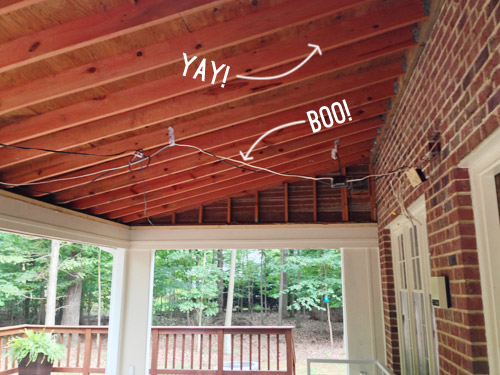
So we put a call into our favorite electrician and got his crew to not only extend the wires so they could be attached to the new/higher ceiling, but also to turn our one fan box into two so we can stay cooler in there (and to hopefully bug the bugs enough that they won’t want to fly into the room at all). We haven’t received the bill from them yet, but we’re guessing that it’s in the $250 range.
Going into this lofting project, we assumed it could be around 1K if we needed to make structural changes (like enforcing things with more beams, getting a permit, etc) not even including any electrical work that we might need to hire out – so it was definitely a lucky break to find out the ceiling framing was just cosmetic and wouldn’t require any extensive restructuring or even a permit to remove it. And getting those two pro-worthy jobs knocked out for around $450 while doing the initial drywall removal ourselves, as well as our plan to re-insulate, hang the fans, and install all of the ceiling beadboard ourselves means we’ll hopefully save a good chunk of change when this is all said and done.
The funny thing is that we realized a few months after moving into our second house we embarked on another outdoor project (laying our stone patio) which came in around $1,200 when we were finished – and with the cost of the tile and the beadboard added onto the expenses out here so far, it looks like this project could end up being right in the same ballpark. Dare I call it an exterior project tradition?
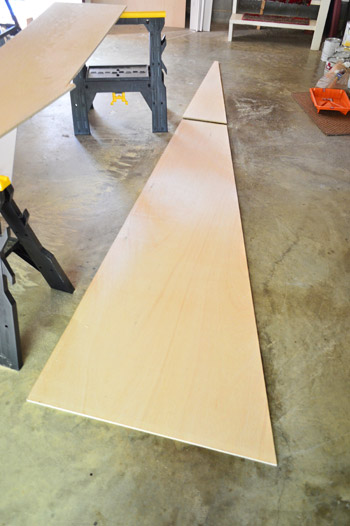
Anyway, with those two tasks taken care of, we could finally turn our attention to rebuilding our exposed ceiling. We decided to start with the two empty triangles on either end of the room, which we opted to cover with plywood that we could paint to match the rest of the room (since the rest of the space is framed out with plywood already).
Dealing with a triangular space sort of sent me into a mathematical tailspin. My brain immediately grasped for every bit of 9th grade geometry I could remember and I found myself furiously measuring angles, calculating hypotenuses, and trying to decide if I needed to remember what a cosine was.
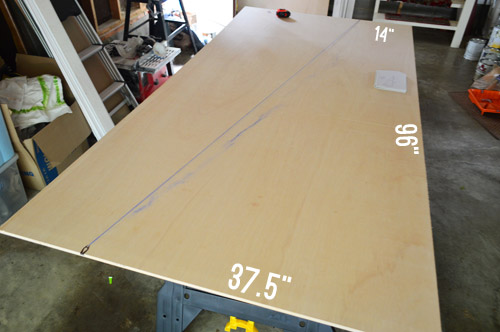
But soon enough I realized I was waaaaay over complicating things. All I needed to know was a few length measurements and I’d be fine. Since my plywood piece was only 8ft long (i.e. 96 inches) I knew I’d have to cut two pieces to fill the space. So I measured the height of the gap at one end (against the brick wall – 40.5″) and 8ft away from that end (17″), which you can see in my sketch below.

Since those two measurements went all of the way to the ceiling (and I didn’t need my board to go all of the way up thanks the beadboard ceiling that would eventually polish off the edges) I trimmed 3″ off those two numbers and marked them on either end of my plywood sheet. Then I snapped a chalk line to connect them.
And just like that the angle of my cut was determined for me. Time to break out the circular saw.

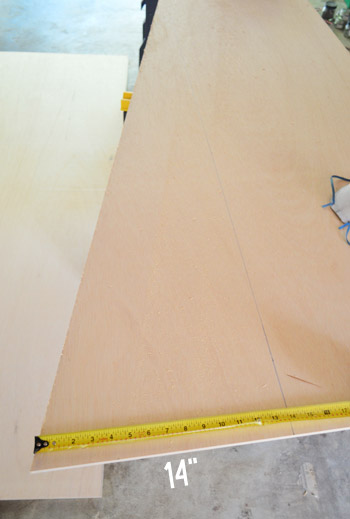
To cut the second piece, I took advantage of the fact that the “scrap” side of the plywood featured the same angle as the good side. So knowing that it needed to match up with the 14″ side of the first piece, I marked that on one side and drew a perpendicular line from there to the angled edge.
Once cut, I had my two pieces ready to be hung.
Well, not totally ready. First I had to build out the studs a bit so that my new pieces of plywood would sit flush with the existing wall. For this I just cut up a spare piece of 2 x 6″ and screwed them into place.
I was a a little nervous when it came time to actually test the fit of my board (such a big piece of plywood wasted by a bad cut would have been a big bummer).
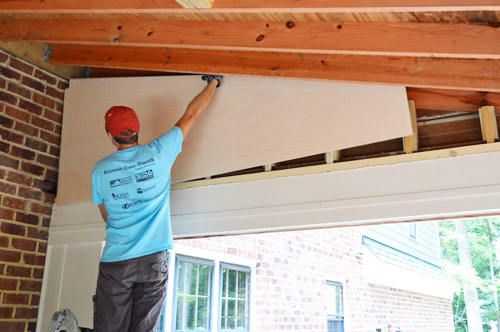
But luckily it went up like a glove (victory!) and I was able to temporarily nail it into place with some brad nails before going back and hammering in some more heavy duty nails by hand.
So here’s one side up (after having put up the small triangle too). You can’t see it here, but it’s not 100% seamless. There’s a line where the new plywood meets the old wall, along the bottom, which we plan to caulk and then cover with trim. And I’ll probably use Bondo or wood filler to try to make the small vertical line where the two pieces meet less visible too.
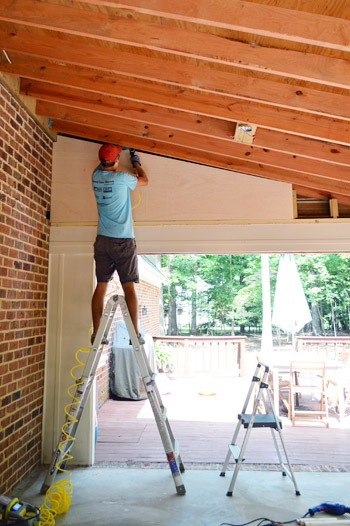
As much as I wanted to celebrate my geometric accomplishment, I had another side to take care of. Back to the drawing cutting board.
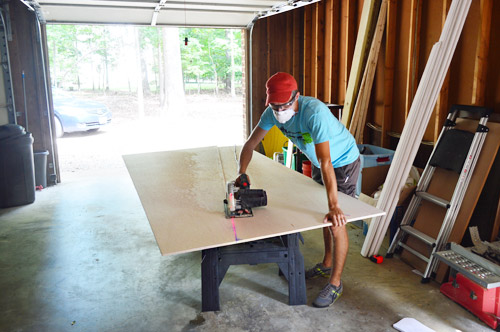
So here’s the other side done. It had the slight added challenge of having to cut a hole for an electrical box (something the electricians had to install to corral some of the wires and, for code reasons, it needs to be visible and accessible). Fortunately, once the plywood gets primed and painted white, we think it’ll blend in pretty well.
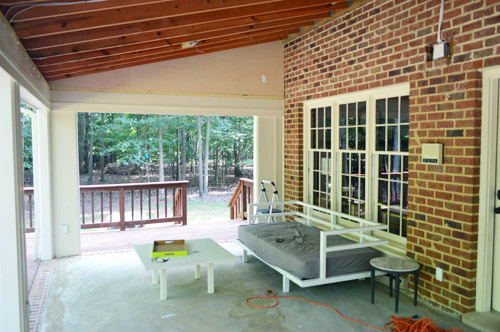
It’s amazing how much more open the room feels now that we’ve removed the doors and popped the ceiling. It doesn’t even feel like the same room.
Now that the boring/mathy part is out of the way, we can finally turn our attention to the light blue beadboard ceiling that we’ve been psyched to install. It’s going to involve pricing a few things out, measuring, priming, and painting before it’s ready to hang – so we’ll probably be back with an update on that early next week if all goes well. What did you guys work on this weekend?

John @ Our Home from Scratch says
I’m with you on the $200 deal. I love DIYing, but for the right price I’ll happily sit on my rear end and take pictures.
Nice plywood, btw. Looks like some quality stuff.
YoungHouseLove says
Thanks John! Home Depot did me right.
-John
Karen says
Ack!! Geometry!!
Kathy says
You two are the best. I truly can’t believe some of the comments today regarding today’s post.
There are silly people in the world.
Keep smiling, and know how much we appreciate your inspiration everyday.
Also, I really respect how you always keep in classy.
Until tomorrow,
-Kathy
YoungHouseLove says
Thanks Kathy!
xo
s
bethany says
you guys I feel like this is going to be your coolest project ever. Seriously. Sherry, mega props for dreaming this bad boy up!!!
YoungHouseLove says
Thanks Bethany!
xo
s
caroline [the diy nurse] says
Yay for affordable estimates! I love when something like a leak or vet visit doesnt cost the first child you were expecting to give up. Clara, sigh a sigh of relief child!
And shame on you for bringing the word ‘hypotnuse’ back into my vocabulary. My brain did a double take.
And then it melted.
YoungHouseLove says
Oh no, my brain melted last night during Dexter. Ahh! We can have runny craniums together.
xo
s
Julianne says
Looking amazing….can’t wait to see it all put together! :0)
MonW says
I’ve been painting and sealing some old bachelor days furniture.
*A small phone table with faux wood grain contact paper only on the drawer fronts, marker graffiti inside and on one drawer, burned key mark on top, and missing stain and sealer all over. I couldn’t do anything worse to it. Didn’t bother to distress it; it already looks distressed enough.
*Also redid a small side table with original horrid stain and sealer job. They were in a big hurry and only did the visible parts of the table, and missed a few of those. It’s awaiting another sanding and two more sealer coats.
Good learner furniture pieces.
Also visited multiple local thrift stores(ReStore, Goodwill) this weekend hunting for a cabinet with very specific dimensions for a “landing area” and for a full-sized headboard to redo.
What I found:
one giant terrarium-worthy wedding gift, (picture a big glass fluted urn for $8)
2 lamps to be rewired, repainted, and new shades.
Oh, and 8 more picture frames for that endless mantel/mantle. I am now prohibited from visiting the frames areas, at all. ;) Need to buy one 5×7 piece of glass, and paint 3-4 frames.
Random Craigslist thought: “WHY won’t people post the dimensions of their items in my area?”
YoungHouseLove says
Loved the recap! And I totally agree about the dimensions. We usually have to call or email about those!
xo
s
Sarah D says
Always happy to see some math love! The progress so far looks great. :)
Sarah says
Did I read that you were going to reinsulate an outdoor room?
YoungHouseLove says
We heard that insulating the roof before adding beadboard would help cut down on the heat in there since the sun beats down on the roof, but we’re still looking into it! Will keep you posted!
xo,
s
Chantel says
Well, I just look at the pictures of before and after and think… I would Never have thought to do that…
You guys are pretty cool!
Thanks for sharing all the stuff you are super brave to do!
And I just want to say that it is So awesome to get to work together with your spouse… I Love it!
Cindy says
The porch is looking great and I appreciate the nature with which the projects are broken up in your posts so they teach and reveal to us readers. Keep up the great work and I am always encouraged by the creativity, fun, and the awesomeness of how your completed projects look. Keep up the good work and don’t let the negative comments get you down. Love the blog and all the projects!!! Have a great day! :)
P.S. – I heard about the “Fox” song on the Bobby Bones show, then here it is on your web site, then this morning on the “Today Show”. Cool!
YoungHouseLove says
Thanks Cindy! Clara has now learned half the words to that song so out of nowhere we’ll hear “the secret of the fox…” It’s hilarious.
xo
s
Sylvia says
I can’t believe how HUGE it looks now. Before it looked like a pretty small room and now it just feels so grand!
Megan Poletti says
Yay! I can’t wait to see it come together. I was super productive this Sunday. I am working on some projects for my blog so I was out spray painting and hot gluing like mad. Plus I made a big pot of chili and also gave the squirmy dog a bath… It was a crazy day! I love being productive though.
YoungHouseLove says
Mmm, now I’m in the mood for chili!
xo
s
Megan Poletti says
If you make it with pulled pork you’ll never go back. Buy one of those pre-marinated pork tenderloins, put it in the crock pot for a few hours, add whatever chili-type things and I’m telling you…. it’s tasty stuff. I will never make chili with beef again.
Audra says
Looking great, can’t wait to see the big reveal.
Okay, don’t know if anyone else commented on this or not but that pic of John straddling the top step on the ladder? Ack! I would have freaked out and have to be rescued like a cat in a tree. That pic makes me dizzy just looking at it.
YoungHouseLove says
I’m a freak about heights too! When I’m that high on a ladder I’m holding into something with both hands and most likely whimpering softly.
xo
s
Kati says
Looks awesome, never surprised by what awesome work you both do! We are working on getting a mid century dresser ready to become our unborn daughters changing table. It smelled a little like old musty wood, so we decided to try ground coffee in cups for a couple of days in the drawers. Well now it smells like old musty wood and coffee! Mmmm! Do you have a suggestion to get the smell out? Thankfully we have around 2 months to get it done!
YoungHouseLove says
Oh no! I am a fan of white vinegar (spray the drawers and set them out in the hot sun to dry all day). Hope it helps!
xo
s
MonW says
I have heard some remedies that work the best (not needed them myself):
*pull the drawers out and take them and the dresser out into the sunshine. Haul them in and out for a few days to get freshened.
*scrub with a gallon of warm water. Scrub all surfaces finished or not. Rinse. Dry in sun.
*Vodka on a rag used as a wash on every surface inside and out. Cheaper vodka is more cost effective….. Dry thoroughly.
Also, remove any drawer liner paper, if present because it will hold scents.
As a last resort, stain blocking primer inside and out.
To prevent drawers sticking after painting inside and out, you’ll need to use paste wax- plain clear from the cleaning products aisle or a beeswax version on the wooden drawers and wood sliders inside if they lack modern runners. Sand the areas a bit and then apply a bit of wax and then buff for a shiny inspection day.
Just did this on mine today. I was surprised how well it worked, too.
Diana says
This room is going to look so amazing when it’s done!
As for my weekend projects…I learned how to fill cupcakes! I’d say that’s pretty productive. =)
MidloMel says
I’m so excited to read that you are doing a Richmond Home-a-rama house! That is sooo cool! I love those home tours. I will have to find out when it is and see yours!
I’m also crazy-jealous about this covered porch.
YoungHouseLove says
Thanks so much MidloMel! We can’t wait for that to get rolling so we can share all the photos as it comes together!
xo
s
Jasmin M says
OMG I just read that you are working on a new book! Yippee, I think when I emailed you I mentioned that I had bought 3 already…. yeah make that 6 now! I’m buying them as gifts for my friends, every time I show it to someone they want a copy. I better start saving now for version 2!!! Congrats you guys!!!
YoungHouseLove says
Thanks so much Jasmin! You’re so sweet!
xo
s
zuanthomas says
That looks awesome. I love to create a similar for my dream house.
Jenn (Student Mom) says
So glad the last pic was the before. I was quite sad that you’d gone and closed the whole thing in after all that work… Only when I noticed the ceiling did I realise…
G says
Hello! Sorry if this question was already asked. I hadn’t the patience to go through every comment ^^ I am wondering why didn’t you insulate those triangles? Does it seem unnecessary to you? (just curious, as I have been interested in those kind of issues lately) Thanks if you can respond me! :)
YoungHouseLove says
Since all of the sides of the sunroom are open we didn’t think insulation would do much good in behind those triangles of plywood, but we are planning to add insulation between the roof and the beadboard ceiling we’re adding, just so that when the sun beats down on the roof there’s something to absorb the heat for us from above.
xo
s
Emily @ Life on Food says
I cannot wait to see the final project. It has changed so much already. I love it when you get estimates for way less than expected – so much easier to have the professionals come in for some things.
Colette says
It most certainly is NOT the same room. It’s looking fabbo! Great work you guys.
Jill says
How did you make your daybed suitable to outdoor use? Is it a blowup mattress? Or is there a real mattress in there with outdoor linens?
YoungHouseLove says
We haven’t yet, but thankfully since the sunroom is like a big covered porch, the rain usually only gets about a foot into the room along the perimeter, so the daybed isn’t getting rained on. I’m planning to get one of those waterproof zip-on mattress covers and then an outdoor sheet for it I think – and it needs a new coat of paint so using something meant for the outdoors will probably help too!
xo
s
Lauren says
I am brand new to DIY, and this weekend braved ikea for some the Vittsjo shelves which I then laid out in my teeny tiny NYC apartment and hand painted with gold rub ‘n buff. No joke. It took forever, but they look incredible! The Rub ‘n Buff really makes them look antique gold and really high end!! My husband wasn’t pleased with the paint fumes, but the end result is completely worth it!
You guys inspired me to finally make something my own and I couldn’t be happier! Thank you!
YoungHouseLove says
That’s awesome Lauren! Sounds like they couldn’t have turned out better!
xo
s
Shannon [Our Home Notebook] says
It’s amazing how much more open this room feels now! I love your vision for this space.
Scott says
OK, it’s my first post to your blog.. I love it, been a creeper for at least a year… oh and just so you know, I secretly hate you and your ability to get things done. I have 2 DYI speeds: Done in one day or It’ll take a year… minimum.
So why post now… well, cause I didn’t see any other mention of it in the other posts… but.. It looks like (from the pic of John on the ladder) you’ve had water damage on the roof (underside of the plywood stain). I hope one of your contractor’s mentioned it, or the new shingles you guys had installed fixed any issues. Just wanna have you double check before you button up the ceiling.
Cheers and stay awesome Petersiks
scott
YoungHouseLove says
Thanks so much Scott! That’s from the old roof that we had replaced, so thankfully it wasn’t bad enough to warrant new plywood and the new roof took care of sealing things up for the long haul!
xo
s
Julia at Home on 129 Acres says
The Pythagorean theorem has been a topic of discussion in our house this week as my husband has started teaching math. He’s starting with review of triangles, so I’ve recently been quizzed on scalene, equilateral, isosceles. Occasionally I throw in rhombus just to be difficult.
YoungHouseLove says
Haha!
xo
s
Monica says
I love this before + after. You guys got vision. That is all!
Jennifer says
As hard as you two work in DIY’ing I’m glad you called the pro’s on this one!
Kim says
Sorry if this is a duplicate but have you thought about putting in skylights? I have seen a similar designed porch to yours at Dixie Design’s blog with skylights! Love your blog by the way!
YoungHouseLove says
Thanks so much Kim! We did think about skylights but we wondered if they’d defeat the purpose of the room a little bit since it’s a nice shady outdoor room for us to retreat to if the sun’s too bright on the nearby deck, so we thought it would be nice to have light come in from all sides (where we removed the doors) but wondered if we’ll actually appreciate not having light coming down from above in there for a more shaded spot.
xo
s
Kim says
For the skylights it was actually: http://dixiedelights.blogspot.com/
YoungHouseLove says
Thanks Kim!
xo
s
Seaweed & Raine says
What an incredible difference it all makes – and you’re not even finished yet! Woo!!! Rather like going from stuffy and old, to taking a breath of fresh air.
Sheree
Jordan says
That’s really coming along nicely. Is it your kitchen that is overlooking the back deck/overhang?
YoungHouseLove says
The living room shares windows with the newly opened sunroom (that door leads to the living room) and the kitchen is next to the deck (no awning there, so we can see right out the kitchen window to the side of the deck with the table).
xo
s
Claire says
I’m so excited to see what you guys do with the sunroom & your kitchen. Your kitchen layout is just like mine & I’d LOVE to have an outdoor space like your sunroom.
I know that you have decking surrounding your sunroom but what is the sunroom’s foundation? I’m nervous to build a covered sunroom with only wood/composite decking because I want materials that will last a long time.
YoungHouseLove says
All we can tell is that it’s bricked underneath to the ground. So I’m not sure exactly what kind of foundation is behind the brick because the crawl space doesn’t go back there.
-John