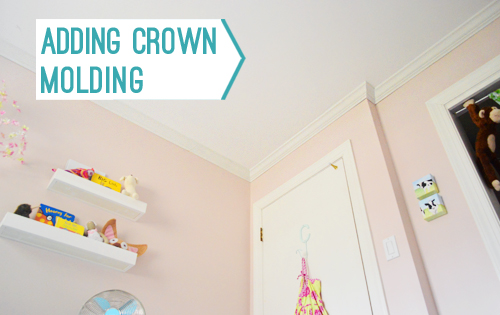
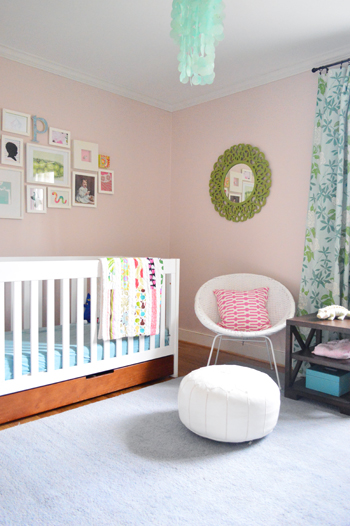
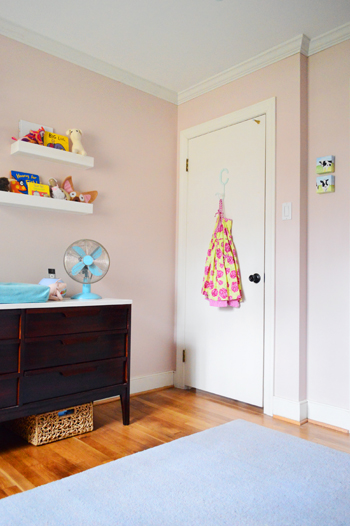
Feeling too nervous to install crown molding yourself? We were too. But we just installed crown molding in our daughter’s bedroom and it was surprisingly cheap to pull off (less than $100!) and easy to execute. *PATS SELF ON BACK*. All it takes is the right tools and some attention to detail.
So let me back up, tell you how I did it, and explain why installing crown molding went from one of my most dreaded projects to one I’ll surely be doing again.
Steps To Install Crown Molding
We’ll provide a more detailed photo and video tutorial below, but here are the basic steps to installing crown molding in any room:
- Select your crown molding
- Determine the angle of your cuts
- Set your cutting platform
Adding Crown Molding: Video Tutorial
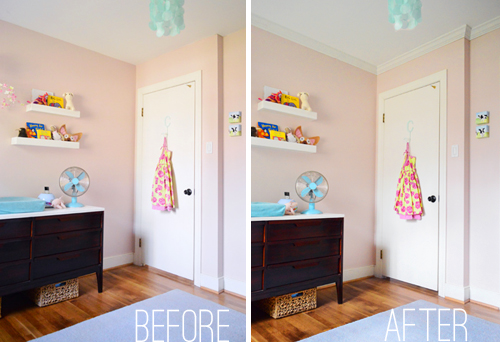
The photos in this post will show you how we installed crown in our daughter’s nursery, but it was so easy that we decided to do all of the other bedrooms too. So in the video below you can see each step in detail as we install crown molding in her big girl room.
Note: You can also watch this video on YouTube.
Selecting Your Crown Molding
I bought standard 3 5/8″ crown molding from Lowe’s because it appears to be what the previous owners installed in our other rooms. It’s almost the most affordable option available. There are other options with different profiles as well. Or, you can use this easy trick to make standard crown molding look thicker.

Each 8ft, pre-primed piece was about $9.50 so, including a couple of extras to cover my butt, my total material cost was $72.
Tools & Materials Needed
You can cut and install crown molding by hand, but simple power tools make this project MUCH faster. We used a miter saw like this one and a nail gun (the ones photographed in this post are no longer available, so I’ve updated these link to our current favorites).
- Miter saw
- Nail gun
- Kreg Crown-Pro
- Measuring tape
- Stud finder
- Pencil
- Caulk & caulk gun
- Paint
- Short handled paint brush
- Ladder or step stool
We already had a saw and nail gun on hand, but we did purchase the Kreg Crown-Pro. It was the real hero of this project!
How To Use A Kreg Crown Pro
I had read great reviews of the Kreg Crown Pro and considering my love of the Kreg Jig, I figured it was worth the $30 price tag to give it a go. Spoiler alert: I love this thing.
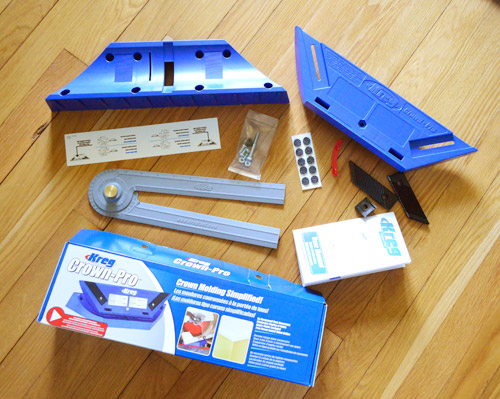
Once assembled (which takes all of five minutes) it looks like this. It creates an angled, adjustable platform so you can cut your crown molding at the same angle that it will sit against the wall. Sounds simple, and it is, but this is a huge help when it comes to cutting crown.
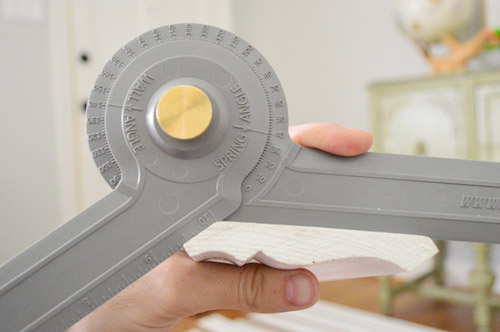
To find the angle the cutting guide should be set at Kreg includes an Angle-Finder tool so you can determine the “spring angle” – or the angle at which the crown leans away from your wall. Apparently, most moldings sit at either 38°, 45° or 52°. Mine was 38°.
Then you just use the red guide on the underside of the Crown Pro to match.
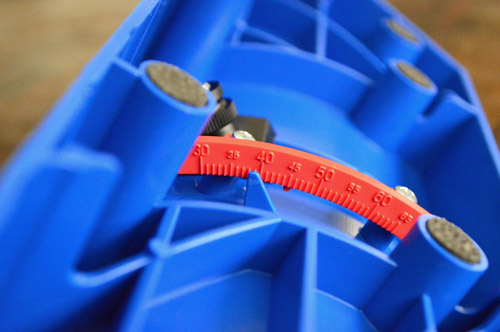
Now the cutting guide is ready to help you cut.
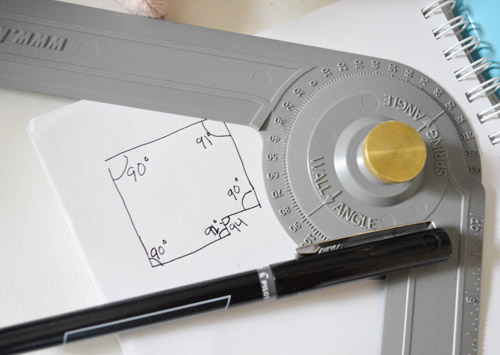
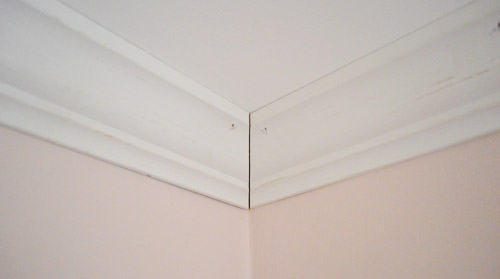
Determine Your Wall Angles
Before cutting anytime, measure and record the angles of each corner of your room. Walls aren’t perfect, so son’t assume every corner is exactly 90°. And these not-quite-right angles can mess you up if you’re not careful. Thankfully, you can use the same angle finding tool for this task.
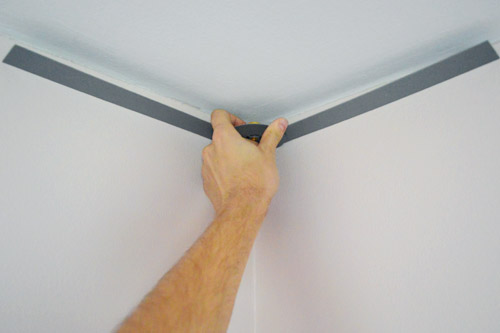
So after measuring and recording every angle, I could figure out how my miter saw should be turned to give me the right cuts. Luckily most of my corners were very close to 90°, so I could set my saw at 45° (half of 90°) for pretty much everything.
For the non-so-perfect corners there was a bit of extra math involved that I won’t get into here because it depends on how your particular saw is labeled, but the instruction booklet that came with the Kreg has a great illustration for this.
Measure Your Wall Lengths
Next, Sherry and I took precise length measurements from corner-to-corner of each wall using a tape measure. This goes MUCH faster with an extra set of hands or you could purchase an inexpensive laser tape measure tool.

We made a sketch of our room with every measurement to help us stay organized while we started cutting.
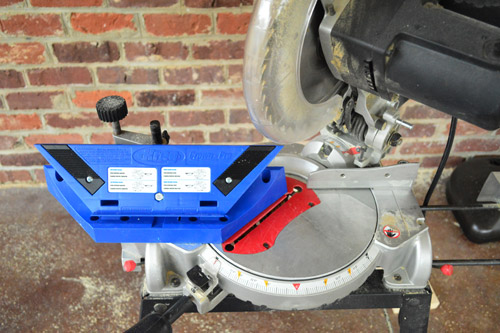
Set The Angle of Your Miter Saw
Since you’ll be cutting your molding on an angle, you’ll need to swing your miter saw blade to the left or right. Which way depends on what kind of corner you are adding molding to (inside vs outside) and which side of the corner your piece is going into (right vs left).
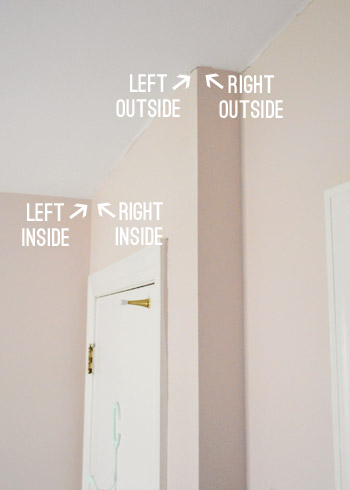
Luckily, the Kreg Crown Pro has a handy guide on the bottom. It shows exactly how your blade should be angled and where you should place your wood to get each of the four most popular cuts.
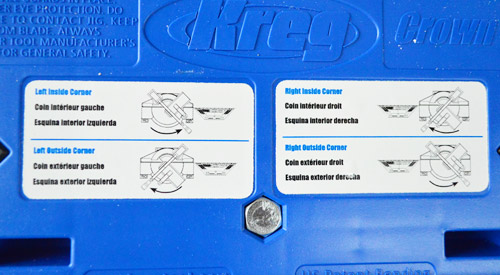
While you’re getting the hang of this, be sure to double check this guide before starting a cut to make sure you’ve got your saw set correcting.
Cutting Your Crown Molding
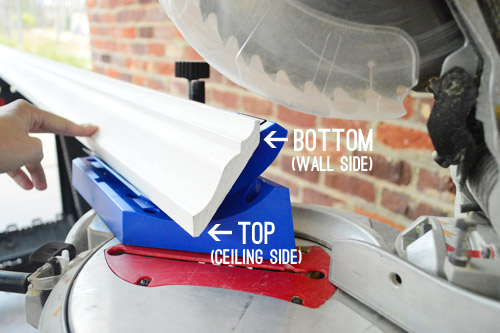
The other important thing to remember when cutting is to put your corwn molding pieces UPSIDE DOWN on the Crown Pro. This means the edge that sits against the ceiling is down on the bottom of your saw.
So with my measurements all taken, my Crown Pro all set up, and my saw blade angled I was finally ready to get cracking, er, crowning.

And remember the old adage: measure twice, cut once. Or, leave a little extra on your first cut. You can always shave off a little extra wood. You can’t add it back!
Nail Your Crown Molding In Place
Securing your cut crown pieces to the ceiling is easy, especially if you have a nail gun on hand. The one pictured was bought for our DIY board and batten project, but we’ve since upgraded to one that doesn’t require an air compressor.
We used 2″ 18-guage brad nails and placed a nail about every 12-16″ inches, hitting both the top and bottom edges of the crown. This keeps it tight to the ceiling and the wall.
I think it took me just about 2 hours to get all of the molding cut and nailed in place this time.
How To Make A Scarf Joint
One shortcoming of the Kreg tool is that it doesn’t address scarf joints. That’s when two pieces of crown meet along a straightaway, not at a corner. This happens when your wall is longer than your piece of molding. I could only fit 8ft pieces of crown in my car, so I had three of these joints in the room.
You’ll get a more seamless transition if you overlap the two pieces (like below) rather than simply butting them together.
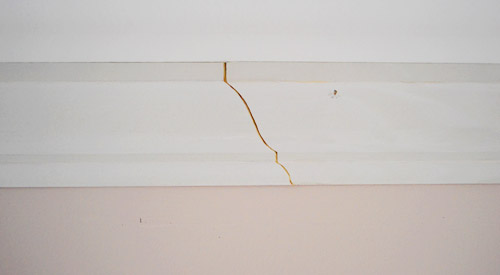
To achieve this, you’ll want to cut one side like an inside left corner and the other like an outside right corner. Or you can do switch left and right listed above, as long as they’re opposites.
Finish With Caulk & Paint
Once everything is hung, you’ll want to caulk the seams, gaps, and holes before you point. We used white paintable Dap caulk. Use a caulk gun in the following places:
- Where the crown meets the ceiling
- Where the crown meets the wall
- Where two pieces of crown meet
- Any nail holes (you could also use wood putty or spackle for this)
This will help hide any places your walls or ceilings are flat, while also giving you a seamless surface to apply paint.

See, much better. And the stuff isn’t even painted yet!

After the caulk dried, we used a small angled paintbrush to apply a coat of semigloss paint that matched the rest of the trim in the room.
Total Crown Molding Project Cost
Our material cost ended up being $67. Add the cost of the Kreg Crown Pro ($30)and my total project cost at just $97. Not bad! We’ve seen enough house listings that say “crown molding throughout” to know that it’s a nice selling point – and now we’re one room closer to a fully crowned house.
More Crown Molding Projects & How-Tos
Since first publishing this post, we’ve tackled a few other crown molding installations – include how to make beefier, more fancy looking molding. Check them out below:
- How To Install Chunky Crown Molding For An Upgraded Look
- Adding Crown Molding To Kitchen Cabinets
- Installing Crown Molding Around Built-In Bookcases
Does anyone have any tricks to their crown molding installations that they’d like to pass on? Or have you had a similarly discouraging first experience with crown, only to crack the crown molding code on your second attempt?

Tara says
A few weeks ago I installed crown molding in my master bathroom and I decided if I ever try it again I will definitely be buying a miter saw and that angle finder! Trying to use the miter box was such a pain. But I finished it and it looks great. I thought the hardest part was goig to be installing it, but that wasn’t too bad (I did it by myself using a hammer and nails!)
Clara’s room looks great!
YoungHouseLove says
That’s awesome Tara! It sounds so pretty – and it’s hard work using a hammer and nails! That’s how we did the crown in the kitchen and it was brutal!
xo
s
notSupermum says
Looks great. I didn’t know what crown molding was but now I realise it’s what we call ‘coving’ in England. We like to be different :)
YoungHouseLove says
Haha, I love that!
xo
s
mary @ B&G JOURNALS says
you guys are seriously real professionals now–you tackle such tough projects with ease, i’m so impressed! i wouldn’t have thought to let the wood pieces acclimate to the climate of your home for a week, thats a really great tip. i tried to do some floor trim that needed replacing in our tiny pantry at our old place, and those angled cuts in the corner did me in, i never got it right. this room is looking great!
YoungHouseLove says
Aw thanks so much Mary! We’re still just finding our way in this whole DIY thing (how did we just buy a nail gun last week?!?! Haha!). Trial and error seems to work though!
xo
s
Christina @ Homemade Ocean says
I had no idea you could do a whole room for under $100. Looks like crown molding is getting added to our to-do list!
YoungHouseLove says
Aw, good luck Christina! It makes such a difference (even more than these pics) in person!
xo
s
Maureen says
I love it! I went out and bought the same nail gun since you guys loved it so much. We have ZERO crown moulding, but that’s about to change. We also are going to replacing our base moulding in pretty much the entire house except one room. I wish I had the nail gun for when we did board and batten in our bathroom. Hammering in the boards really stinks!
YoungHouseLove says
Have fun with your new toy Maureen! Good luck with everything!
xo
s
Megan @ Rappsody in Rooms says
I am so impressed! This project still scares me but your handy dandy tool there does seem to simplify it. It looks so good! Maybe one day in my house…all of which is molding free. :(
YoungHouseLove says
You can totally do it Megan!
xo
s
Lil says
Lovely job…as always. I thought crown molding would be way more expensive…now you’ve got me thinking…
Question! I saw your nail gun in your previous post…did you already have the air compressor? Where did you get that? Details?
Thanks as always!
YoungHouseLove says
That came with it! All for $70! We just read reviews to find a really well rated but affordable one!
xo
s
Amanda B says
Great job on the crown! I had to smile at “probably not the closets”… I’m working on removing popcorn ceilings in my house, one room at a time. I did my master bath and bedroom recently, and my mom (who was helping me) pointed out that I’ll still have the popcorn in the closet. I decided this: I hope I always have more important things to do in my life than spend a weekend working on my closet ceiling! The popcorn on the ceiling in my closet will always be a reminder to me of the many blessings that fill my life!
YoungHouseLove says
Hahahahaha!
xo
s
Julianne says
Just a quick question. When we had crown moulding installed by a contractor he first put a 1×2 (or something like that) behind the moulding. Is that something you came across when researching installation?
YoungHouseLove says
Never heard of that! Anyone else heard of that?
xo
s
Julianne says
I replied on the wrong post! Easier to install backer board to studs and then moulding to backer board.
YoungHouseLove says
Interesting! Never heard of that! Rest assured it was really simple to do without any backerboard though! So it’s a way to save time/materials if you’d like to just go without it :)
xo
s
Jen says
I’e heard of it. Its called a cleat. You put it behind the moulding so you have something more hefty to nail into. And that way, you can secure the cleat to some studs or something.
Jayme @ Keeping Up With Myself says
I don’t get it. Why can’t you just lay the crown pieces flat on the jig and saw straight down at whatever length you need? I’m hopeless at understanding this kind of stuff :/
YoungHouseLove says
Since they hang on the wall at an angle (they’re not flat against the wall like baseboards, they literally angle out) the cuts would all be wrong and wouldn’t line up.
xo
s
Jayme @ Keeping Up With Myself says
Oh! Thanks, I was confused. Good thing y’all did this tutorial because if I ever tried this I never would have know until it was too late!
YoungHouseLove says
Sure thing! Good luck with everything Jayme!
xo
s
Diane @ Vintage Zest says
I love crown molding, but it totally intimidates me. Thanks for the tips so it’s not as scary!
Jillian says
Looks great!!! I am curious to know why you chose not cope this time around. I am finishing up my bathroom and didnt cope either, but I saw that you coped in the kitchen. Also, what compressor do you have?
Thanks,
YoungHouseLove says
The new tool (the Crown Pro) takes the place of coping! So much easier and faster! And the compressor came with the nail gun (all of it was $70). So helpful!
xo
s
Ardy says
We were doing this just last night in our powder room which I gutted and am almost done. Frustrating, but the tutorial you posted should render positive results! Thanks!
Noelle says
I have a pile of crown molding in a house I’m renovating right now that my previous “trim-guy” had installed upside down and attached with the flat part right on the wall, not even angled at the ceiling! I had him take it all down because obviously, he’d never installed crown before. I keep telling myself I’m just going to learn how to do it on my own but every video or home show I’ve watched scares me out of it. I’m feeling inspired to try it now that I know there’s a special tool out there! Great post!
YoungHouseLove says
Oh no! That’s terrible! Hope that the second time’s the charm!
xo
s
Danielle says
Crown molding looks great! A little off topic here, but I was wondering if you guys were still composting with your pallet system, and if you’ve had better luck with that or the original plastic bin system you used. Thanks for all the lovely posts!
YoungHouseLove says
Oh yes, it’s still going strong!
xo
s
Jamie says
We’re installing quarter round next weekend, so this post is right on time! Kind of off topic, but have you considered using a curtain rod and a floor-to-ceiling length panel for the reading nook/closet, just to balance out the drapes on the other side of the room? Just noticed that the tension rod was sagging a little (like they ALL do over time).
YoungHouseLove says
Oh yes, that could use a little upgrade for sure!
xo
s
Julianne says
Okay, I did some googling. Main reason: easier to find studs when first nailing up a backer board. Then, the crown moulding is nailed to the backer board, not studs and joists.
Julianne says
Ah, that was supposed to be a reply to my post. iPhone fail!
hjc says
The crown molding looks fantastic – congratulations on the second-time-around success! My favorite part of this post though is the proof that we both have great taste in pens. Yay Pilot Precise V5! Best pens ever!
Jeff H. says
Crown always makes a big difference. We just put it up in our family room and the technique that helped us the most was to cope the corners. Essentially you do a straight cut and a regular right inside corner cut. Then you use a coping saw to cut the back of the right side out so it fits perfectly regardless of if your corners are 90 deg or not. We wrote about it in more detail on our blog here: http://www.softpuppywarmhouse.com/2013/02/25/adding-the-crown/
YoungHouseLove says
Love that!
xo
s
John @ Our Home from Scratch says
Looks perfect!!
Pauline says
Have to show this post to my husband. We have been talking about putting crown molding in our bedrooms, but he is kind of dreading the project. With your great instructions and handy tools it should be much easier. Thanks for the info on the nail gun. My hubby has been wanting one for a long time and I seem to be unable to find the right one. Can’t wait to get started.
Koliti says
Beautiful! COOL tools rule!
I can relate to the flip-flop-which-angle crown-nundrum.
I liken it to the time-zone-daylight-savings conversion mind bend. Ouch!
Since John looks so sexy in his reading glasses, I can imagine that Sherry is looking for every oportunity to give him a new tool just so he has to read the instruction manual :)
YoungHouseLove says
Haha, amen!
xo
s
Denise says
After reading your post last week about your nail gun I ordered one on Thursday and it arrived on Friday just in time for us to install trim in the kitchen. My husband loves it and is very happy that it made the job go by so much quicker. I am going to use it this week myself and install trim and baseboard in the bathroom, I can’t wait to try it.
YoungHouseLove says
So glad!
xo
s
K says
Crown molding looks great! Where is the cute cow art from?
YoungHouseLove says
That’s from an insanely talented reader who painted that for us and made our mouths drop by hanging them to us at a signing. Aren’t they cute?
xo
s
Ammie says
I vote for putting crown in the laundry area! Bathrooms and closets seem good to skip, but i think it’d really finish off that cute little nook nicely, especially since it’s right at the kitchen and office which both have molding too. Plus, it’s so little, it’d be cheap!
YoungHouseLove says
True! I’ll have to work on John… hah!
xo
s
Emily says
Great post, guys! I would love to add crown molding throughout our house, but we have textured ceilings. Has anyone had any experience with this who could offer any tips?
YoungHouseLove says
Anyone have tips? I would think just caulking the line where the crown meets the ceiling would make it nice and seamless!
xo
s
Gretchen@BoxyColonial says
Ha! I can see the listing now….”4 bedroom brick ranch featuring crown molding in all closets….” Everyone will think it’s the latest thing and rush to put up their own ;)
YoungHouseLove says
Hahahah!
xo
s
Kim says
Looks amazing! Also… this is totally unrelated, but I was checking out some chairs at Target online and came across this: http://www.target.com/p/avington-upholstered-armless-accent-slipper-chair-gazebo-cloud-floral/-/A-13916598#prodSlot=large_1_24 That fabric has been popping up EVERYWHERE! You guys are such trend-setters :)
YoungHouseLove says
Aw, I love those chairs!
xo
s
Mindy says
Looks so good! It makes me want to crown my house as well. I better get saving my pennies. Good work!
Ida says
Looks awesome! Crown moulding is definitely a must have upgrade, IMHO.
Gretchen Brown says
Thanks SO MUCH for posting this, John! We are about to install crown in our new master bath and master bedroom. It is currently sitting in the basement getting to know our house. ;) I am ordering my husband that handy dandy Kreg tool RIGHT NOW! I am sure it will save many a curse word and frustration. THANKS for the tip! (And Kreg owes you a commission! ha!)
Lynn @ Our Useful Hands says
We have yet to tackle crown molding but doing new baseboards through 4 bedrooms and a 17′ long living room was enough back bending/breaking work for us to take a few months (March 9 makes our 1 year mark in the house!) off from even going down that aisle at Home D or Lowe’s. But the good thing is that now we have realized that large jobs like that we REALLY need to get them done in one shot before our bodies get hip to what’s going on and try to revolt. :)
My best, Lynn
* Oh and it looks super great in Clara’s room! A real classy finish…or almost finish.
Alyssa says
There are not enough hours in a day to explain how frustrating our first attempt at putting crown molding up in our sons bedroom was. Because it was so difficult and we never ended up figuring out how to do it, we ended up buying these corner pieces (not the decorative type that are usually longer than the crown itself) where the two pieces if crown molding slide into the back of the corner pieces. We have stained dark wood trim throughout our house, so we just stained those corner pieces to match. They actually look seamless up against the trim and I’m so happy with them. (They are shaped like the corners of the trim would be, so you just cut the trim straight across which is easy!) however, we do have plans to put some crown molding in our master, so I’m mentally bookmarking this post to refer back to it and we will give it another try! I think we even bought that kreg tool and still couldn’t figure it out…I wonder if my hubby read those instructions?! Probably not! Lol
YoungHouseLove says
Oh man, that sounds rough!
xo
s
Emily Ehlers says
Trying to remember/figure out which way to cut the wood so the edges match up is the hardest part! When we were adding molding to rooms in my mom’s house we were constantly having to start over and recut. It didn’t seem to matter how many times we swiveled the saw blade or flipped the molding..we were bound to mess one up once in a while! Seeing these suggestions (and everybody else’s in the comments!) will be so helpful in the future.
The room looks great!
Kerry says
We have had crown molding sitting in our basement for at least a year. My husband has been putting off the project partly due to the difficulty of cutting the angles for the corners. Thanks for sharing the tip about the Kreg Crown-Pro. I’m forwarding this post to my husband with hopes that it will motivate him to finally cross this project off the list!
Kelly says
This is AWESOME. That tool is just what we need. Our family room has crown molding, but it was a PAIN to install for the same reasons you had trouble. The measuring and angles are SO confusing!
Erin @ The Impatient Gardener says
OOH, such a timely post. We’re about to put crown in our kitchen (the cabinet guy will do it on top the cabinets but we’re doing the rest of the room to save money). Crown molding is not cheap so $30 for a tool to help us is well worth it if it keeps us from screwing up expensive boards. I’m all over that. Thanks for the tips.
Melissa S says
We have yet to tackle crown, but we’ve redone all the door and window casing and almost all of the floor trim, we also caulk the joints, but occasionally run into it shrinking up months later… We use the DAP ALEX white paintable caulk, I know you mention DAP is this what you are using? Or have you seen this issue before?
YoungHouseLove says
Hmm, that sounds strange that it shrinks months later (sometimes things shrink when they dry and then you reapply them a few hours later for a flush look). We use Dap paintable caulk for moldings/windows/doors and have had luck with it so far (we used it in our first house too, and years later it was in good shape). Hope it helps!
xo
s
LMG says
I just wanted to take a moment to say THANK YOU for posts like this–whenever I start a home project by myself I come here first to see if you guys have done it so I can learn from your successes and mistakes. I’ve saved myself a significant chunk of time and money over the past few years.
YoungHouseLove says
You’re welcome LMG! Happy to help.
-John
John says
Nice job! Looks like John got a little sketch book, great idea. He should date each little project to look back on some day.
Katrina says
Looks great! This is one of the projects we want to tackle in our bedrooms :) Thanks for the tool tip :)
Rosie says
Beautiful! I have a dumb question … what is that saw called that you are using? does it come with the attached table? is it useful for things other than molding? and is there an easy way to do crown molding without it? Maybe that was four dumb questions. :)
YoungHouseLove says
It’s a miter saw. It comes with the table and everything. You can do molding without it (with a miter saw and a miter box) but it takes more work/time :)
xo
s
John says
If you can’t stop there is always the mancave basement to add crown molding.
YoungHouseLove says
Haha!
xo
s
Daria says
Crown molding always make a room look better! You did a great job.
deb says
How would you handle walls that have angles up?? They are not all the walls but just one wall. Can you cut to have it follow along or would that look weird?
YoungHouseLove says
Hmm, we haven’t tackled anything like that. Anyone have advice for Deb?
xo
s
LauraC says
That’s exactly why our house will (probably) never have crown molding. Both our upstairs bedrooms have 2/4 walls sloped, and our living room and dining room have coved ceilings (which we love). Sorry I’m not any help, just letting you know you’re not the only one with that issue!
Nichole K says
Could you do a picture rail (not right at the top of the wall) then paint the wall above the railing and the sloped ceiling a lighter color? Sort of like this house crash in their dining room? https://www.younghouselove.com/2012/12/house-crashing-lovely-at-last/
Tara says
Looks great! I grew up in a house with crown molding and just noticed how lonely my current rental is without it.
Dianne says
THANK YOU! Breaking the task into bites of information, which you both do so well, makes the difficult seem simple. My next lumber/hardware store purchase: Kreg crown molding kit. It looks excellent — job well done.
YoungHouseLove says
Thanks Dianne! Happy to help.
-John
Pam in NC says
we bought new kitchen cabinets from a big-box stores and they sold us crown molding to finish them up
we hung the cabinets and then we realized the cabinets were never meant to have crown molding (cuss-word!).
I think with this tutorial, we might be able to make the crown molding work – crossing my fingers!
YoungHouseLove says
Good luck Pam!
xo
s
Jeanna says
The crown looks so great :)
Rachael says
This looks awesome!! Great job! We are house hunting and whenever we look at fixer-uppers, I think in my head “John and Sherry would totally change this and that…”. It’s been super helpful, so thanks for being the voices in my head! ;)
xo Rachael
Home Sweet Harbor
waterlooheather says
Oh my goodness. I think I’m in love… A man who reads instruction manuals?! I die!
xo
Heather
YoungHouseLove says
Haha, I know right?! Not to worry, he only seems to read them when things like broken limbs can result in not following them (he ignores Ikea assembly instructions like the best of them, haha).
xo
s