We did it. Holy cats, we did it.
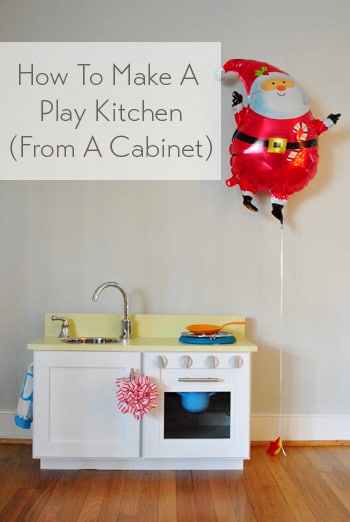
Just a few days before Christmas we started Clara’s homemade play-kitchen (in secret of course, since she thinks Santa brought it)… and we actually finished it on Christmas Eve! Yes folks, it was a Christmas miracle. We went into it with a goal of spending under $99 since this basic play-kitchen from Ikea is that price – but we wanted to add a bit more detail like oven knobs that actually turn, an oven light that goes on and off, a wire baking rack inside the oven instead of a shelf, and a real faucet (not plumbed of course, but movable!). So here’s how we made our own little Clara version in the last 72 hours before Christmas, for what ended up being $74.
More pics in a moment (lots more!), but first the dirty details. The core of our homemade kitchen was initially going to be a real kitchen cabinet, so we had it around already (yessss!). It was actually the one we bought for $14 from the Habitat For Humanity ReStore when we intended to hang a big microwave next to our pantry. Heck, we even hung it temporarily when determining where we wanted the electrician to add our microwave plug a while back.
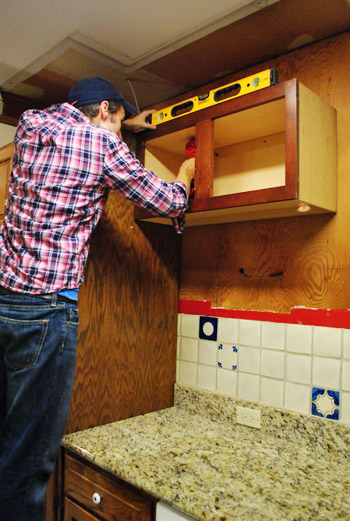
But in the end it never got used (since we opted for a smaller microwave – more on that here) so we hung onto it in preparation for its eventual rebirth as a play kitchen.
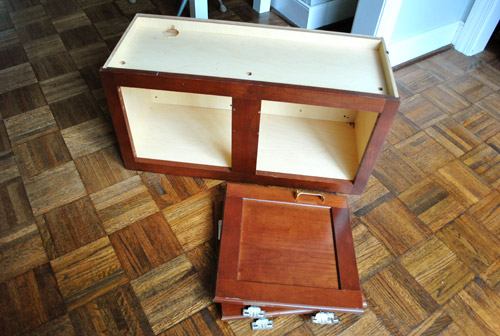
It was a little low (only 15″) so we began by building it up on the bottom with a quick box made out of a 1 x 4″ remnant that we had in the basement. We offset it from the front a bit so it would even look like a real base cabinet in a kitchen (toekick and all).
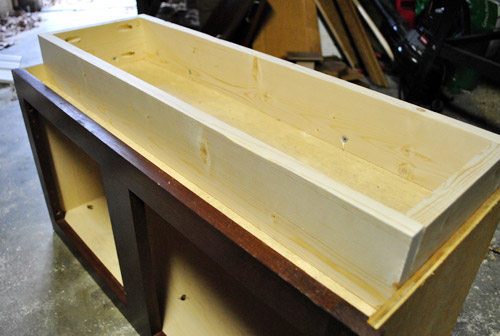
John also had a spare 1 x 12″ board in his scrap wood pile that, when paired with a leftover plank from our desk-building project, fit perfectly as a counter and low backsplash. Well, perfectly once they were cut down a bit.
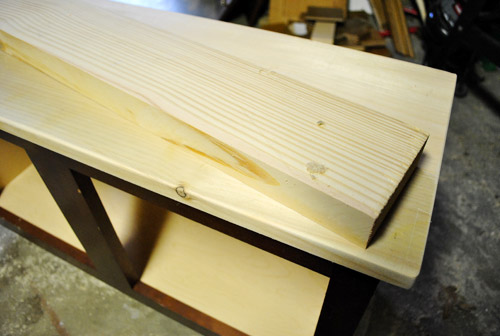
Picture me rubbing my hands together maniacally and saying things like “it’s all going according to plan!”
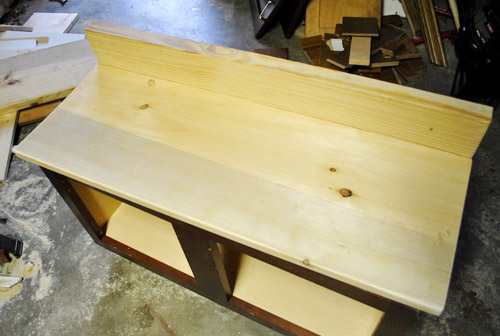
But before attaching all that, we had to build our sink area. We hit up the ReStore again and snagged a real faucet and handle for $10 (and inadvertently crashed their company Christmas party in the process – sorry ReStorians, thanks for letting us quickly grab that faucet!). We thought those two real kitchen features paired with a metal bowl (found at Target for $7) would make for a purty chrome and stainless steel kitchen sink area. Only the best for our girl. Haha.
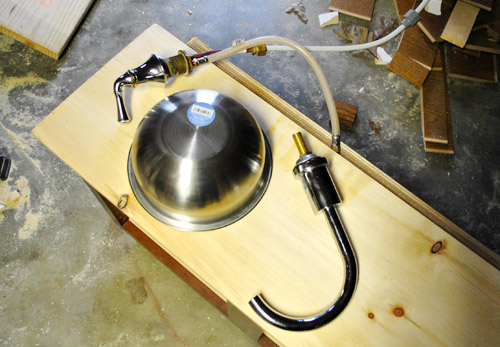
After tracing around the lip of the bowl, John jigsawed a hole just inside the line (so the edge of the bowl had something to rest on). It didn’t have to be perfect since the bowl would be covering it.
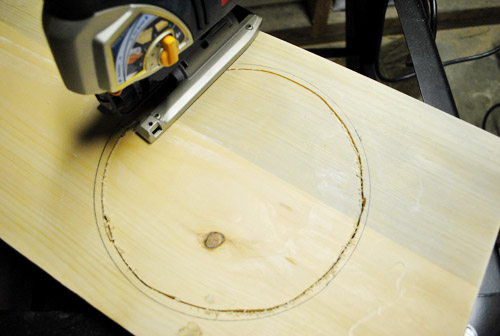
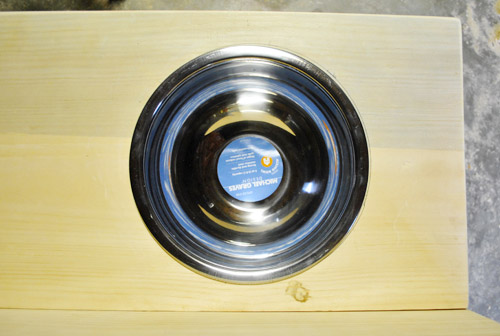
After cutting matching holes in both the counter and the cabinet top (and sanding them both smooth), the bowl was officially transformed into a sink – just by dropping it in.
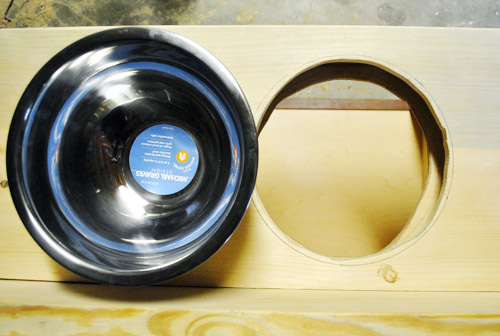
I wish I had peeled that sticker off for this pic, but you get the idea.
Adapting the sink hardware was also pretty straightforward. The faucet was pretty much ready to go, but the handle had lots of tubing that was just going to be in the way under the counter.
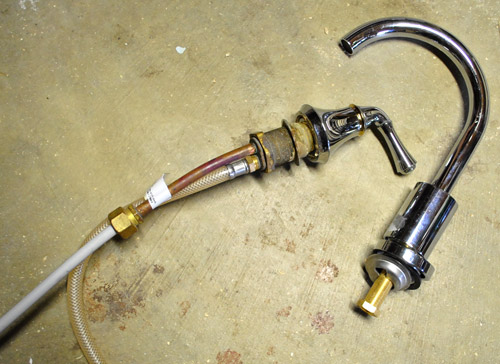
Luckily, with a wrench and a copper pipe cutter we removed the excess mumbo jumbo. Oh, and since the bottom of the fixture will be concealed between the top of the cabinet and the counter we don’t have to worry about Clara messing with it.
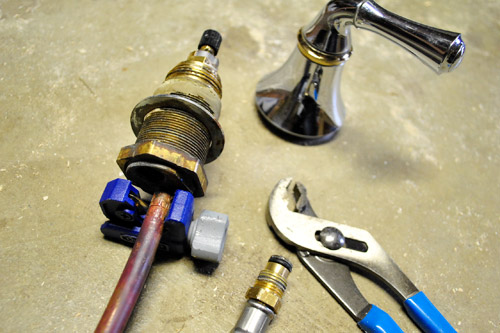
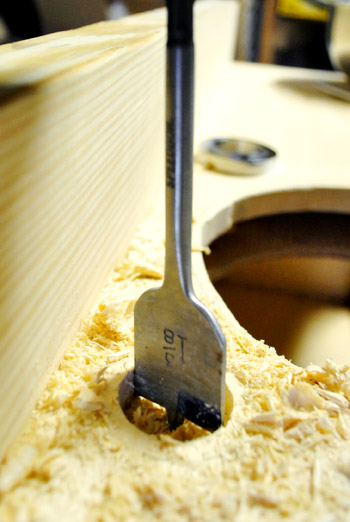
Then it just took drilling some holes…
…and securing both fixtures to the underside of the counter (though the handle was so thick it required an extra block of wood to keep it secured).
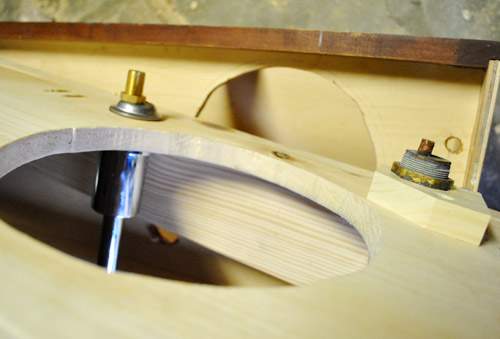
Now that we could finally secure the counter to the cabinet, it was starting to look like a play kitchen! So yes, this is where we got all weird / annoying / giddy / hyper.
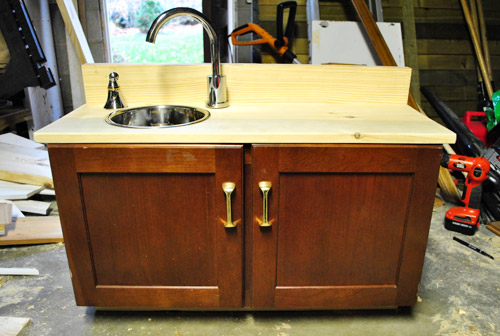
But just wait, there’s more excitement in store. Check this out…
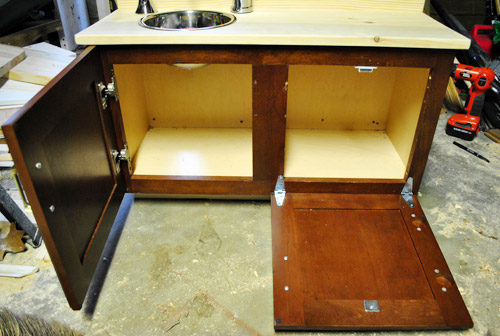
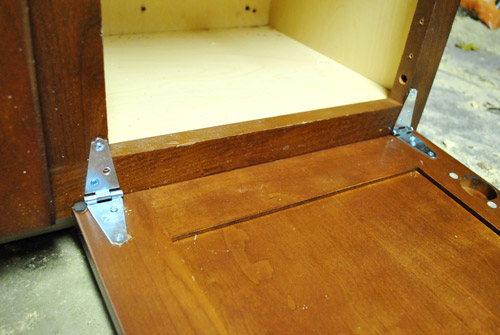
Every play kitchen needs an oven right? So we bought some $3 fence hinges to convert one door to open downwards.
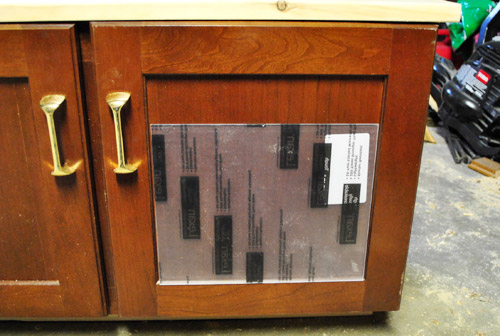
And we also snagged a piece of pre-cut plexi from Home Depot (for just $3!) so that we could give Clara’s oven a proper window (the girl’s gotta check on her souffles). We completely lucked out that this pre-cut pane was the perfect size.
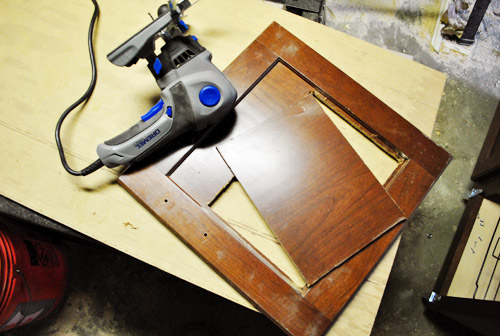
We weren’t so lucky when cutting the hole for the plexi though. John can’t figure out if it’s him or his Dremel Trio, but he has trouble getting straight cuts sometimes (his words, not mine). It looked okay from a distance…
…but up close he was less than happy with it. Yes, there may have even been some hushed cursing.
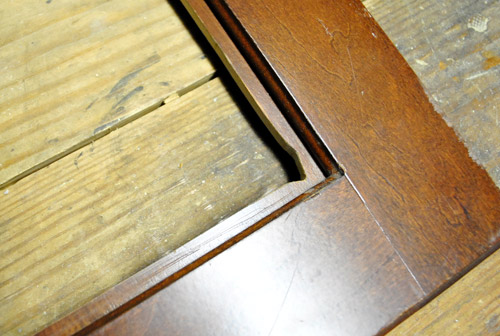
So after a dash to the craft store (we had to buy materials for some oven knobs anyway) we grabbed some thin pieces of craft wood and cut a miniature frame to trim out the imperfect opening. Huzzah for Plan B!
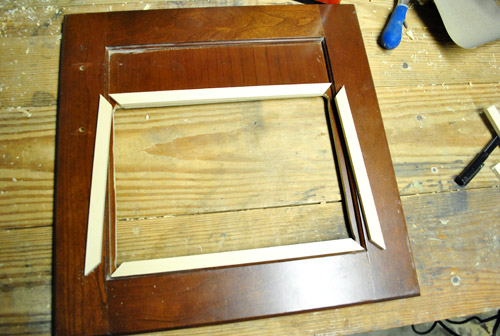
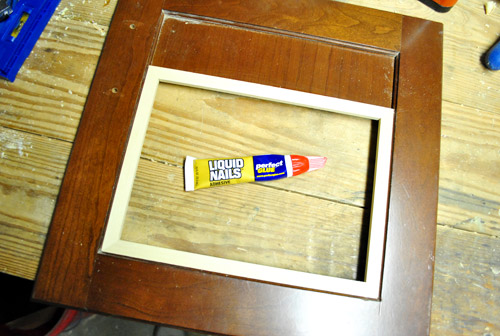
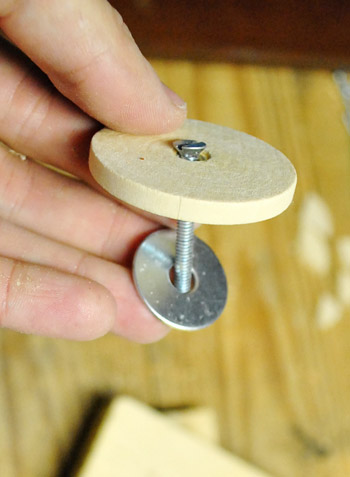
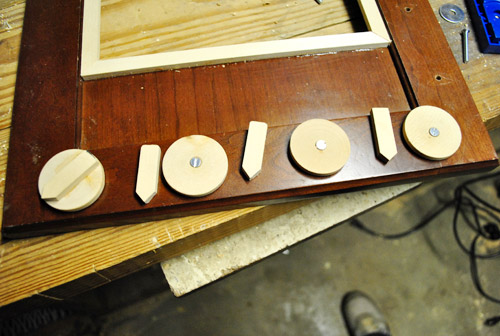
We didn’t want to actually attach the plexi until we were done priming and painting, so it was onto making some knobs for the oven. I guess knobs are usually for a stove, but we figured it wouldn’t hurt to have something for Clara to spin and interact with. So we took some small wood discs from Ben Franklin (for $2) and drilled a hole in the center for a washer and bolt.
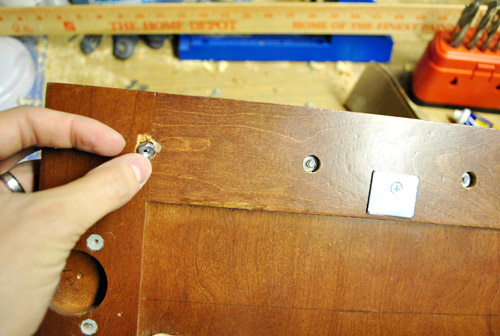
Luck was back in our favor when it came to drilling holes for the nut on the back of the oven door. The Kreg Jig drillbit (which has a small pilot drill on the tip before becoming larger) made the perfect sized holes for not only sinking the nut into the door (since our oven wouldn’t close if they weren’t flush) but also kept the nuts from spinning too, which made attaching everything really easy.
Final attachment of the knobs wouldn’t happen ’til after painting, but here’s a preview (check out the assembled one on the left). John used some of the leftover craft wood (that he had from the Plan B oven window frame) to cut some little arrows that would later get glued over the bolt head on each knob. But back to these in a minute.
Now that everything was constructed, we snuck it upstairs to the sunroom after Clara was asleep and primed the whole darn thing (after patching some holes with wood putty). It was actually not that bad since we were in priming and painting mode for our real kitchen too. Then it was painting time, and we did all those finishing touches like gluing in the oven plexiglass and adding hardware over the next 48 hours.
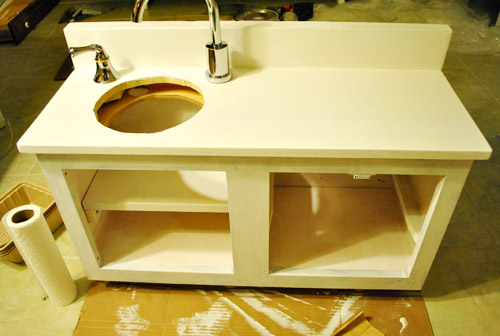
The rest of the finishing touches are easier to explain while looking at the “after” kitchen, so through the magic of the Internet we’ll fast forward a bit:
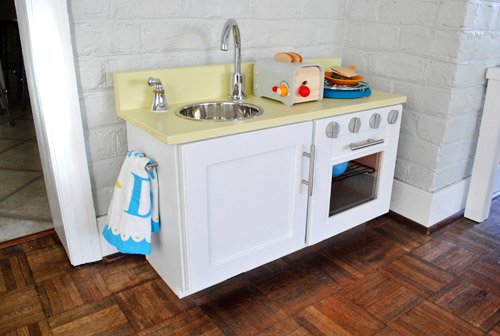
We primed and painted it using leftover paint that we already had. The top is our kitchen wall color (Sesame by Benjamin Moore) and the base is the same stuff we used for our office cabinets (Benjamin Moore’s Advance paint in Decorator’s White in a satin finish). We painted the inside of the pantry Sesame also, but did the oven in a medium grey thanks to a test pot of paint that we had leftover from grey-washing our living room beams (in Benjamin Moore’s Shaker Gray). It’s sort of hard to see in the pics, but in person the gray oven and the grellow cabinet are fun little details to help each side feel more defined.
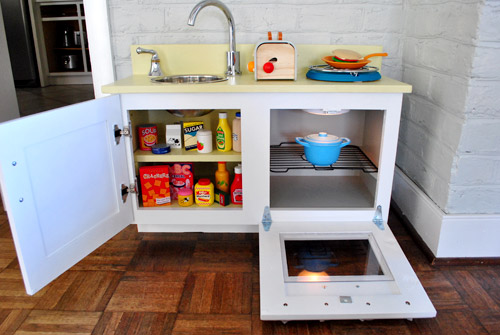
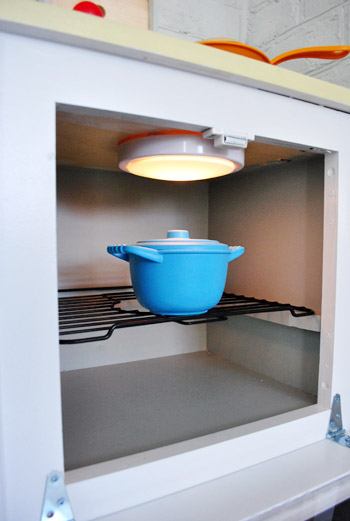
To dress up the inside of the oven we used heavy duty velcro to hold up a simple tap light, so Clara can actually “turn the oven on” just by pushing it. We also found this black wire shelf (it’s actually one of those bottom-of-the-sink drying trays) at Target for $5. It definitely helps things feel more oven-ish in there.
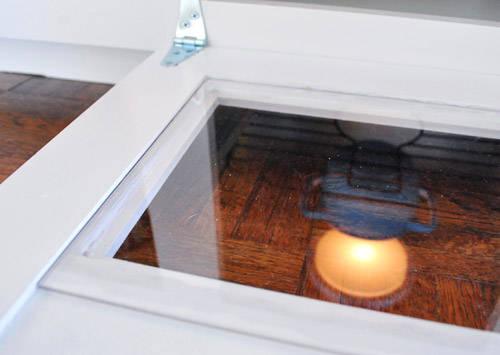
Oh, and here’s what the plexi-glass looks like from the back. We just used some clear silicone caulk to adhere it to the backside. That keeps it in place, but is totally invisible from the front thanks to the blessing-in-disguise frame that John had to add. Three cheers for happy accidents along the way.
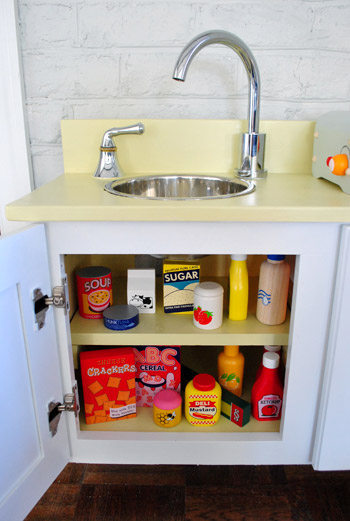
We also whipped up a last-minute shelf on the sink side when we realized that most of the play food Clara was getting from her grandparents (they sweetly offered to give play-kitchen-themed Christmas gifts, knowing what we had up our sleeves) would be dwarfed by one big open cabinet. She’s got the basics covered… soup, cereal, crackers, pasta, tuna, sugar, milk (oh wait, maybe this girl needs a fridge someday…).
We opted not to add a stovetop so that she’d have more flexible-to-use-for-other-stuff-too counter space (you know, for mixing and setting out dishes, etc). It has already been a handy choice because there’s room to house the play toaster her Grammy and Tom-Tom bought her for Christmas (yes, it’s kind of the cutest thing we’ve ever seen). But I did make her a makeshift hot plate of sorts, so she has one burner to play with (instead of four space-hogging circles). What does she use it for? To fry sandwiches, apparently.
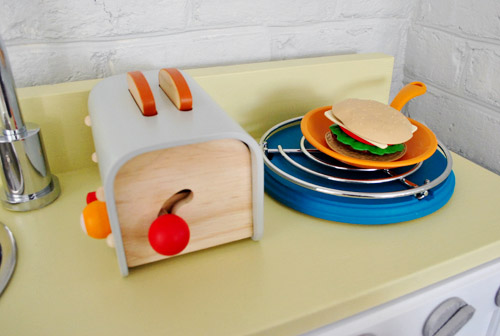
All that little DIY hot plate entailed was buying a $5 trivet from Bed Bath & Beyond and a $4 round of wood from Michael’s (which I painted teal with leftover paint from this project) and then drilled into it in three spots (to allow the feet of the trivet to “sink” inside the wood round so it was nice and solid). Then I used a flat washer and a screw to hold the trivet into the round of wood from the center. Voila: instant burner.
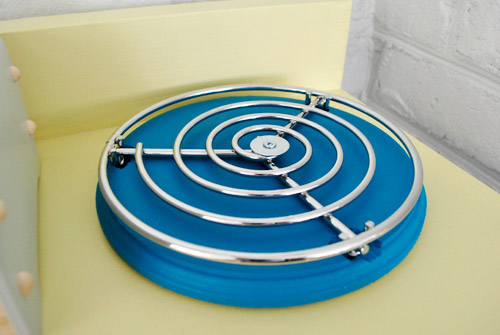
Oh and I used little felt furniture feet on the bottom of my burner (to lift it up ever so slightly to keep it from scratching the counter) which you can sort of see in the picture below.
Here’s a closer look at the final oven knobs too. I sprayed them with leftover spray paint (Rustoleum’s Titanium Silver that we bought to test on our old kitchen hardware). It’s not a perfect match to the new shiny chrome door hardware ($5 each from Home Depot) and our sleek sink and faucet, but it’s close enough. And it sort of glitters, which is semi-adorable (new rule: every play kitchen should have at least one glittering element).
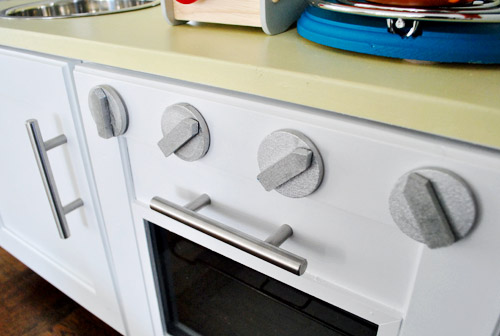
We actually bought three of those Home Depot door handles so that one could act as a towel bar on the side of the sink. Little details like that were kind of my favorite part. As for hatching this whole kitchen plan, John and I took Clara and Burger for a nice long walk and chatted about things we could add to “our kitchen” (didn’t want to spoil the play-kitchen surprise for Clara) which is how we came up with things like the towel bar, the wire rack, the oven tap light, all the other little details like those spinning knobs that we thought would make it Clara’s favorite thing ever. The brainstorming part of a project is always my favorite. So much possibility…
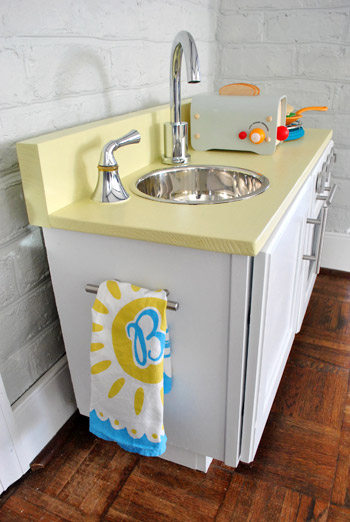
So now I think you’ve see just about every nook and cranny of this puppy (can you tell we’re proud of it?)…
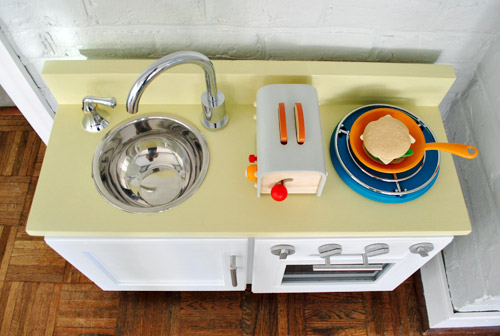
So how about a budget breakdown?
- Secondhand cabinet (from the ReStore): $14
- Secondhand faucet & handle (also from the ReStore): $10
- Stainless sink bowl (from Target): $7
- Oven knobs and frame (from Ben Franklin craft store): $5
- Hinges for oven door (from Home Depot): $3
- Pre-cut plexiglass and wood trim for oven window (from Home Depot): $4
- Wire oven shelf (from Target): $5
- Tap light for the oven (from Home Depot): $2
- Wood counter, backsplash, and toe kick: $0 (already owned scrap lumber, but it might be $15 or so to buy it all)
- Trivet (from Bed Bath & beyond) and wood round (from Michael’s) for hot plate: $9
- Three hardware handles for oven, cabinet, and towel bar (from Home Depot): $15
- Primer and paint for counter, cabinets, and hot plate: $0 (already owned, but a few $4 paint testers would do the trick if you needed to buy it)
- Miscellaneous wood pantry items (by Plan Toys): $0 (Christmas gift from Grammy and Tom Tom, but they might cost around $15 if you were to buy them)
- Play toaster (also by Plan Toys): $0 (another super thoughtful gift from John’s parents!)
- Total project cost: $74
And as they say in the commercials, watching Clara play with what Santa brought her: priceless.
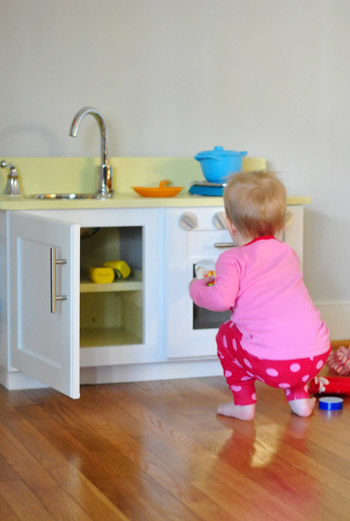
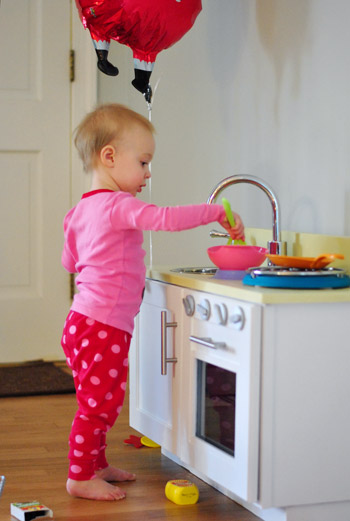
If only a certain larger kitchen were this easy to knock out. Oh well, I guess that’s the difference between one cabinet and 20 of them. But I gotta say that this little guy is getting a ton of action. Stuffed animals regularly get bathed in the sink, fake slices of lettuce and tomato get toasted, boxes of cereal and crackers get baked in the oven, and random cars, balls, and trains get stuffed into the pantry cabinet. It’s also really nice to have a little “Clara zone” shaping up along the living room wall right off of the kitchen (we moved it to the wall on the left side of her new desk after Christmas). Good stuff.
Oh and oddly enough, folks ask us all the time what we want to “parlay” this blog-thing into, and for the past few years we’ve never really known how to answer that question because we love blogging as-is (we don’t want a TV show or anything – ack, that makes us break out in hives – so, we’ve actually turned those opportunities down a few times). But I can honestly say that “designing” Clara’s desk and her play kitchen have been hugely amazing and fun projects for both of us. So for once I might have an answer the next time someone asks what sort of side projects we’d love to end up doing in a decade or two (right along with the blog of course, since YHL = our first baby). Designing cute and affordable kid furniture (which seems to be surprisingly hard to find for some reason) might just be the sweet spot. Ya never know, right? So I’m just putting that out there into the universe. Who knows where we’ll end up…

Monika says
Are you guys for real? This is the cutest thing EVER! You never cease to amaze me! Yey for that!
Sherry from BC says
Love this…..It is so much nicer than the plastic stuff on the market and the knobs are great. Hope you do fix up the kids furniture market…..It would be great to have affordable, well made stuff instead of pink and purple plastic.
Cherri T. says
Much cuter than the Ikea version. Adorable!
tjack says
Such a great idea! Kid furniture would be something I would purchase, especially at such an affordable price. I mean even if you doubled the price it would be affordable for how great it looks!
Maybe you guys could make some things on an individual order basis? That way you can feel it out to see if it is what you might like doing. I would love to see a kid fridge someday.
So so cute!
Liz says
It turned out great! So much cuter than what you can buy in the store. I made a play kitchen for my daughter’s second birthday back in April based on Ana White’s plans. It was the first thing I ever built (so don’t look too closely :))
http://www.flickr.com/photos/65952314@N04/6629199885/in/photostream
YoungHouseLove says
It looks great! Love those handles on the fridge especially.
-John
Steph says
Liz! That kitchen is SO adorable… I’d keep it out in the open as home decor! :) Great job!
Nic says
This truly warms my heart. I love, love, love that you guys put so much, well, LOVE into this project for your sweet girl. My mother talks about how her mother used to make dolls for her and her sisters at Christmas and how much they cherished them. Clara will treasure this kitchen!
Karla@{TheClassyWoman) says
I love this play kitchen! Yours is so much better than the Ikea version. So great how the light comes on in the oven!
Thx for sharing the video. Wow, Clara speaks really well for her age-you have one smart little cookie on your hands and she’s adorable! :)
Ashley @ sunnysideshlee.com says
Clara is too cute. Omg! I love hearing her talk!! :)
Annalea says
Kids’ furniture would be awesome! And Ikea-style flat-pack kits would be rockin’, too. That might make high-end/healthy/no-voc components a lot more affordable. Maybe kits that took some DIY’ing, as well? You guys would be awesome.
And don’t forget that you’d have people knocking your doors down for mood boards and design advice . . .
Crystal says
So precious! The creativity of you two continues to amaze me! And seeing that adorable little smile is so much fun!
Jazmin says
Oh, my goodness! First or all, Clara is talking now!!! haha, I’m such a dork! I have followed her growth, and I feel like she’s my niece or something! She’s sooo cute! Okay, and that kitchen is way better than my REAL kitchen! Lucky Clara to have such crafty parents!
Jazmin
Gretchen says
This is so cute! I can’t believe that you guys made that so wonderfully and so quickly!
Khia says
I think that this is the cutest, most creative thing that I have ever seen on any blog. Awesome job! I wish you guys were my parents ;-)
Happy New Year!
K
Jamie@WrightHouseAffairs.com says
Ohmygosh! This is maybe the cutest thing I have ever seen. Well done…It would never occur to me make one of these- you two are too clever!
Janelle@domesticallyseasoned says
That is just amazing! Totally envy here. When can we come over for a play datE?
heather s. says
Great job! I’ve seen many DIY kitchens for kids and always love them.
Jess M. says
This is the CUTEST thing I’ve ever seen!! Once again…nice job you two :D I am definitely inspired to make this for our baby girl (she loves to help me put garlic in the pan & calls out salt & pepper when I’m cooking)!
Beth/Tributary Handmade says
This is so great! Thanks for posting all the pictures of the process. Wonderful project! (Loving that toaster, too!)
Darcy says
Happy New Year, to one of my favorite families!
Absolutely A-DOR-A-BLE!! That is the best play kitchen I have ever seen, and I completely agree on the kids furniture making biz being in your futures! I know I would buy pretty much anything that you would make!!
I think my son would love that kitchen too — he got pots and pans from santa, and he plays with them on his little toy BBQ set, but I think he totally needs a kitchen!
And that video of christmas morning is one of the cutest things I’ve ever seen! LOVE the Santa balloon – wish I’d have thougtht of that! My fav part — beans and cereal!!! LOL! :-)
Emily says
Oh my gosh you guys. I teared up watching Clara. Totally did. I can’t believe she’s so big. You guys did an AMAZING job! So much love went into that kitchen, we can totally tell.
As far as manuscript encouragement: home stretch, you can do it!! We’re all routing for you!
I told my husband this morning I was having anxiety that you guys were going to wear yourselves out with everything you’ve got going, so please for the love of all that is DIY and holy, TAKE A VACATION! lol xoxo.
Erin @ The Impatient Gardener says
Super cute! I love that Christmas morning is like a red carpet event in your house with the papparazzi snapping photos. Does Clara seriously wake up that happy every morning? That’s amazing. I love that you didn’t cut corners on that little kitchen. Most parents would have had that little mess up and just thought “oh well, she’ll never notice” but not you guys. Great detail and so well done. I can’t imagine how much Clara will treasure these moments when she’s “old” and sentimental like I am. And the fact that it’s all on video will make it that much more special. Good job, Santa!
Debbie says
Wow this is the best gift you could have given Clara!
Candice says
That little kitchen is the cutest thing I’ve ever seen. Much nicer than the one from IKEA. Clara is a lucky girl to have such great parents.
Janelle D says
John & Sherrrrrrry! This is adorable. My favorite part is the bowl sink. Clara is a lucky girl.
Karen F says
where do I start?? the play kitchen is seriously awesome (SOOO much cuter than the plastic monstrosity I have), and that video is priceless! Nice work, guys!
Tonya@mycozylittlefarmhouse says
That is absolutely adorable. Clara is one lucky little girl. She doesn’t have to settle for generic mass produced toys when her creative parents can build her something unique!
Nadine says
Brilliant! Clara is a lucky girl, and she’s so cute!!! Congratulations and a very Happy New Year!
Kim says
Adorable!
Larissa says
This is wonderful!!! I can’t believe you gave Santa and his elves all the credit. :)
GreenInOC says
This is SO sweet! How weird is it that the video made me cry?! I love her telling you all about it!
Tania says
The posts of your Clara projects are some of my favorites (I teared up at the one about the stamping in her closet). My parents and I built a doll-house together (after seeing a $300 one at Toys R Us) when I was about six or seven and to this day, it is still one of my fondest childhood memories. I know Clara will treasure this play kitchen. We’re expecting our first in February (thanks for the tip on the BabyMod line at Walmart!) so I am hoping there might be a YHL line available when our little one is ready for things like this! Great job, guys!
Kelly says
You two really are amazing DIYers and amazing parents.
What a lovely gift for Clara. Kudos!
:-)
Megan says
This is the cutest thing ever!
Laura says
amazing!!! congratulations on your creation!
Corie says
Um… yeah, you did it! And HOLY MACKEREL! What a good job! I could not love it more!
And yes, yes, yes! Design children’s furniture to look just like adult furniture/something an adult would chose themselves BUT make it kiddie-sized and awesome!
Lauren M. says
Wow…all I can say is that you guys are amazing! Clara is a lucky lady :)
MyersMaison.blogspot.com
Diana says
This is so cute:) I still couldn’t believe how cheap this was compare to the Ikea kitchen. I pin this on to my Pinterest.
Lita says
Okay, that picture with Clara with her little polka dotted bum sticking out as she peers into the oven is the cutest! She made me smile here at my desk!
amanda says
That looks so awesome, I wanna play with it! The turning knobs were a good idea, she really enjoyed those. I love the video, babies are just so fun to watch. Clara is only one right (she’s so tall, it’s hard to tell!)? If so, I’m excited for next year since my nephew will be one. He already got a ton of gifts this year, but it’s more fun when they are involved.
Also, on the previous post about cabinets, I can tell it’s gonna look awesome with the green walls and white kitchen! Very excited!
Cara says
That is soooo cute! I plan on building my little girl one too. Of course she is only 6 weeks old so I have time!
Melissa says
Seriously?! Your play kitchen is adorable and Clara talking is super sweet. I have a soft spot for play kitchens, especially the hand made ones, as my dad made one for me as a child. Yours is a bit more modern though. Cheers to a happy and healthy new year:)
Mallory says
That is out of control cute!!! Wow, serious props to you guys for putting that together!!
Amie says
This is wonderful! It’s so much like the kitchen Dad made my sister and I. He used old cabinets as well, and it was in two pieces, the stove and oven and sink and cupboard. We had many uses for the playset, from Barbie store to Pet store (yes, we put our cats in there, and had the Barbies go shopping for pet tigers), Lego Fortress to Worm Farm (Mom wasn’t crazy about that one). Clara will love it forever, and cherish it all the more because you made it for her.
Amanda says
Great job! I love the moveable burner and the over details. I transformed a little cabinet into a kitchen for my kids a few months ago (http://namesakedesign.blogspot.com/2011/03/lets-get-cooking.html). They love playing with it. I may have to upgrade my oven with a light and plexi window :)
YoungHouseLove says
So cute! What a great piece to start with. Wish Clara had some “upper” cabinets!
-John
Melissa Dale says
OMG- LOVE the Christmas morning video- how precious!! Thank you for sharing. It is obvious that the adorable kitchen was made with so much love for your little one:))
Now, any suggestions for how to go about a DIY workshop for a three year old boy?
Would love to hear your ideas!
YoungHouseLove says
I bet you could use a similar method. Skip the sink step, maybe leave the wood top as is – or stained. Instead of an oven, leave one (or both) sides open. Swap the low backsplash for a tall section of pegboard with hooks for hanging tool. Sounds like fun!
-John
Monique says
WOW. Gorgeous! Love the video of Clara too.
Vidya says
Aww…thats super duper cute. I was almost in tears while reading trying to imagine how you guys would have felt making it. You did an awesome job. Wish I was this handy when my daughter asked for a play kitchen. We just totally steered her away from the idea as we did not want to spend $$$ on plastic junk.
Robyn says
ADORABLE!! Cutest lil’ kitchen ever!
jrm says
Just adding to the chorus that I too love Clara’s kitchen. Fits perfectly in that little nook.
Diana says
You two are the most clever, amazing people! It’s like whatever you dream up can become a reality! Love, love the new kitchen for Clara, and her Christmas morning reaction is so precious! Love how Clara knew immediately what to do with the knobs on her new appliance! Did you notice the concentration? :)