It has been nearly a month since we talked about stenciling the floor in our sink nook (we’re all over the place lately – Clara’s room, outdoor tiling, installing our stair runner, landscaping adventures, starting in on the kitchen, etc) but that doesn’t mean we were done in there. We had a few more bullets to check off:
- sealing those stenciled floors
- loading in the closet after the floors dried (hopefully with more function/storage instead of the stuff we thoughtlessly shoved in there when we moved)
- updating the vanity with more function as well as a fresh finish (up close it was in pretty rough shape, and we thought we could gain more function from that empty cubby on the right side if we added some inexpensive shelves)
So to knock that first bullet off the list, Sherry used a small foam roller to apply two thin and even coats of SafeCoat Acrylaq to the floor (that’s our favorite non-toxic eco poly). She rolled those on about 24 hours apart, and wore a respirator just because it wasn’t fully odorless. It went on pretty fast, and she started in the furthest corner of the closet and just rolled her way out of the room. Then we blocked it off while it dried so we didn’t end up with puppy paw prints in it.
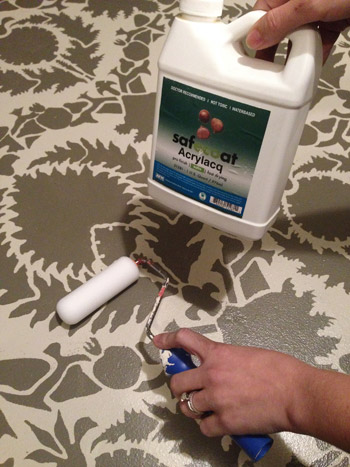
It has been a nice protective final step that has made us less worried about any chips or drips (heck, I was even able to scrape off a dried staining splatter later without damaging the stencil).
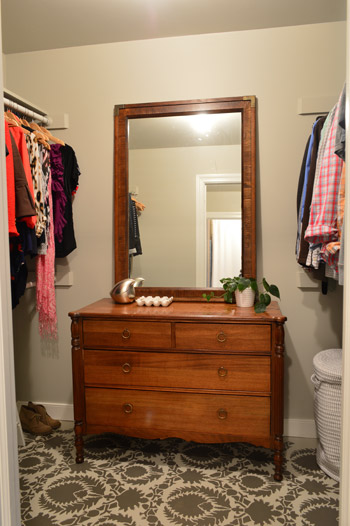
Once the floor sealer was fully cured (we waited around 72 hours) we could load in the closet, and this time we tried to be more thoughtful about what went where, and what would be the most functional. Bringing in a dresser and a mirror as well as a laundry room basket to use as a hamper really helped to make it a lot more storage-friendly than a bunch of random bins and piles. Although this dresser will probably end up in the nursery and our new West Elm dresser will most likely make its way in here after we add that wall of built-ins around our bed down the line.
Here’s a shot of Sherry’s side:
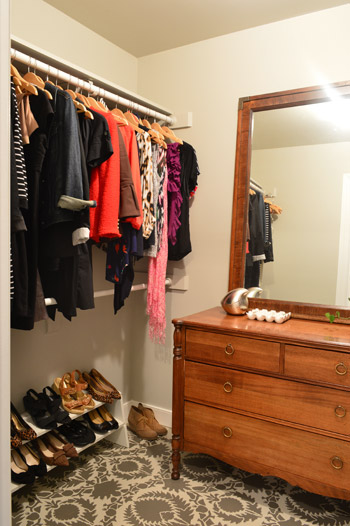
And my side (note the difference in shoe quantities):
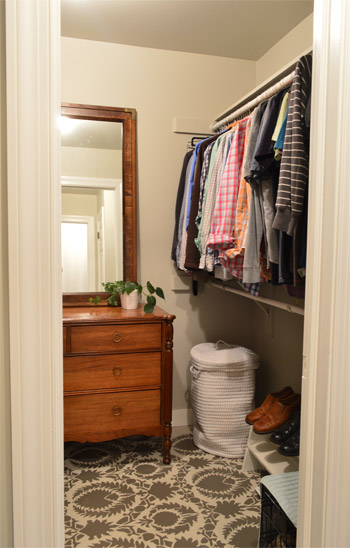
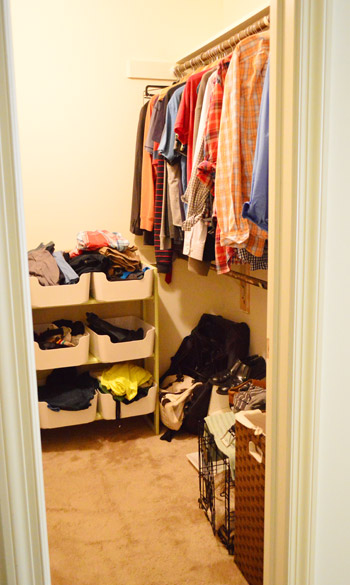
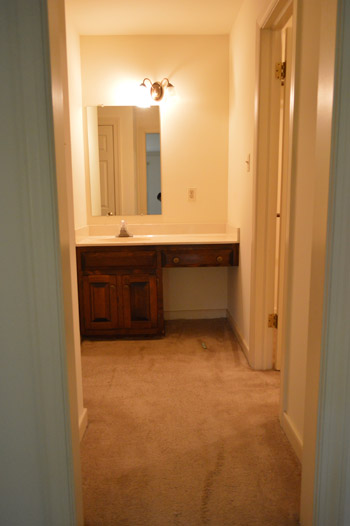
Just as a refresher, here’s what the closet looked like when we moved in and threw everything down. It’s amazing what some fresh paint on the walls, trim, floor, and ceiling along with some much needed organization and some old furniture (the dresser’s a hand-me-down and the mirror was a $5 yard sale find) can do.
So with those first two bullets checked off, it was shelf o’ clock. They were actually a pretty easy build. We just had to keep two things in mind as we planned them out on paper:
- how to build supports for two shelves (function!)
- where to create places to attach the front-facing boards to make it look pretty (form!)
So here’s what we came up with (we like to map things out on paper together, and then we usually divide and conquer, so in this case Sherry did the polying and most of the closet organization, and I was happy to do the shelf building and staining, especially since the stain isn’t without VOCs). Then Sherry swooped back in and tackled the hinges and reattached the doors while I switched out the drawer and door hardware.
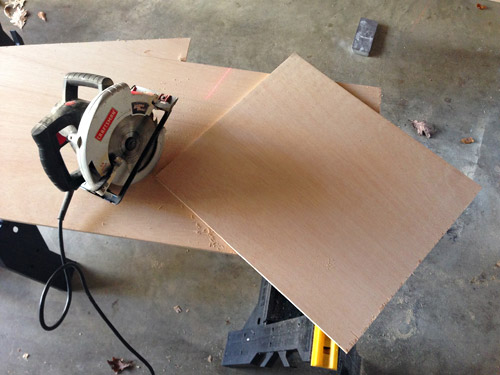
As for the building step, I started from the floor and worked my way up.
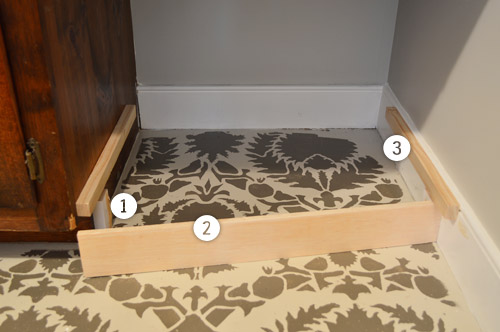
Step 1: I nailed a small piece of scrap wood into the side of the vanity (and another just like it into the baseboard on the opposite side) with one side resting on the floor and the other set back 3/4″ from the front of the vanity’s toe kick.
Step 2: This created a spot for me to attach a strip of plywood that would effectively extended the toe kick all the way across.
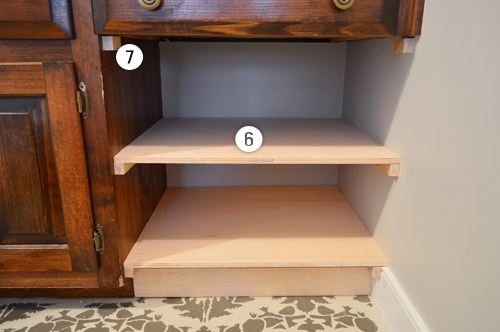
Step 3: Right above this, I nailed in matching strips of 1 x 2″ board (that I ripped in half on my table saw) that the bottom shelf could rest on. You’ll see in Step #10 why I didn’t line it up with the bottom of the vanity.
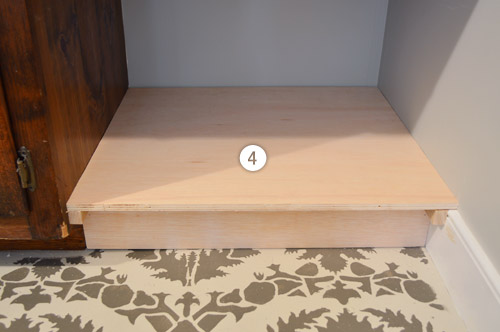
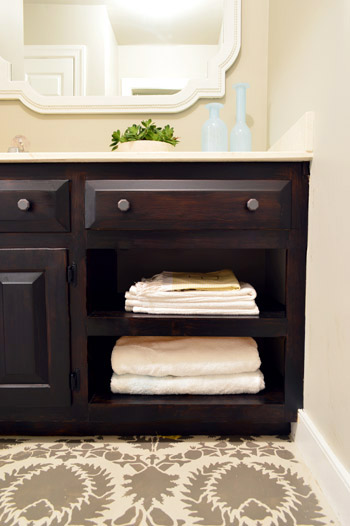
Step 4: I placed my first shelf, which I cut out of a piece of plywood I had leftover from the sunroom ceiling. It was such a tight fit I didn’t bother nailing it into place.
Step 5: After carefully measuring for the middle of the space, I nail-gunned another set of small strips on all 3 sides. I hadn’t done a back strip on the last shelf because it (coincidentally) rested perfectly on the top of the baseboard. Note: in this photo you can see how the vanity is a little dinged up in a few places, hence our desire to refinish it, which would also help us match the new wood with the old wood.
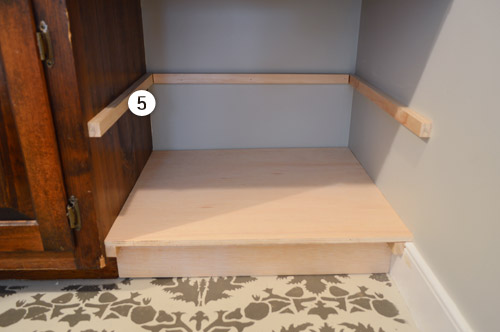
Step 6: I added my second shelf, cut from the same piece of plywood scrap.
Step 7: We wanted to add a face board at the top of the opening too, since we were trying to mimic the spacing and the look of the existing vanity. So by putting a face board here, it’d continue the strip of wood between the drawer face and cabinet doors that’s already on the left side. So, just like I did for the toe kick, I nailed small pieces of scrap wood here, set slightly back from the front of the cabinet.
Step 8: Time to start adding face boards. I started with a vertical one against the wall, which was a 1 x 3″ board (which really measured 1 x 2.5″) that I ripped on the table saw to be 1 x 2″ to match the width of the existing face boards. I glued and nailed it into place against the supports and shelves.
Step 9: Since that vertical face board got nailed into the small piece of scrap that I had placed at the top, I no longer had a place for the horizontal face board to attach. So I screwed another piece of scrap into the back of the vertical board to create one again.
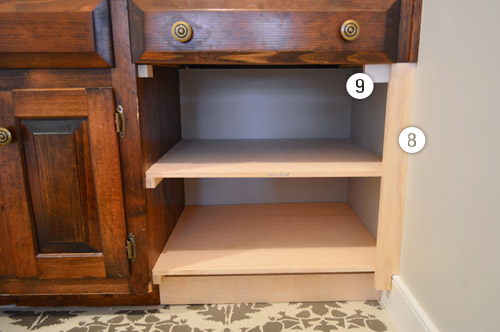
Step 10: Now to put in all of the horizontal face boards, which were from the same 1 x 3″ board that I ripped to be 2″ wide. I was able to glue and nail these into the supports and the front edge of the shelves too. I wanted the bottom edge to match up with the existing vanity, which is why in Step 3 I had to account for the 2″ face board when placing my shelf support strips.
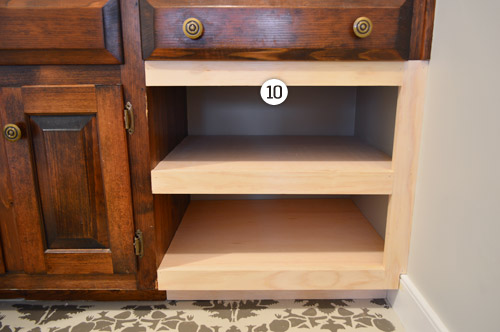
Here’s a pulled back shot of the whole thing once it was constructed. Putting it together was pretty fast (maybe an hour?). It was triple-checking all of my measurements and cutting my pieces that took the longest. I was certain I was going to mess something up along the way – like forgetting to account for the thickness of the plywood shelf when placing my support strips – so I tried to do the whole measure twice (and think twice) before cutting once thing.
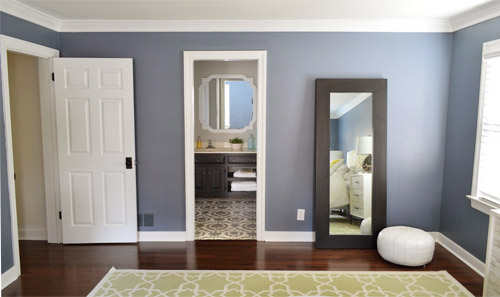
Obviously the next challenge was getting the new shelves and the old vanity to be the same color. We wanted to maintain some semblance of wood grain texture, but also had some darker toned wood items in our bedroom (like a big leaning wall mirror near the doorway to this sink nook) that inspired us to go a little richer/darker with our new stain choice. We also learned from painting the vanity in our half bathroom that a deeper, less-orange shade can tone down the yellow in the sink top. So after having such a good experience with PolyShades on our stair railing (and having half a can leftover) we decided to go that route with the vanity.
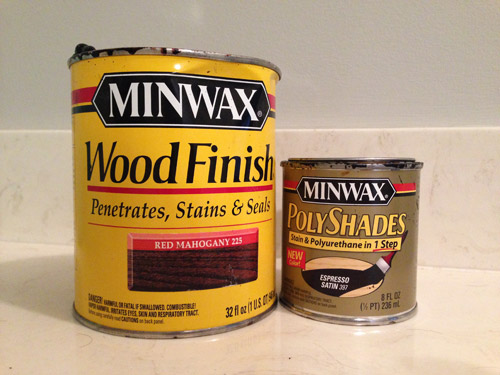
The other can pictured above is some stain that we had leftover from Clara’s dresser makeover, which we first brushed onto the new shelves (to get them closer to the existing color on the left side of the vanity before PolyShading the whole thing to be uniform). I stupidly forgot to take a picture of that step, so unfortunately we’ll just have to skip ahead, but the color wasn’t a perfect match at all – just sort of within a tone or two instead of one side being bleach blonde. Apparently it was enough of a similarity that one coat of Espresso PolyShades (applied with a brush) did the trick in fully bridging the gap. Oh and before I brushed on the PolyShades, Sherry lightly sanded the existing vanity side so it was stain-ready just like the fresh wood was.
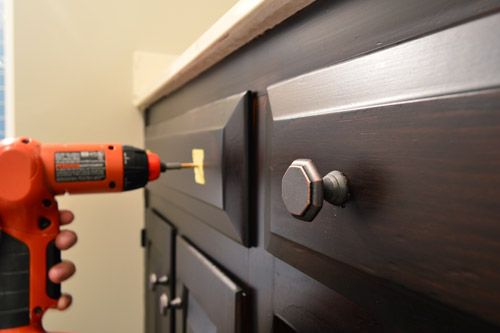
Before Sherry reattached the doors and put the drawer back in (all of which I had removed to make staining easier) we updated the knobs with some cheap ones (under $2 each!) that we found at Target. We thought that the octagon shape was a nice step-up from completely basic but the color would blend in nicely with our dark stain, so the knobs won’t compete with the patterned floor. In addition to using four of them to replace the existing knobs, I also drilled holes to add two more in the dummy drawer face that sits under the sink for a more balanced look.
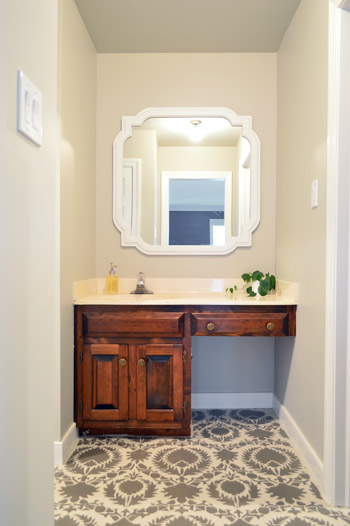
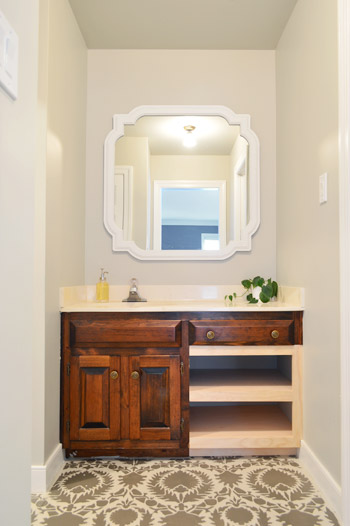
And with that folks, we have a completed vanity. Wait, but let’s reminisce about what we started with:
And where we ended up:
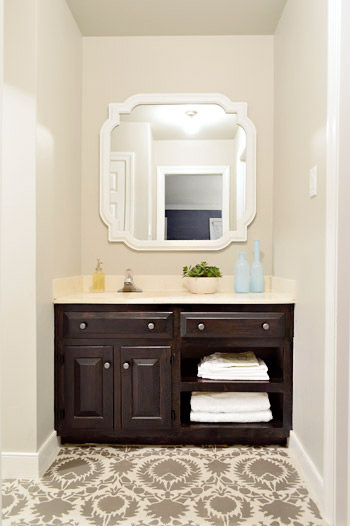
I realize the dark stain color makes it a bit hard to see some of the detail in photos (in person it’s more wood-grain-ish without looking quite as goth-dark), but I’m happy to report that the new shelves look like they’ve always been there. We only did one coat of the PolyShades because we didn’t want it getting any darker, so there’s a little variation in the wood tone throughout the vanity. A second coat might’ve evened that out, but we both decided we like how the variation maintains the wood grain (although if you’re going for consistent overall coverage, we’d probably recommend two coats).
The best part is that the project was super cheap for us. Thanks to having the plywood and both types of stain on hand, our only costs were a 1 x 2″ board and a 1 x 3″ board ($12 total), along with the knobs ($12) and two pairs of new ORB hinges for the cabinet doors ($6). So this entire vanity update came to a grand total of $30. Note: if you don’t have plywood and stain on hand, you might want to add $30 to the budget.
Between this, our half bathroom, and our stair makeover, we’re starting to notice that we’re really gravitating towards high-contrast, almost monochromatic color schemes in the smaller nooks and crannies of this house. I don’t think it’s an indication that we’re ditching color (our adjoining bedroom has blue walls, a green rug, bright yellow pillows, and a patterned headboard – and we can’t forget Clara’s recent wall & door makeover) but I do think we’re appreciating the impact of some dark accents in the mix.
And just for fun, here’s a before shot from that angle from before we moved in:

So I’d say we’re getting pretty darn close to calling Phase 1 of the sink nook complete. Which is probably a good thing since we’re halfway through stripping wallpaper in the dining room and ready to start rolling on some kitchen updates before the chaos of the holidays (along with the showhouse kicking into high gear). What did you guys do this weekend? Any building? Sealing? Staining? New hardware? Closet organization? As boring as the closet organization part sounds, it’s pretty nice to finally have a real spot for all of our stuff after feeling like we were living out of bins and sorting through random piles since June.

em says
This is so impressive! And I am super excited to learn you can just stain on top of stain.
YoungHouseLove says
Yes, not all stains work that way, but just a gentle sanding was all it took before applying the PolyShades.
xo
s
Page says
By “gentle sanding,” do you mean you hand-sanded or use an electric sander? If so, what kind: palm sander, etc.?
YoungHouseLove says
Hand sanding. Just with 200 grit paper to rough it up.
xo
s
Kelli says
AHHH-MAZING!! Looks great!!
Virginia says
Wow!!! Guys this really is so inspiring! I’m always amazed by the little (and big) construction projects John can just whip up. Do you have any recommendations for a woodworking/carpentry book for someone on an advance beginner-intermediate level to improve their skills? My father is retiring, and I’m buying my first house, which will need a lot of moulding and cabinetry work. I know there are lots of blog guides, but think he would enjoy print more. Thanks as always for the inspiration!!
YoungHouseLove says
His advice is always that a few years ago he had NO idea how to build anything, and it started by getting a Kreg Jig (that’s a really helpful building tool that makes pocket holes, so you can build so many things) and then just start with some small projects (he made some little shelves for Clara’s room first, and slowly built up to bigger builds). Also sites like ana-white.com are awesome for plans, so he doesn’t have any books, but uses the internet all the time!
xo
s
heather says
Check out Fine Woodworking. It’s a great magazine (holiday gift?). The website also has links to other books though. My husband is a builder so we get both Fine Woodworking and Fine Homebuilding. I even like reading it, and I barely have a clue what’s going on in the wood shop with the exception of the lathe.
heather says
Here’s one specifically on cabinets and built-ins: http://www.tauntonstore.com/bookcases-cabinets-built-ins-071416.html
Alex the Airhostess says
I’d recommend anything from the This Old House people. They were doing DIY & hgtv-ish stuff way back in the 80s and have really friendly, easy to do instructions that are written for beginners.
I also have a Reader’s Digest “Complete Do-it-yourself manual” (copyright 1977 for my version) that looks like a no frills textbook and is quite awesome. I bought it at a thrift store for $1.69 and it tackles almost every home maintenance task and a lot of improvements, but uses really friendly graphics and just basic tools. I’m sure you could find one on Amazon or try a local thrift store. It has a great section explaining different types of screws and nails and why you would choose them for different tasks.
Viginia says
Thanks so much for all of the advice and encouragement! I’ll definitely point him toward these resources and encourage him to get started! Thanks guys!
YoungHouseLove says
Good luck!
xo
s
Rosie says
it looks so much better with those shelves. Our family will be relocating after the first of the year, which means a new house and SO many have knee holes in the vanities, like yours, which I don’t love (and don’t get!). I’ve been standing to do my hair and make up for 20 years, why sit now?
I love those these shelves looks, and the extra function is awesome, especially if a bathroom linen closet is missing. Seriously, y’all are so inspiring. Pinning to remember in case we end up with a knee-hole ridden home. :)
Kristin says
Holy cow! You’re a cabinet maker! Amazing makeover. I am now seriously considering PolyShades in our kids’ bathroom. And am wishing we’d used that in our half bath instead of black paint (although it looks REALLY nice, especially with the YHL builder grade mirror update and a bright multi-colored rug).
Ginny @ Goofy Monkeys says
Wow! I really love it!
You guys always inspire me to get off the couch and start DOING something around my house. I wonder what it will be this week…???
jenn aka the picky girl says
I finally got out of Phase 1 in my bathroom! I’ve lived in my house for almost five years and have hated my bathroom. But this weekend, I painted, ripped up flooring (discovered a wet subfloor from a leak in the toilet), dried it out, laid new flooring (so pretty!), put in a new toilet, took my cheap mirror and turned it into a really cool driftwood mirror, and started shopping for accents.
I’m so so excited! (And your closet nook looks amazing.)
YoungHouseLove says
Congrats Jenn! Sounds like you made so much progress!
xo
s
Tara says
Amazing what a few inexpensive changes can do to transform that space. Once again I feel inspired to finish something on my own house instead of watching from the sidelines with yours. I’ve been waiting to paint my bifold closet panels with some color after loving the idea in your book!
Jessika says
First off, this looks GREAT. Second, I LOVE POLY SHADES!!! I had an old dresser that I was in the middle of sanding, sanding,sanding (and more sanding) when we found out we were pregnant. I didn’t want the dust particles or stripping chemicals anywhere near me, so the project stopped, and we had a half-finished dresser in our dining room with nicks and a ratty color. I read about the PolyShades and thought to give it a try this weekend (will full respirator on). AMAZING. I now can’t wait to use it on 14 other projects.
http://oregonkaisers.blogspot.com/2013/11/polyshades-dresser.html
YoungHouseLove says
Love that!
xo
s
Deborah says
Beautiful job!
2 questions….where did the extra drawer come from for the shelf project? and where did you get the beautiful stencil for the floors?
YoungHouseLove says
If you check out the before photo, there’s actually a drawer there already (there were two), so the shelves underneath were all we needed to add. As for the stencil, we bought that from royaldesignstudio.com a while back, but they still sell it!
xo
s
pamela says
just wondering if you now regret painting the vanity downstairs and wish you had stained it like this one instead? I always find I wish I had done something different earlier in the process. I’m usually happier with projects that happen later in the timeline as I have learned along the way!
YoungHouseLove says
I think with the slate floor downstairs, the Silhouette paint seems to work better with the tones in that, but for this space since the floors are glossy and stenciled it’s nice to have some natural element (like the wood tone) showing through so the walls, floor, ceiling, and vanity aren’t all painted.
xo
s
Amy says
The transformation is incredible! The bathrooms in our house are monochromatic blue in one and pink in another. We are hoping to do a “Phase 1” with them as well until we are ready to commit to something long term so this gives me hope! Thanks guys!
Kaesey says
The vanity looks great! Those shelves made all the difference. =)
I did pull apart a closet and reorganize, actually! Our utility closet gets cluttered fast and was in desperate need of organization. The biggest improvement required one (just one!) large nail. We have a vacuum, a broom, and a mop in that closet along with our tools, step ladder, etc. After having the mop tip over and bop me on the head twice while I was cleaning things out I noticed that both it and the broom have holes in the top of their handles for hanging. Doh! One large nail later, both items are off the floor and out of the way. Much better.
Other than that, I’ve been sewing. I normally don’t like to talk about Christmas until after Thanksgiving, but when you make gifts September is not too early to start!
YoungHouseLove says
Love small updates like that – they’re completely life-changing even though that sounds completely over-dramatic! Haha!
xo
s
Chelsea Wilson says
You guys amaze me! So simple, but so well-done & such a great change!
Lindsay says
Your stain job looks great!! So really to prep for that, you just did a little sanding and that was it? I have a WHOLE house full of yellowish pine wood – HATE! We’ve been painting the trim white, but I don’t want to paint all of it. Thinking that stain might be a good idea for the rest, as long as I don’t have to strip it before hand or do a ton of prep work? How do you think it will hold up? You might have inspired a new project in our house! Yeah! (whoa! lol)
YoungHouseLove says
Yup, just some light sanding is what the can calls for (different stain colors might have different instructions though, so I’d read the can that you choose to be sure).
xo
s
Beth Ann says
Did you have to do any prep to the existing vanity before darkening it with stain? We’re moving into a house with beautiful old wood mouldings but I don’t love the yellowy orangey shade of them. I also don’t want to paint them white. I’m realizing that maybe I can stain them darker?
This room looks beautiful by the way :)
YoungHouseLove says
Just some gently sanding to rough things up was all the can called for. I’d pick your color in the PolyShades stuff and then read it to be sure the instructions are the same for all of them!
xo
s
Vickie says
Wow! It all looks wonderful!
Juliet V. says
I LOVE the contrast. Looks great! Keep up with the awesome job you’re doing. :)
denise says
Wow! What an amazing transformation! I think this is the most spectacular update you’ve done so far in this house. It looks so good…way better than just a temporary fix.
bran dy says
Love it! Random question bc i am also changing out my door knobs. I noticed on the new white door….the knob is dark with some sort of plate? Did the platecome with the new knob or did yall spray paint? I like that plate look
Thanks!
YoungHouseLove says
It came with it! We ordered all new doorknobs after we painted all of our doors white, and have been so happy with them! More on those here and here.
xo
s
Abbie says
This might be one of my favorite things you guys have ever done. I thought there was no hope for that ugly cabinet, but you guys totally rescued it. Well done!
YoungHouseLove says
Thanks Abbie!
-John
Jessica Feinberg says
What an amazing transformation!
I love the idea that you use of making smaller, inexpensive changes that you can “live with happily” while saving money to do a complete overhaul on the more expensive projects.
Anne Phillips says
Love the stained vanity, it looks great! And, since you asked, I spent my kid-free weekend (they went to the grandparents’ house) sanding and staining my stairway railings. I tried the polyshades brand but really was unimpressed on how it turned out. Did your first coat of polyshades just sit on top of the previous finish on your railings? I found that mine did. When I used it on a completely sanded surface, the result was better. But still not as good as gel stain. I have yet to add poly. So. much. sanding.
YoungHouseLove says
Oh yeah, I think the key might be sanding and it also might depend what you have (the more poly/shine you have to start with, the more it’ll sit on top of that I think). Ours were pretty worn down (both the railing and the vanity) and almost chalky in texture as opposed to glossy, so maybe that helps it penetrate?
xo
s
aNJFLer says
Really really nice job, folks. Perfect solution for the space. I’m impressed!
Andrea says
Nifty! LOVE IT!!! You guys are SOO inspiring. Now if I could get off my butt and stop reading blogs and taking some ACTION on the ideas in my head… I would be ALL SET!
Jill says
Sherry, is it just me, or is there, like, 50% more color hanging in your wardrobe than there used to be?
Let’s set aside that it’s extremely weird that know/noticed that and just say that this perfect stranger who is definitely not stalking you is wholly supportive of your stepping out on the black. :)
YoungHouseLove says
Ha! Yes! I’m trying to break out of the black clothes comfort zone. It’s slow-going, but somewhat affective…
xo
s
Kelli says
Wow! It looks really fantastic. Nice work.
Amelia R. says
Whoa, you two . . . that looks amazing! The vanity stain makes the whole thing so much more modern, and the shelves are a huge improvement.
So, you stain-matched the shelves to the vanity first, and then coated the whole thing with the espresso color, correct?
YoungHouseLove says
Yes, we used that Red Mahogony stain just on the blonde side, let that dry, lightly sanded the existing vanity wood so it was ready for stain like the new wood was, and then John applied PolyShades to the whole thing (espresso color).
xo
s
Melissa@TheChicDream says
Wow! It looks fantastic. I love how you guys find a way to work with what you have and make it look great. My dad is a cabinet builder and he would be very impressed with your wood-working skills! The whole space looks amazing.
YoungHouseLove says
Thanks Melissa! That’s so kind of you to say.
-John
Zuzanna says
Really stunning…I hope to one day be able to use all those magic tools and also create such wonders!
Kathryn says
I think this is my favourite post title of ALL TIME. Nice one, John!
Andrea Worley says
Love what you guys did in there!! I love the bedroom paint color as well.
Jennifer R. says
It’s really nice to see your taste evolving. I am in my early 20s decorating my first house and I feel like we have craigslisted half of our old stuff because it just wasn’t “us” anymore. I have always liked your decorating choices but I feel over the last 5 years there is a huge difference. It’s still cheerful but more mature with a higher focus on quality. :)
Beth says
This made my jaw drop. Gorgeous.
Alisa says
Ahhhhhh! That looks amaaaaazing! If we weren’t renting our townhouse, I would be doing this pronto. This works way better than using that spot as a random storage space which we are doing now (barstools in the bathroom, anyone?).
Jessica says
Looks awesome! 2 questions:
1) Is there a door from the bedroom to the sink nook? Seems like it could be annoying if one person is in bed and the other one has the light on in there.
2) You guys have talked a lot about using no voc stuff while Sherry is pregnant. What about nail polish Sherry? Do you not use it when you are pregnant or is there a special brand that you use?
YoungHouseLove says
There actually was a door to the bathroom, but never to the sink nook (and we removed that bathroom one since it was such a tight space to have a door banging against other walls/corners). We don’t seem to have an issue with the light since we both get ready and go to bed at the same time, but when we fully renovate the sink nook and combine it with the bathroom to make one big space we’ll definitely add a door. As for prego-safe nail polish, I’m a big fan of Honeybee Gardens (sold in places like Whole Foods) and Zoya (which is a lot more pure than most mainstream brands, but lasts forever and looks great, like Essie or OPI).
xo
s
Vanessa says
Looks AMAZING, you guys! Love it so much. Also: The post title? Kills me. And in the final before & after shots from your bedroom, it almost looks like you widen the doorway to the sink area. Amazing what a great paint job can do!
Emily says
I thought the same thing about the doorway! It looks so much less narrow with the new paint.
Caitlin says
I am new to your website and I just ordered your book! I am so excited to start my house adventures reading through your stuff! You are a super cute family and super creative!! I love this post since we have weird, old bathroom cabinets that I need to update soon! This is a keeper :) And congratulations on your pregnancy, so exciting!!!
YoungHouseLove says
Thanks so much Caitlin! Hope you love the book, and good luck on your house adventures!
xo
s
Kendra says
Did I miss the hardware source? Those are some super fab little octagons (for 2 bucks each!?! a steal!)!
YoungHouseLove says
They’re from Target.
xo
s
Larita says
I LOVE this! I was already sold on the floor, but that dark stain makes it look even better. It looks so luxurious that it’s hard to believe this is a “short term” update. But, the organizer in me wants a peek inside your drawer/cupboard since this is a different set-up than your last master sink nook :P Sorry, is that too personal?
YoungHouseLove says
Haha! It’s just that drawer above the shelves that’s full of most of our everyday stuff (floss, toothbrushes, contact solution, toothpaste) and then the cabinet under the sink is for things like our toiletry bag (ours is always stocked so we just grab it when we travel, some extra toilet paper, my never-used hairdryer, etc).
xo
s
Reenie says
WOW!! Great job John ~ looks like it has always been there!!
kim a. says
I never make these kinds of comments but WHA?!? you’re going to hide your new west elm dresser in your closet once you make built-ins?! that seems a shame!!! but love the bathroom/closet updates looks fab! :)
YoungHouseLove says
This is going to be a Beverly Hills Housewives closet (read: faaaabulous, except with clothes from Old Navy in it, haha) so it’ll be the crowning jewel with built ins and a chandelier and a big mirror…. at least that’s the plan for now. Who knows, it could end up on the wall across from the bed too and we could just do built-ins in the closet!
xo
s
Jess says
Fun fact: I did a double-take on the finished product because I honestly thought that was a photoshopped version. W-O-W does that look gooooood now!
YoungHouseLove says
So funny! A few other people have said that too! Is it a sign I’m photoshopping too much? Haha!
xo
s
Helen says
HOLY COW! That’s all I have to say. That vanity looks freaking amazing.
AlisonG says
Wow, that is an amazing before and after. Wonderful job. I would love to have half your energy and motivation.
Nikki Kelly says
Wow! I can’t really see any difference between the old and new. Looks so good! I’m doing a little staining and sealing on some oak stair treads. Yay for wood stairs!
Kati Howell says
I don’t comment often, but this deserves a daaaaaaaa-ng. Great job, guys! I feel like even I could do this, too! woot!
YoungHouseLove says
Thanks Kati!
xo
s
Linda says
Looks Fantastic! Nice job. I was wondering what the transition from bed room to bathroom is like? Did you replace the transition piece after removing the carpet, or is there a slight height difference.
YoungHouseLove says
Good question! The transition piece still seems to work (it has always been angled down to the carpet side of the doorway, and even without the carpet, that downward angle just seems to transition into the subfloor). I go to the bathroom every night in the middle of the night in the dark and haven’t stubbed my toe yet, so I think the old carpet was so low/matted it’s not much of a difference. Thank goodness!
xo
s
Dana Leigh says
Wow & Wow! That’s an awesome facelift! I wish I was able to stain my vanities. The three vanities in my house are all flat white melamine. They are constantly taunting me for a makeover. *sigh*. Think I might have to bite the bullet and replace them with a dresser or something. One of these days …. I did get 2 drop in vanity sinks for $5 each though at Lowes (score!) but they aren’t that useful sitting on the floor, LOL.
Thanks, by the way, for being a renovation inspiration! I always look forward to seeing the projects.
YoungHouseLove says
Such a deal! Congrats Dana!
xo
s
Emily says
Looks great!