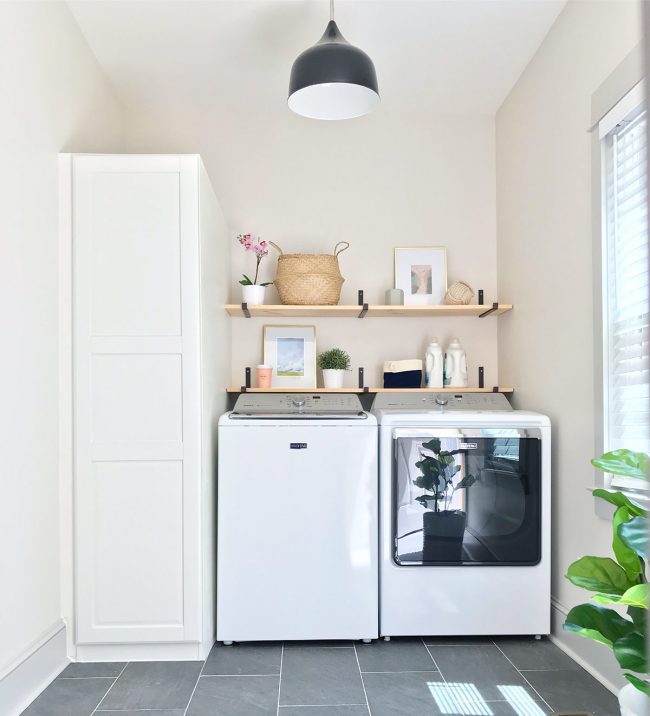
If you have some ugly things in your laundry room you’re interested in hiding, or you’re just looking for photos of a laundry room with a top loader (since most online photos feature front loaders with a big counter over them), well this post is for you. After months of simmering in the background, the beach house’s laundry room/mudroom finally came together over the weekend. It’s a pretty simple room that we’d been planning and shopping for since way back in December (yes, as in 2017), but it always got stuck in line behind other tasks like building the walk-in pantry and constructing the wall-to-wall bunks beds. With those out of the way, it was nice to clear out all of the lumber, tools, and random dust bunnies that had been calling this room home and make it a working, functional space that’s approximately 89% nicer to look at.
Let’s take this makeover tale waaaaaay back, shall we? This was arguably the UGLIEST area of the beach house when we originally bought it. And that’s quite a title to hold, given the stiff competition.

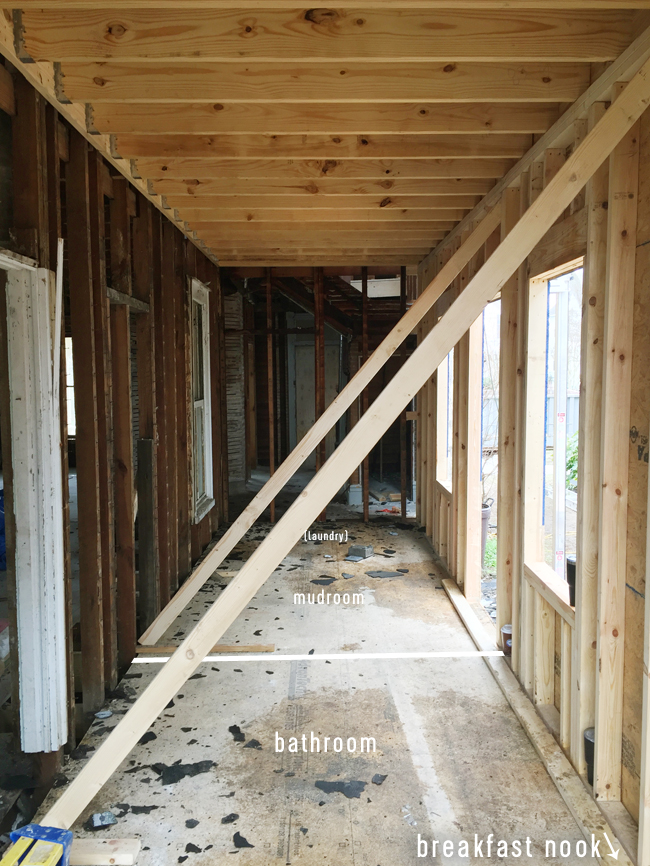
This room had originally been a porch that someone “enclosed” at some point. I say that in quotes because it wasn’t done very well (they used interior flooring instead of siding) which caused this whole section of the house to get soggy and rot over time (there were fist sized holes in it by the time we purchased it). That, plus the failing foundation is why we had to have this whole side area of the house rebuilt entirely (it was set in sand as opposed to having concrete footers… and sand slowly sinks… as did this area of the house).
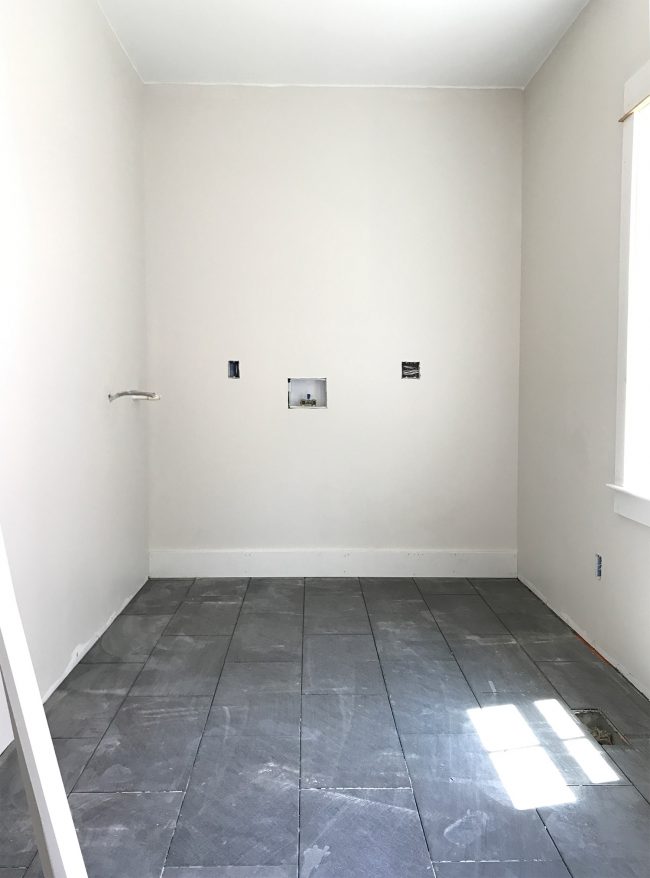
But by the end of last summer, it was starting to take shape, thanks largely to drywall and the floor tile we laid. It was from Lowe’s and was nice and easy on the budget (we used Warm Gray grout by Mapei with it).
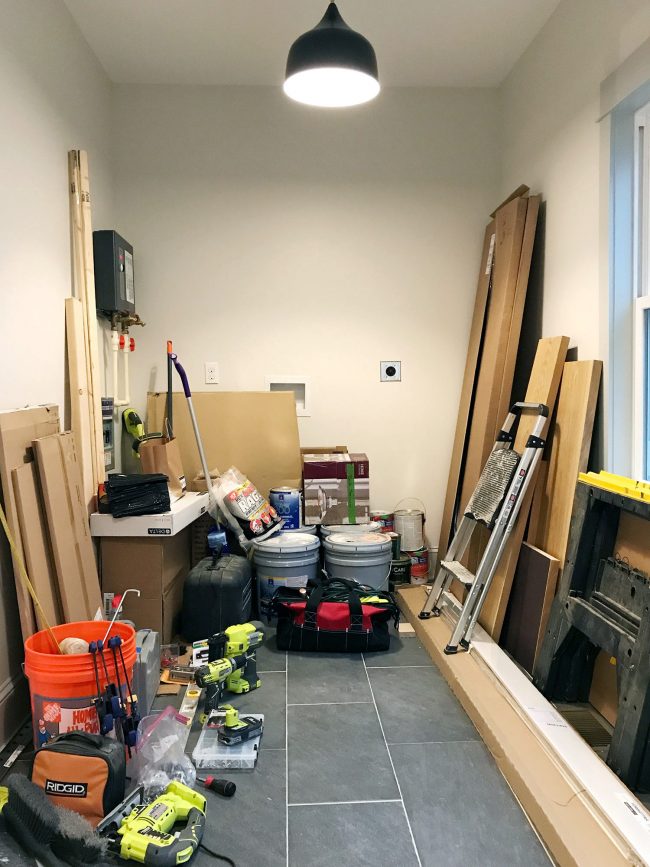
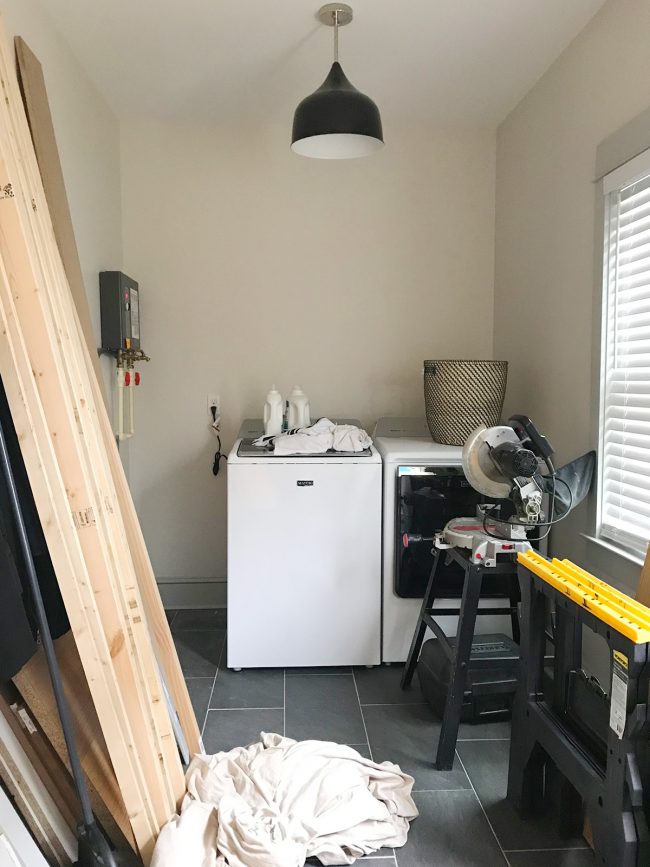
But for the last 6 months or so, other than finally hanging some light fixtures that we designed (this is the onyx color), it has largely been a dumping ground for all of our project supplies. Since we don’t have a garage or a shed (yet – a shed is on the list), all of our tools, scrap wood, boxes, etc, ended up in here.
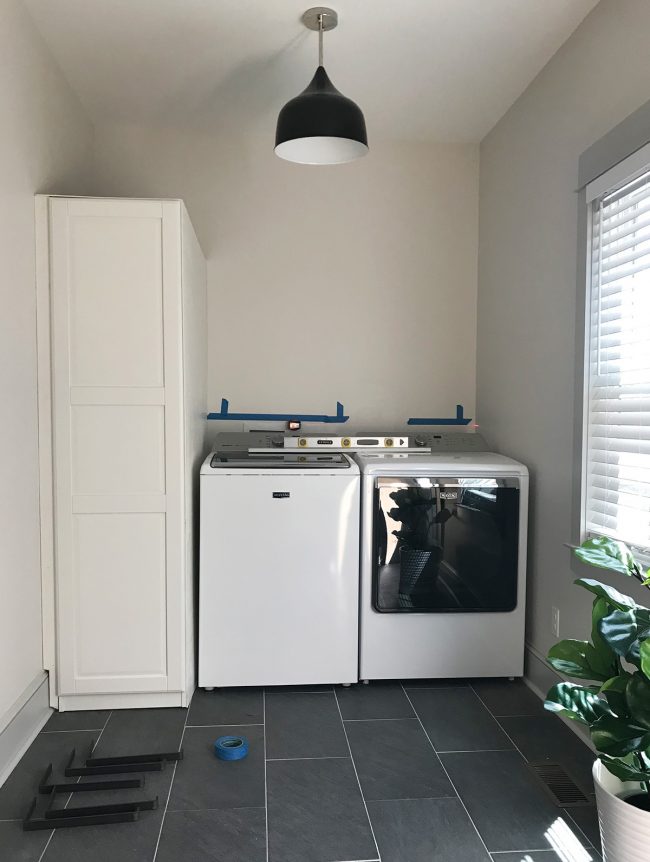
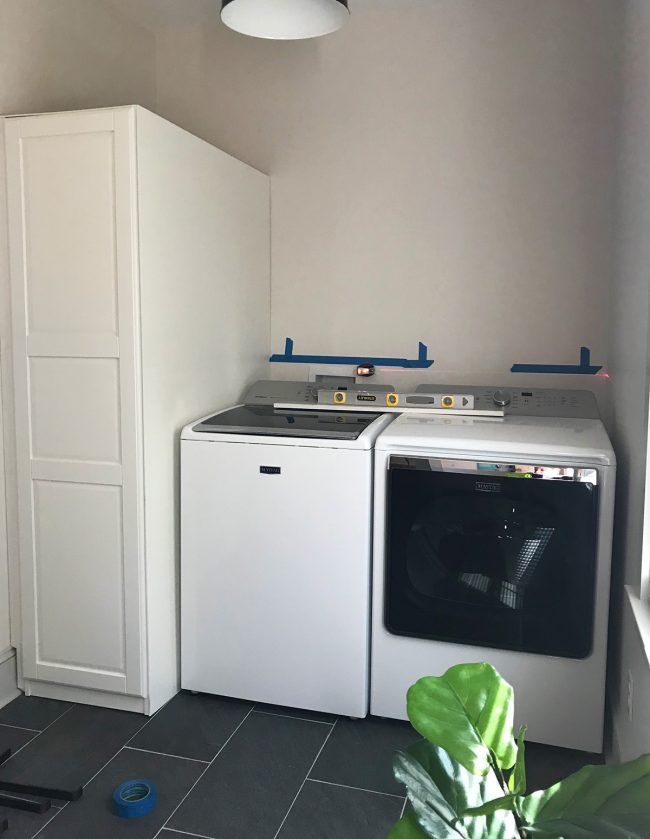
After our laundry appliances arrived around Black Friday, it still resembled a work zone more than anything else. This is the washer and dryer we got, which are the current models of what we bought for our own laundry room four years ago (we really really like them, hence buying them again for the beach house).
So how did we jump from that mess to this weekend’s mostly-finished room? Let’s break it down.
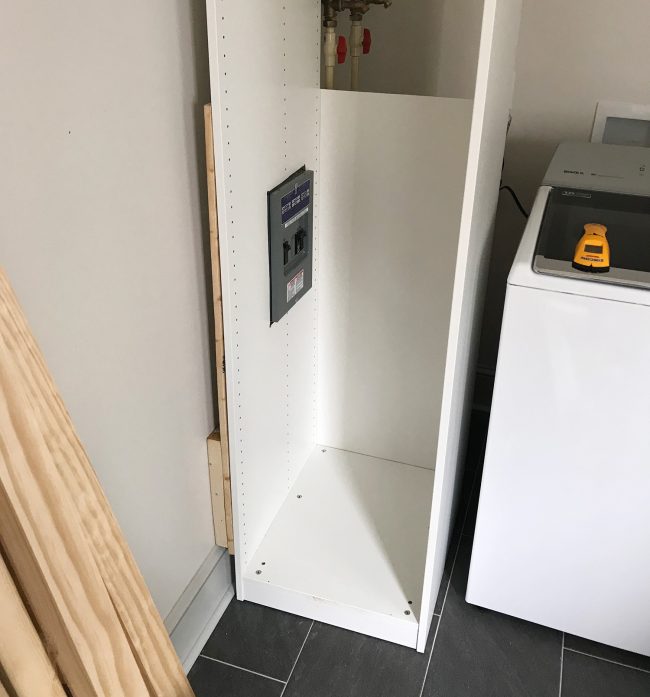
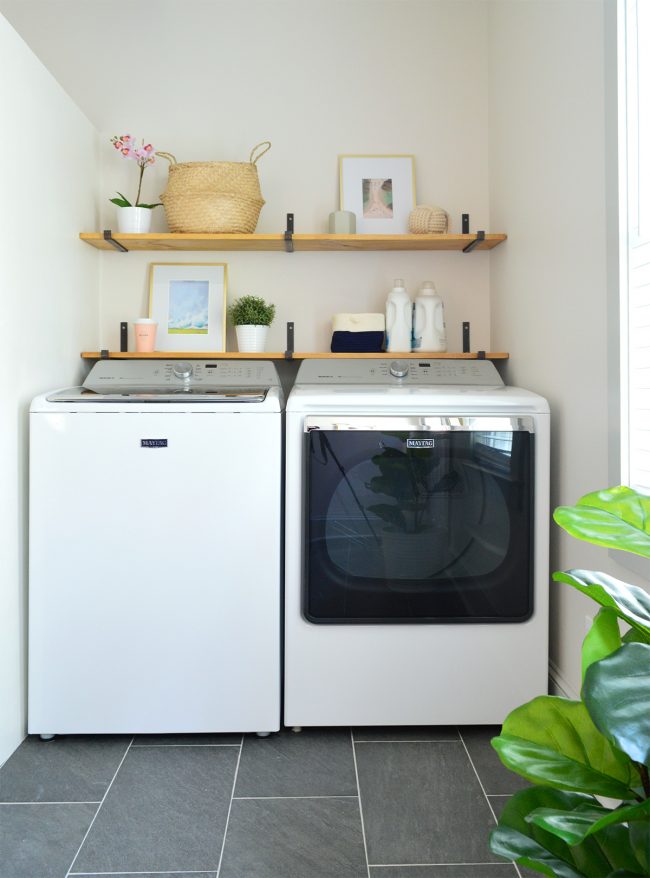
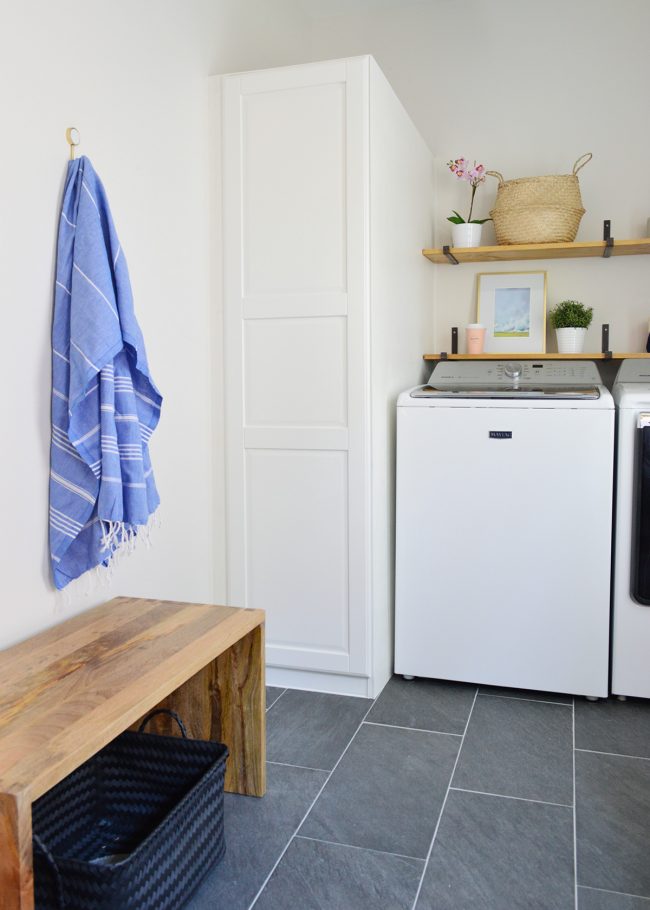
The biggest challenge in finishing off the laundry room was the ugly stuff on the wall to the left of the washer, aka our tankless water heater (you can see it more clearly two photos up). We wanted to cover it all with some sort of cabinet, but still leave it easily accessible for service and so we can still turn it off every time we leave (when a house is vacant, turning the water off = great peace of mind). Our solution? A good old fashioned IKEA hack. Ignore the lack of cabinet organization for now – that’s still on the to-do list (are you sensing there are around 348 things that are still on that list?).
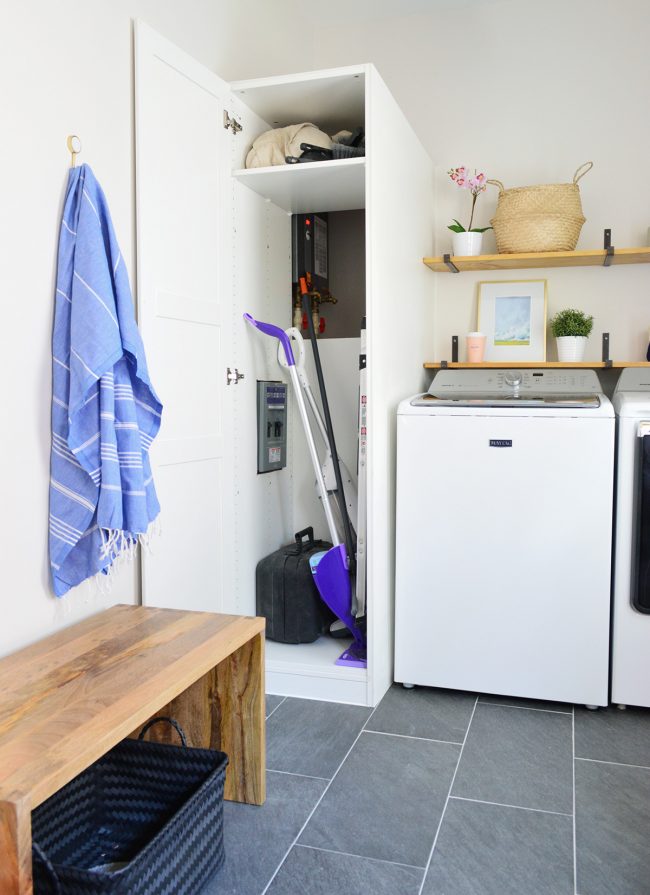
We discovered that an Ikea PAX wardrobe could fit nearly perfectly in the space that we had available between the wall and the washer. They sell one that’s about 20″ wide, which would fit as long as we cut out a hole to slide over the water heater’s breaker box (which we needed access to anyways). And the 24″ depth would allow the whole thing to sit in front of the water heater without sticking out too much beyond the washer, creating a nice little built-in nook for them.
Even though we have nine foot ceilings in here, we chose the shorter 79″ height (instead of the 93″ one) so it was visually similar to the height of the window and the two doorways in the room, rather than being the one super tall object in the space. It’s nice because it feels like the window height on the right sort of balances the cabinet height on the left when you face the laundry area:
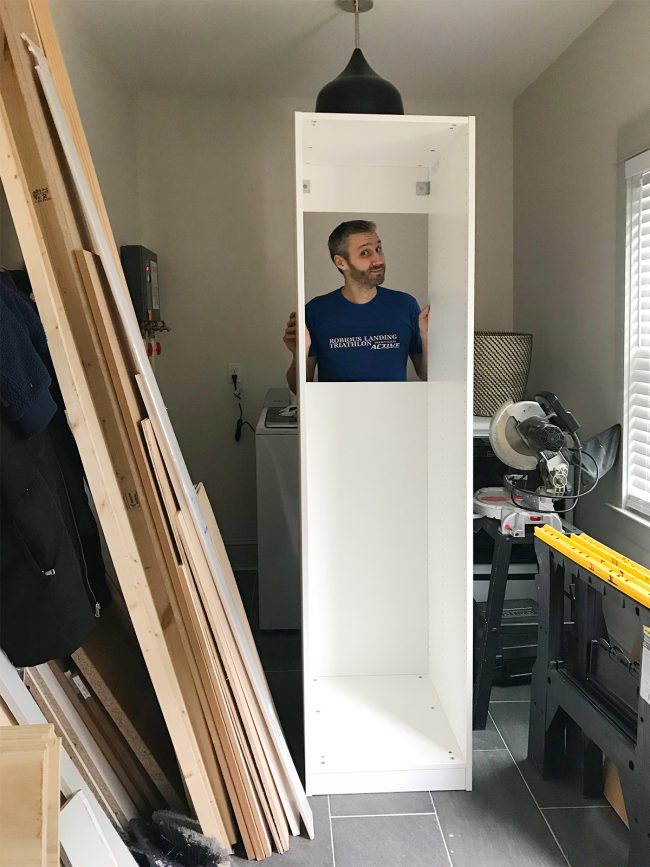
Back in late January we picked up the PAX at Ikea, but it wasn’t until a visit in early March that we actually found time to start building everything. I should point out that I was in this position when our contractor Sean popped over for a visit.
Creating access for the water heater was easy. The two side panels provide the majority of the structural integrity to the cabinet (the back panel is much thinner, sort of like a veneer) but I thought cutting a section out of it and leaving the rest of it in place would help keep things square and provide more helpful storage than making the unit completely backless.
So before attaching the back panel, I used a jigsaw to cut a big section out of it (you can see my cut lines marked below). After everything was assembled it didn’t feel compromised at all with that opening in the back – although I’d warn against making any cuts this large in the sides since those provide most of the support.
Once I nailed the remaining pieces in place, we were left with this generously sized access hole in the back of the wardrobe. I had Sherry take this photo of me for scale.
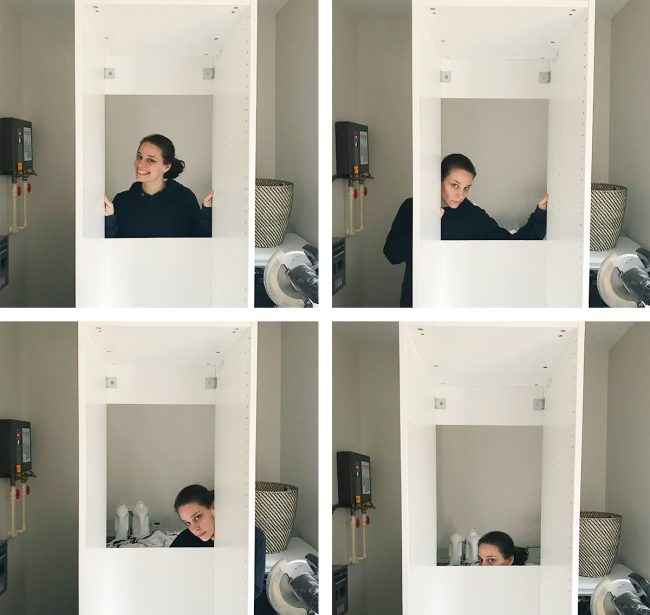
Then I thought it might actually be better to use Sherry for scale since I’m the tall one, and she basically used it like a photo-booth and “showed me what she was working with.” #NailedIt
We did have to cut a smaller hole in the side so it could slide over and give us access to the breaker box for the water heater. Here you can see it after it was cut (as we were figuring out what wooden spacers we needed to add along the side so we could firmly secure it to the wall). Screwing those boards along the side into the piece (and into the wall studs) also provided a lot more strength to the cabinet, so that small cutout for the breaker box didn’t make it wobbly or anything on that side. I’ll share a little more detail about those side boards that we added in a second.
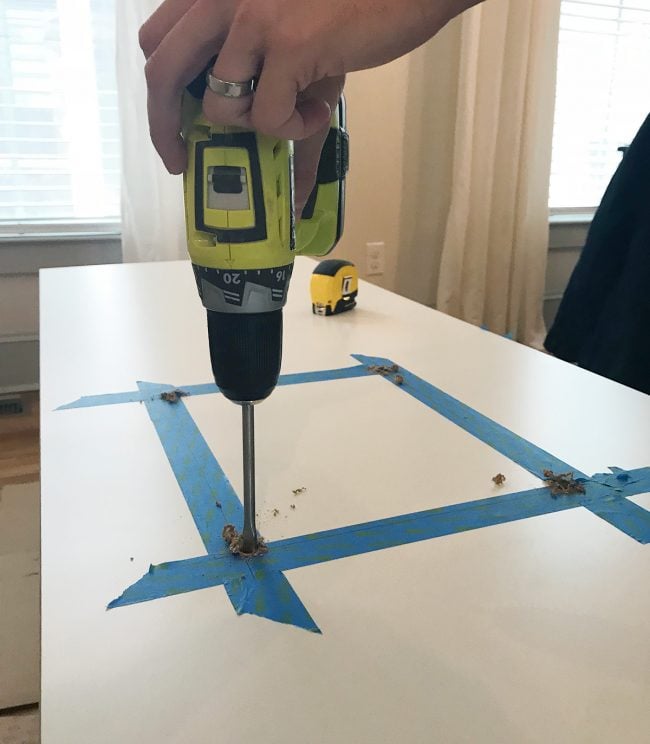
As for how we made that rectangular cutout for the breaker in the right spot (can you imagine if we messed that up?) we just took careful measurements of where we needed the cutout to be placed, and then we marked it off and taped along the cut lines, which helps to make the cuts cleaner and less splintery. Whenever cutting in the middle of any material with a jigsaw, I liked to drill holes in each corner (this is a 3/4″ bit) so that it’s easier to navigate the blade around the turns. You can go back and square off the corners if you want a crisper edge afterwards.
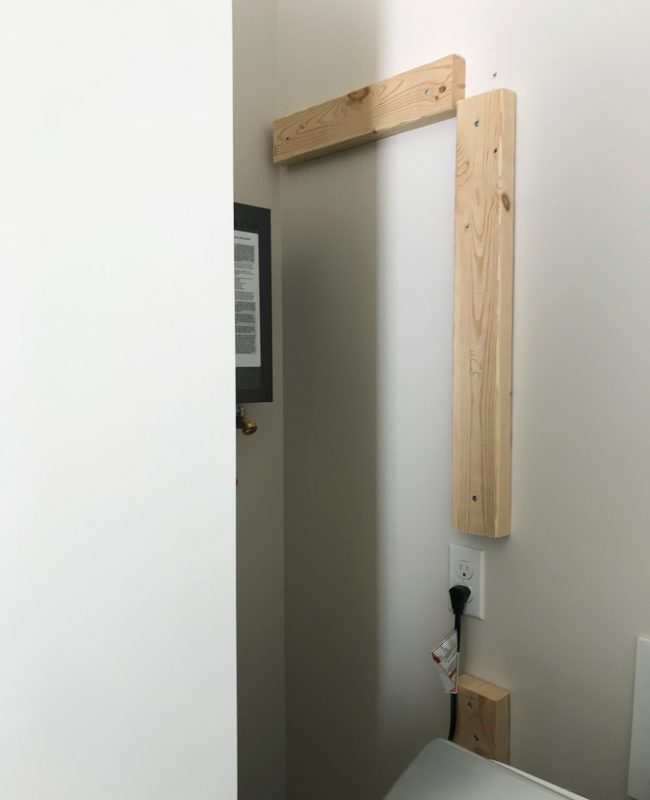
The last step before putting the PAX in place was to add some blocking against the wall (which you saw me testing out two photos above). Since I couldn’t anchor this piece to the back wall like Ikea intends, we knew we wanted to screw ours into the side wall instead.

First we had to add some boards to bridge the distance between the cabinet and the wall so we could firmly attach everything. I screwed the boards into walls studs, making sure the vertical piece was placed 3/4″ behind where the front of the PAX would eventually sit – this way we could eventually add a 3/4″ white filler piece right against it to conceal the 2 x 4″ boards (that’s how you make it look a lot more built-in).
In this picture below you can see the white filler piece (just a primed piece of 1 x 3″ board that we cut to size) and later added against the wall to cover the blocking behind it. We’d later caulk it, which always makes things look more seamless.
We also added a large flat panel on the other side to give it the appearance that the cabinet goes all the way back to the wall, even though it doesn’t. It’s just a 1/4″ sheet of plywood that we cut to size and painted to match (Behr’s “White” matches this door perfectly – literally, that’s the name).
You can see below that before installing the side panel I added some more 2×4″ blocking against the back wall so that I had something to secure the back edge of the plywood into. That top board is because I used some leftover plywood to add a top piece too. Mostly just so anything we end up storing on top of the PAX doesn’t fall behind it.
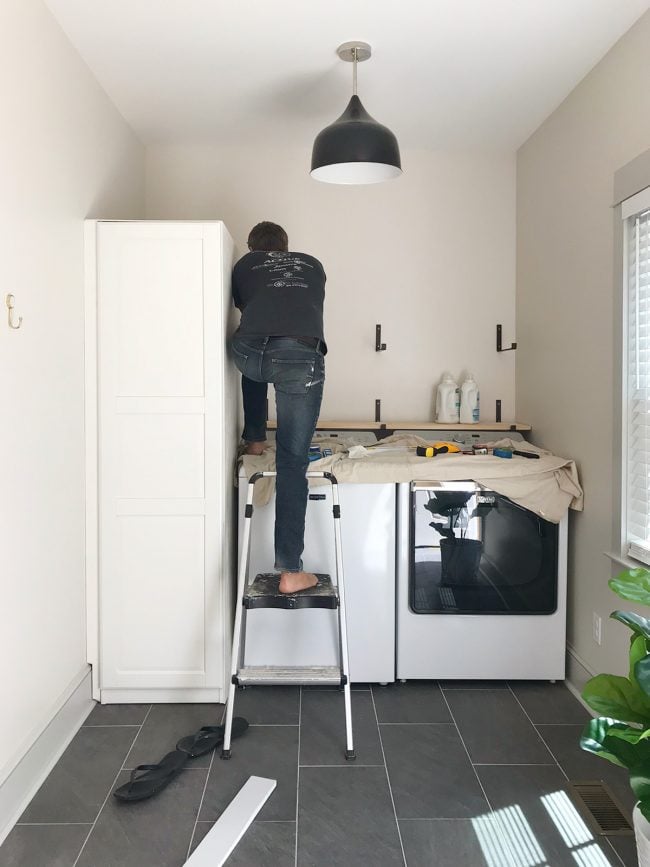
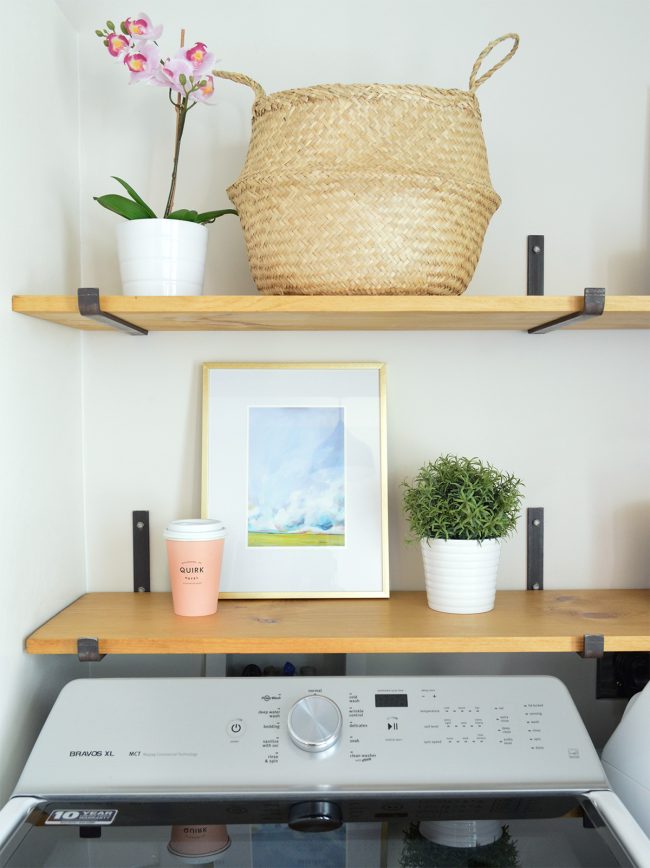
So with the cabinet portion pretty much done (we still need to add hardware and figure out the interior organization) it was on to adding shelves above the appliances – which Sherry captured sooooo graciously in this photo of me screwing the brackets into the wall. Guys, I think I have a career as a lunge model.
Like the cabinet, the shelves serve the dual purpose of storage AND hiding ugly stuff. The bottom shelf is intentionally placed there to make the washer hook-ups and the dryer plug less visible, while also spanning that annoyingly large gap behind the appliances (since the dryer hose often prevents them from going right up to the wall, we find there’s always at least an 8″ gap back there for things to fall down, never to be seen again). Our dryer vents directly out the right wall there and because of some studs in the way, we actually have about a 12″ gap behind the appliances, so these 12″ shelves fill that space and help prevent us from dropping stuff behind the appliances.
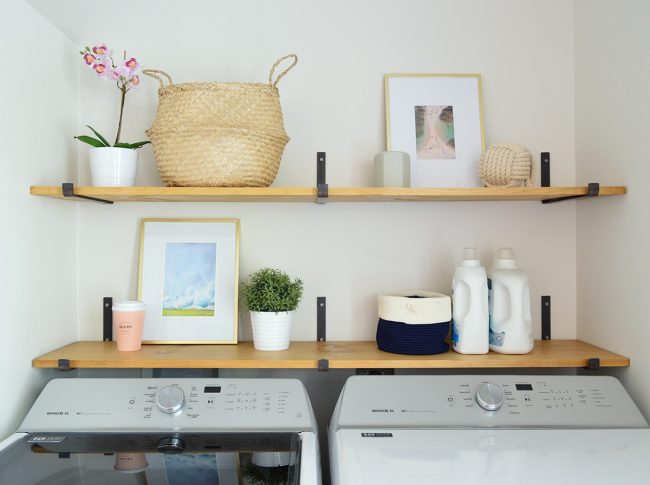
They don’t interfere with using the washer (turning the knob, opening it up to load it, etc) because the shelf basically starts right above the back edge of the washer and dryer if that makes sense. So it doesn’t stick out over them like a diving board (that would mean the washer door wouldn’t be able to be opened fully – so keep that in mind when choosing a shelf depth).
You may remember we actually did something similar in our laundry room at home – creating a shelf to cover the ugly stuff and fill that weird gap. We’ve found it to be a great solution for top-loading washing machines since you can’t just throw a counter over everything like you can with front-loaders.
We knew these iron brackets from Etsy (which Sherry actually found via Little Green Notebook) would be perfect for this situation because they come in lots of sizes (we ordered the 12″ depth and the “natural waxed” finish). One great thing about them is that because the shelf board just lays on top and is cradled by the bracket’s front lip, we can easily lift and remove that bottom one if we need to access the plugs or valves behind the appliances.
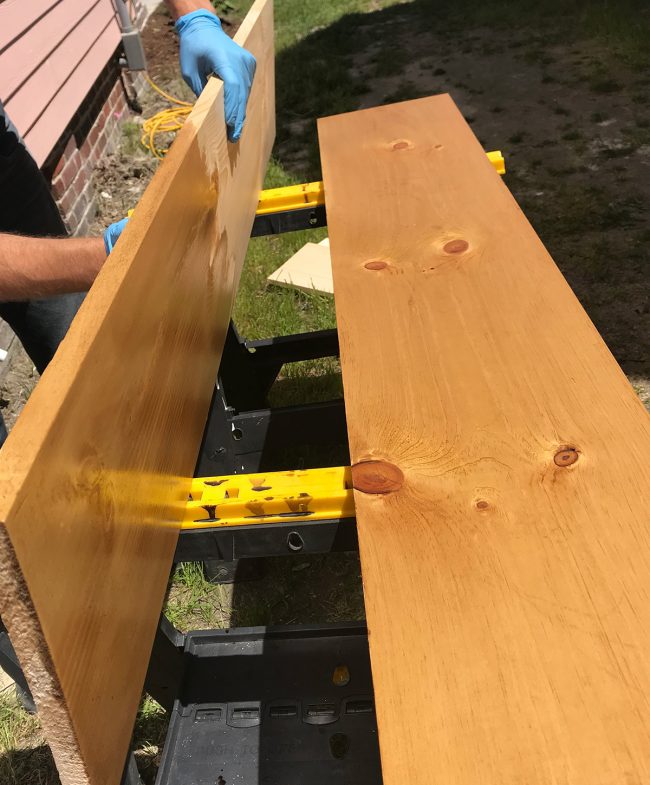
The shelves themselves are just 1 x 12″ whitewood boards from Home Depot that we stained to look closer to the old pine doors and floors in the house (we did one coat of wood conditioner, followed by a light coat of Puritan Pine by Minwax, and a few thin coats of Safecoat Acrylacq to seal it).
Apart from using the baskets to store some laundry supplies and setting our detergent right out there in the open, the shelves are mostly just decorative thanks to things like the gold frames and a few other accents Sherry added. So it’s nice to know that there’s room to spare for some more functional things up there if the need arises. But hopefully we’ll always find a place to show off the coffee cup that inspired us to make the beach house pink. Sherry said that someone on Instagram suggested we stick it in a glass cloche so nobody thinks it’s garbage and throws it away. Probably a smart move.
We still need to tweak the mudroom area of the room so it’s a little more hardworking, but for now we just brought down one of the wood benches we had upstairs (it’s from Target a while back and is no longer sold, but here’s a similar one). We had already hung some hooks last winter to give us a place for winter coats – which will now transition to a place for beach towels (like this blue Turkish towel that Sherry whispers sweet nothings to). We’ll probably end up with a similar set up, just maybe with more hooks/storage space. We’ll keep you posted.
Doing laundry isn’t something I’d describe as “exciting” but I will say that updating this room makes it noticeably more pleasant than having to step over a saw and a ton of scrap wood on the way to the washer and dryer. Once our outdoor pathway is done, which will lead to this side door as well as the back patio and the outdoor shower (not that it’s even started – ha!) we expect this door into the mudroom to become a primary entrance, especially after sandy trips to the beach. So it will be nice to walk into a good looking space versus some weird wood graveyard.
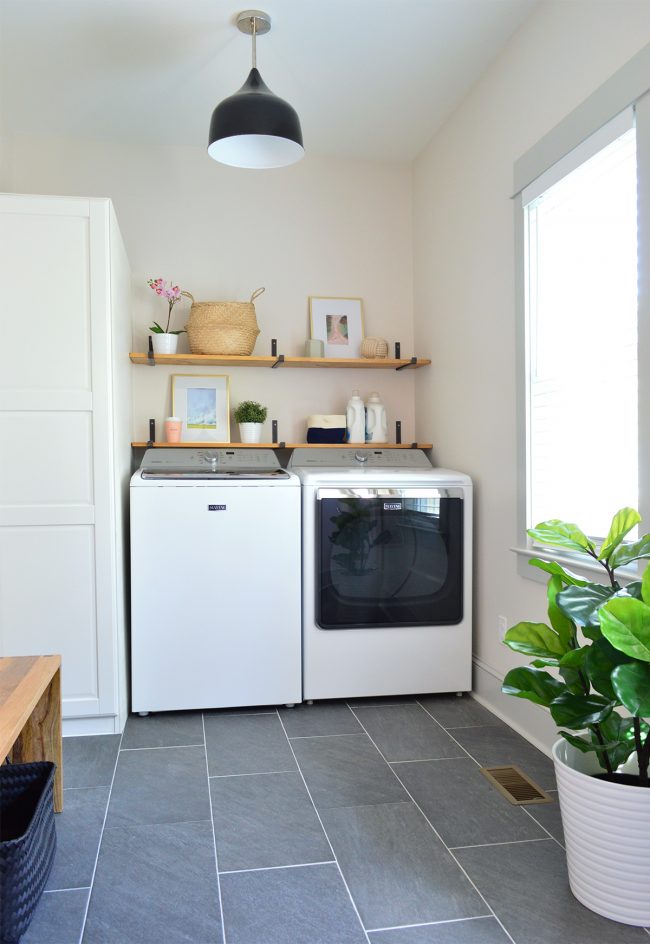
And since most of the questions we get revolve around paint colors & room sources, Sherry put together a little mood board for this space for anyone who is looking for the same tile, light fixture, gold frames, etc. Oh and the walls are White Heron and the trim is Stone Isle (both Sherwin Williams).
1 /2 / 3 /4 / 5 / 6 / 7 / 8 / 9 / 10 / 11 / 12 / 13 / 14 / 15 / 16 / 17

***P.S. If you’re interested in bonus photos, tips, project ideas, and behind-the-scenes info delivered straight to your inbox, you can click here to subscribe to our free newsletter.***
*This post contains affiliate links*
