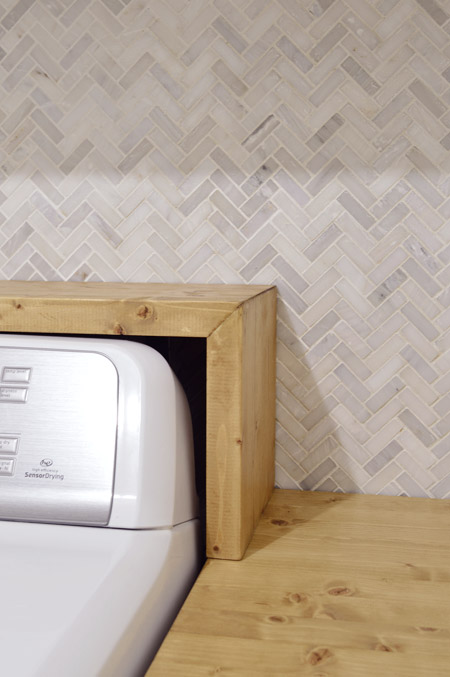
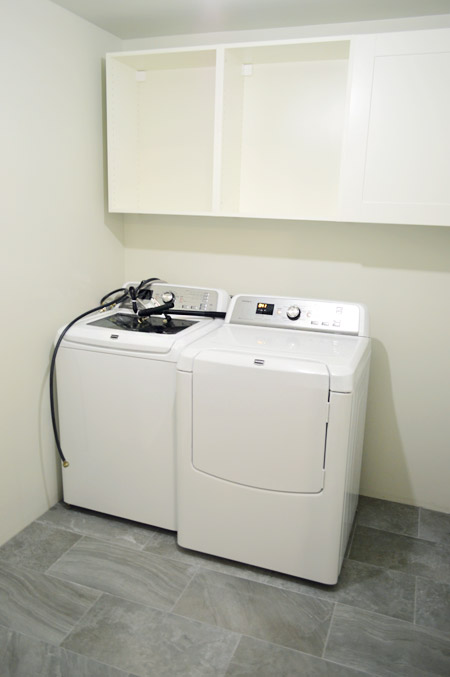
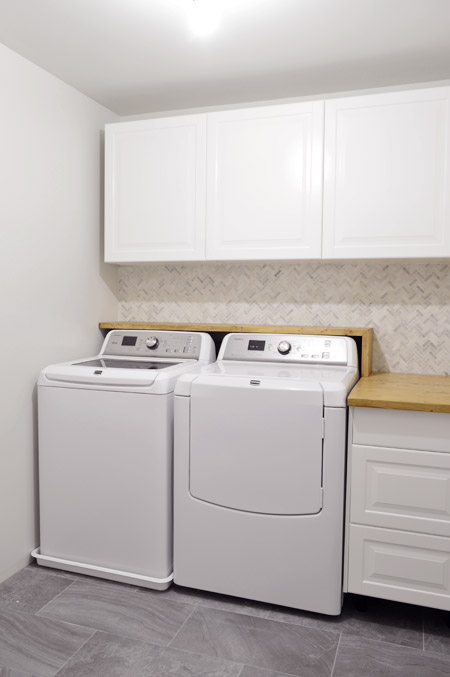
That’s right. You can call me T-Boz. Let’s talk about our new shelf in the laundry room, which is sporting a sweet arm band waterfall edge and some light natural stain. It was a simple DIY project involving some wood and some stain/sealer for a butcher block like effect.
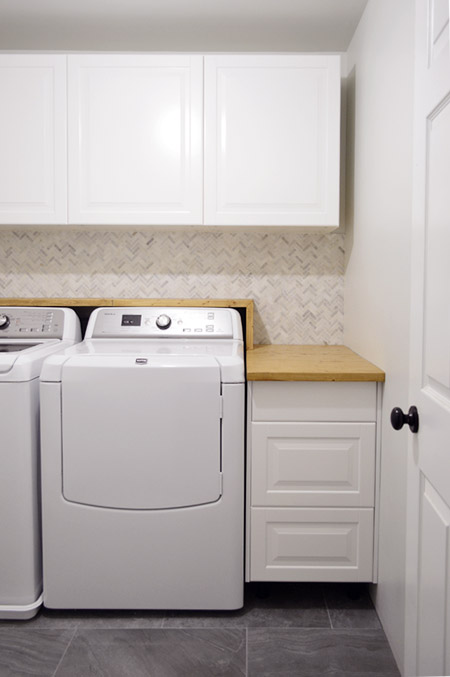
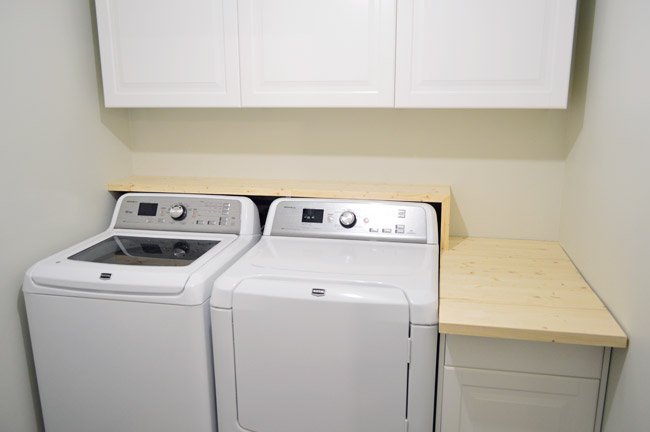
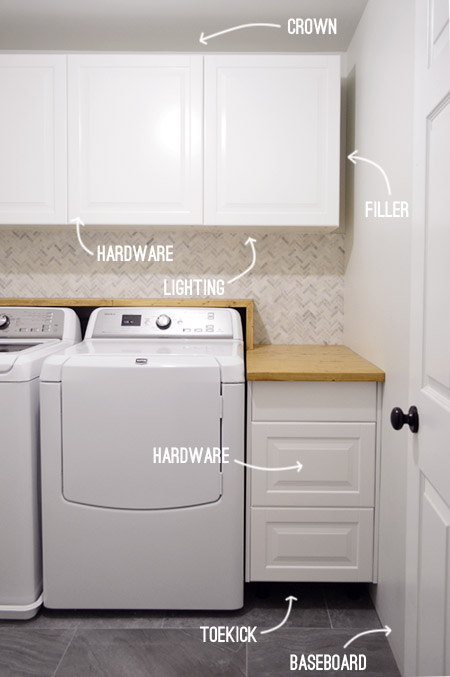
We deviated from our usual mocha stain choice because we were inspired by a few rooms we’ve seen with light cabinets and tile mixed with with natural wood to add some texture and warmth. Here’s a wider shot for you. Ignore the missing filler/crown/toe kick/baseboard/hardware situation. We’re also chasing that stuff (you know, along with the waterfalls).
But first we have to talk about installing our appliances since I meant to cover that a while ago. It wasn’t all that big of deal since it was just re-attaching what I had unattached during the demo process. But one challenge was setting the washer pan under the washer and attaching it to our new overflow drain, so I thought I’d talk through how we did it (we couldn’t find many detailed tutorials about that step). The washer pan is the thing that usually sits under a washing machine when it’s on the second floor – that way if it springs a leak, the water hopefully won’t flood your upstairs, rot the floor, and send the washer plunging through the joists onto something valuable below. A nightmare scenario, no doubt, but in my head it always plays out like some Wiley Coyote cartoon. Either way, it’s not something I want to experience.
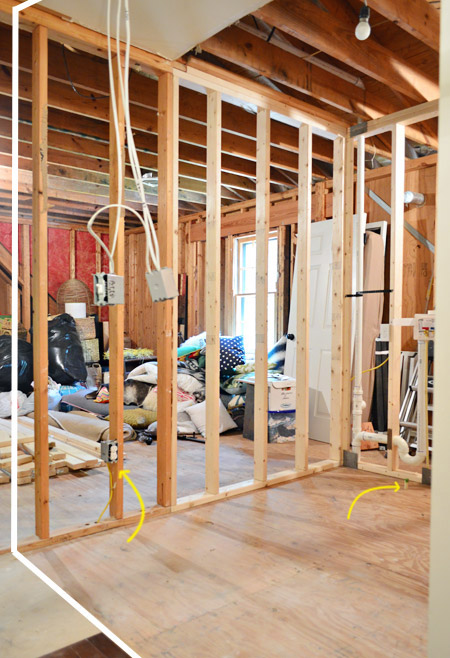
All of the contractors & plumbers we talked to actually said it was an optional thing to have a pan and an overflow drain (there’s no code dictating it in our area). One even told us that he wasn’t sure it made much of a difference (his opinion was that if your washer’s gushing water, a pan and a drain aren’t going to do much). We heard from others that it can save you a ton of trouble for those slow leaks you might otherwise miss, so we decided to be better safe than sorry, and had the plumbers put one in when they were here moving all of the other hook-ups (it was included in the $375 plumbing fee). Note: a few folks have asked about the outlet situation in the room, so you can see the extra pair we added in this shot too.
Some of you noticed that we cut around that overflow drain as we laid various levels of flooring (for example, you can see it poking up in this thinset shot from this floor tiling post). The drain was set in a way where we could gently raise or lower the pipe in the garage ceiling below, which came in handy so we weren’t constantly tripping over it.
When the plumber left us the washer pan, he shared instructions for attaching it ourselves. But first we had to figure out the exact placement of the appliances so we could precisely set the pan.
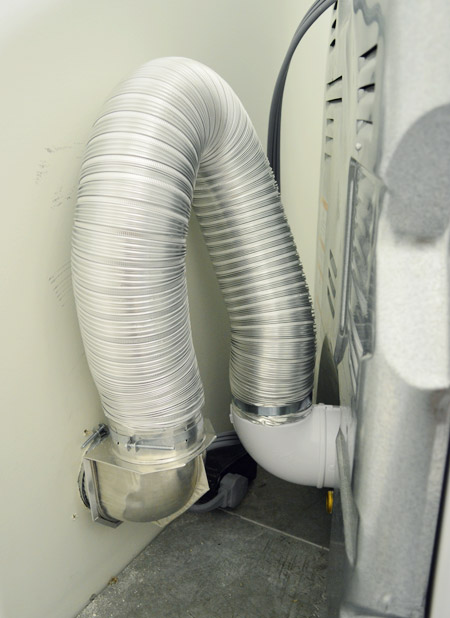
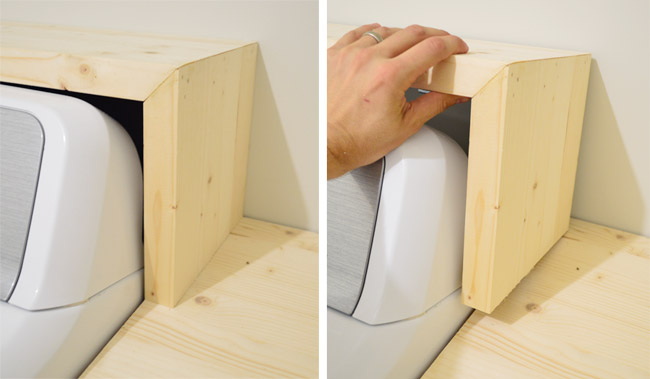
The washer would’ve happily sat nearly flush to the back wall, but the dryer’s a different story. During an installation, leaving some excess semi-rigid ducting behind the dryer is recommended so you can easily pull the dryer away from the wall without violently yanking the duct out of the wall every time it comes forward. That ducting takes up some space obviously (it’s pulled out below to show you it a bit more clearly, but even when it’s nested more closely, the dryer sits out about 8″ from that back wall). Note: they sell systems for sinking the ducting into your wall (between your studs) so it doesn’t protrude, but all the systems we found called for a vent that went up to the ceiling and ours goes straight out under the attic stairs (more on that here) so they weren’t compatible.
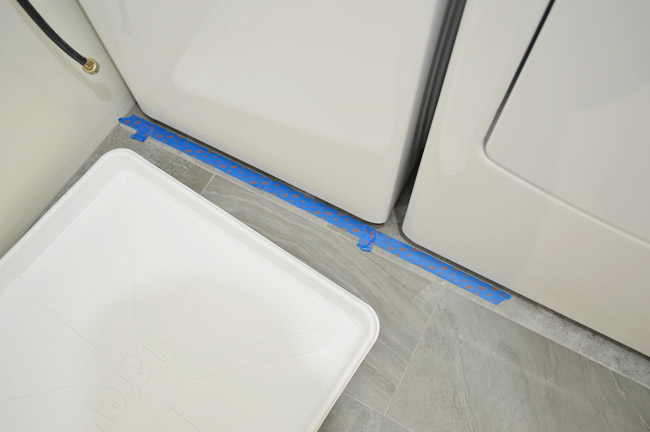
Thankfully that vent-space behind the dryer wasn’t a big deal to us since we expected it and had already planned the shelf. And after finalizing the dryer placement, we could finally determine where the washer should sit so it matched that depth exactly (didn’t want the washer pan sitting too far in or out). We marked the line on the floor with tape so that when we pulled the washer out again, we knew exactly where to place the pan.
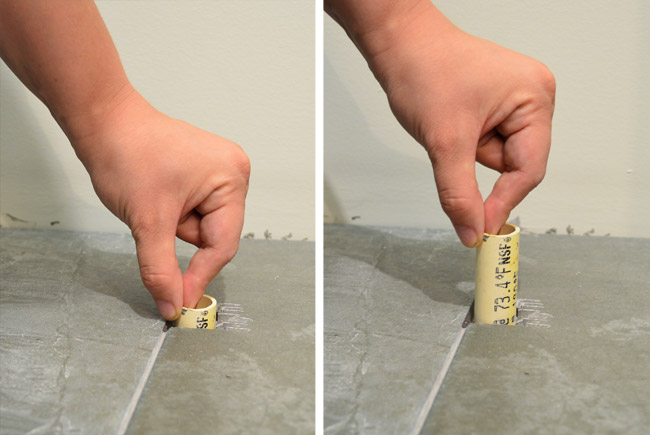
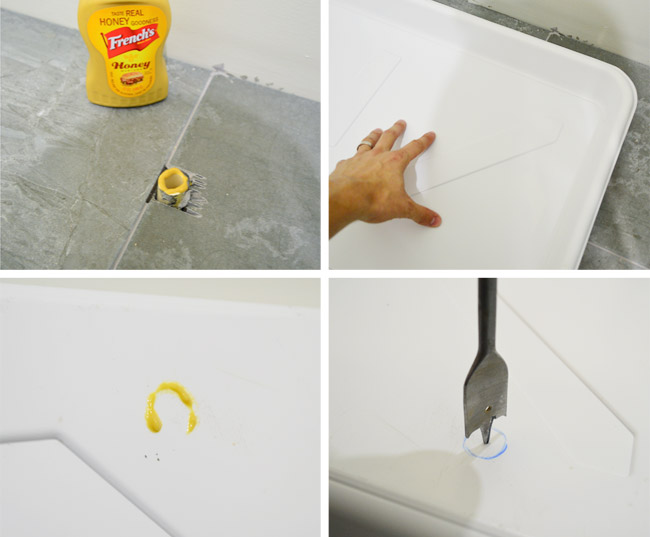
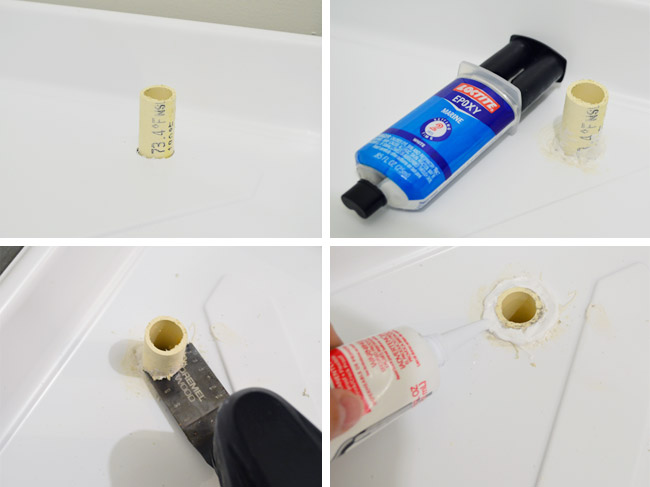
To cut a hole in the pan for the drain, the plumber recommend this suuuuuuper scientific method that involved mustard. Squirt some on the drain pipe, press the pan into it (while using the tape in front as a guide for where to place the pan), and then drill where the mustard left its mark. I marked over our mustard circle with Sharpie, since the “real honey goodness” was a bit overpowering odor-wise (at least when it wasn’t accompanied by a hot dog or something).
Once the pipe was in the pan, we had been instructed to “silicone caulk the heck out of it.” I didn’t feel totally comfortable relying on caulk as our only adhesive (silicone caulk has some flex to it and we worried the weight of setting the washer down in the pan could flex it loose right off the bat) so I talked it over with another plumbing guy and an employee at Home Depot and they both suggested an expoxy, like this Marine Loctite (marine = crazy waterproof). So I glued the pipe and pan together, let it dry overnight, cut off the excess pipe with my dremel (you need the pipe to be as flush to the pan as possible so the water can drain down it) AND THEN silicone caulked the heck out of it – just to be safe.
Then it got interesting. I don’t have any pictures of Sherry and I hoisting the washer over the lip of the pan into place, but I’m sure our faces were super attractive. Somewhere in the vicinity of strained and extra veiny.
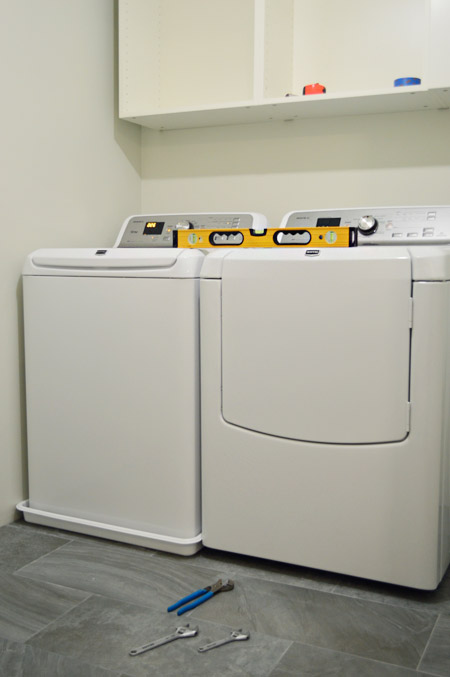
There was also some adjusting of the dryer feet to get it level with the washer – not only did we want the front of both appliances to line up, we wanted the tops to be the same height as well (hence the level and those wrenches you see one the floor in the picture above). And when it did it was sort of like we hit the jackpot. There was celebrating. We finally had a washer & dryer again.
Speaking of other small adjustments – in our post about the Ikea cabinets a few of you recommended getting the soft-close drawer and door add-ons, so we planned to grab those the next time we were near Ikea. Then, in an exciting hinge-related turn of events, about 12 hours later we happily realized the Ikea lady must have added them to our order, because they were in the bottom of our bag with all the under cabinet lighting stuff. I’d estimate the drawers and doors are now approximately 35 times less slammy. Well worth the upgrade.

But back to the shelf. You may recall that we built it before tiling so that we knew exactly where our tile needed to go.
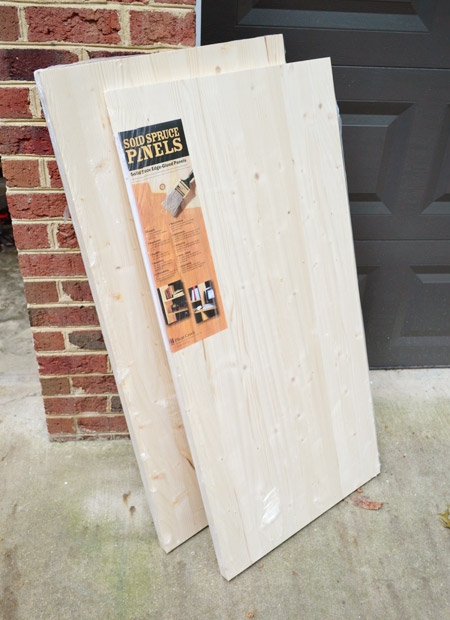
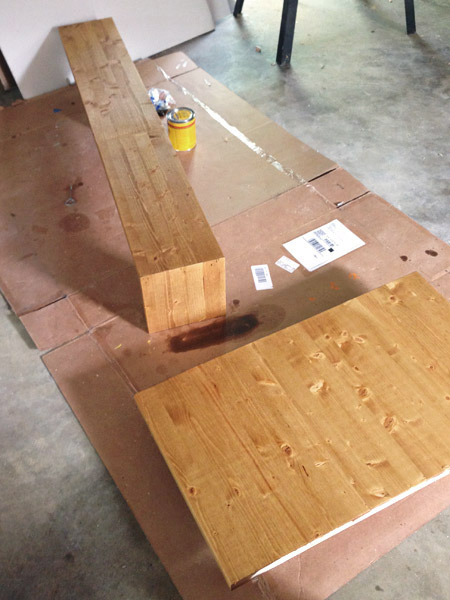
We constructed the shelf and counter out of two of these solid 2 x 4′ panels from Lowe’s. We liked ’em because they were chunky (1.5″ thick) and had that nice butcher-block look to them.
We used one panel for the shelf and one for the counter. For the shelf I cut one panel into two 9″ wide boards and then we Kreg jigged them together into one long shelf. The counter involved cutting the other panel into two 18″ wide pieces and jigging them together. I didn’t cut off the excess counter until after the tile was installed since I wanted to be sure to get the overhang right (so you can see it hanging over too far in this picture).
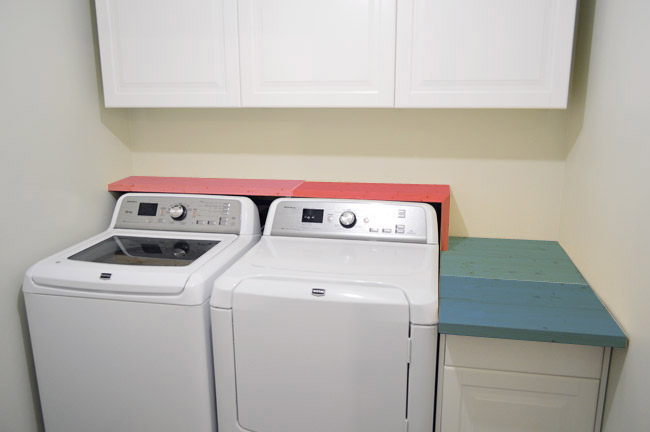
The waterfall edge came from cutting the end of the shelf off at a 45-degree angle and then gluing & nail gunning it together again at a right angle. Since it’s attached to the shelf (which we made removable so we have easy access to the appliance hookups when we need them), I just measured carefully so that it would rest on the counter and line up nicely on the left edge, to make it look like one piece. The top of the shelf doesn’t rest on the appliances, it rests above them on four heavy duty brackets, which you can see better in this post (three of them were screwed into studs to make them extra strong). We didn’t want the washer to shake the shelf and knock things off as it ran. We’ve done three pretty big loads of laundry and so far, so good.
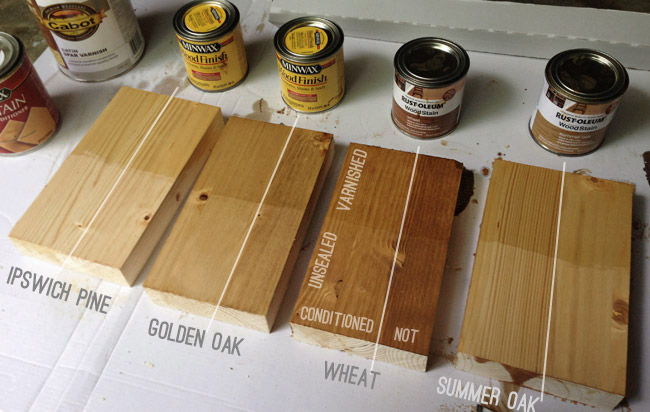
Since we don’t have a go-to lighter stain preference, we tested out a bunch of options on some scrap pieces from the shelf/counter build. Sherry pre-stained/conditioned half of each, then stained the whole block with one of four colors (two by Minwax, two by Rustoleum). Once dried, we pained some varnish on the top half of each – but it made them more yellow than we wanted, so it quickly got nixed. Of course the nuances are easier to see in real life, but we thought Ipswich Pine and Summer Oak looked a little too light and Wheat was a bit too dark/red for us. So Golden Oak was a pretty easy choice.
We applied one coat of stain, followed by three coats of Safecoat Acrylaq, which is what we used to seal the wood vanity top in our first house’s bathroom (it held up so well to water in there that we knew it would be great in a laundry room).
I’m stoked with how it turned out. I think it’s exactly what the room needed, and it’s exciting to start layering things in over the light & bright foundation of the cabinets and the tile. Admittedly our shelf looks a little lonely right now, but we’re just getting started…
So we still have some loose ends to tie up on this wall (here’s my visual checklist of sorts), but on the bright side – we got the door hung!
And the fancy glass one that leads to the future bunk-room is in the works, so we’ll hopefully finish that up and have the details for you next week. It bears mentioning that we’ll also be adding things like a laundry sorter, a pull-out drying rack, and a wall-mounted ironing board on some other walls of the room, so those details should be coming soon too.
This feels like a good moment to do a budget update, so here you go:
- Framing (labor & materials): $360
- Electric (labor & materials): $400
- Plumbing (labor & materials): $375
- New dryer vent: $87
- New HVAC vent: $59
- Drywall & insulation: $298
- Drywall mudding: $84
- Sub-floor materials: $30
- Tiled floor: $451
- Ikea cabinets & under-cabinet lighting: $862
- Appliance re-install: $15
- Tiled marble accent wall: $281
- Shelf & counter (including stain testers & stain): $97
- TOTAL: $3,399
The two contractor estimates that we got for just the framing, electrical, plumbing, and drywall stuff came in at $3,250 and $5,000, so it’s incredibly comforting that we’re still on the low end of that range after adding a marble backsplash, tiled floors, cabinetry, and a shelf/counter (including some upgrades like soft close doors and under-cabinet lights). That being said, we’re almost exactly double where we were at our last check-in because we hit our big ticket items like tile & cabinets. But hopefully once we’re past the door and trim/crown installation we’ll be at the end of our major expenses. Dare I say this new room of ours (and reconfigured bunk-room entry) might clock in under the $4,000 mark?
That sounds like a jinxy thing to say. Maybe I should play it safer? I’m certain we’ll come under the $100,000 mark (now I really hope I didn’t jinx myself).

Anele @ Success Along the Weigh says
Excellent! I still drool over that floor in there. So in love with it! Lookin’ good y’all!
Elae says
Everything about the room looks great, but I’m just not a fan of that light stain paired with the lovely grays… I wish you’d gone with the mocha!
YoungHouseLove says
Thanks Elae! I’m definitely expecting to hear from the “I would have gone dark” peeps today! And the “I’d paint it white” folks too! We’re really excited to see the room come together more and think this color will be awesome for us when the room’s complete, but it’s definitely not the same call everyone would make. The nice thing is that if we end up regretting it we can always sand & stain it darker – or prime and paint it down the line :)
xo
s
Tanya says
I think this may be a classic example of “the middle makes no sense.” I’ve enjoyed reading about the laundry room transformation and am eager to see how it will all come together.
Debi says
Loved what you’ve done but the counter tops bother me as well. You’ve used such rich clean tile colors but my eyes go straight to the wood color and it just takes away the overall look. Question to ask yourself what do you want to standout in the room, the countertop or the tile? If you want the eye to focus on the tile you need to change the counter tops to white so they neutralize or later replace the wood to a white marble or something like that will give your laundry room a rich look and complements the beautiful backsplash you chosen.
Erin says
I agree! It unfortunately cheapens the look of the room. I typically love the look of the majority of YHL design choices, but the light stain on the wood makes it look very raw and unfinished. I love wood tones, but in this room the blonde wood just doesn’t work. That gorgeous tile needs to SHINE, so I would love to see that countertop WHITE so that it blends with the appliances.
Mary Beth says
Expensive laundry room! Or maybe I’m just really cheap. LOL I’m currently using a closet on the top floor so I’m jealous of anyone who has more than 8 sq feet for theirs..
I look forward to seeing how it looks when there’s some colour in there!
You are both so lucky to have the chance to design a laundry room from scratch.. so many pre-built spaces are totally inefficient and wasted space. I can’t imagine what I’d do with a blank slate!
MB
http://www.hystericallyeverafter.com
Caroline says
Although the bottom line looks like a lot- over $1000 is making that space a “room”. They’ve added WAAAAAY more in equity by now saying a laundry room rather than laundry closet. I feel like they’ve been able to cut corners (not in a bad way) in many other spaces and they went right for the phase 2 (instead of investing in a phase 1 update) update here knowing it would be more. And if I’m not mistake I think their original contractor quote was $3,000- so they’ve done ALOT with that space (and used pretty nice materials). Great job YHL!!!
Eclectic Hamilton says
I love your new laundry!
Its so fresh and clean.
Greetings & Love
Ines
http://eclectichamilton.blogspot.de/
Angela L says
I think it looks awesome! I love how this laundry room is coming together, and I’m a bit jealous. :)
(Oh, and in the 5th paragraph, you wrote, “The drain was set in a way where we could gently raise or lower the *pope* in the garage ceiling below”…and now I’m picturing His Holiness with his pointy hat being hoisted up and down as you adjusted the drain pipe. :D )
YoungHouseLove says
So funny! Off to fix that!
xo
s
Emma says
I saw that too and just about fell off my chair with the giggles :) too funny :)
Mary Beth says
That is HILAROUS…. LOL
Natasha says
Haha!
Becca says
The nerd in me must mention that it is also “Wile E. Coyote” not “Wiley Coyote,” but the reference did make me smile!
YoungHouseLove says
Bahaha! I love the E initial!
xo
s
Sarah says
I totally just thought that “pope” was some DIY/plumbing term that I wasn’t familiar with.
*headdesk*
Elise says
Hehe!
“We could gently raise or lower the pope in the garage ceiling below.”
Good mental image! (This has been my first typo-pointing out point over 3 years reading, thank you very much!)
YoungHouseLove says
Our apologies to the Pope! All fixed :)
xo
s
Emily says
I’m just wondering, how does your washer drain after the wash or rinse cycle? In my laundry room, I have a 4 ft tall pipe sticking up through the floor from the basement that the drain pipe from my washer connects to. Everything I read online says you need a drain pipe that is higher than the water level in your washer to drain properly. If you have figured out a way to avoid this, I’d love to know! If I could get rid of that hideous pipe, I’d be one happy lady!
YoungHouseLove says
Oh yes, that’s the washer drain, which needs to be hung high (ours hooks into the water line, which is at the back/top of the washer on the wall). This is just an overflow drain, so it’s a secondary system installed just to divert water if it ends up in the pan (or otherwise would end up on the floor).
xo
s
Juanita says
Hi Y’all,
Your laundry room project has been inspiring… and a joy to watch its progression! I do have one comment… you may want to look further into the whole “venting the dryer” situation.
I just (like literally 2 weeks ago) spent $250 to repair a dryer, and $750 to place in a new vent duct. Now, prices might be lower where you live (! gosh, I hope so), but still, here’s the situation: as the dryer vent specialist told me: every load of wet laundry puts (a gallon? or was it 5 gallons?) of moisture in the air– (euro front loader washers have the extra powerful centrifugal spinning options so can remove more water— but you have a top loader) — eventually all your dry lint that gets blown out your dryer vent, gets weighed down BY SOME moisture. Then a clog starts to develop in that lovely curly cue vent you’ve got going up and down the back of the dryer. Once that happens, it starts taking longer and longer to dry clothes, or like mine, it works fine until the day it doesn’t, and the temperature fuse in the dryer blows. It may take 2 years to get your first damp blockage in there— maybe 5 years?— who knows?— in our case it took 10 years (we had a 2004 renovation). But, your room is so shiny and bright and new!— see if you can manufacture a straight piece of pipe that goes straight from dryer with as few bends as possible to your floor venting situation. The vent specialist told me you can fix it “permanently”, or “just call me in once a year to get all the(caked on) lint out of the pipe”. Best of luck as you look into this.
YoungHouseLove says
Thanks Juanita! Everything we read about a short straight pipe that goes out of the room meant that once it was attached (screwed on) in order to take the dryer away from the wall, you had to yank it forcefully out of the wall (without having any “play” in the vent, it’s not easy to pull the dryer out if that makes sense). Will look into that more though – sounds nice and simple!
xo
s
Pam the Goatherd says
As an appliance service tech’s wife I can tell you that Juanita is right. All those 90degree angles and that big loop in your dryer venting are just asking for disaster! Take both the 90degree fittings off of the dryer and wall. The venting that you have is expandable. You can go straight from the dryer into the wall with a piece of that venting that is in the unexpanded state. That way you’ll have a clear shot for the lint and moisture to exit and you will still have a way to pull the dryer out without having to worry about trying to disconnect the vent pipe first. Just make sure you don’t crush the venting when moving the dryer back in closer to the wall.
YoungHouseLove says
Thanks so much for explaining that so clearly! Love that we can still pull it out that way and it’s safer! Will do!
xo
s
Karen says
Eh… not a fan of that stain. It still looks like unfinished wood.
Wish you had gone with a dark gray stain for that aged, beachy wood look.
YoungHouseLove says
We definitely considered some darker/grayer stains but thought the whole room might feel too cold for us (gray floor, white/gray backsplash, etc). Who knows how we’ll feel when everything comes together though! This is a first for us when it comes to that stain color…
xo
s
Pam the Goatherd says
I have stained just about every piece of wood in my house with the Golden Oak, so you know I really love it. But I agree with Karen. When I saw the finished shelf I immediately thought that a grey, driftwood sort of stain would fit so much better with both the floor and wall tile. But your mood board includes more natural wood accents so maybe when we see some more of that we will think it fits better.
CB says
I totally agree. It looks like unfinished wood that’s been stuck there to keep stuff from falling behind the washer. It doesn’t look finished like the rest of the room.
Skaapie says
So funny – I’ve sort of gotten used to you guys always staining things dark, so my initial thought was *go dark*. But my kitchen has light and white and when I moved in I wanted to change it, but now it’s grown on me and I dig the Scandinavian vibe. Go Team Light Stain! :-)
Jeanie De Melo says
We’re still in the “newbie” stage when it comes to DIY projects, so you guys probably know something we don’t – why didn’t you install the baseboard before re-installing the appliances?
YoungHouseLove says
The cabinet on the right needed to be fully built-in before any baseboard goes in (we didn’t want it sitting away from the wall due to baseboard – and we couldn’t finalize the placement of that cabinet without properly installing the washer & dryer since the overflow drain and washer pan had to be in the exact right spot since it was attached to the floor). Long story short, adding baseboard around the washer and the cabinet made more sense than putting them in first since they would bump into our room and crowd the washer and cabinet and then we’d have to work around them with things bumping into the room more from the sides.
xo
s
Jeanie De Melo says
Makes sense!! Thanks!
Gauri says
I love the white cabinets/light counters look! I have lived with it in my kitchen since December and I’m still loving it, so I’m sure you will too. I initially thought I was going to want to go darker once it was in, but after living with it, I love the brightness.
Now to wish for a laundry room like this instead of the creepy basement laundry room I have…
keisha says
Room looks so good. And holy cow, how did I never think about putting a shelf over the back of the washer and dryer like that!!! Our hanging rod is above the dryer, and I can’t tell you how many times over the past 10+ years I’ve had to fish dropped hangers from behind the dryer. You guys. Brilliant.
keisha says
PS Now I have that TLC song in my head, where it will be all day. Thanks for that.
Gretchen Brown says
My laundry “room” (nook in the basement) is put to shame! This is beautiful!!! :)
Vicki says
Too bad dirty laundry has to come into this beautiful space! :)
Margaret says
haha haters gon’ hate, $her-dog! I like the butcher block look….It will look so great once all the other layers are added in like your rug, and hardware, and other knick-knacks I know you’ll throw in. DO YOU girl! You know better than all of us what works for you!!
Sara Jean says
I agree 100% with Margaret. I always play it safe and default to the dark stain but I am LOVING that light color you chose. It’s so bright and cheery. I can’t wait to see the room once you’ve added all the accents/fixtures. You guys never disappoint. :)
Casey Leopardi says
You guys are totaly an inspiration with these types of projects! I know design is totally a different strokes for different folks deal, but that countertop looks unfinished to me. Everything else looks so high end and the light lumber looks out of place. I definitely think a darker stain or a grey wash would look more finished.
Abbey_G. says
Looking forward to your post on hanging that new door. My husband and I may have to completely re-hang the door leading from our garage to the kitchen and it would be great to follow your step-by-step process! :-)
Mary says
I love this room! Not that you are soliciting opinions from strangers on the internet, but I would totally paint that shelf some snazzy pop of color since everything else is so gray/white.
Kimberly | Turning It Home says
It’s really coming along! Speaking of chasing waterfalls, have you ever seen The Other Guys? There’s a character in the movie that is frequently making TLC references, so naturally your post title reminded me of it. That’s normal, right?!
YoungHouseLove says
Never seen it! Will have to check it out!
xo
s
Heather W. says
Best.movie.ever!!!!
Steph says
This looks SO awesome.
Can you guys come do my laundry room now? And by laundry room I mean the creepy little unfinished room off my garage. Actually, can you just come organize my entire garage? There’s more stuff in there than a tiny 1 car garage should deal with and the car isn’t even in it right now! It needs some love and storage. That sounds like a TV show. Love & Storage.
YoungHouseLove says
Bahaha! Totally does!
xo
s
Kim R says
Looks great. (I like the lighter stain. I can’t wait to see if you’re going to do some artwork on the walls.)
erin says
Count me as one of the shudda gone darker peeps. And call me crazy, but I actually like the blue (stain?) wood you had on the lower cabinet. I think a deep, woodsy blue would look beautiful with your wall tile, floor, and white cabinets.
But that’s my opinion. And you know the saying about those…
SG says
The soft-close door attachments have fallen off our Ikea cabinets and for the life of us, we can’t remember how to attach them – since you just put them on, can you please ‘remind’ us how to get them to attach? I’m talking about the ones in the left picture.
Thanks!
YoungHouseLove says
There are two notches at the back of the slide, so we just pushed them in there. Hope it helps!
xo
s
Erin says
It looks wonderful! We are actually thinking about moving our washer and dryer upstairs into the room over the garage that connects with our master bedroom. I was wondering, the safe coat acrylaq that you used for this project as well as the bathroom, is that what you always use when putting a top coat on a wooden project? Or just in cases where water could be involved?
YoungHouseLove says
Yes, it’s an eco sealer/lacquer, so it works well in wet locations (we like knowing any dresser or table can survive a drink ring so we use it often).
xo
s
Natasha says
What about a deep gray stain on that counter? I love the flooring (we have something similar in our bath) and it would pick up the hints in the backsplash. I’m not a fan of the light wood (seems like it’s waiting for something to happen to it) but I’m a big fan of both of you!
YoungHouseLove says
Thanks Natasha! We considered that but thought with the gray floor tile it would be a little too cool/gray. Who knows where we’ll end up though!
xo
s
Annie says
Gotta agree. The room has gorgeous tile and the white cabinets look good. But that counter and shelf! Oy. Does NOT go with the room. Does not go! It looks so weird and wrong to me in what is otherwise a true jewel of a room
Mary | Lemon Grove Blog says
What a great investment in your home!! Must feel pretty snazzy to have that whole room now, vs. the configuration y’all had before! :)
YoungHouseLove says
We were just joking last night that we run around saying “what else can I wash?!” Haha!
xo
s
Laura says
“Real Honey Goodness!” – hahahahahaha!!
Carrie says
this looks so great! now, how can I find me a “John” of my own? haha!
YoungHouseLove says
He’s the best! I think we should clone him. Or would that be weird…
xo
s
Melanie says
I adore the wood stain you chose! I’m a huge fan of the light wood lately (very Scandinavian)with the whites and the grays, just beautiful. Props for not going ‘typical’ with the dark. Good call. And all the other ‘accessories’ will pull it together perfectly. I’d love to turn this whole look into my ktichen :)
YoungHouseLove says
Thanks Melanie! That’s what we’re hoping for! Now to finish the rest of the room…
xo
s
Emma says
Nice door! I hope you can do a post about that – those things can be tricky right? I’m so glad you guys went this route. More upfront costs but NOW you have a laundry room! Looking forward to seeing all of the finishing touches. I’m also a bit shocked that the Ikea cabinets & lighting was so expensive. Ouch Ikea!
Meike says
Hi! I love the light wood. I think people can go overload with dark stain so its nice to mix it up and see more natural wood colors. I am planning a little shelf for my washer dryer too more to hide all the hookups that are higher than the top of the washer/dryer. Is your shelf just resting on brackets or is it attached to the wall in some way?
YoungHouseLove says
Thanks Meike! The brackets are drilled into studs in the back wall. You can see them better in that post we linked to in that sentence about them :)
xo
s
alex says
would those spruce panels work for kitchen counters?
YoungHouseLove says
I think they’re made as like an island topper or a tabletop, so I think they could, with the right finishing. They only come in these sheets though, so I don’t know if they’re long/deep enough for every space.
xo
s
Reenie says
Looks great ~ I like the light stain and am glad you went with it. :)
Heather Rae says
Thank you for getting that song stuck in my head….it’s going to be a long school day —
Love what you’re doing with the laundry room! I’ve been showing my husband your progress in the hopes that it will spur him to update our basement laundry room eventually.
Ava says
The solid panels that you used for the shelves, where in Lowe’s can i find something like that? I have been looking for something exactly like that.
Also, the room looks amazing!
YoungHouseLove says
They’re in the lumber aisle right by all the tabletop rounds and boards (not by the moldings).
xo
s
Kelsey says
S&J,
The room is looking great! Can you shed some light on why the top drawer front has no molding? I’ve seen this look lately in a lot of kitchens. Is it just a style preference? It would drive me nuts to have one panel different than all the rest.
YoungHouseLove says
That’s just how they’re made. I guess a lot of those top drawers are flat panel and the deeper lower ones have a frame?
xo
s
Betty says
My understanding is some companies keep the rails (top and bottom) and stiles (side) constant. So if the top drawer is 6″ high and the rails are 2 1/4″ that leaves 1 1/2″, which makes it hard to place the handle in the middle of the drawer. There are companies that keep the stiles constant, while the rails may vary for narrow drawer fronts. Or companies that will change the rails and stiles size for narrow drawer fronts. It’s a matter of preference.
Sheila F says
I like the idea of having a shelf over the washer and dryer. Not only does it “Save the Socks!” but it is also a place to put the all important stain remover within easy reach. (Important with 2 little ones.) I have one small recommendation. That is to put a peace of furniture felt on the edge of the wood that sits on the countertop. This will keep any scratching from happening to your lovely finish. I know you have attached the shelf to brackets but it may still vibrate slightly when the washer spins. Just a thought to protect your hard work.
YoungHouseLove says
Love that idea!
xo
s
Erin Stober says
Looks great! I like the counter top color, the color looks good here. It is not as predictable or safe as going with a darker stain or painted. You two are accessorizing pros, so I’m sure everything will come together swimmingly.
But, here is a ‘been there done that tip’ – the flex hose dryer vent behind the dryer looks pretty questionable, like one commenter pointed out, super fire hazard. You might look into using the ‘dryerbox’ brand installation system – this brings your rigid ducting (from the attic) into the laundry room in a nice between-the-studs fashion, recessed from the wall plane. Anyhoo, this should allow you to use a shorter run of flex duct from the dryer to the rigid duct, removing the loopy, curly-q, lint catching situation you have now. We added one after a fire about six years ago and it.is.awesome! Allows for super easy cleaning, etc.
YoungHouseLove says
Thanks so much Erin! Will look into that!
xo
s
Sheila F says
Piece not Peace. LOL But I do wish you PEACE in your dealings with laundry! LOL
YoungHouseLove says
Haha!
xo
s
Jeanna says
The room is really shaping up! Through the monitor the wood shelf really looks like it has a definite yellow undertone, but I’m thinking it will make more sense when you get the rest of your things in the room
Anderea says
…please stick to the rivers and the lakes that you’re used to.
Both the TLC reference and the laundry room are my jam!
Jennifer says
I love how you guys title your posts! It took me back! :) Great looking laundry room!
Hannah Banana says
Just a note for everyone, all IKEA cabinets with drawers automatically come with the soft close attachments.
We just installed a whole IKEA kitchen and are VERY impressed with how solid and well they go together and look fantastic. We are going to add the in drawer lighting, IKEA is pretty impressive, especially for the price.
YoungHouseLove says
No way! That explains why they were miraculously in our bag!!!
xo
s
Deena says
I’m going to preface my question with a caveat: I swear I used your search bar first before asking this! I couldn’t find my answer…
I know you guys use Safecoat products a lot (and the mention of the sealer in this post sparked this question), but it doesn’t appear they have a granite sealer. We’re moving to a new house in a few weeks and need to seal granite. Did y’all seal the granite in your first house? If so, did you like the product you used and would you recommend it?
YoungHouseLove says
Our granite came from Home Depot and had something called “permaseal protection” so it didn’t need to be sealed once it was installed. So sorry we don’t have a sealer recommendation for granite, but maybe someone who is reading will?
xo
s
Katie W says
I LOVE the light stain! While dark stain can be lovely, I think it’s overdone these days. The light is unexpected and far more interesting. I also have a feeling, with as popular as dark stain is right now, it’s going to go out of style soon and leaving all that dark wood looking “dated”. But maybe that’s just me.
Kathy says
I agree. I’m old enough to know that wood stains go in and out of fashion with every decade…which is one reason we used a rich and varied medium stain when we installed our Bellawood floors a few years ago. I love the dark stained floors, but I thought a “classic” would seem less dated over the years. :)
Annie says
It’s not a matter of fashion or overdone. This stain simply does not go with the rest of the room. The yellows in it clash with the grey and the white.
Lidia says
Sherry and John, you were right with everyone chiming in on your choice of stain! Personally I like it and find that the yellow tones are a great complement to grey. That’ll be the upcoming colour scheme for our eventual bathroom reno!
Stephanie says
Not a fan of the stain…I feel like it is way too yellow for all the cool colors in the room. Would love a driftwood grey or maybe even Jacobean for warmth. Not that you asked :) maybe some accessories will change my opinion…
Brittany says
Looks great! I like the stain choice a lot, I think the room needs the little bit of warmth that it brings.
Silvi says
Oh. I love that you chose the lighter stain. I’ve just replaced my old counter top in the kitchen and it is almost the same colour. I was a fan of dark stain before, too, but i love now how it makes my kitchen more brighter and cheerful with the light tones of wood. Keep up the good work! I think you will start a new trend here.
xo
Silvi
Larissa says
Hi!
will you guys be showing us how to install the filler strip beside the cabinets? It’s boggling my mind how you will get that in there and i’d love to add some in my kitchen – specifically will you put anything underneath? (beside the wall but if you were to reach your hand up from the counter.. if that makes sense)
Love your blog! Starting an entry way wall with my new miter saw next week and I can’t wait!
-Larissa, Canada
YoungHouseLove says
Oh yes we’ll try to share that process when we finish the rest of the filler and trim in one big post :)
xo
s