Q: You’re putting time and energy into this “temporary” job for your bathroom (not to mention some money), so why not just go ahead and do the full gut job? I know you guys watch money really well, but isn’t this not the most cost-effective in the long-run? :) – Karen
A: This is a great question, and we thought it would be fun to elaborate on the subject. Because it’s safe to say that we love saving a buck, but we also like showing an old house some love and making it feel like home, so here’s our take. First of all, I think a lot of people think like Karen does – in fact we had that same exact instinct when we moved into our first house. It was so tempting to just to freeze a room until we had the budget to completely redo it.
But we slowly learned that sometimes a small “sweat investment” in the form of a few upgrades to tide you over for a year or two until you can save up the loot to fully redo a room (and really think it through) is completely worth the Phase 1 effort and the small amount of money you might sink into that interim upgrade. And sometimes doing a few small things to improve a space before diving into a bigger redo can actually save you money because they give you a chance to (inexpensively!) figure out what you like and what you don’t like as you go. It can definitely cost you more if you don’t discover those things until the middle of a big gut job when time is money and the stakes are a lot higher.
Let’s take our current bathroom makeover, where we’re aiming to spend around $100-200 on a Phase 1 makeover.
We got to the point where we just couldn’t live with the old carpet in there for another day, so to us, showing the room some interim love just made a lot more sense than living with things that made us groan for a few more years. Especially since inexpensive updates like a few cans of paint and a new mirror (which can always be used in another room down the line) can easily make it a lot more pleasant in there. Note: this is just a photoshopped rendering of our plans, but next week we hope to have the floors stenciled!
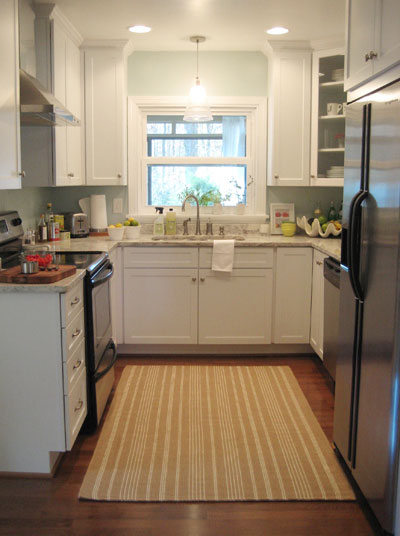
Why not just get to gutting things right away? Well, we learned all the way back in our first house (even before we started blogging) that doing a full renovation when you only live somewhere a few months means you might not have time to think everything through. For example, it took us over a year of living with our first kitchen to realize that if we closed off a door we’d gain 70% more counter space. Had we rushed into a renovation, we never would have come up with that plan – so we’d have new counters and cabinets – but the same cramped layout that we started with.
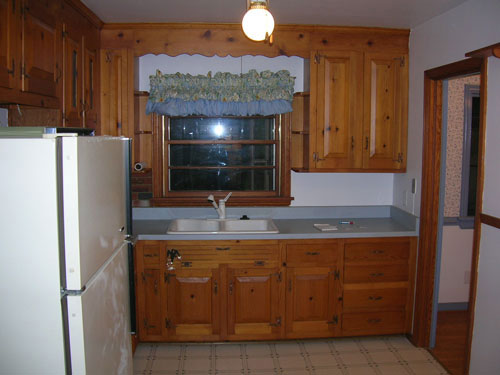
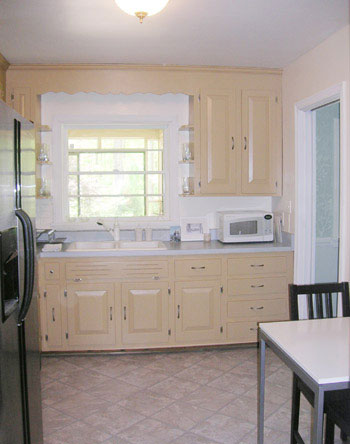
Soon after moving in we did a Phase 1 makeover while we saved up for a more major reno down the line. Just some paint on the cabinets and peel and stick tile on the floors (along with updating a few appliances that we reused when we fully redid the room). Let me just tell you, it was so worth enjoying a somewhat updated kitchen for that time (during which we got married in the backyard and had 75 of our friends and family over). Sure, we spent a weekend painting the cabinets, another weekend updating the floor, and dug into our savings for about $150 just for Phase 1 (that’s a guess at the total cost for the primer, paint, and the peel & stick tile) but the “return” on that money & time investment was that for over a year we got to walk into a room that felt fresher, cleaner, and more like us, instead of feeling stuck or frozen in the before shot for over a year.
When we had finally saved up the money – and had fully thought it through – we got to renovate that kitchen and ended up loving the outcome. It was completely worth the small time/effort up front for a Phase 1 update while we saved our pennies, and the fact that we ended up with a completely redone space that we adored (with a lot more function than anything we could have slapped together right away after moving in) definitely confirmed that this phase-by-phase, over-time method just seems to work for us.
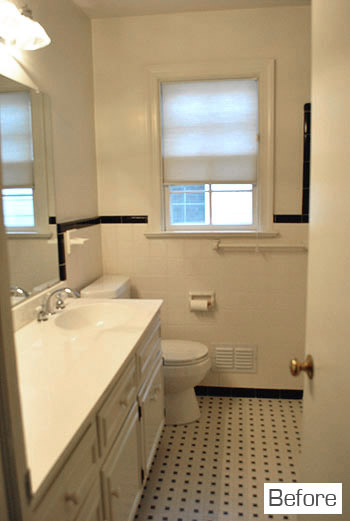
The same thing happened in our full bathroom at that first house of ours. We started with this carpeted and crocheted space…
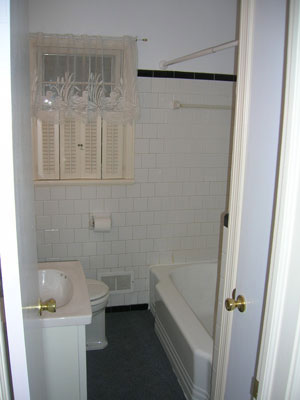
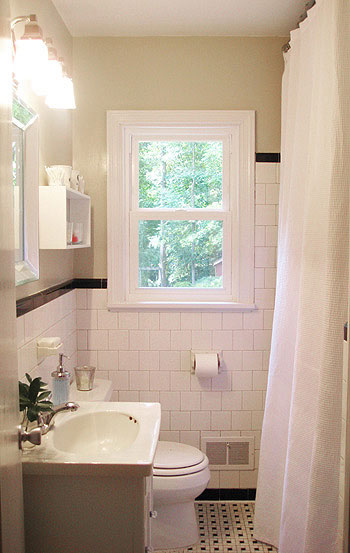
… and we did some simple updates like pulling up the carpeting, re-caulking things, adding some paint, and bringing in some sweet art, new lighting, and accessories to tide us over for a few years.
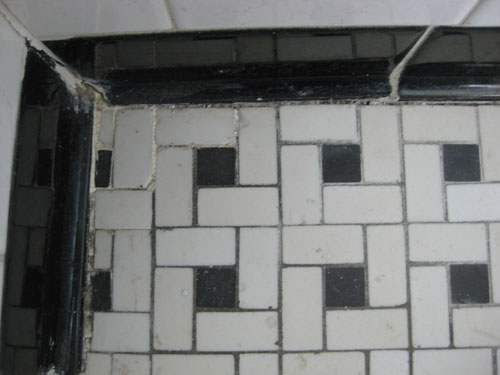
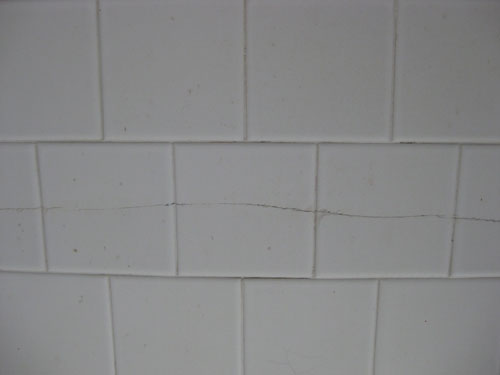
But up close both the floor and wall tile was cracked and damaged, so although we loved it, we sadly couldn’t salvage it.
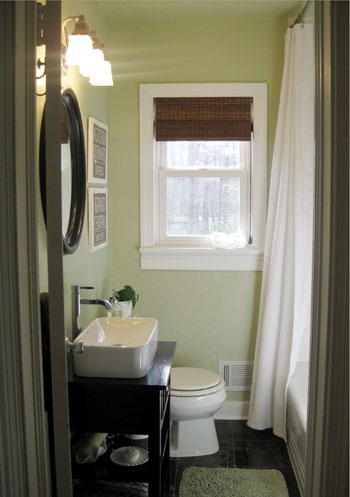
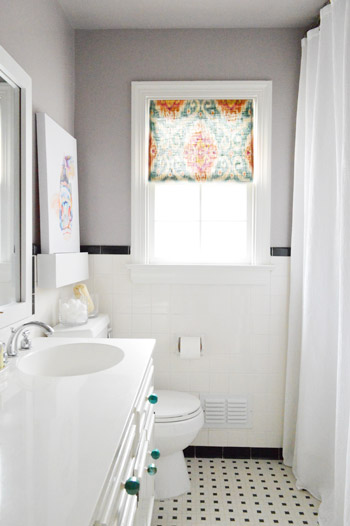
So when we finally had the money and time to tackle a full gut-job a few years later, we were excited to dive in. And thanks to spending a lot of time planning every step, we only spent around $1800 on a full bathroom renovation, including rebuilding this room from the studs (new walls, new trim) along with a new marble tile floor, new fixtures, a tub/shower that we tiled to the ceiling, a new custom vanity, etc.
But it was certainly nice not to spend years living with this carpeted bathroom with a duck curtain, and do that Phase 1 update – even though we couldn’t fly out of the gate with a full renovation immediately.
So this method has been serving us well for a while now (holy cow, over seven years!) and we expect that nearly every room of our current house will have a multi-phase progression since we’re planning to be in this house for a nice long time. We don’t want to rush into anything without fully thinking it through and we’d like to save up for things that we truly will love for the long haul. But that doesn’t mean we have to live with old carpeting and wallpaper – and that we can’t toss up a little paint up, hang some art, update some light fixtures or faucets, and generally make the place feel fresher and more like us as we plan those larger scale undertakings and squirrel away some money.
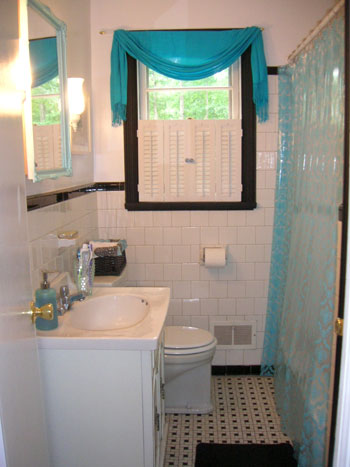
In fact I think moving forward and experimenting within a certain space (not just in your head or while staring at a picture in a magazine) is a really helpful step when it comes to getting it right down the road with your major renovation. This was our first attempt at our first house’s bathroom. Scary, eh? But it turns out we had to paint the windowsill black and toss up a blue pashmina to learn that it was NOT what we liked (I thought it would be “so Domino magazine” and it was so… bad).
So we course corrected as we went, and ended up with a room that we could really enjoy in the interim, which then led to a brand new bathroom that we loved even more down the road. I guess one way to look at it would be that those small updates over time are like stairs. They build to a better result, and they bridge the gap between your before to your after. Without Phase 1 in here, we might never have arrived at that “love it” Phase 2 result, which might now have led us to a “love it even more!” Phase 3 outcome. So expecting to freeze at “before” and then skip right to “after” might not happen for everyone. But for us, that step-by-step approach over time just seems to get us from point A to point C without as much stress as attempting to skip right from what we hate to what we love in one fell swoop.
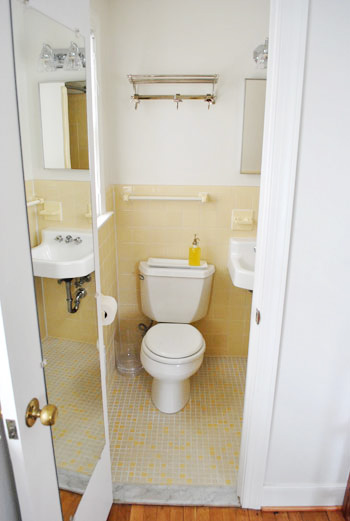
And sometimes it’s amazing to see how a few updates like paint, art, a window treatment, and a few accessories can bring an old room back from the brink without a major makeover down the line. Yes, in some cases a Phase 1 update can help you see that you don’t need to gut something at all (hello, money savings!) – and realizing that you can actually work with what you have can be the equivalent of finding a thousand dollar bill in your couch cushion. Take our $51 guest bathroom mini makeover, for example. We had pretty much planned to work with this tile from the start (it was in great shape and we thought the vintage yellow tone was charming) so we hoped this bathroom just needed a few cosmetic fixes… but others who came over couldn’t see how it would ever work without bringing in the sledgehammer.
All we did was paint, add a window treatment, hang some art, and remove some bad elements (like the mirror that reflected every guest’s full body while they sat on the toilet) but when the decorating dust cleared, even my mom was saying “you’ve made a believer out of me.”
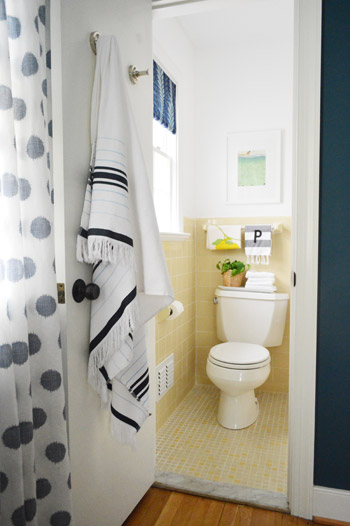
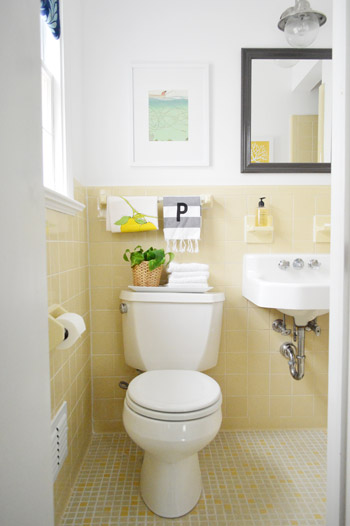
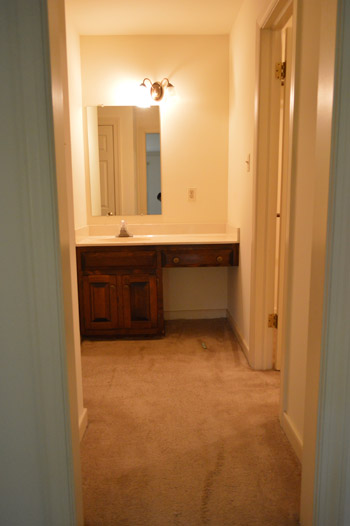
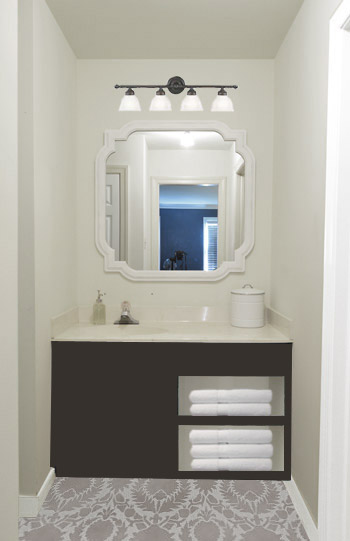
So you might think a room needs a full gut job, but experimenting with some affordable for-now fixes might just prove otherwise and save you a whole lot of money and effort down the line. And the only way to find that out sometimes is by diving into Phase 1. So if you wait and skip right to Gut Job, you might never know how charming a room can be with just a few wallet-saving fixes. Our hall bathroom was a slightly more involved update than our guest room (we framed out the mirror and added a built-in shelf), but the tile was still in great shape, so we got to work with almost everything that was there already. Note: pardon the yellow cast on this picture, it was move-in day and I was rushing around shooting in the wrong mode.
After spending just $168, we had a completely fresh looking room.
The cool thing about this method is that if Phase 1 does the trick, you’re done! And you’re probably thanking your lucky stars you didn’t go straight to full-reno mode. And if Phase 1 only serves to “tide you over” instead of majorly saving you from a bigger renovation, it’s still a win because you get to smile more as you save up and percolate on Phase 2 plans down the line. Plus going through the thought process of Phase 1 can better help you pinpoint what you still don’t love about a room (the layout, damaged tile, missing counter space, etc) and you get this bonus “learning experience” before jumping into any major construction down the road.
What about you guys. How do you balance your desire for a space that feels fresh and homey without blowing a bunch of cash you don’t quite have? I’m sure it’s different for everyone, so I’d love to hear what works for you. Do you do the ol’ freeze thing and just try not to think about all the things that bug you? Or do you sprinkle in some inexpensive updates along the way? Don’t get me wrong, we still have a bunch of rooms that we’ve been ignoring for months (can’t do ’em all at once!) but I like to think that those “we just can’t take this anymore” moments are what help us decide what needs a Phase 1 intervention most of all, and then we can dive right into that with some gusto.
Update – Wanna know where we got something in our house or what paint colors we used? Just click on this button:


Kim says
Perfect timing for a Phase 1 post!! I’m starting a Phase 1 project in my kitchen as we speak. Instead of moving the fridge, getting new counters/sink/faucet, building a new island and moving some cabinets, and getting a new floor, I am doing a Phase 1 of: painting the walls, painting the tile backsplash, and painting/polycrilic-ing the laminate counters (finally read all 700 tutorials on this on Pinterest and decided if it really ends up looking like horribly sponge painted walls circa 1989 instead of ‘faux granite’..I might splurge for new laminate sooner than planned.) I’m hoping this will give us a couple more years to save up for the Big Kitchen Makeover :)
Rhonda Corbin says
I love the first pic of the stars with the gray background for Clara’s room above her bed. What little girl wouldn’t want to be your daughter??!! She is sooooo lucky!!! I love your blog, btw.
Kristin F says
I seem to always be in phase 1 as I tire of the paint/art/furniture in a room within 3 years. We’ve been renovating our kitchen for a year now, after a full year of planning, and I’m still changing my mind about the direction I want the final product to go in! Living in a space before a major reno works for me, too, though I usually am slapping paint on walls before the ink dries on closing documents! Ha!
Jessica says
I could not agree more with this post! My husband and I dove right into a complete kitchen reno at our second house. We ended up with less counter and cabinet space then the original kitchen as well as a strong desire to blow out one of the walls we had put cabinets on to open up the kitchen. Oops! We are now in our third house and my weekend project is to paint the kitchen cabinets, it’s a band aid for now, but it’ll give us so much time to dream up the perfect layout for the day we do the full reno!
K says
I am a big fan of phase 1. We phase 1-ed our kitchen for about $2k (includes labor), and now I can see that our 40-year-old kitchen will easily last another decade before we do a gut reno.
KYHokiemom says
Glow in the dark stars in a fun design over a grey wall?
Cee says
I think blog readers sometimes forget that bloggers are just like the rest of us. Either you have the money to do a big make over at once, or you have to go into debt to do it. Reality for most of us is that you have to save if you don’t want to stick it on a credit card. It doesn’t make for exciting posts but hey that’s real life. Moving into a relatively new house with carpet in the bathroom(why?) we had to rip ours out as well and do a cheap tiling job instead of redoing the bathroom all at once. Just that small change made it so much nicer.
shar y says
Phase 1 definitely works for me. I do not like the orangy oak cabinets that were put in my house in the ’80’s. Or the beige cracked counter-tops. But, can’t do it all yet. So, I painstakingly painted the cabinets in a nice beachy green color (it’s on the coast) and what a difference it made. I can live with the countertops for now until Phase 2 money comes along. And, BTW, it’s not Formica that I do not like, it is all of the cracking and peeling. I have seen some gorgeous new colors of Formica lately that will be a close contender depending on the budget. And, like others have said, so glad you do all of the phases, nice to see~!
Nikki H says
This is the most timely post! We are moving into a new (to us) house in about 3 weeks after living in this one for 32 years. Yes, we are so excited–we are not down-sizing, we are up-sizing and we are going to be minutes from our son’s family and our daughter’s family, instead of 9 hours. There are some things we want to do to the (much newer) house, but we talked about not being in a rush. Thank you, thank you, thank you for reinforcing that we should take our time. At this point, we are not even going to paint anything. The sellers had it painted, and we don’t hate any of it. We’re not even buying new furniture right away, we’re just going to see how we will be using the rooms, and make do with what little furniture we’re taking. We definitely will be changing the countertops and sink in the kitchen, but still, no hurry on that. They are serviceable and I don’t hate them. Thanks for listening–I still can’t quite believe we are moving across Texas in 3 weeks.
Abb says
Phase 1 is always a great idea. We rushed into Phase 2 on our kitchen and to this day wish we did a kitchen island and NOT a peninsula. But, we were trying to save money and now 5 years later looking for storage space in a kitchen with things that cannot be changed easily. (granite, tile floor, etc).
Our guests love it so, we can certainly work to come up with creative storage solutions. I’m thinking about a custom cabinet built in front of one of my windows that does not open. (Saw this on the Food Network show, Michael Ciarello). It would be a conversation piece!
Cari says
Been there, done that. Am there, doing that now! Our kitchen was so ugly there was no way I could stand looking at it until we could afford to completely redo it. Phase 1 was just paint and new hardware and totally transformed it. For me at least. :-)
Here are before and after pictures of Phase 1 if you would like to take a look:
http://withdietcokeinhand.com/2013/08/12/its-not-u-g-l-y-any-longer/
Living in a house for several months is the only way to get to know what really works for us.
YoungHouseLove says
Holy cow, what a change Cari!
xo
s
Jen says
This is great. It’s sort of what we call a “mini-update” because we tend to do that a lot around here, plus if we tried to number them, we would have phase 1 to 150,000.
For example, my parents (aka the landlords) updated the counter in our kitchen, and added a back-splash. We tacked on an under-counter sink and new faucet at the same time.
Next phase is to figure out the cabinet’s finish “update” because the finish (original to the cabinets back to when the house was built in 1964) is starting to discolor in places. Or the next phase might be a new kitchen floor, (my Grandmother, and prior tenant, changed that during the 80s) as that could really use an update as well. However, the husband is pushing to add the dishwasher now, so we are thinking about that as well.
The dream is eventually to get new cabinets, fridge, oven/stove unit (which are currently a wall oven and in-counter stove), and add a dishwasher if we haven’t before then. My parents have to get in-put into this process, because it’s their house. However the main thing that holds us back is money.
So if it were not for “phase 1” updates, I would still be living in what basically was my Nana’s house. The little updates make it more us than her’s so it works for us and our budget.
Marjorie says
I think it depends partly on the livability. When we moved into our home, some things were truly vile (a relative had owned it, so it was waaaay cheap. Not a house I’d have moved into at anything like a “full price.”) The kitchen could not be cooked in until I did some major cleaning (including replacing the flooring with cheap vinyl floor tiles and ripping down the grease stained wallpaper only to find OSB, not drywall, underneath.) So, we’ve painted the OSB, replaced the appliances, and added some trim above the cabinets to keep critters out. We plan on a gut job someday, but in order to live in an old house, we had to do it. Because unlike the gorgeous Queen Annes that rich people remodel as their 2nd vacation property on This Old House (that show’s gotten pretty useless for DIYers, IMHO), people who really inhabit old houses sometimes need that carry over just to keep the dream alive.
YoungHouseLove says
I love the livability thing! Definitely has to come into account!
xo
s
Sue Erneta from Sue at Home says
This is my plan with my kitchen: A full reno isn’t in the budget now so I ripped out the wallpaper, painted the walls, painted the cabinets and added new hardware and lighting. I might end up taking out a wall so I didn’t want to invest in floors and countertops just yet. The crazy part is that I SPLURGED (big times!) on the lighting and hardware because I figure that when I do go full reno in the future, those pieces can still be used!
YoungHouseLove says
Love that! It’s so smart if you know you can reuse something down the line!
xo
s
Brenda says
I think at least one other has said how helpful the interim measures are for those of us living in apartments. Your budget-conscious fixes were what attracted me to YHL in the first place, and these ideas really help me think creatively about how to brighten things up in a temporary living situation. I realize that is not your purpose in doing these things, but thanks anyway!
YoungHouseLove says
Aw I’m so glad Brenda! We were both renters for years so we can totally relate!
xo
s
Dana@chocolateandsunshine says
This is such a timely post. Just last week-end, I put a band-aid on my guest powder room as I was having guests and needed to wait at least 6 more months until I could do it completely. It was originally painted a Restoration Hardware blue, including the ceiling and the vanity was 20 years old & disgusting. I painted the ceiling a crisp white; the walls a pale gray and the vanity a high gloss deeper gray. I even added some metallic stripes to the top. My hope is to add a new tile floor, walls and new vanity, etc. I just wasn’t there yet and at least it looks great for the holidays. I didn’t even blog about it — just wanted to smile at a room that is one of the first seen from the front door…. Love you guys!
YoungHouseLove says
Love you right back! And congrats on all that you knocked out so far! Sounds like a lot.
xo
s
Ali says
I’m actually really glad that you posted about this because we have done the phase approach for several projects and I’ve felt almost guilty (ok, not almost, actually guilty) for doing it like this? Our kitchen looked just like yours in your first house and I spent a lot of time sanding, painting, and updating the hardware. We didn’t plan it from the get-go, but we ended up gutting the kitchen a year and a half later. In that time, we decided to take down the wall between the family room and kitchen, which i don’t think we’d have seen the urgency of had we renovated at the beginning. I thought back, ‘do I regret spending all that time in the phase 1 reno?” But no, because it was such a more cheerful and pleasant kitchen to be in than if we had left it.
Tee Cee says
“The cool thing about this method is that if Phase 1 does the trick, you’re done! And you’re probably thanking your lucky stars you didn’t go straight to full-reno mode.”
Oh my gosh–after reno’ing two houses, that is the quote of the year and so right on.
Sherry was 100% right when she said that you can actually end up spending more money if you jump in and update right away. It’s tempting to do that (because as human beings we want instant grat) but you’ll almost always regret it–especially when you see that a few dozen dollars can turn a room into something you really love.
There are certain times when you’ll have to spend a few thousand and do a gut job–but you can’t just rush into it. Live with it awhile and see what sticks for you; hard to be patient, but you’ll never regret it.
Gail says
When we moved into our new (to us) old house, someone said, “You should live in a house at least 6 months before you do anything major. That was years ago, and I think it was great advice.
Beth says
I totally rock the phase 1 on the regular (and 2 and 3) before making more final changes, and I totally agree that it’s totally worth it. In our old house in particular, we really didn’t have any extra funds, so phase 1 type tweaks via inexepensive paint, thrift store/flea market shopping, and general craftiness/creativity helped make things so much more comfy and welcoming. If we’d never done phase 1, we’d have been stuck and feeling depressed surrounded by our super dark “70’s-fied” panelling, carpets, and curtains (that came in it) and such until the day we moved out! A lot of the furniture/accessory tweaks totally work in our new house too so, that’s definitely not money wasted either.
In our new house, it’s the same way. Also, I really like phase 1 type of shifts just to change the way the house looks and feels from time to time. It’s like a minor tweak in the furniture layout and/ or accessories and such can totally make me feel like I have a new outlook on life. I’ve read that Coco Chanel said, “A woman who cuts her hair is about to change her life.” That may be true, but I also would add that, “A woman who starts rearranging her furniture/making minor tweaks in her house is also about to change her life.” :)
Beth says
I totally rock the phase 1 on the regular (and 2 and 3) before making more final changes, and I totally agree that it’s totally worth it. In our old house in particular, we really didn’t have any extra funds, so phase 1 type tweaks via inexpensive paint, thrift store/flea market shopping, and general craftiness/creativity helped make things so much more comfy and welcoming. If we’d never done phase 1, we’d have been stuck and feeling depressed surrounded by our super dark “70’s-fied” paneling, carpets, and curtains (that came in it) and such until the day we moved out! A lot of the furniture/accessory tweaks totally work in our new house too so, that’s definitely not money wasted either.
In our new house, it’s the same way. Also, I really like phase 1 type of shifts just to change the way the house looks and feels from time to time. It’s like a minor tweak in the furniture layout and/ or accessories and such can totally make me feel like I have a new outlook on life. I’ve read that Coco Chanel said, “A woman who cuts her hair is about to change her life.” That may be true, but I also would add that, “A woman who starts rearranging her furniture/making minor tweaks in her house is also about to change her life.” :)
Casey says
I’m totally with you on Phase 1 projects! Some things are just unbearable in the interim. And I loved before when you mentioned just wanting to get everything to a blank slate before the baby comes. It’s only been in the last couple years I realized what a big job that is in and of itself. We still don’t know the whole backstory of our house (we purchased in 2005 but it had also been sold in 2004)—but it seems the 2004 seller had sort of brought it back to blank slate in order to sell it after evicting a prior tennant. Anyway, there was not a single hole in a wall, no crazy paint to cover up or really anything to demo. It looked like an apartment on the inside. And while we did eventually put in a new kitchen and flooring and finish the basement (which included knocking down some walls), it was so nice when we first moved in to have a practically finished-looking house just from painting and putting up some window treatments. I’m sure we won’t find that again, it was so lucky!
Also, side note, been meaning to tell you I was at Home Depot a few weeks ago and randomly picked up one of those 2″ angled, short-handled brushes to touch up some trim… oh my gosh. CHANGED my life. Amazing. For three weeks now I’ve just been walking around painting every smudge and spot like a crazy person (even the ones that could probably just be cleaned with a magic eraser or something). I’ve always been a painters tape freak, but you made a believer out of me! It has a rubber handle too, so it’s totally pliable and so crazy easy to control. I’m in love!!
YoungHouseLove says
Aren’t they the best?! SO glad you grabbed one. Life changing is not an exaggeration. Haha!
xo
s
Heidi says
Great blogpost. Wish I read it two years ago! I went with the full makeover. Still not finished though. Love your blog!
Ericca says
Too bad you couldn’t keep those old tiles in the bathroom. The phase 1 had so much character and looked like a traditional bathroom worth restoring. If you ever redo the bathroom I suggest going back to the original design!
Katie says
I think this speaks to those of us who rent, as well. Currently my husband and I rent a small garden home. We sunk a few hundred dollars into paint for five rooms and have bought (and plans to buy) a few new things to spruce up each room. It’s so hard for me to purchase things knowing they may not work in the next house we live in, but it makes a huge difference enjoying what we have NOW! Trying to live in the moment! But, I have learned to stay on the cheap side and that it’s okay to settle for these “Phase 1” projects in some areas. For instance, I wanted to spend about $60+ on my dream shower curtain (because, yes, I have a dream shower curtain)… but then realized we may not use the same color scheme in a house in the future so I opted for a $12 alternative. It’s not my favorite but it totally works in the room!
Kim says
I spent far too long living with features of my house that I hated because we couldn’t afford a full renovation. Our only bathroom was a hideous avocado color from floor to ceiling, and our dining/living room was dark wood paneling. After 8 years here, I did some research and figured out I could paint the avocado paneling in the bathroom and spent a weekend doing it. It’s so much better now! Then, this past winter, I painted our living/dining room paneling a creamy color. The house feels so much different now! Someday, we will gut and redo the bathroom (the tub/shower is still avocado…ew), but I’m really liking the painted paneling in the living room! It feels very cottagey!